filters

Five Questions: Nikon Z 8 for Night, Perseids, Aurora Apps and More

The night photography world is full of questions, and we’re happy to help with answers.

This installment of our “Five Questions” series features inquiries about the new Nikon Z 8, locations to shoot the Perseids, aurora apps, filter systems and an Irix lens.

If you have any questions you would like to throw our way, please contact us anytime. Questions could be about gear, national parks and other photo locations, post-processing techniques, field etiquette, or anything else related to night photography. #SeizeTheNight!


1. The Nikon Z 8 and Night Noise

Question:

Since the Nikon Z 8 was announced this week, do you have an opinion about it with respect to night photography and noise, and how it compares to Nikon’s other mirrorless cameras? I’m currently shooting with a D850, which I really like but it’s getting long in tooth. In your opinion, what is the best high-res Nikon mirrorless camera for night photography at this point? — Jeff

Answer:

Three of our team members shoot with the Nikon Z 6II, one with the D780 and one with the D5. Between all of us, we’ve shot the Z 7 and Z 9, but none of us owns one, and none of us intends to own one. That tells you something about our preferences, but it doesn’t mean those are bad cameras, even for night photography. Shooting priorities matter.

We haven’t done methodical comparisons between the Z models, and the Z 8 is not yet shipping, so we have no experience with that model. But from our experience shooting Z cameras, here’s what we know:

We have found that the Z 6II has a slight edge in high ISO characteristics, with the Z 9 not that far behind. The Z 8 features the same 45.7-megapixel full-frame sensor and Expeed processor as the Z 9, so the former should perform as well as the latter does for a high-resolution camera at night. In other words, the Z 8 is kind of a mini Z 9, so we’d expect the same results.

That would mean the Z 6II would still be the best option for low-light photography in terms of high ISO noise, all things being equal.

However, all things usually aren’t equal. There is a lot that goes on in determining the best noise characteristics of any given camera. You could do a side-by-side test by shooting the same scene with all of same parameters, but that may not be the best test for night photography.

For example, when shooting to freeze star points, you need to use a faster shutter speed on a camera with a higher pixel count than you would on one with a smaller pixel count to achieve the same visual result. This means you need to use a faster ISO on that higher-resolution camera. Now you are no longer comparing apples to apples.

The Z 8 autofocus is sensitive down to -9.0 EV, making it the best camera autofocus for low-light photography.

There are other considerations with the higher pixel count as well. Such as:

  • Do you like to do a lot of star stacking? High-resolution files can really bog down that process due to their sheer size.

  • Do you like to make giant prints? If so, a higher-resolution camera could be a great choice.

  • Another consideration would be the better low-light focusing the Z 9 and Z 8 have—a feature called “Starlight View.” If you have trouble focusing at night, this capability alone may trump everything else.

  • The Z 8 simulates the Z 9 in high-speed capture, advanced auto-focusing capabilities and superhigh-resolution video. If you like to shoot sports and wildlife in addition to night photography, those robust features would be a huge asset.

In short, we have not shot with the Z 8 yet so we can’t really say how it will compare with the other Z models. We do look forward to getting our hands on one and putting it through its paces, but seeing as none of us shoots with the other higher-resolution cameras, my guess is that our collective preference will remain the Z 6II. — Tim

2. Perseids from the Curb

Question:

Can you recommend someplace I could go to photograph the Perseid Meteor Shower where I’d have the possibility of an outstanding foreground and dark sky for the meteors? One caveat: I have a knee issue. — H.

PhotoPills confirms that Great Sand Dunes National Park could be a great Perseids option.

Answer:

It sounds like you need a good roadside location. You also definitely need someplace with a north/northeast view and no light pollution in that direction, nor a mountain range blocking the sky.

Great Sand Dunes National Park is awesome for those criteria. You can shoot roadside and have the dunes in front of the mountains with the sky above. I’d even be tempted to attempt a vertorama with a blue hour bottom and star field above.

Badlands National Park also has some spectacular pull-outs where you could do the same. The beaches of Olympic National Park fit the bill, but the ones with the best foregrounds require at least a little bit of a walk, and slippery stones may be troublesome if the tide is receding. At Crater Lake National Park, shooting from the lodge over Wizard Island could be amazing. — Matt

Note: For more information about shooting meteor showers, be sure to check out our e-book Great Balls of Fire.

3. Tracking Auroras

Question:

Can you share the aurora tracking app that you use? — Deborah C.

Vatnajokull National Park, Iceland. © 2023 Chris Nicholson. Nikon D5 with a Nikon 14-24mm f/2.8 lens. 4 seconds, f/4, ISO 6400.

Answer:

The answer is ... several! I’m on Android, and I use My Aurora Forecast. Lance, Tim and Matt are on iPhone, and they use Aurora Forecast (Lance, Tim), My Aurora Forecast & Alerts (Matt) and SpaceWeatherLive (Matt).

We recommend using more than one. Pooling info from different sources can give a more accurate picture of what might happen and where. Also, it can be nice to set up an automated alert—sometimes we can end up shooting auroras on a night we didn’t know they’d happen. — Chris

4. Finding a Filter System

Question:

I’d like to get a filter system that works with my lenses—primarily an 82mm and 95mm. But I also have a very concave lens (the Sigma 14-24mm f/2.8), so I’m thinking I need a 150mm system. — Rachna

Answer:

Welcome to the wonderful world of filters! This is a great way to extend long exposures during the day and night.

I’m a fan of square systems, as they offer the most versatility. Going down the path you suggest, I suggest you invest in these three things:

  1. NiSi 150mm Filter Holder for Sigma 14-24mm lens

  2. the adapter rings for 105mm, 95mm and 82mm filter threads

  3. Starter Kit that includes 6-stop, 10-stop and 3-stop graduated 150mm neutral density filters

This is pricey but gets you everything you need, albeit in a big kit. (Most people who invest in 150mm filters find them cumbersome, but that’s the way it goes.)

Alternatively you can use rear ND filters for the Sigma and then use 100mm filters for your other lenses. This would be more cost-efficient, as well as a smaller footprint on your lenses and bag. The caveat is that there are no rear graduated ND filters, so scenes that would normally call for them would need to be shot with multiple exposures and blended in post.

But if you do choose to go that way and use a 100mm square filter system, the NiSi V7 Advance Kit includes pretty much everything you would need except the 95mm adapter. However, the caveat with this system is that the circular polarizer will work only with lenses 82mm or smaller.

Another thought is that most mirrorless lenses are smaller than their DSLR counterparts, and they don’t have bulbous front elements. Therefore, switching to mirrorless also facilitates a more compact and cost-efficient filter system.

Finally, why do I keep recommending NiSi? There are lots of filter systems that are great. I happen to like NiSi because they are a good value. I’ve been using them for more than 5 years and couldn’t be happier. — Gabe

5. Eyeing the Irix 21mm

Question:

I have a Canon R6 mirrorless camera and I’m looking for a good, fast astro lens. I noticed you recommended the Irix 15mm f/2.4 lens. Is the Irix 21mm f/1.4 good for astro too? — Jim

Answer:

I’ve shot with the Irix 15mm for years and am quite fond of it. You need to stop down to f/3.2 to eliminate most of the coma. I have not shot with the 21mm yet but will be receiving one soon. Based on their other f/1.4 lenses, I’d expect that you’ll need to stop down to f/2.8 or thereabouts to minimize the coma.

The main thing for you and the R6 is that these lenses are DSLR-mount only. If you don’t mind using the adapter, then I’m sure either would be a great lens for you—the choice just depends more on your style of shooting. The 15mm focal length is quite wide, so you really need a foreground.

My first choice would be the Canon 15-35mm f/2.8, which wide open should get you coma similar to the stopped-down Irix lenses. But if that is not in your budget, I’d go with whichever of those Irix lenses fits your shooting style the best. — Lance

Chris Nicholson is a partner and director of content with National Parks at Night, and author of Photographing National Parks (Sidelight Books, 2015) and Photographing Lighthouses (Sidelight Books, 2023). Learn more about national parks as photography destinations, subscribe to Chris' free e-newsletter, and more at www.PhotographingNationalParks.com.

UPCOMING WORKSHOPS FROM NATIONAL PARKS AT NIGHT

Five Questions: Barns, Filters with Auroras, Star Trail Settings and More

The night photography world is full of questions, and we’re happy to help with answers.

This installment of our “Five Questions” series features inquiries about photographing barns on the Blue Ridge Parkway, coma with Nikon Z lenses, moving a Lightroom catalog on a Mac, using filters when shooting auroras and settings for star trails.

If you have any questions you would like to throw our way, please contact us anytime. Questions could be about gear, national parks and other photo locations, post-processing techniques, field etiquette, or anything else related to night photography. #SeizeTheNight!


1. Clapboard on the Blue Ridge Parkway

Question:

I am thinking about traveling to the Blue Ridge Parkway to do some star photography and would love to do some light painting of old barns or structures. I am wondering if you have any locations you can recommend. — Michael S.

Mabry Mill, Blue Ridge Parkway. © 2021 Chris Nicholson. Nikon D5 with a Nikon 24-70mm f/2.8 lens, lit with four Luxli Fiddle LED panels. 30 seconds, f/2.8, ISO 6400.

Answer:

The Blue Ridge Parkway is a great place to find barns! But many are on privately owned or leased farms along the parkway; you could still shoot those, but would want to ask permission of course, especially if photographing them at night, and absolutely if you’re going to light paint them.

Sticking to barns that are not privately owned, here are some tips:

Stay north of Asheville. The section of the parkway south of Asheville (and even for a bit north) is mostly mountainous. The northern two-thirds of the parkway—perhaps safely stated as “north of the Linn Cove Viaduct”—is more rural and agricultural.

If you’re open to just historic clapboard structures that aren’t barns, you can’t drive more than a few miles without seeing some. These come to mind immediately: Mabry Mill, Puckett Cabin, Brinegar Cabin. Lots of others scattered about.

For barns in particular, off the top of my head: the Johnson Farm at Peaks of Otter (you’ll need to hike to it), Explore Park (though you’ll want to ask about access after 8 p.m., as it’s managed by the city of Roanoke) and the farm at Humpback Rocks Visitor Center. — Chris

2. Non-Coma Z Lenses

Question:

I just switched to the Nikon Z 6II and am looking for a recommendation for a lens without coma distortion. I have tried and returned two Rokinon 14mm f/2.4 lenses with severe coma. My preference would be a lens in the 14-24mm range. — Edmund

Answer:

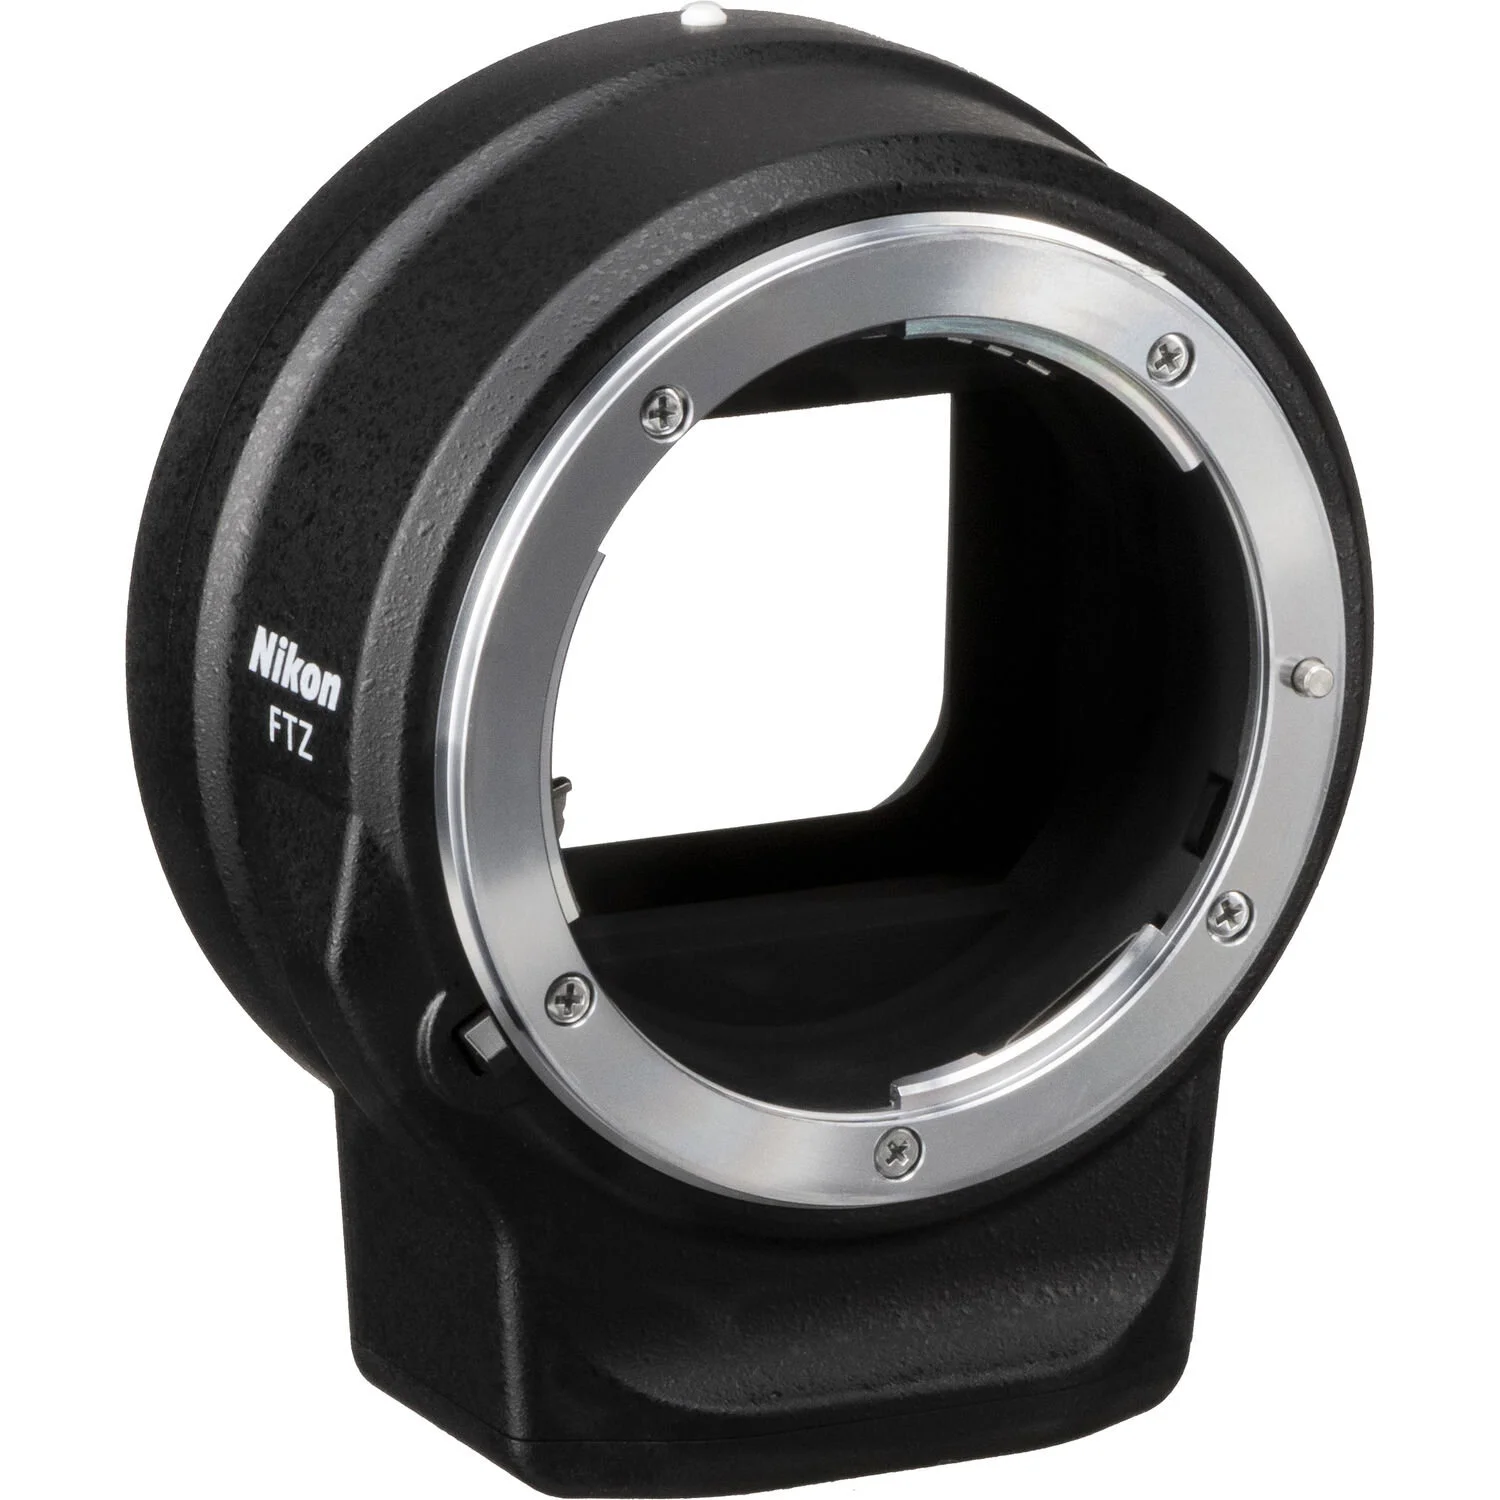
You are going to love the Z 6II! The FTZ adapter works well, so it gives you lots of options, but both the Nikon Z 14-24mm f/2.8 and Nikon Z 24-70mm f/2.8 are among the very best lenses Nikon has ever produced. Pricey, but worth it. Another option (assuming you have the FTZ adapter) is the Nikon’s F-mount 14-24mm. There is nothing better than those three lenses at this time. — Lance
3. Moving Lightroom on a Mac

Question:

Is there a simple way to migrate Lightroom files on a Mac? I will soon have to bring in a new and larger external hard drive. — Julie P.

Answer:

Yes, and the process is actually pretty simple.

  1. With Lightroom closed, plug in the old drive and the new drive.

  2. Copy all of the information from the old drive to the new drive.

  3. Unplug your old drive and launch Lightroom. You will see question marks next to your folders, because Lightroom can no longer find your old hard drive.

  4. You need to locate the parent folder for your images. In Lightroom, navigate to the topmost folder in your Folders hierarchy. That may well be the parent folder, but it’s possible that the true parent folder is hiding above it. By right-clicking on that topmost folder, you will see an option to Show Parent Folder. This command will show the folder containing that topmost folder, if there is one.

  5. Right-click on your parent folder and choose Find Missing Folder. Lightroom will open your system’s Finder.

  6. Navigate to the new drive, then choose the matching parent folder and click Choose.

The parent folder and all of its subfolders (all on the new hard drive) will now be linked back with Lightroom. — Tim

4. Light Pollution Filters and Auroras

Question:

I just read your article on light pollution filters. Will these filters also be usable when shooting Northern Lights? — Claron K.

Answer:

Yes, I believe they would be useful for shooting Northern (or Southern) Lights when near inhabited areas. As auroras tend to be green, pink, purple and sometimes blue, the orange/yellow blocking ability would have a complementary effect. However, you could be lose up to 1 stop of light, so keep that in mind. — Matt

5. Star Trail Settings

Question:

I just reviewed your “How I Got the Shot: Lake McDonald” blog post about star trails. Phenomenal image! I have done a ton of research on how to do this kind of photo, but was hoping for a simple recommendation for settings and timing. I’ll be shooting with either a Nikon D850 or a Nikon Z 6 with a 14-24mm lens. — Darlene

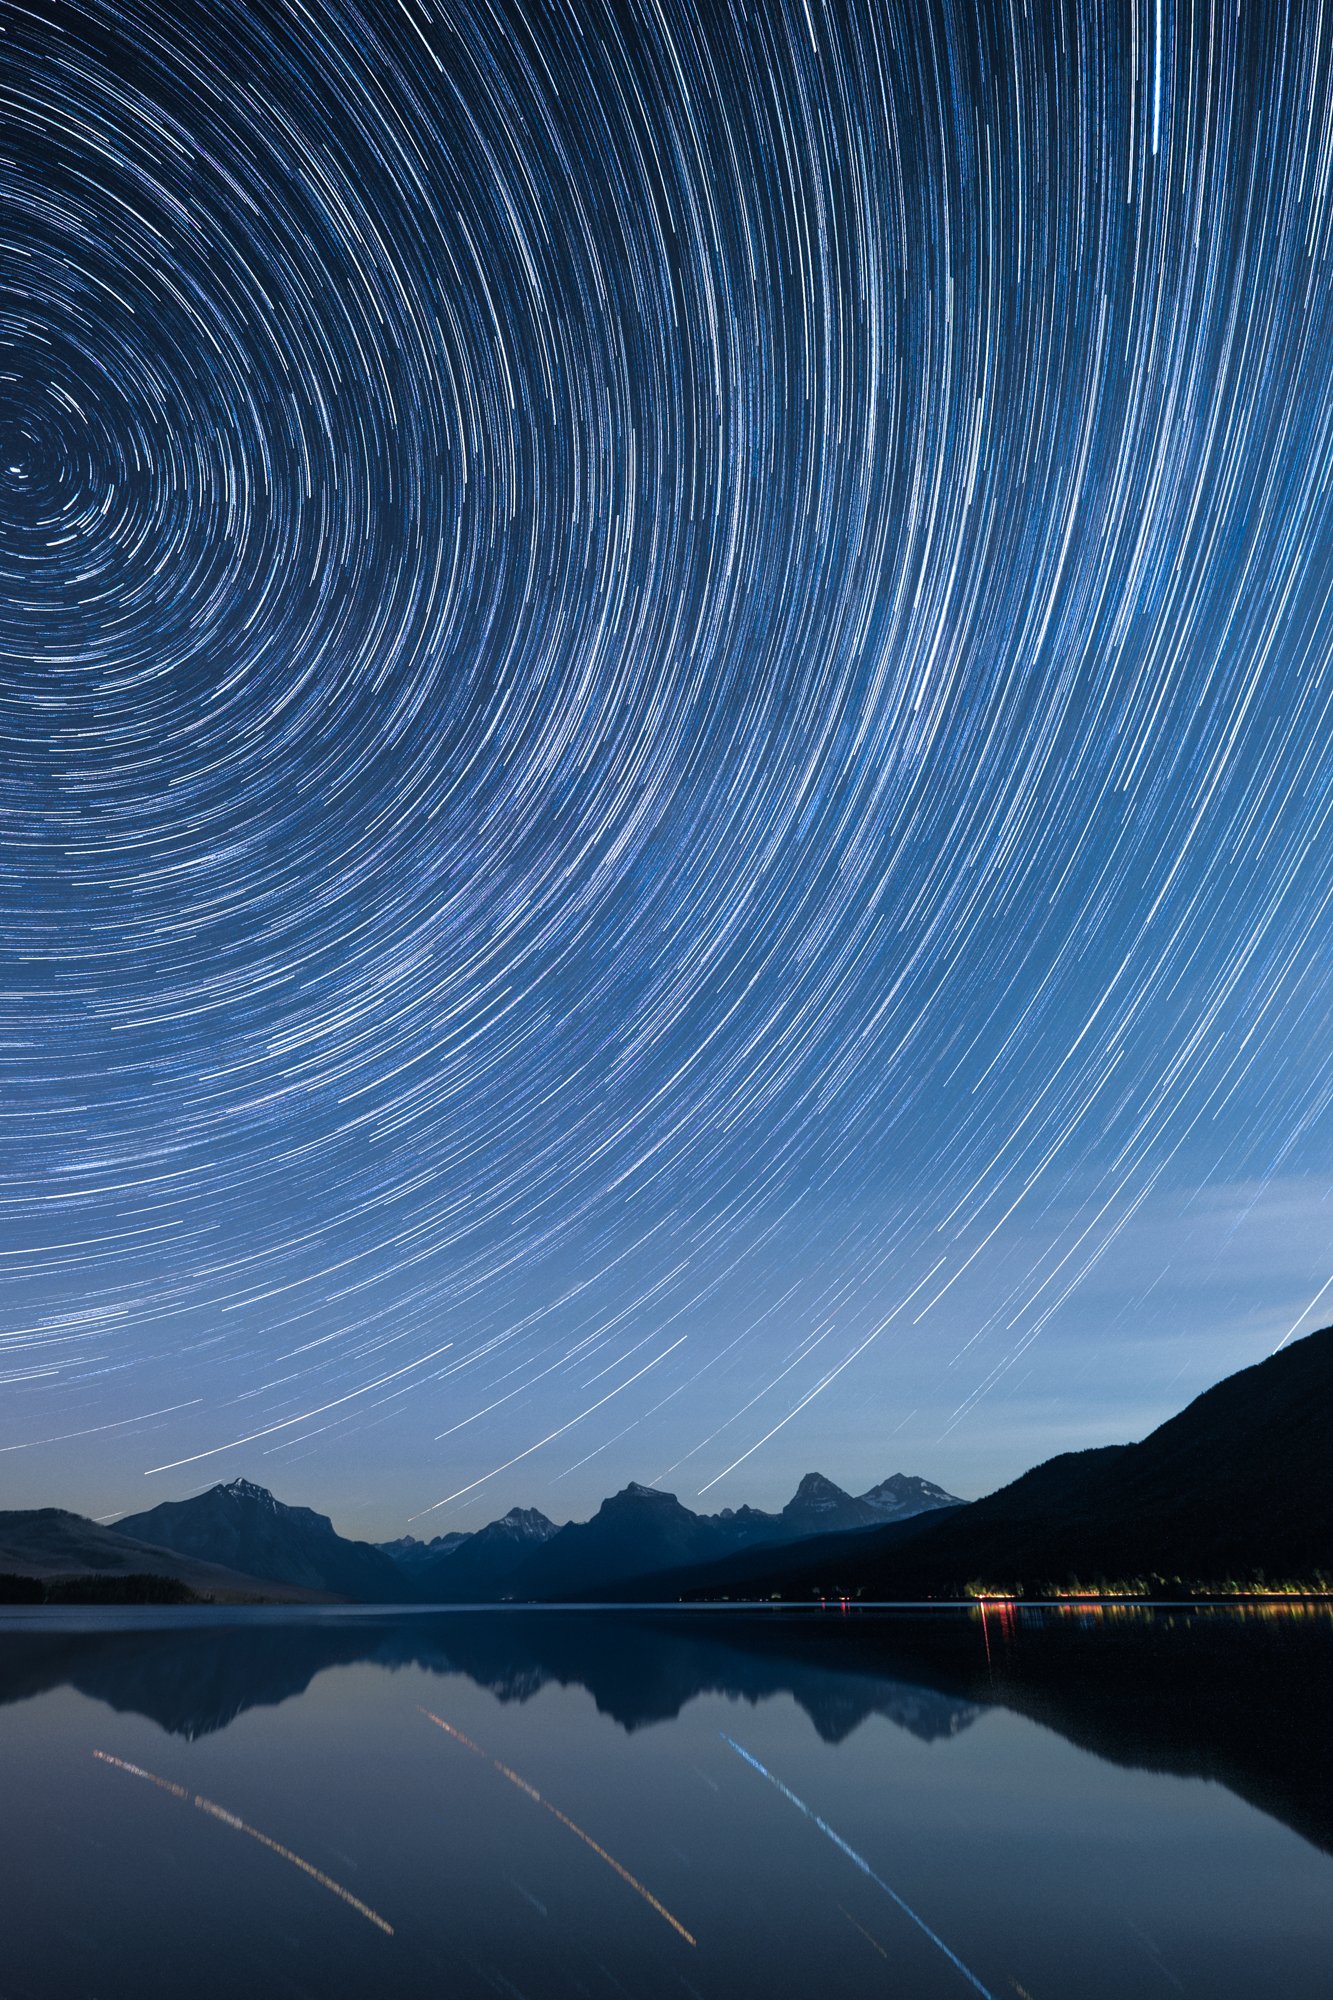
Star Circles Over Lake McDonald. © 2015 Gabriel Biderman. Fujifilm X-T1 with a Fujifilm 10-24mm f/4 lens. 41 stacked frames, each shot at 2 minutes, f/4, ISO 3200.

Answer:

There is no simple formula for star trails. You need to find the balance between a proper base exposure, how long you want to go, and image quality.

You can capture trails with either one long exposure or with multiple shorter exposures that you later stack in Photoshop. Single exposures are often best for up to 15-minute shots, but when you want longer trails you’ll most likely want to shoot multiple frames to stack.

Do a high ISO test shot to figure out the proper exposure. Then you want to get to a more optimal image quality setting. Lower your ISO to something you’re comfortable with in terms of noise (for example, maybe ISO 800), and then adjust your shutter speed accordingly to compensate.

Also consider apertures, in this regard: The wider the aperture, the higher number of stars will appear. While that might sound like a good thing, too many star trails could look too chaotic and distract from the rest of the scene. For example, on a dark night f/2.8 will show an overwhelming number of trails, while f/8 would create a more subtle effect. Under a full moon this isn’t so critical, as not as many stars are visible anyway. Either way, just be careful that you don’t stop down so much that you have to crank up your ISO and sacrifice image quality.

Another consideration is how long your camera’s shutter can be open without generating long-exposure noise (speckled red, blue and green confetti-like specks in your image). This noise is produced when a camera processor overheats during long exposures, but higher outdoor temperatures and lower humidity also play a factor. You have to learn what your camera can tolerate by running some tests in different conditions. For example, if the ambient temperature is 60 to 65 F or less then you can usually get away with 4- to 6-minute exposures, but if the temperatures are 80 F or higher then you might be limited to 30 seconds or 1 minute.

To counteract that effect, you might wonder about using long-exposure noise reduction (LENR). You can use that quite effectively if you’re shooting one long exposure for star trails, but it would be countereffective for stacking. The reason is that for most cameras, LENR disables the shutter after each exposure (for the same amount of time as the shutter speed), which would create breaks in your star trails.

The final decision is how long you want your star trails to be. When facing north for circumpolar trails, you want to shoot for at least 1 hour, and the longer the better. If you are facing east, west or south, you can get away with shorter total exposures—8 to 30 minutes might be sufficient. — Gabe

Chris Nicholson is a partner and workshop leader with National Parks at Night, and author of Photographing National Parks (Sidelight Books, 2015). Learn more about national parks as photography destinations, subscribe to Chris' free e-newsletter, and more at www.PhotographingNationalParks.com.

UPCOMING WORKSHOPS FROM NATIONAL PARKS AT NIGHT

Five Questions: Dark Skies, Light Stands, PCs and More

If you send questions, we’ll send answers. Want proof? See Exhibits 1 through 5 below.

This installment of our “Five Questions” series features inquiries about websites for finding dark skies, light stands, PC computers for photo editing, filter vignetting and a lighting effect.

If you have any questions you would like to throw our way, please contact us anytime. Questions could be about gear, national parks and other photo locations, post-processing techniques, field etiquette, or anything else related to night photography. #SeizeTheNight!


1. Tools for Seeking Dark Skies

Question:

A few of the presenters at the Night Photo Summit referenced the website ClearDarkSky for help in planning night sky photography. Assuming that I will probably have to drive at least two hours one way to reach a certified dark sky preserve from my home, just to photograph only stars and the Milky Way, is it sufficient to just look at the darkness and cloud cover on that website? I see that Dark Sky has similar information, but its forecast components appear to be more related to telescope viewing. — Ray B.

darksitefinder.jpg

Answer:

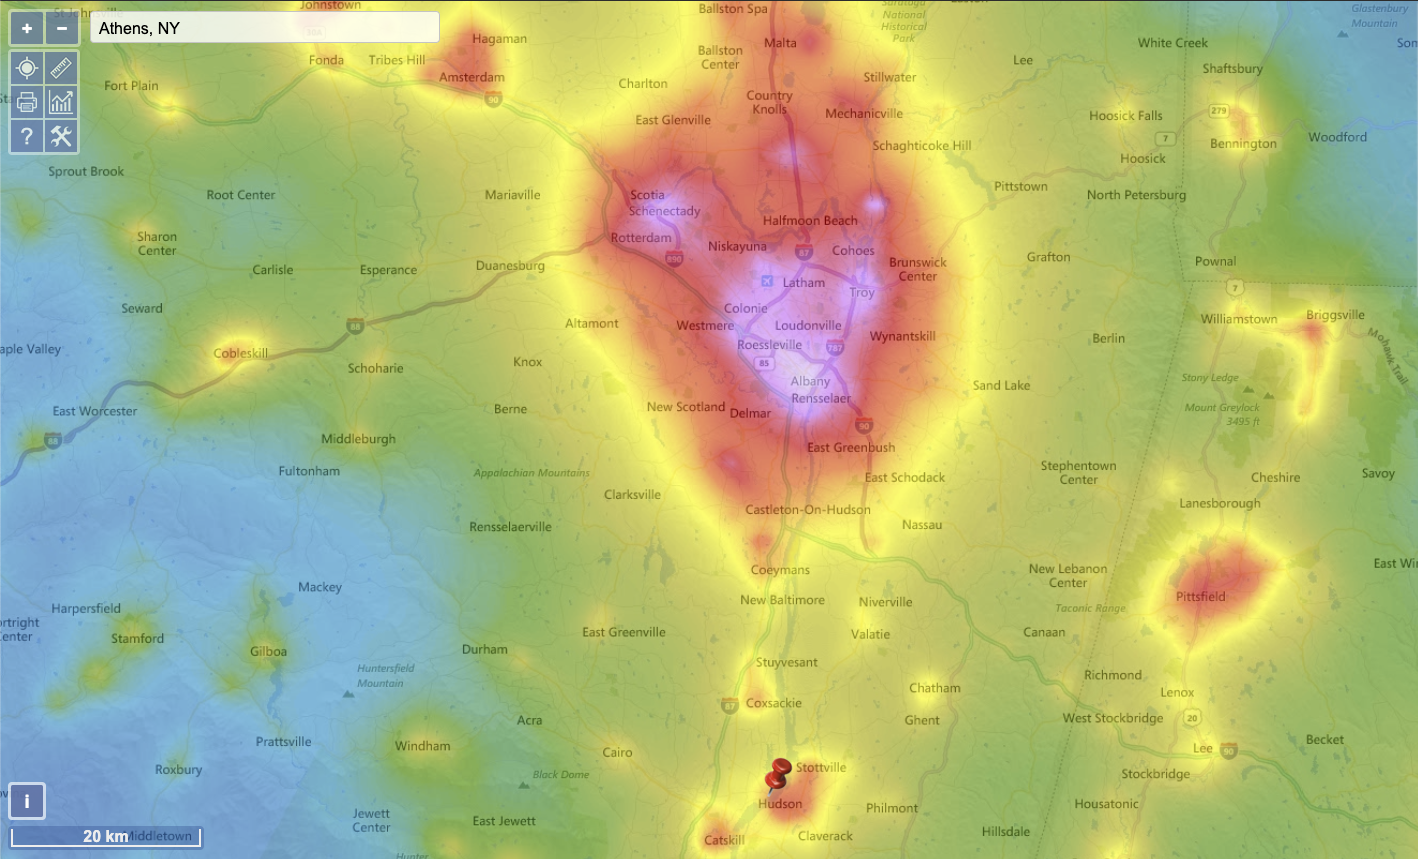
You can always make a photograph in any condition. Obviously, the darker the sky, the more stars you will see, and the more of the Milky Way you will see in your images. Are you primarily interested in photographing the sky, or the landscape, or both? There are many dark-sky websites you can check (I like DarkSiteFinder), but don’t get too hung up on Bortle numbers—just go out and make some images.

If you’re just doing astro-landscape photography, then find a spot with an interesting landscape/foreground that doesn’t have any artificial light in the immediate area, and see what you get. I think it’s more important to make interesting pictures than to have the darkest sky possible.

On the other hand, if you are mainly interested in photographing the sky and celestial objects (i.e., astrophotography), then use any one of those websites to find the darkest spot within a comfortable driving distance, and go for it.

This screenshot above from DarkSiteFinder has a pin where I live. Even though I’m on the outskirts of an urban area, I can easily see the Milky Way with the naked eye, and it shows up even better in-camera because the light pollution is to the north and Milky Way to the south. — Lance
2. Night Light Stands

Question:

I have been playing with my Luxli Fiddle light but could use a stand to position it better. What type of stand do you use? — M. West

Answer:

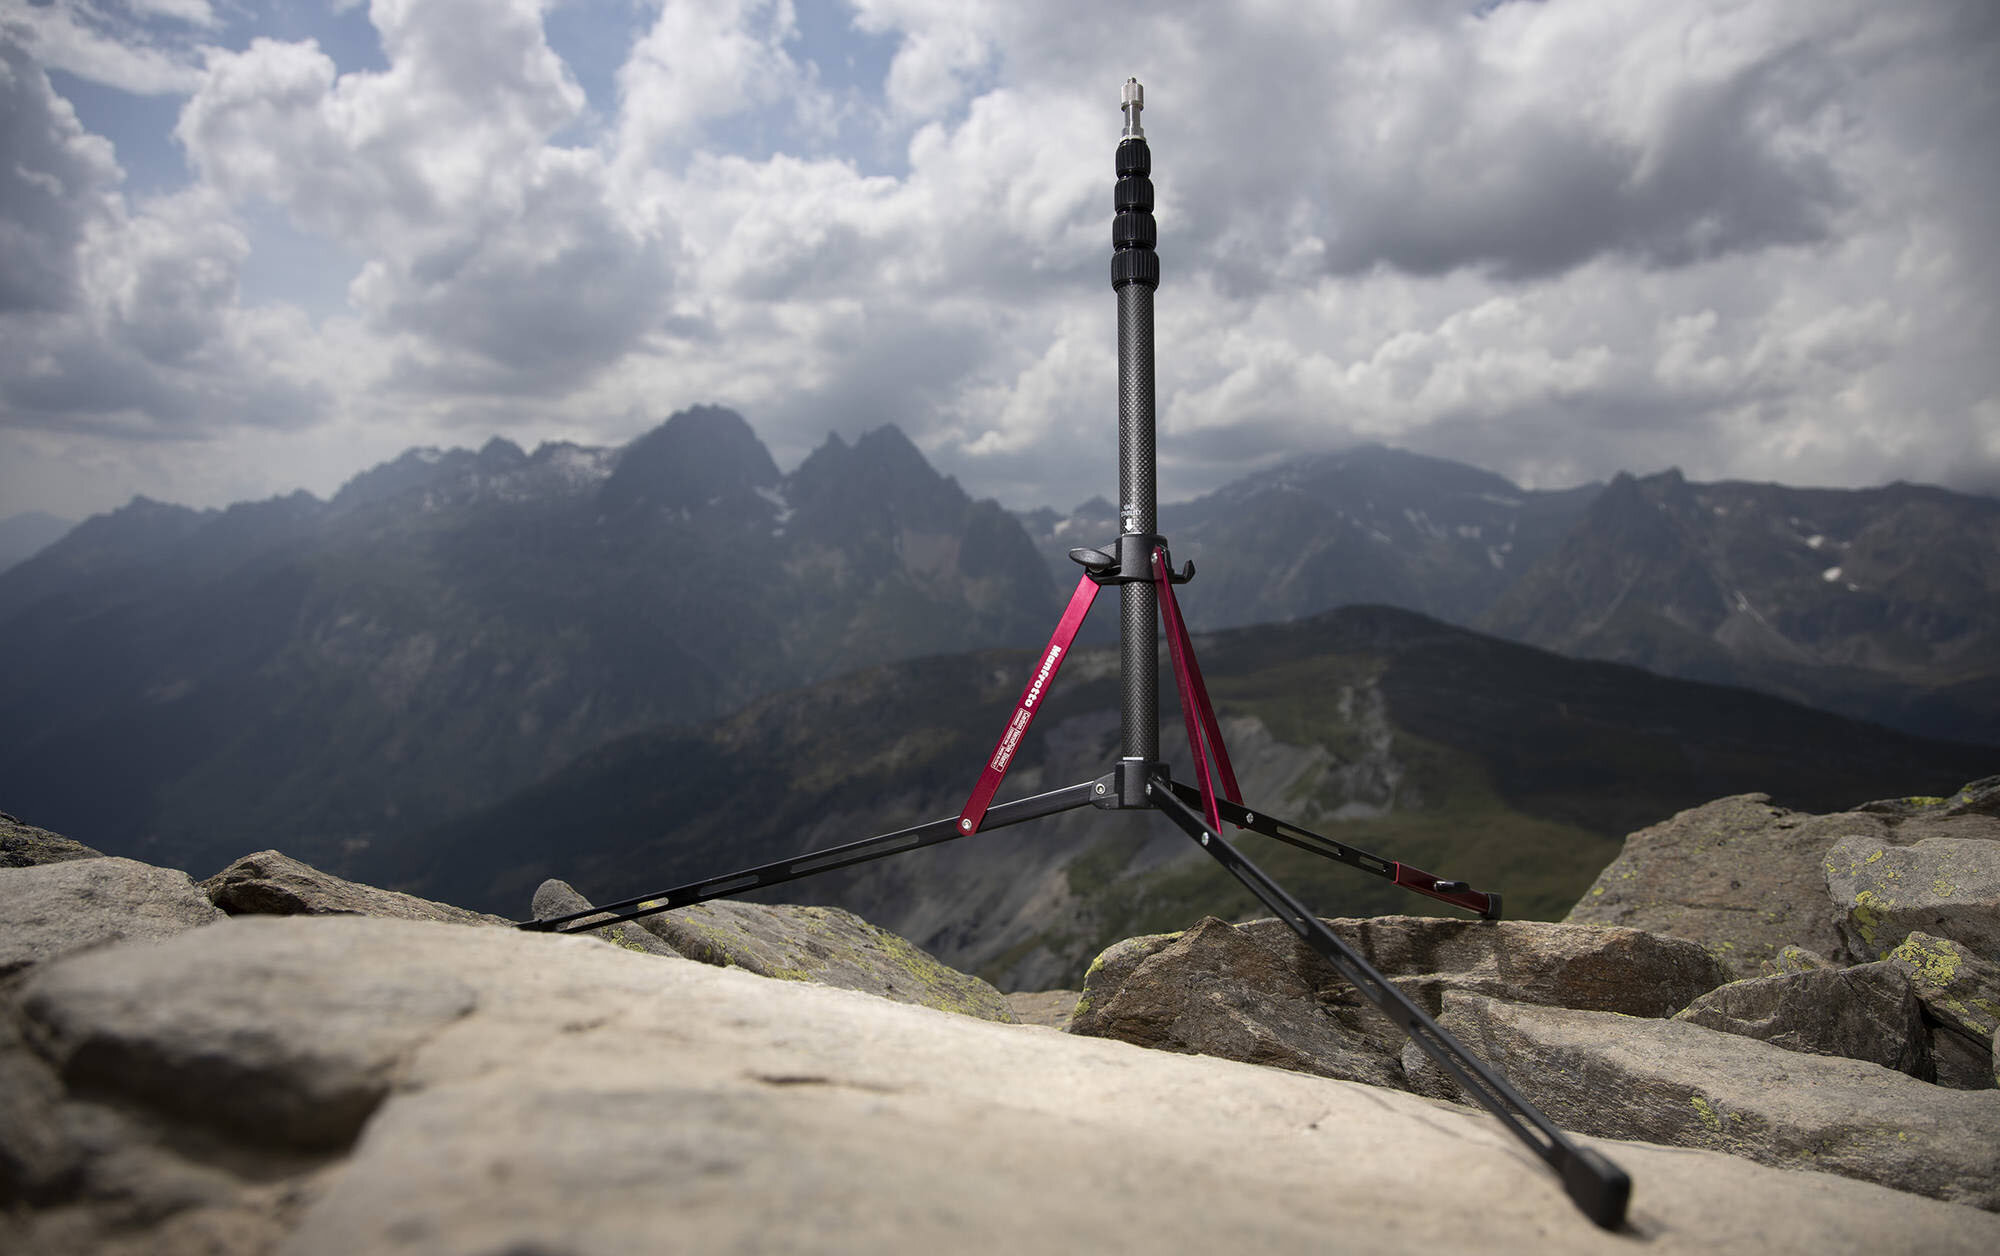
A compact and travel light stand is a perfect complement for your Luxli Fiddle. You’ll be able to set it up, finesse the position and then leave it there for repeatability. It has been a game-changing way for many of us at National Parks at Night to level up our Low-level Light Painting. (Though if you’re shooting in national parks, note that many of them require a Special Use Permit for light stands.)

Below is a breakdown of our favorite compact light stands that are easy to pack for your night adventures (you can all their specs compared at this link):

The Impact Reverse is the least expensive and the most basic.

The Manfrotto options offer an adjustable leg, which is helpful on uneven terrain. The Nano Plus will also hold bigger lights if you have any strobes. The Nanopole will let you easily pull out the center column and to use as a boom arm. The Carbon Fiber is the lightest but also most expensive of those mentioned.

While your Luxli Fiddle will screw directly into the light stands with the included 1/4-inch adapter, you will want to add a mini-ball head adapter so you can adjust your light easily. — Gabe

3. PC Preferences

Question:

I’m wondering about your recommendation for a laptop of the non-Apple variety. Do you recommend using a desktop or laptop with external monitor? Space and money are at a premium. — I.B.

Answer:

My personal approach is that I have both a desktop and a laptop.

The desktop is my workhorse—that’s where all my power is (i.e., RAM, higher-grade processor, terabytes of storage space, etc.). My laptop has enough power to run Lightroom and Photoshop effectively when I’m traveling, but doesn’t have all the bells and whistles of my desktop. The reason is that an all-powerful desktop PC is notably less expensive than its performance equivalent in a laptop, and the aforementioned strategy gives me a combined system with “enough” power when I’m on the road and full power when I’m home.
However, that’s not necessarily the best “space and money” option overall. Instead of two computers, you could get just a somewhat-better-than-adequate laptop that you can connect to your larger display when home, as you suggested. For photo editing, I personally recommend a laptop that meets or exceeds these specifications:

  • a calibratable 15-inch display (larger is better for photo editing, but is also heavier for travel)

  • HD (1920 x 1080) resolution or greater (but not 4K, unless you’re also doing video work)

  • 2 GHz processor with 64-bit support

  • 16 GB RAM

  • 2 GB video memory

  • 1 TB internal SSD hard drive

I suggest checking B&H Photo to see what kind of system you can put together for your budget. Go to their Laptops page and enter your desired specs in the left margin, then browse your options, looking for what might fit your budget. Alternatively, just call B&H and speak with someone from the computer team. They’re excellent at guiding you toward a solution based on your needs, and they can even custom-build a desktop or laptop computer. In my experience with B&H for over 25 years, they will not guide you toward something more expensive that you don’t need.

For what it’s worth, since last fall I’ve been using an MSI Creator 15, and I recently obtained an MSI Creator Z16 (pictured above) that I’m eager to take out for a spin. — Chris
4. Perseid Vignettes

Question:

I’m hoping to shoot the Perseids in August and wondered about the Breakthrough Photography filter for light pollution. Do you know it and whether it vignettes? — Wendy K.

vignette meteor.jpg

Answer:

I have not used that particular filter, but I can confidently say that it should not cause vignetting. Light pollution filters inhibit particular color wavelengths that are commonly associated with light pollution. The only way they would vignette is if they have a deep profile that can be seen through a too-wide-angle lens, which good design should prevent.

This is a great year for photographing the Perseids, as they’ll peak on nights when the moon isn’t visible. For more information on how to shoot a meteor shower, be sure to check out our Great Balls of Fire e-book. — Matt

5. Cape Cod Lighting Effect

Question:

I recently saw a presentation you did, and I have a question about the image Chris showed of the dune shack at Cape Cod National Seashore. Was a special “effect” in editing applied to that picture, or was it just your lighting? — K. O’Donnell

Dune shack, Cape Cod National Seashore. © 2017 Chris Nicholson. Nikon D5 with a Nikon 14-24mm f/2.8 lens, light painted with a Coast HP7R flashlight. 20 seconds, f/4, ISO 1600.

Dune shack, Cape Cod National Seashore. © 2017 Chris Nicholson. Nikon D5 with a Nikon 14-24mm f/2.8 lens, light painted with a Coast HP7R flashlight. 20 seconds, f/4, ISO 1600.

Answer:

No special effects or trick editing—I only lit and shot it. There was some post-processing, of course, but just to tweak exposure and contrast.

That said, I’m not sure if you’re referring to the color of the background or the illumination of the shack, so I’ll address both:

  • The warm tones of the background are caused by the lights of nearby Provincetown bouncing off the clouds. Some night photographers avoid light pollution at all costs; I try to embrace it creatively, and this photo is a good example of how and why.

  • The foreground light coming from an unfiltered Coast HP7R LED flashlight. The light is soft and broad and a little warmer than usual because rather than hitting the shack with a direct beam, I bounced the beam off the top of the sand dune to camera-right, and it’s reflecting back to illuminate the front of the shack. That was a creative solution for working in a tight spot where I couldn’t side-light from outside the frame (because of the slope of the dune), and it came with the added benefit of creating that nice, soft effect. — Chris

Chris Nicholson is a partner and workshop leader with National Parks at Night, and author of Photographing National Parks (Sidelight Books, 2015). Learn more about national parks as photography destinations, subscribe to Chris' free e-newsletter, and more at www.PhotographingNationalParks.com.

UPCOMING WORKSHOPS FROM NATIONAL PARKS AT NIGHT


How to Deal With Light Pollution, Part I: Filters

Note: This is the first in a three-part series about one of the most common questions we get: How do you deal with light pollution? We have three answers: with filters, with post-processing, with creativity. In this week’s blog post, Matt Hill discusses the first of those solutions: light pollution filters.


Light pollution is a reality. It affects humans’ quality of life. And it’s not addressed in a serious manner by most local governments.

When it comes to night photography, it’s purely up to individual aesthetic if light pollution is positive, negative or neutral.

I like to think of the problem as a coffee metaphor. Would you make coffee without a filter? No. That would be sacrilege (and like drinking mud). The same principle applies to photography. There are certain situations wherein a filter does exactly the right job and is therefore necessary. Neutral density and polarizers are perfect examples.

But as light pollution filters are relatively new to the photography world, the question stands about whether they fall into the same category. So I set out to understand if and when light pollution filters are useful. After some deep testing experimenting in post-processing and hours thinking about the issues, I have some observations and suggestions for you.

The bottom line is this: Yes, light pollution filters are very helpful in certain situations. Read on to find out when I’d suggest using them.

Note: This will not address deep-sky light pollution filters used typically for strict astrophotography. I focused on what we do best: astro-landscape and suburban/urban night photography.

The Problem(s)

1.  exactly what light pollution filters do is not clearly described.

The manufacturers of light pollution filters claim they remove unwanted color casts from night photography. But very few, if any, provide graphs or data showing which wavelengths of light are blocked. On top of that, very few laypeople know what the heck those mean anyway—so maybe that’s why they aren’t just readily available on the manufacturers’ websites.

In short, the makers say that the filters block a yellow glow. And most often they claim the glow comes from sodium lights. But there are distinctions in this range. As we see in Figure 1, low-pressure sodium vapor lamps typically emit at 589 nm (nanometers).

Figure 1. Source: Wikipedia

The Irix website provides the chart in Figure 2, which clearly shows 589.3 nm as the wavelength being narrowly blocked with only 15 percent transmittance. This means only 15 percent of the light at that wavelength passes through the filter. And it slopes up on either side, so some other nearby wavelengths (colors) are also affected.

Figure 2. Source: Irix.

By comparing the two charts—the emitted light spectrum and the filter’s blocking profile—we see that this is a very specific filter. In fact, it has only one job: to block light at a very narrow wavelength.

Mercury vapor lamps are trickier to filter for, since there are many wavelengths and uses for them. But when used as overhead street lighting, they typically show as blue (435.8 nm) and green (546.1 nm) to our eyes. There is a yellow-orange variant too, which emits at 578.2 nm. This latter one is likely also blocked using (what I can discern as being) typical light pollution filters.

Figure 3. Source: Wikipedia.

We also need to consider the LED revolution. Many cities and townships are in the process of (or have completed) converting all street lamps from the often-beautiful mixed-color lighting to very consistent and “clean” LED lighting. The color temperatures from LEDs may vary widely from warm to slightly cooler than daylight. They also emit more of the color spectrum and will thus render colors better (though not as well as a true tungsten light source). Keep reading to see examples.

So it feels like this wave of light pollution filters is about 10 years too late. But is it?

2. how to best use light pollution filters is not clearly described.

Not one manufacturer source that I researched suggests a white balance setting, nor any post-processing settings. None even mention the filter factor (i.e., how much light the filter eats and how much to compensate for it).

It seems to me that photographic lens filters are a sunset product. Meaning, they are mostly outdated and unnecessary except for the aforementioned specialty filters that have very narrow, specific jobs that cannot be reproduced by post-processing. Their effect must be in-camera. Because this category of products is basically fading away, there are very few passionate manufacturer advocates who put energy into clearly explaining what the filters are for and how to use them. This is a personal gripe I have and my own observation. But it makes sense, right? I wish more technical and instructional information existed in the filter market in general, and definitely for such a new type of filter that’s been generating such buzz.

3. Using filters is inconvenient.

Screw-on filters are a PITA to mount and unmount. I get so anxious doing it. Especially since I often have my camera over a precipice, railing or bridge. I dread that the filter will fall out of my hand or not thread properly and splash/crash.

Some forward-thinking manufacturers now use a magnetic mount system. I have not tested this, but the premise of it addresses my pain directly. My concern (again, having not used it) whether the filter remains in place if I forget it’s on and move my tripod around with the camera mounted. I am not sure how strong those magnets are.

Drop-in filters are also painful to use. Resin filters damage the optical quality of your images too much to even consider. And glass drop-in filters, even though they are chemically hardened, are still glass and therefore fragile. So transporting them to the shoot location and them keeping them safe as you move around is another concern.

Bottom line: You have to care about the problem to use the solution.

The Gear

For these tests I used the following camera gear:

Testing Methods

I shot one control and two tests with the following process:

  1. Photograph without a filter at Tungsten white balance.

  2. Photograph with an Irix screw-in filter.

  3. Photograph with a Benro drop-in filter.

To avoid bumping the camera, I gently screwed in the Irix filter, shot, unscrewed it, and then used the quick-mount Irix filter holder with the Benro glass filter in it. Minor camera movements happened—despite my process.

Locations

I chose a few locations with varying light pollution. I did not go to a place without light pollution, as that would negate the need for the filters.

  1. Athens, New York—Bortle 4 (rural/suburban transition)

  2. Catskill, New York—Bortle 5 (suburban)

  3. Astoria, New York—Bortle 8-9 (city sky / inner city sky)

Let’s Talk About Color

Visible light occurs between 400 and 750 nm. Some light sources emit full-spectrum light (such as tungsten lighting) and some emit less of the color spectrum (such as sodium vapor).

So I brought along my favorite tool for getting a) the most accurate color in-camera, b) a reliable color reference for comparison and c) a reliable neutral for color balancing. That tool? The X-Rite ColorChecker Passport Photo 2.

Color management is not voodoo. And color science is not as daunting as it seems.

Here is how I use it:

Building a camera profile

When I want to make sure I have the colors represented as closely as possible to correct, I photograph the object in Figure 4:

From Lightroom, using the ColorChecker plugin, I export that image to build a profile (Figure 5).

Figure 5.

Then after restarting Lightroom, under “Profile” in the Basic panel of the Develop Module, I choose the new camera profile.

Figure 6.

The process of building a camera profile is simply one of asking science to place all the color values where they should be (Figure 7). Know this: You may want to build camera profiles for different light sources, such as midday sun, moon, flash, flashlight, sodium vapor, etc. Even if you don’t use a white balance adjustment, the colors will render more true to life.

Figure 7. It’s science. Color science. And don’t the colors look more “right” as you both profile and apply a white balance?

Let’s compare them side by side without a profile and without color balance adjustments, as seen in Figure 8:

Figure 8. Nikon Z 6 with an Irix 15mm f/2.4 lens. Tungsten white balance; 30, 50 & 50 seconds (left to right), f/2.5, ISO 125.

It’s easy to see what a sodium vapor light source does to color when you have a series of calibrated color patches. None of them look right without correction. That’s because that light source is not full spectrum, so different-colored objects reflect it differently.

And when you put a filter on the lens to filter out that light source, you are compounding a problem again. First, the light source didn’t emit at full spectrum, so expecting it to render anything “naturally” is not just unreasonable, it’s impossible. The color patches above demonstrate this. You can come closer via profiling and white balancing, but never true to a full-spectrum light source.

Figure 9. Note the dramatic change in contrast on the stone bench arm beneath the ColorChecker Passport, as well as the neutralization and color change in the streetlamps in the background.

But when you apply a light pollution filter to block that spectrum, you can prevent it from affecting (or, polluting) your image.

That’s when these light pollution filters become viable. Even necessary.

I provide all the above to help you understand the side-effects of filtering out that spectrum and the ideal ways to approach correcting this. I will explain what I have learned.

OK, let’s get out of the science weeds and into the practical application.

One more note before we continue: I love my ColorChecker Passport Photo 2 for daylight and flash camera profiling. It’s invaluable. But for night photography it falls short; often due to the partial spectrum light sources we use. I highly recommend owning one but its applications for night photography are limited to primarily white balancing. It was, however, an excellent tool to demonstrate the color shifts and missing color spectrum.

Light Pollution Filters in the Field

The first time I saw a practical benefit for a light pollution filter was when facing … well, light pollution. (Amazing, right?)

When photographing the Perseids this year, I set up my Nikon D750 as a second camera facing due north from Athens, New York, toward Albany, New York. That city is 45 miles north and yes, it brightened the sky.

Figure 10. Nikon D750 with an Irix 15mm f/2.4 lens, no filter. White balance 3200 K, 260 seconds, f/2.8, ISO 100. Note the warm clouds and cool sky.

Figure 11. Nikon D750 with an Irix 15mm f/2.4 lens, with an Irix Edge Light Pollution Filter. White balance 3200 K, 257 seconds, f/2.8, ISO 100.

Figure 12. Nikon D750 with an Irix 15mm f/2.4 lens, with a Benro TrueNight filter. White balance 3200 K, 252 seconds, f/2.8, ISO 100.

All of the images in Figures 10 to 12 were “cooked to taste” in Lightroom.

With the Irix and Benro filters, a few things happened:

  • The clouds became neutral.

  • The haze in the sky decreased dramatically.

  • The Benro filter seemed to be even more aggressive in neutralizing the yellows.

  • I noticed about one-half to two-thirds of a stop of light loss, and I often increased exposure time to compensate.

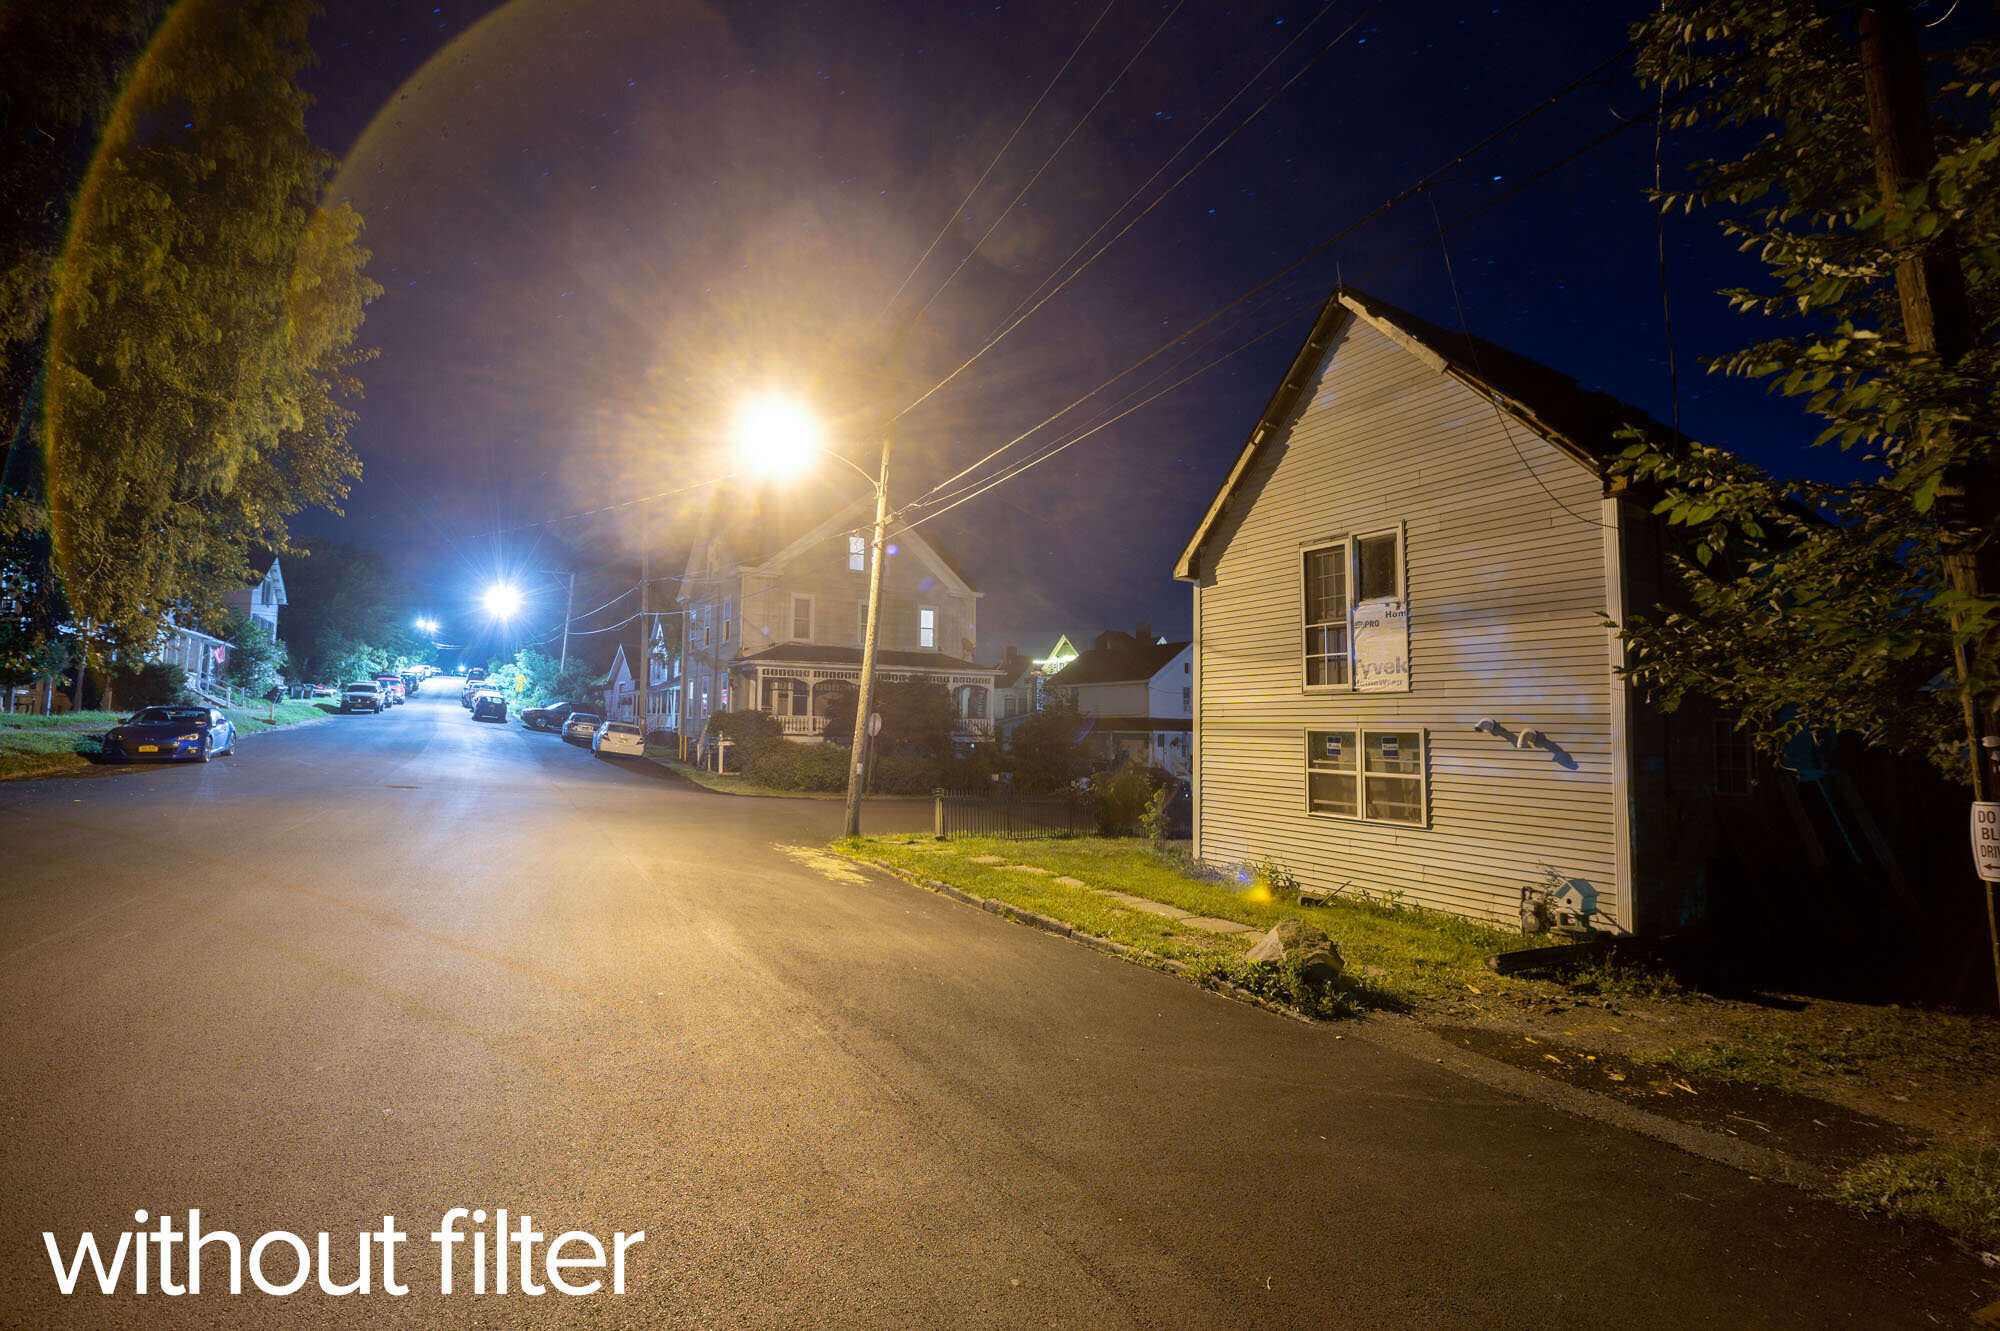
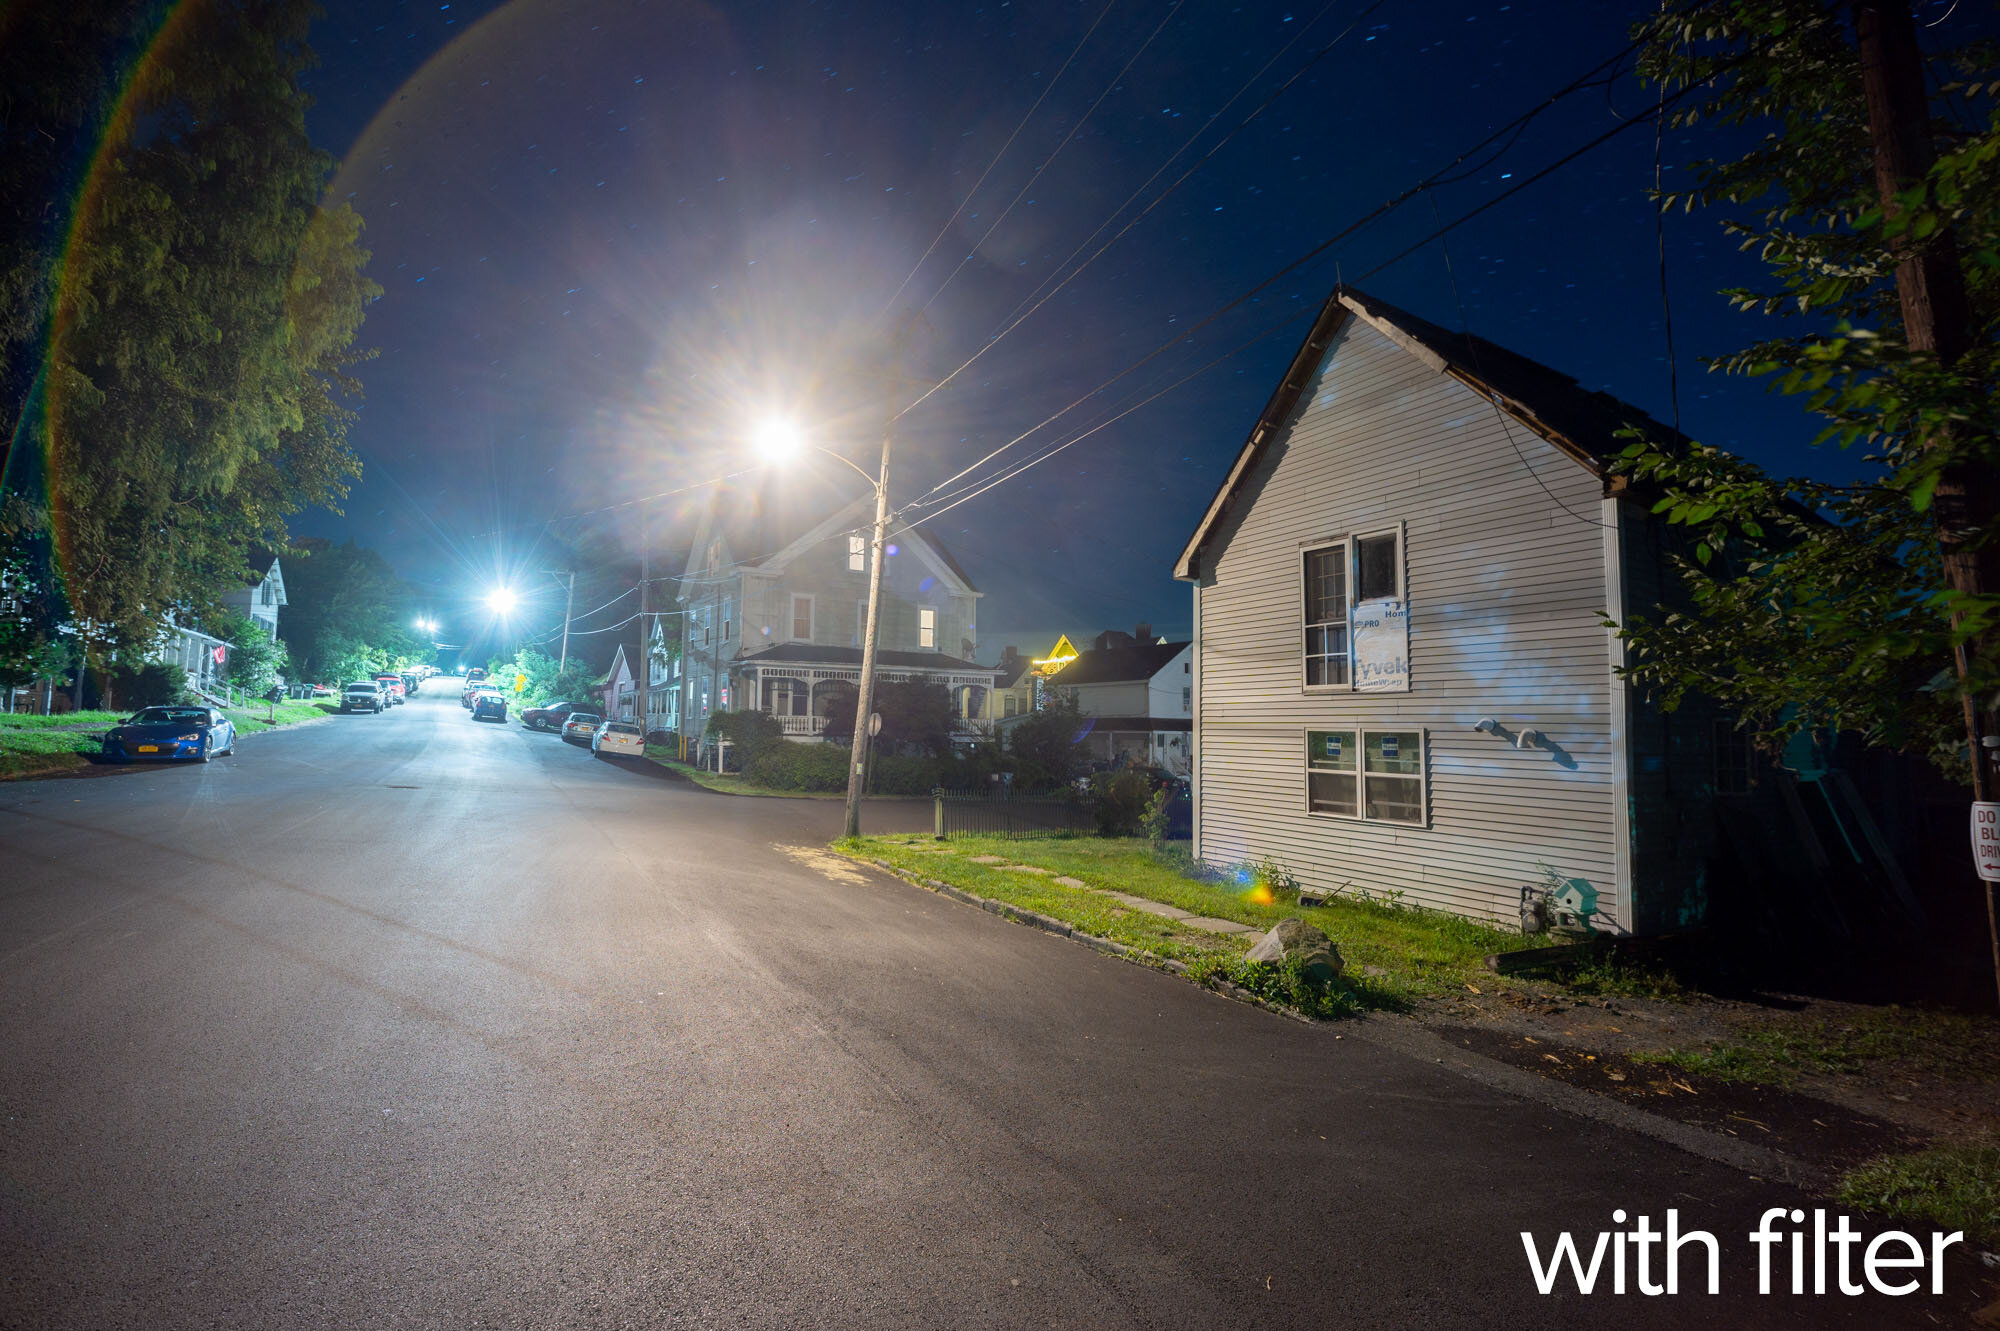
The second point above piqued my curiosity. So as I tested more, I looked for evidence of haze being removed from the sky, but found instead that the strong yellow cast from a sodium vapor streetlight was completely removed from the light on the side of the house (Figure 13). This has major implications for urban night photographers because white balance and post-processing do not offer great solutions for color correcting sodium vapor lights, due to their limited spectral emissions as noted earlier.

Figure 13. Nikon Z 6 with an Irix 15mm f/2.4 lens, with no filter (left) and an Irix Edge Light Pollution Filter (right). 61 seconds, f/4, ISO 800.

Here is a Lightroom screen capture zoomed in:

Figure 14.

Note I did not go turn off that light source. I put on the Irix filter. That’s it.

So now I am thinking to myself: All those times I sighed heavily when trying to color correct an image that had heavy orange/yellow streetlights in it—this filter could have prevented a headache.

Figure 15 shows the light source that was hitting the side of that house, without and with a filter (for effect!). It’s not an artful shot, but check out the contrast on the blacktop, as well as the contrast in the sky and on the side of the house:

Figure 15. Nikon Z 6 with an Irix 15mm f/2.4 lens. 61 seconds (left) and 86 seconds, f/4, ISO 100.

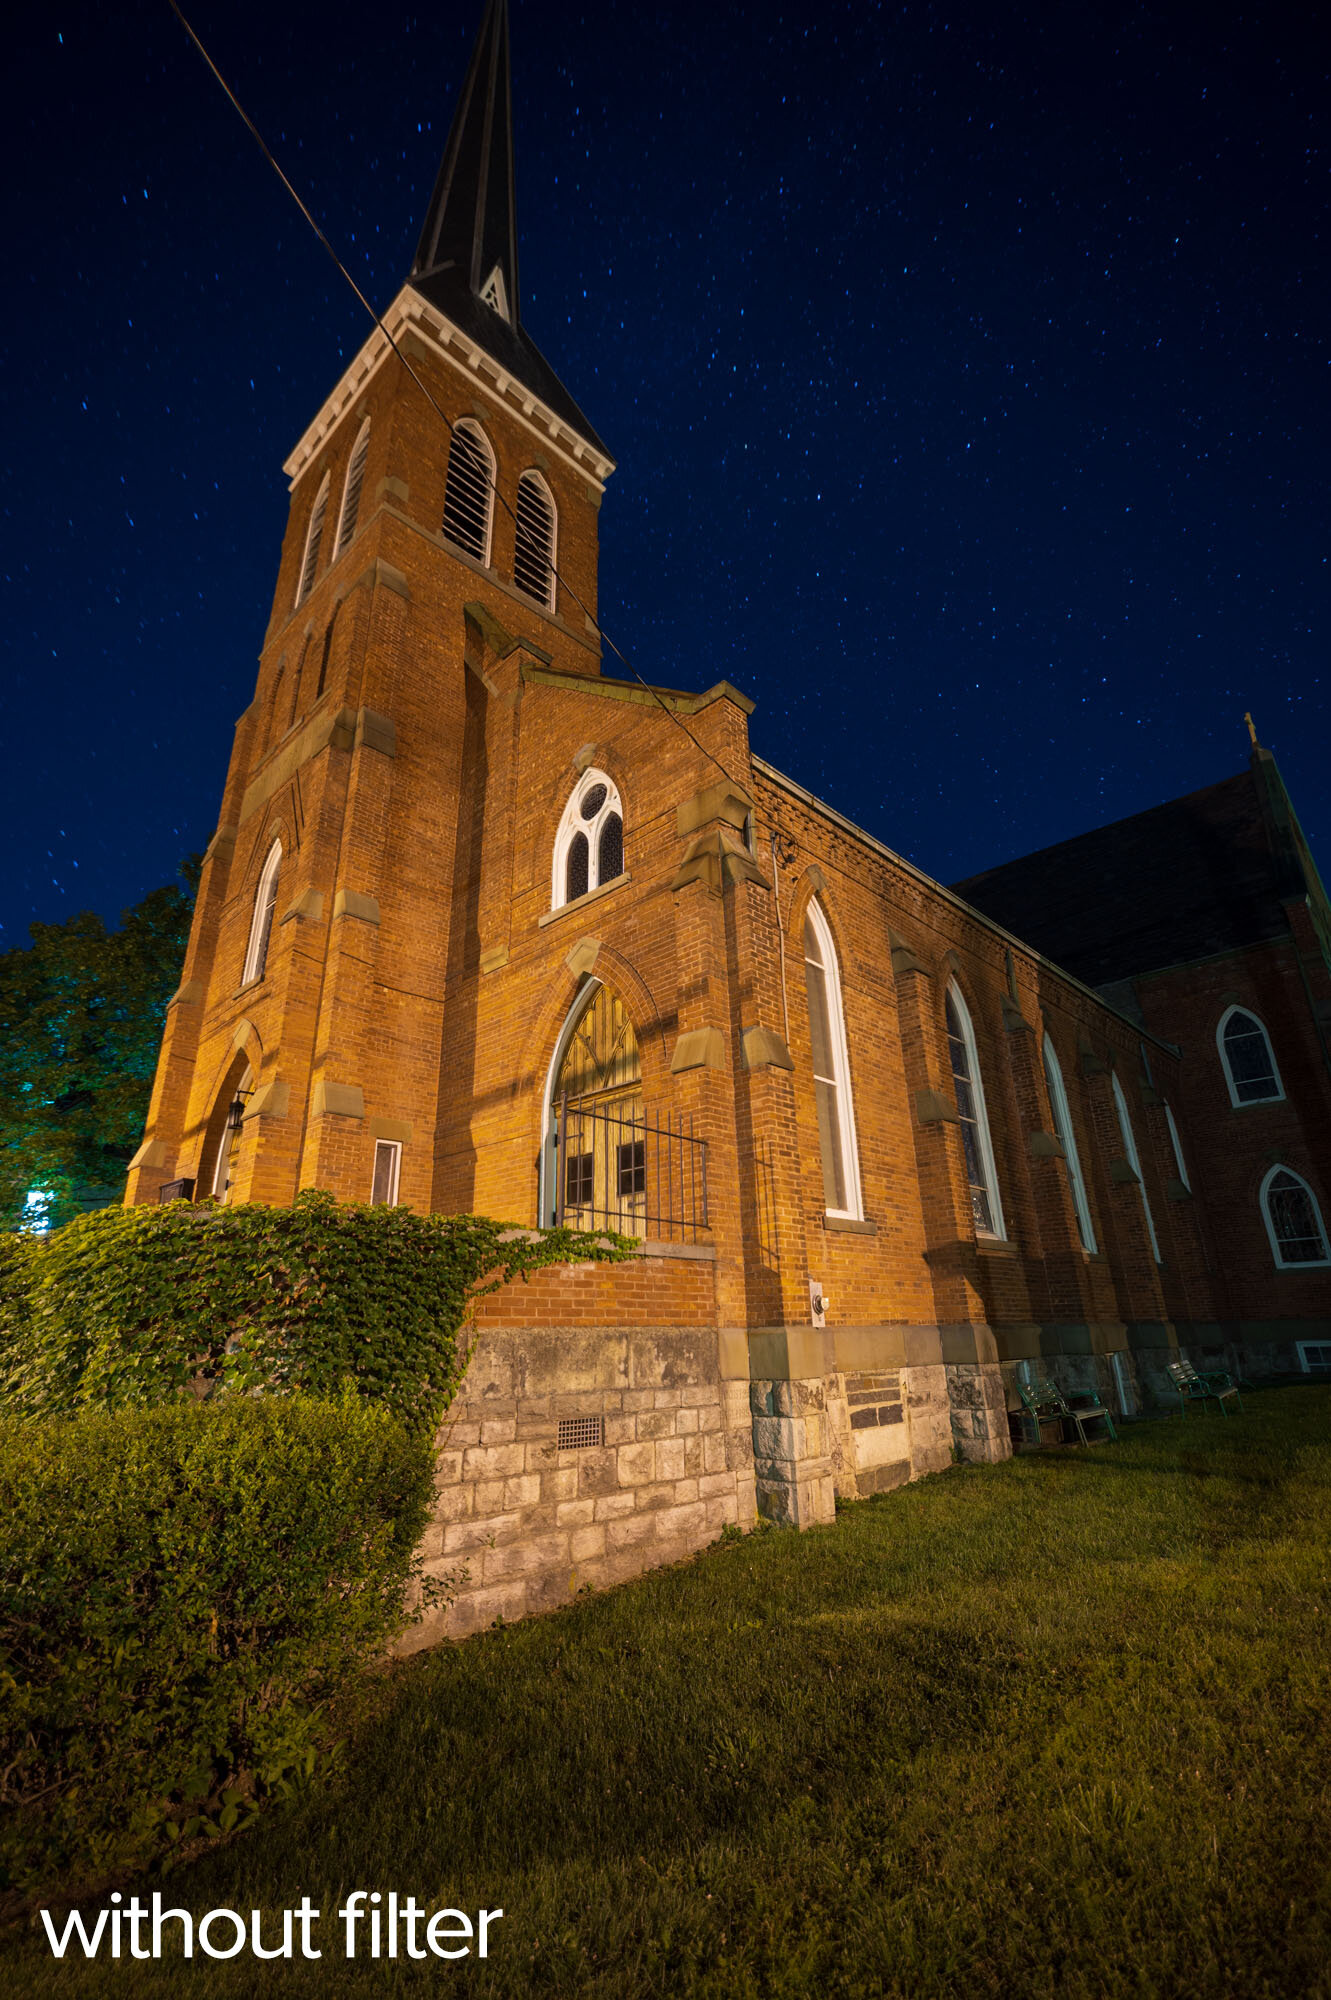
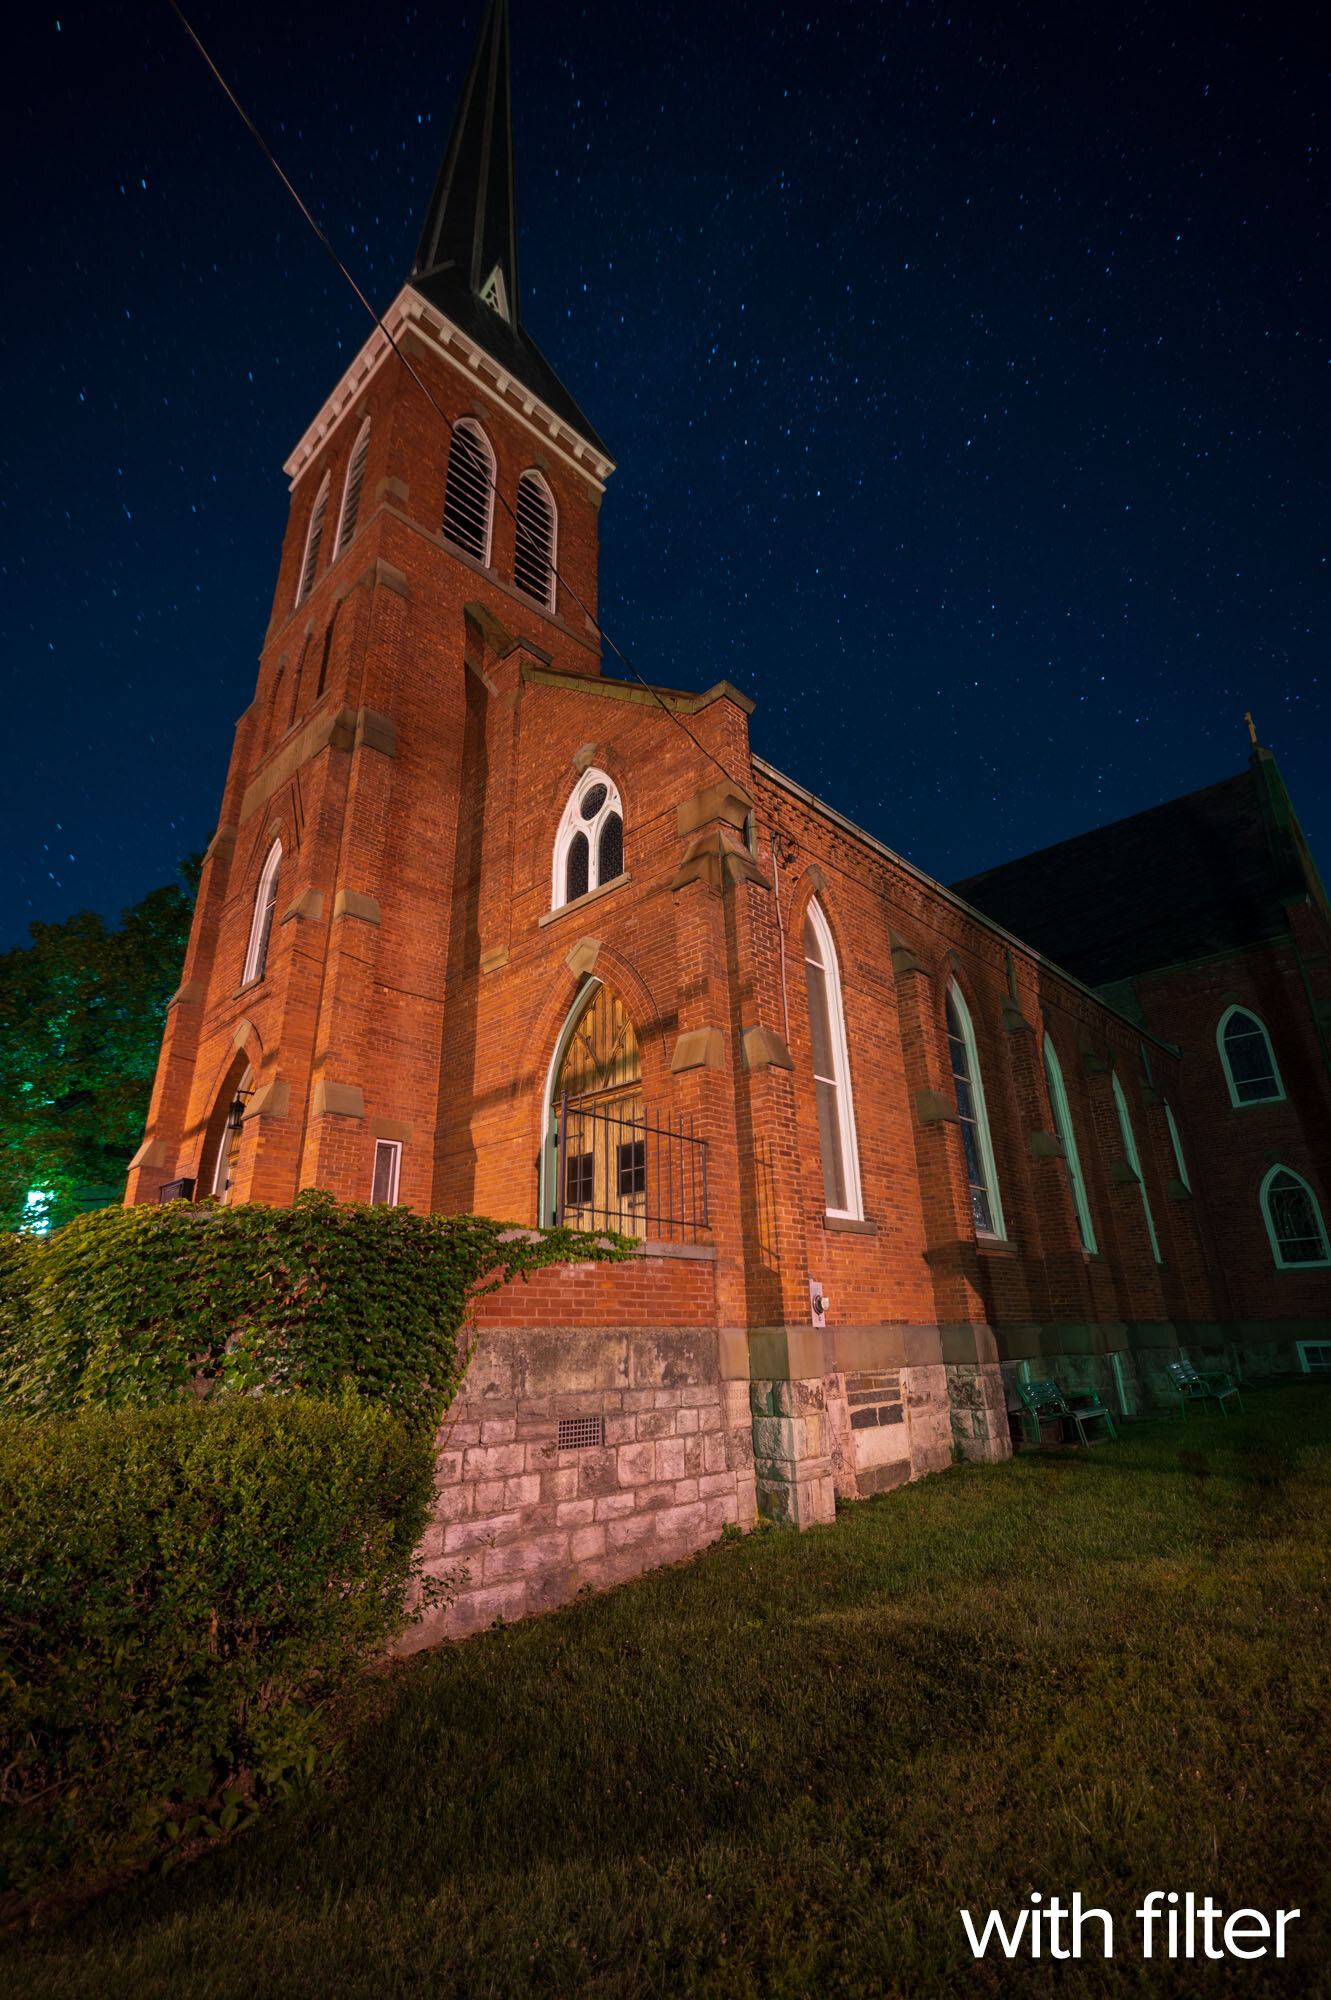
Figure 16 shows how you can make a brick church look a little more like a church:

Figure 16. Nikon Z 6 with an Irix 15mm f/2.4 lens. 60 seconds, f/2.8, ISO 100.

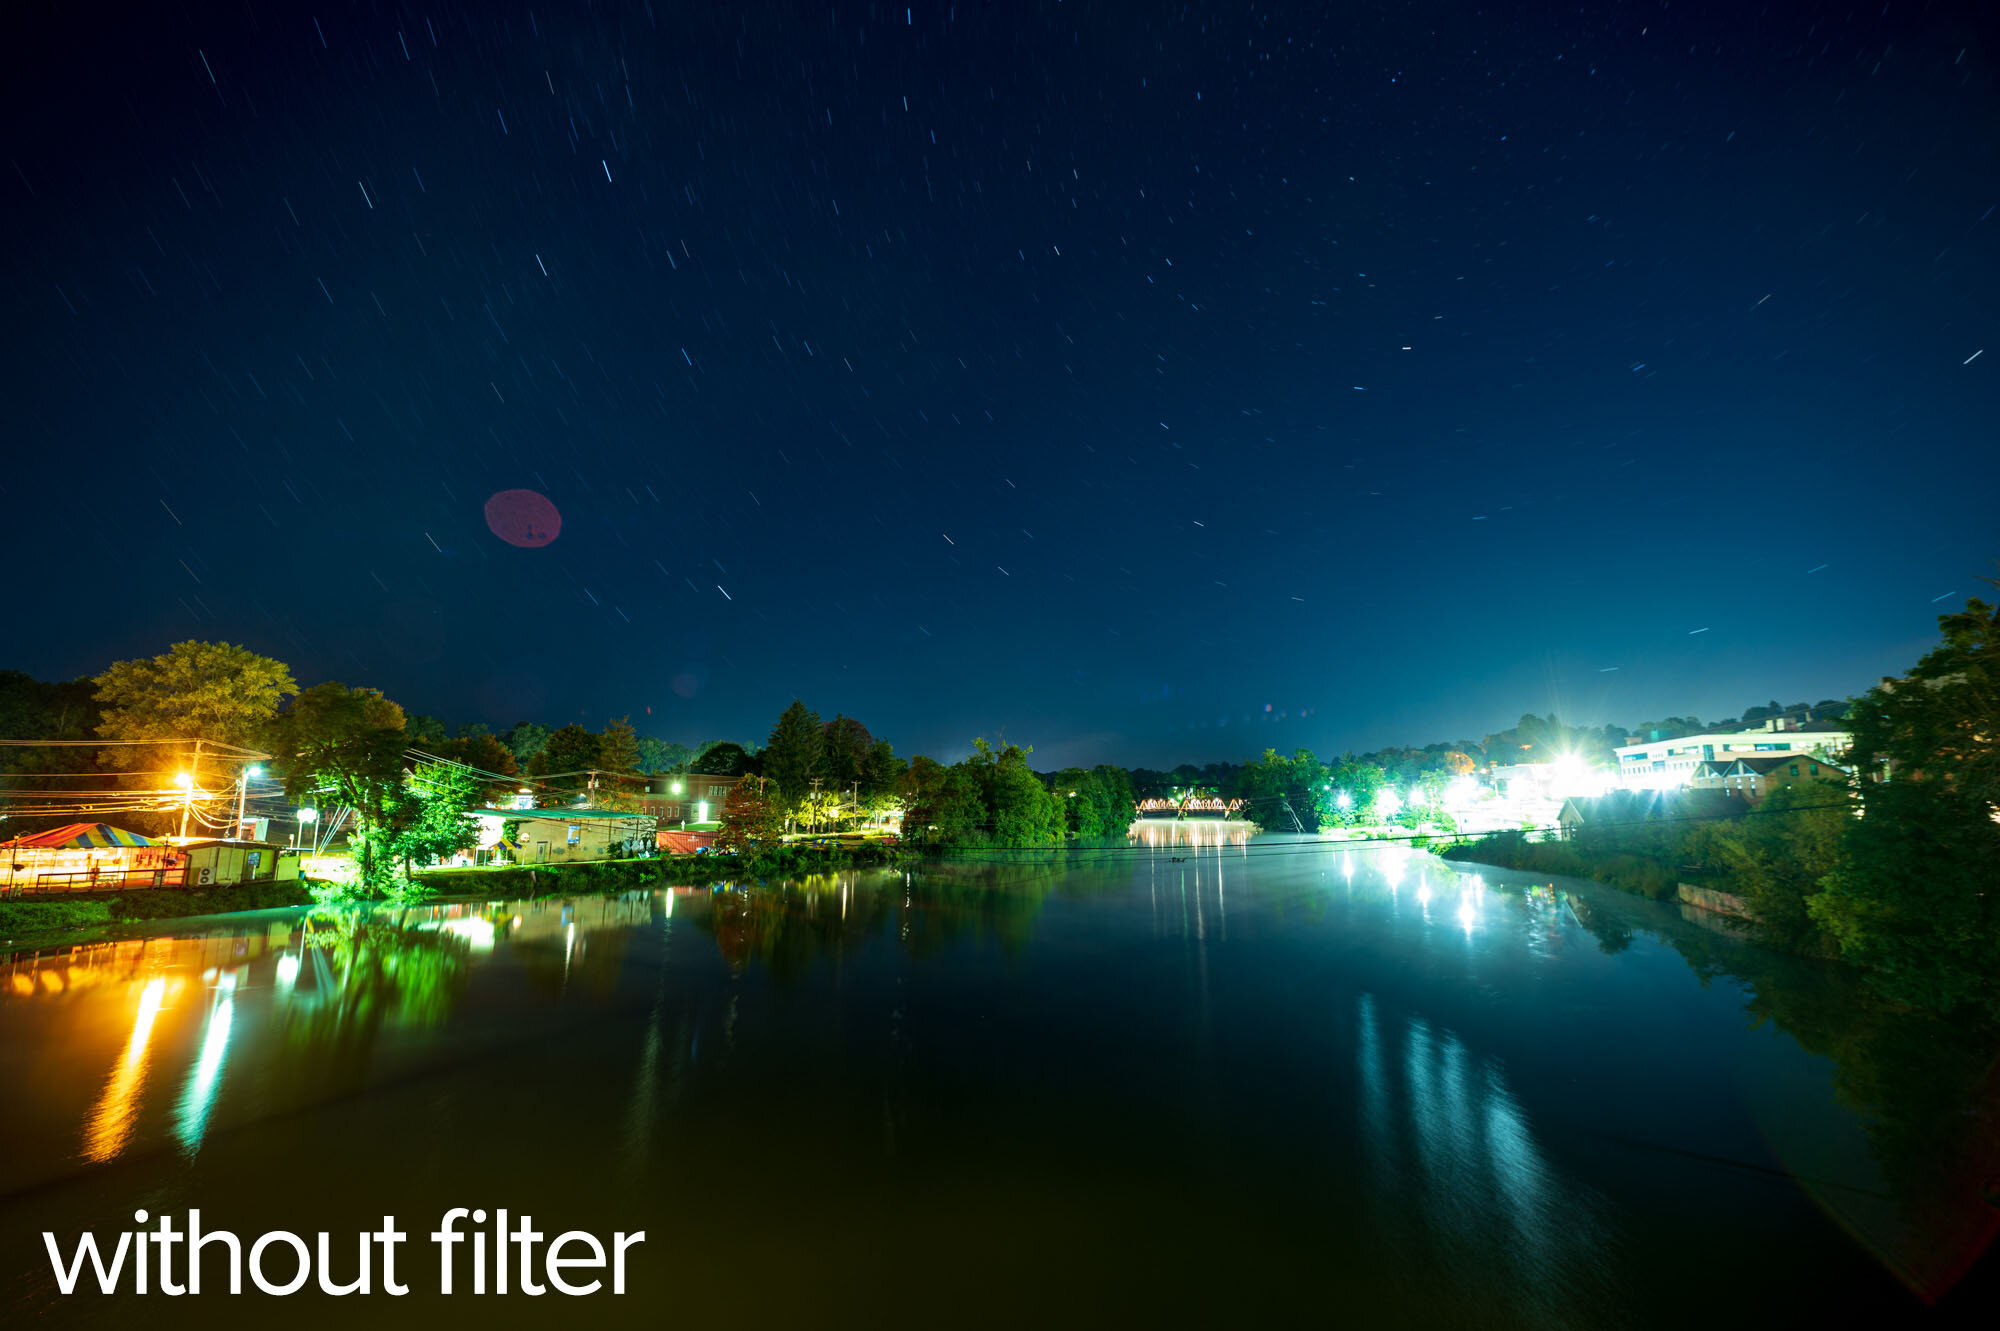
The pair in Figure 17 is especially dramatic. Notice how the yellow glow in the water foreground disappears, along with many reflections. But the sky gets more contrast as the yellow/orange is removed:

Figure 17. Nikon Z 6 with an Irix 15mm f/2.4 lens. 441 seconds, f/4, ISO 100.

Now, in Figure 18, an example that addresses the burning question in our night photographer hearts: “Will it help my Milky Way images?” I processed each of these individually to taste. Applying the ColorChecker camera profile to the no-filter image helped. It did not help the others, so I applied the Adobe Landscape profile and processed to them look similar. They probably look the best they can:

Figure 18. Nikon Z 6 with an Irix 15mm f/2.4 lens. 10 seconds, f/2.8, ISO 6400.

The examples in Figure 19 have mixed light sources. The lamp on the side of this building is a CFL (compact fluorescent) bulb. The light hitting the side of the building is from multiple sodium vapor streetlamps. Note that the fill light almost disappears, yet the CFL lamp remains unaffected. Wavelength filtration at its finest.

Figure 19. Nikon Z 6 with an Irix 15mm f/2.4 lens. 15, 25 and 25 seconds (from left to right), f/11, ISO 400.

Finally, I decided to pay a visit to the mecca of light pollution, New York City. I visited Astoria Park’s waterfront and shot downstream toward the Hellgate and RFK bridges. I think I got just about every kind of light source one can get in a single frame.

Figure 20. Nikon Z 6 with an Irix 15mm f/2.4 lens. 8, 13 and 13 seconds (from left to right), f/5.6, ISO 800.

I processed those (Figure 20) to be similar to each other. I found that the skies in the images shot with filters were a bit duller, so I had to boost the luminance and sometimes tweak the hue. Otherwise, global adjustments were all that were necessary.

To me, the shot without the filter seems better. But this was just this night at that location with those skies.

In Conclusion

Using and testing light pollution filters, I learned:

  • If you have some particular man-made lights that are vexing, and you have a filter that can block them, light pollution filters are useful.

  • If you like your clouds to be a neutral cast, light pollution filters are useful.

  • Your image ends up being more blue, which will require additional post-processing.

  • I can imagine that this helps immensely in situations where the horrid orange yellow light makes skin tones look terrible or prevents you from editing a color image properly.

  • It’s surprising to just be able to subtract that light source without affecting much else.

If you absolutely hate carrying filters and using them, none of this matters. 🙂 But if you find any of the above effects attractive, perhaps you will make room in your bag.

Big thanks to Irix for their support. We use their lenses all the time and love them. Getting to know their other products has been a privilege.

Also thanks to Benro for loaning us the TrueNight glass filter.

If you want to learn more about light pollution, please visit or join the International Dark-Sky Association. They provide a wealth of educational materials, conversation starters and resources for those who want to help address the light pollution issues that affect nearly everyone on the planet. Please consider becoming a member or donating money to support the pursuit of dark skies.

Questions?

I hope so! Lay ’em on in the comments below, on our Facebook page, or via email to adventure@nationalparksatnight.com. In the future I plan on doing a big shootout of all the light pollution filters I can get my hands on. So what you ask now will help me develop a better testing schema.

Thanks! Seize the night.

Ready for another solution to light pollution? Read “How to Deal With Light Pollution, Part II: Post-Production.”

Matt Hill is a partner and workshop leader with National Parks at Night. See more about his photography, art, workshops and writing at MattHillArt.com. Follow Matt on Twitter Instagram Facebook.

UPCOMING WORKSHOPS FROM NATIONAL PARKS AT NIGHT

Level Up With Light Painting: Correcting the Color of Your Flashlight (Part III)

In 2017 I wrote a two-part blog post titled “Level Up With Light Painting: Correcting the Color of Your Flashlight,” which discussed the color biases of flashlights and how to filter them to neutralize that color when shooting at different white balance settings.

In the first part I talked about the pros and cons of LED flashlights, color theory, white balance, testing your flashlight’s color and how to fashion your own custom filters. This all revolved shooting at Daylight white balance.

In the second part I followed up with how to filter Coast HP7R and HP5R flashlights to provide a neutral color when the white balance is set to 3200 K. This is a common setting for shooting in urban areas at night, as most streetlights and other city lights are rendered overly orange when white balance is set to Daylight.

In both of those posts I used a decidedly unscientific method of performing the color tests. While the results were close to accurate, this past summer I decided to look for more precision, so I set about running color tests with the aforementioned flashlights (my favorite two to use). Now I can paint with neutral light at any white balance.

The Color Tests

For this I needed a color meter. Admittedly, color meters are expensive and not generally used by the average photographer. They are, however, an invaluable tool in commercial/advertising photography and in the film industry. Since I don’t own one, the generous folks at MAC Group arranged to loan me a Sekonic C-800 SpectroMaster. (Thank you, MAC Group! Your gracious loan benefits us all.)

My goal for the tests was to determine the proper filtration for the HP7R and HP5R with a camera set to the white balances most often used for night photography. (For a rundown on these, see Matt’s post “How to Choose the Right White Balance for Night Skies” and my post “Making the Move to Manual White Balance.”) I tested each of nine white balance settings (5500, 5000, 4800, 4500, 4200, 4000, 3850, 3500 and 3200 K), with each flashlight set at both high and low power. I then determined which Lee Filters gels would neutralize the color while also adding a little warmth to the light.

Then we put all the results into a guide to assist other night photographers who would like to remove unwanted color casts from their Coast lights. You can download the guide by clicking here or on the image below.

Click image to download

While the chart is extensive, I would suggest not getting too wrapped preparing for all the options—it’s unlikely that you’ll be shooting at nine different white balances. For my kit, I created filters for 3850 K and 3200 K for each of my flashlights. This gives me enough flexibility for most situations I encounter.

When shooting on a white balance setting of Daylight, I use my 3850 K filter combination to add slight warmth to my flashlight. When setting my camera’s white balance to 3850 K, I use the 3850 K filter combo for a neutral light or the 3200 K filter combo for a warmer effect. Likewise, when using the 3200 K filter with the camera’s white balance set at 3200 K (i.e. Tungsten), the flashlight provides a nice neutral color.

Putting it into Practice

Let’s look at an example of this in action.

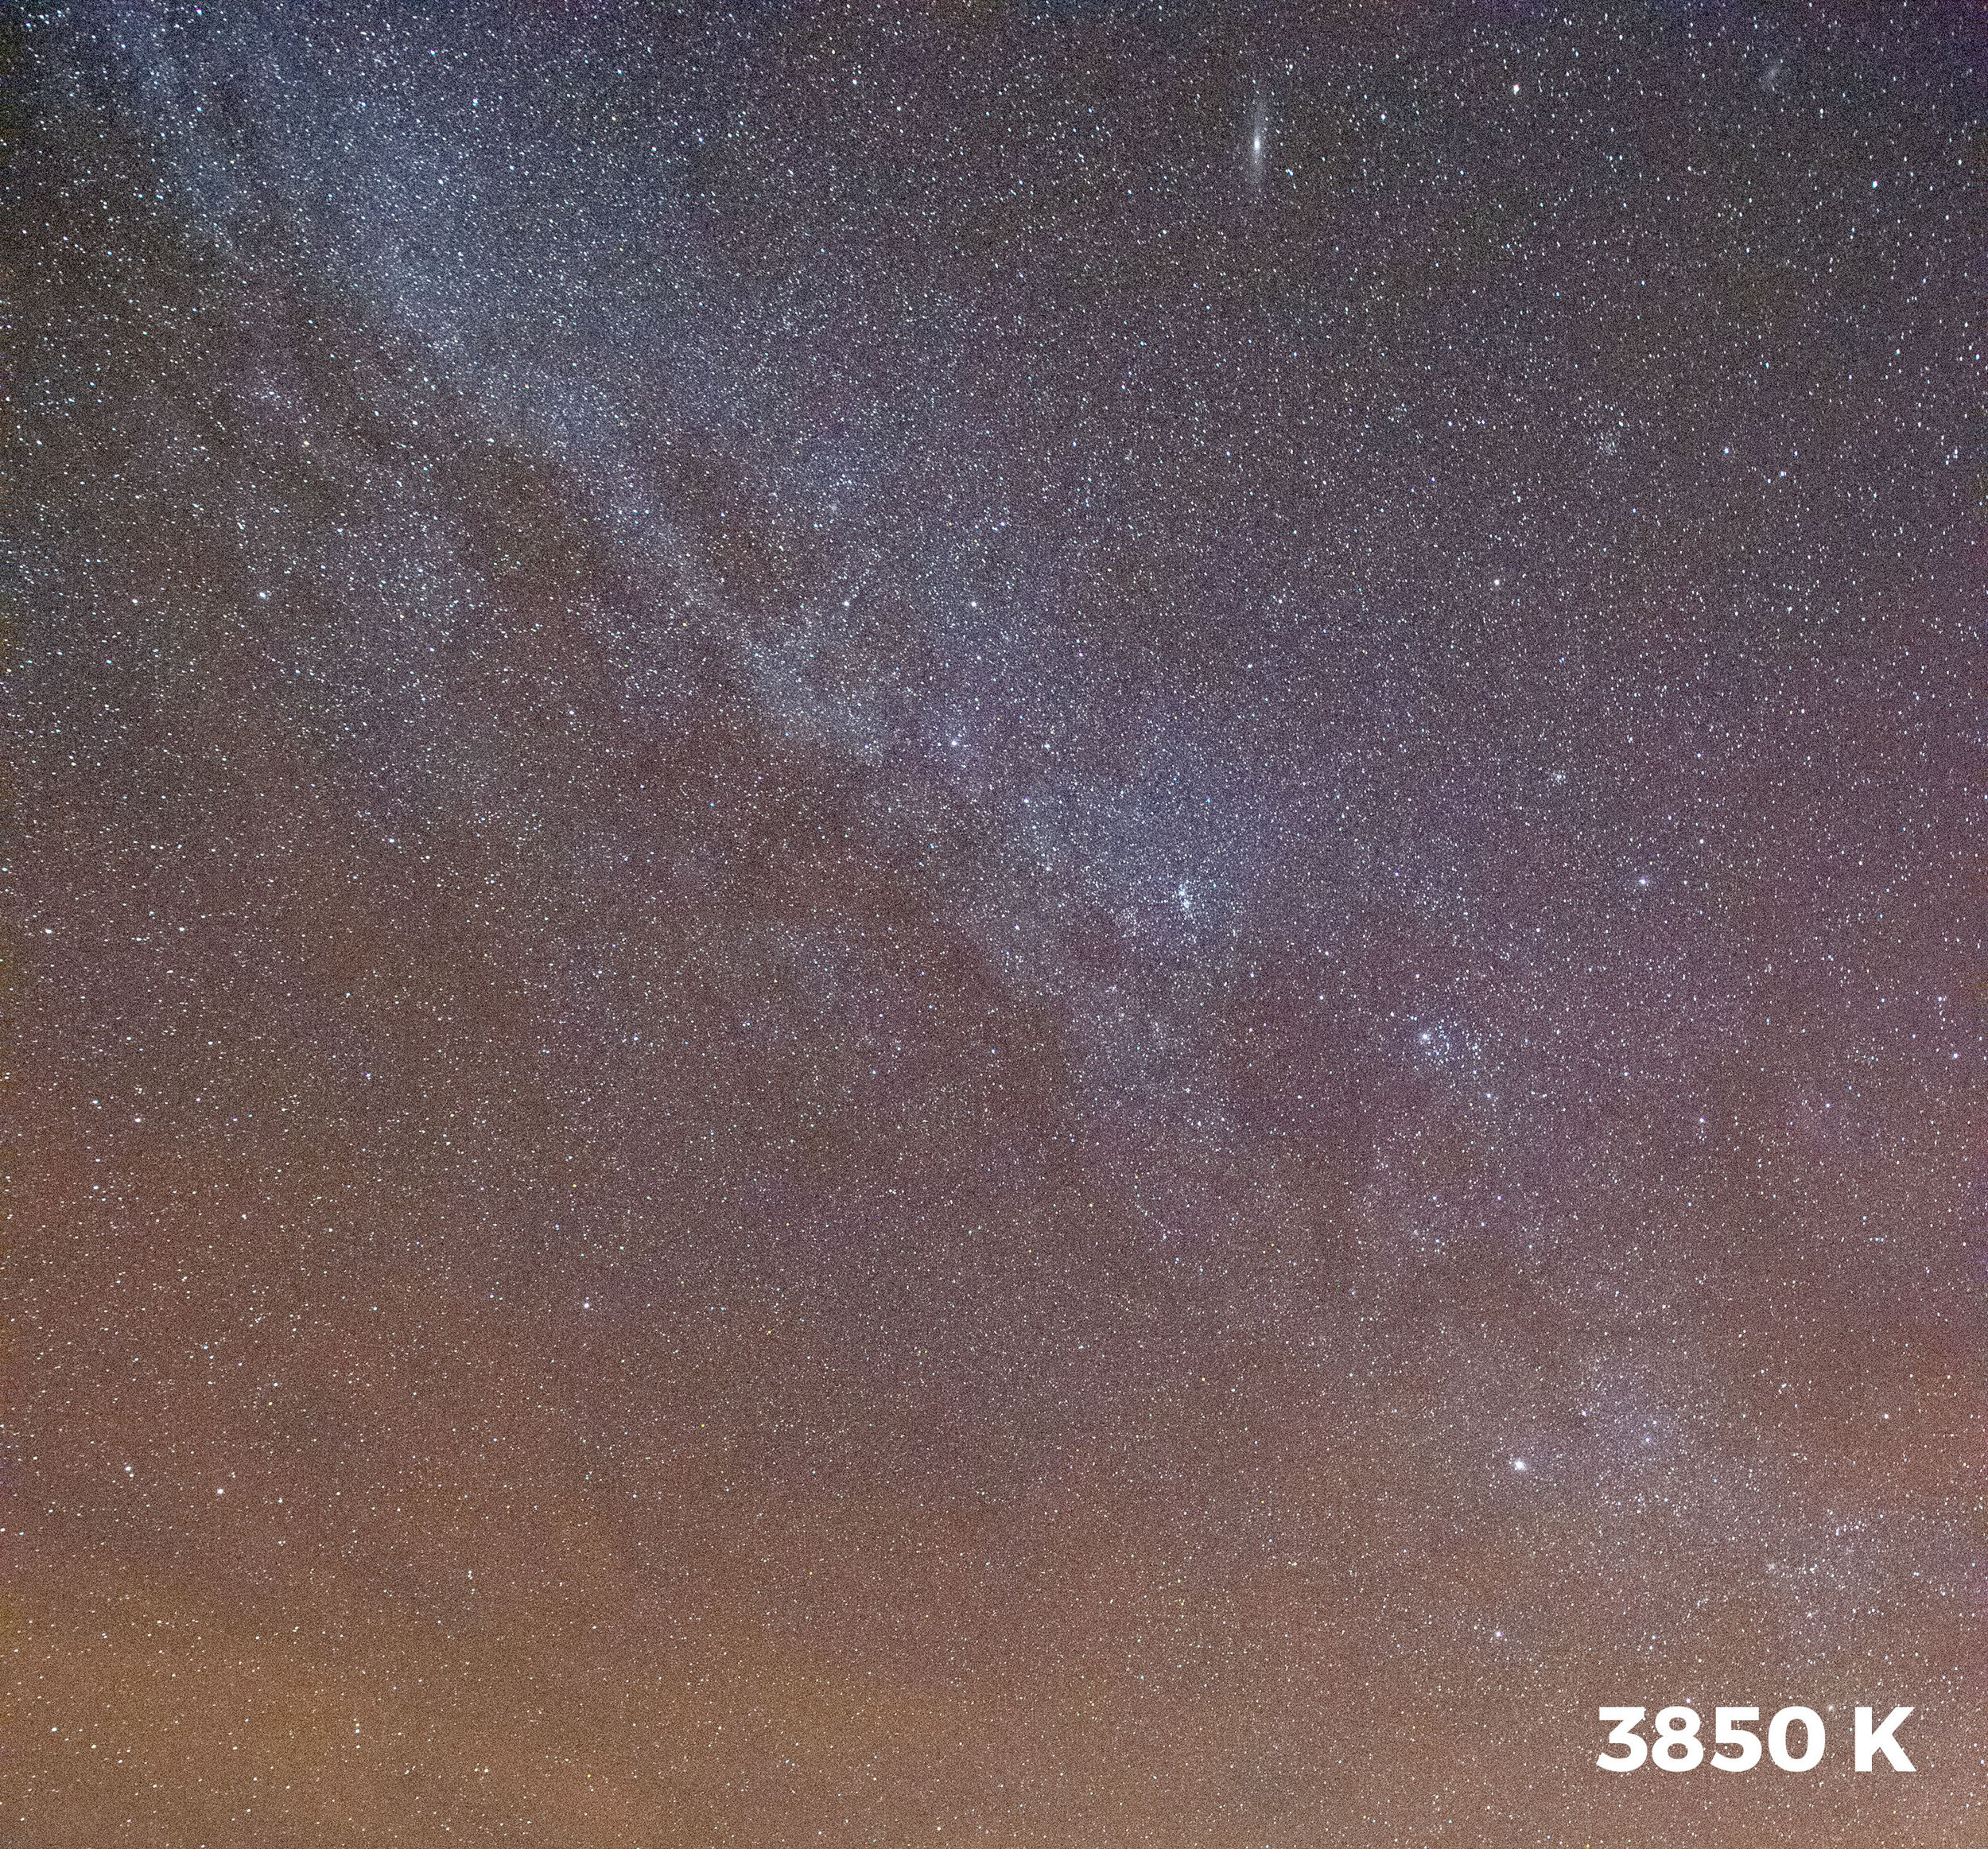
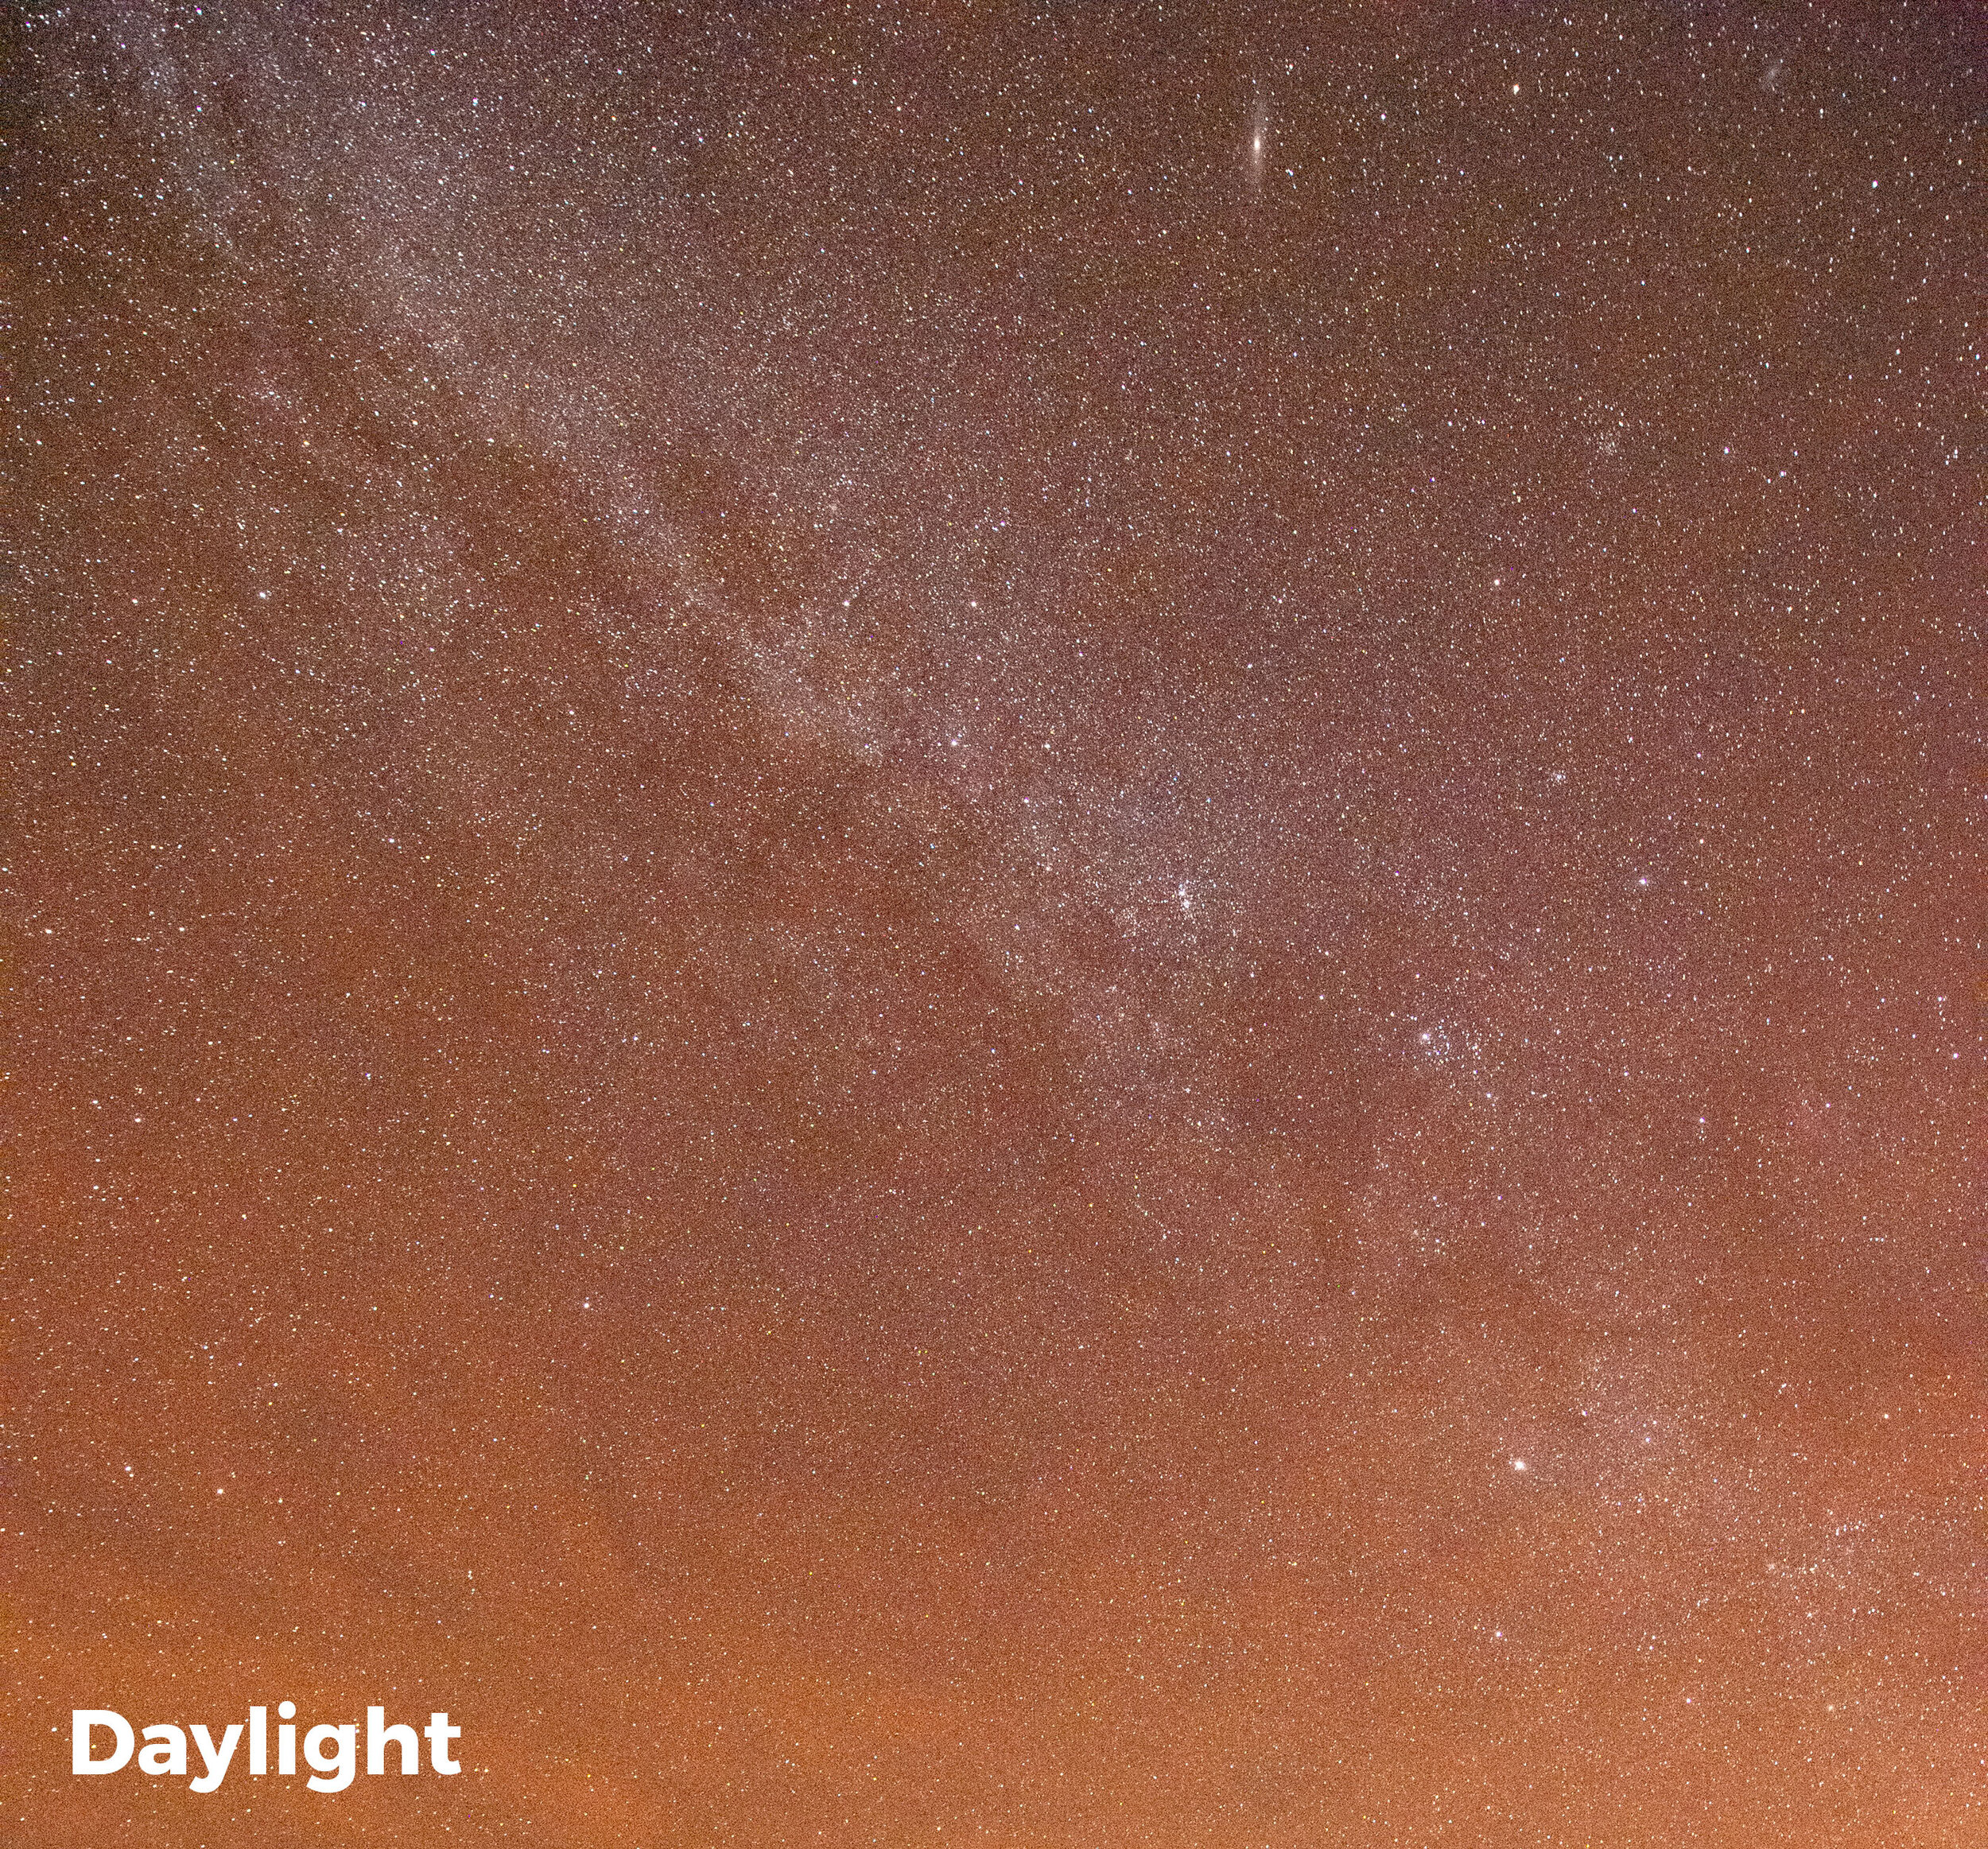
My favorite white balance for capturing the Milky Way is 3850 K. Why? Because when shooting night skies using Daylight (about 5500 K), even in dark sky environments it’s not uncommon for the resulting image to have an orange cast to it. Using 3850 K creates a cooler, more natural look to the sky while maintaining some warmth in the colors of the galaxy.

In Figure 1 you can see the result of shooting the Milky Way in Death Valley National Park with my white balance set to Daylight compared to 3850 K. The latter better represents how I want the night sky and the Milky Way to appear in a photo.

Figure 1. The color difference between shooting the Milky Way at a Daylight white balance versus 3800 K.

If shooting the Milky Way is all I wanted to accomplish, setting my white balance to 3850 K would provide great results. But for those who know me, you know I love light painting!

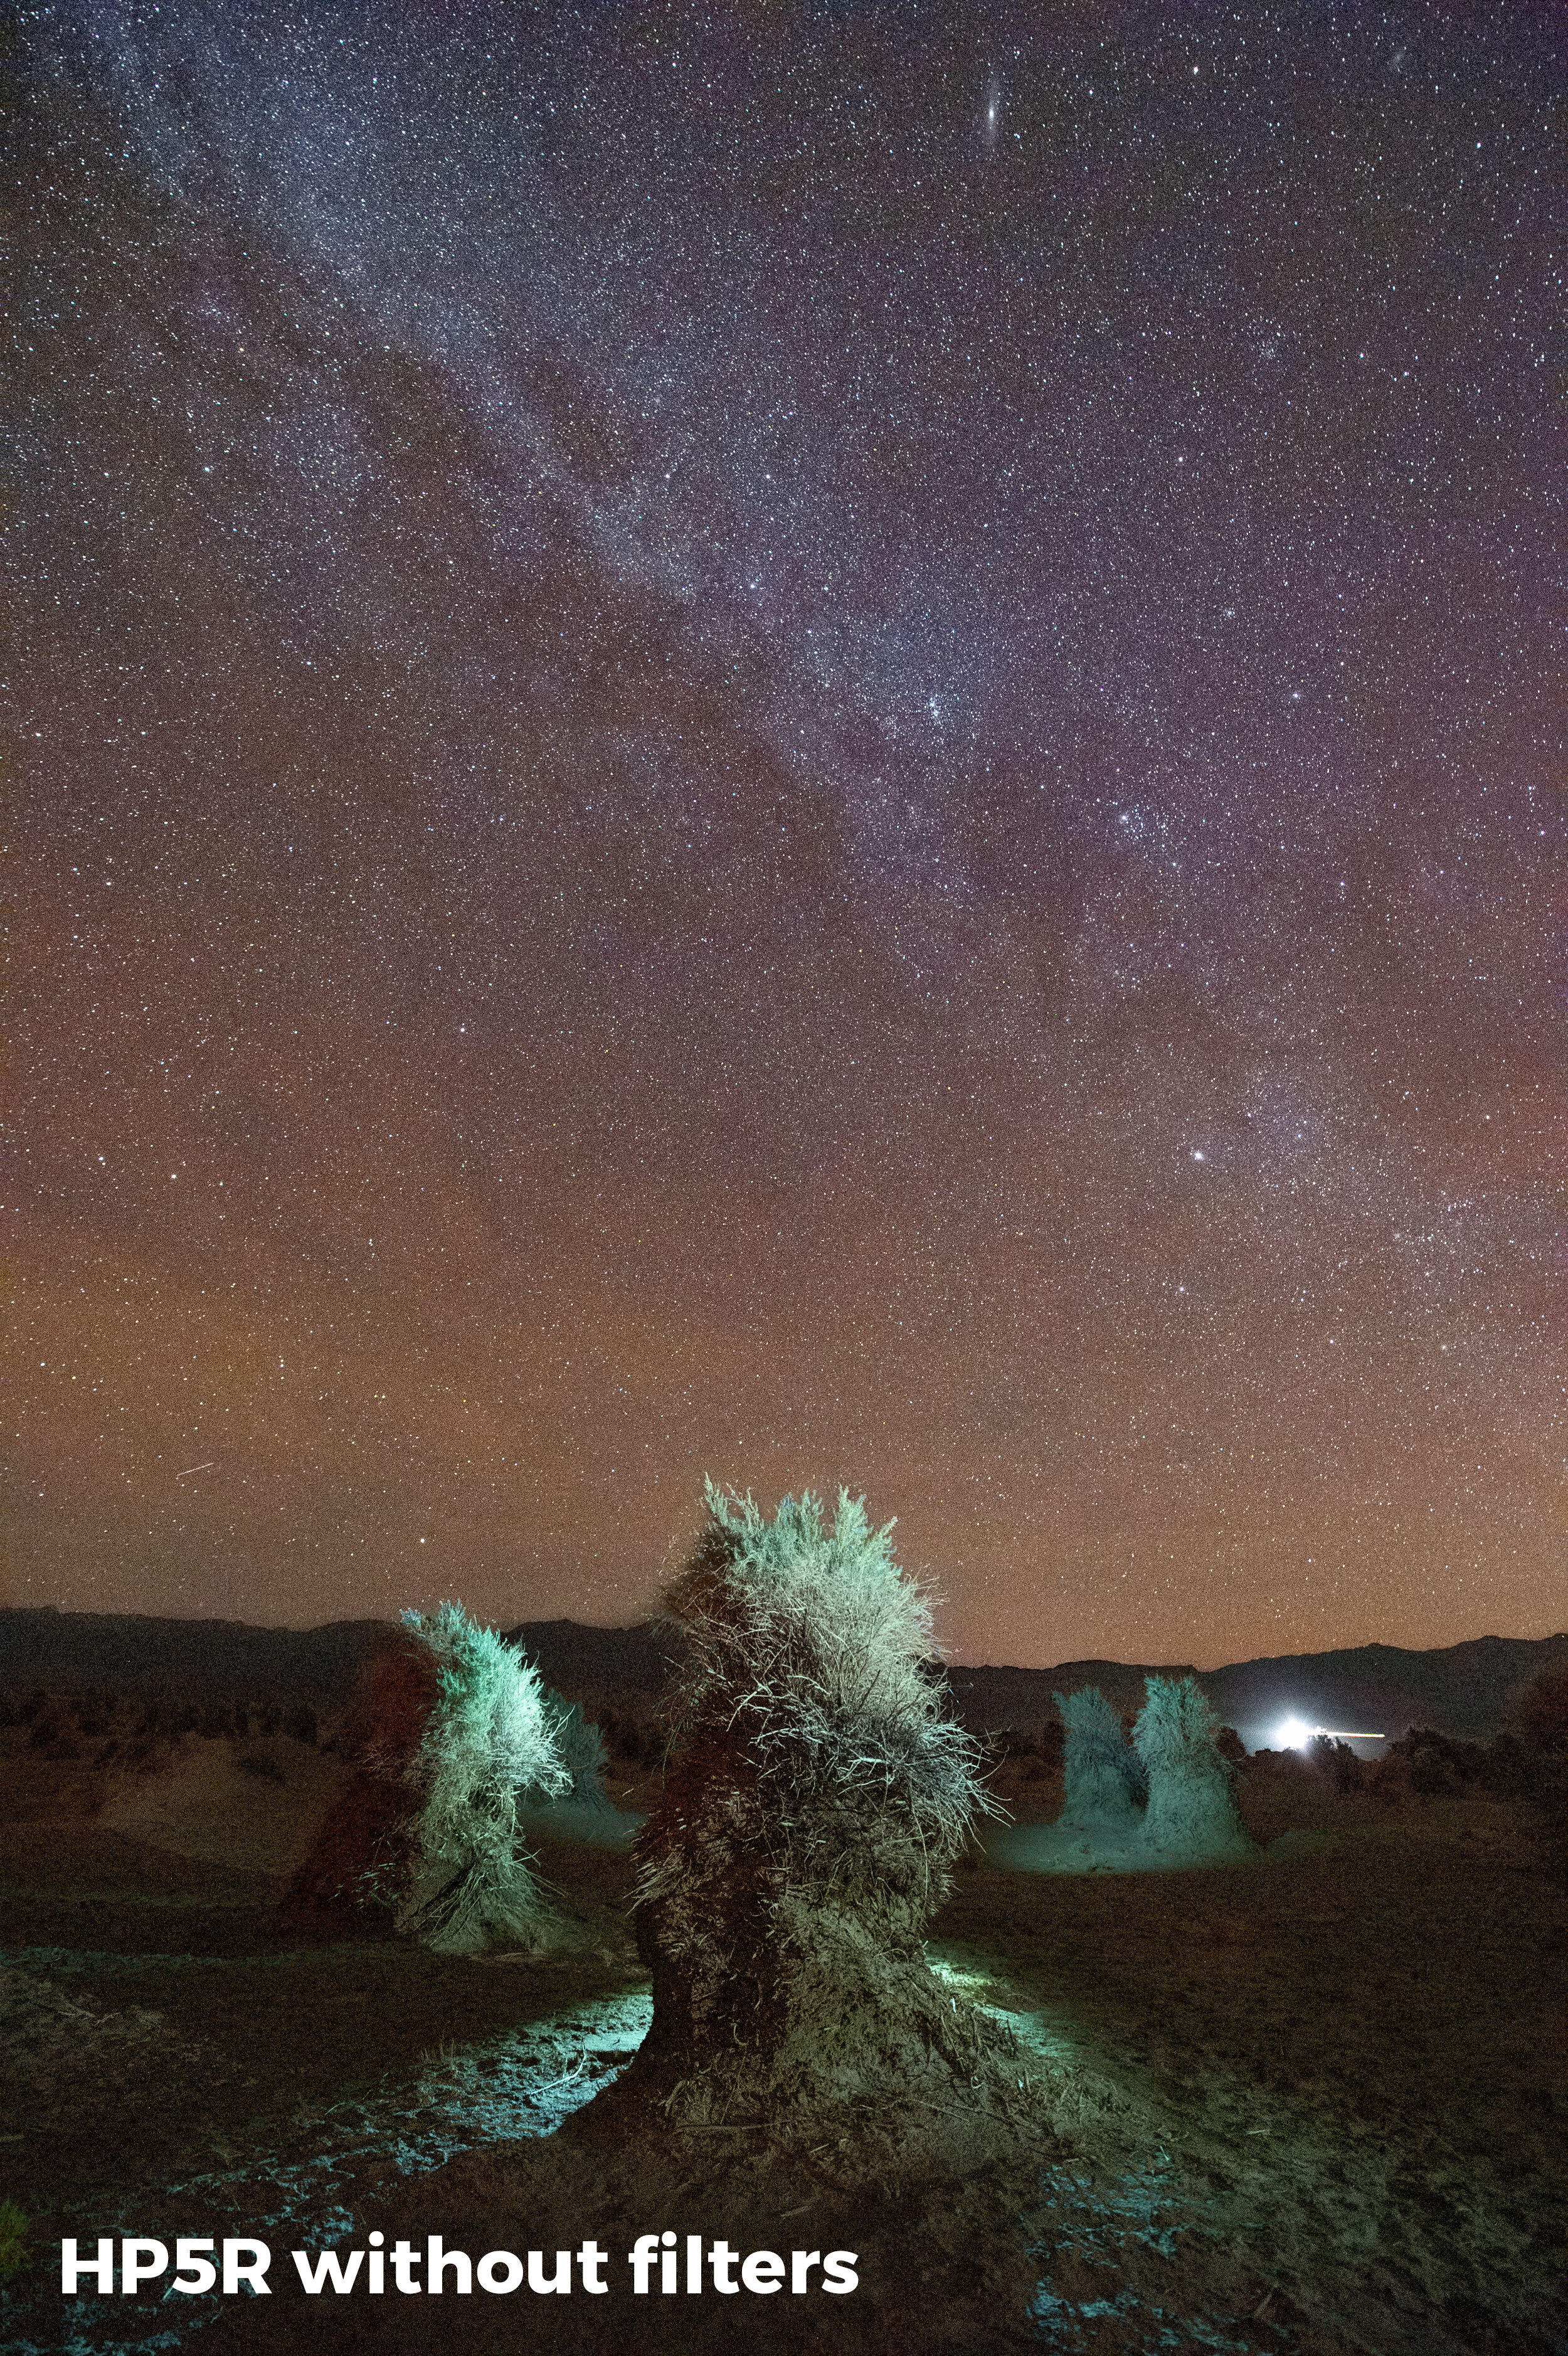
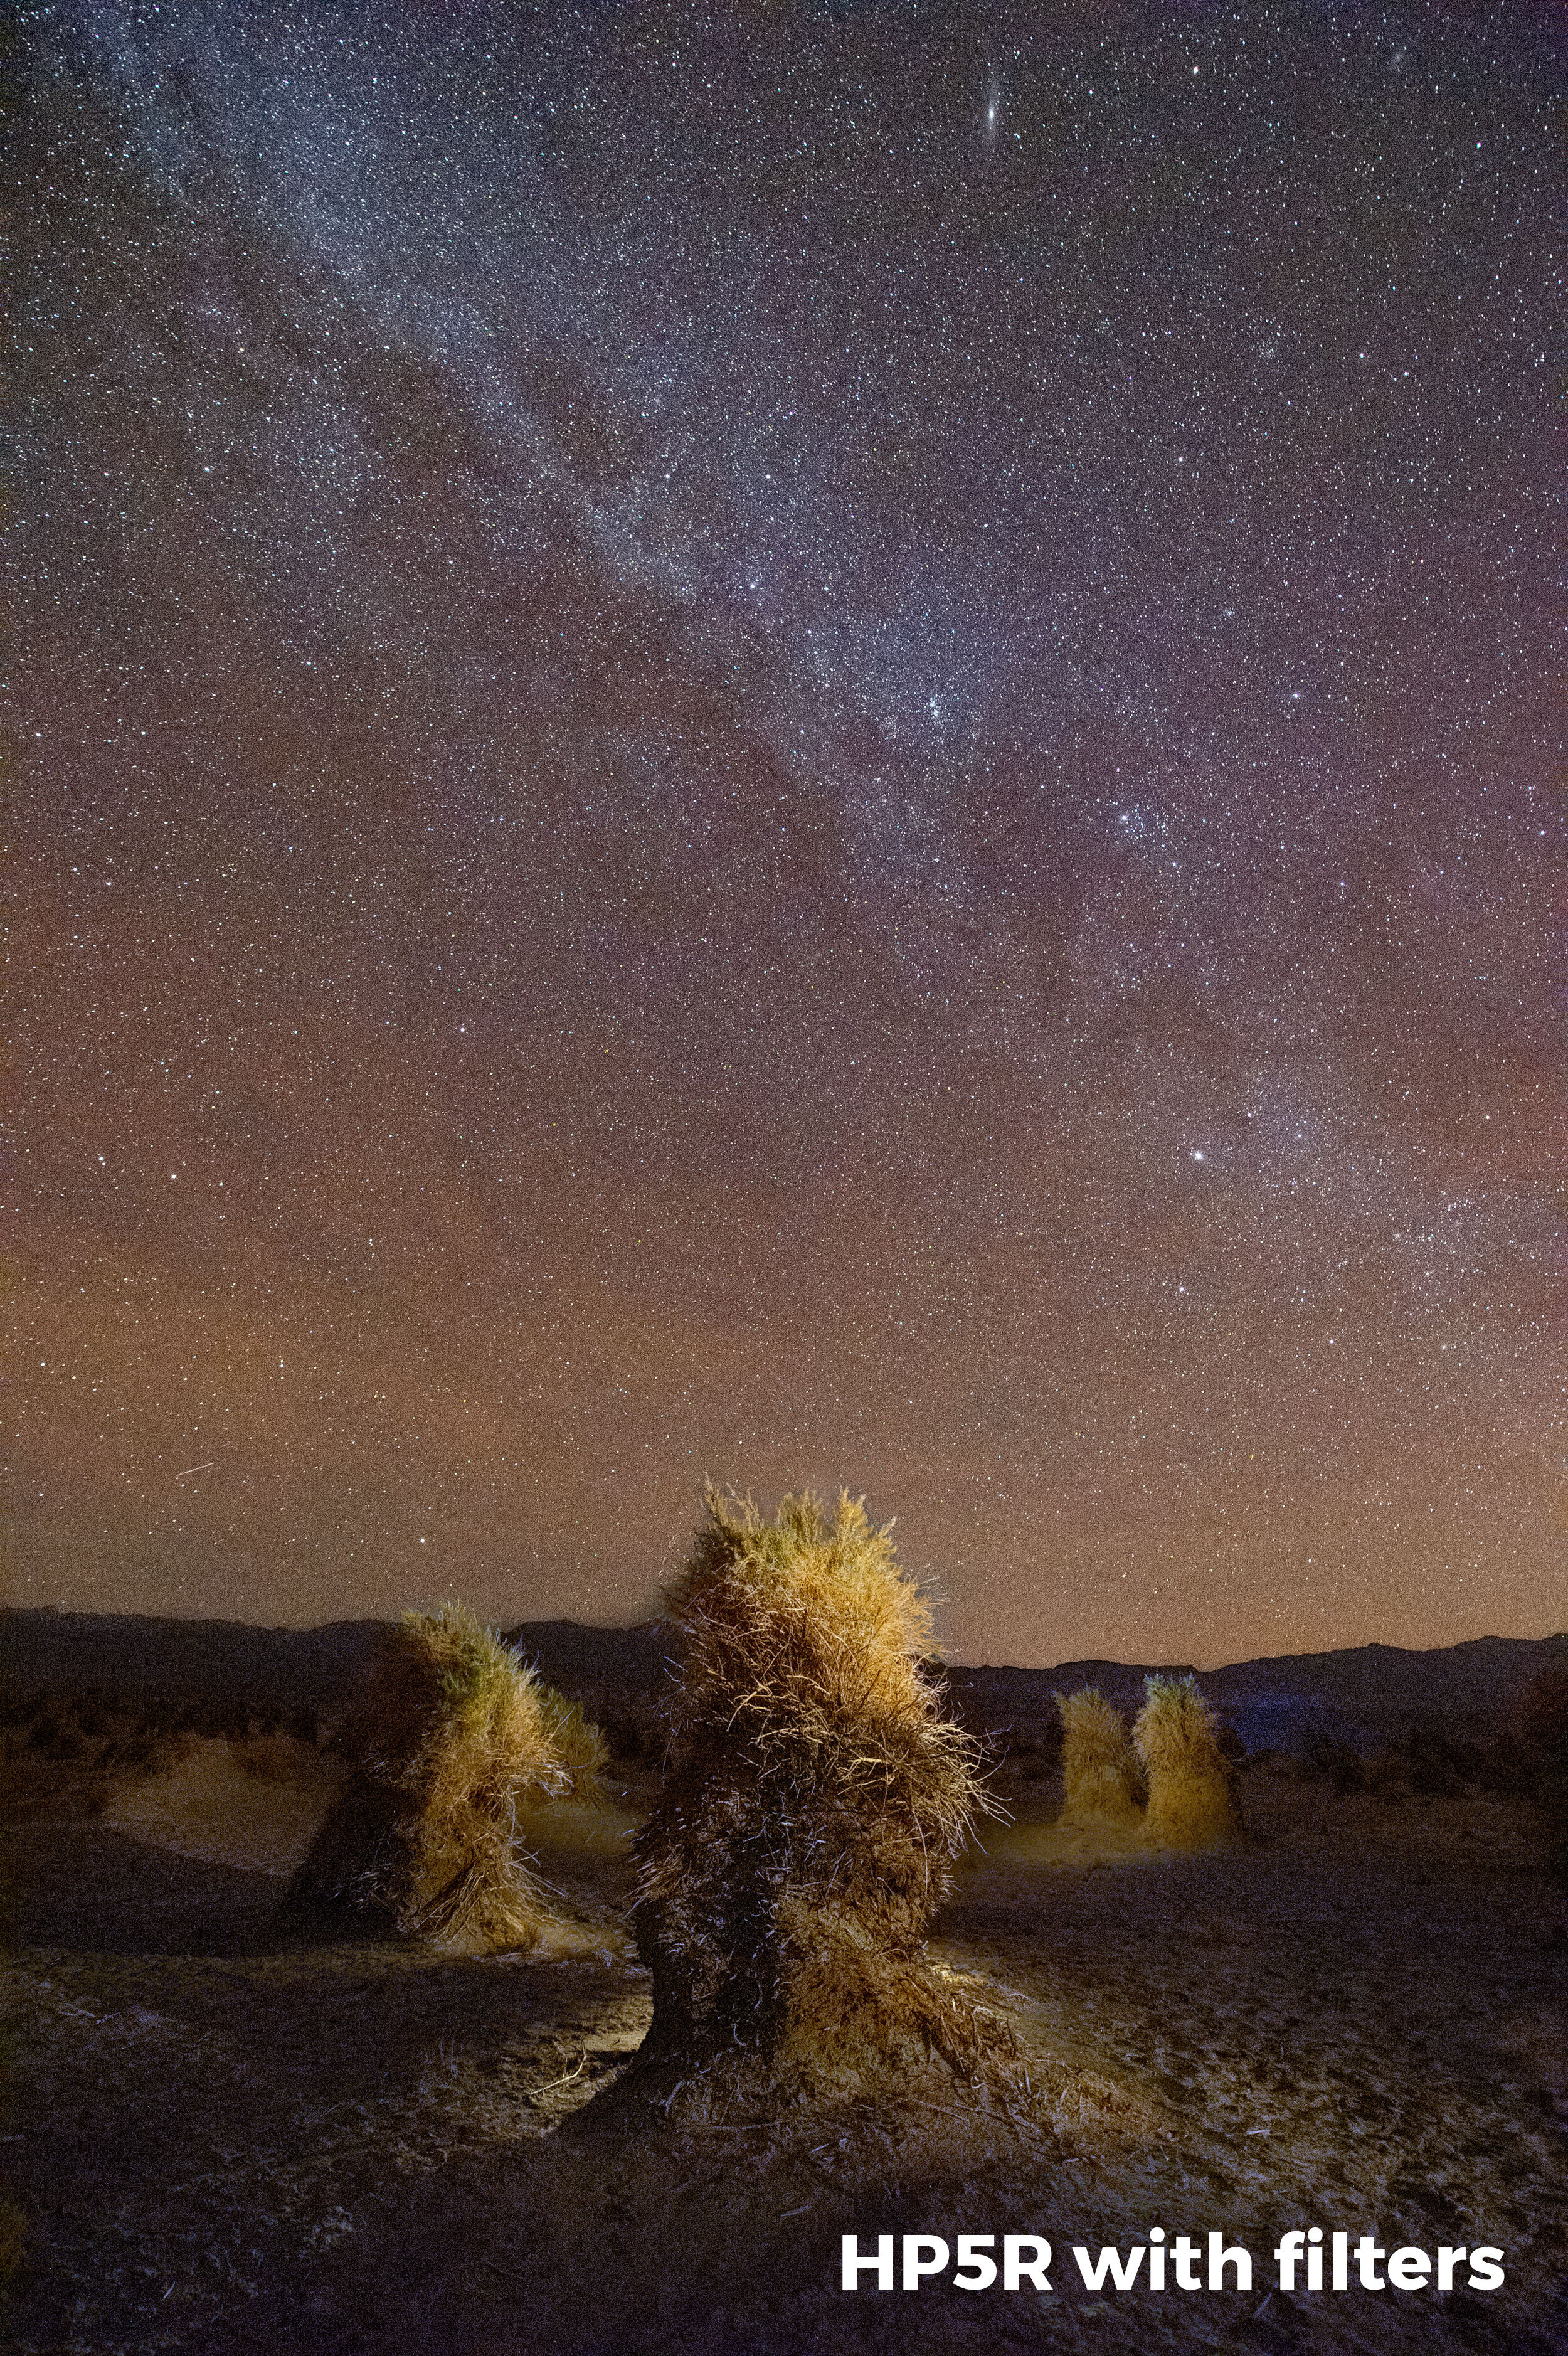
At Death Valley’s Devils Cornfield, I captured the first image (left) in Figure 2 with a white balance setting of 3850 K. For the light painting I used the low-power setting on my Coast HP5R. Notice the overly blue/green effect that the unfiltered flashlight created?

To get my added light to accurately render the colors of the scene, I filtered the flashlight to look good at that white balance of 3850 K. According to my test results, that meant I needed a combination of 1/2 CTO + 1/8 CTO + 1/4 Minus Green.

That fixed the incorrect color cast, but I really wanted my flashlight to put out a slightly warmer rather than neutral color, because I like the visual effect of warm light. So instead of using the filter combo for 3850 K, I used the combo for a 3200 K setting: 3/4 CTO + 1/8 CTO + 1/4 Minus Green + 1/8 Minus Green. That gave me exactly the color I was hoping for (Figure 2, right).

Figure 2. Devils Cornfield, Death Valley National Park. Nikon D4s with a Nikon 14-24mm f/2.8 lens. 20 seconds, f/4, ISO 6400, with a white balance of 3850 K. Light painted with a Coast HP5R unfiltered (left), and filtered (right) with Lee 3/4 CTO + 1/8 CTO + 1/4 Minus Green + 1/8 Minus Green gels.

One last point: It can be a bit tedious to hold filter gels in front of a flashlight while running around in the dark. The solution? I create a “disc” filter that attaches right to the front of the flashlight. To see how I do this, look back on Part I of this series.

Tim Cooper is a partner and workshop leader with National Parks at Night. Learn more techniques from his book The Magic of Light Painting, available from Peachpit.

UPCOMING WORKSHOPS FROM NATIONAL PARKS AT NIGHT