
I love shooting suburban night scenes. Which is a good thing, because I live in an awesome place for it: the historic, charming, picture-perfect village of Catskill, New York.
But working a suburban environment (and especially an urban environment) at night comes with a major challenge: artificial lights. Wherever we find artificial lights at night, we also find blown-out highlights in photos.
While working on my #CatskillNights project, it’s common for me to see a cool home that looks great to the naked eye but that doesn’t look so great in a single exposure. The dynamic range between the brightest brights and the shadow details are just too far apart.
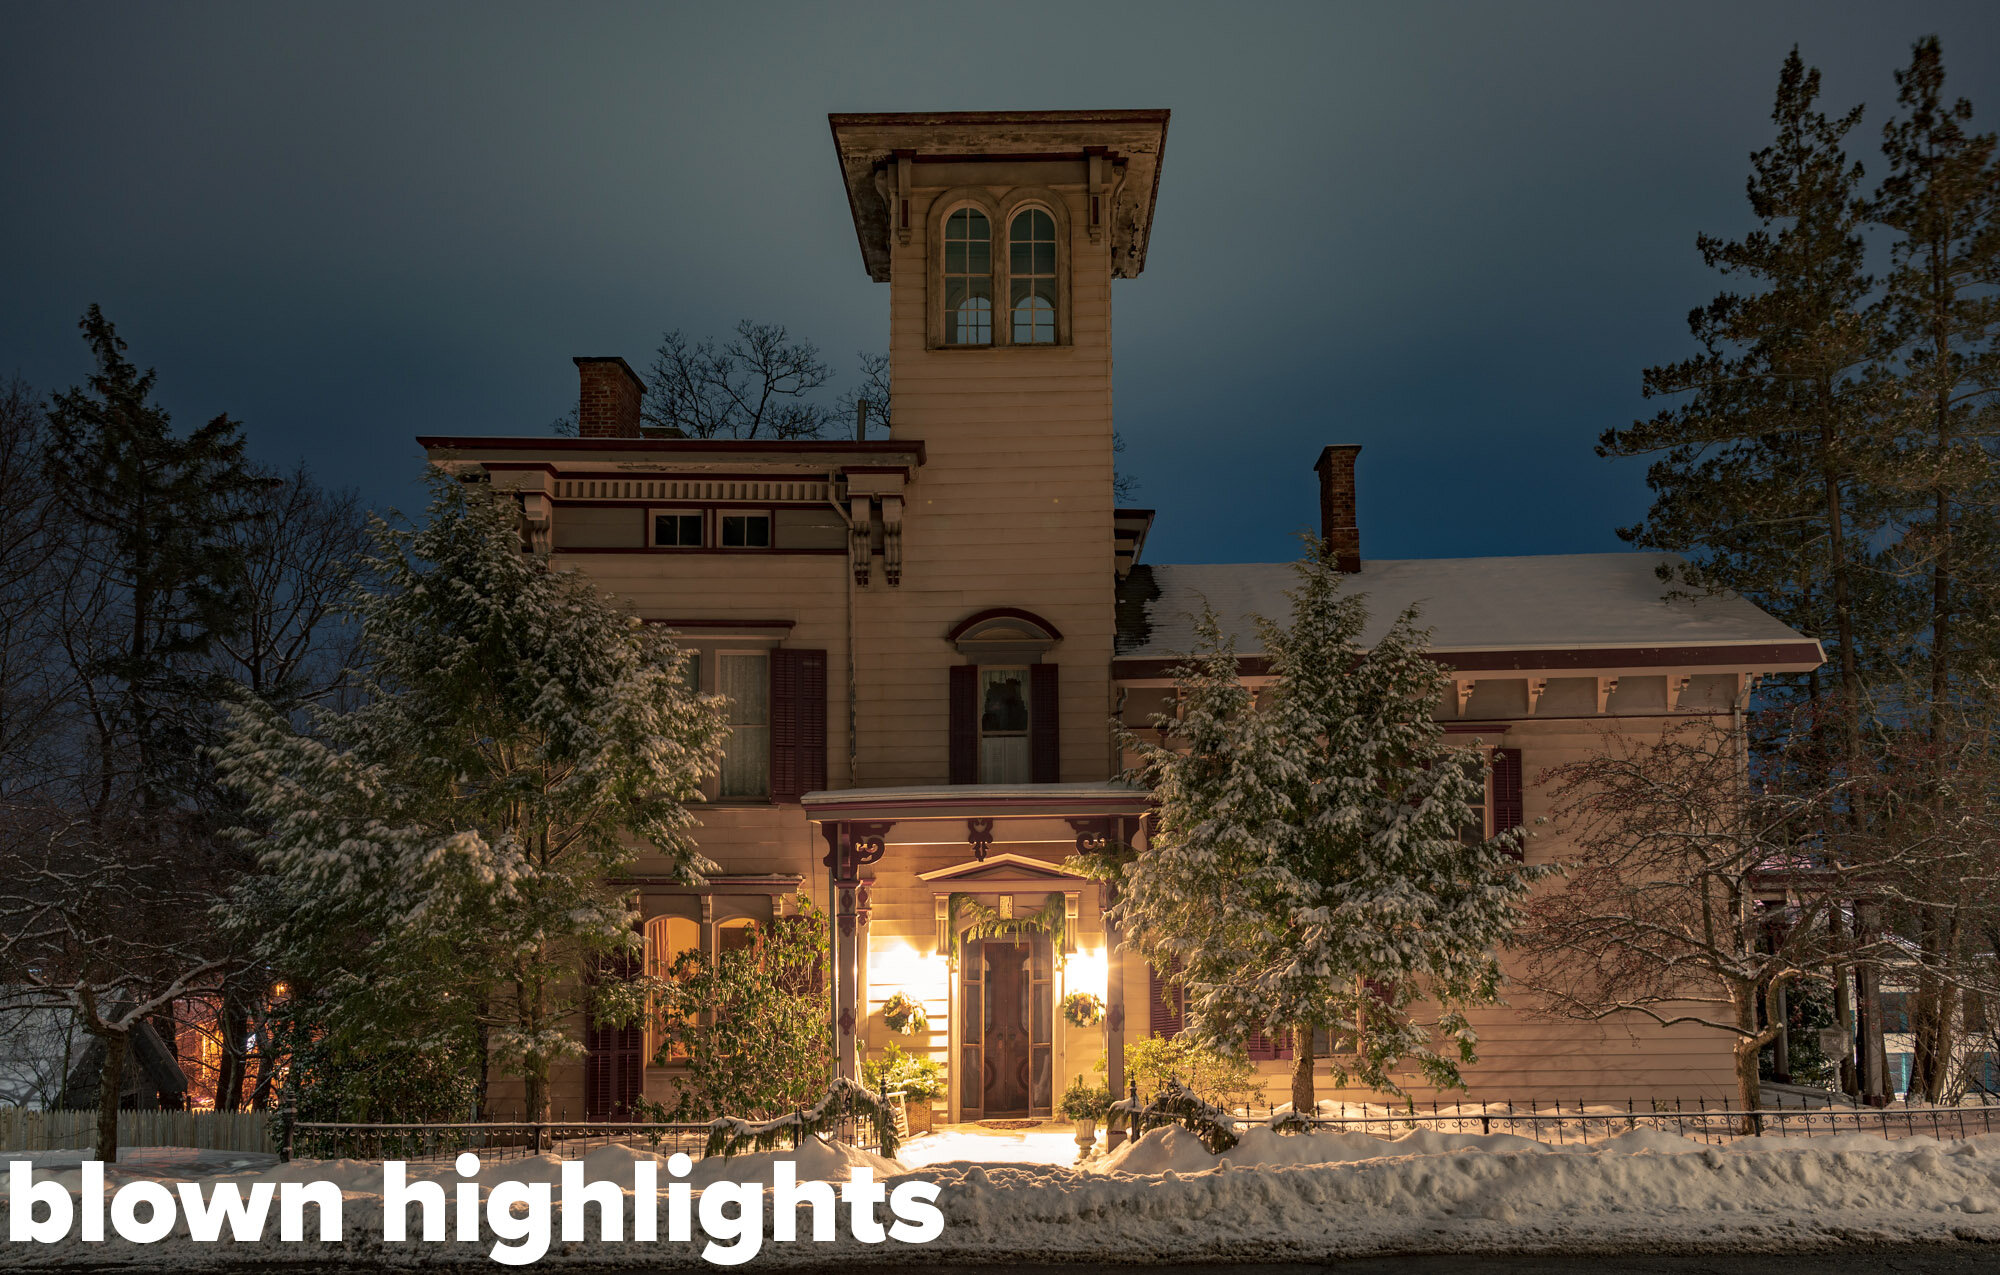
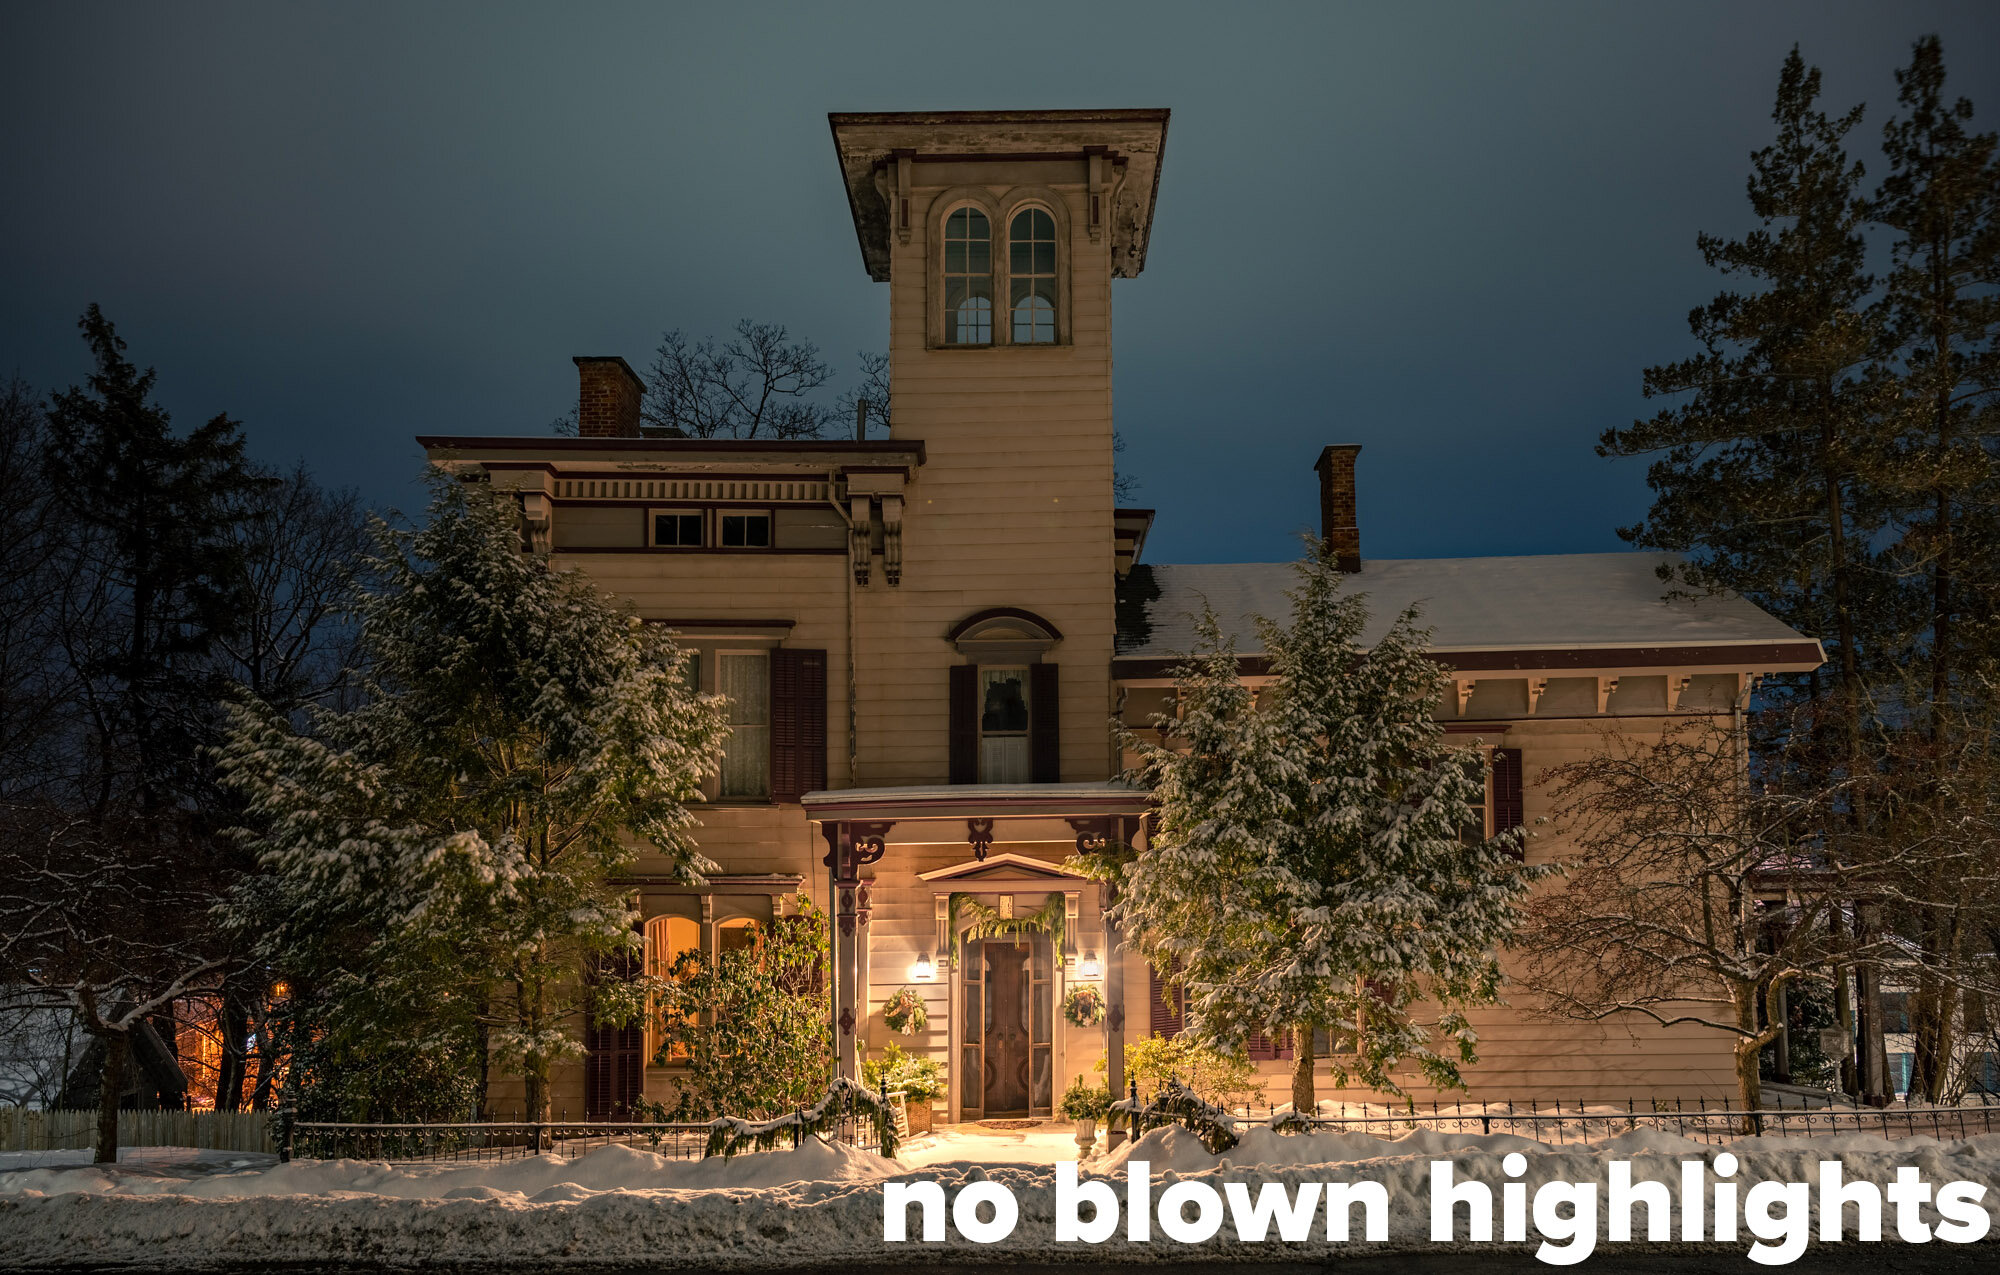
Castle in the Snow, Catskill, New York. Nikon Z 6II with a Nikon 24-70mm f/2.8 S lens at 24mm. Four merged frames shot at 30, 10, 3 and 0.6 seconds; f/5.6; ISO 100.
How do we control this? By shooting multiple images at different exposures and combining them during post-processing into an HDR image.
But you must shoot it right on scene to have a chance of processing it right in post. So let’s begin with:
Getting it Right in Camera
First up, try to strategically hide visible light sources behind columns or trees. That will save you lots of highlight headaches. Why? Because it’s not the light that’s causing the problem—it’s the light source. It’s the bulb, the lamp, the streetlight itself. If you can hide those things behind objects in the composition, they go from being a problem to being magic.
If you can’t do that, no worries. Read on.
For my first frame, I shoot for an ideal overall exposure that has clear shadow detail. The highlights will blow out. That’s fine. For now, essentially you just want your camera’s histogram not to collide with the left side (Figure 1). Don’t worry about the right.
Figure 1.
For my second frame, I stop down 1 to 2 stops to rein in some highlight data, and then I inspect the image. And the histogram. Then I shoot more frames. I keep reducing the shutter speed by 1 to 2 stops until the highlights retain color and tonality.
Nikon Z 6II with a Nikon 24-70mm f/2.8 S lens at 24mm. 30 seconds, f/5.6, ISO 100.
10 seconds, f/5.6, ISO 100.
3 seconds, f/5.6, ISO 100.
.6 seconds, f/5.6, ISO 100.
To be extra sure, I zoom to 100 percent to ensure there is detail. If I don’t see highlight detail, I stop down further and make another exposure.
Below is an example of how a single shot can have terrible highlight transitions, versus a processed HDR composite. Look at the first image around the lantern and note the missing details on the wall, then look at the second image and note the complete details on the wall. It’s subtle when it’s right, but blatantly obvious when it’s wrong.
That’s it, really.
Make a great overall exposure and keep reducing your shutter speed until you get beautiful light sources with no highlights blowing out.
Also, you may notice that I shot every image in this post at ISO 100—because that’s the native ISO of the Z 6II. Do the same. Find your camera’s native ISO and shoot there. Cameras produce images with the widest possible dynamic range at native ISO, which is essential for this type of work.
You might consider getting fancy with your skies in a final, longer exposure (knowing you can mask the bottom half out in post—see Tim’s blog post on this in the near future). You could also create star trails, or points, or make really interesting cloud streaks. The sky is the limit (hee-hee).
Below are three more straight-out-of-camera image sets that show how I bracketed exposures to set myself up for a good night HDR final image. Each starts with the good overall exposure and ends with the frame that has decent highlight detail.
Processing the HDR Raw Materials
Thanks to constant improvements in software, making natural-looking HDR images is easier than ever. Many software vendors offer HDR options. I will be limiting this demo to how I use Adobe Lightroom Classic.
(Note: I find that using Adobe Photoshop for HDR is less intuitive and flexible—for me, anyway. I prefer the DNG workflow of Lightroom, and having only rasterized images coming back from Photoshop is too limiting.)
In the Lightroom grid mode, I select all the images in the sequence, right-click (Control-click on a Mac) and choose Photo Merge > HDR (Figure 2).
Figure 2.
In the HDR dialog (Figure 3):
I toggle Auto Settings on and off to see which gets me closer to my goal. More often than not, Auto settings “on” is better for me.
As for Auto Align, I always leave it on—no harm in doing so.
For most nights, setting Deghost to “none” works fine for me. Unless there is a stiff wind or other movement in critical areas.
Figure 3.
Once I click “Merge,” a task is created inside Lightroom, the job will be processed, and the merged image will appear in the catalog alongside the other images (Figure 4).
Figure 4.
Now for the magic of editing.
For urban/suburban images, I first neutralize the color temperature and then warm it up a tad. (Tap the W key to activate the White Balance Selector, click on something white, then use the Temp and/or Tint sliders to warm to taste.)
Figure 5.
That gives me a good starting point for marching through the rest of my processing process:
I go straight to Profile and change it to “Adobe Landscape.”
I start sliding the Dehaze slider to the right. Pushing Dehaze also adds saturation, so …
I usually pull back the Saturation slider a tad.
I try lightly lowering Contrast.
I usually drop Highlights down and push Shadows up.
I make sure the black point is at the dead left of the histogram to get rid of any muddy shadows.
After doing those top-level edits, I use Transform (Figure 6) to straighten any vertical keystone effects from having used a wide angle lens tipped upward.
Figure 6.
Finally I do highlight control. Using a local brush, I make sure the visible light sources are believably detailed. I may lower the exposure, highlights or whites a little bit to taste. Or not at all. I am just looking for some details and hue in the light sources (Figure 7).
Figure 7.
I aim to shoot every light bulb to render it perfectly, yet to also make it look like a light source participating in the illumination of the scene. It’s a delicate balance to pull off naturally. Too much detail equals too much fake.
Less Has Been More
I have noticed that I’ve had a lot of success with HDR composites that are made from only two images. One that’s a solid general exposure and one that’s for extreme highlight control.
Why is that? I’m convinced the dynamic range of my Nikon Z 6II is so expansive that I have enough information to make a decent exposure of everything except for the light-source highlights. So I’ve found myself shooting fewer frames for sequences—and if I shoot more frames, they’re strictly for highlight control and not for revealing shadow details.
Here are some examples, each showing the good overall exposure followed by the highlight-control exposure followed by the final HDR:
I tested that theory by processing only one of the best single exposures to the best of my ability, then processing an HDR, and comparing. Noticing the areas of the image that actually needed to be improved really locked in for me how I need to shoot to make a “meh” urban photo into a banger.
Do the same. Test your particular camera to learn how you need to expose to make this all happen. Note that the older your camera is, the less dynamic range it probably has, so the more frames you’ll probably have to shoot to get good detail throughout the exposure.
Summary
It’s pretty simple to make gorgeous HDR images in urban and suburban areas:
Get a good overall exposure, ignoring blown-out highlights.
Get the highlights right in camera—shoot as many images as you need to get detail in them.
Combine the images in Lightroom.
Cook to taste (tastefully).
Have fun out there and be safe!


The Conversation Continues …
See Matt and Lance talk more about “Controlling Highlights in Urban and Suburban Night Photography” in our #BlogChat YouTube program:


