
Star Trails and Tufa Spires, Trona Pinnacles, California. Nikon D5 with a Nikon 24-70mm f/2.8 lens, light painted with a Coast HP7R flashlight with 1/2 CTO and -1/8 green gels. 20 minutes, f/2.8, ISO 100.
I’ll admit—Trona Pinnacles National Natural Landmark was not in my crosshairs. I was not aiming to photograph it, nor even to visit. I really had never even thought about the place. But while planning a Death Valley workshop with my friend Susan Magnano last year, she asked if afterward I’d be interested in shooting at Trona with her for a couple of nights. I’m always happy to spend time with Susan (if you knew her, you would be too), so I said yes.
And gosh am I glad I did.
The Place
Trona Pinnacles is a 3,800-acre piece of BLM land that’s accessed via a 5-mile dirt road in the Southern California region of the Mojave Desert. Not far from Death Valley National Park, not far from Alabama Hills, Trona features one of the most surreal landscapes of the whole Owens Valley.
The primary photography targets are the 500-plus tufa spires that rise as much as 140 feet from a dry bed in the Searles Lake basin. Standing amid them, you could be forgiven for thinking you’re on another planet—the area looks so much like a foreign world that it’s been used on numerous occasions to depict exactly that. If you’ve watched sci-fi films and TV shows such as Battlestar Gallactica, Lost in Space and Planet of the Apes, then you’ve seen Trona Pinnacles.
It’s a great place for photography. The formations can be mixed and matched and juxtaposed to create endless possibilities for compositions. The groups of pinnacles are far enough apart to make for a relatively expansive park, yet close enough to make walking around relatively easy, and the landscape is open enough to provide plenty of space to move around and create angles for light painting.
Star Circles over Trona Pinnacles, California. Nikon D5 with a Nikon 24-70mm f/2.8 lens. 31 minutes, f/4, ISO 100.
The Scout
On our first night of shooting, I mostly focused on the grand landscape—the pinnacles as a foreground for big-sky compositions. On our second night, I honed in on the rock formations as primary elements of more intimate compositions. The image at hand is one of those, and was the second-to-last that I made on the trip.
During our daytime scouting, this was exactly the kind of composition I’d been looking for: a group of three pinnacles that juxtaposed nicely to form a triangle effect. My first preference was to find a triad in front of where the Milky Way or North Star would be, but this was the group I liked the best in terms of the shape they combined to create.
With the afternoon sun shining on the landscape, I walked around the pinnacles to find the best spot for the tripod, and made a rock note about where that spot was so I could find it hours later at night. (What’s a rock note? I placed three golf ball-size rocks next to the tripod feet, kind of like I was marking my ball on the green. They were pretty easy to find later, and I knew exactly where to set up.)
Then I strolled around the scene again, envisioning the angles I could light paint from—not only where the light would look the best, but also where I could safely walk in the dark.
The Shoot
After first shooting night scenes in other places we’d scouted, Susan and I returned to this spot at about 12:45 a.m. The moon had set a few hours earlier, so aside from a little of light pollution from the community of Trona to the north and the city of Ridgecrest to the west, we were working in pretty dark conditions.

Figure 1. The base exposure before light painting: 15 seconds, f/2.8, ISO 8000.
I set up my tripod, mounted my Nikon D5 and 24-70mm f/2.8 lens, and quickly found the composition I’d visualized earlier. I shined a Coast HP7R flashlight on the front spire, which was plenty of light for the D5’s autofocus to lock onto. We’d been shooting for a while, so I already knew what the base exposure would be: 15 seconds, f/2.8, ISO 8000. I fired a test shot (Figure 1) to make sure everything looked right.
I knew the spot I wanted to light paint from, but the one thing I hadn’t been able to test in daytime was the light itself. Now that it was dark, I could start doing that.
When light painting by myself (Susan was a few hundred yards away working on her own photograph), I like to use a wireless shutter trigger—specifically, the Vello FreeWave Micro. This allows me to get into position before firing the camera, rather than pressing the shutter button and running into the landscape to start lighting. (Another option is to use a timer, but I sometimes find that from a distance I don’t hear the shutter open. I also might not be in position when the camera fires, or conversely might be standing around waiting for it to fire. The wireless release solves all those issues for me.)
I made a few test exposures, adjusting the lighting strategy with each (Figure 2). I’d fire, light the pinnacles, return to the camera to see the results, then get into position and start again. (This is a great way to stay in shape.)
My concern in this particular composition was lighting each spire about equally, but with the front-and-center one just a little brighter. They look close to together in the image, but they were actually far enough apart, and at different enough distances from the light source, that each required a different amount of light. For each formation, I just counted how long I was lighting it—perhaps 2 seconds for the first, 3 seconds for the second, 4 seconds for the third. (I don’t recall the exact amount of light I used for each—the concept is more important than the specific number.)
Figure 2. Different light painting trials (all of them failures—albeit positive failures, because they led to something that worked).
Once I got the timing down, I tried changing the color temperature of the light. For the initial test shots I was using my HP7R with a gel combination of 1/2 CTO and -1/8 green (see Tim’s post “Level Up With Light Painting: Correcting the Color of Your Flashlight”). Just to be sure that’s what I liked best, I also tried a few without the color correction, opting for the naturally cool temperature of the LED flashlight (Figure 3).
Figure 3. Testing a cooler color temperature.
I decided I liked the warm look better (Figure 4), as it nicely complemented the warm tones of the clouds reflecting the street lights of Ridgecrest.
Figure 4. The light painting approach I settled on—or so I thought.
Going Long
The next step was to adapt the lighting strategy for a long exposure. I wanted to shoot for 8 minutes, which with a focal length of 31mm and facing west I thought would give me star trails long enough to be compositionally relevant. To get my exposure from 15 seconds to 8 minutes, I dropped the ISO from 8000 to 200. (The 1/3 stop less of exposure was to compensate for the light reflecting off the clouds, which had grown a little denser.)
Figure 5. To test the light painting for the long exposure, I kept the shutter open just long enough to test what I was adding with my flashlight. The idea was to keep the test short by evaluating only that one piece—I didn’t care if the background went to black.
At the new, less sensitive exposure, clearly a few seconds of light would not have been enough to illuminate the foreground. But how much light was right? I obviously didn’t want to use an 8-minute exposure to find out, especially if I needed two or three tries, which would have resulted in 16 or 24 minutes of testing. That’s not time spent well.
The good news is that for a test shot, I don’t need to care about the background—just the light painting. So I opened my shutter, tried the light, then closed the shutter. The background was nearly black, but I could see if the light painting was correct. Lucky me, it was! (Figure 5. I hardly ever get this right on the first try.)
At this point I felt ready to fire the long exposure. I turned on Long Exposure Noise Reduction, opened the shutter, applied my tested light painting, and waited out the rest of the 16 minutes (8 minutes of shutter time plus 8 minutes of LENR).
Once the camera was finished cooking, I looked at the result on the LCD (Figure 6). The exposure was right, as was the light painting. Alas, the stars were too short. Another issue I noticed is that the ground in front of the pinnacles was completely black, which I didn't like.
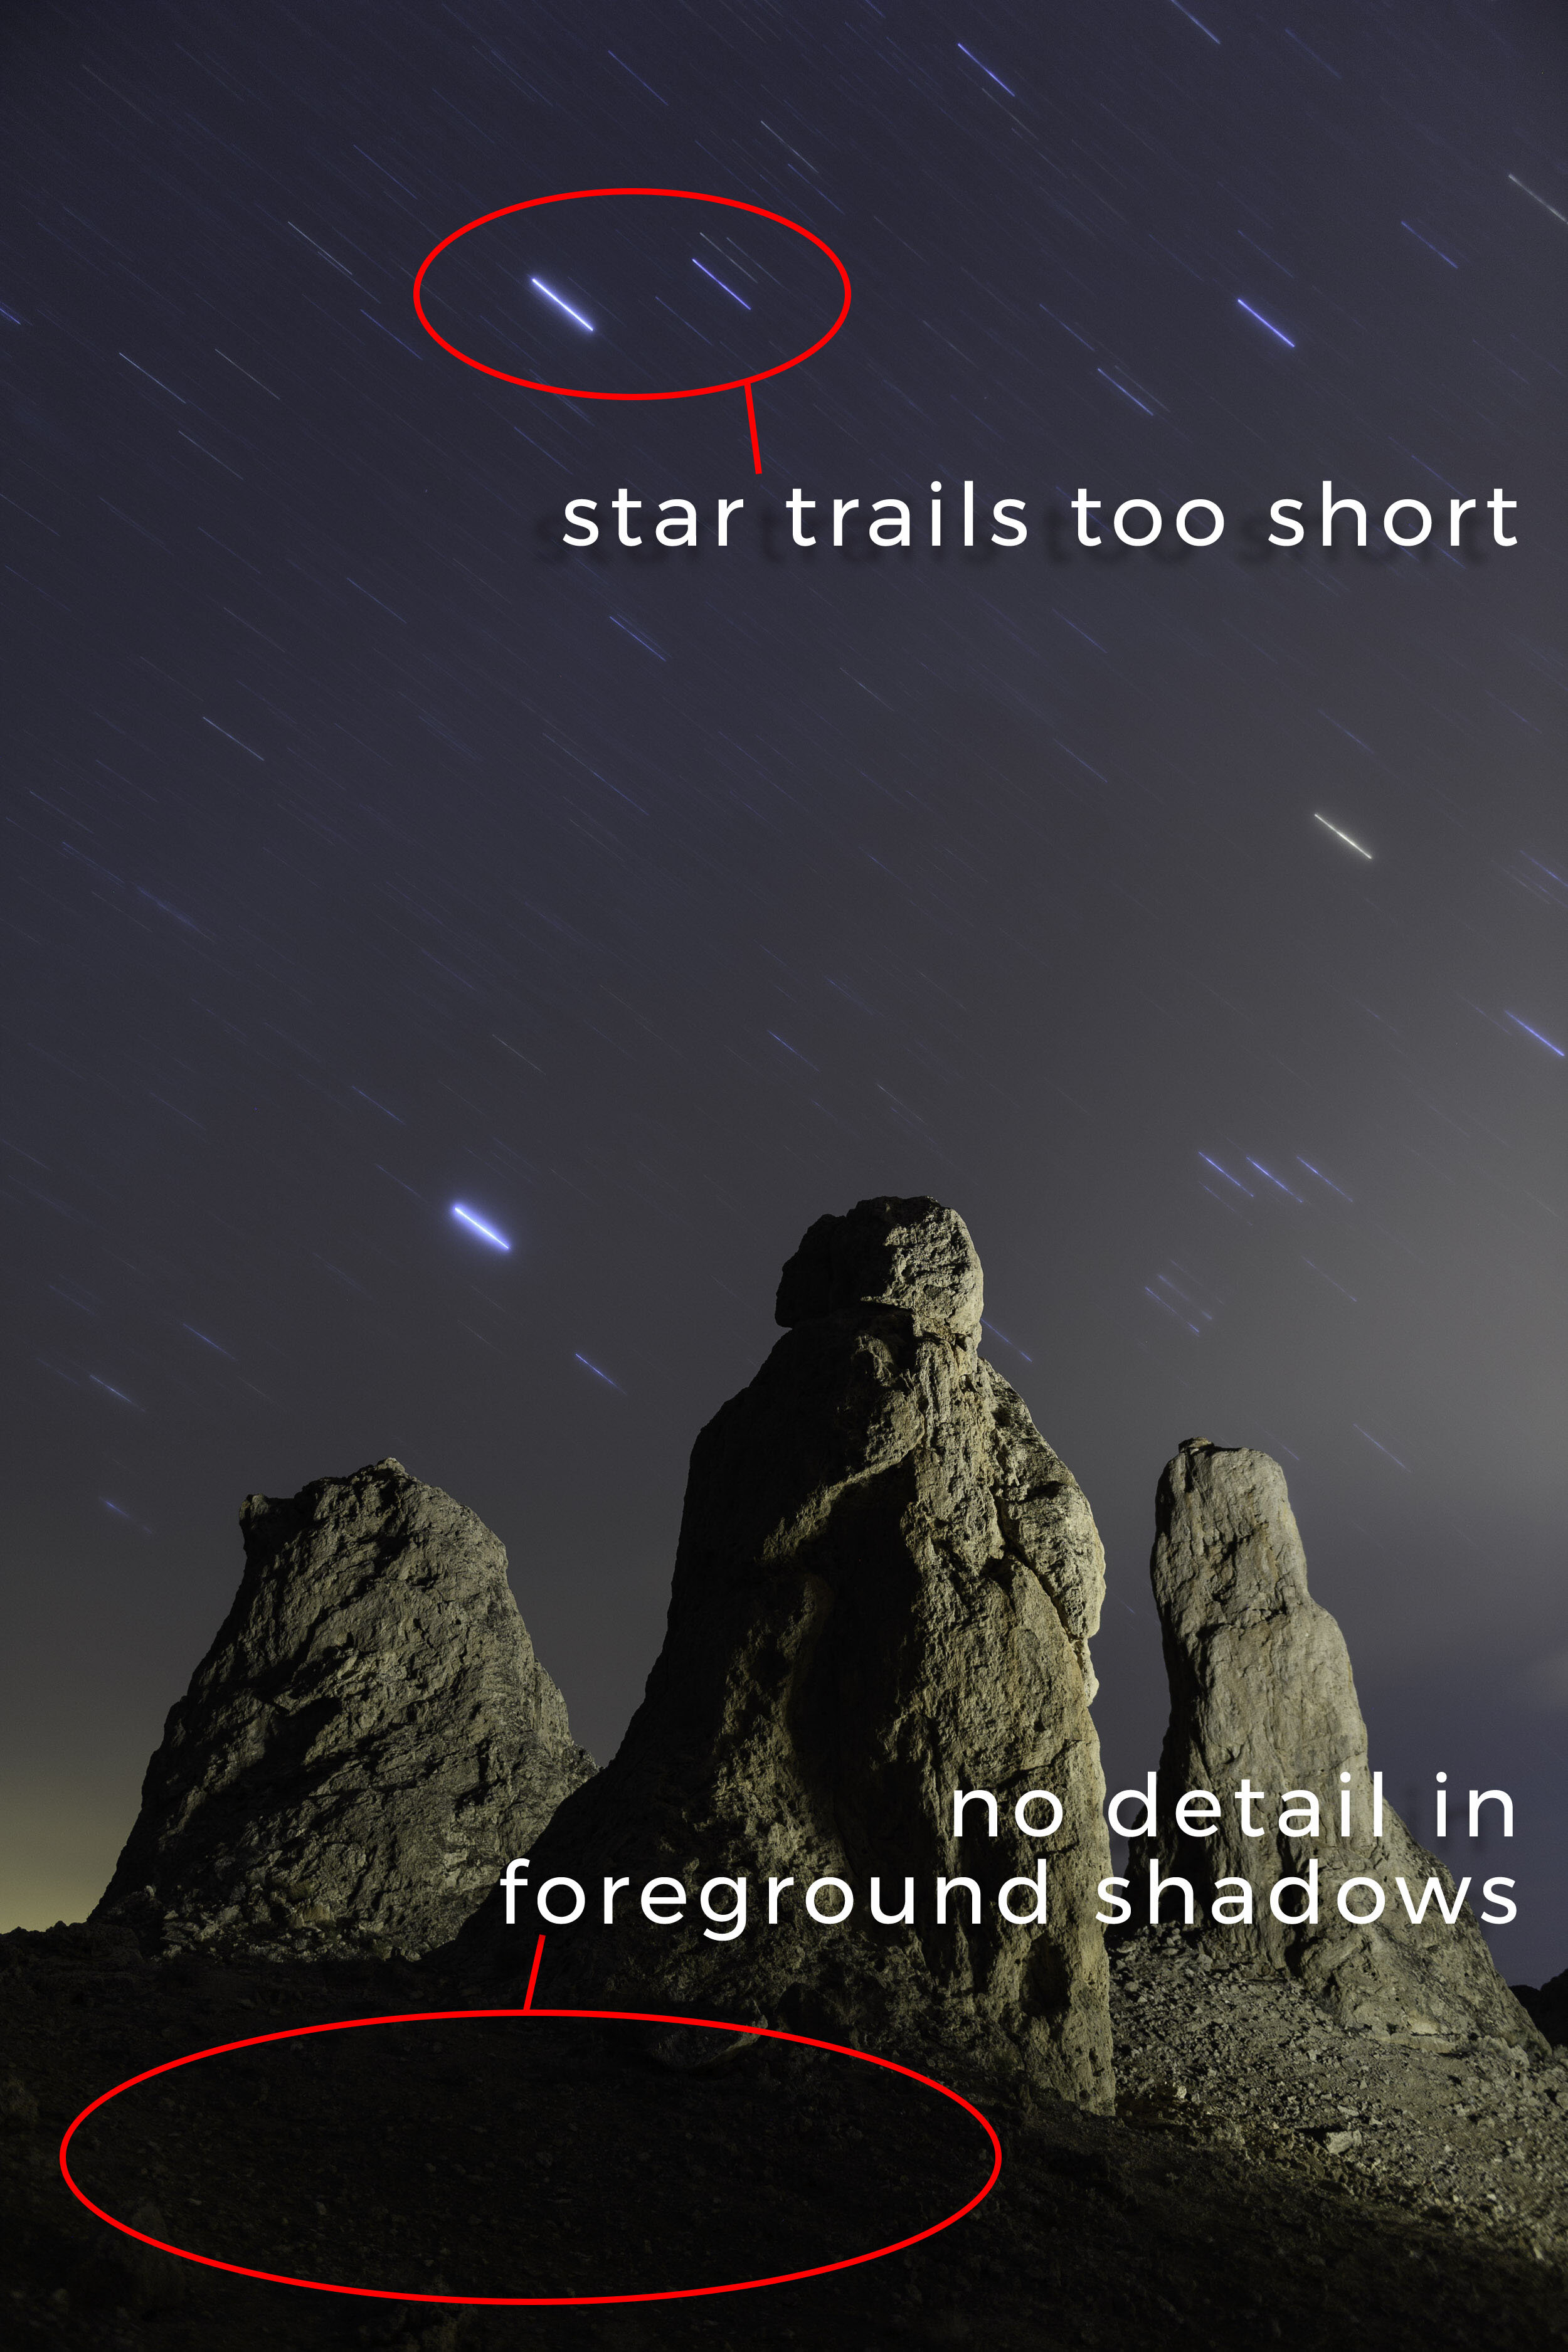
Figure 6. Problems to solve for the final exposure. 8 minutes, f/2.8, ISO 200.
I didn’t want to spend another half hour on a photo I'd thought was almost done, but I preferred that idea to investing all that time and not getting the image right. So I went at it again.
I turned off LENR (so as not to unnecessarily double the test-exposure time), dropped the ISO to 100 and started re-testing the light painting. First I shined some light on the ground, adding just enough to reveal a bit of detail—which took me three tries to get right. Then I re-tested the light on the formations (compensating for the lower ISO), combining it with the foreground light to make sure everything would look good in the final, even longer long exposure (Figure 7).
Figure 7. Testing some light to draw out detail in the foreground shadows. The first take was too much light, the second just about right, and the third combined the new foreground light painting with the light on the spires.
Once I was (relatively) confident the painting approach was sound, I turned on LENR again, opened the shutter, set a timer for 16 minutes, light painted, strolled around gazing at amazing night skies for 12 minutes, then closed the shutter. When the LENR finished, I finally had my shot (Figure 8).
The Final Image
Taking the time in the field to work out the kinks meant that the final image required very little post-processing—just some basic tweaks in Lightroom’s Basic panel to optimize contrast and color.
Figure 8. The final image with 20-minute star trails and all the light painting.
Want to shoot this great space with us in 2020? We have one ticket left for our Trona Pinnacles & Alabama Hills workshop. Sign up today!


