
I had another “What if?” moment, dear readers.
It was this: What if I use a circular polarizer at night?
My mind boggled. It balked. It basically said, “There are tons of reasons you should not even consider doing that.”
Such as:
You’ll lose up to 1.5 stops of light! My precious light …
It’s going to be hard to see the effect through the lens.
A polarizer is another thing to carry and/or take care of. (Have you seen my backpack? I call it the “kitchen sink.”)
Your sensor will capture fewer stars—perhaps?
You may be disappointed.
So What?
Despite all those naysaying, braying voices in my head, I set about scraping out some moments during our Rocky Mountain National Park workshop to run some experiments.
Why? Well, I know polarizers have these positive traits:
minimized reflections, making water easier to see through
more vibrant colors and deeper saturation
reduced highlights, which puts more of the exposure inside the dynamic range of my camera
eliminating or reducing off-axis light
That last one was really exciting to me, as we would have lots of moon at Rocky Mountain, as well as at our workshop immediately afterward at Chaco Culture National Historical Park.
Maybe, just maybe, I could make a polarizer do something useful—or even something amazing.
Note: Since my polarizer was a screw-in 95mm, I did not go through the hassle of removing it during tests. I simply set it to minimum effect for the “before” images and maximum effect for the “after” images.
Testing My Hypothesis on Star Trails
So I set out to test my hunch that it would work. After all, it’s just science, right?
On our final day of the workshop, we embarked on an add-on adventure with five attendees, during which we hiked with our gear almost 2 miles (one way) with 650 feet of elevation gain at over 8,000 feet of altitude. It was challenging, but we did it.
Our first shoot location, Emerald Lake, had a moon shadow slipping around to the right. The moon was at my left shoulder—ideal conditions to make a polarizer work.
Tip: Polarizers work best when used perpendicular to the light source (90 degrees). So keep the moon (or sun, if you are so inclined), on your right or left shoulder.
I set the polarizer to minimum effect:
Nikon D850, Zeiss 15mm Distagon f/2.8. 30 sec, f/2.8, ISO 6400.
Exactly what I’d expected. Not a lot of stars. So I turned off my camera, peeped through the viewfinder, turned the polarizer and found the area of deepest effect:
Nikon D850, Zeiss 15mm Distagon f/2.8. 30 seconds, f/2.8, ISO 6400.
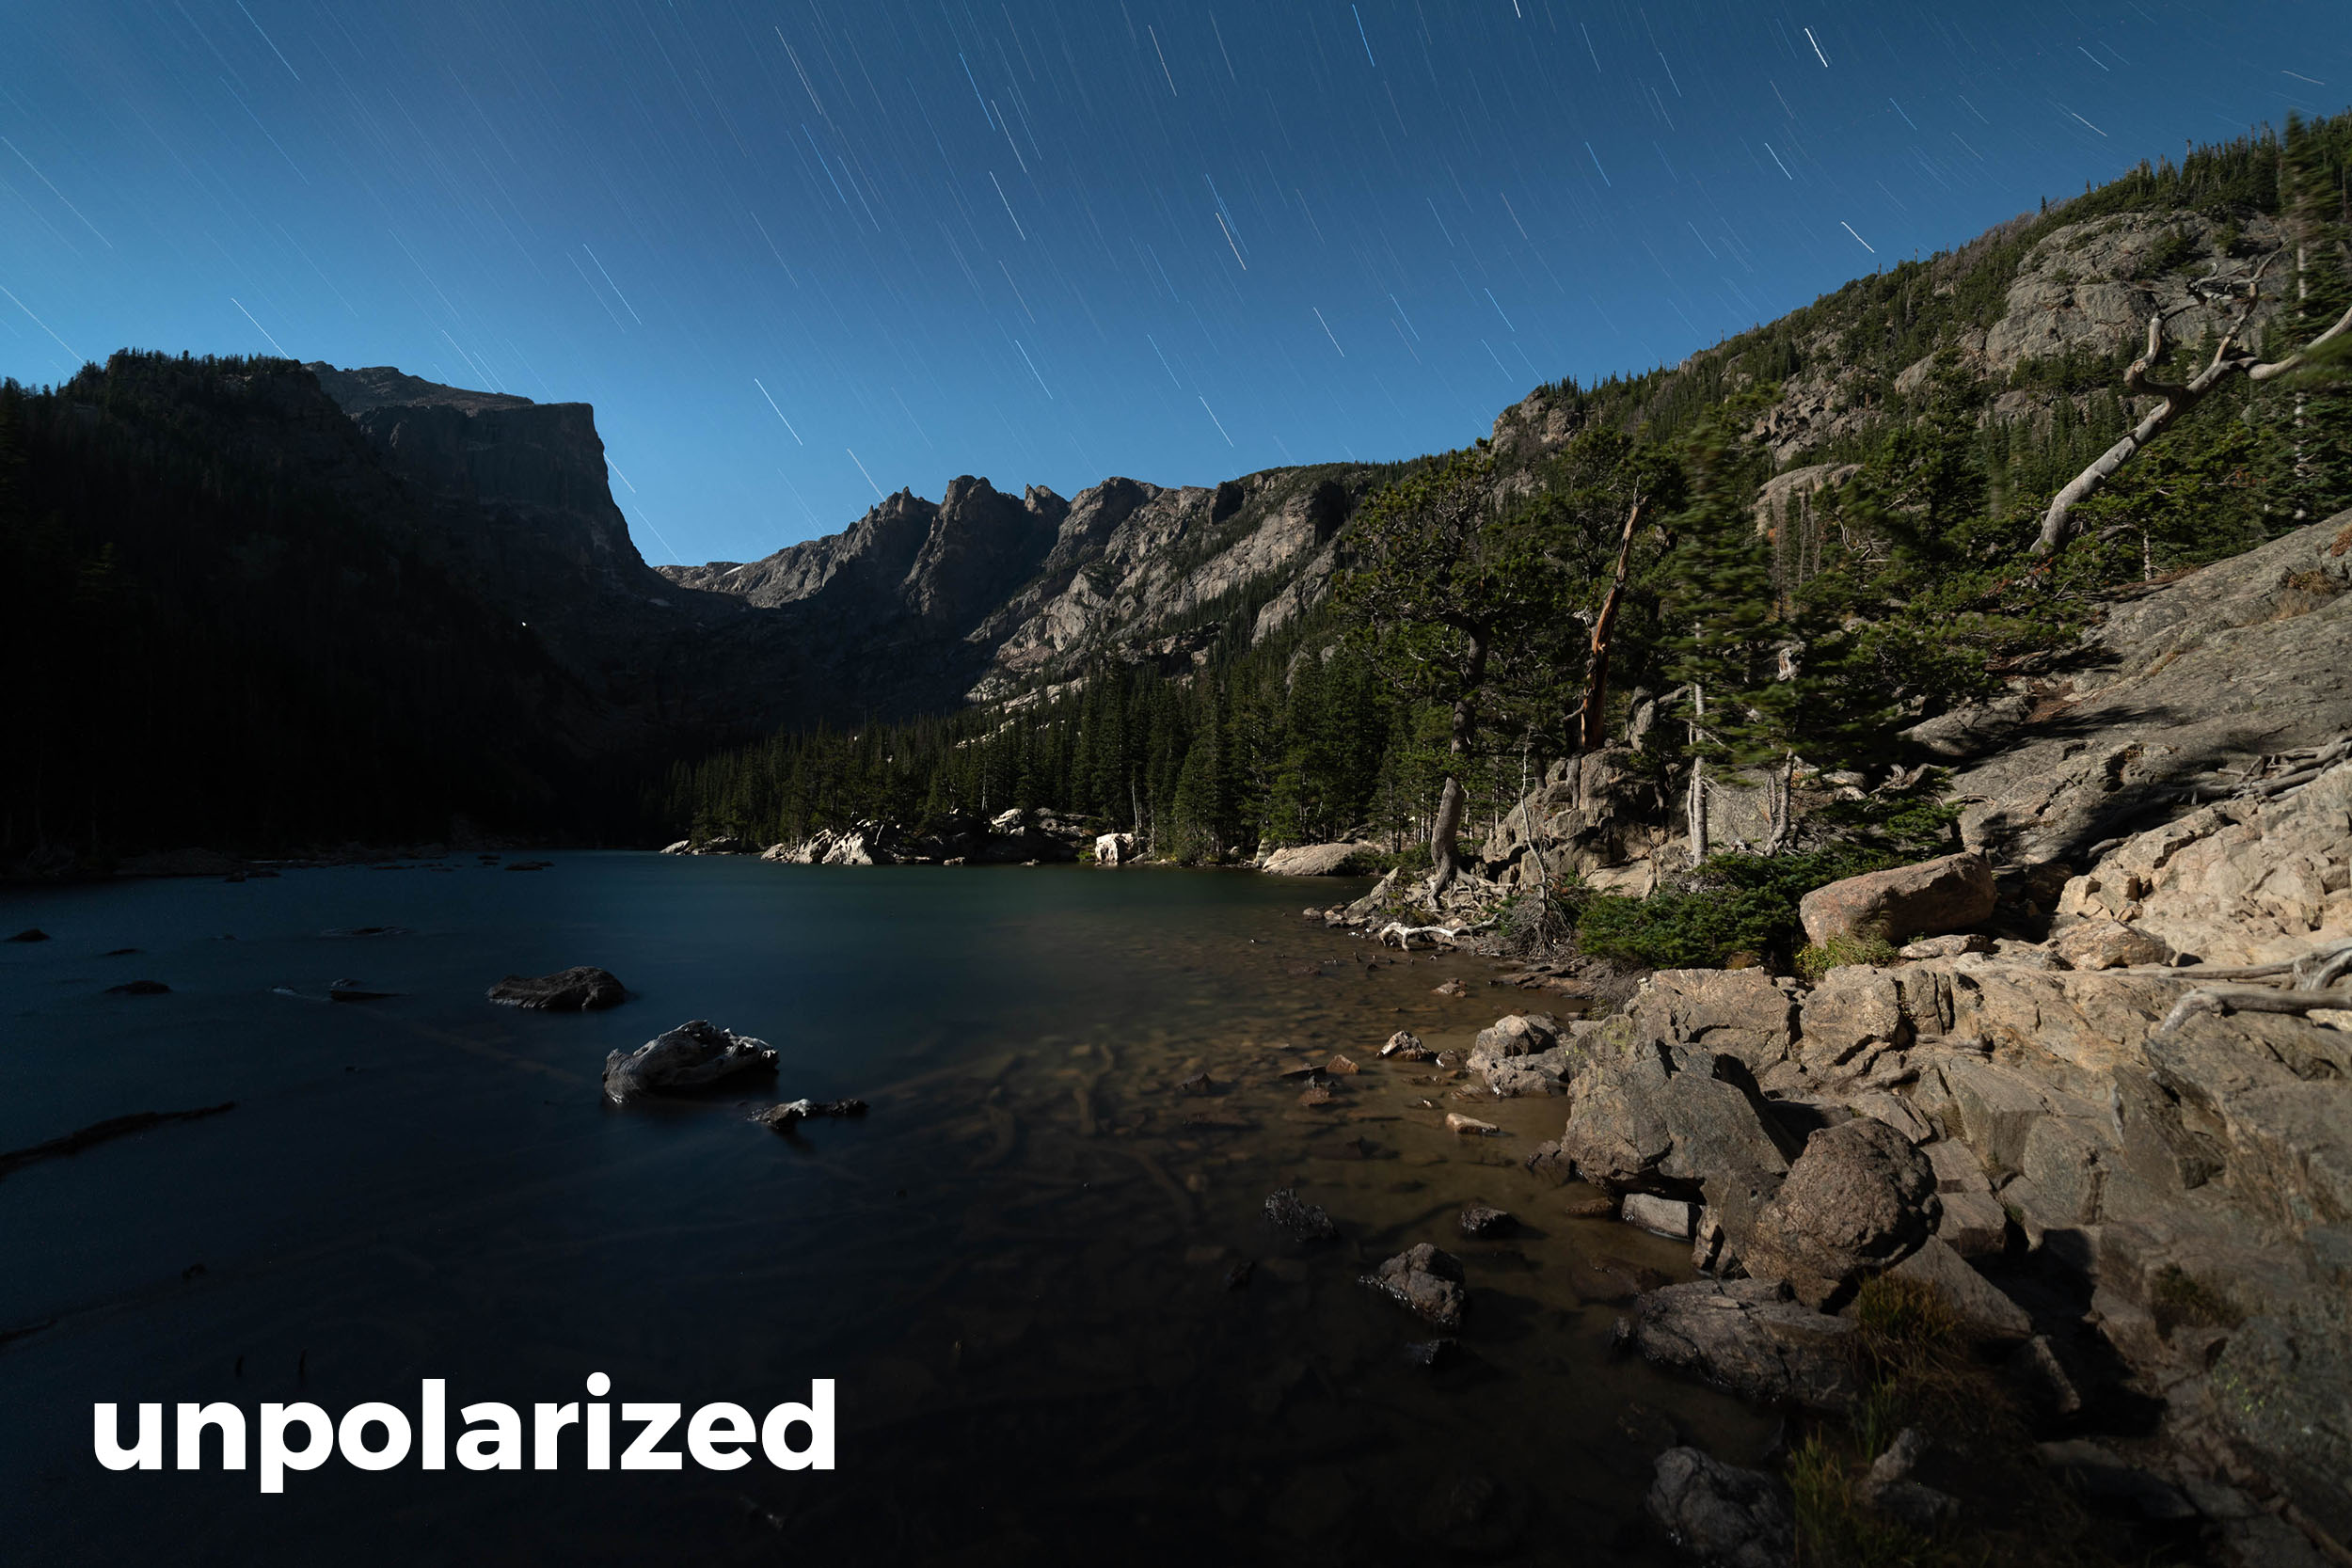
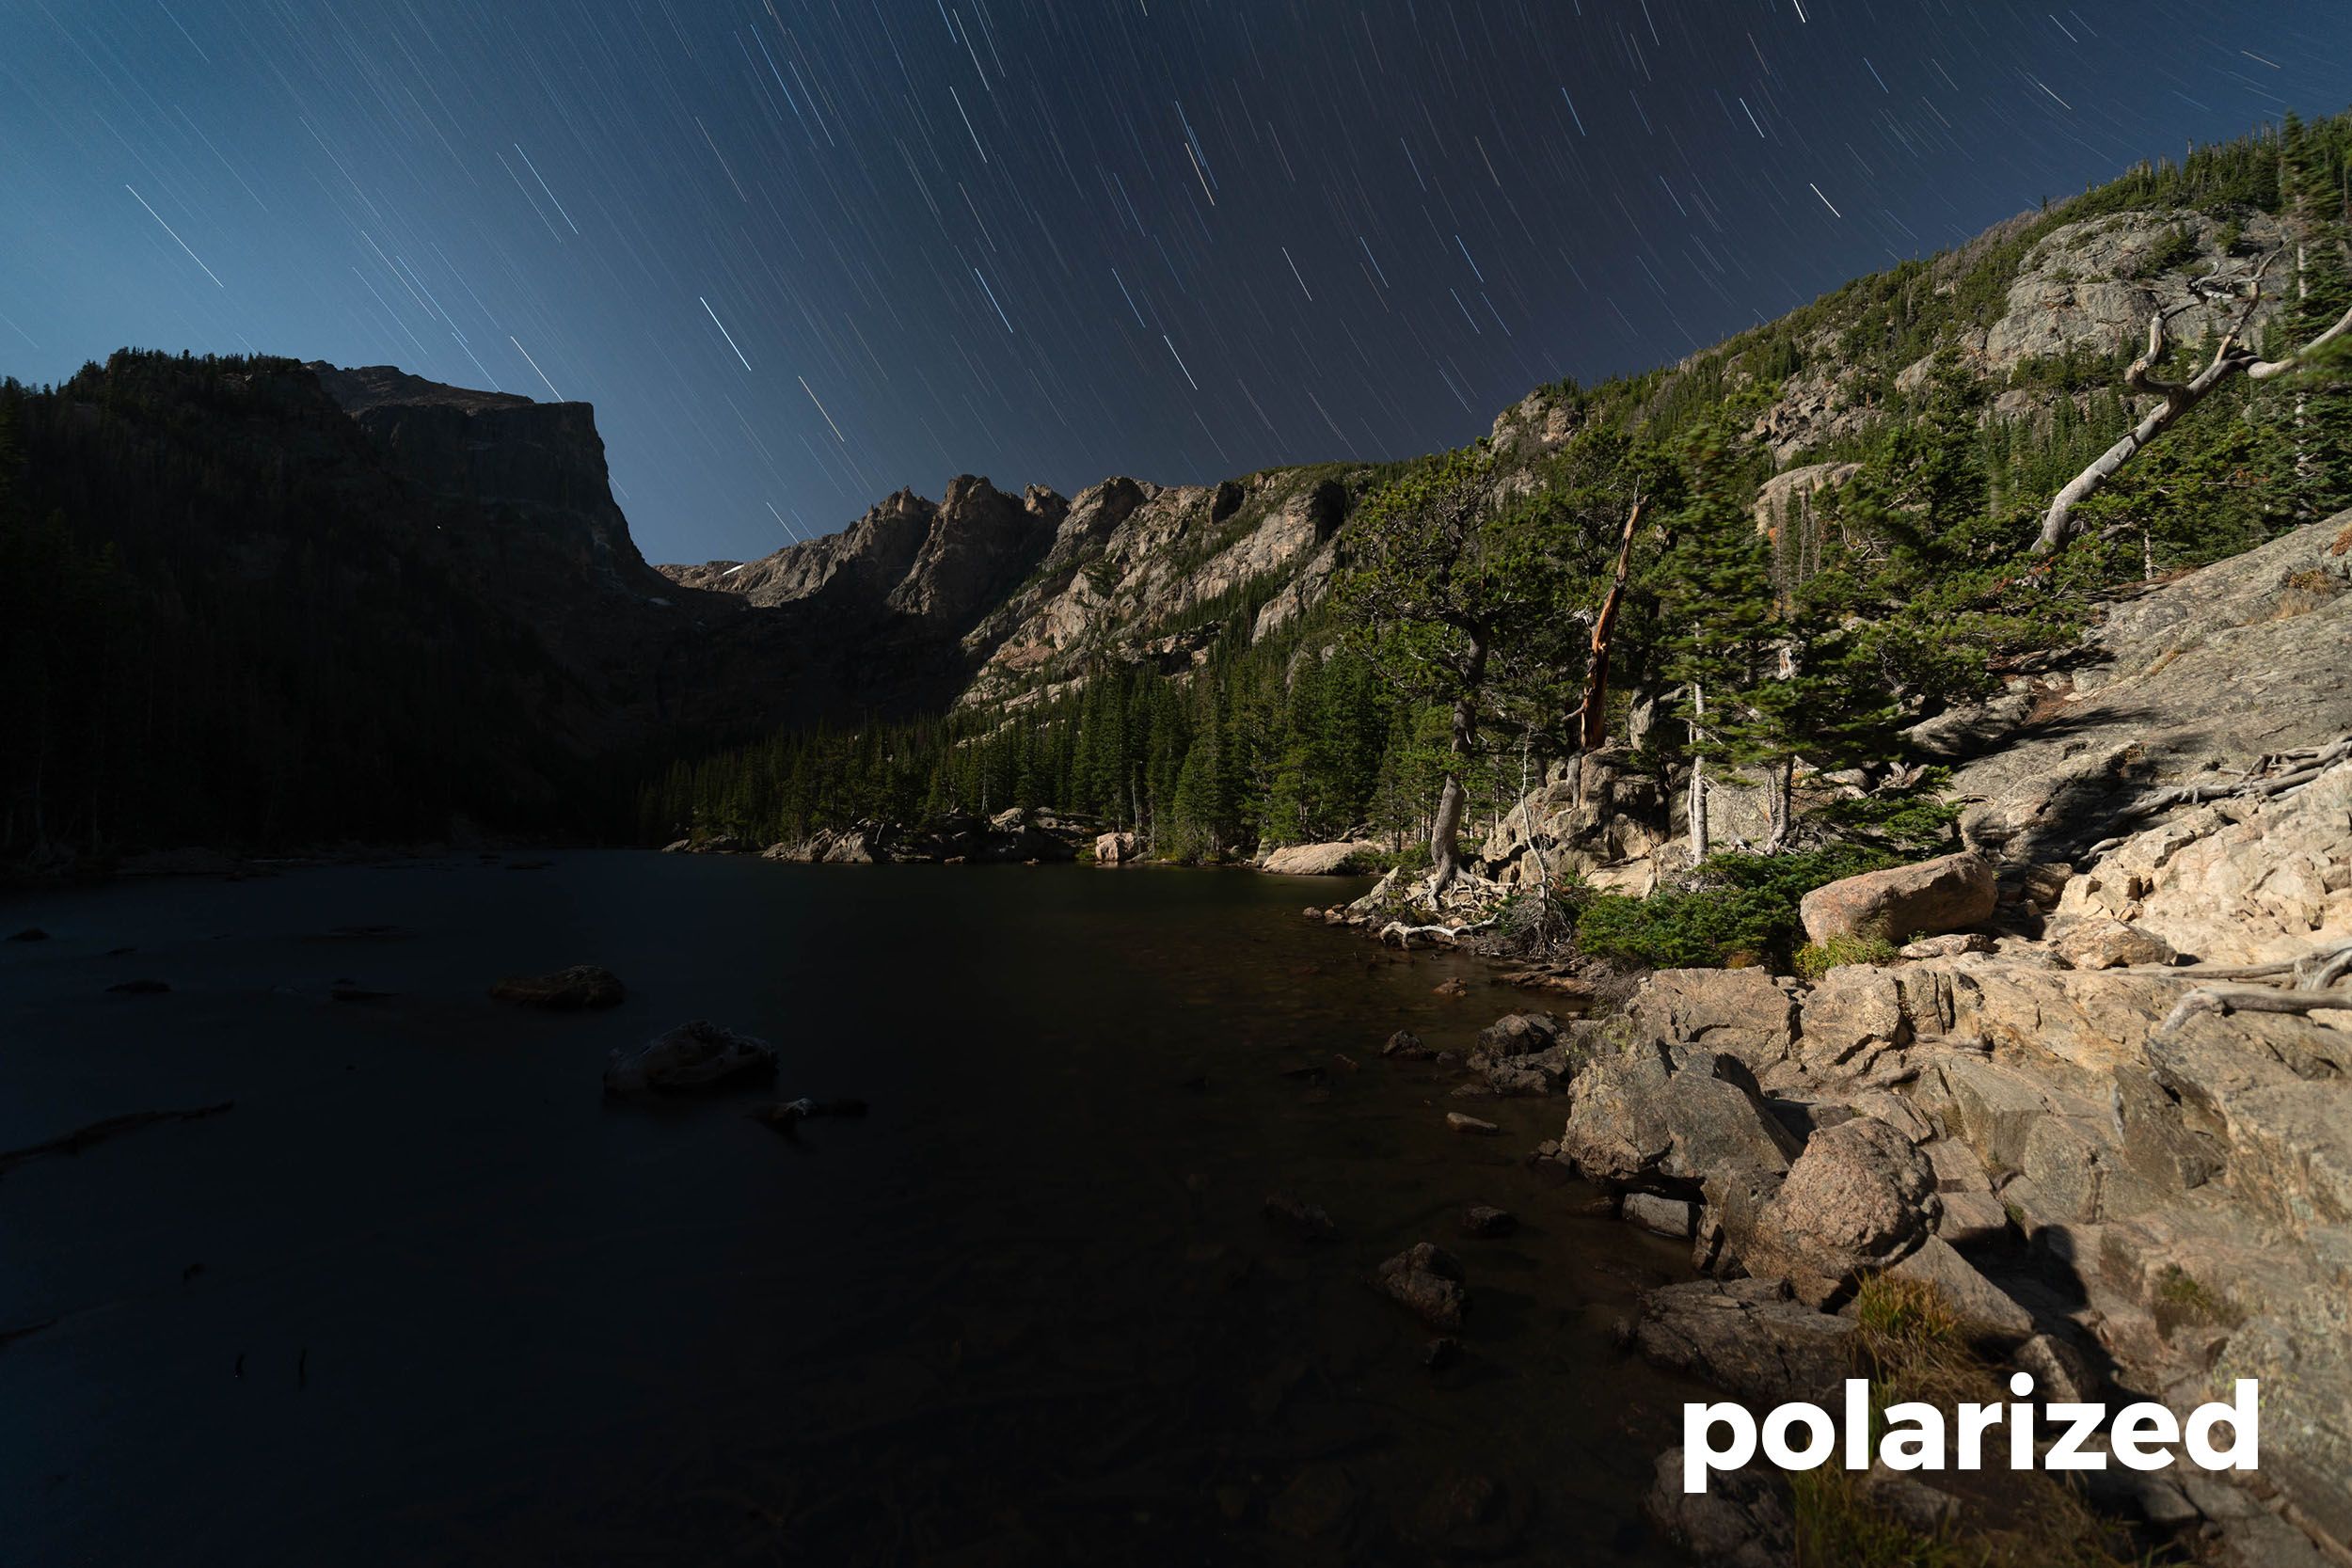
I was so excited (and it was so cold) that I settled into a sequence of eight 7.5-minute exposures, totaling one hour:
Nikon D850, Zeiss 15mm Distagon f/2.8. Eight frames at 7.5 minutes, f/2.8, ISO 6400.
Booyah. Many stars, despite shooting with broad moonlight. It worked!
As we started hiking back down, we stopped at Dream Lake. I wandered to the south end of the lake with a student and set up another test, this time with stiller water. (There had been crazy wind up at Emerald Lake.) I ran two high ISO tests at 15 seconds, f/2.8, ISO 6400:
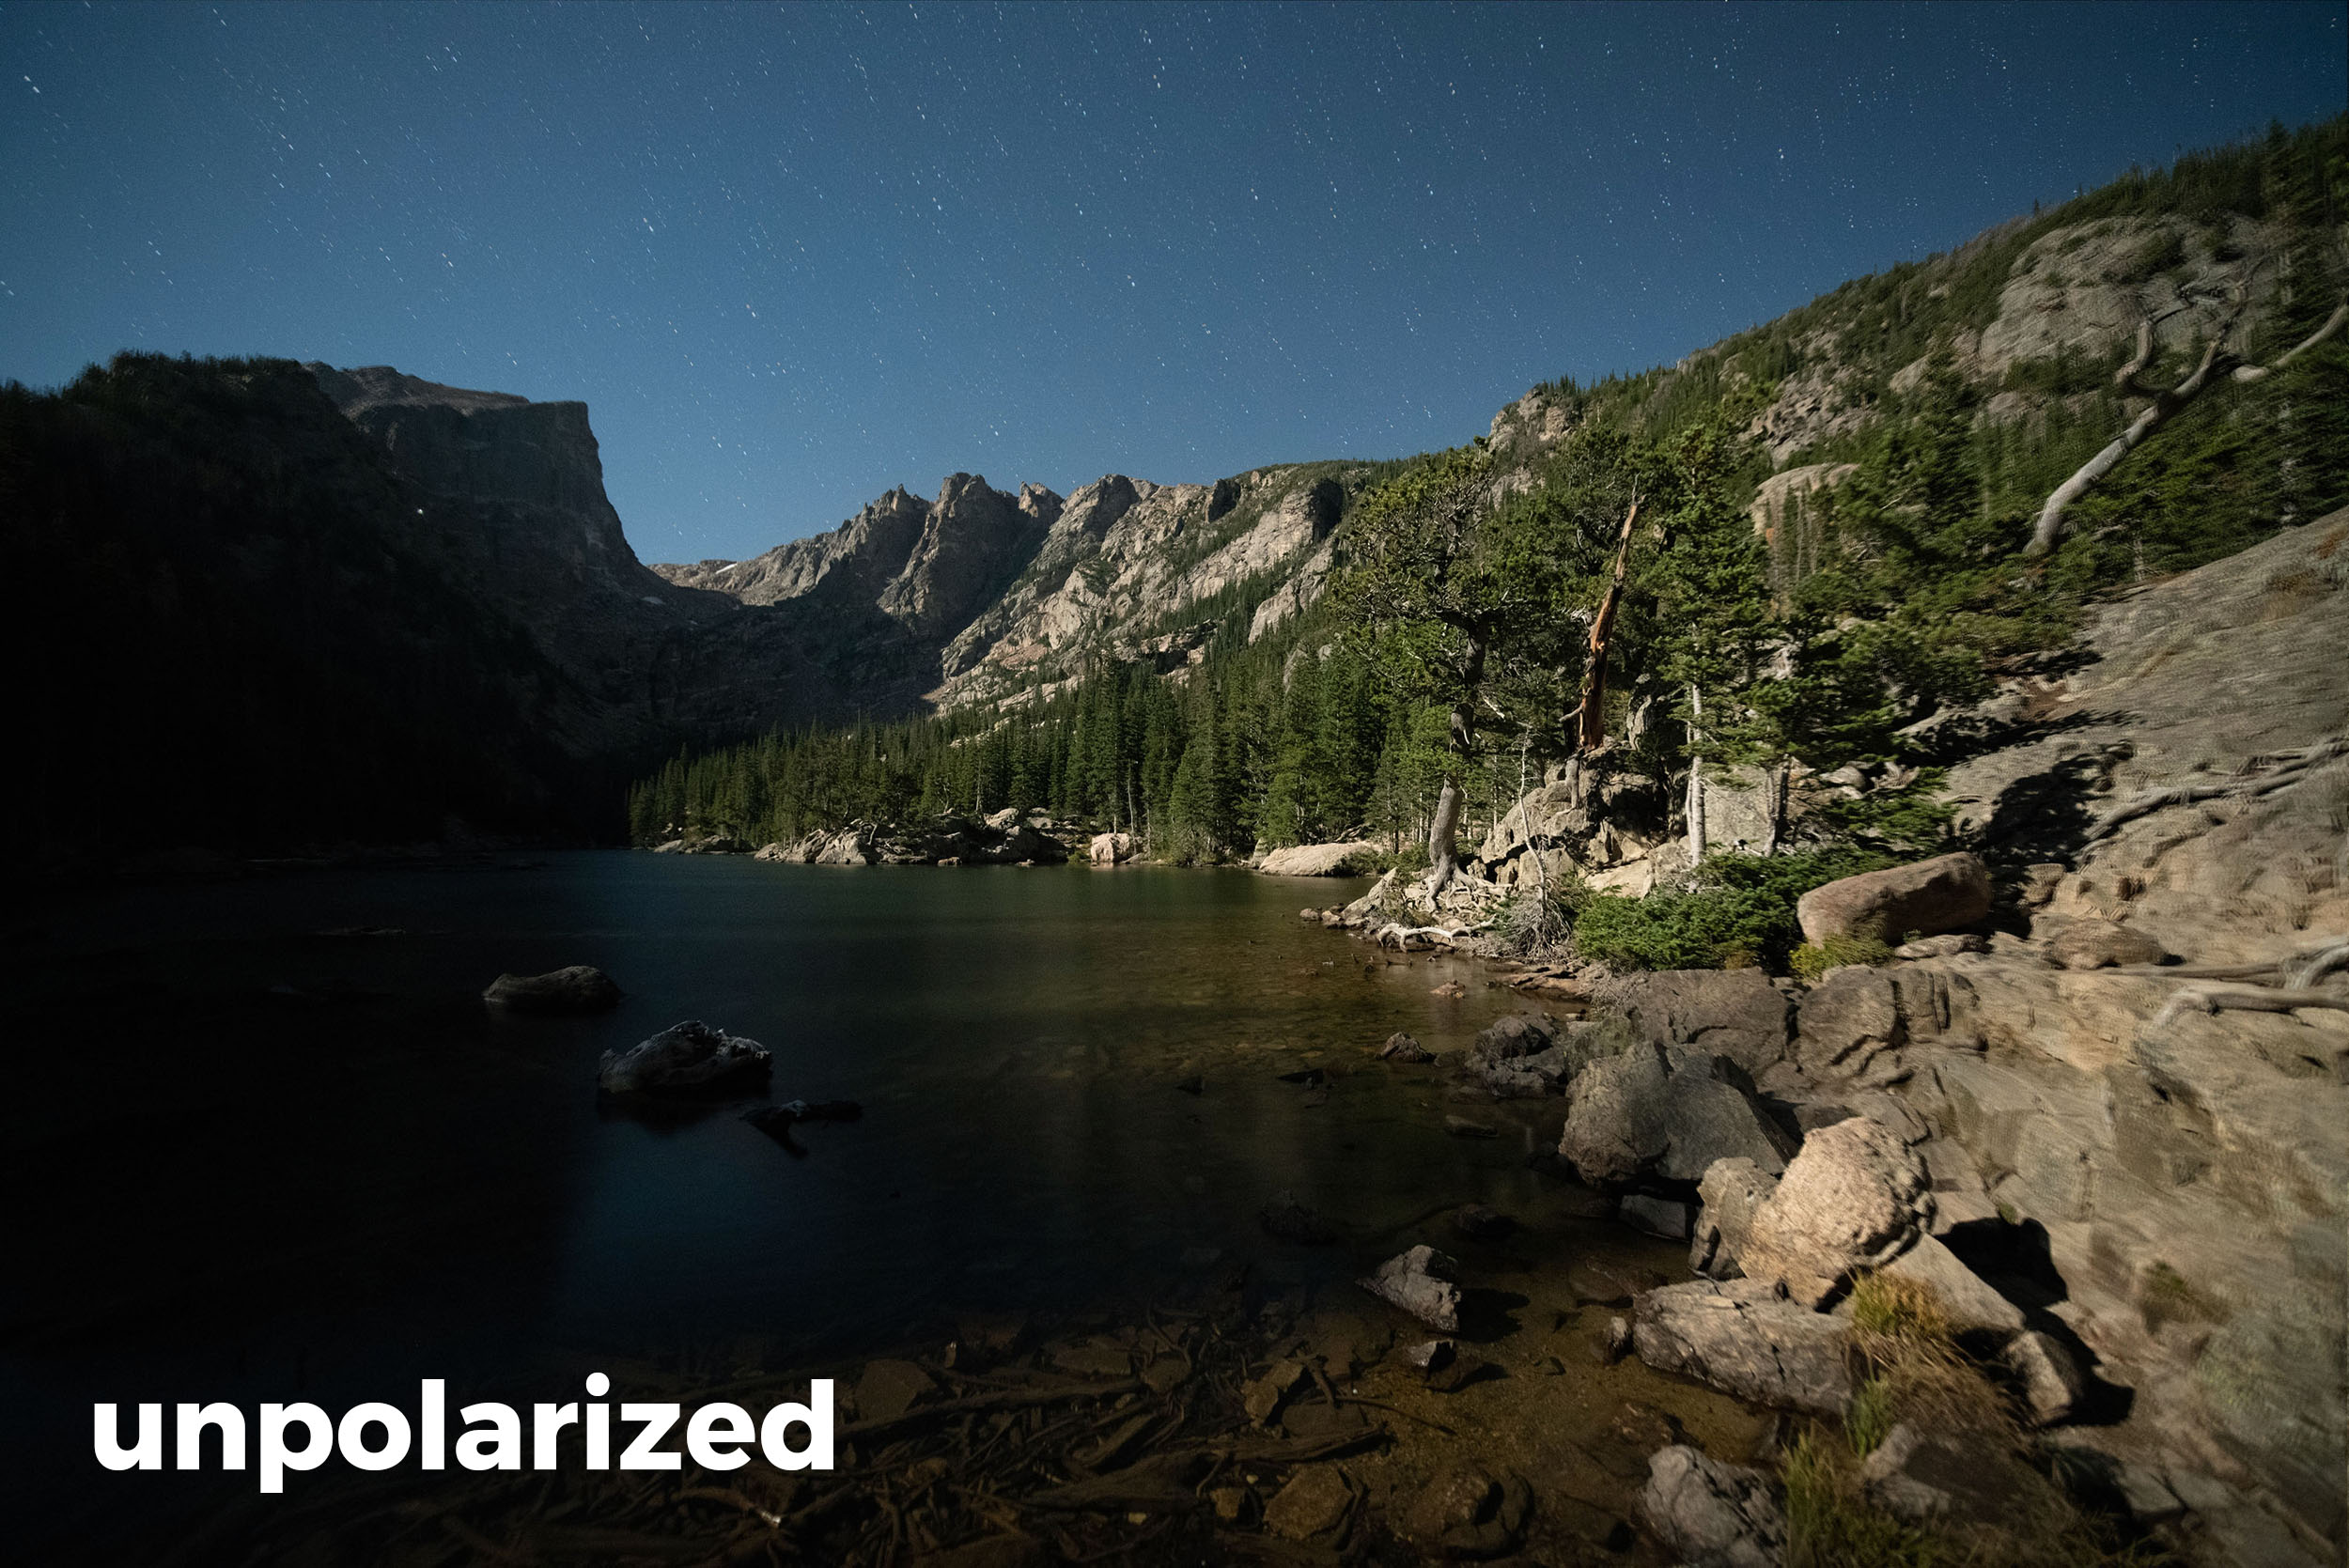
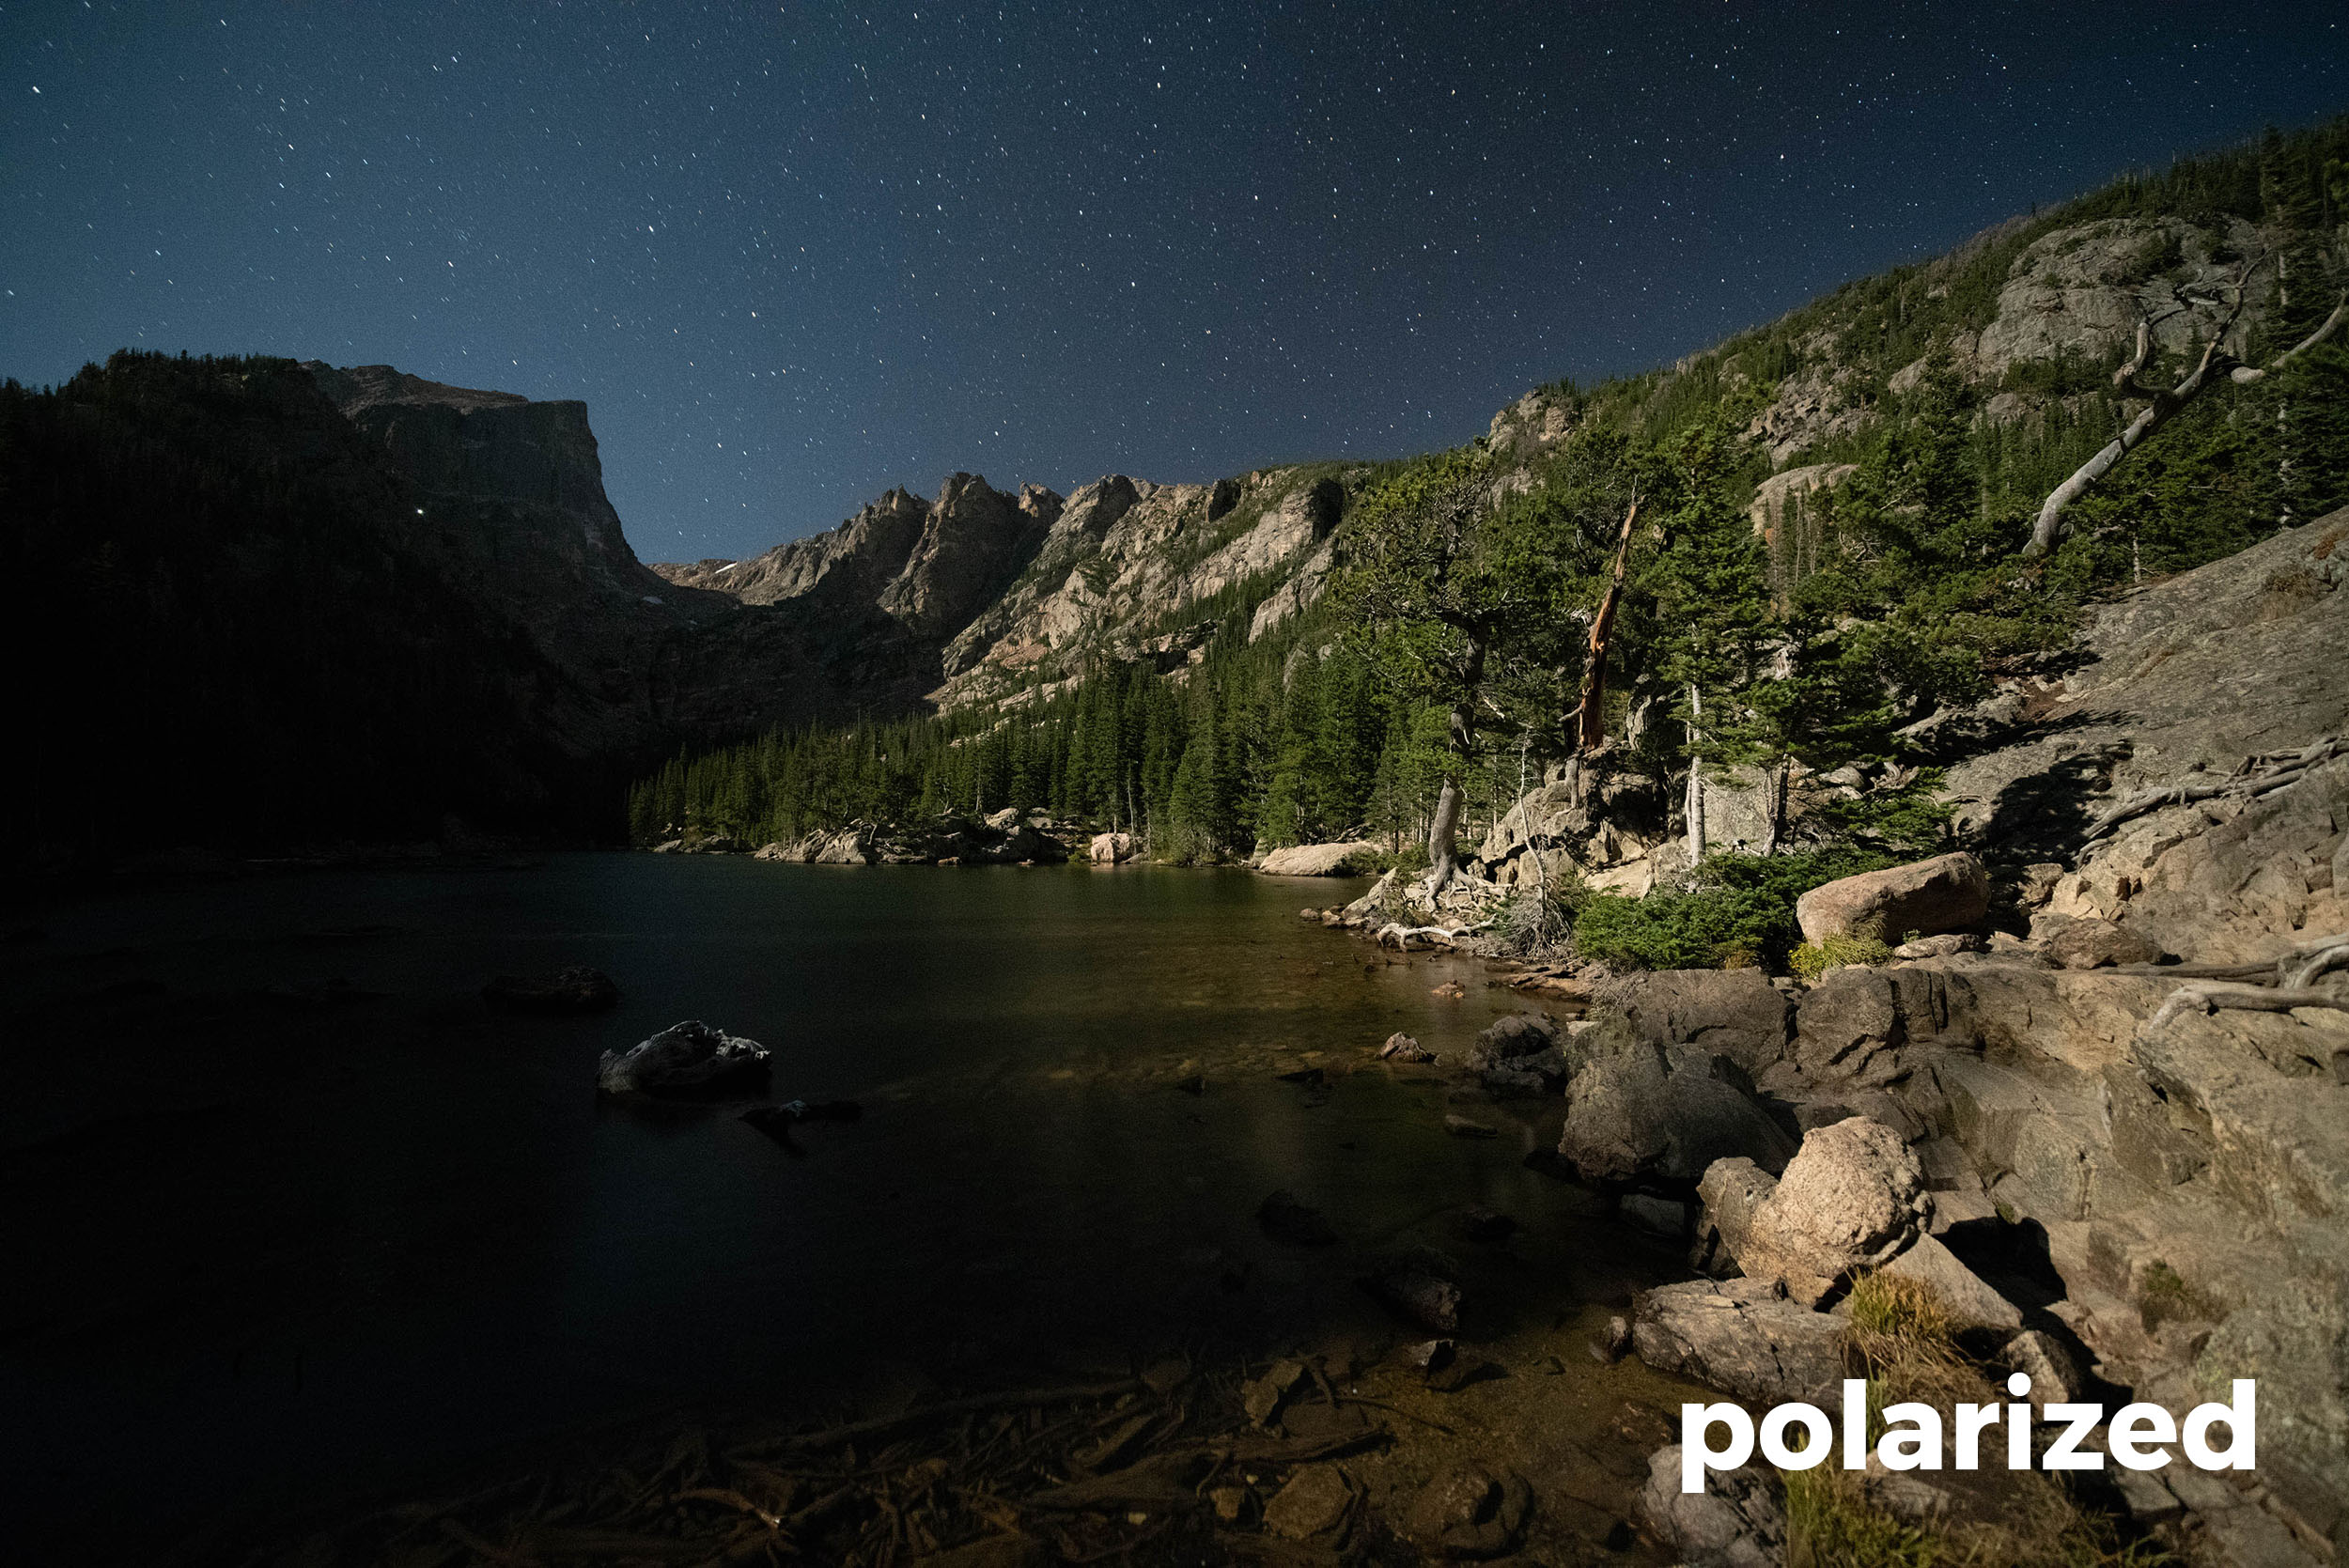
I loved what was happening so much that I wanted to grab two 15-minute exposures to compare:
(I wish I’d done the “without” photo first, because the moon came out more during that exposure.)
So, then I had another “What if?” moment during editing. What if I used the water from the zero-polarizer shot and masked it in to the yes-polarizer shot?
Nikon D850, Zeiss 15mm Distagon f/2.8. 15 minutes, f/2.8, ISO 100. Maximum polarization (in the sky portion).
Again, a wonderful solution for pulling out more stars and deeper, darker skies. Plus, if you shoot both, you can choose the best of each and blend them together. That’s powerful stuff.
And then the Rocky Mountain workshop was over. … But I had another workshop (with Lance) in two days, so Chris and I hustled down to Chaco Culture. And during the second-to-last night, I had a couple of moments here and there to test again.
Facing north, I wanted to test how many stars I could capture at f/13 for a star trail rip.
Test shot No. 1. Nikon D750, Zeiss 15mm Distagon f/2.8. 25 seconds, f/11, ISO 3200. Maximum polarization.
Test Shot No. 2, with a different polarizer orientation: Nikon D750, Zeiss 15mm Distagon f/2.8. 25 seconds, f/11, ISO 3200. Three-quarter polarization.
I felt it had better skies. I wanted a touch darker, so I dropped to f/13 and I committed to a one-hour shot with Long Exposure Noise Reduction turned on.
I admit, I had to do some post work to pull out the stars on the skies, but they’re there!
Nikon D750, Zeiss 15mm Distagon f/2.8. 1 hour, f/13, ISO 50. Three-quarter polarization.
I think next time I’ll shoot such a photo at f/8 to see a touch more stars. But it’s not the normal, cluttered sky we get without polarization and a much wider aperture. And the sky in the background is darker—much darker—which is something we don’t generally see when shooting in moonlight.
But what about the Milky Way?
Well, what about the Milky Way? It’s a silly question, right? You can’t shoot the Milky Way on a moonlit night.
Or … ?
This last test, if successful, would be the coup de grace, on my circular polarizer experiments. Can I extract a Milky Way from moonlit skies? It was an idea raised by Jason, a Rocky Mountain attendee who was on that hike with us the week before. And now I could try it out.
Now in New Mexico, we were shooting at Pueblo Bonito, the park’s showpiece ancient structure, which features over 600 rooms plus multiple kivas of fascinatingly intricate architecture.
There was a 25-minute window of darkness between the end of twilight and moonrise. We hustled to nail the Milky Way during that window, but I suspected I had an advantage with a circular polarizer and hoped I could make it appear even after moonrise.
As soon as the moon rose, people started repositioning to re-frame to make the Milky Way less important. They couldn’t see it. But … maybe I could?
First shot, with minimum polarization:
Nikon D750, Zeiss 15mm Distagon f/2.8. 25 seconds, f/2.8, ISO 6400. Minimum polarization.
And then...
Nikon D750, Zeiss 15mm Distagon f/2.8. 25 seconds, f/2.8, ISO 6400. Maximum polarization.
Double booya. Ignoring the fact that someone did light painting in the foreground for this shot, check out that Milky Way! This is not a composite. It’s one frame, with some Lightroom adjustments.
You may notice that the area of sky around the Milky Way is darkest. That’s not from a local adjustment in post, but rather that’s where the circular polarizer’s effect happens. I strategically placed the effect right along the axis of the Milky Way. The polarization occurs only in that area (rather than the whole sky) because I am using a superwide lens and the effect covers a limited angle.
Anyway, back to the exciting part. I was able to shoot a clear Milky Way sky with a full moon lighting the landscape. My whoops of pleasure resonated from the canyon walls. I let out massive yawps of glee.
Folks, a revolution has arrived. You can put one more big gun in your bag to make your night skies sing. You can use a polarizer to photograph the Milky Way in moonlight.
When Does a Circular Polarizer Not work?
One caveat: When using ultrawide-angle lenses (like my Zeiss 15mm Distagon), you will discover that the area affected by polarization can be narrower than you want.
Check this out—I adjusted the polarizer all around to find a sweet spot, but didn’t find one: (
I also experienced some flare when the moon was at the edge of my ultrawide lens in the above.
So to avoid these two things that I found disadvantageous, I switched lenses to my 35mm, went vertical with a lens hood, and made a pano stitch (without a polarizer), and am very happy.
Note: Polarizing with pano stitches is rarely successful.
Nikon D850, Sigma 35mm f/1.4 Art. Ten frames at 10 seconds, f/5, ISO 6400. No polarizing filter.
So watch your images to be sure the effect is one you want to commit to, but give it a shot.
Wrapping Up
A circular polarizer is definitely worth putting in your toolkit for night photography. ’Nuff said.
And I can’t wait to see what you do with this! Please test for yourself and post your results in the Comments section here or on our Facebook page. We’d love to see what amazing things you make.
Gear
For you gear geeks: I used the Benro Master Slim Circular Polarizing screw-in filter on my Zeiss 15mm Distagon.
In case your superwide lens doesn’t accept a screw-in, know that many manufacturers, Benro Filters included, now make 100mm and 150mm square filter holders that allow for a circular polarizer to be mounted, as well as neutral density and graduated neutral density filters. It’s an amazing photography world we live in these days.


