
The lighthouse on Monhegan Island is an amazing place to shoot at night. But then we saw the comet, and the lighthouse may as well have not even existed. We quickly moved away from the compositions we’d been working so hard on and focused on the celestial visitor instead.
Lance and I are midway through a two-week trip to Maine, where we’re leading two workshops along some of the most beautiful coastline in the U.S. And gosh did we (and the attending night photographers) luck out, because our time here coincided perfectly with the astronomy surprise of the year: Comet NEOWISE.
Photographing the comet quickly became high on the priority list not only for our participants, but also for us. It’s not common to get such an opportunity—once every 7 millennia, for this particular comet—and all of us have been pretty excited by the chase.
We have one more week in Maine, shooting first on Monhegan Island, then moving to Acadia National Park. But before moving on, we wanted to share some tips about photographing the comet, so you can get outdoors too and take advantage of this amazing night-sky event.
Comet NEOWISE over the Monhegan Island Lighthouse keeper’s quarters, Maine. © 2020 Chris Nicholson. Nikon D5 with a Nikon 14-24mm f/2.8 lens, illuminated by the lighthouse and a Luxli Viola. 25 seconds, f/3.5, ISO 6400.
Finding NEOWISE
First you need to know where in the sky to look for the comet, and when to look there. Fortunately both are pretty easy.
When the comet was first appearing earlier this month, it was doing so in early, early morning—but now (thank goodness) it’s showing up at nautical twilight and hanging around for a few hours before dipping below the horizon. This schedule is much easier for most people to work with.
Where is the comet hanging around? In the north-northwest sky, below the Big Dipper. (See Figure 1. This is for the Northern Hemisphere. Unfortunately our night photography friends south of the equator don’t get to share this show.)
Figure 1. A rough projection of where in the sky to find Comet NEOWISE this coming week. In general, starting at dusk, look north-northwest, below the Big Dipper. The comet will appear to rotate with the rest of the sky, and will set below the horizon a few hours after first appearing.
Each night the comet will appear slightly more west, as well as slightly higher from the horizon (thereby lasting a little longer before setting). As the evening hours progress, NEOWISE will appear to move toward the horizon with the stars and constellations, eventually setting out of view. Assuming clear skies, you’ll have lots of time to experiment with different strategies and compositions.
How long will the comet be visible? Astronomers are hypothesizing that we’ll be able to see it until about the end of July. But precision is hard to come by. The good news this week is that the comet is traveling closer to Earth, which should make it larger in the sky; the bad news is that it’s traveling further from the sun, which should mean it won’t be as bright. At some point NEOWISE will cross a threshold where those variables make it even less visible, and then invisible.
Either way, the rest of this week should be the prime opportunity for photography. The comet will be detectable at reasonable hours during very dark skies (i.e., with a new moon). After that, as the comet fades from view, the moon will be growing larger and setting later, eventually obscuring the final acts of the NEOWISE show.
Photographing NEOWISE
As mentioned, we’ve been photographing NEOWISE for a week, so we have some tips we can offer. We hope these will help as you get out this week to capture the comet.
Sharpness
To keep the comet sharp with a long exposure, you’ll want to approach shutter speed the same way as when trying to keep stars or the Milky Way sharp: Use either the 400 Rule, or for more precision, the NPF Rule. In other words, if your stars are sharp, then your comet will be too.
Of course, the comet is by nature a fuzzy-looking thing, so you can get away with a longer shutter speed—perhaps even twice as long as you’d use for a standard sharp-star shot. For example, if a camera/lens combo would allow for a 15-second exposure to freeze the stars, you might be able to shoot for 30 seconds and acceptably freeze the comet. However, then the stars in your image would begin to trail (Figure 3). So it’s probably best to keep shooting for sharp stars, and then everything in your frame will be crisp.
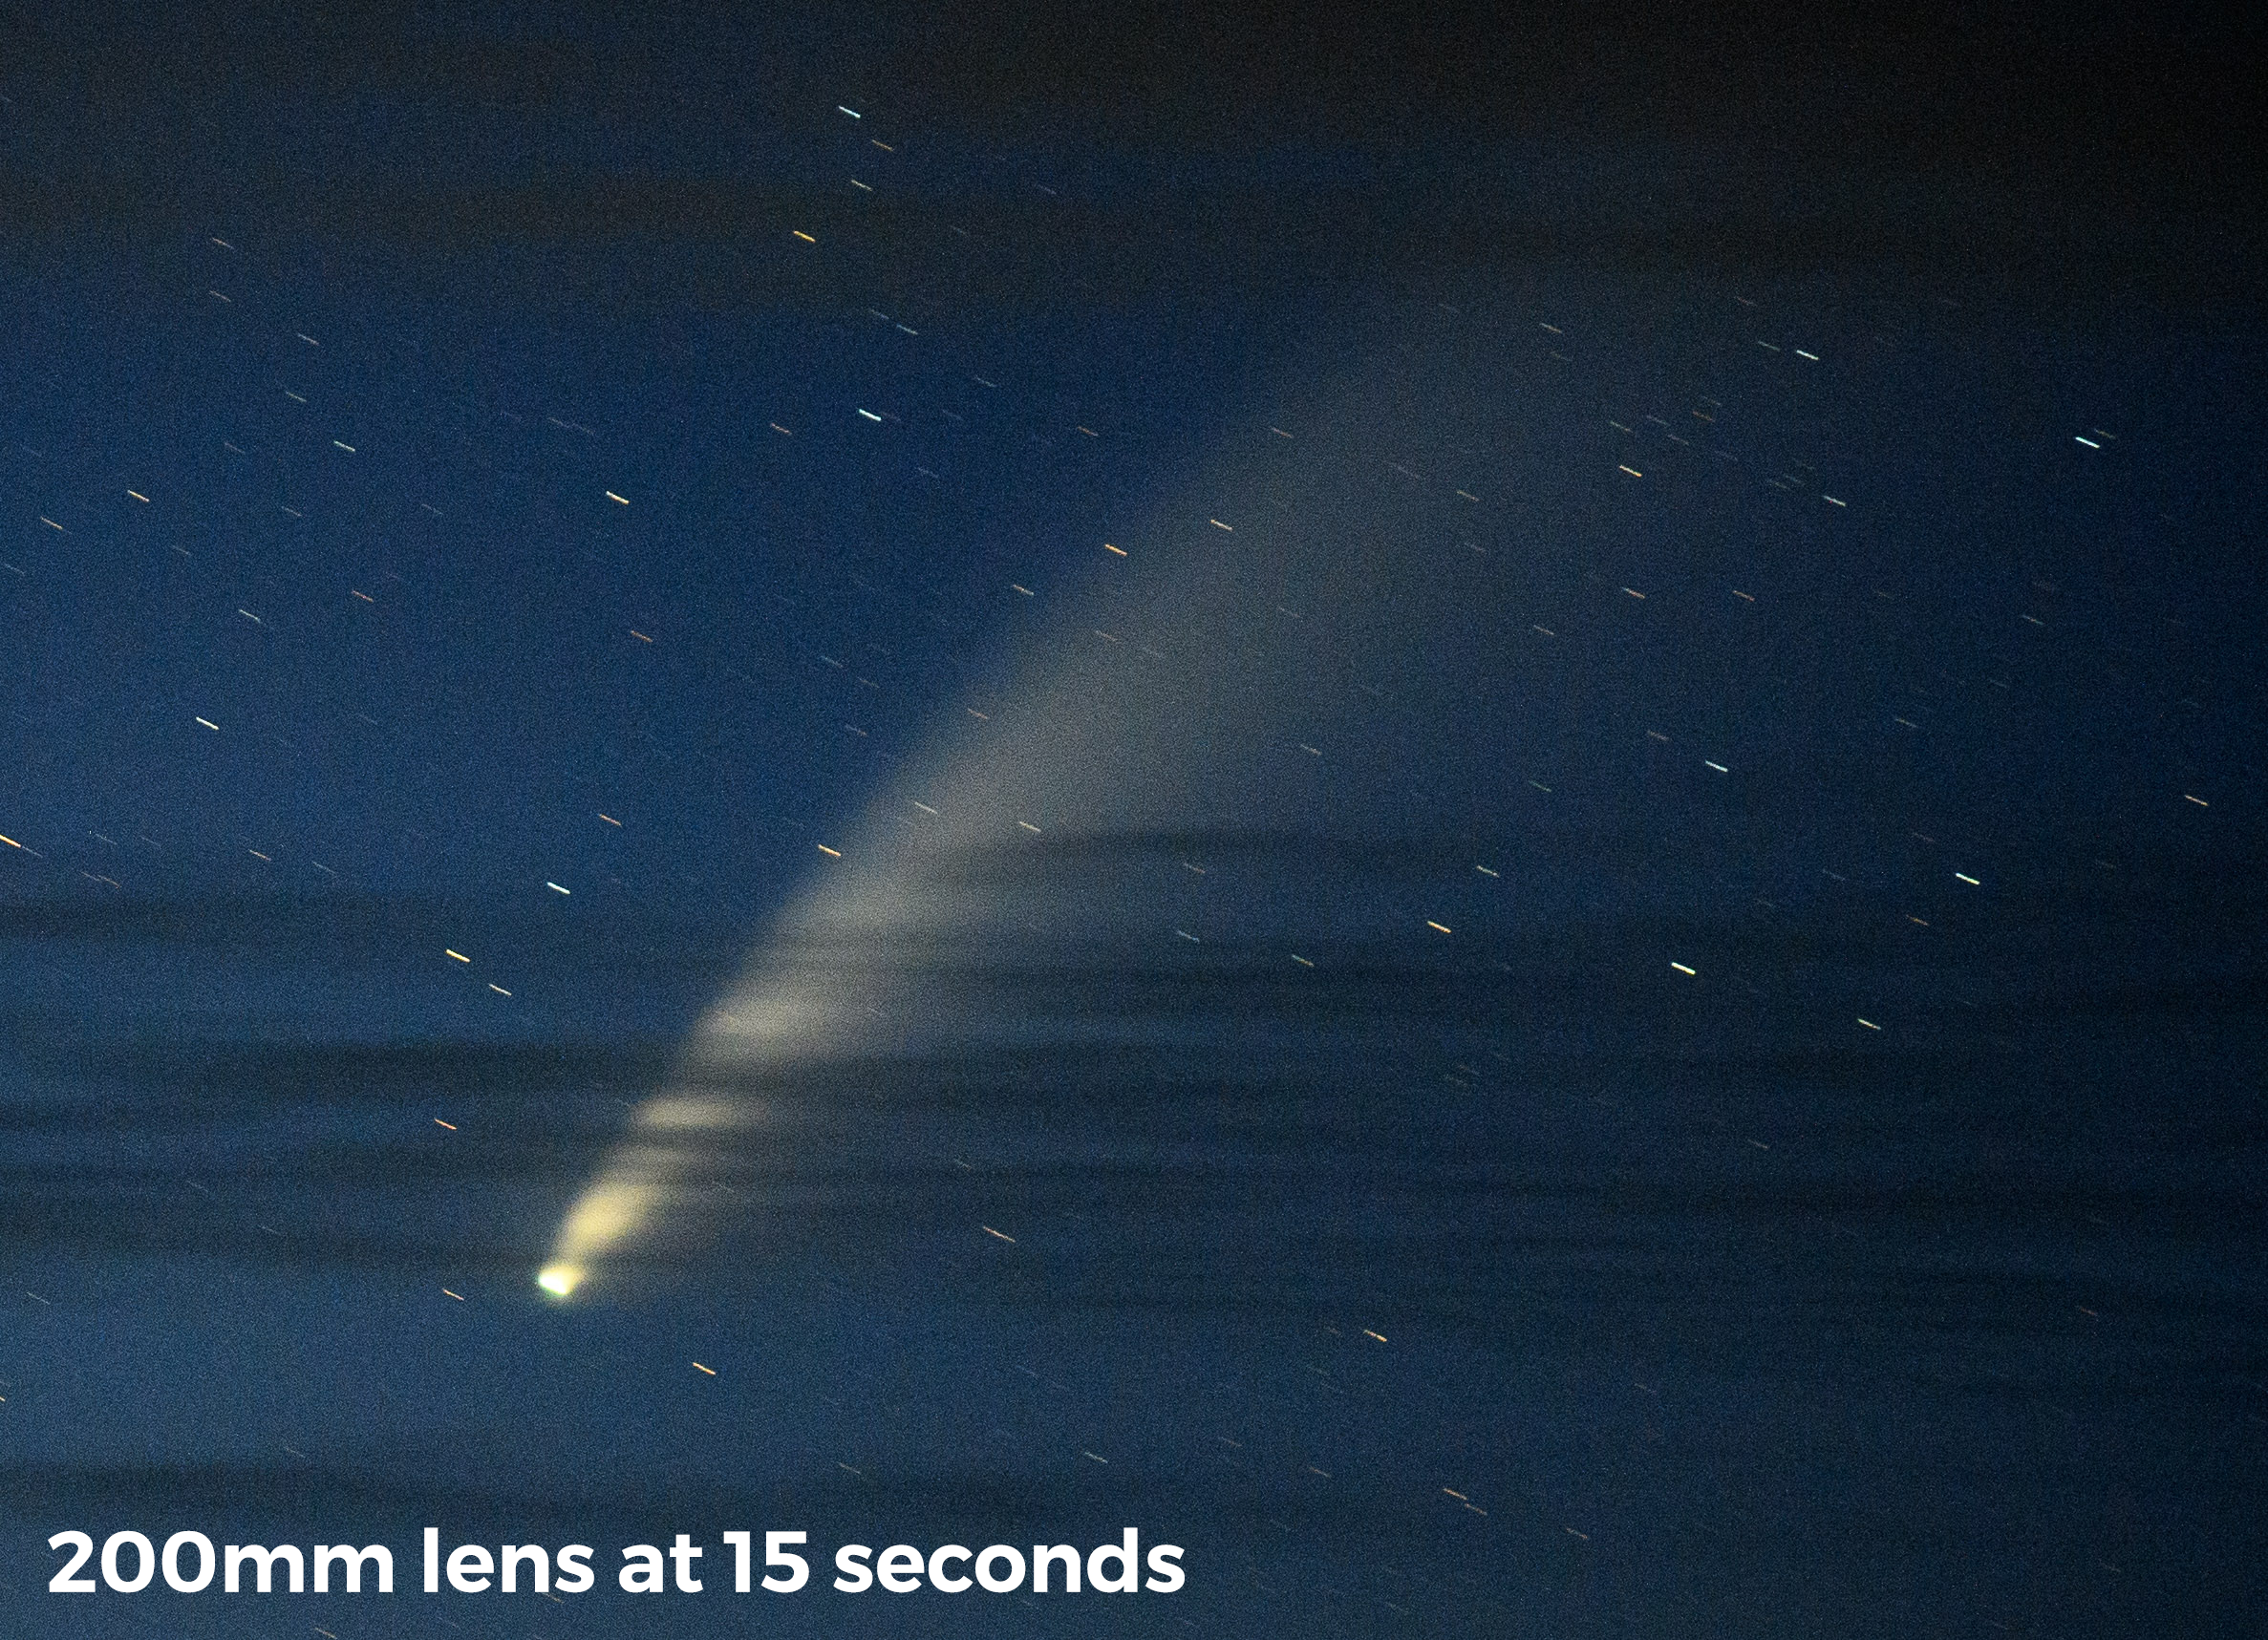
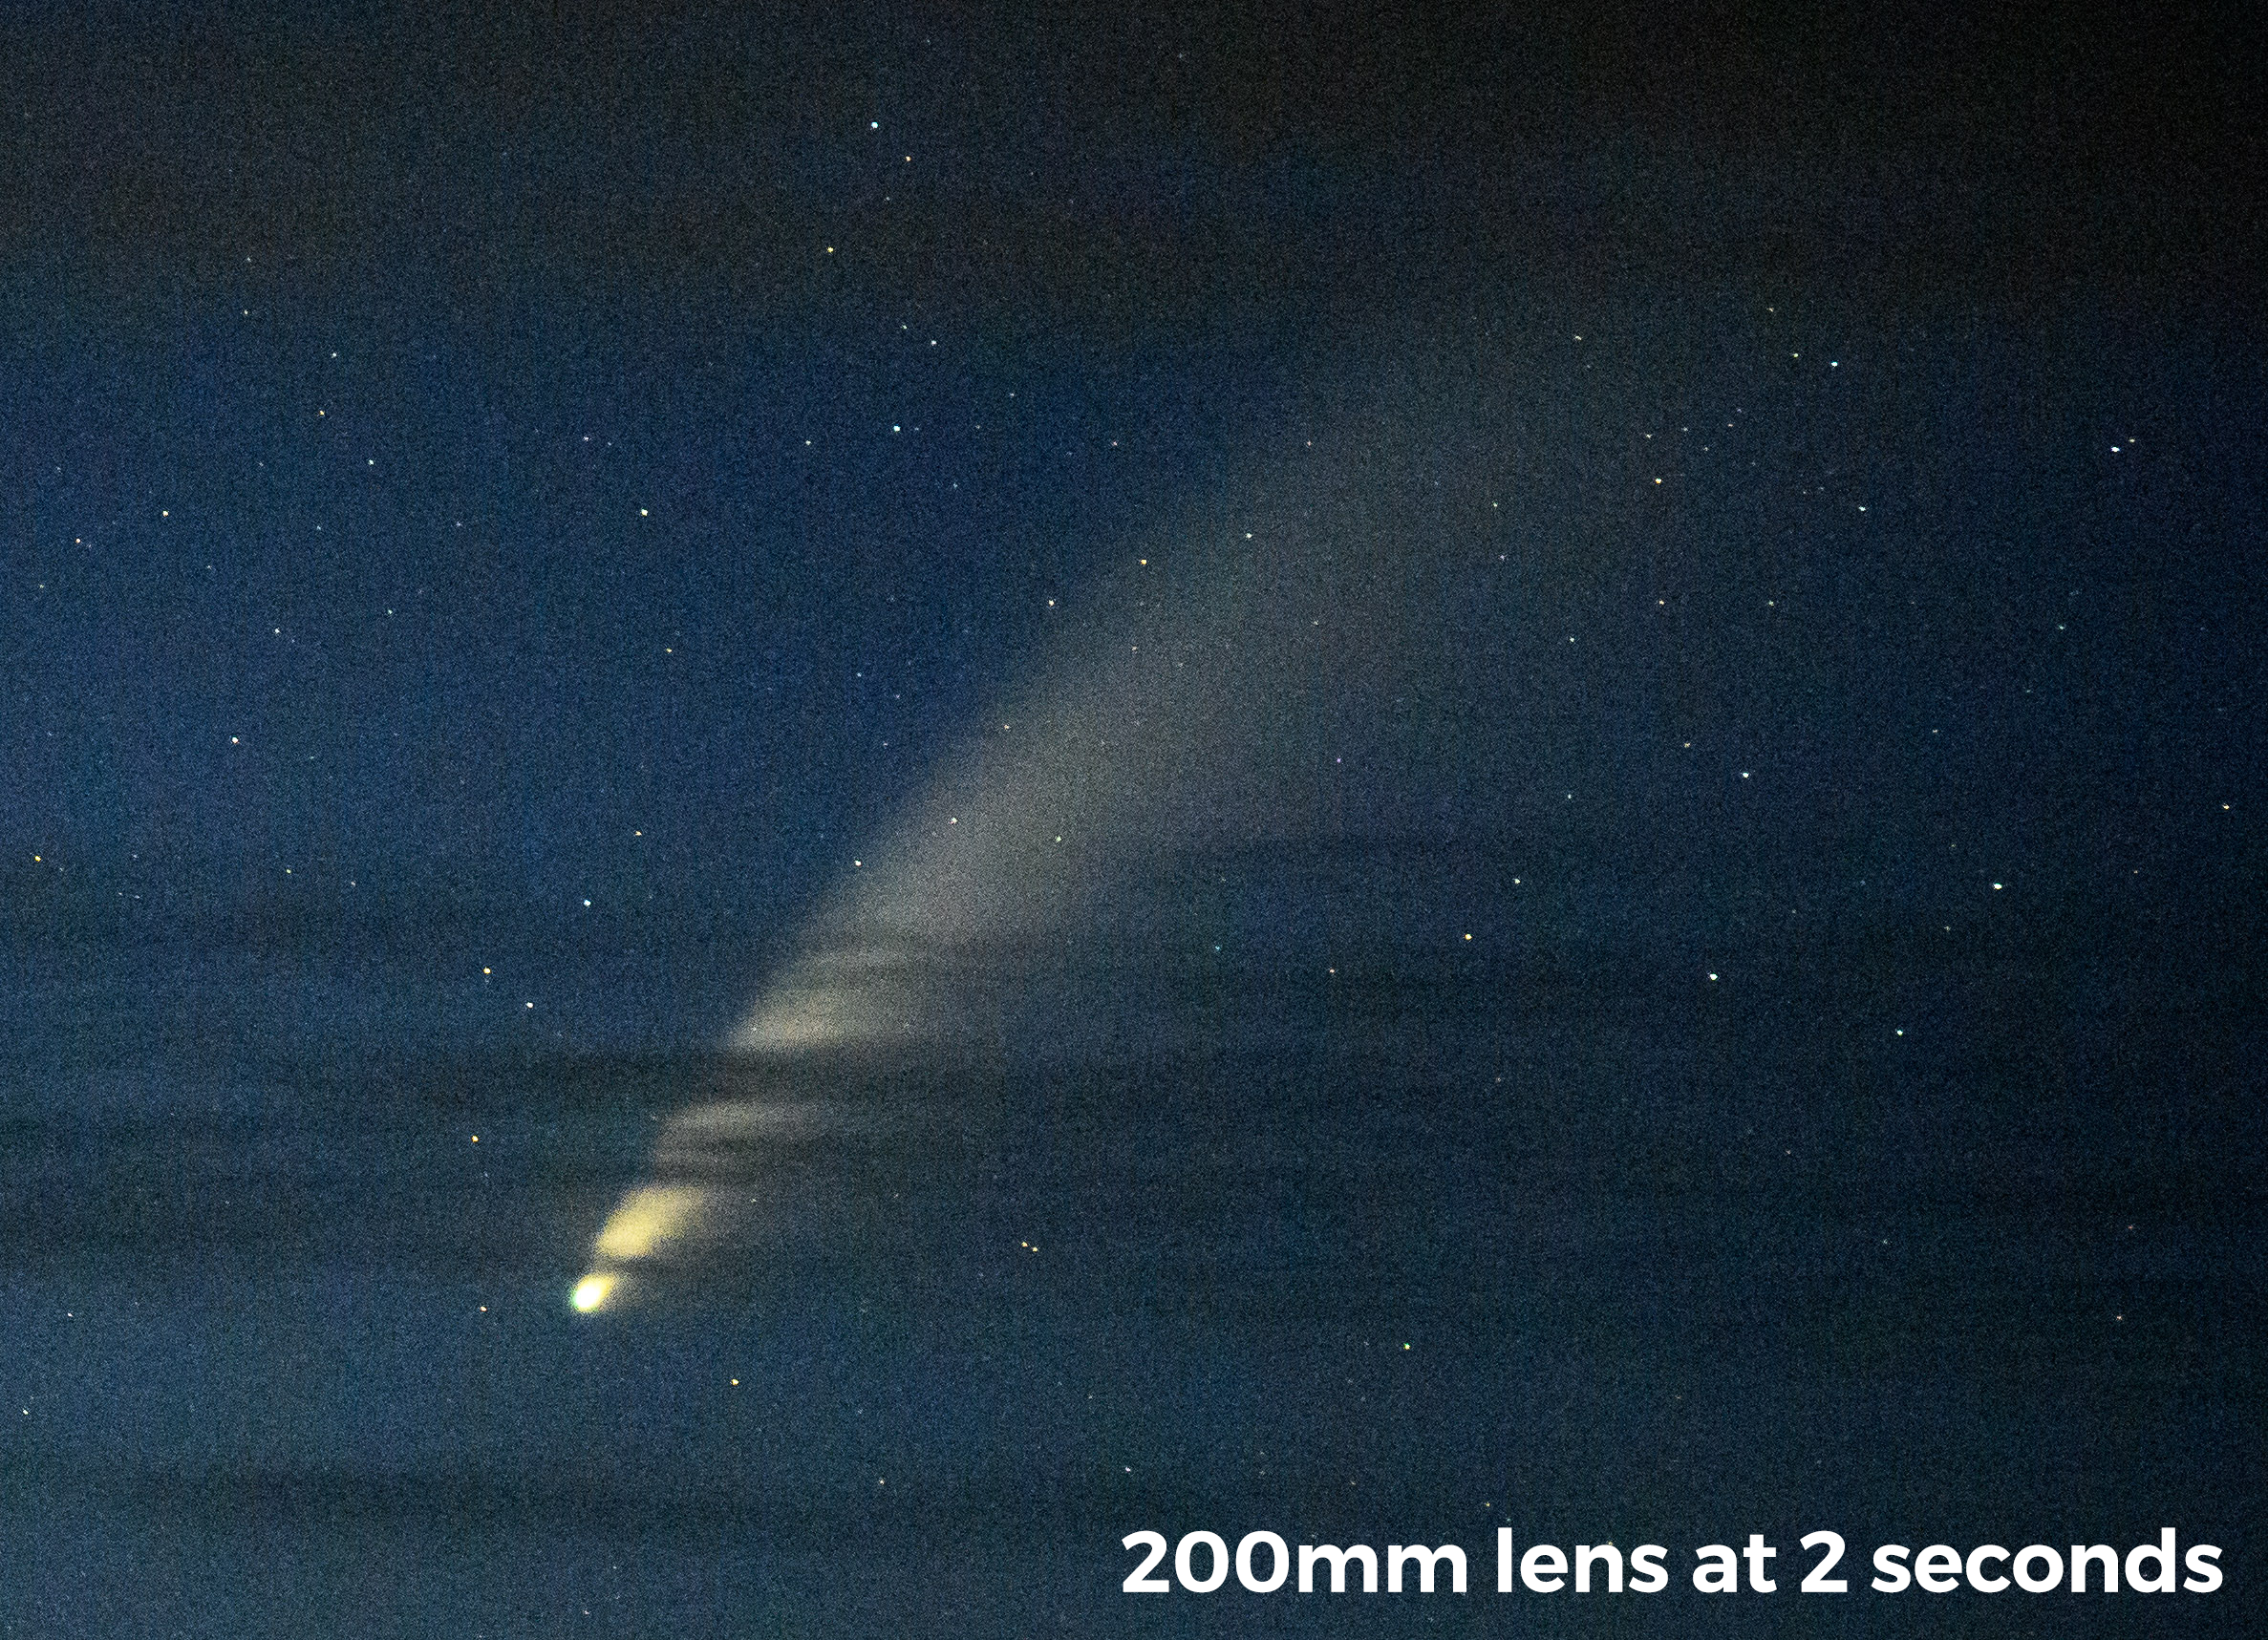
Figure 3. Both of these photos were shot with a 200mm lens—one at 2 seconds, which is compliant with the 400 Rule, the other at 15 seconds, which allowed for shooting at a lower ISO. The comet isn’t that much fuzzier in the latter image, but the stars are trailing. In the former image, despite the higher noise, everything is sharp.
(Another tactic could be the opposite philosophy. Why keep the comet sharp? Maybe photograph a comet trail!)
Lens Choice
The lens you choose will depend on your composition, of course, but it will also depend on your priorities.
If you would like the comet to appear larger in your frame, you’ll want to use a longer lens. However, the longer the lens you use, the shorter your exposure will need to be to keep the comet and stars sharp, which means you’ll need more light to make a good image.
Therefore, if you want to use a longer lens, you’ll probably want to shoot during twilight, when there’s more light in the sky to work with. For example, if shooting with a 200mm lens, the 400 Rule dictates a maximum of 2 seconds for the shutter speed before stars and the comet begin to trail. At twilight with an f/2.8 lens you can shoot for 2 seconds at ISO 3200 or 6400, but after twilight you would need an ISO of 64,000. So, yeah, best to save those telephotos for twilight.
Once you’re into astronomical twilight and beyond, stick with shorter lenses. The comet will appear smaller in your frame, but with creativity you can make the image work (Figure 4). Just put the comet somewhere in the scene where it will be noticeable and will complement the composition. In other words, you’re essentially making an environmental portrait of NEOWISE. Most of the good comet photos I’ve seen were made this way.
Figure 4. Comet NEOWISE over the Pemaquid Point Lighthouse, Maine. © 2020 Lance Keimig. Nikon D750 with a Sigma 24mm f/1.4 Art lens. 13 seconds, f/4, ISO 6400.
Compositing
You could also use both types of lenses to make a composite image. You could shoot a big comet with a long lens earlier in the evening, the foreground and a big sky with a short lens later in the evening, and blend them together in post-production.
This approach is not something I favor either for my artistic process or when looking at others’ artwork—I just don’t like unnatural proportions of natural objects (i.e., a giant moon over a wide-angle alpine landscape). But such a strategy is possible, so it’s prudent to mention here. If you like that style, or you’d like to try that style, the comet is a good subject for it.
Compiling Light
Just like with stars, there are other approaches to keeping the comet sharp, and they involve some way of “stacking” the available light to create a low-noise image in a high-ISO situation. This might allow you to use that longer lens at a lower ISO, or to just get a cleaner final photograph.
Stack multiple exposures of the same sky scene using a program such as Starry Landscape Stacker for Mac or Sequator for PC. (See our blog post “Processing Star Point Images … .” This works great for creating crisp, low-noise photos of stars, and works well with a comet too. On the other hand, it means more work both in the field and at the computer.
Use a sky-tracking device, such those made by SkyWatcher and Move Shoot Move (Figure 5). These mount to your tripod and slowly rotate the camera to counteract the rotation of the earth, which allows you to shoot the night sky with longer exposures and lower ISOs. This method also requires a little more field work, as well as some extra post-production time if you want to mask in a sharp foreground.
Figure 5. The Sky-Watcher Star Adventurer (left) and Move Shoot Move Portable Star Tracker (right) are two gear options that allow you to shoot longer exposures of moving stars (and comets).
White Balance
The approach to white balance is not much different than it would be photographing any other night. Just shoot how you normally would for a given environment. Here are a couple of resources from our blog to help you decide:
Mind the Moon
As mentioned previously, the moon is about to crash the comet party. This means two things:
In the nights after the Monday new moon, a thin crescent will be low in the sky during twilight, which might sound tempting for including it in a composition with NEOWISE. However, the moon rises in the east, more than 100 compass degrees away from the comet. So you’re not likely to get them in the same frame in a good composition. (Unless you shoot a pano. Hmm.)
After a few nights (Friday, where we are), the moon will still be in the sky after astronomical twilight is over. It will be at 20 percent illumination that night, and getting brighter, and setting later, on each successive night. Concurrently, the comet will be traveling further from the sun and from Earth. All of these factors together mean that NEOWISE will grow fainter each night.
Find a Foreground
Shooting a comet certainly has a wow factor—just like shooting the Milky Way, or a meteor shower, or a moon rise, etc. But all of those are better when set in the context of a composition that includes other elements.
So rather than just pointing your camera at the sky, remember to look for an interesting foreground, and set the comet behind it. A good rule of thumb is that if the composition isn’t interesting without the comet, then it won’t be a great photo even with the comet.
Look for a lighthouse, or a building, or a shoreline, or a sea stack, or a train trestle, or a rock formation, or mountain road, or an old barn, etc. Make a good composition with the comet as an important element alongside whatever else, and you’re on your way to artistic greatness.
Wrapping Up
Of course, as always, we would love to see your images of Comet NEOWISE. Share them in the comments section or on our Facebook page. (To view a bunch of great images our workshop alumni and others have already shared, see this post.)


