Muses from the Past: The Night Photographs of Jessie Tarbox Beals

Analyzing classic photographs can be an effective way to progress in one’s own work. The key is not to simply mimic someone else’s great ideas, but to use the knowledge that comes with reproducing the work of masters and move on to create something new. With this in mind, National Parks at Night's Lance Keimig offers this ongoing series highlighting some of the early masters of night photography. We'd love to see any photographs you create after learning more about the pioneers of this niche—please share in the comments section!


In his book Conversations With Picasso, the famous Hungarian night photographer Brassai tells of how Picasso came to nickname him “The Terrorist” because of his use of explosive magnesium chlorate flash powder to illuminate his photographs. Brassai certainly was not shy about his generous use of the smoky, smelly substance, but perhaps the lesser known photographer Jessie Tarbox Beals is better deserving of the moniker.

Jessie Tarbox Beals, c. 1905

Jessie Tarbox Beals, c. 1905

Beals is known as the “first woman news photographer,” and the “first woman night photographer,” and was also one of the first female photographers to use flash powder. In 1905, the New York American reported:

The explosion of an over-charge of flashlight powder set off by two photographers, one of them a woman, just as crowds were poring out of the Garrick Theatre, caused tremendous excitement and considerable damage. Windows in several houses were broken, scores of families, brought out of bed by the detonation, which rang through three blocks, came scurrying into the street, some of them in their bedclothes. The theatre patrons were panic-stricken, and there was a stampede to get out of the neighborhood. The photographers were trying to get a special group coming out of the theatre, from a stoop across the street, when the explosion occurred. Two pounds of flashlight powder, four times the usual amount, is alleged to have been set off.

It was difficult for any photographer to estimate the amount of powder needed to light up a space outdoors. Despite their severe shaking up, both the man and the woman recovered sufficiently to lose themselves in the crowd and get away. … Palmer Hunt, who lives at 70 West 35th Street, whose windows were wrecked, said that he thought that the explosion was due to an attempt on his life. He said that he is a strike-breaker, and at the head of the Iron Worker’s Ass’n, a non-union organization. Investigation proved however, that the entire disturbance was due to a no more serious disturbance than that which lay behind the effort of the photographers to get their coveted picture.

And all these years since 9/11, I’ve been wondering what photographers had to do with terrorism every time I get rousted by the cops or an over-zealous security guard. Turns out I can blame it on Jessie Tarbox Beals!

Beals was born in 1870 and died in 1942, which made her a close contemporary of Alfred Stieglitz. While Stieglitz left a larger legacy, Beals was a remarkable woman whose drive and spirit enabled her to succeed in a challenging profession against significant odds.

Throughout her career, Beals worked with an 8x10 view camera, even at night. A large view camera is cumbersome even in the daytime, but is exceedingly difficult to work with in the dark. Her basic kit consisted of camera and lenses, a bulky wooden tripod, holders, and heavy glass plates that weighed about 50 pounds.

Like most women of her day, Beals had to work at least twice as hard as men to make any headway, and she worked tirelessly to make ends meet. She often made speculative images of events and sold 8x10-inch contact prints for 60 cents apiece!

There are relatively few mentions of night photography in Beals’ papers, nor in her 1978 biography written by Alexander Alland, but there is plenty of photographic evidence.

The archive of her work at Harvard University’s Schlesinger library contains well over 100 prints of nocturnal images that span Beals’ photographic career. She photographed New York at night at the same time as Stieglitz and his followers, but primarily as a journalist. Her images were sharp and in stark contrast to the soft focus dreamscapes of the pictorialists.

Sadly, we will never understand her motivations to photograph at night, nor how she initially happened upon night photography in the first place. Stieglitz and his colleagues had been photographing in New York since about 1895, and there is some evidence that Beals was aware of Stieglitz and certainly his 291 Gallery where many of the pictorialist’s night images had been shown.

Beals took many night views of the pavilions of the 1904 St. Louis World’s Fair, houses lit by gaslight in Boston’s Beacon Hill neighborhood, and later the mission-style architecture of Santa Barbara after she moved to California in 1922.

Beals had trained her husband to be her assistant, and he processed her plates and made prints—but they were generally of the down and dirty variety a journalist makes on the fly for a deadline rather than as precious works of art. As in the examples shown here, Beals’ night views are generally ordinary scenes showing a record of time and place.

The significance of her legacy is more one of a pioneer than a maker of images. It’s not an exaggeration to say that Beals’ efforts paved the way for other women photographers who came after her. Alland wrote in his biography of Beals that after her success in New York, there was an increasing number of other women photographers who ironically became her competitors. It was that competition for assignments that in part ultimately led to her relocating to California.  Photographers such as Bernice Abbott, Helen Levitt and Margaret Bourke White followed close behind in the footsteps and tripod holes of Jessie Tarbox Beals.

There wouldn’t be the slightest use
For it to snow in Boston,
Because my aching pocket book
Has such an awful frost on.
I want to go and take some more
Night photos in your city,
But till some “dough” doth make a show,
I can’t, and more’s the pity.
— Jessie Tarbox Beals
Lance Keimig is a partner and workshop leader with National Parks at Night. He has been photographing at night for 30 years, and is the author of Night Photography and Light Painting: Finding Your Way in the Dark (Focal Press, 2015). Learn more about his images and workshops at www.thenightskye.com.

UPCOMING WORKSHOPS FROM NATIONAL PARKS AT NIGHT

Oh, the Places We’ll Go—15 Destinations for Epic Night Adventures in 2019

It’s hard to believe that we are entering our fourth year of leading night workshops to beautiful and spectacular places. But here we are, announcing our adventures for the next year.

We threw our dream darts all over the globe, from the mysterious giant stone Moai statues of Easter Island to the sand dunes of Morocco. In between, volcanoes, canyons, towers, ghost towns, lighthouses and great, smoky mountains will be our subjects under the stars.

We will also offer a trio of National Parks at Night firsts:

  • our first backcountry camping adventure
  • our first urban night workshop
  • our first dedicated post-processing course

Oh, and did we mention we are going to Cuba and will tour the country in the very cars we love to photograph there?

So come dream with us and dedicate some time to leveling up your night visions!

Note: Several workshops have already sold out, as we announce them to our alumni and email list first. However, if that workshop truly speaks to you, be sure to sign up for the waitlist! There is no fee to do that, and we’ve had many waitlisters become happy alumni!

A Trio of Trip Types

We offer three styles of learning experiences: our Passport Series and Adventure Series, and our brand new skills development workshops.

Passport Series

At Passport Series workshops, we take you to a national park and teach you how to interpret the night sky against a variety of landscapes and lighting elements. We often have these cherished locations to ourselves and offer classroom time as well as hands-on education.

Adventure Series

At Adventure Series workshops, we take you to other fascinating natural wonders that may be on or near national and/or protected lands in in the U.S. or beyond! These workshops may have a little less “classroom” time and a bit more field time as we are constantly exploring beautiful places during the day and night.

Skills Development

In 2019 we’re introducing the skills development workshops, designed to kick up your processing power in Lightroom and Photoshop! We will guide you to get your photographs organized and looking better than ever before. It’s time to take it to the next level. Five nights and six days of skills improvement, plus a little shooting at night and then applying what you learned to those RAW files during the day.

The Amazing Destinations

You can click on any of the links below to learn a lot more about all the workshop locations. For a quick read about what each experience will entail, read on …

Dates Location Series
January 20-25 Post-Processing Intensive in the Catskills Skills
Feb 19-March 1 Easter Island Adventure
March 20-29 Morocco Adventure
April 11-16 Valley of Fire & Nelson Ghost Town Adventure
April 21-26 Great Smoky Mountains National Park Passport
May 19-24 Outer Banks & Cape Hatteras National Seashore Adventure
June 9-14 Bryce Canyon National Park Passport
June 16-21 Grand Canyon National Park South Rim Passport
July 8-12 Devils Tower National Monument Adventure
August 5-10 Shi Shi Beach Backcountry Adventure
August 18-22 Lassen Volcanic National Park Passport
October 2-6 Cape Cod and the Province Lands Adventure
October 13-18 Big Bend National Park Passport
November 3-8 Golden Gate NRA & San Francisco Adventure
December 7-15 Cuba Adventure
 

Passport Series

Great Smoky Mountains National Park

Join us for the gently moon-kissed cliffs, mountains, coves, riversides, preserved cabins and churches of this historically pivotal national park. From the rolling valley of Cades Cove to the peak of Clingman’s Dome, we’ll explore the mercurial and mystifying skies of Great Smoky Mountains National Park.

Dates: April 21-26, 2019
More Information: Great Smoky Mountains National Park

Bryce Canyon National Park

In the surreal and vast expanses of the Utah landscape, we will spend a magical week exploring the otherworldly hoodoos of Bryce Canyon National Park. The crimson, orange and yellow rock spires make the perfect foreground for our night photography.

Dates: June 9-14, 2019
More Information: Bryce Canyon National Park

Grand Canyon National Park South Rim

It’s one of the greatest natural spectacles in the world. Join us in our first year of exploring the many layers of the Grand Canyon. Our focus during the 100-year anniversary of the park will be the popular South Rim. Known for its spectacular sunrises and sunsets, this workshop will emphasize many ways we can interpret the rim—from long exposures to panoramic and time-lapse techniques. We will also prove that the Grand Canyon is much more than a “rim shot.” We will seek the many traces of humankind that can be found along the canyon: Native American ruins, historical buildings and woman-made structures.
Dates: June 16-21, 2019
More Information: Grand Canyon National Park South Rim

Lassen Volcanic National Park

Lassen Volcanic National Park is home to steaming fumaroles, meadows freckled with wildflowers, clear mountain lakes and all four different types of volcanos. Jagged peaks tell the story of its eruptive past while hot water continues to shape the land. Lassen Volcanic National Park offers opportunities to explore and photograph a majestic landscape that is distinctly a part of the American West.

Dates: August 18-22, 2019
More Information: Lassen Volcanic National Park

Big Bend National Park

Big Bend National Park is pretty raw country. It’s also pretty. Especially in the right light, and double especially at night. All the rock formations, all the canyons, all the mountains and valleys and dirt roads and ruins—all sit under some of the quietest and darkest night skies of North America. The landscape is at once harsh and beautiful, at once hard and delicate, at once tough and mesmerizing. And we’ll be there to capture it all under the October stars of Texas.

Dates: October 13-18, 2019
More Information: Big Bend National Park

Adventure Series

Easter Island

Few places on earth are as mysterious or compelling as Easter Island. The giant stone figures known as Moai oversee this remote island 2,200 miles off of the coast of Chile. Most of Rapa Nui, as it’s known to the locals, is a national park. Not only is it hard to get to here, but it is notoriously difficult to access the park at night. In February of 2019, National Parks at Night will be taking 10 lucky people to do just that.

Dates: February 19-March 1, 2019
More Information: Easter Island

Morocco

Morocco is a land of large bustling cities, tranquil seaside towns and remote mountain villages. Our photo tour avoids the major cities in favor of smaller, quiet places away from most of the tourists and tourist traps. The port city of Essaouira, the kasbah at Ait BenHaddou and glamping in the Sahara desert will be the highlights of our adventure.

Dates: March 20-29, 2019
More Information: Morocco

Valley of Fire & Nelson Ghost Town

Join us for the broad, red mountains, valleys and arches within Valley of Fire State Park and the abandoned wonderland of the Nelson ghost town. We’ll explore having fun with light and stars in these desert jewels of the American southwest.

Dates: April 11-16, 2019
More Information: Valley of Fire & Nelson Ghost Town

Outer Banks & Cape Hatteras National Seashore

The Outer Banks—what a name, and what a place! Home to tasty crab cakes, the honored ground of first flight, pristine national seashore and perhaps the most iconic lighthouse in the United States. And at night, when you look up, oh my! You take in the stars and the Milky Way in that incredible Atlantic darkness while the ocean breezes tousle your hair and bring salt to your lips. And beneath it all, a camera and a tripod, capturing the majesty of what this special place offers.

Dates: May 19-24, 2019
More Information: Outer Banks & Cape Hatteras National Seashore

Devils Tower National Monument

Join us to explore the strange stone mountain of America’s first national monument. Revered by Native Americans in folklore, shrouded in mystery, we’ll explore the mercurial skies of Devils Tower.

Dates: July 8-12, 2019
More Information: Devils Tower National Monument

Shi Shi Beach Backcountry

Shi Shi Beach is a remote photographer’s paradise, reachable by six miles of round-trip hiking, plus a little more to reach nearby Point of the Arches. We will hike first to Second Beach for a warm-up night of camping and photography, then to Shi Shi for a two-night, three-day, adventure among the stars and the starfish, the sand and the sea stacks. We will photograph ebbing and flowing ocean waters, tidal pools, Pacific sunsets, and of course the Milky Way and the beautiful Olympic night skies.

Dates: August 5-10, 2019
More Information: Shi Shi Beach Backcountry

Cape Cod and the Province Lands

Cape Cod’s Province Lands comprise a captivating collection of simple scenic wonders. Ponds. Beaches. Sandy dunes. Pine forests. Lighthouses. Old dune shacks. Cranberry bogs. Atlantic waves cascading onto the coast. These old shores hold countless treasures for the night photographer. We’ll explore them all, and more of what Cape Cod offers, during one of the peak of the region’s finest season: a New England autumn.

Dates: October 2-6, 2019
More Information: Cape Cod and the Province Lands

Golden Gate National Recreation Area & San Francisco

Like a beacon at the end of the world, San Francisco’s diverse land and skyscape will guide our exploration into our first urban workshop. We will focus our lenses on the winding streets and bright city lights, but also explore the coastline, bunkers, bridges and ruins that intersect the beautiful Bay Area. We will challenge you to re-interpret the city with a multitude of long exposure and processing techniques that will leave you with a unique and fresh view of The City by the Bay.

Dates: November 3-8, 2019
More Information: Golden Gate National Recreation Area & San Francisco

Cuba

On this photography and cultural tour you’ll experience the best of Cuban culture on an island with photo opportunities everywhere you look. In Havana we’ll explore life in the streets both day and night, plus the vibrant art and music scenes, architecture, people and cuisine. We’ll road-trip to Las Terrazas and Viñales Valley (a UNESCO World Heritage Site) to photograph Cuba’s magical landscapes. This boutique tour will give you access to Cuban experiences you’d never be able to create on your own. All you’ll need is an adventurous spirit and flexible mindset (it’s Cuba!).

Dates: December 7-15, 2019
More Information: Cuba

Skills Development

Post-Processing Intensive in the Catskills

You’ve spent a lot of time building your camera skills and honing your photographic vision. Now it’s time to take it to the next level. Post-processing has become an integral part of nearly every discipline of photography. Just as the black and white photographers of the 20th century were able to creatively interpret their work in the darkroom, we can now use modern technology to enhance our photos, and even to create images that were impossible only a few short years ago.

Dates:  January 20-25, 2019
More Information: Post-Processing Intensive in the Catskills

But Wait, There’s More!

Don’t see the perfect fit for your schedule or location? In the coming months we will announce our 2019 Ambassador Series destinations with our partners at Atlas Obscura, Rocky Mountain School of Photography, and a brand new partner whose name we’re not yet mentioning. (Hint: It’s big.)

Also, remember to always monitor our Speaking Engagements page. We give lectures and photo walks in the New York City area and all over the country. And if you want us to come directly to your camera club or meet-up group, feel free to contact us. (Click here to see what we can offer.)

We also offer one-on-one tutoring in-person or via videoconference that can help you build your portfolio, organize your images or give you targeted, individualized education to elevate your photography skills.

Finally, we’d like to express a deep thanks to all our alumni—the 300 fine photographers who have accompanied us over the past 2.5 years to wonderful night photography locations such as Acadia, Biscayne, Capitol Reef, Dry Tortugas, Death Valley, Redwood, Zion, Great Sand Dunes, Cape Cod, Centennial Valley and more. We appreciate you so very much.

Do you want to see their work? Check out this playlist of all the workshop slideshows. Want to see some of their accomplishments? Check out our Alumni Spotlight.

Seize the Night

2019 will have 365 nights. Which will you be spending with us? Sign up today to #seizethenight!

Gabriel Biderman is a partner and workshop leader with National Parks at Night. He is a Brooklyn-based fine art and travel photographer, and author of Night Photography: From Snapshots to Great Shots (Peachpit, 2014). During the daytime hours you'll often find Gabe at one of many photo events around the world working for B&H Photo’s road marketing team. See his portfolio and workshop lineup at www.ruinism.com.

UPCOMING WORKSHOPS FROM NATIONAL PARKS AT NIGHT

4 Ways to Remove Airplanes from Star Stacks

When I make a star stack sequence, I’m at a crossroads for my editing choices.

Do I remove the plane trails? If so, do I live with the tiny gaps in those star trails left behind by the removal process?

It’s a hard decision. On the one hand, the journalistic approach is, “That’s what happened in front of my camera—it’s the truth.” If that’s your creed ... you’re done! Make whatever levels and color adjustments you want and move on.

But when I desire to have a final image without plane trails, I spend some time to make sure it’s done right, and that I’m making a quality photograph.

Want to learn some techniques on how to do this? Is there a method—without having to be a professional photo retoucher—that doesn’t leave gaps? Read on, my fellow night photographer.

Note:

If you are unfamiliar with how to create a star stack, see these previous blog posts:

Prep: How to Find Which Layers Have Plane Trails

I used the same image stack for all the demos below. Shot in the Fruita Orchard of Capitol Reef National Park during our workshop in June 2018.

Gear:

Exposure details:

  • 63 images shot at 30 seconds, f/5.6, ISO 6400
  • total exposure duration: 31.5 minutes

I knew I wasn’t going for star points, so I chose a 30-second exposure to keep long exposure noise down in the high desert summer heat. The temps weren’t that bad, but I wasn’t taking any chances.

For expediency, I exported full-resolution JPGs from Lightroom to Photoshop. Stacking TIFFs straight from Lightroom with this many files can really choke a computer. As it was, the PSB file was 4.2 GB when saved.

Note:

Do not apply lens profile corrections before making a star stack. It can lead to irreparable moire in the final stacked image. If you want to do apply lens corrections, do so after stacking and flattening.

How to Find the Planes

  1. Create your image stack in Photoshop and save as a PSD or PSB file (the latter when the file is over 2 GB—don’t worry, Photoshop will prompt you if it’s needed).
  2. Identify which layers have plane trails. But how, you ask?
  3. I like to turn on all the layers and apply the Lighten blend mode to each so I can see everything.
  4. Then I click and hold on the eyeball icon at left of each layer and drag downward in groups of ten or so, while staring at the image. This gives me kind of a faux animated preview of the layers being added one by one. (See video below.)
  5. If I see plane trail (or a portion of one) disappear, then I click the eyeball on each layer, one by one, upward from the bottom until it disappears. That’s how I know I found the offending layer.
  6. I make that layer a color to identify it for further work later.

An alternative way to do this is by revealing only one layer at a time, from top to bottom. Which strategy to use is just personal preference. Unless you’re on a PC, apparently. Chris is a PC user, and the trick I detail above and in the video doesn't work for him. What he does is group the layers ten or so at a time, changes the blend mode of all the groups to Lighten, then hides each group one by one, which helps him narrow down the locations of trails more quickly. Finally, he goes into the offending groups and finds the offending planes.

Either way, this process is time-consuming. So be patient. Find those planes. For the photo in the video below, the process above took me about five minutes. (I made it faster for you to watch.)

Note:

You may also find meteors and satellites in there. We have another blog post coming soon on how to identify the differences between them.

4 ways to remove plane trails in a star stack with Layer Masks

  1. Remove plane trails in a flattened image in Lightroom.
  2. Use the black paint brush in Photoshop.
  3. Use the spot healing brush in Photoshop.
  4. Use layer masks in Photoshop.

Which one is best? I am going to explore all four and compare them, so you can decide which works best for you. And, you can bet that I will have an opinion about what works best for me, too. ;-)

Removing Plane Trails in a Flattened Image

This is the fastest method, but also the least likely to be effective in terms of quality. If you must have it fast, try this first. If you don’t like the results, try one of the options that follows.

  1. Open your flattened image with plane trails in Lightroom.
  2. Select the Spot Healing Brush.
  3. Click once at the beginning of the trail. (See note below.)
  4. Hold Shift on your keyboard.
  5. Click once again at the end of the plane trail.
  6. Repeat for every plane trail on every layer.

NOTE:

You can paint freehand with the trackpad on your laptop (most awkward), with your mouse (somewhat awkward) or with a tablet like a Wacom (hardly awkward at all). This applies to subsequent techniques too.

I find that using keyboard arrow keys to move the healing brush target around is easier to manage than just using a mouse or trackpad. But it causes “jaggies” (below) more often than not, no matter how precise you are.

Using a Black Paint Brush in Photoshop

Since the Lighten blend mode for layers reveals the brightest pixels in a scene, painting with a black brush right on the image layer will make trails (which are bright) disappear.

  1. Select the Brush Tool with these settings: Opacity at 100 percent, Flow at 100 percent and Color at 100 percent black.
  2. Make your brush slightly larger than the width of your plane trail. (You may have to adjust this up and down, depending on the trail.)
  3. Paint over the plane trails. But only over the plane trails.
  4. Repeat for every plane trail on every layer.
  5. Merge layers or flatten when done with all.

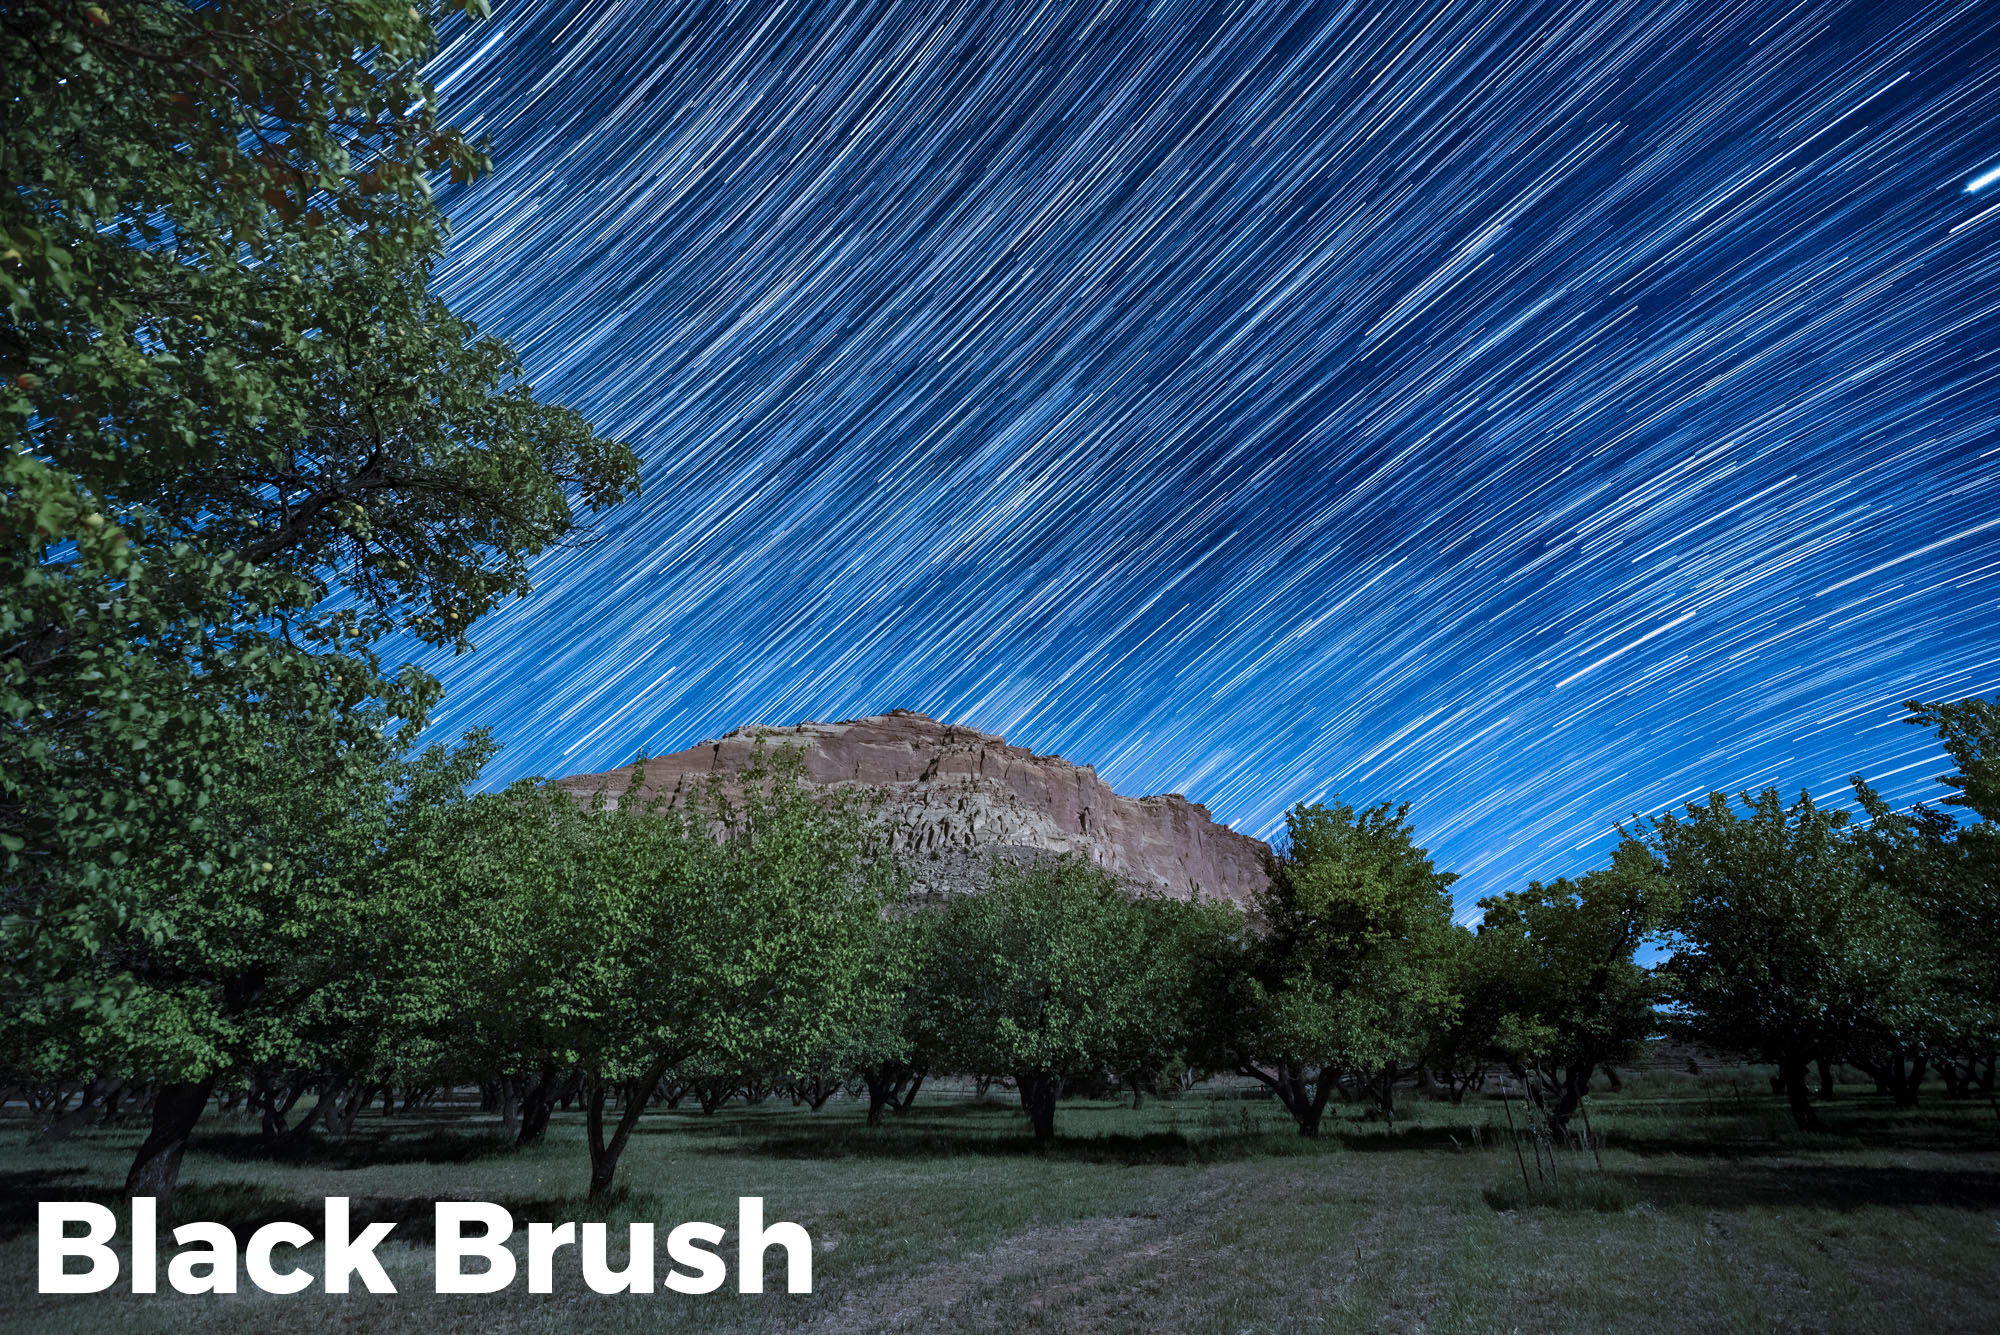
Resulting image after using black brush to remove plane trails. Click to enlarge.

100 percent zoom crop to an area where a plane trail was removed.

In this video, I used the process of identifying layers first and then color-coding them before blacking out the trails. Even then, I discovered more along the way.

Note:

This is a destructive process. No going back. Unless you duplicate each layer you paint on and turn off the duplicate, but that increases your PSD/PSB size.

Using the Spot Healing Brush in Photoshop

I recently discovered this. While mucking about in Photoshop, editing my star stacks from Capitol Reef National Park earlier this year, I had a What If? moment. …

I asked myself, “What if I try using a different tool to remove star trails?” (I usually use layer masks, which we’ll get to in a little bit.)

  1. Select the Spot Healing Brush tool, and change the Type to Content-Aware.
  2. Make your brush slightly larger than the width of your plane trail.
  3. Click once at the beginning of the trail.
  4. Hold Shift on your keyboard.
  5. Click once again at the end of the plane trail.
  6. Repeat for every plane trail on every layer.
  7. Merge layers or flatten when done with all.

It works. I love this method, despite it being a destructive process.

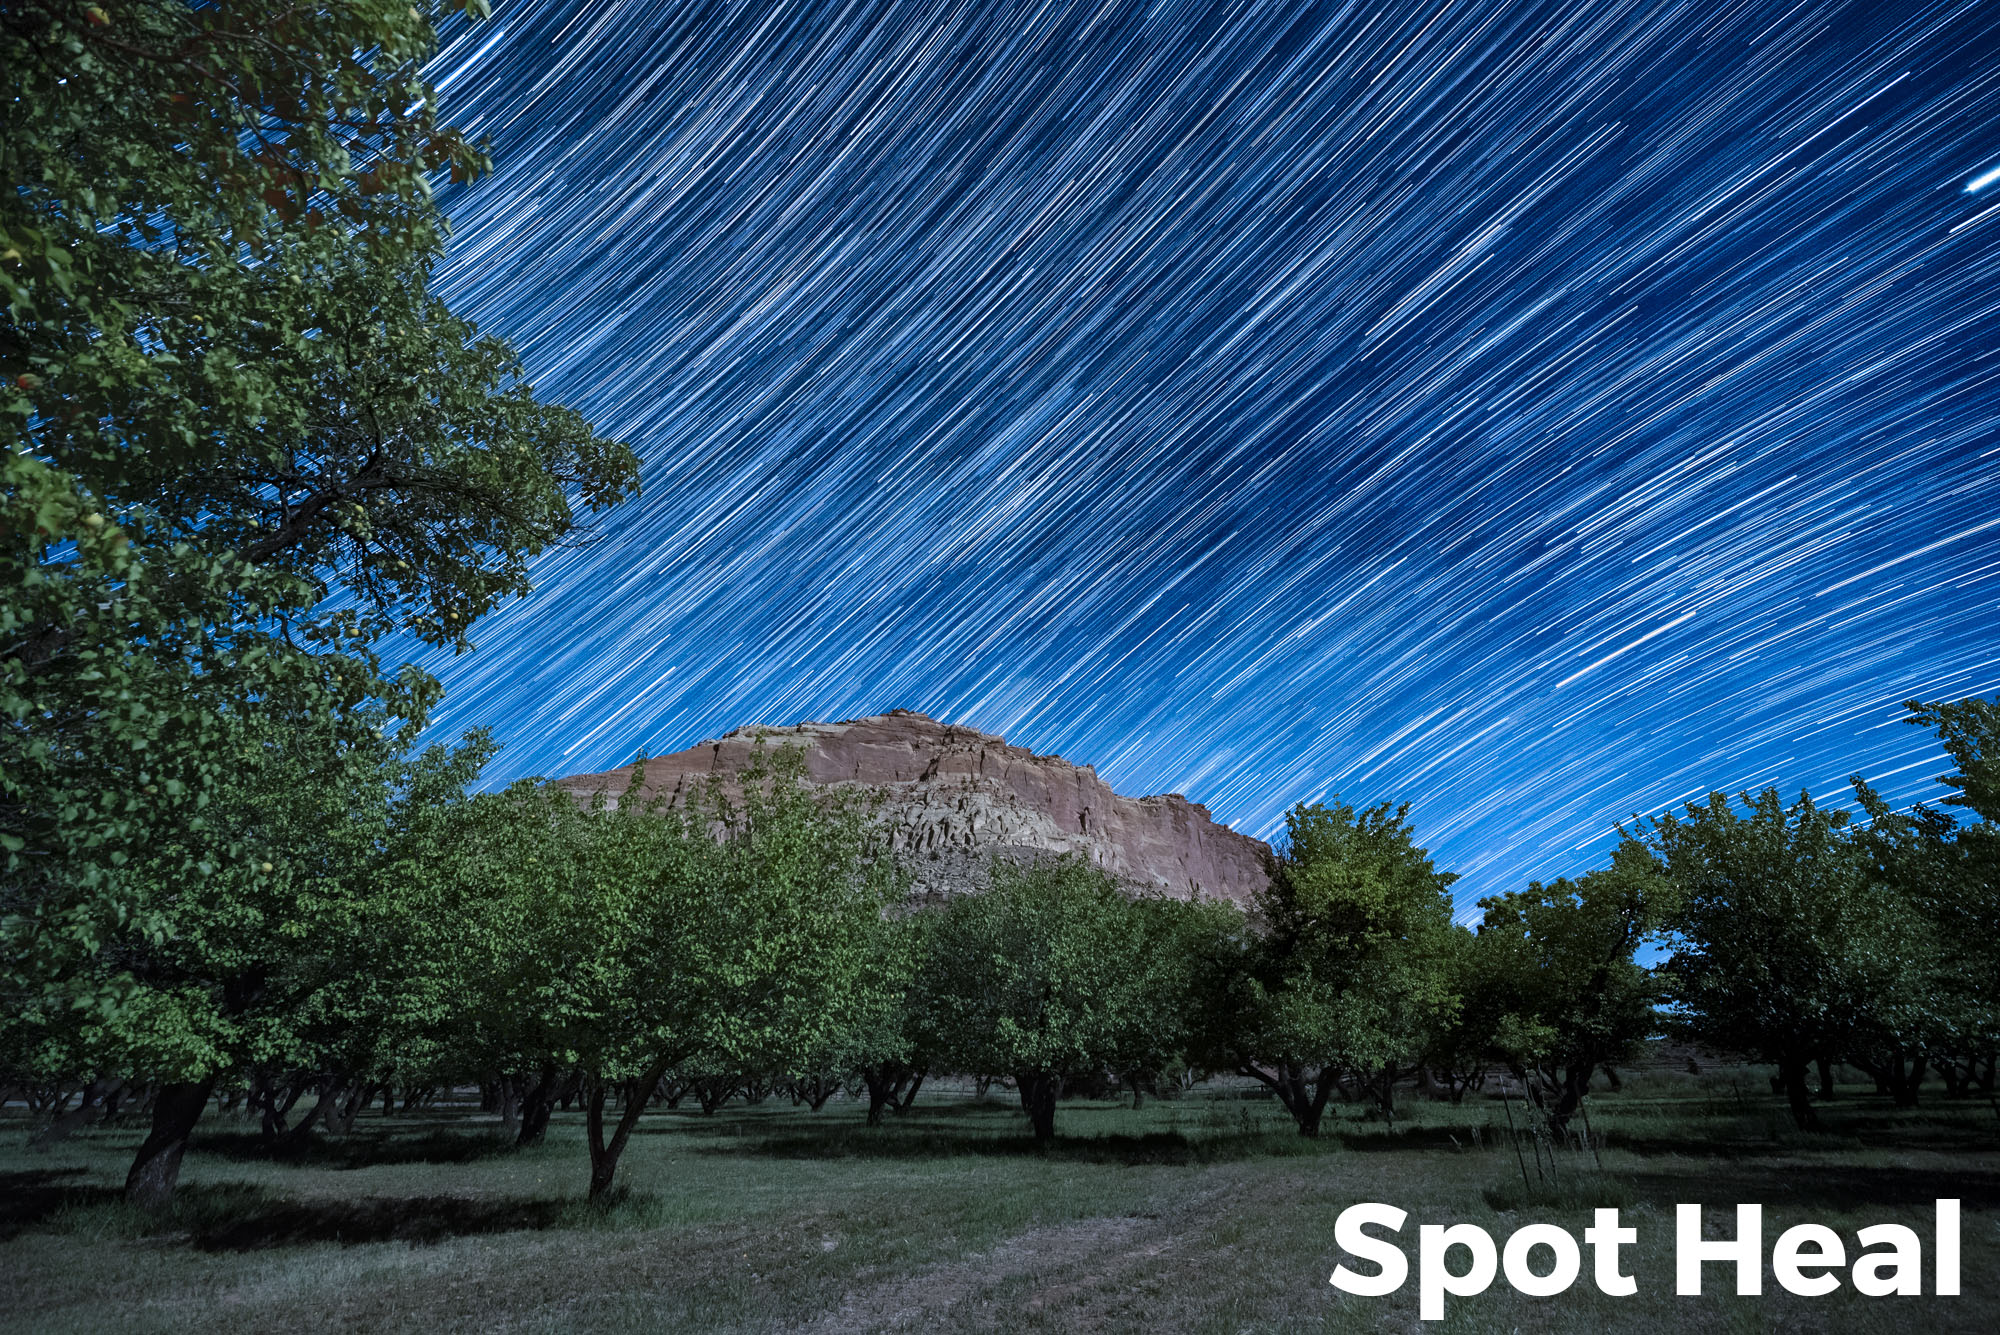
Resulting image after using Spot Healing Brush to remove plane trails. Click to enlarge.

100 percent zoom crop to an area where a plane trail was removed.

In this video, I simply went from top to bottom to eliminate trails in each layer without color-coding them. I missed one plane trail, because I was kinda tired doing both back to back.

Note:

As mentioned, this is also a destructive process. No going back. Unless you duplicate each layer you paint on and turn off the duplicate, but that about doubles your PSD/PSB size.

Comparing the Methods

Let’s take a look at how the methods stack up against each other. (See what I did there?)

The edit in Lightroom of a completed, flattened stack? I immediately abandoned it. It was janky to complete, and undesirable:

And when your stars go the wrong way, it’s really hard to make it match:

So, all that’s left are the two competitors we’ve looked at so far. Below you can see the final images from each:

And here are some comparisons I made while viewing both simultaneously in Lightroom:

Above you can see that there isn’t really much difference between the two methods. At least in terms of image quality.

But … what did my time cost?

Painting Black

Pros: Easy to see if you covered a plane trail.

Using Spot Heal Brush

Pros: I just feel better seeing an image versus black lines all over. The trails are gone, and the layers still looks like a photograph.

Both methods have the same cons:

  • destructive to pixels
  • makes some gaps in the trails (thought remarkably few)
  • no way to go back on edits unless you duplicate your PSD/PSB beforehand

To Identify or not to Identify

I spent eight minutes identifying layers with stuff to eliminate.

I spent 30 minutes using the black brush on those layers I identified.

I spent 27 minutes using the Spot Healing Brush, layer by layer, without color-coding or pre-identifying layers.

It’s up to you which method helps you get through the process better. I can operate without color-coding in the future. One-by-one is the way for me.

Conclusion: Which Method Wins?

Guess what? Both strategies are just as effective. Yay!

And here is the proof: When gaps appear, they do so in the same places using both methods.

The above were from testing my own hypothesis that Spot Healing would work better. Surprise! I’m delighted to discover that for this test, both techniques performed the same.

Both methods create gaps. But you can meticulously fill them in with Photoshop prior to flattening. Use the clone tool, if you have the extra hours. ;-)

The Fourth Way—Using Layer Masks in Photoshop

This is how I’d always done it before my recent discovery. This method is non-destructive—if you save your PSD/PSB, you can always roll back the edits or modify them. (The downside, of course, is that an unflattened, many-layered file could be downright huge. If you’re not planning to save an unflattened file, this doesn’t provide much benefit.)

  1. Add a mask to a layer with a plane trail.
  2. Select the Paint Brush tool with these settings: Opacity at 100 percent, Flow at 100 percent and Color at 100 percent black.
  3. Make your brush slightly larger than the width of your plane trail.
  4. Click once at the beginning of the trail.
  5. Hold Shift on your keyboard.
  6. Click once again at the end of the plane trail.
  7. Repeat for every plane trail on every layer.
  8. Make your final contrast, color and other finish adjustments.

Give it a shot. You may like this better, especially if you are already masking out other things in your scene.

Et al.

Here are some examples of other stacks I’ve done using these techniques:

So go forth and capture, my fellow lovers of the night sky. And fear not the airplanes arcing across the heavens, for you can make their presence just a memory.

Matt Hill is a partner and workshop leader with National Parks at Night. See more about his photography, art, workshops and writing at MattHillArt.com. Follow Matt on Twitter Instagram Facebook.

UPCOMING WORKSHOPS FROM NATIONAL PARKS AT NIGHT

Five Questions: Flashlights, Big Bend, Fireflies and More

Once again, we’re ready to take a swing at the questions you pitch. This installment of our “Five Questions” series features inquiries about light painting tools, built-in timers, hot parks, dewy lenses and bright bugs. If that all seems fuzzy, read on and it will all come into focus.

If you have any questions you would like to throw our way, please contact us anytime. Questions could be about gear, national parks or other photo locations, post-processing techniques, field etiquette, or anything else related to night photography. #SeizeTheNight!

1. Shedding Light on Coast

The Twins, Capitol Reef National Park. Nikon D750, Zeiss Distagon 15mm f/2.8, Coast HP7R flashlight. 26 seconds, f/3.2, ISO 6400. © 2018 Matt Hill.

Q: Can you tell me what you like in particular about Coast flashlights? Other than sturdy durability, which seems obvious. Are the beams adjustable? The couple of times I’ve fooled around with light painting, I found it was difficult to be exact with what I had. — Therese I.

A: You hit it the nail on the head. The Coast flashlights feature an adjustable zoom optic. At its widest, it is an even illumination with a crisp edge. This is fantastic for slowly illuminating a large area evenly. At its narrowest, it is very intense with a rapid falloff from center to edge. This is ideal for lighting something distant.

We often add a Light Painting Brushes Universal Connector as a snoot for very small detail work, or we cup our hands around the end and squeeze open a small crack for fine lighting work. On top of that, Coast lights are waterproof and the rechargeable versions have long-lasting batteries you can charge via USB.

The only downside is that the color temperature of Coast lights is kind of cool for night photography work. But a small CTO gel fixes that. Warms it right up. (You can read more about this in Tim Cooper’s blog post “Level Up With Light Painting: Correcting the Color of Your Flashlight.”)

Light painting is part science and part art. Exact is something you obtain only after thousands of hours of practice. And even then it’s generous to call the craft exact. — Matt

2. Built-In Intervalometers

Q. I just got a Fuji X-T2 and I have a question. Do I still need an intervalometer? There’s one built in, so I’m not sure if I need another. — Anne K.

A: Generally speaking, the built-in intervalometers are more complex to use than an external intervalometer. There’s also the issue that in many cameras, the length of the shutter speed is limited (often to a maximum of 30 seconds) with the internal option. Not ideal for long-exposure work.

However, with the X-T2 in particular, I’ve used the built-in intervalometer with star stacks and had no problem. The built-in shutter speeds for that camera (with the latest firmware upgrade) go to 1 minute, 2 minutes, 4 minutes, 8 minutes, 15 minutes! It’s awesome. If you are comfortable with the internal option, then go for it! If not, nothing wrong with using an external option. — Chris & Tim

3. Big Bend in Summer

Agave on the South Rim, Big Bend National Park. Nikon D850, Nikon 14-24mm f/2.8. 2 minutes, f/5, ISO 1000. Light painted with a Coast HP7R. © 2018 Chris Nicholson.

Q: I noticed you haven’t offered a workshop at Big Bend last year or this year. I am headed there this summer in hopes of photographing the Milky Way and other nighttime objects under a new moon sky. Do you not offer workshops there because the location just isn’t that great? I’m wondering if you’d turn me on to any spots that are preferred for astro-landscape photography. — Alison C.

A: It’s not that we don’t offer a workshop in Big Bend, just that we haven’t yet. I can assure you that this Texas park is amazing for photography, day or night.

However, as for your trip, not to dissuade you, but summer is an incredibly uncomfortable time of year to be in Big Bend. There’s always a chance that you’ll catch a break with the weather, but generally summer there is stifling and unbearable. Moreover, that same heat at night will likely create considerable long exposure noise in your Milky Way photos. I’d avoid any exposures over 30 seconds or so (depending on your camera), and I’d certainly use Long Exposure Noise Reduction.

As for locations, probably the best in the park is the South Rim, but I wouldn't advise hiking out there in summer. There are a lot of fantastic spots accessible via the primitive roads, but again, I can’t advise venturing out those ways at this time of year, because of safety in the extreme heat should the car break down or get a flat tire.

However, you can find plenty of great spots to photograph that are closer to the safety of the main roads. I would definitely check out the Chisos Basin and Santa Elena Canyon, and you can find interesting ruins in the surrounding towns that are good for light painting.

No matter where you go, always have a good supply of extra water in the car—not just enough to drink for the shoot duration, but enough to drink in desert heat should you run into car issues. Have I mentioned this place is hot in summer? — Chris

4. Aurora and Condensation

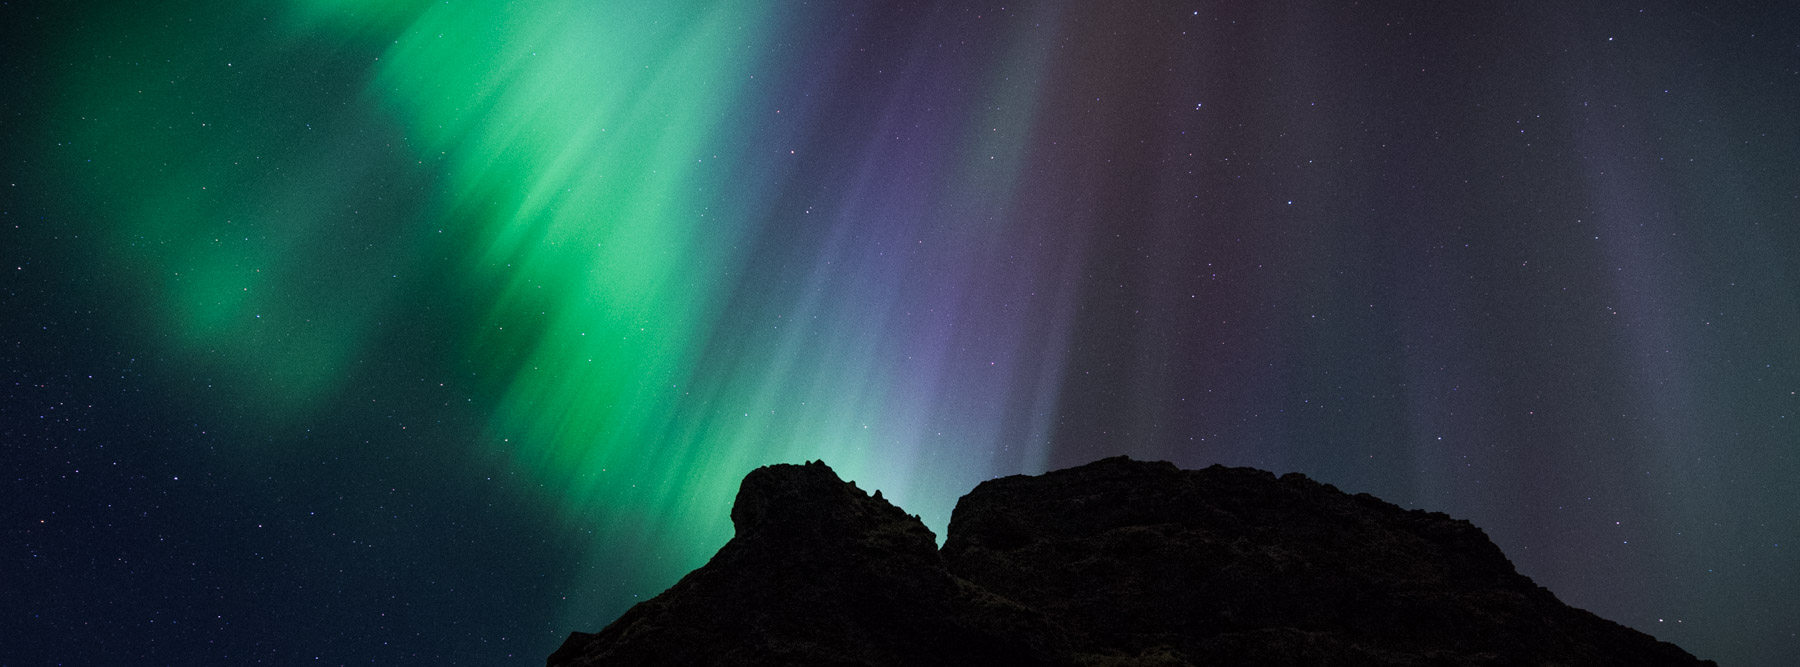
Aurora, Westfjords, Iceland. Nikon D750. © Lance Keimig.

Aurora, Westfjords, Iceland. Nikon D750. © Lance Keimig.

Q: I’ve taken an interest in nighttime photography in Canada to capture the aurora. It appears to my eyes to be just a white glow (only my rods are sensing the light), but when I take the photo, voila, it is green! One of the main problems I’ve had—both in Yellowknife, Northwest Territories, in February (-24 C), and in Ontario in September—is condensation on my lens or filter as the camera cools off. I recently purchased a wrap-around lens heater, and am excited to try it in Ontario this August during the Perseids meteor shower. — Gil J.

A: Yes, faint aurora can be hard to differentiate from plain old clouds sometimes, which is why using an app like Aurora Forecast can give you a heads-up to be on the lookout.

As for lens wraps for condensation, they can make the difference between the end of your night and a killer shot. Once the temperature reaches the dew point, condensation can form quickly. I’ve been in situations where I had to wipe the lens mid-exposure, which can introduce all sorts of problems. For a DIY version, I’ve cut a beer koozie so it can wrap around the lens, and put a chemical hand warmer inside. Sometimes even a hand warmer with a rubber band to hold it to the lens will work in a pinch! — Lance

5. Fireflies

Fireflies in Cuyahoga Valley National Park. Nikon D3s, Nikon 24-70mm f/2.8. 90 seconds, f/2.8, ISO 1600. © 2018 Chris Nicholson.

Q: I have a pressing summer question: How does one photograph fireflies? I’ve seen them and I want to try it! — Susanne H.

A: That’s a fun question, and definitely a fun thing to do. We’re about to start our workshop on the Blue Ridge Parkway, and we’re hoping to see some fireflies on those mountain nights!

I recommend a few strategies:

  • Get into into a dark, wooded area, or at the edge of one, that has lots of firefly activity.
  • Focus on the closest trees or a solid subject.
  • Use a fast telephoto lens, like a 70-200mm f/2.8, so that you can zoom into the area of activity and concentrate a bunch of fireflies in the frame. I was recently trying with a wide-angle lens and didn’t get any good results.
  • Shoot wide open to collect all the light.
  • To really maximize the effect, shoot a lot of frames and stack them in Photoshop (using the Lighten blend mode, just like we do for star stacking).

Have fun and please share your results in the Comment section! — Gabe

Chris Nicholson is a partner and workshop leader with National Parks at Night, and author of Photographing National Parks (Sidelight Books, 2015). Learn more about national parks as photography destinations, subscribe to Chris' free e-newsletter, and more at www.PhotographingNationalParks.com.

UPCOMING WORKSHOPS FROM NATIONAL PARKS AT NIGHT

Filling in the Shadows: Light Painting Before and After

Light painting is and can be many things. It can control the viewer’s eye. It can be a catalyst for creativity. It can bring life into the shadows of a composition. It can add drama to an otherwise ordinary scene. It can be an artist’s brush used to sweep strokes of illumination onto a landscape to allow us to see into the night in new and previously unimagined ways.

In other words, light painting is a versatile tool that can be a means to various ends. Below, all five National Parks at Night instructors share a way they have used light painting to enhance a nocturnal photograph.

You’ll notice that the examples included do not involve drenching a scene with buckets of untamed light to paint every crevice and fill every shadow. They also don’t involve dramatic re-representations of reality, wherein we let the light alter the authenticity of the world that’s in front of the camera. Rather, as Gabe says, we paint with shadows as much as we paint with light. And as Matt says, we let the light merely kiss the subject.

For each photograph, click or press on the slider, and drag it left and right to see how the light painting subtly but noticeably enhances the composition. Study the ways that the added illumination helps accomplish different tasks or helps solve problems of exposure, composition, etc. Then think about how you can apply those same ideas to your own night images.

More importantly, also think about how you may have illuminated these scenes differently. One of the amazing aspects of light painting is that it affords us an opportunity to create a completely different photograph than another photographer who may have the exact same composition.


Lance Keimig

Nikon D850, Irix 11mm f/4 lens, 15 seconds, f/5.6, ISO 3200.

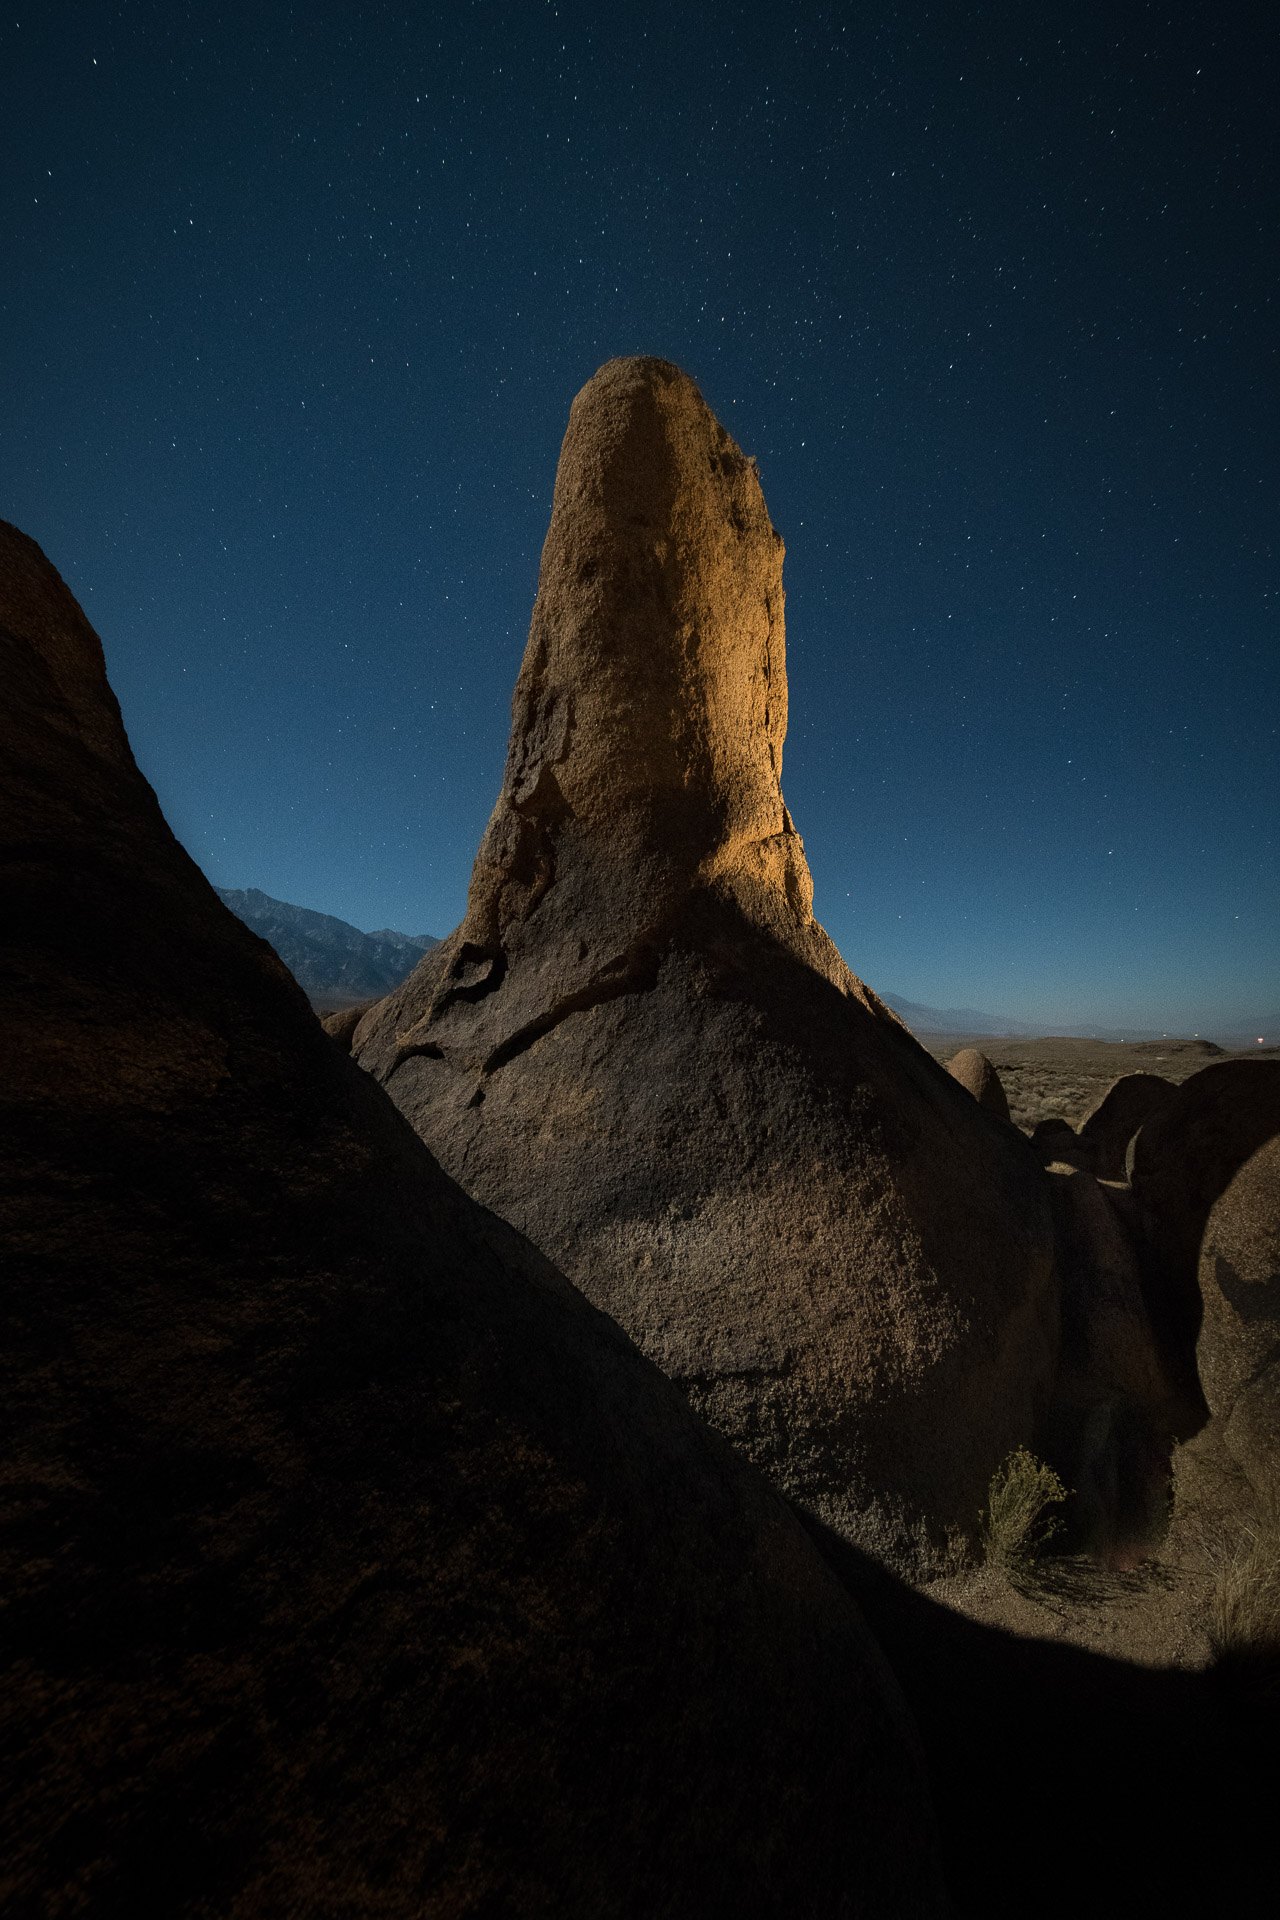
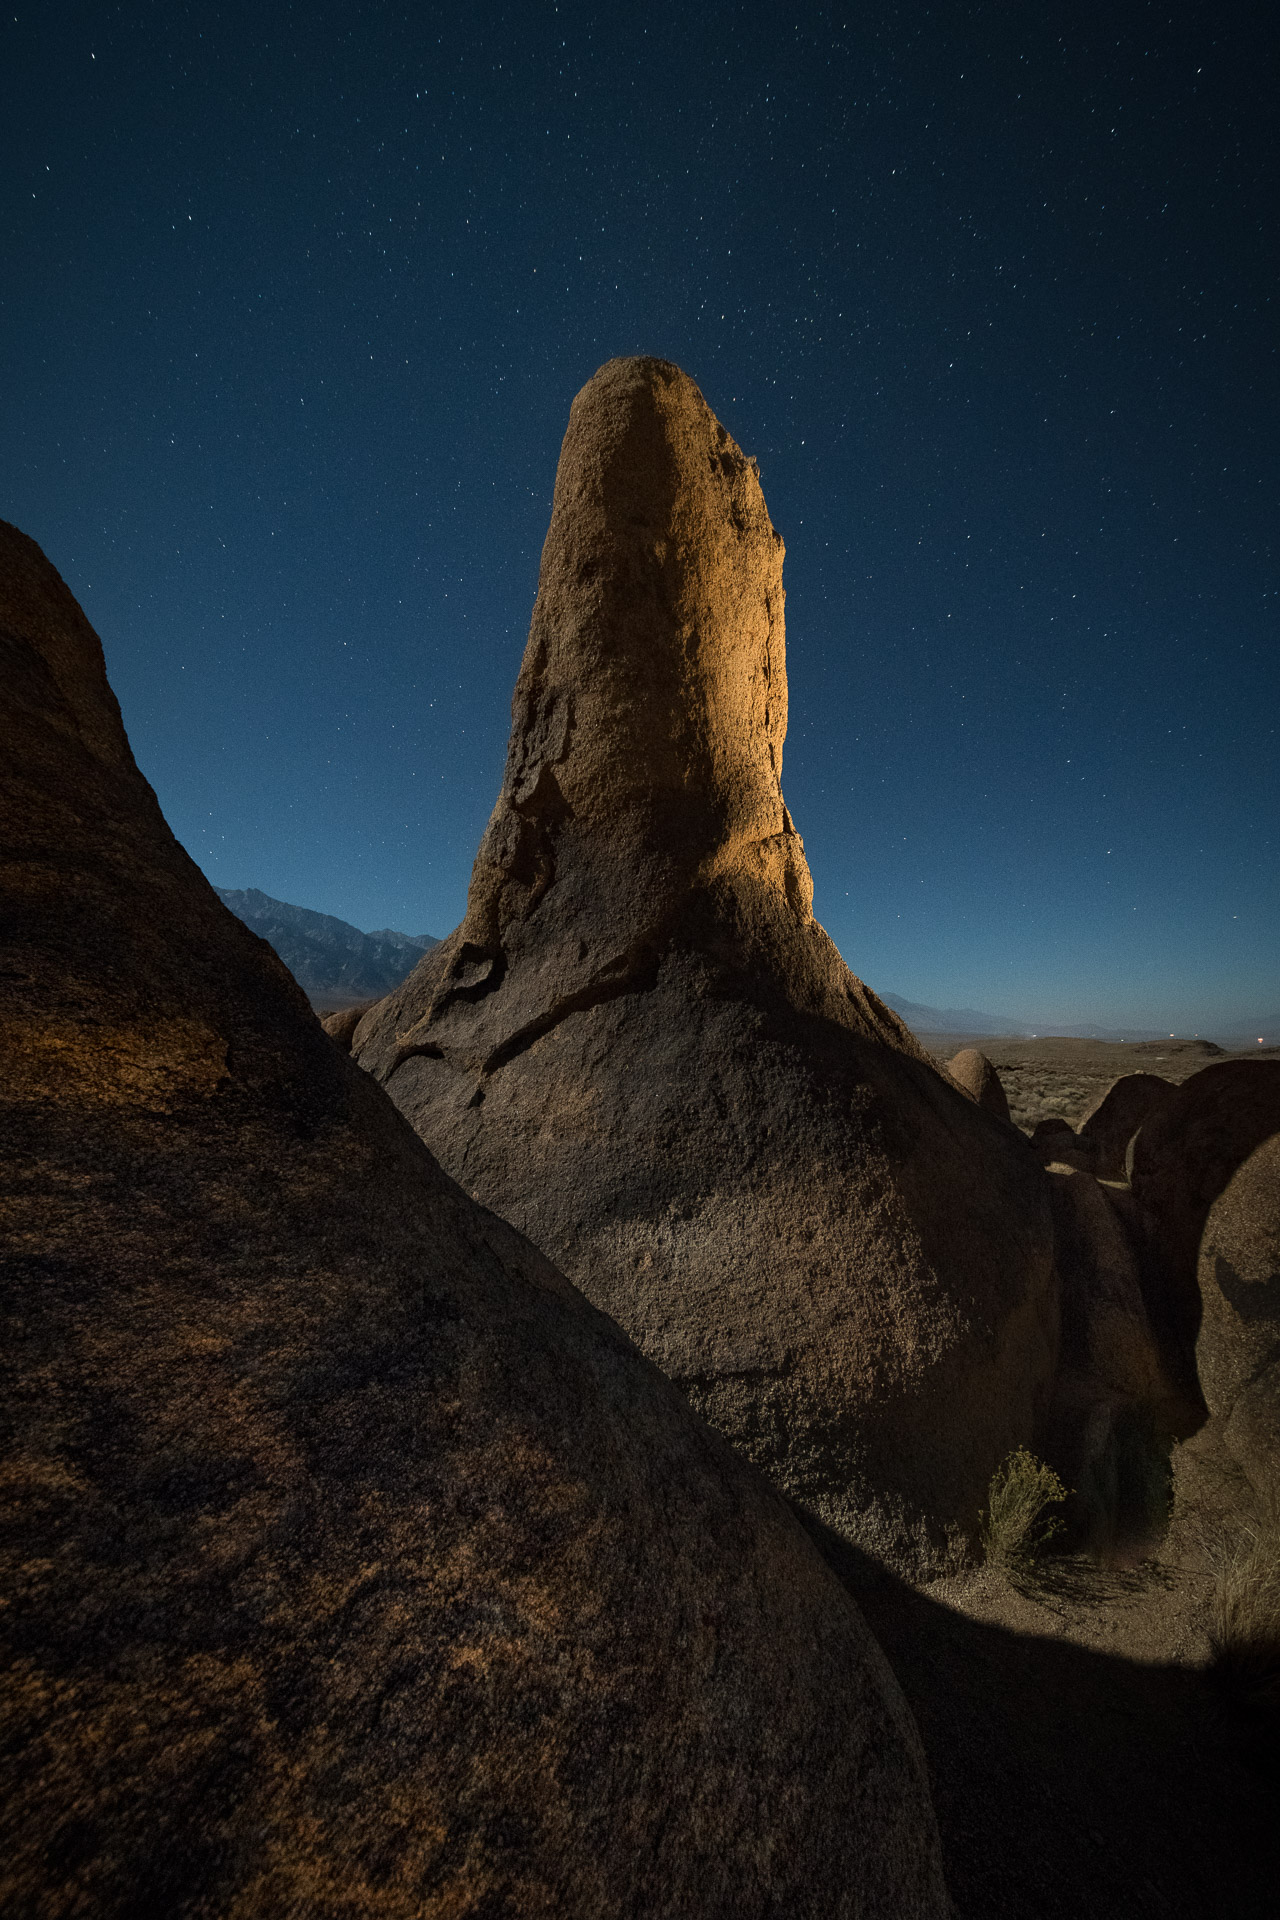
This image of the backside of Lady Boot Arch in the Alabama Hills of California’s Eastern Sierra was made at the end of a long night during our workshop there last November. I had photographed the arch many times before, and was looking for a unique vantage point. It’s a situation that I often find myself faced with––trying to make an image that I’ve never seen before in a familiar location.

Once I found this perspective, I knew that I had the shot. I just had to figure out how to light it. The moon was high in the sky to the west, illuminating the left side of the arch, and the foreground was deep in shadow. I lit the right side of the formation from behind with a warm-gelled Coast HP5R flashlight, which gave depth and texture to the arch, which from the rear looks more like a tower.

The light painting worked like this: The repeated diagonals from upper left to lower right created depth and drama. However, the dark mass on the left and bottom of the frame was too heavy, so I decided to add just a hint of fill light to this part of the frame. Anyone who has studied with me has heard the mantra to “not light from behind the camera,” but in this case, there really wasn’t much of an option. A quick swipe of the flashlight along the surface of the rock was all it took to bring out the texture and fill in the shadows.

The key was to rake the light along the surface of the rock rather than to light it straight on. The flashlight was a better choice for this than my Luxli Viola because I needed a strong directional source, as I was lighting from next to the camera. Low-level Landscape Lighting with the Luxli would have been much easier, as I had only 15 seconds to paint from both locations. But as it turned out, racing to get the lighting completed before the shutter closed was a fun challenge that served the additional purpose of keeping me warm after about eight hours out in the cool autumn air!

This image ended up being my favorite of 2017, not only for the image itself, but for the challenge of executing it all in one frame in just 15 seconds.


Tim Cooper

Nikon D4s, Nikon 14-24mm f/2.8 lens. 60 seconds, f/5.6, ISO 100.

Light painting is all about angles and shadows. More specifically, it’s about the angle of the light source to the subject, and the shadows that the light source subsequently produces. Painting a subject while you stand right by the camera always produces the most boring light. Why? Because it causes all of the shadows to fall behind your subject. But when you paint from an oblique angle, you produce a more interesting picture with tons of texture.

Texture, and in turn drama, is brought out when you paint your subject from the side or from behind. Painting your subject from behind causes all of your shadows to fall in front of the subject and toward the camera. This type of lighting can be really dramatic. It can also be difficult to pull off when you have to hide your light from your camera.

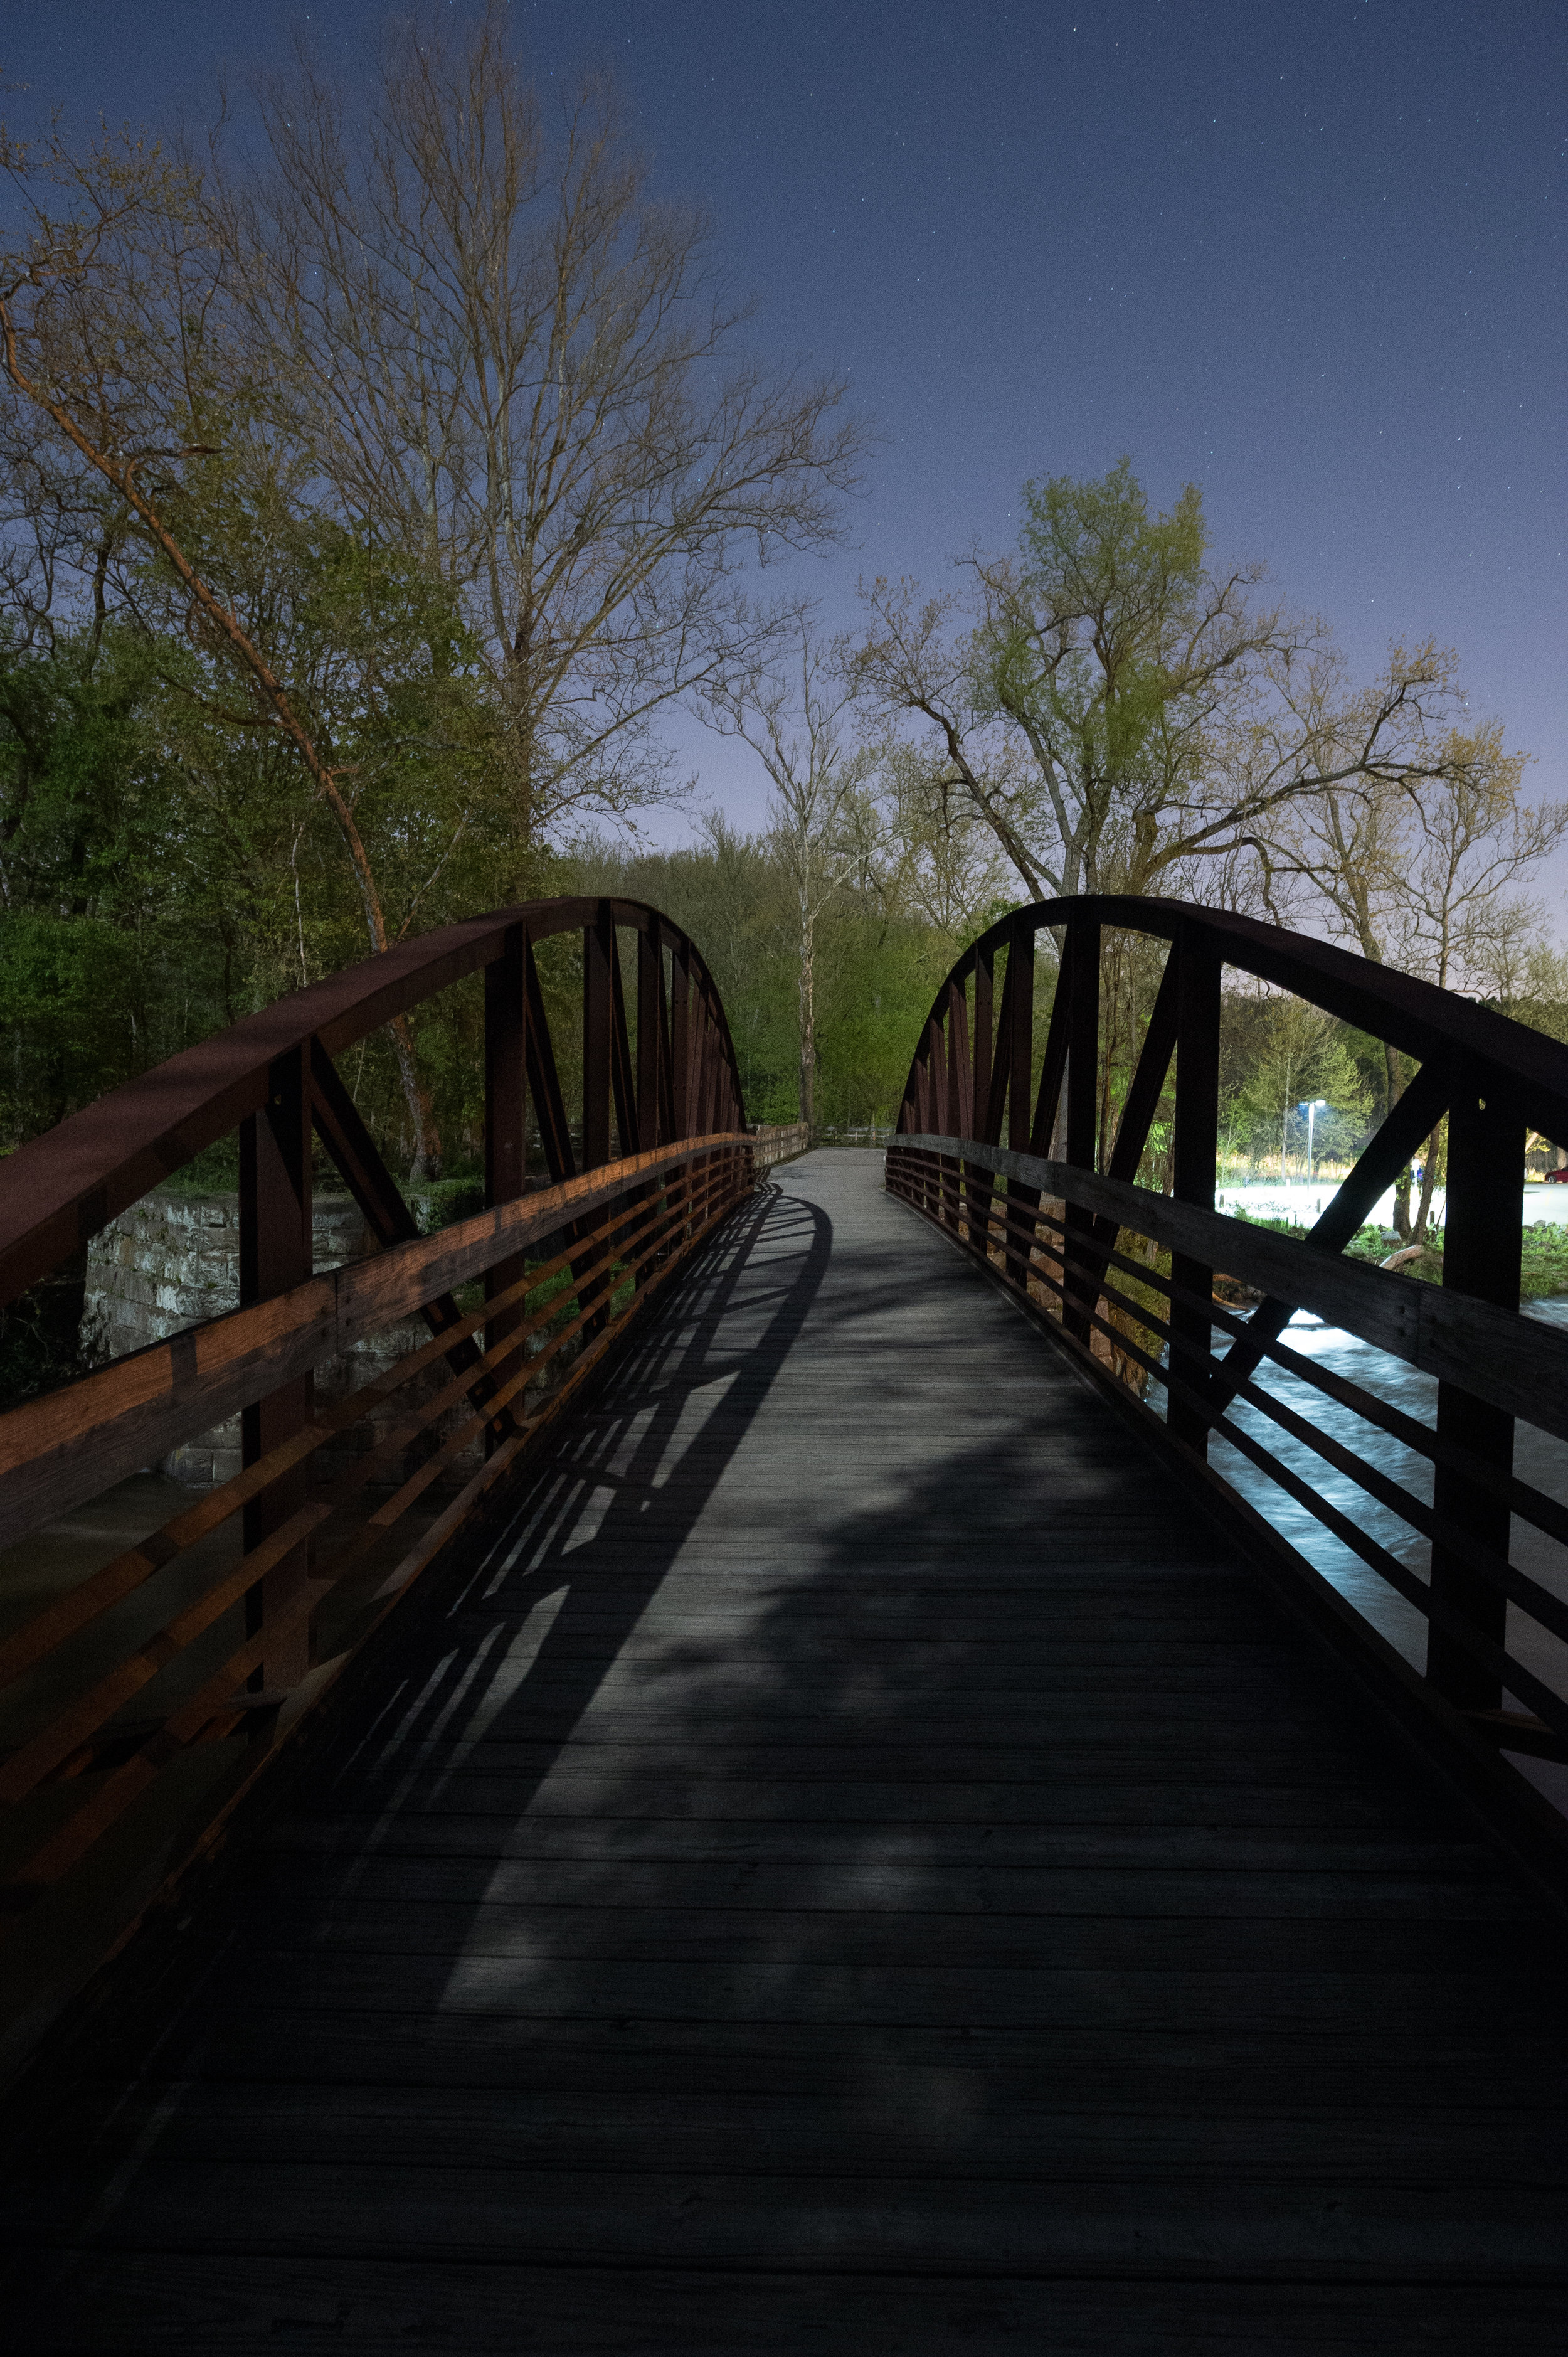
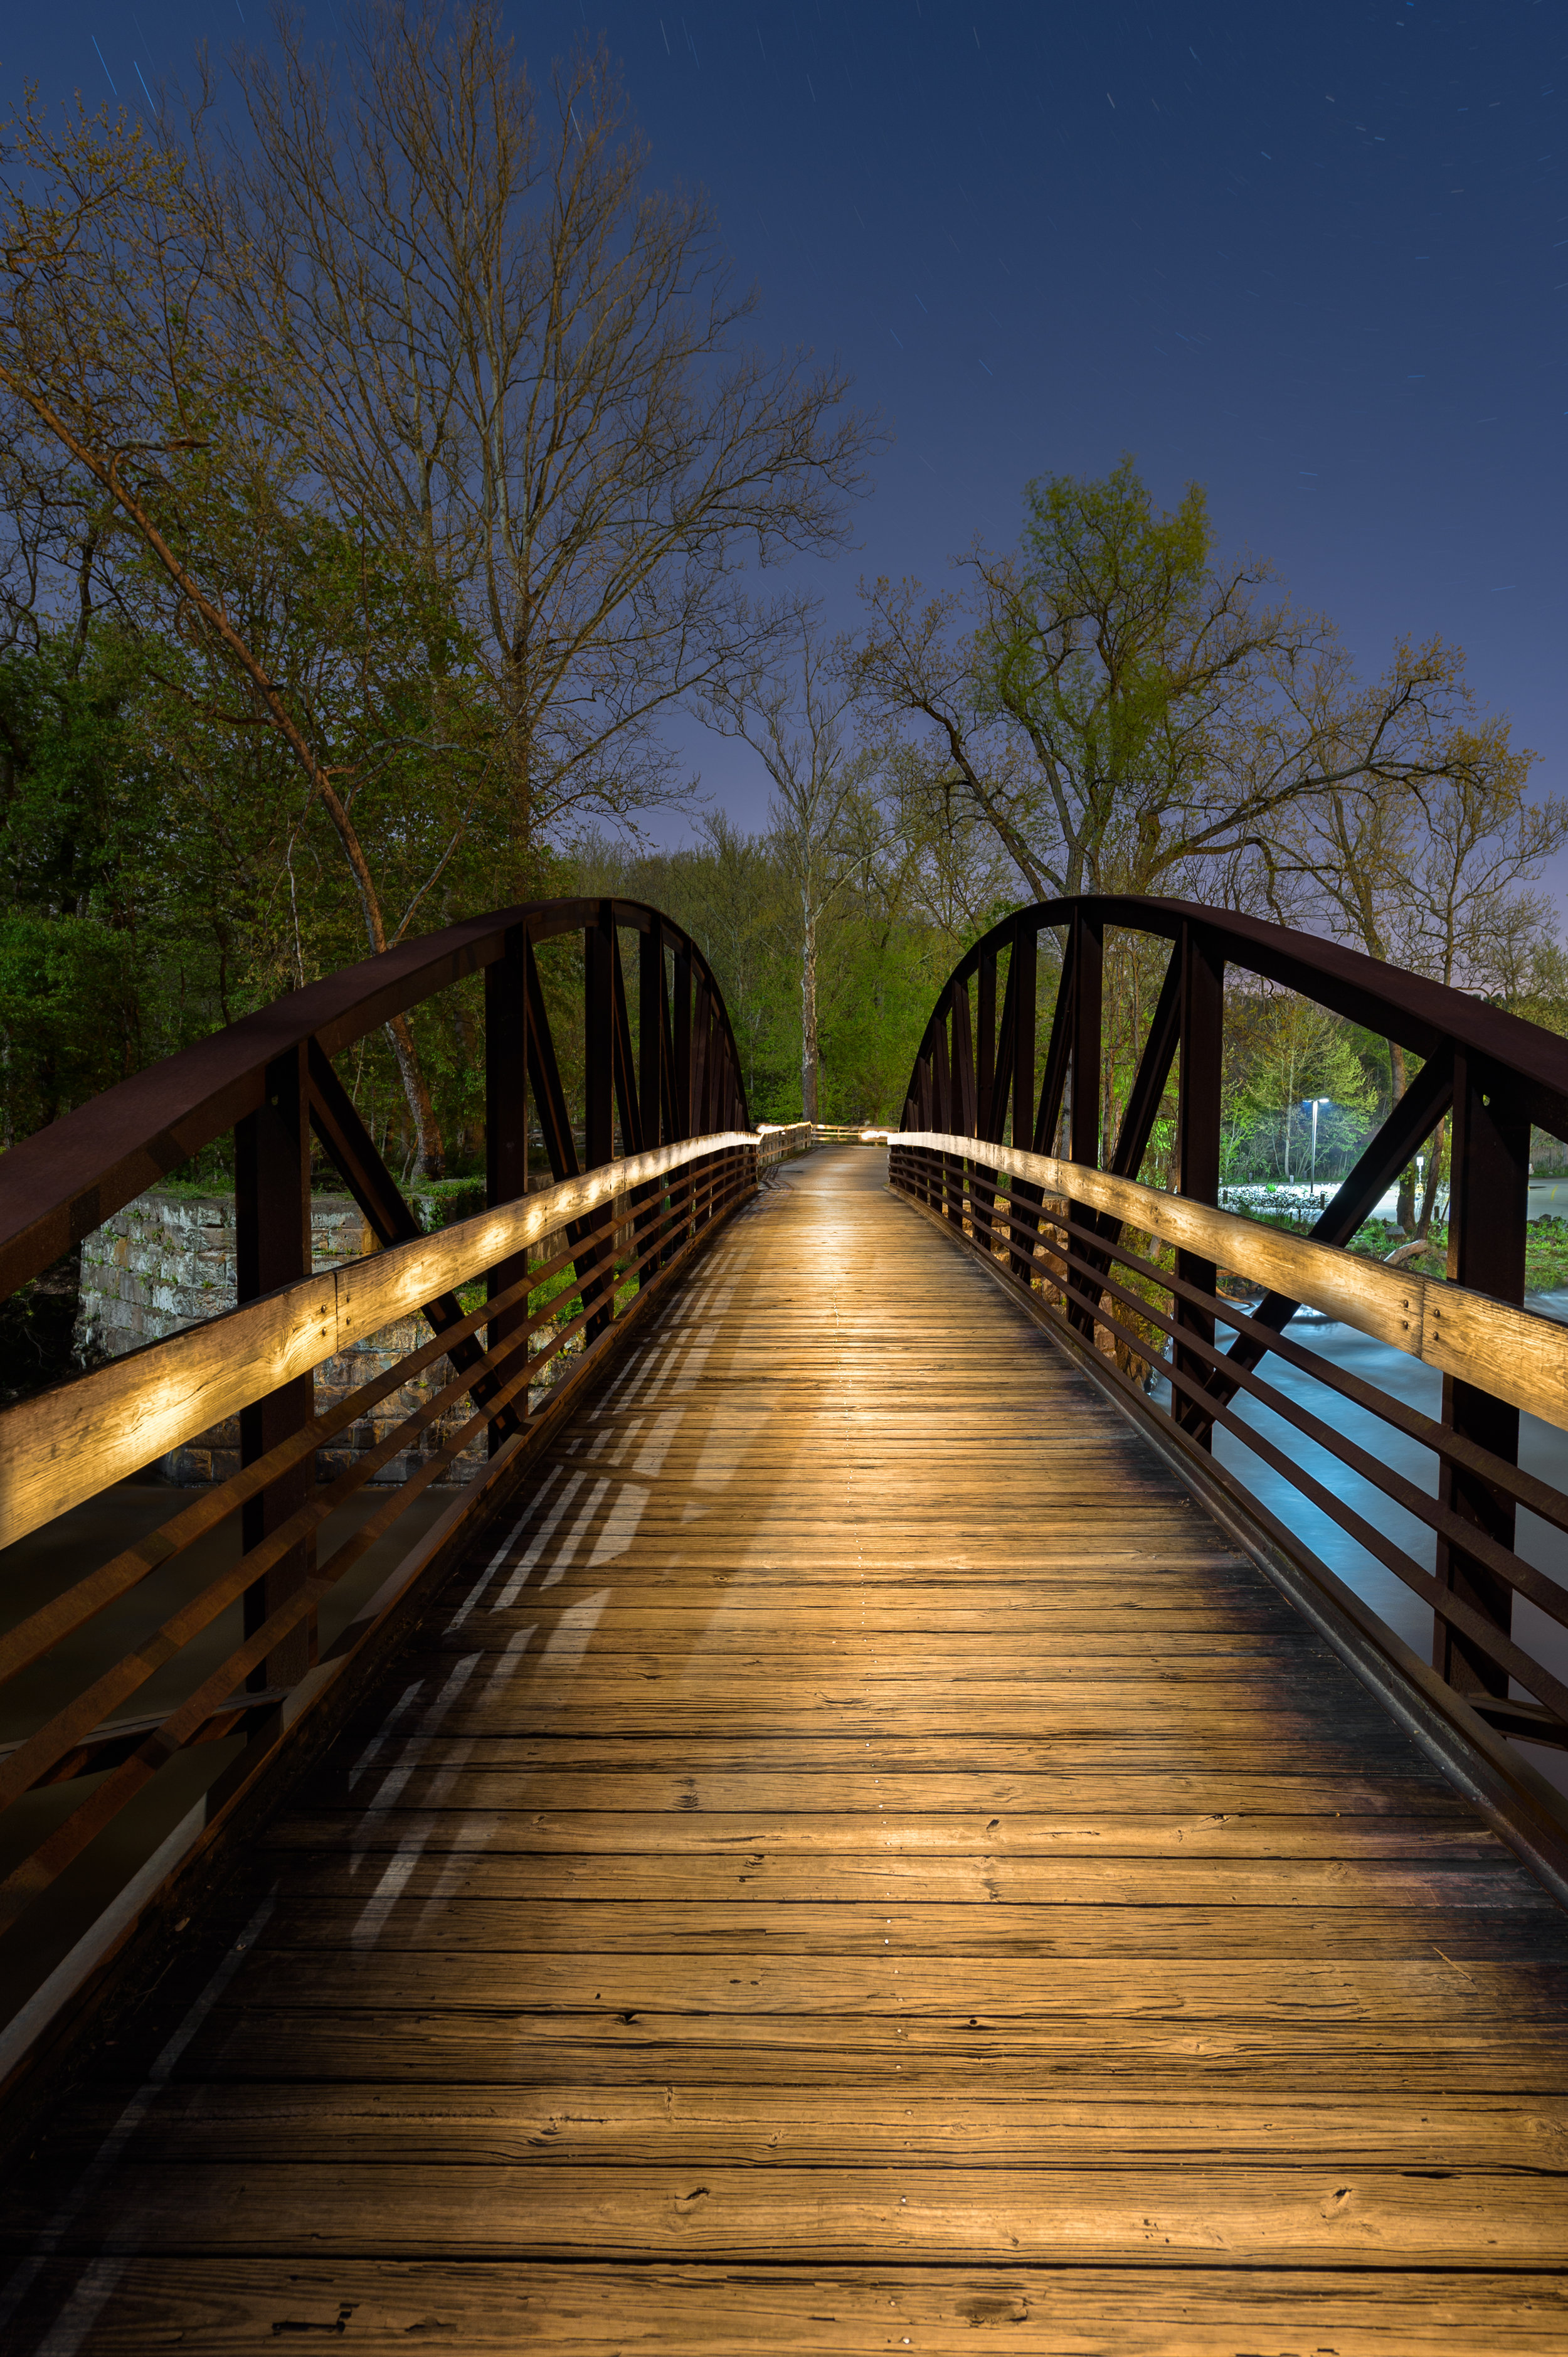
That was the case with this footbridge in Cuyahoga Valley National Park. I wanted to paint the railings and the walk, but I didn’t want the flat look of front lighting. So I tripped the shutter and hid the flashlight in front of me while I walked down the bridge pointing the flashlight backward at the left railing. When I reached the end, I walked backward and again hid the flashlight in front of me while I painted the right railing. Doing this kept the flashlight hidden from the camera the whole time.

The next and more difficult task was to light the walk. In this case I couldn’t walk away from the camera while painting with the flashlight in front of me, or my body would have blocked the camera’s view of what I was light painting. So I had to start at the far end of the bridge and walk toward the camera while painting the walk in between me and the camera. Painting in this manner brought out all of the texture in the wood decking.

Unfortunately, it also caused the problem of the flashlight being fully visible to the camera. That’s a big no-no in light painting. To solve this problem, I held my hat in my other hand and used its brim to hide the flashlight from the camera while I painted down at the walk. The diagram below shows the basics of this technique.

Remember to always hide the flashlight from the camera, and always wear dark colors so that the bounce light doesn’t illuminate your body!


Gabe Biderman

Nikon D5, 14-24mm f/2.8 lens at 24mm. 20 seconds, f/4, ISO 6400.

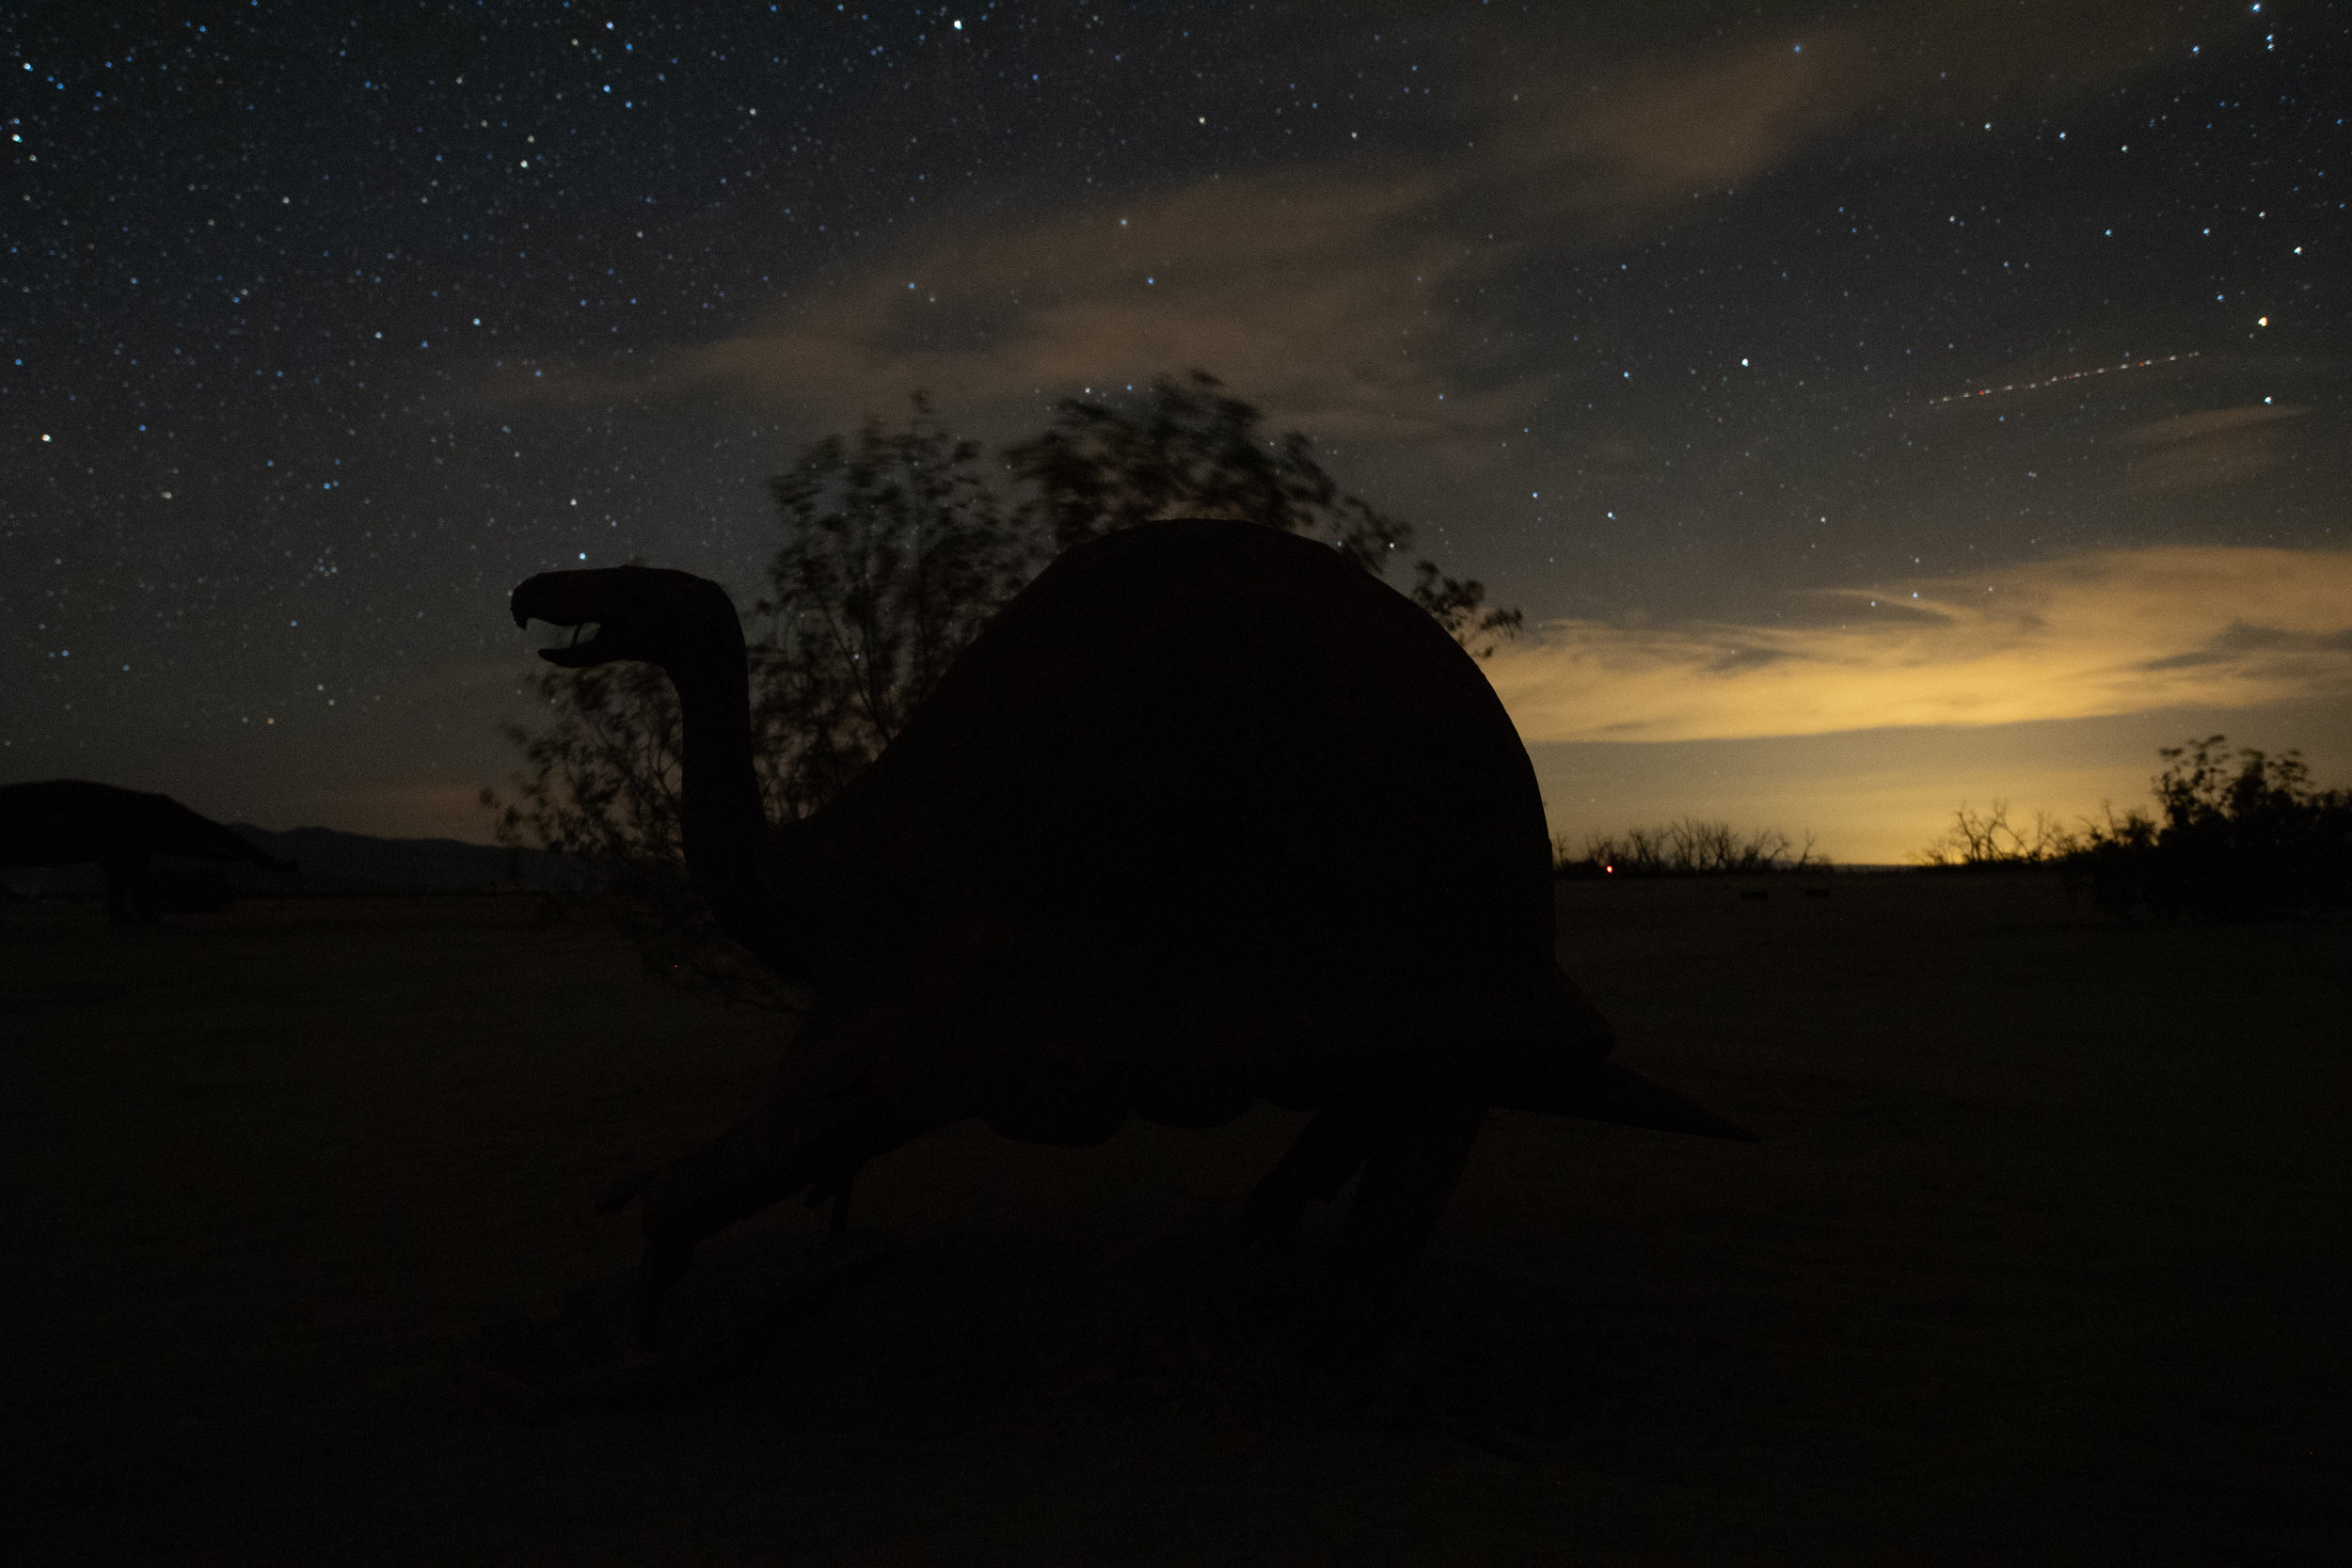
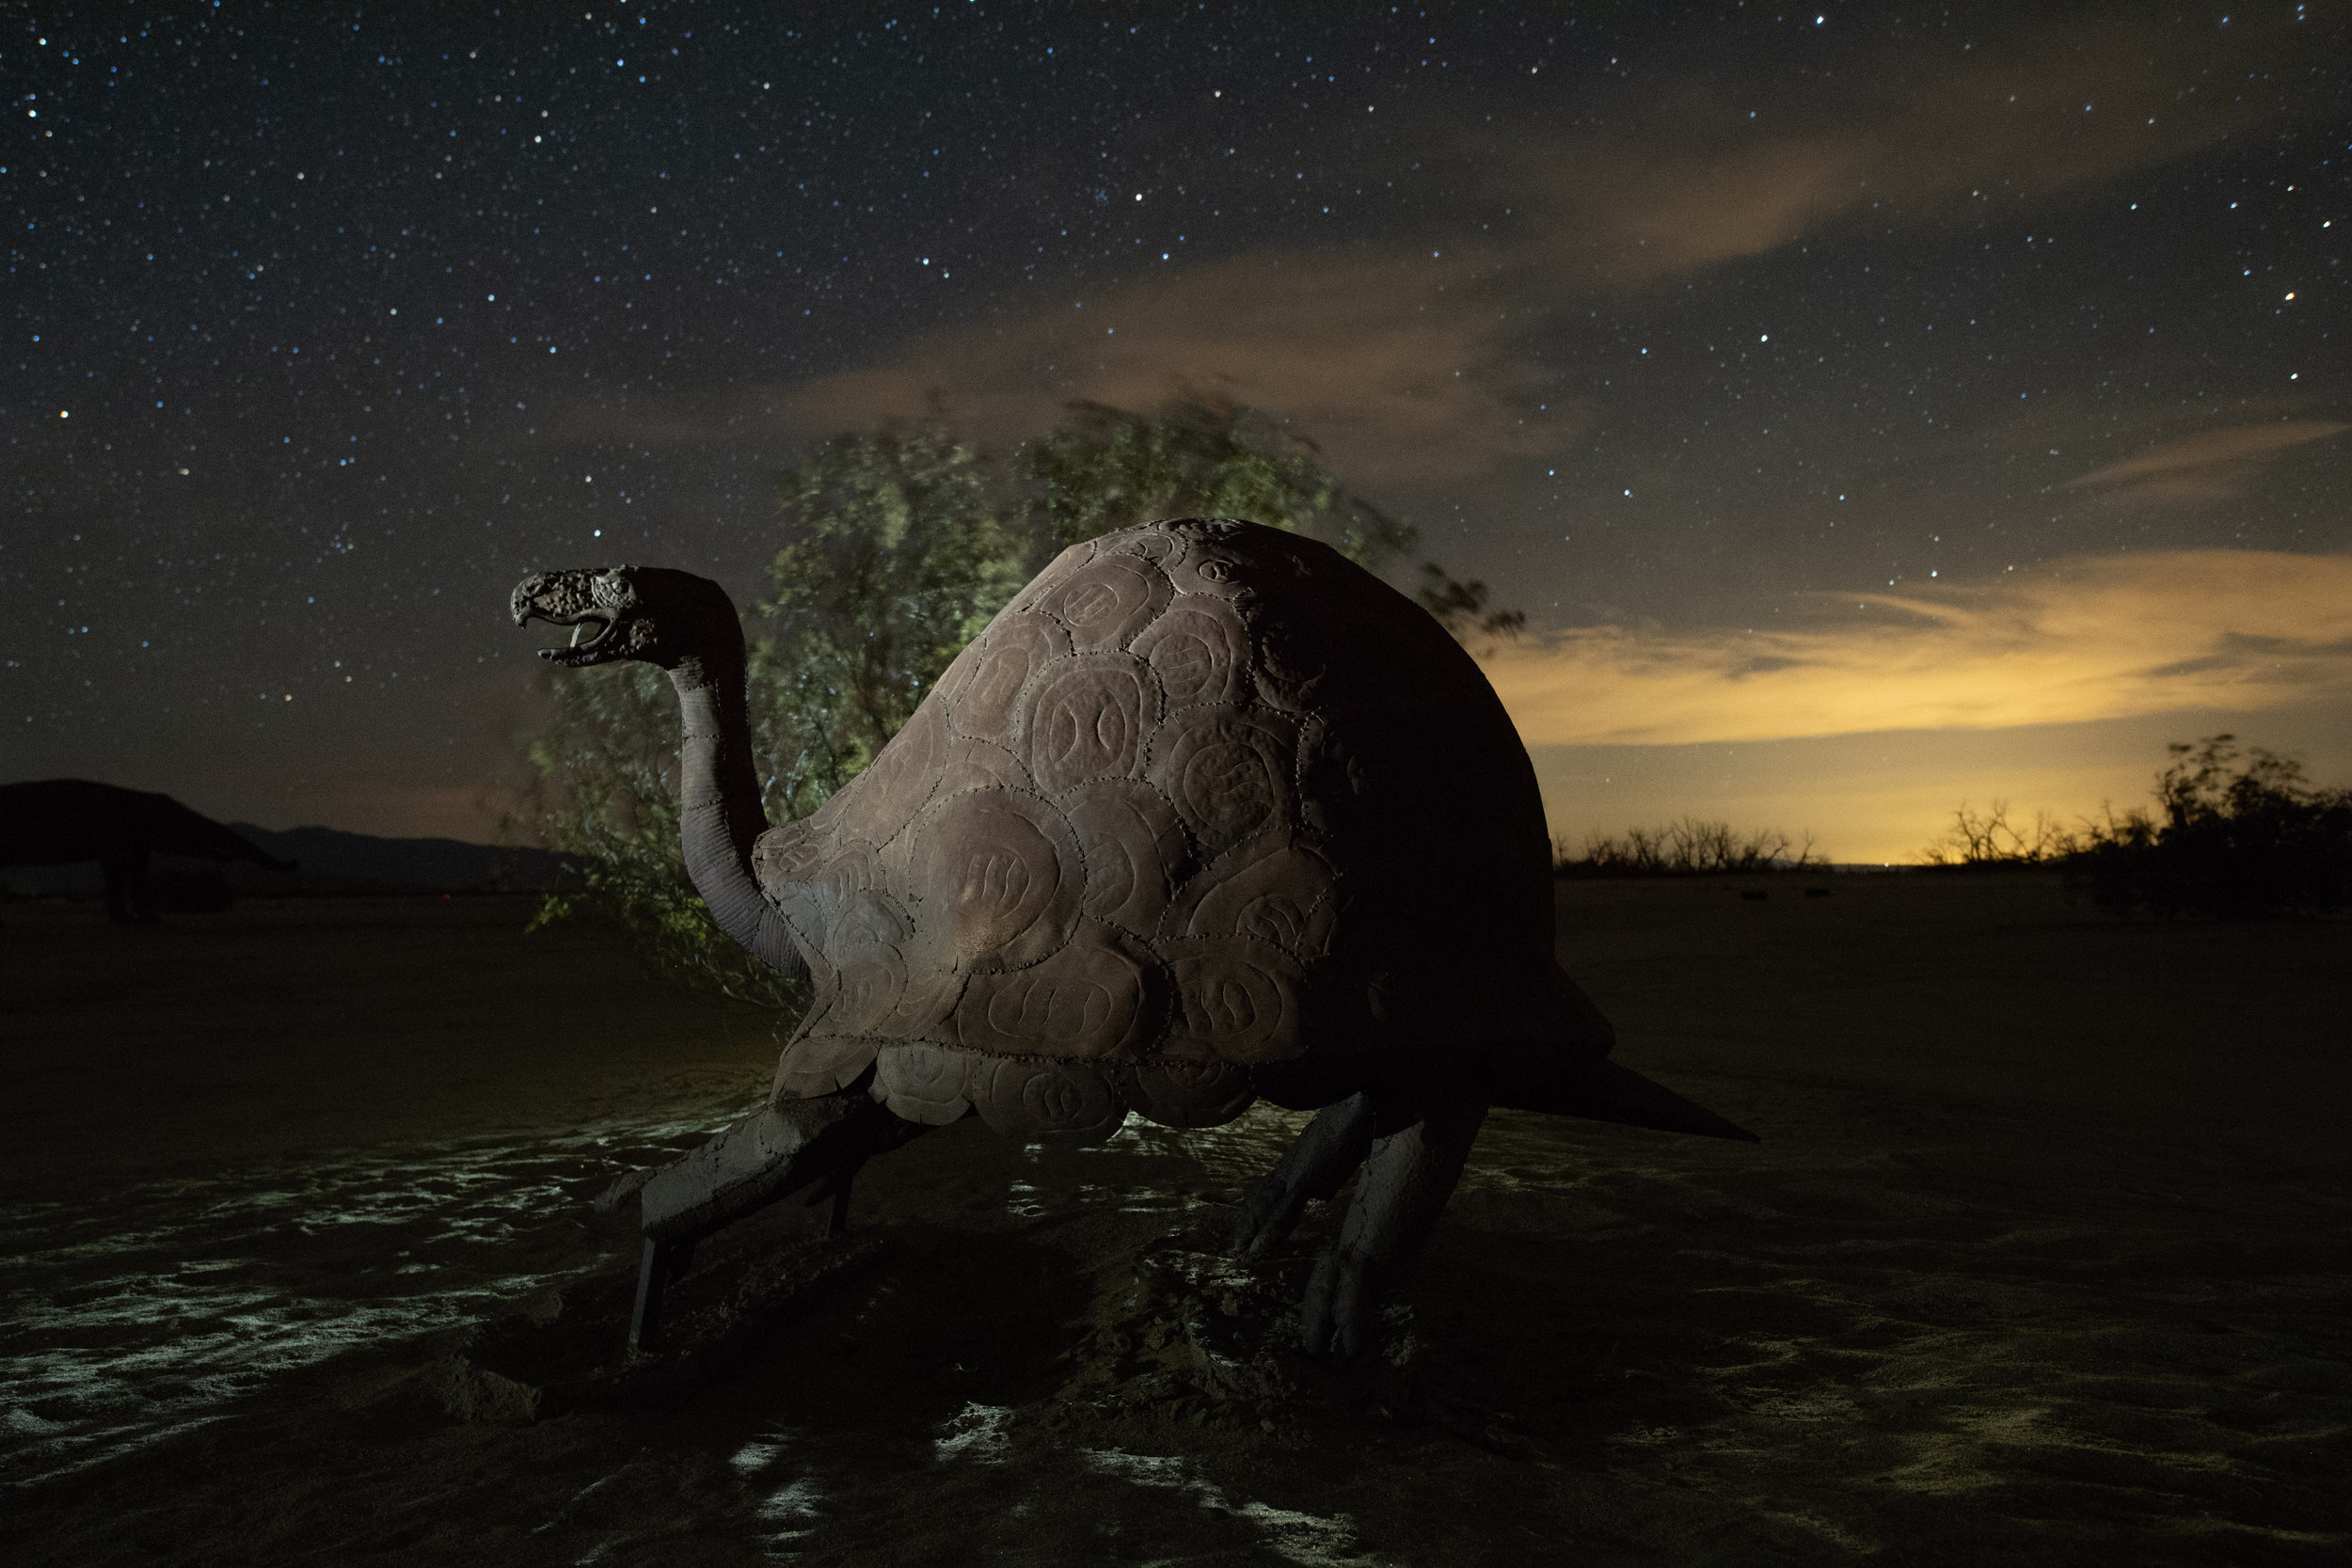
Light painting is a must when photographing close subject matter under dark sky conditions. We specifically chose a new moon time period for our first Ambassador Series workshop with Atlas Obscura at Borrego Springs. The focus was to revisualize the many surreal sculptures that surround the town against the billion-star backdrop.

Before I paint with light, I always take several test shots to help me see, compose and focus. This also helps me figure out where the light would create interesting shadows. We call it light painting, but I like to call it “shadow painting” because not only is it about revealing information, but it’s also about creating interesting textures and shadows! This can generally be achieved when our light hits the subject at a 45- to 90-degree angle from the camera.

I also love adding dramatic backlighting to scenes and I chose this composition specifically so that the bush would frame the turtle and I could cast light and shadows into the scene.

During the 20-second exposure I walked 10 feet to the left of the frame with my 1/2 CTO-gelled Coast HP5R flashlight. I did the side lighting at the lowest setting for 2 seconds. I was careful not to move my flashlight while it was on, which allowed me to create the dark shadows along the neck and back of the sculpture—i.e., the areas I shadow painted.

With the flashlight off, I then walked behind the bush, got low and out of view from the camera, and quickly turned the HP5R on and off while it was pointed back toward the turtle. This revealed so much texture in the sand and created an interesting mosaic of shadows reaching toward the viewer.

So give shadow painting a try!


Matt Hill

Fuji X-T1, 7artisans 7.5mm f/2.8 lens. 58 seconds, f/2.8, ISO 6400.

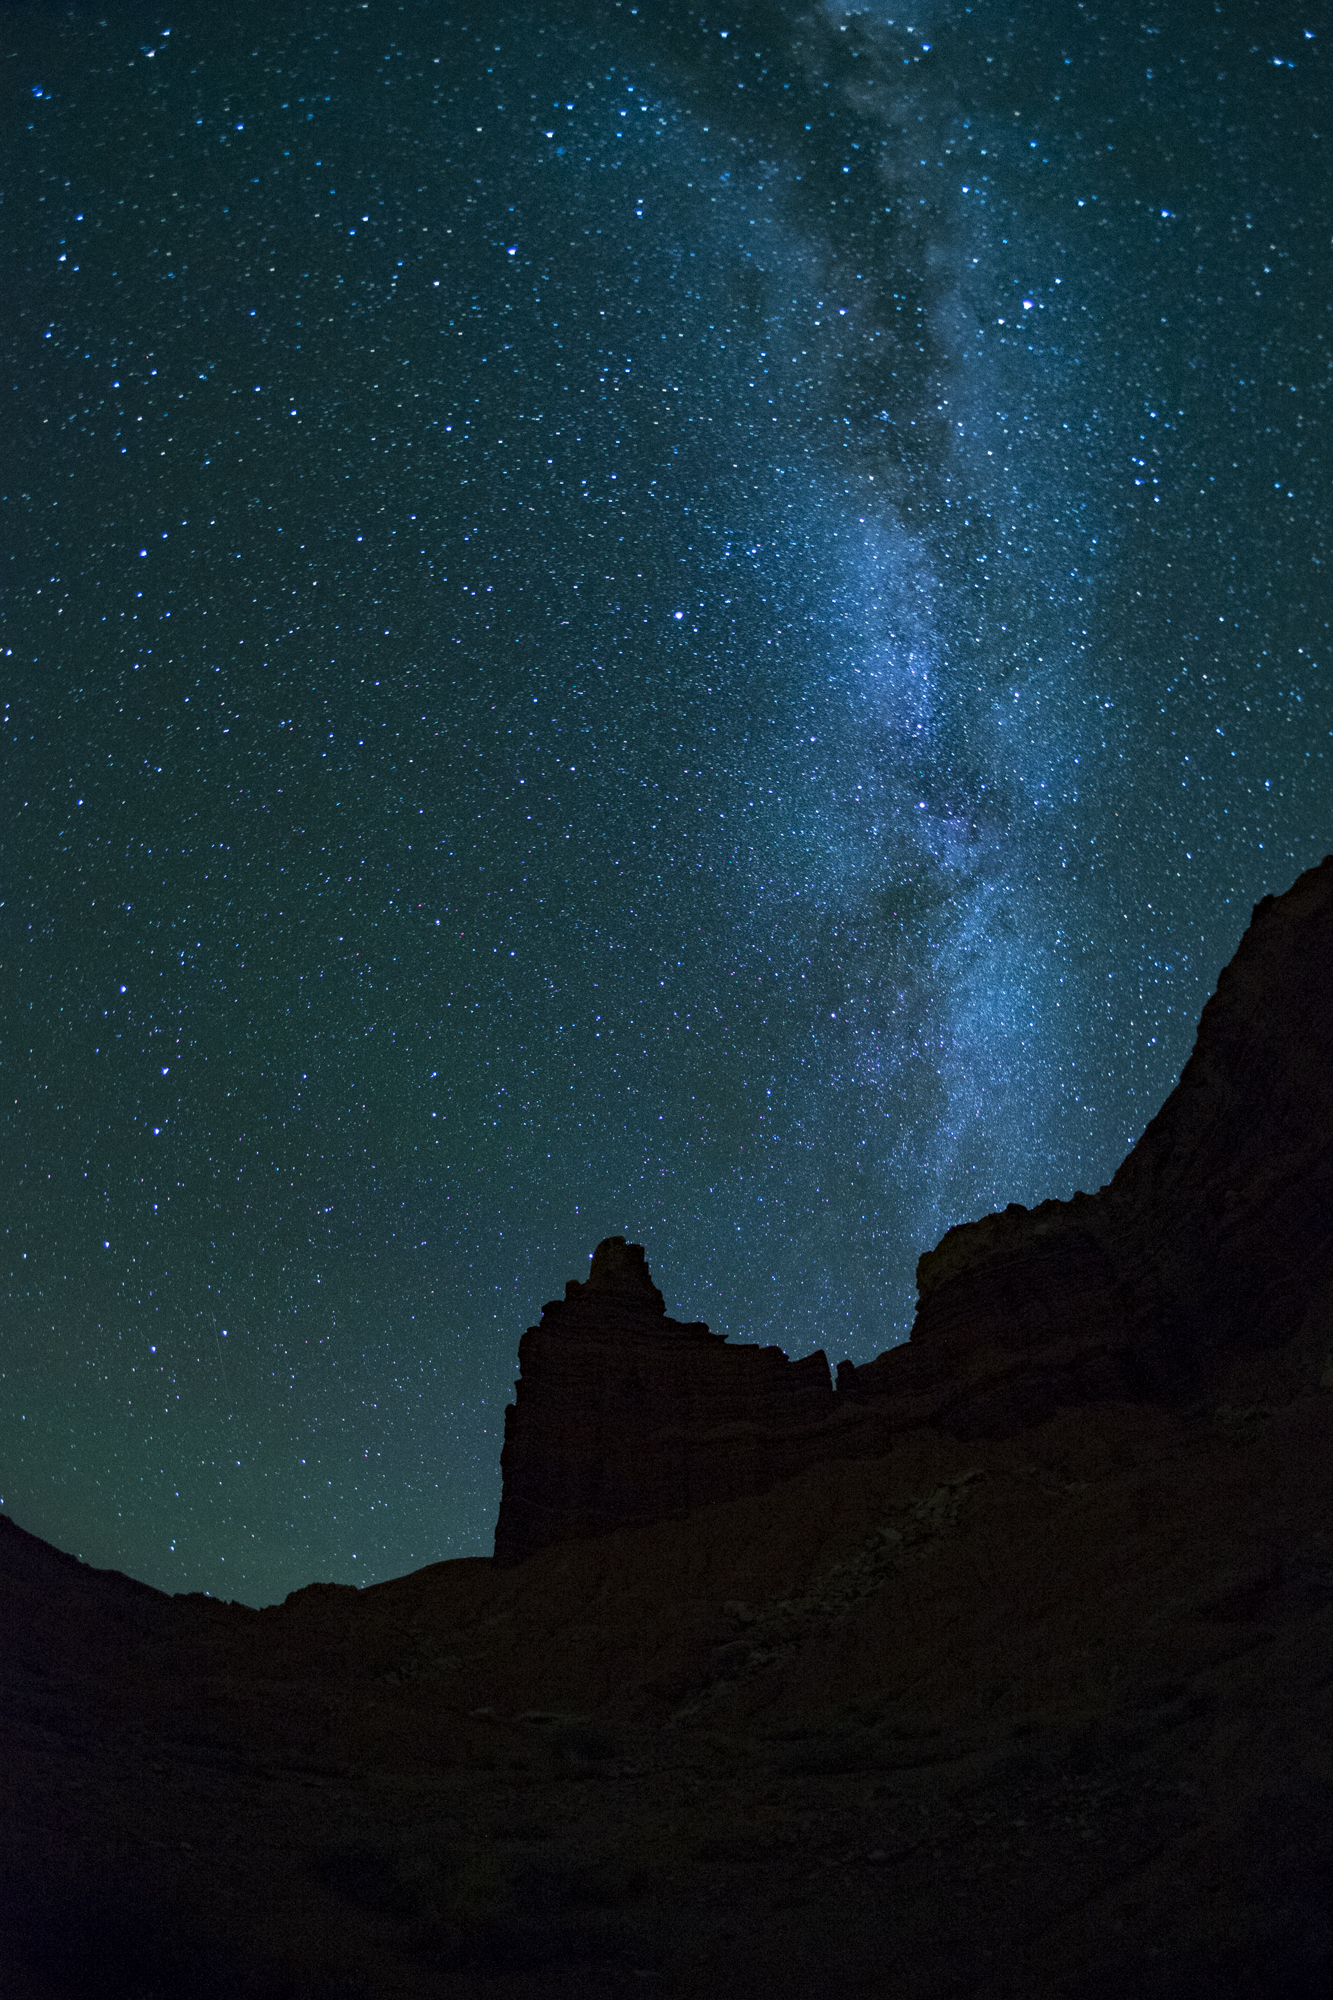
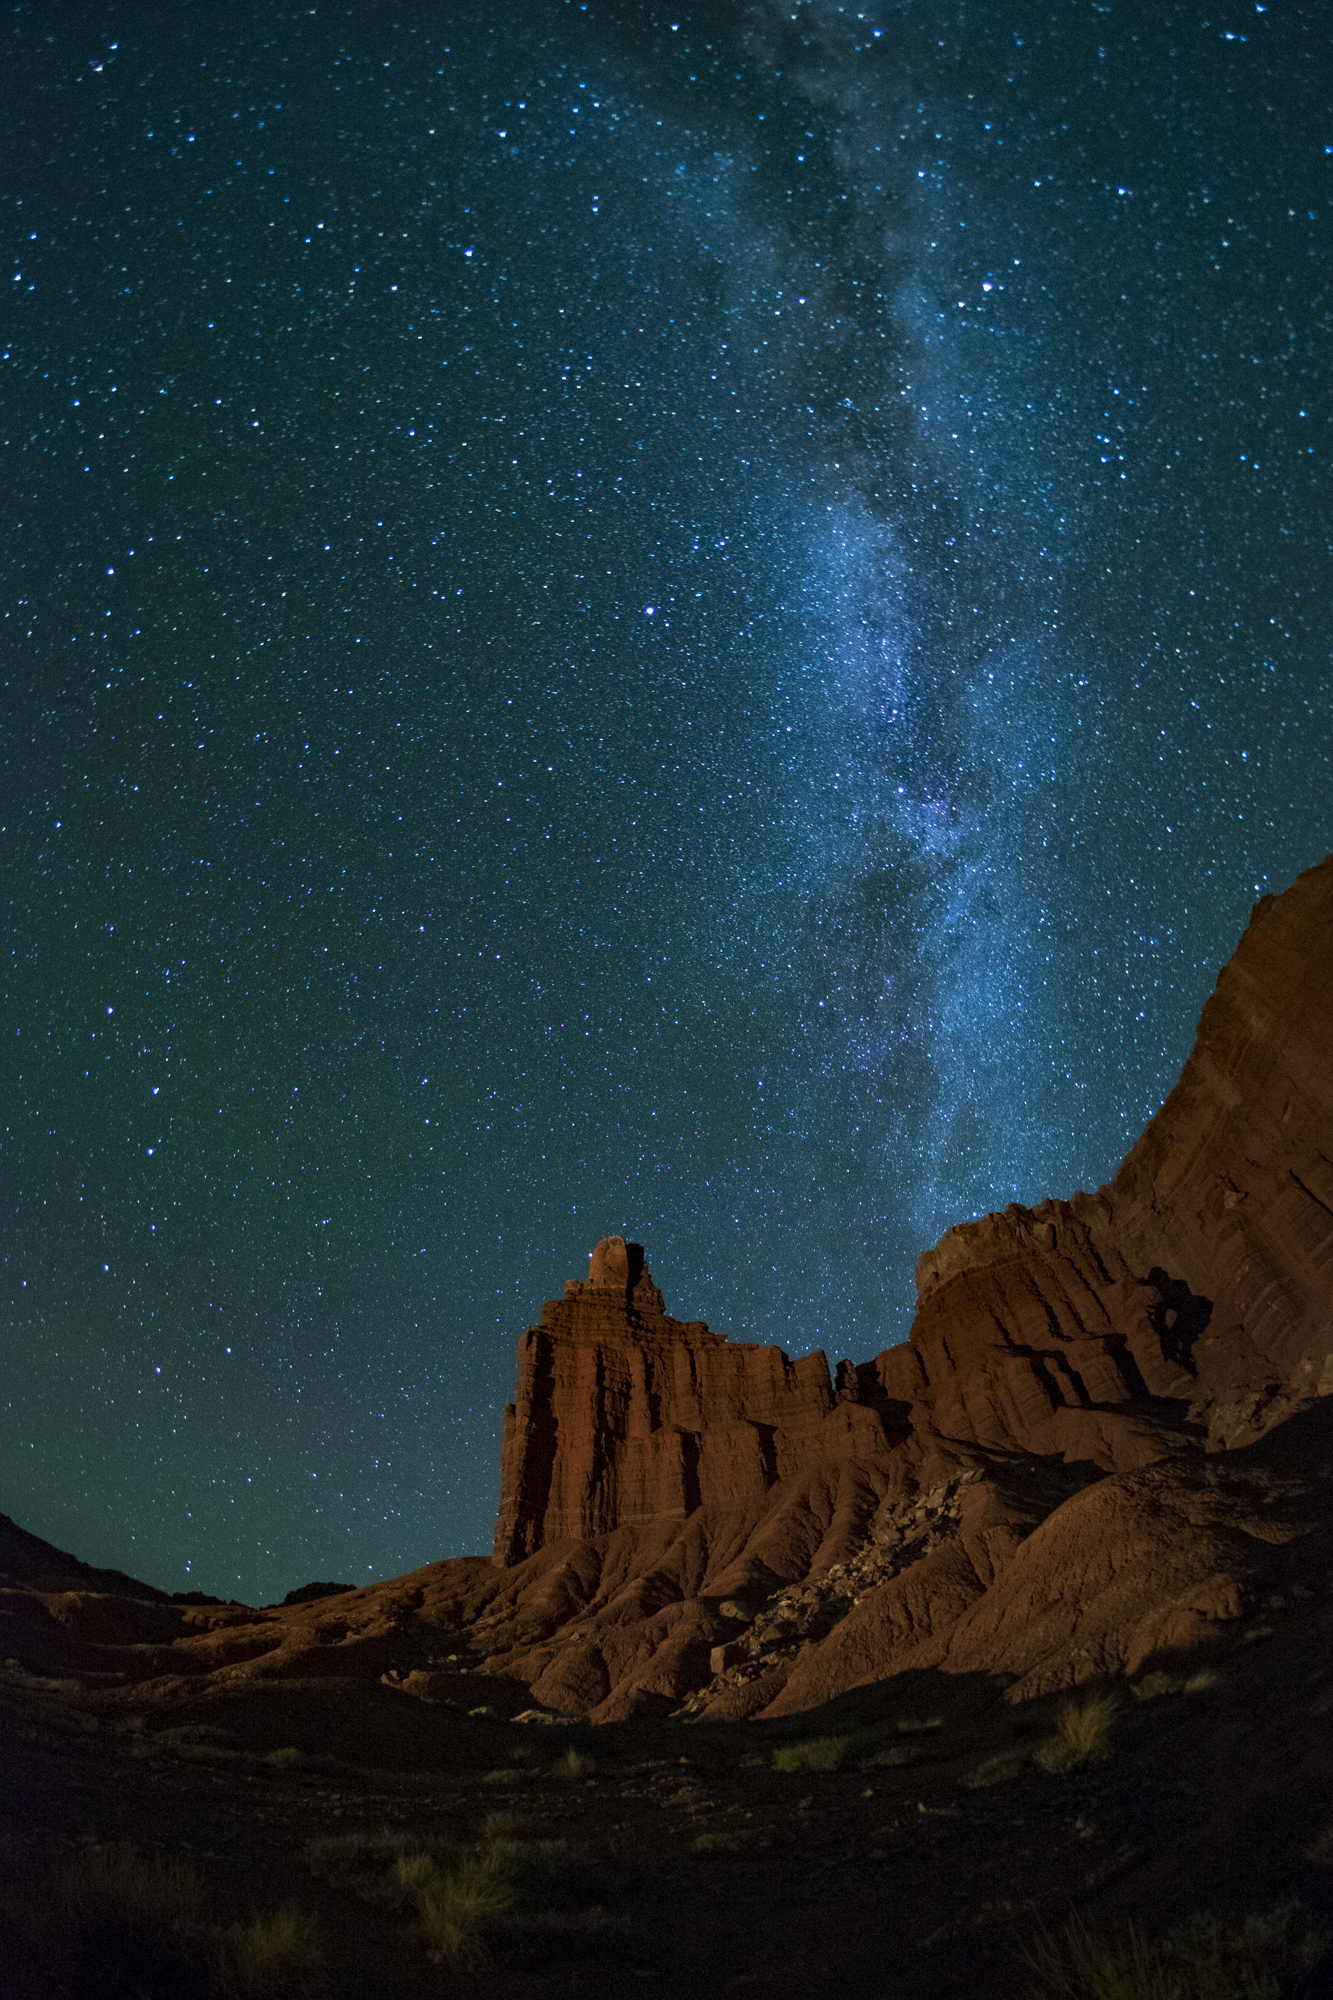
Sometimes light painting a 400-foot tall pillar of Moenkopi sandstone calls for bringing in the big guns. I was running a long star stack/time-lapse with some other students on our Capitol Reef National Park workshop earlier this year.

The stack started during moonset, which was very gentle, and beautiful. But according to PhotoPills, the tail end of the Milky Way wouldn’t be ascending the rock formation until we came back to collect our cameras over an hour and a half later. As we came back, student Karl Zuzarte asked what was already on my mind: “Can we light paint the last frame or two of the stack?” “Heck, yes,” I said.

Since it was a bit of a slog to get to our cameras, I asked Gabe to grab a radio and a Luxli Cello panel light (which is the new big brother to the Viola), and to head off about 1/4-mile away at an oblique angle similar to moonset.

Gabe set the Cello to 3000K and maybe 2 percent intensity. Unlike sweeping a flashlight around, which softens the shadow edges, the fixed position of the panel created the perfect strong kiss of light to cast crisp shadows. And its 72-degree beam angle covered the entire massive rock formation and grazed the tops of the vegetation on the desert floor.


Chris Nicholson

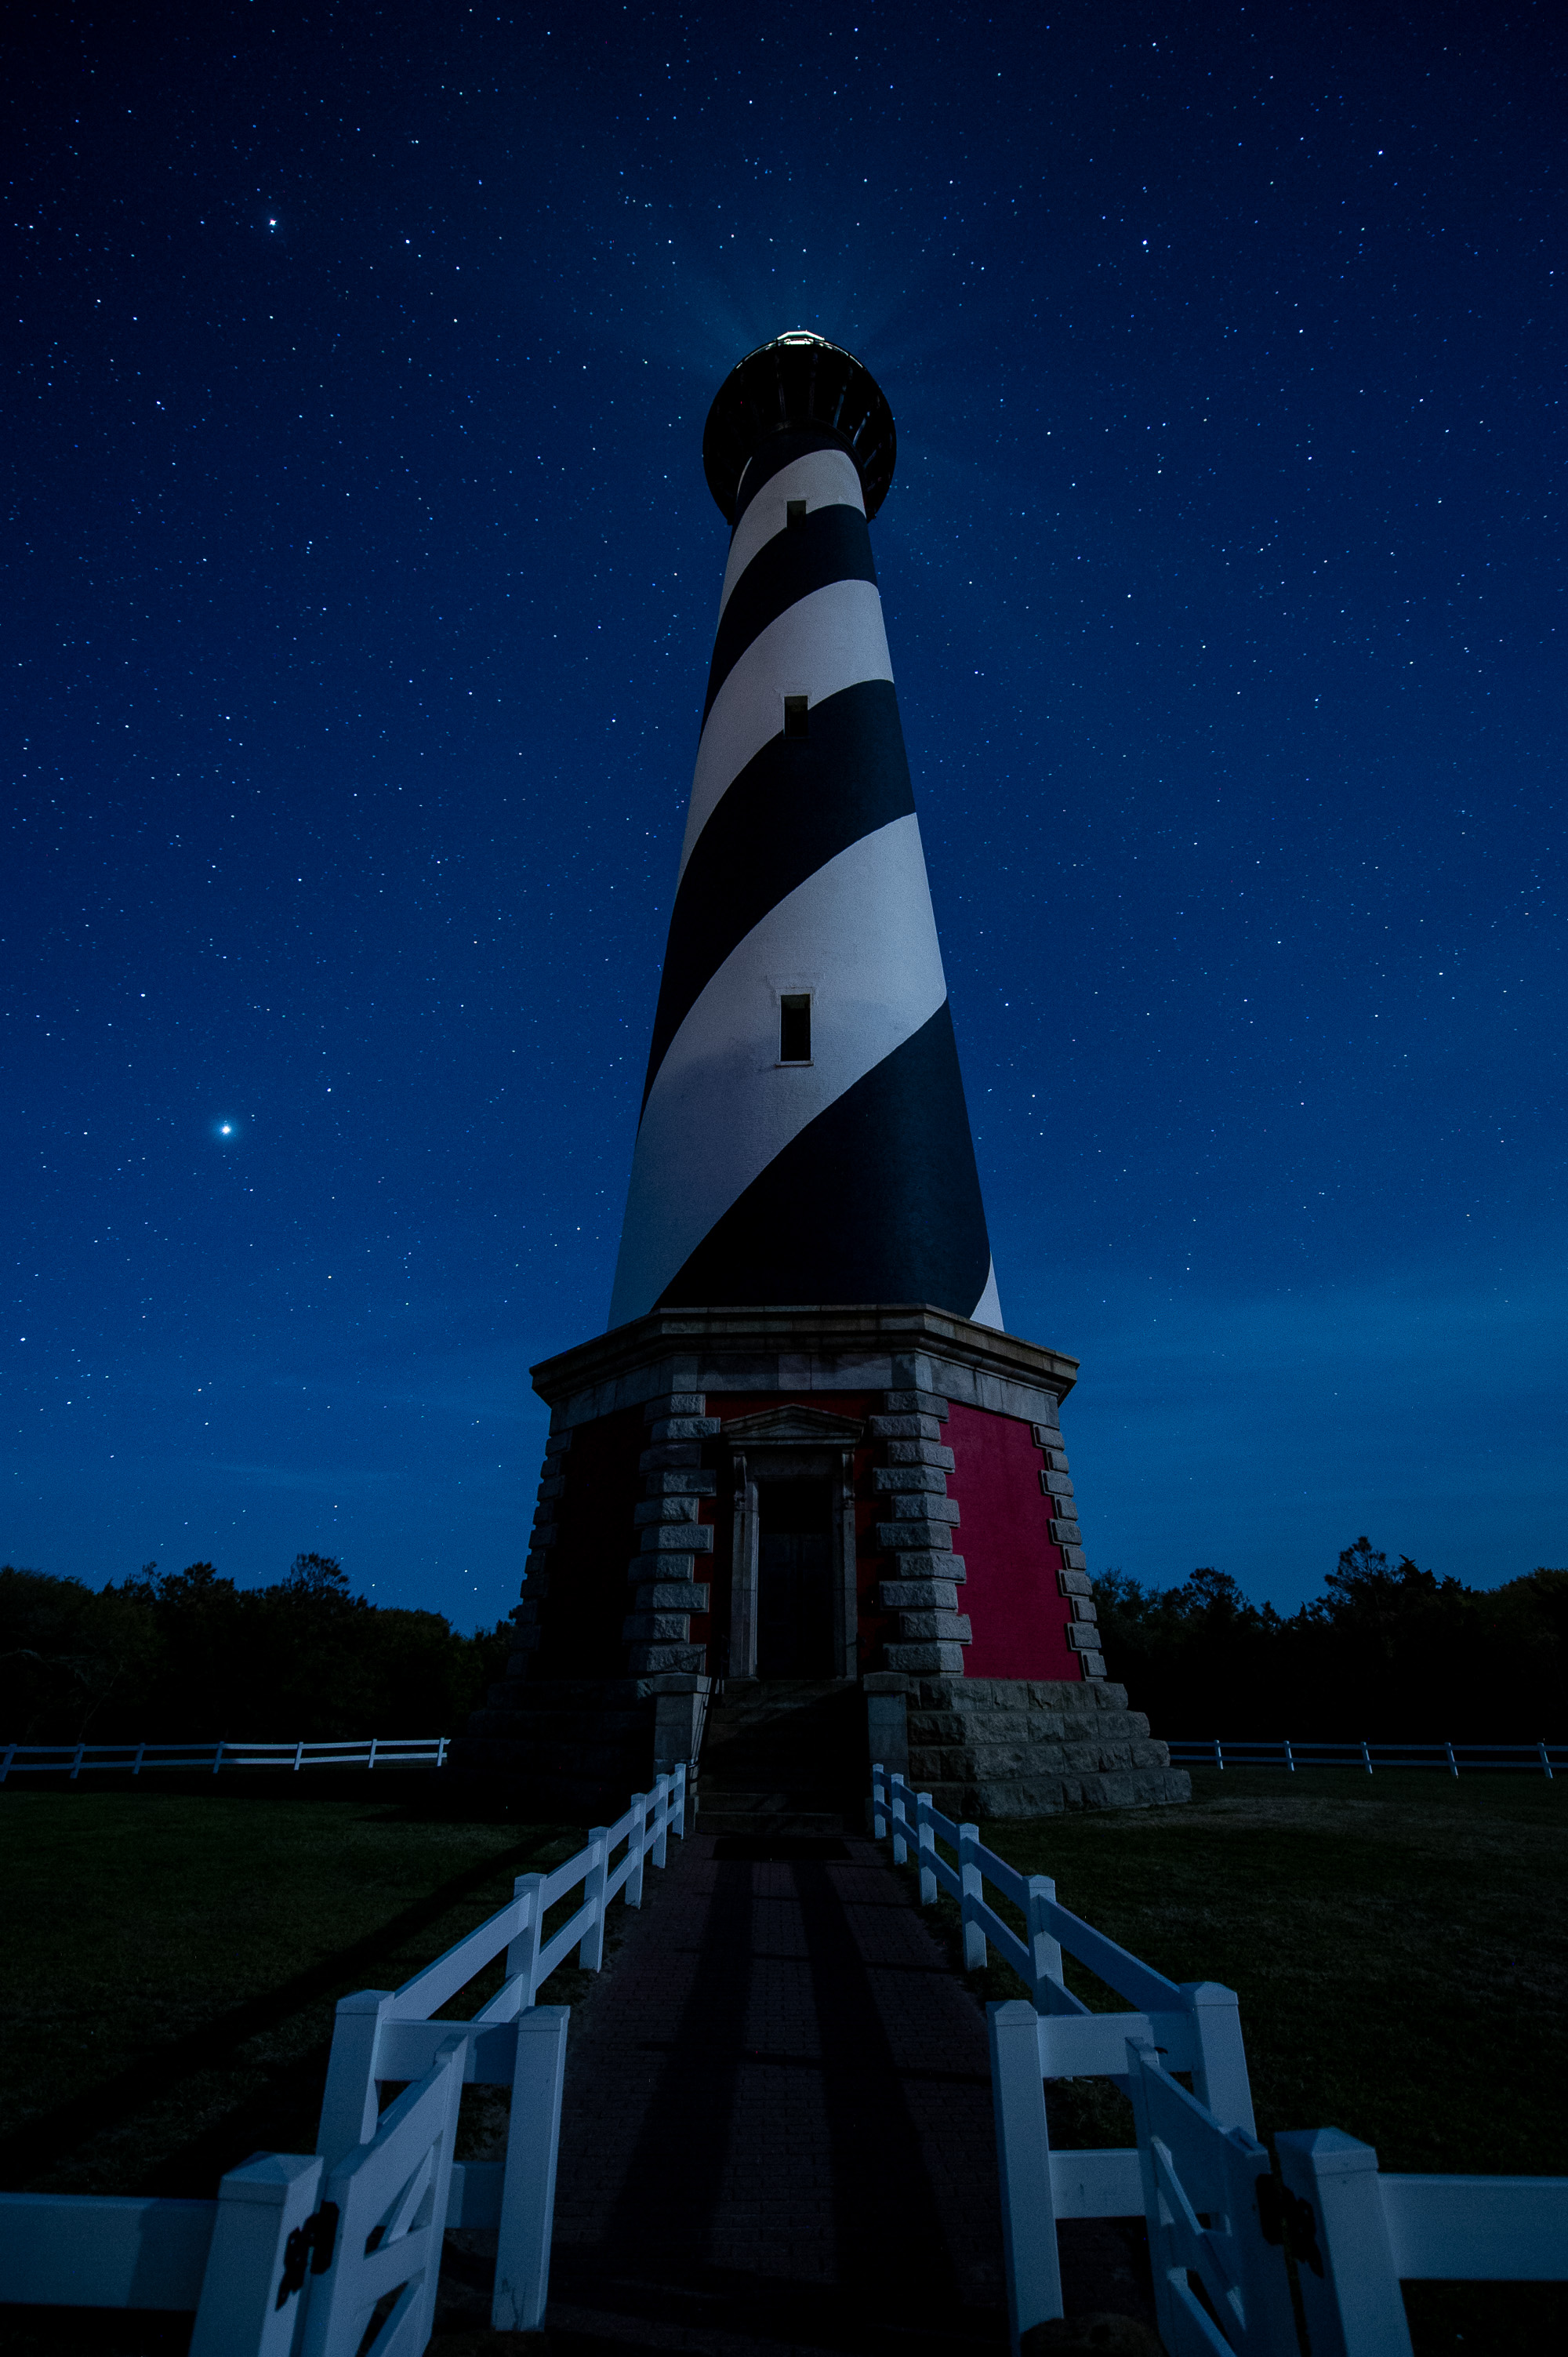
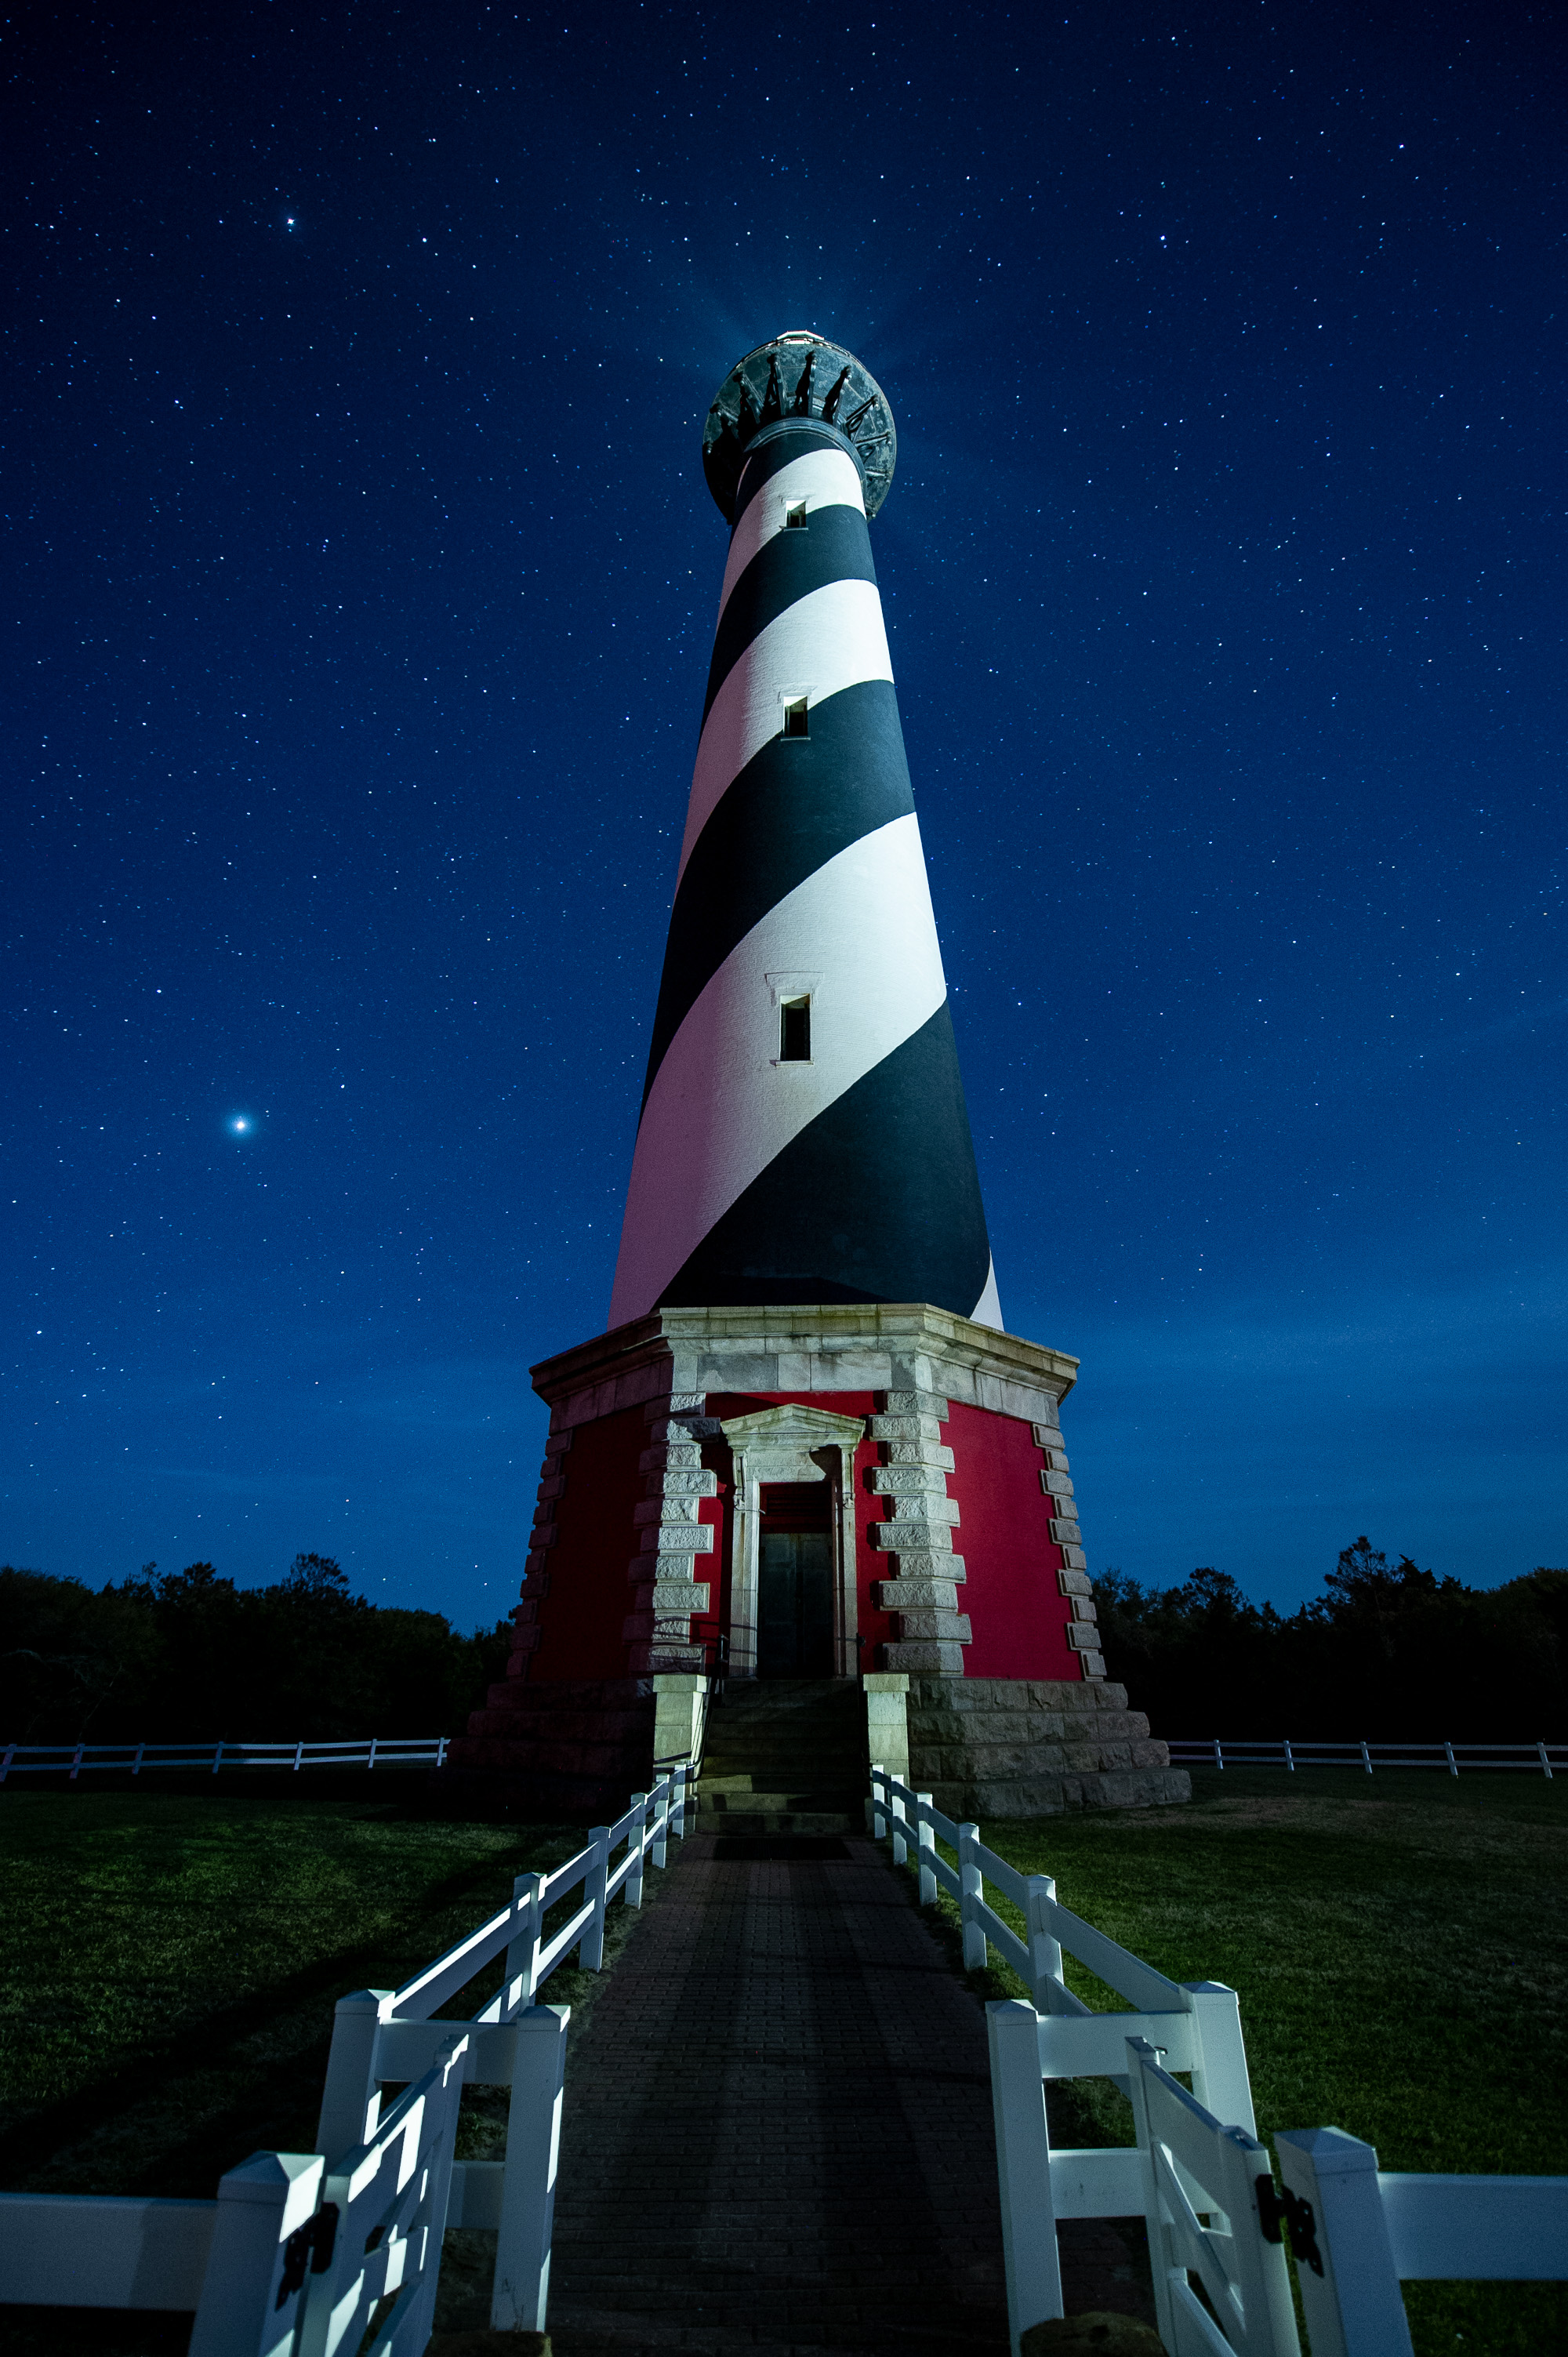
Nikon D3s, 14-24mm f/2.8 lens at 14mm. 15 seconds, f/2.8, ISO 2000.

When shooting in Cape Hatteras National Seashore earlier this year, I was excited to tackle perhaps the most famous light house in the United States: the eponymous Cape Hatteras Light. I'd shot there only once before, in 2001 or so, and that was during daylight. This time, I got to do it with stars!

I went for a wide-angle composition, drawn by the symmetry of the scene, as well as by the low angle that allowed me to include as many stars as possible. I liked the framing, but felt the scene needed a little lighting to help emphasize the primary subject—i.e., the lighthouse. If I’d let the structure stay in relative silhouette, then the visual emphasis would have been on the sky instead.

For the light painting I used a lightly gelled (1/2 CTO) Coast HP7R flashlight. I stood to camera-right, beyond the out-of-frame fence, at almost 90 degrees from the lighthouse. I fired my shutter with a Vello Freewave wireless remote, then started light painting with a wide beam and a downward stroke, starting at the lantern and moving down to the stones and steps at the base. I then quickly focused the flashlight for a tight beam and side-lit the fence leading to the bottom of the frame, letting it catch just pieces of the fence here and there, but being careful not to light the grass.


Light it Up!

We hope this gives you some ideas about various ways you can light the night, and about some of the ways you can use light painting to overcome night photography obstacles.

There are of course many other examples, and I’m sure we’ll offer more in the future. In the meantime, we’d love to see your work. In the Comments section, please share some stories (with photos, of course) of how you have used light painting to help you seize the night!

Chris Nicholson is a partner and workshop leader with National Parks at Night, and author of Photographing National Parks (Sidelight Books, 2015). Learn more about national parks as photography destinations, subscribe to Chris' free e-newsletter, and more at www.PhotographingNationalParks.com.

UPCOMING WORKSHOPS FROM NATIONAL PARKS AT NIGHT