Equipment

Nikon Night Photography Showdown: The D850 Compared to Its Cousins

As you may know, all five of us at National Parks at Night are primarily Nikon shooters. Between us we use the D750, D810, D3s, D4s and D5. Although we are generally happy with our current cameras, some of us are ready for an upgrade. As such, the announcement of the D850 a few months ago excited us as much as it did the rest of the photo world. This camera was touted to be a game-changer for every niche it caters to, including night photography. So it was natural that weโ€™d want to field-test it as a nocturnal tool.

With its nearly 46-megapixel sensor and impressive list of specs and features, the D850 was a fitting camera for Nikon to release during its centennial year. Although it is a direct successor to the D810, the D850 seems to be more of a hybrid between the high-megapixel D810 and the high-speed D5. The new camera sports a Nikon-designed 45.7-megapixel FX-format BSI CMOS sensor aimed at landscape, studio and architectural photographers, but can shoot up to 9 frames per second and at least 51 continuous frames before the buffer fills for sports and wedding photographers. And the back-side illuminated sensor should improve low-light performance, which is obviously key for night photographers!

I recently had the opportunity to spend some time (not nearly enough) with the D850 and compare its performance to other high-end Nikon cameras, especially as it pertains to night photography. Despite the moon, UPS and the weather (clouds, cold and wind) all conspiring against me, I was able to spend a couple of nights with the D850, as well as make some comparison images with the D750, D810 and D5.

Lady Boot Arch from behind, Alabama Hills, Eastern Sierra, California. Lighting with a warm-gelled Coast HP5R flashlight from camera right, low and just in front, plus behind and to the right of the rock column. Single shot. It took about eight tries to get the lighting right. Nikon D850, Irix 11mm f/4 Blackstone lens. 15 seconds, f/5.6, ISO 3200.

There are many online reviews of the D850, but in this one Iโ€™ll focus entirely on how it performs and handles for night photographyโ€“โ€“in particular:

  • high ISO astro-landscape photography
  • native ISO long exposure night photography
  • high contrast artificial light night photography

I am assuming that the reader is at least minimally familiar with Nikon DSLRs, and that they will use other resources such as DPReview and DXOMark to evaluate the camera for other types of photography.

Features and User Experience

The camera is just slightly heavier than the D810, and is well-balanced and comfortable to hold. It weighs about half a pound more than the D750, and almost a full pound less than the D5.

The controls and buttons of the D850 are similar to the D810, except that the ISO and Mode buttons have switched positions in line with the D5. This is a nice improvement over other Nikon cameras like the D750 where the ISO button is on the back and to the left of the display.

The pop-up flash has been sacrificed in favor of better weather sealing and a larger optical viewfinder with .75 magnification and 100 percent frame coverage. Night photographers should appreciate both of these features more than a built-in flash. There is also a flip lever with a shutter to block light from entering through the viewfinder during long exposures.

The D850 has an articulated rear screen which operates in the same fashion as the D750 screen, except that it is higher resolution and touch-sensitive. The screen adjusts on only one axis and is useful primarily for low and high camera angles with the camera in the horizontal position. Previous Nikon touch screens were usable only in playback mode, but the D850โ€™s touch screen is also active in live-view and menu navigation modes.

Like many of Nikonโ€™s semi-pro and professional cameras, the D850 has two card slots, one for XQD and one for SD cards. Personally, I would prefer the choice of two of the same card slots, but the XQD cardโ€™s extreme write speed is required to take full advantage of the cameraโ€™s high frame rate and large buffer, as well as the massive amounts of data recorded by the high-resolution sensor during video recording.

One feature that is especially welcome to night photographers is the introduction of backlit buttons, which obviously ease the task of finding controls in the dark. Though, unlike with the D4s, D5 and D500, only the buttons on the left side of the D850 are illuminated.

As with the D750, there is a Time exposure setting, available in manual mode in between X250 and Bulb. The Time setting looks like two dashes (โ€œ- -โ€) in the Control Panel. Unlike the Time setting in the D750, which shuts off after 1,694 seconds if not ended sooner, the D850 shutter will remain open indefinitely.

Despite the few quibbles mentioned, the D850 is a joy to use. Itโ€™s highly customizable and very easy to get comfortable with.

Unfortunately, programmed shutter speeds do not extend past 30 seconds, which is also true of the available shutter speeds in the built-in intervalometer. Canon finally extended their shutter speed range with the 6D Mark II and 5D Mark IV, and hopefully Nikon will follow suit with their future models.

One of my biggest disappointments with past Nikon cameras has been the poor quality of the live view image in low light, which makes live-view focusing at night quite difficult. There is some improvement with the D850, and a new setting that allows the user to set different brightness levels for live view and image playback is helpful, as are the addition of live-view focus peaking and zebra stripes . (If youโ€™re not familiar with the latter feature, know that it will make your life better. Check it out.)

Petroglyphs, Volcanic Tablelands, Bishop, California. Illuminated from the right with a warm-gelled Coast HP5R flashlight. Nikon D850. 15 seconds, f/9, ISO 6400.

The awkward Mode dial has been replaced with a much more user-friendly Mode button, with the unfortunate trade-off of losing the user-programmable custom modes for saving frequently used combinations of camera settings. Iโ€™m also not a fan of the outdated menu banks. Two other concerns:

  1. The SnapBridge Bluetooth app for transferring images to your smartphone, at least at first inception, was unreliable at best and is the only way to add GPS data to your files in-camera. (Nikon has told us that the recent update makes it usable, but I have not been able to test it.)
  2. Transferring files over Wi-Fi requires an attachment, of which the Nikon option is the $750 WT-7A Wireless Transmitter. (There are third-party options as well, which we will cover in the future.)

Despite the few quibbles mentioned, the D850 is a joy to use. Itโ€™s highly customizable and very easy to get comfortable with. Iโ€™m not sure that Iโ€™d want to hike the Pacific Crest Trail with it on my back, but in my limited experiences, it didnโ€™t feel noticeably heavier in the field than my D750.

Imaging

Most previous Nikon DSLRs have used Sony engineered sensors, so the first thing to note with the D850 is that this is one of the few cameras that features a Nikon designed sensor. Itโ€™s a 45.7-megapixel FX-format BSI CMOS sensor. BSI stands for back-side illumination, a technology that has an atypical arrangement of the sensor components that allows more photons to reach the photodetectors, improving low-light performance, as well as readout rates, or the time required to digitize the light reaching the sensor.

What this means to us is that Nikon has produced an extremely high-resolution camera that does not sacrifice low-light performance. Night photographers can make very large high-quality prints from images made with a D850.

(An interesting side note is that Sonyโ€™s a7R II was the first FX camera to utilize a BSI sensor, and the replacement a7R III also utilizes BSI technology. This technology has been around for a while, but until recently was too expensive to implement in a reasonably priced FX camera.)

Mesquite Flat Sand Dunes, Death Valley National Park. The moon is low in the sky and the ambient exposure is intentionally underexposed for effect. For the middle-ground dunes, warmth, exposure and contrast were boosted using a local adjustment brush in Lightroom. An example of the malleability of files from this camera. Nikon D850, Nikon 24-120mm f/4 lens at 34mm, and Luxli Constructor LED light at 3200 K on the lowest setting, placed at the toe of the foreground dune. 30 seconds, f/10, ISO 800.

Like its predecessor, the D850 has a native ISO of 64, allowing for wider dynamic range than cameras with a native ISO of 100. The sensor also utilizes dual conversion gain, which has the effect of preserving highlight dynamic range while increasing sensitivity. In essence, the sensor has two different sensitivities: the native ISO of 64, and ISO 400, which is when the increased gain is activated.

Of course night photography is often done at high ISOs, which sacrifice dynamic range in favor of shorter exposure times. It has been suggested that underexposing at ISO 400 or 500 and then raising the exposure during RAW conversion will preserve more of the dynamic range than shooting at higher ISOs up to 4000. To me this indicates some degree of ISO invariance, (which is reinforced by my test images) although the article linked above claims that it is not.

Owens Valley Radio Observatory, California. This image was shot at the D850's native ISO of 64 to test the dynamic range of the sensor in a real-world situation. The scene was exposed for the maximum possible exposure without significant clipping of the brightest highlights, to determine if there would be adequate shadow detail while preserving highlight detail. Neither the cameraโ€™s histogram, blinking highlight indicator, nor zebra stripes indicated clipping, but highlight detail just exceeds the capability of an Adobe RGB display. Slightly less exposure would be preferable, especially considering that there is plenty of room on the left side of the histogram for compromise. Unfortunately, I was unable to do comparison shots with the other cameras at this location. In a nutshell: the dynamic range of this camera at native ISO is incredible. Nikon D850, Irix 15mm f/2.4 Blackstone lens. 30 seconds, f/3.2, ISO 64.

The focusing system in the D850 is the same as in the D5: a 153-point autofocus system featuring 99 cross-type points. Both the center focusing point and light meter are rated down to -4 EV. This is not enough to focus or meter by starlight, but it does offer a slight improvement over previous Nikon models like the D750 (-3 EV) and D810 (-2 EV).

As with the D810, the D850 has no optical low-pass or anti-aliasing filter, which makes for the sharpest possible images, but at a cost of an increased risk of moirรฉ in highly detailed areas of a repeating pattern.

Image Quality

I was able to use the camera in different lighting conditions varying from full moon to starlight to some artificial lighting mixed with moonlight. When I had access to the camera, temperatures ranged between the low 20s and low 40s F, so long exposure noise was not a problem. (Iโ€™m eager to try the D850 during our Redwood National Park night photography workshop in late June to see how it performs during long exposures at summer temperatures.)

An example of ISO 25,600 in moonlight. Ken Lee at the Keane Wonder Mine, Death Valley National Park. Seeing detail in Ken's screen and in the folds of his black coat is astounding at this ISO. I would not make a large print of an photo shot at these settings, but the image quality is still very impressive. Nikon D850, Nikon 14-24mm f/2.8 lens at 24mm. 2 seconds, f/6.3, ISO 25,600.

Thirty-minute exposures at native ISO without enabling LENR were clean as a whistle. Native ISO 64 exposures yielded truly extraordinary image quality in both natural and artificial light, but higher ISO images were inconsistent. To be fair, I was not testing in a controlled environment, but with real-world variability that makes it more difficult to be scientific.


D850 test and Comparison Images

So you can make your own evaluations, we are providing you a selection of images made during the testing I did for this article. They are mostly DNG files with embedded metadata. Feel free to download the files and manipulate them for evaluative purposes. Please do not attempt to remove or edit the files in this folder, but rather download them onto your own computer first.

You can download everything mentioned below at npan.co/d850testimages. (Warning: It might take awhile, and we recommend not doing so with a mobile device using a cellular data connection. The files total about half a gigabyte.)

(All images are ยฉ 2018 Lance Keimig/NationalParksAtNight.com, and may not be printed or republished without express written consent of the author and National Parks at Night.)


ISO 6400 Comparison

6400.jpg

ISO 6400 Comparison

D750 v. D810 v. D850

These images were made sequentially on a very cold and windy night in Vermont just before moonrise. The clouds near the horizon are reflecting the lights of South Burlington or Williston, about 20 miles to the north. As the clouds were changing quickly during the shots, the value of comparing highlight clipping is somewhat limited. The foreground was lit by a handheld Luxli Constructor light, which was moved across the frame during the exposure, as the beam was not wide enough to light the entire scene. In hindsight, it would have been better to mount the light on a stand for consistency. The white lines in the road are puddles reflecting light from the sky.


Dynamic Range

Uhebe Crater Dynamic Range.jpg

Dynamic Range

D850

In this folder you will find a daytime image made at Ubehebe Crater in Death Valley National Park. The image was made shortly before sunset, during a windstorm that kicked up a tremendous amount of dust. It wasnโ€™t the photo op I had hoped for, but still provided plenty of material to work with. There are three PNG files showing my Lightroom basic and local adjustments, and one showing clipping in the original file. I have included the DNG file, so you can make your own adjustments as well.

There is also the radio telescope image in DNG format to show the maximum dynamic rangeโ€”whatโ€™s possible, and what isnโ€™t.


Native Versus High ISO

hi-lo.jpg

Native v. High ISO

D750 v. D5 v. D850

There are two subfolders here, one showing native and +6-stop exposures in mixed artificial and moonlight shot with the D750 and D850. These are DNG files. The second folder shows native and +6-stop exposures in starlight with a little light pollution, comparing the D5 and D850 under these circumstances. Note that heavy clouds moved in during the 30-minute exposure on the D850, so it looks quite different than the 30-minute D5 image.


ISO Invariance

invariance.jpg

ISO Invariance

D5 v. D850

These two folders include a sequence of images shot with the D5 and D850 at full-stop ISOs from 100 to 6400 using the same aperture and shutter speed. The D850 folder also includes an ISO 64 image since that is the native ISO of the camera. For each stop of underexposure, the resulting image was given an additional stop of exposure in Lightroom, up to 5, the maximum available. For the ISO 64/100 exposuresโ€”which are six stops less than the 6400 exposuresโ€”five stops plus Highlights and Shadows were added to make the image look as good as possible. Only basic module adjustments were applied.

The conclusion is that the D5 is most definitely not invariant, and the D850 is. The D5 has a lower dynamic range at native ISO, and best results are achieved by giving correct exposure at whatever ISO you use, and not by raising exposure in post-processing. Conversely, the D850 has extremely wide dynamic range at native ISO 64, and also has a small bump in dynamic range at ISO 400 when the additional gain is applied to the sensor. Best results are achieved by shooting at ISO 64 when possible, or, for astro-landscape imaging for star points or Milky Way photography, I recommend shooting at ISO 400 and adding four stops of exposure in the RAW converter of your choosing.

For example, a typical astro-landscape photography exposure would be 20 seconds, f/2.8, ISO 6400. With the D850, I recommend using 20 seconds, f/2.8, ISO 400, and then boosting the exposure by four stops during RAW conversion. This will allow you to use the much wider dynamic range at the lower ISO without adding additional shot noise to the image. (Using ISOs lower than 400 and boosting the exposure in post by more than four stops will not yield better results.)

These are DNG files, so feel free to download and reset them to make your own adjustments from scratch.


Light Writing Comparison
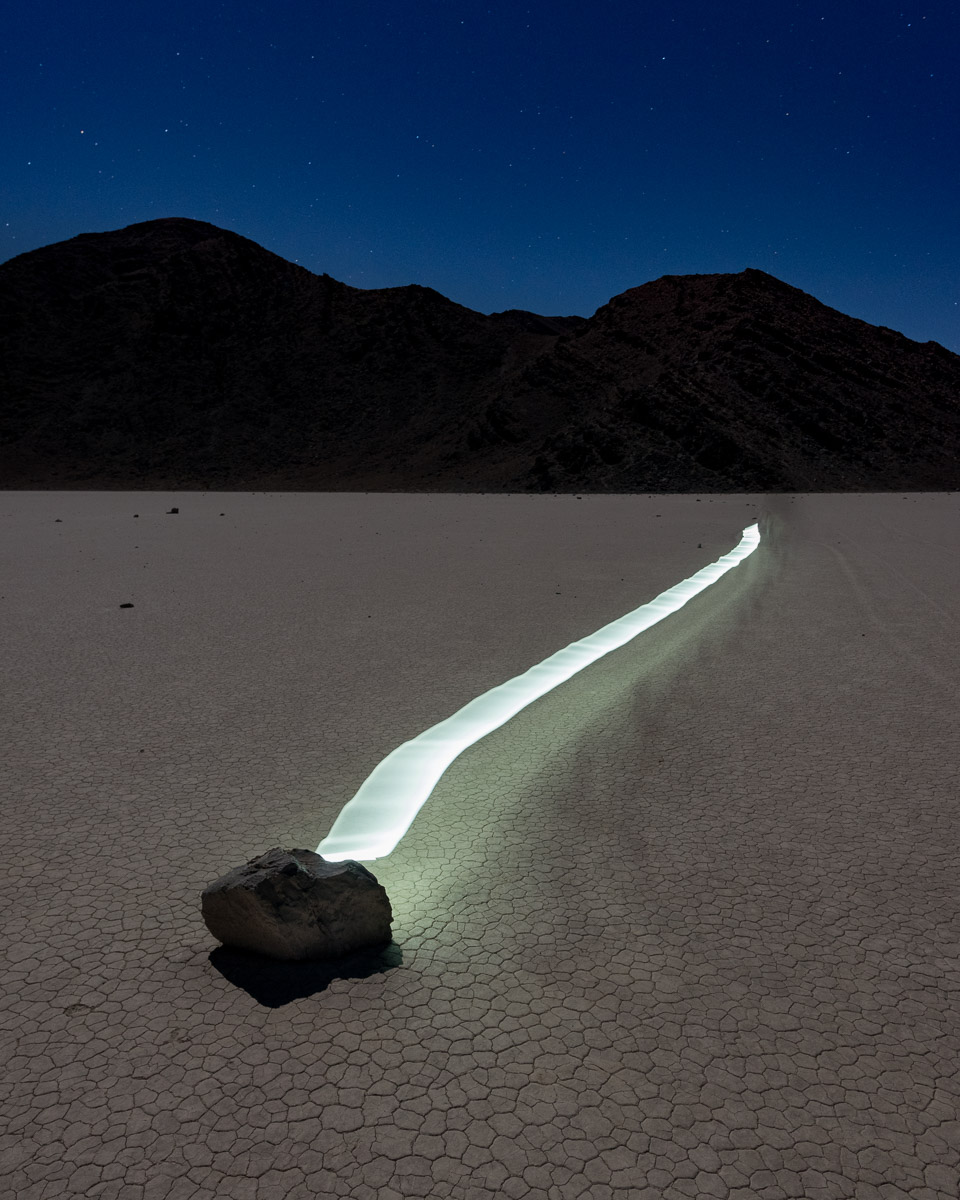
light writing.jpg

Light Writing

D750 v. D810 v. D5 v. D850

These images, made on the Racetrack Playa in Death Valley, are the only ones I have comparing all four cameras. But due to the unique nature of each light-writing exposureโ€“โ€“namely the angle of the light source and the speed it was movingโ€”there are some intrinsic variations in highlights. Still, theyโ€™re fun files to review in order to get a general sense of the image qualities under these conditions (moonlight with a light source in the frame).


Which Nikon is Right for You?

In short, all of the cameras I tested have outstanding image quality, and make excellent choices for night photographers. The question readers should be asking themselves is, โ€œWhich camera is best for my needs?โ€


D750

The D750, despite being released more than 3 years ago, produces images that hold their own amongst its more expensive brethren. It is a superb value, currently priced at just under $1,800, and is a great step up from an APS-C camera. It would also be an excellent choice for a second body.

The compromise in choosing the D750 is primarily in user experience. Lacking a touch screen and the better live-view image quality of the newer camerasโ€”as well as the comfort features of the D5 and D850 such as illuminated rear controls and an eyepiece shutterโ€”donโ€™t affect image quality so much as ease of use.

If you never print, or if you never display your images on anything larger than your computer display, you might be best off with a D750 and using the extra money to invest in some new Nikon glass to go with it.


D810

The D810 was released 3 1/2  years ago, and is currently priced around $2,800. Heralded as revolutionary at the time of its release, it is still a great camera, but a bit harder to recommend after the release of its successor. At roughly $500 less than the D850, I donโ€™t think thereโ€™s enough of a savings to sacrifice all that the new camera adds to the party. Photographers who need the resolution of the D810โ€™s 36-megapixel sensor but are on a restricted budget are those who might be attracted to the predecessor now. Look for price drops in the near future, or consider buying a used one as upgraders unload their โ€œoldโ€ models.


D5

The D5 is truly a beast. Capable, durable, fast, accurate and relatively heavy. Itโ€™s not a camera for hikers, not even for long walks. Some famous photographer once said that if a subject wasnโ€™t within 100 yards of the car, it wasnโ€™t worth photographing. This camera is for that guy. Maybe itโ€™s for you if you have a reliable assistant who never complains about schlepping your gear. Maybe itโ€™s for you if you are strong and young and cost is not a primary consideration. For the journalist, sports or high-end wedding shooter who also does night photography, this is the camera. The D5 is worthy of its flagship status in every way. But not only is it significantly heavier than its more-than-worthy little siblings, itโ€™s also significantly more costly: $6,500, body only.


D850

Now, the camera we really want to talk about: the D850. Released in October 2017, and priced at $3,300, there is still a backlog and a wait of one to two months to get your hands on one. Nikon Professional Services members do a little better, with an approximate wait time of two weeks as of January 2018.

As mentioned earlier in this post, the D850 takes some of the best features of both the D810 and the D5 and combines them into one camera. The D850 offers outstanding image quality, close to medium-format resolution and high-end features (many of which are extremely useful for night photographers)โ€”all for roughly half the price of the D5.

Itโ€™s not perfectโ€“โ€“native Wi-Fi and a useful smartphone controller, GPS, extended shutter speeds, custom exposure modes, and high ISO amplification that doesnโ€™t push highlights into clipping would all be welcome improvements. Still, the combination of image quality, high resolution and features make the D850 one of the very best digital cameras ever made.

I recommend the D850 for professional and serious amateur night photographers who want to make large high-quality prints. And those who want to take advantage of the latest technologies in a camera with outstanding image quality without taking out a second mortgage should also put their names on the list.

What do you Think?

We welcome your thoughts and questions in the Comments section. (Please post all questions here for the benefit of other readers.)

Lance Keimig is a partner and workshop leader with National Parks at Night. He has been photographing at night for 30 years, and is the author of Night Photography and Light Painting: Finding Your Way in the Dark (Focal Press, 2015). Learn more about his images and workshops at www.thenightskye.com.

UPCOMING WORKSHOPS FROM NATIONAL PARKS AT NIGHT

How to Master Color at Night with the Luxli Viola

Luxli Viola 5" On-Camera RGB LED Light

Luxli Viola 5" On-Camera RGB LED Light

Rarely do I find a tool that causes a paradigm shift in creativity or efficiency. The Luxli Viola 5" LED light is one of them. Why? Simply put, I can be very, very deliberate and accurate with the color of light I choose when light painting.

Prior to this, only a few tools really made me say, "Now I can really do something different/better." Those were:

  • a 4x5" view camera (total control over the image)
  • PocketWizard flash triggers (those changed photography forever, and for the better)
  • a light/flash meter (because I could focus on being creative instead of finding the right exposure)
  • the on-camera histogram (this unlocked the High ISO Test so we can all nail a proper long exposure)
  • the Pixelstick (because, damn โ€ฆ its potential for creativity as a light writing and painting tool is limitless)

Each one of these tools opened new realms of creativity. Once I started using them, I was eager to experiment, and I found new efficiency in what I could do (well, except for view camerasโ€”they slowed me down in a truly terrific way).

As with these other tools, the single most important characteristic of the Luxli Viola is that it solves a technical problem. The result is that it allows me more time to focus on being creative.

The Real Problem this Solves

This problem is illustrated best when light painting using multiple flashlights, which often happens when working in a group. In the images below, you can see the color difference between my flashlight and Gabe's:

Note that Gabe's flashlight is warmer than mine. When I choose one flashlight source as neutral at 2600 K, the other is warm. If we had the same model flashlight and same strength and color gels, it would be the same. But we didn't. It doesn't look wrong, but I started to notice when it happened and thinking about how to collaborate better to create group masterpieces. You can even see the difference in the original 4000 K captures in-camera. 

My 2017 Self-Challenge

At the beginning of the year I asked myself, "What makes me uncomfortable? What should I be better at doing, but perhaps am avoiding putting time into practicing?"

Well, I am very fond of black and white photography. I love it so much that I practice it almost as exclusively as I do night photography. So I challenged myself to master color. And not just color in general, but being very particular and deliberate with how I use color.

My new BFF

Then in walks this rather humble-looking LED source. There are tons of on-camera LEDs for video. What sets the Luxli Viola apart and directly applies to my night photography is that it 1) renders all color temperatures from 3000 K to 10,000 K and 2) renders any hue on the color wheel that I desire. Why, you may ask, is that so groundbreaking?

Well, I've been gelling flashlights for years and frankly I hate doing it. It's awkward. It reduces the output. Sometimes I lose them. And most of the time, the color correction of blueish LED sources doesn't quite render the 3200 K or 3000 K or whatever warmer tone that I want. Sometimes it's too warm and causes the delicate reds and yellows of my beloved desert featuresโ€”such as arches and bridgesโ€”a bit too garish. 

Knowing I can simply roll a dial on this LED panel and nail a color temperature got me so excited.

How I make the sausage

The first place the Viola really made an impact was when shooting Milky Way star point exposures. I'm consistently using a 3800 K white balance to accurately render the galactic core. What if I want a neutral light source for the foreground? Easy. Dial the Viola in to 3800 K.

With a flashlight instead, the illumination may end up too cool with a light CTO gel, or too warm and slightly tinted red with a bastard orange gel. But with this LED, no fuss. If I want something a little warmer, I cheat down to a lower color temperature. If I want cooler, I do the opposite. So easy. If I want to go crazy and use straight hues for color accents, I switch to color mode and dial in any darned color I want.

The only other tool I've heard of that exceeds the Viola is the ProtoMachines LED8, which is a light painter's dream (and a also pretty serious investment at $559). Anyone familiar with Troy Paiva's work has witnessed the power of this tool in the hands of a master. I just discovered that ProtoMachines released the Radium light painting wand, an upgrade to the LED2 that runs only $275. However, I have heard is that patience is sometimes required to obtain one, since they hand-build these tools.

Figure 1. Owachmo Bridge at Natural Bridges National Monument. Shot with a Nikon D750 and Distagon T* 15mm f/2.8 lens. 22 seconds, f/2.8, ISO 6400, blended with a dusk image shot at 78 seconds,
f/2.8, ISO 400.

The Luxli Viola 5" LED is also spectacular when applying the Low-Level Landscape Lighting technique. For the photo in Figure 1, I set the Viola to 1 percent output and placed it below Owachmo Bridge. The panel provided a constant, barely perceptible glow that complemented the exposure time needed for star points and the Milky Way. (This image was then blended with an indigo dusk photo for the shadowsโ€”more on that in our recent post, "Finishing Touches: 3 Killer Post-Production Tips For Night Photography.")

Figure 2. Tower Point at Hovenweep National Monument. Split exposure of 22 seconds and 480 seconds, f/2.8, ISO 400.

When it's really hot out, sometimes you have to make two exposuresโ€”one for a low-noise foreground, and one for the spectacular dark skies you get in southern Utah in June. For the photo in Figure 2, I made a 480-second exposure to blend with the sky of a 22-second frame. For the long exposure, I didn't to add light the entire time. So I used another of the Viola's cool features: Bluetooth control. I turned on and off the light for a few seconds at the beginning of the long exposure with my phone. How convenient, right?

I placed the LED to craft textures and faithfully render the bricks' delicate colors at the same 3800 K that I'd set my D750 to. I was so confident about the results that I simply sat back and enjoyed the view. ;-)

At Tashi Gomang Stupa (above), we used a Luxli Viola on a low-to-ground tripod at the bottom left corner to illuminate the main body of the structure. The camera and Viola's white balance were set to 3200 K. If you observe at the light spilling out from behind the stupa, you'll see a warmer light from a 1/4 CTO-gelled flashlight. See the difference between a color-corrected source and one that is simply correct?

Now, aesthetics also come into play. I wanted a warmer splash behind, so this was intentional. But the flashlight-plus-gels scenario is limited to what you carry, and also eats time while setting up. I am enamored with starting with a neutral light source and then cooking the color to taste. 

Mixing and Matching Color Balances

Because of the I put this to the test in the field at Olympic National Park. At Second Beach, I found a sea stack in the distance with some rocks in a tide pool in the foreground. The tide was coming in and making sweet swirls around the rock. This effect was also aided by the thick foam (which Chris commented wiggled like Jello-O when prodded with a toe).

Figure 3. All images above shot at 26 seconds, f/2.8, ISO 6400 with a Nikon D750 and Zeiss Disatgon 15mm f/2.8 lens. Download a high-res version of this chart here.

Keep in mind that there is no right or wrong when it comes to color temperature. There is knowing what affects your sky and foreground in a manner that you find pleasing. For the scene in the test above, I prefer the 3800 K camera and 5700 K LED. I was surprised by thatโ€”I had thought I'd like the 3800/3800 combination. Test and experiment!

Night Portraits

The Viola is also hella cool to use for night portraiture. It's not a flash, so don't expect crispy edgesโ€”people do move. But if you use the Viola briefly and your models hold still enough, it can be a great light source. 

Figure 4. The B&H marketing crew and astrophysicist Summer Ash at the Atlas Obscura eclipse event in August.
Nikon D750, 22 seconds, f/2.8, ISO 6400. White balance 3800 K (camera and LED).

For the photo in Figure 4, I matched the color temperature of my Viola to my CTO-gelled flashlight at 3800 K. The Viola is on the left of camera and the flashlight is low on the right.

Bonus: Bluetooth!

On top of all this, as mentioned earlier, the Luxli Viola has Bluetooth that allows you to control up to nine lights. When is this useful? When you want to simulate a flash, but can't use one, like for this group photo of our workshop participants at Olympic National Park last month:

I'm operating the lights with my phone behind Chris' back at left. Camera is set on intervalometer. 10 seconds, f/4, ISO 6400.

Wrapping it all up

I am enjoying the process of thinking critically about color and its application. I feel like I've grown as an artist and have another vital tool in my toolbox. I am equally excited about color and black and white imagery, but I think the results were worth going outside my comfort zone. And I'm keeping the Luxli Viola in my bag. Now I have to decide what to vote off the island, since gels didn't really occupy all that much space. ;-) 

Here is a recap of the benefits I find using a Luxli Viola:

  • Constant light makes it easy to repeat lighting effects, including exact shadows, intensity and placement.
  • Choosing a color temperature that matches my color balance in-camera will faithfully render the color of the objects in the scene.
  • Choosing a warmer or cooler color temperature can add creative flair.
  • It's very light and small.
  • When running at 1 percent power (which is most often for me), it will run all night and then some.
  • Adding the collapsible diffuser kit gives me a soft snoot to kill light spill at the edges, plus an even softer effect. 

There are a few disadvantages, however:

  • It's $350* (way more than a good Coast flashlight and gels).
  • The optional diffuser kit (which is amazing) is another $100*, or you can get both together for $429*.
  • An LED array is many little lights in rows and columns. It will never throw as far as a flashlight with a focused reflector on the front. So, you'll likely not be able to use it as a focusing aid, or for illuminating things very distant, unless you go for a longer exposure, or walk it deep into your frame and point it toward the thing you want to light up.
  • It's bigger than a flashlight. (That's a hint! hint! for any manufacturers out there who want to put these features in a flashlight form!)

* At the time of writing, these are the prices listed on B&H. Prices can fluctuate, so check back. 

Let's talk about color in the comments! How do you feel about your control and use of color? What tools do you use? How are you challenging yourself to grow? 

Matt Hill is a partner and workshop leader with National Parks at Night. See more about his photography, art, workshops and writing at MattHillArt.com. Follow Matt on Twitter Instagram Facebook.

UPCOMING WORKSHOPS FROM NATIONAL PARKS AT NIGHT

Tech Support: 10 Apps that Will Power Up Your Night Photography

We live in amazing times. Awesome people are making tools that solve problems for niche areas, like night photography! What once took days of research, trips to the library, learning esoteric maths, using arcane lore or even saying, โ€œI'll wing it because this is too complicated ...โ€ is now in the palm of your hand.

Our team uses a variety of apps to explore locations and plan shoots, plus understand the moon, stars and celestial events. Weโ€™ve curated some of the most useful ones here for you. The age of informed precision is here, and itโ€™s waiting in your pocket.


Chris Nicholson

Sun Surveyor

There are several excellent apps for showing where and when the sun and moon will be. Sun Surveyor is a relatively new one that I love because it makes visualizing the movement of the sun and moon so easy. The placement of each in the sky is portrayed in a virtual-3D arc on your phone or tablet screen. As you turn, or as your device tilts, so does the graphical representationโ€”so as youโ€™re standing on-site, you can see exactly where to expect the sun and moon to be at any time.

Website: www.sunsurveyor.com
Cost: $9.99 (iOS), $7.99 (Android)


Chimani

IMG_0898.PNG

If you have questions about locations in a national park, Chimani is a great place to start looking for answers. They have a travel-guide app for all 59 national parks, each of which contains GPS-enabled maps, and each of which covers topics such as where to lodge or camp, trails to wander or hike, and tips for places to see and explore. Moreover, Chimani recognizes photography as one of the top three activities practiced in the parks, so they also build in photo advice, location tips, sunrise/sunset/moonrise/moonset/blue-hour/golden-hour times, and so on. Andโ€”ready for this?โ€”all the apps are free and work without an internet or cell connection.

Website: www.chimani.com
Cost: Free


Matt Hill

WeatherUnderground

There are many weather apps, but I prefer WeatherUnderground (WU) for a few reasons:

  • Their presentation of precipitation, temperature and sky conditions is easy to understand at a glance on a daily or hourly basis.
  • You can add โ€œSmart Forecasts,โ€ including Star Gazing and Landscape Photographyโ€”plus edit those presets to taste (see above screenshots).
  • You can add multiple locations, much like the other night photography apps we use, to monitor weather in places you are traveling to or want to shoot.

If youโ€™re generous enough to confirm the conditions in your area, youโ€™re part of the community that contributes to the excellent reporting. Itโ€™s like Waze for weather. It rocks. And youโ€™ll rock. 

Website: www.weatherunderground.com
Cost: Free


Pablo

Wanna practice your light painting and see what you did and when? Then download Pablo and start practicing. It uses your smartphoneโ€™s camera to record images in sequence to create either one final photograph or an animated GIF/video that shows how you built up to the exposure. Itโ€™s pretty hip, so wear shades. 

Website: www.hipablo.com
Cost: Free or Pro version $2.99 (check out this video for Pro version)


Gabriel Biderman

PhotoPills

If I were to be stranded in a national park with no cell service and all my gear, Photo Pills would be the one app that I would use to help me navigate my day and night photographic experience. Photo Pills is rich with multiple tools to help you visualize and plan where the sun, moon and Milky Way will be at any location in the world. You can also use it help you figure out your maximum depth of field and hyperfocal distance, as well as to calculate time-lapse intervals, photos and total memory usage.

My two favorite sections that I use all the time are Planner and Night AR. The Planner lets you drop a pin in any location and then easily read important night photography info for that spot: when the sun and moon will rise and set, twilight times, when the Milky Way will rise and set, and what elevation and angle the galactic core will be at any time during the night. You can save those settings and really plan when would be the best time of the year to visit those locations. And when on location, Iโ€™m constantly using the Night AR feature to see the when, where and what angle the Milky Way and other constellations will appear against the mountains and other key foreground elements Iโ€™m standing in front of.

Thereโ€™s lots of info to be had with Photo Pills, and I advise visiting their blog to access tons of training on how to maximize your experience with their app.

Now available for the Droids as well!

Website: www.PhotoPills.com
Cost: $9.99


Ricoh Theta+

Iโ€™m a big fan of the Ricoh Theta 360-degree camera, now in its fourth generation. The inexpensive camera lets you take and share 360-degree images that you can view immersively in Facebook, Tumbler, Twitter or YouTube, or view in VR goggles. Each camera has made a major leap forward in image quality and user experience. Iโ€™ve even had some success with night photographyโ€”it is a great way to capture the space and place.

While you use the regular Theta app to capture the image, I always quickly switch over to the Theta+ app to do some quick editing. It provides you the best way to flatten the image for more universal viewing, offering Mirror Ball, Little Planet, Flat or Straight options. I default to either the โ€œtiny planetโ€ or panoramic โ€œflatโ€ viewpoint, and then can apply an Instagram-style filter (I like Libra) as well as do some additional editing. The final step is how you want to save to share the image. I always choose the crop image as it saves the image flat but when posting to most social sites will read as a 360. โ€œSave as 360 imageโ€ links your post to the slightly more engaging Theta website, but typically posts small on Facebook and doesnโ€™t get as many views because the viewer needs additional clicks.

So take a leap into the world of 360 with the Ricoh Theta camera and Theta+ app!

More info: www.theta360.com
Cost: Free


Tim Cooper

Compass

As Chris mentioned above, there are several excellent apps for showing where and when the sun and moon will be. Why then have a compass app? Because itโ€™s quick and easy. While apps like Sun Surveyor and PhotoPills are invaluable, they are also multitaskers. A simple app like Compass is a one-trick pony whose trick is really important. I donโ€™t know how many times I just wanted to quickly locate west on a cloudy day. Compass app makes this determination effortless. The iPhone version also comes with a simple altimeterโ€”itโ€™s always fun knowing how high you are!

More info: www.macworld.com
Cost: Free native app on iOS6 and iOS7; similar apps available for purchase for both iOS and Android


Tide Graph Pro

Tides? What do they have to do with night photography? Well, admittedly they donโ€™t have much influence over our skies. But having a tide chart will help you plan a night shoot at low tide with some stunning sea stacks or tide pools in the foreground. Tide Graph Pro allows you to locate the nearest tide station via a map or by name search. Once youโ€™ve located your nearby station itโ€™s a simple matter to determine the highs, lows and even the height of the tides. The time/date tool and tide graph are both very intuitive and easy to use.

Website: www.tidegraph.com
Cost: $2.99 (iOS), $1.99 (Android)


Lance Keimig

Field Tools

Field Tools is a simple, straight-forward, and customizable depth of field and hyperfocal distance calculator. Despite not having been updated since 2012, it still works perfectly on iOS 10.3, and is the best of several DoF calculators that I have used.

Website: www.appadvice.com
Cost: Free (iOS only)


Sky Guide

Sky Guide is a richly featured but easy-to-use astronomy app with a beautiful interface and a great augmented reality.

Website: www.fifthstarlabs.com
Cost: Free (iOS only)


Bonus

The Photographerโ€™s Ephemeris

When we work on things like this, weโ€™re kind of democratic about it, and we also just let each other run with where our thoughts take us. Because of that, none of us chose to mention perhaps the most obvious app to mention, because each of thought another of us would. So, from Chris...

The Photographers Ephemeris (TPE) is a mainstay, and one of the granddaddies of this space. Theyโ€™ve been making their product and providing their service since before not just tablets and smartphones were around, but before even PDAs. Their original app (which you can still download for free) was designed to run on โ€ฆ ready for it? โ€ฆ desktop computers!

As opposed to many pieces of modern technology, age does not work against TPE. Not only have they spent their years making updates and improvements, but it still does great what itโ€™s always done great. Every photographer should have it and use it.

What does it do? It graphically tells you exactly where and when the sun and moon will rise and set at any time of day and year anywhere in the world, along with the same data for the Milky Way. Very, very powerful information for scouting a photo location either on-site or from your couch at home.

Yes, other apps do this too. TPE did this first.

Website: www.PhotoEphemeris.com
Cost: $8.99 (iOS), $4.99 (Android)


Your Turn

There are certainly more than 10 (well, 11) apps that help out with a night photography shoot, and we will certainly cover more of them in the future.

In the mean time, what are you favorite apps that make national park or night photography just a little easier or more fun? Tell us in the Comments section below!

Matt Hill is a partner and workshop leader with National Parks at Night. See more about his photography, art, workshops and writing at MattHillArt.com. Follow Matt on Twitter Instagram Facebook.

UPCOMING WORKSHOPS FROM NATIONAL PARKS AT NIGHT


Tools for Illuminating the Night: Building a Light Painting and Writing Kit

One of the most fun parts of being a night photographer is experimenting with light during long exposures. Some people do it for practical reasons, like adding light where it's dark. Some use it to add creative or artistic flair to an image. Whatever your purpose, I am going to show you how to build a kit for both painting and writing with light.  

I want to first establish some definitions:

Light painting: adding light to something within your frameโ€”e.g. shining lights on the grass, trees, people, rocks, etc. This light bounces off those objects, defines them, and comes back to the lens.

Light writing: turning your light source toward the lensโ€”in effect, you are "writing" with the light, capturing its vector, or path, through space in single or multiple exposures.

For the record, my definitions are not universally adopted or applied. Many people refer to "writing" as "painting." It's neither right or wrong, as long as we all get along. ;-) But for the purpose of this article, let's agree on the above.

I use both methods to make long exposures at night. Both practices have a practical purpose and identifiable effects.

Identifying Light Painting versus Light Writing

In Figure 1, you'll note that a proper exposure that does not blow out highlight details in the sky leaves the foreground lacking sufficient detail. Light painting to the rescue in Figure 2. Both images are from the backcountry of Valley of Fire State Park in Nevada. 

In Figure 3, you'll see a starlit scene with a Pixelstick used to light-write around a tree in the foreground.

Figure 3. The Windows at Arches National Park just before moonrise, with light writing done with a Pixelstick. 68 seconds, f/2.8, ISO 6400 with a Nikon D750 and Nikkor 16mm f/2.8 fisheye lens.

And just for fun, Figure 4 is an example where I played catch with my friend using a Frisbee with a blue LED in it. 

Figure 4. Three 2-minute exposures stacked. You try vigorously throwing a Frisbee for six minutes in Denver. I'm still catching my breath.

Figure 5. From left to right: Coast HP14 (629 lumens, 813-foot beam), Coast HP7R (300 lumens, 754-foot beam), Coast HP5R (185 lumens, 600-foot beam) and Coast A8R (low-power, 62-foot inspection beam).

Light Painting Starter Kit

If you're just starting out with light painting, let me be the first to say, "Welcome!" You're going to have a blast. You'll want just a few items to get you on your way to opening up more creative roads than you'll know what to do with. Here's what you need to get started:

1. One high-power flashlight with a tight or focusing beam for illuminating objects in the distance. I suggest 300 lumens or more. I use the Coast HP7R (Figure 5) most often.

2. One penlight for writing stuff in the air and for observing things on your camera. (I just fell in love with the Coast A8R, seen in Figure 5.)

3. One pack of Rosco sample gels to warm or cool your light temperature or to make funky colors.

4. Some gaffer tape. Because, you know, gaff solves nearly anything for a night.

Figure 6. Coast FL75R dual-beam focusing rechargeable headlamp.

Light Painting Advanced Kit

Wanna level up and get serious? Roll up your sleeves and bring a bigger bag. Include all of the above, plus:

1. One headlamp (Figure 6) for hands-free safety while trekking around in the dark, and/or for hands-free gear operation. Just be careful not to ruin anyone else's shots when wearing it. Or to blind them by looking at them when it's on.

2. One massively high-power flashlight for light-painting distant objects. I carry the Coast HP14 for this (Figure 5).

3. One kinda-low-light flashlight for delicate workโ€”around 100 to 200 lumens at most. See the Coast HP5R (Figure 5).

4. One good incandescent flashlight for painting with a warmer color temperature than sans-filter LEDs. It might stay in your bag a lot, but sometimes it's just the right solution.

5. One roll of Cinefoil. Cut some, fold it up and put it in the bottom of your bag. Use it to make your own snoots anytime.

LIGHT WRITING KIT

Mechanisms for light writing are a bit different, and come in all shapes, sizes and builds for varied situations. You can learn how to use these tools for their intended purposes, and then use them for anything else you can think of too. Creativity is the key.

Here are some good options to get ya going.

1. One Pixlelstick (I was backer No. 243 on Kickstarter!), or the similar Lumibrush, or any of the fabulous DIY LED arrays if you are technically inclined. (Figure 3.)

2. One Light Painting Brushes Deluxe Starter Kit. This collection of awesome creative tools will keep you playing around in the dark for months. It has everything from the essential Universal Connector (which alone is a great snoot to control light spill), to color cones, a fiber optic wand (I call it the light octopus) and a Jedi-esque light sword.

Figure 7. (No audio.) See the light-beam spread demo from a Coast HP7R, and a quick overview of Light Painting Brushes items mounted on same flashlight, with zoom in/out.

Figure 8. EL Wire.

3. EL Wire. It's inexpensive and makes soft, glowing trails like foxfire. Be careful, thoughโ€”it's sometimes delicate when transporting and swinging around.

Figure 9. Battery-powered Christmas lights.

4. Battery-powered Christmas lights. With the advent of LEDs, you no longer have to use C or D cells to power themโ€”now it's a pair of AA batteries (light!) and you're good to go. Swing them around to make orbs and light trails. I like to buy them for a dollar or so right after Christmas!

Additional Toys (um ... Tools)

Here is a brief list of other things you may consider using on your path to becoming the night photographer you aspire to be:

  • fire (be carefulโ€”and do not use inside national parks!)
  • fireworks (be even more careful, and be legal!)
  • steel wool + whisk + metal cable (I wait for wet, rainy nights to do this or I stand in waterโ€”and again, fire, not in national parks!)
  • glow sticks
  • programmable LED strips
  • toys with lights in them
  • balloons with glow sticks in them
  • LED votive lights
  • DIY light painting tools and shapers of all kinds
  • professional light painting tools
  • lasers
  • car headlights and taillights

I use all of these indiscriminately. Why? Well, when you say no to something, your options are limited. So why not try everything and then some?

Now take a deep breath. You can't possibly carry all that with you. Though I have tried...

Below are some more images I've made while experimenting with light writing and painting.

Matt Hill is a partner and workshop leader with National Parks at Night. See more about his photography, art, workshops and writing at MattHillArt.com. Follow Matt on Twitter Instagram Facebook.

UPCOMING WORKSHOPS FROM NATIONAL PARKS AT NIGHT

Game-Changer: The Best New Piece of Gear for Night Photographers

While night photography has been reaping the rewards of the continual improvement in cameras, lens, tripods and flashlights, there have been very few gadgets that have come out and revolutionized the way we approach night photography. Well, Iโ€™m here to share that the Case Relay by Tether Tools does just that. It is the best new piece of gear for night photographers.

The Case Relay gives you power, and lots of it. The constant bane for photographersโ€”during the day or nightโ€”is running out of juice. Once Iโ€™ve got my shot all set up on the tripod for a series of long exposures, I dread having to take the camera off mid-stream just so I can replace a battery. And good luck realigning the shot!โ€”especially during a time-lapse when you have an extensive rig set up.

The Tether Tools Case Relay Camera Power System.

The Tether Tools Case Relay Camera Power System.

With the Case Relay, you replace your regular battery with the Tether Tools Camera Coupler, which looks exactly like your battery with a cord at the end. That cord connects to the Case Relay. The other end of the Case Relay has a 6-inch USB cord that can be plugged into one of the many USB battery packs on the market.

The Case Relay isnโ€™t just a conduit of power, but actually has its own secondary internal 1200 mAh battery built inside. This allows you to hot-swap your USB battery packs without missing a shot. When you tap into a 10,000 mAh batteryโ€”like the Tether Tools Rock Solidโ€”you are tapping into a long night of shooting on one battery. The Rock Solid has two USB out ports, so we can also power our phones in the field!

I like adding a little grip and protection to the Rock Solid battery pack with a protective silicone case that comes in black or orange. The final ingredient that literally ties all these items together in a very organized and neat way around your tripod is the StrapMoore.

My first test of night with the Case Relay System


Normal
0


false
false
false

EN-US
X-NONE
X-NONE


 <w:LatentStyles DefLockedState="false" DefUnhideWhenUsed="true"
DefSemiHidden="true" DefQFormโ€ฆ

My first test of night with the Case Relay Systemโ€”4 1/2 hours of shooting stars, trains and people lighting up the scene, all stacked into this one image. And I still had plenty more power to tap into.

Iโ€™ll be transparent here: We have a sponsor relationship with Tether Tools. But Iโ€™m not plugging their product because we have a relationship; we pursued that relationship because I absolutely love this product for how it changes my approach to night photography.

We recently made a video demonstrating the unlimited power of the Case Relay during my last Bannerman Island workshop with Matt Hill. I was shooting for eight hours and โ€ฆ not to give away the ending โ€ฆ but I still had juice in the tank!

So if you are into shooting time-lapses, long star trails, or just for many hours during the day or night, I think youโ€™ll find the Case Relay Camera Power System to be a must-have tool to bring on your shoots.

(Note: There are several components to assembling your very own Case Relay System, so to help, we have organized all the pieces youโ€™ll need on our Gear page.)

Gabriel Biderman is a Brooklyn-based fine art and travel photographer, and author of Night Photography: From Snapshots to Great Shots (Peachpit, 2014). During the daytime hours you'll often find Gabe at one of many photo events around the world working for B&H Photoโ€™s road marketing team. See his portfolio and workshop lineup at www.ruinism.com.

UPCOMING WORKSHOPS FROM NATIONAL PARKS AT NIGHT