Milky Way pano

How I Got the Shot: Grosvenor Arch Milky Way Pano

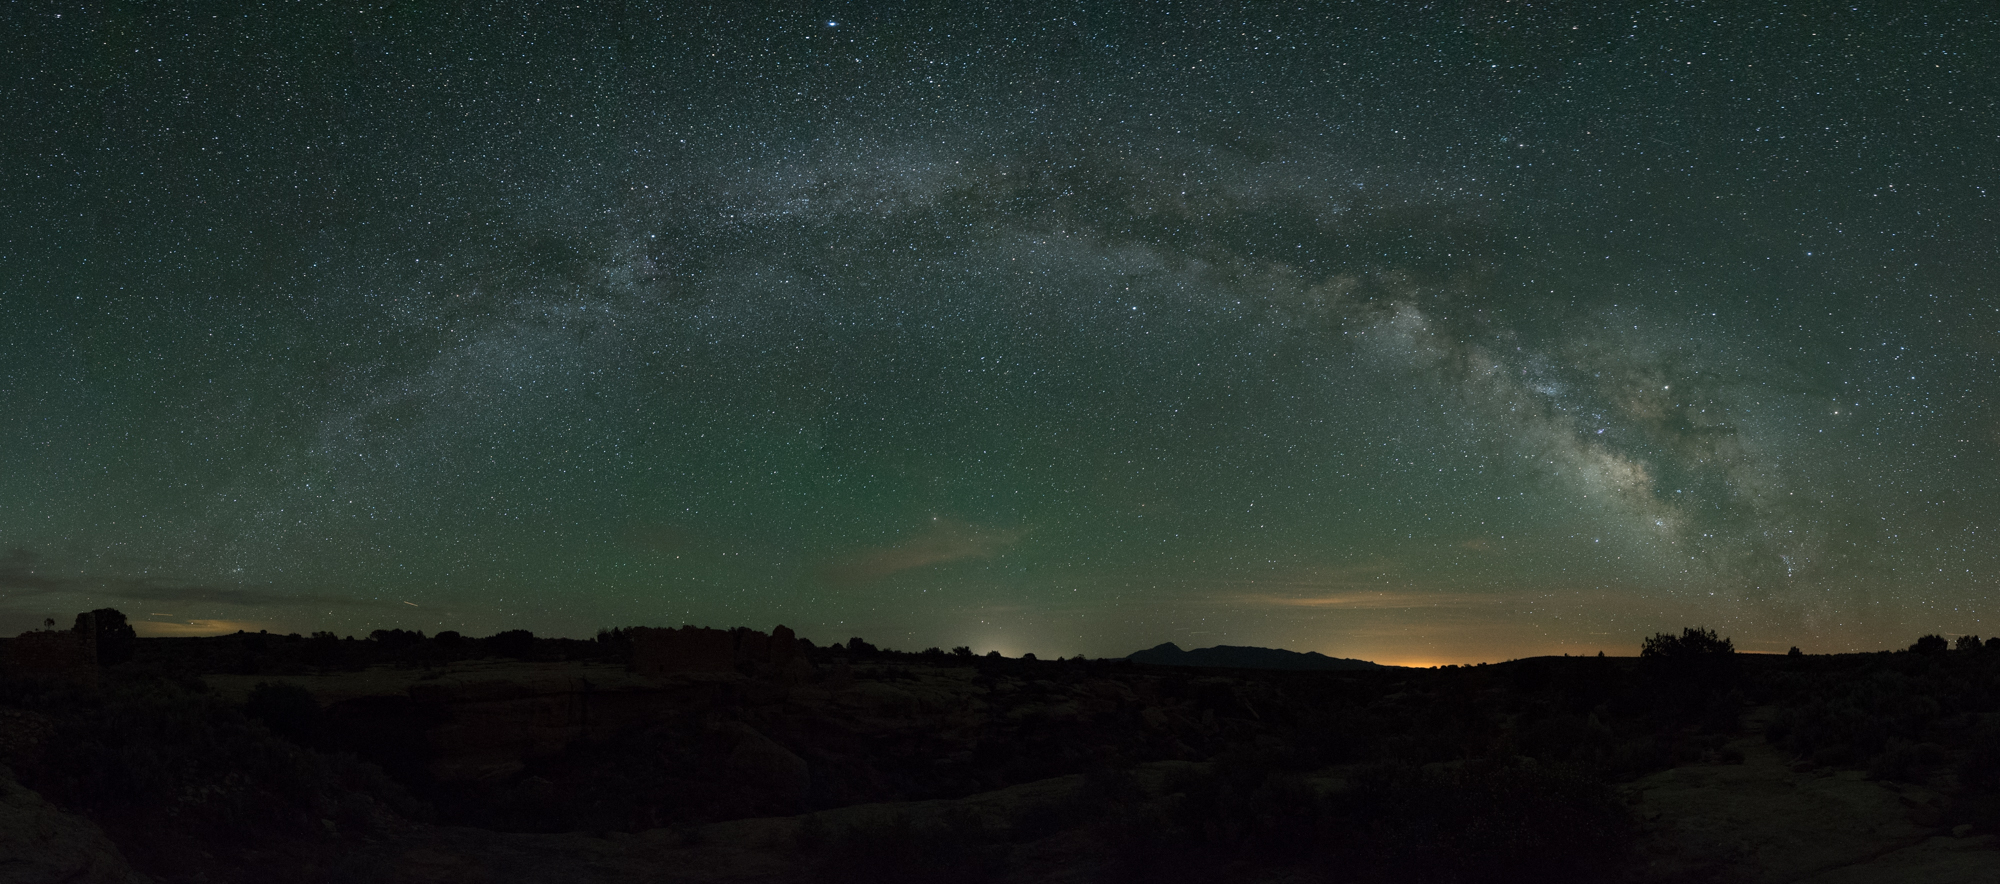
Grosvenor Arch Milky Way Pano. Nikon Z 6II with an Irix 15mm f/2.4 Firefly lens and FTZ Adapter, mounted on a Novoflex VR-System Slim Panorama System, lit with two Luxli Fiddle LED panels. Eight frames shot at 15 seconds, f/3.2, ISO 12,800 and stitched in PTGUI Pro.

The Location

One standout feature among many in the nearly 2 million acres of Grand Staircase-Escalante National Monument is Grosvenor Arch.

This hulking double sandstone arch stands 150 feet above ground. Named in honor of Gilbert Hovey Grosvenor (1875-1966), the first full-time editor of National Geographic magazine and husband of Elise May Bell, daughter of Alexander Graham Bell. Gilbert is credited with transforming the much-too-scholarly National Geographic into the illustrated and superb publication many of us have enjoyed for decades.

Figure 1. Grosvenor Arch sits in the backcountry of Utah’s Grand Staircase-Escalante National Monument, which is gigantic. Click here to download a map of the area. Satellite imagery courtesy of Google Earth.

Photographers from the National Geographic Society named the arch after Grosvenor during a 1949 expedition, as they believed he “had done more than any other person to arouse public interest in geography.” So this was a fitting subject for Gabe Biderman and I to stop at during our 3-week tour of California, Utah and Arizona in 2021.

From our base in Kanab, Utah, Gabe and I made a day and night of driving north and past the entrance to Bryce Canyon (gasp!) and onward to Kodachrome Basin State Park for sunset (Figure 2).

Figure 2. Nikon Z 6 with a Venus Optics Laowa 15mm f/2 FE Zero-D lens, mounted on a Novoflex VR-System Slim Panorama System. Seventeen frames shot at 1/60, f/8, ISO 100 and stitched in PTGUI Pro.

A fun detour! But our real goal for the night lay farther down the primitive, hardpack Cottonwood-Canyon Road.

Upon arrival, we noted that 1) only one other car was present and the owner was either sleeping or hiking, and 2) there was a bathroom. Yay! The ample parking and paved walkway were welcoming after some of the back-trail adventures we’d had.

While scouting (Figure 3), I knew that my ultimate goal was the rise of the Milky Way core and the resulting arch connecting with the landform. Gabe and I studied the scene and planned the compositions. I was really into making panoramas during that trip (and still am!).

Figure 3. Scouting with PhotoPills.

The Pre-Shoot Shoot

As darkness drew upon us, we still had a long time to go before the galactic core appeared. Not ones to waste a good dark sky, we shot plenty while waiting.

We started with deploying some Low-level Landscape Lighting (LLL). Gabe hiked down the road a bit and then a little into the field to set up a Luxli Fiddle LED panel. Being over one-third of a mile from the arch, Gabe turned it on at 30 percent brightness. The result was a crisp, directional light source that defined the most important shapes and textures of the eroding rock formation.

We set up 1.5-hour star trail stack (Figure 4) and dove hungrily into our sandwiches.

Figure 4. Nikon Z 6II with a Nikon Z 24-70mm f/2.8 S lens at 34mm. Sky: 31 frames shot at 4 minutes, f/2.8, ISO 800 and stacked in Photoshop; foreground shot at 8 minutes, f/4, ISO 800.

After sitting back and enjoying the stars for a bit, we moved closer to the arch to shoot some star-point stacks, while the clock crept ever closer to the triumphant rise of the galactic center.

During that time I made this composite image with a 15-image star point sequence and a longer base image for the landscape (Figure 5).

Figure 5. Nikon Z 6II with a Venus Optics Laowa 15mm f/2 FE Zero-D lens. Sky: 15 frames shots at 10 seconds, f/2.8, ISO 12,800 and stacked in Starry Landscape Stacker. Foreground: 8 minutes, f/4, ISO 800. Blended in Photoshop.

Reviewing those images in the field, I noticed that the ground was dark in the composition. As natural as that was, Gabe and I agreed to draw out some more definition in the trees closest to us. We set up much closer to the foot of the arch to put even more of it above the horizon. Having that air around the formation really brought out the space between the eroded, airy portions, not to mention set the stage for a landing point when the Milky Way would appear.

The Shoot

It was dark. Really dark. Bortle Class 1 dark (Figure 6). So our short exposures were shot at ISO 12,800, and for star points we were using NPF settings (see below), which made the exposure even more challenging.

Figure 6. Bortle Class 1 info for the Grosvenor Arch area. Source: lightpollutionmap.info.

As we began setting up the panorama sweep, we set another Luxli Fiddle in the two trees in front of us. The concept was to cast shadows toward our lenses and radiating outward toward the arch. This gave the otherwise dull and dark trees shape and texture.

I placed and leveled my Novoflex TrioPod Pro75, then mounted my VR-System Slim Multi-Row Panorama System. This setup gives me reliable and repeatable rotations. Repeatability was necessary because I planned to execute the pano sweep three times with different settings. (Though I did end up getting it in one pass—lucky!)

I chose the Irix 15mm lens for this shot. NPF exposure duration for that lens on my Nikon Z 6 is 18.04 seconds for Default and 9.02 seconds for Accurate (Figure 7). (See the post “NPF: The New Rule for Shooting the Sharpest Stars in the Sky” for further information.) I was already at ISO 12,800 and didn’t want to push further. I opted for an educated guess of 15 seconds to drink in as much light as I could. I felt comfortable leaning toward letting in more light in the near-darkness versus a “correct” exposure with little information to post-process.

Figure 7.

After test shots, I waited for the Milky Way to be in the ideal position, and then I committed and shot the sequence. Job done! Well … almost.

The Processing

In Lightroom Classic, I first made basic local adjustments. Then I processed one of the image sets (Figure 8) by adding a mask for the sky using the new AI-assisted Masking tool. I also brushed in the negative space under the arch and cleaned up some of the land/sky mask using the Subtract tool. I adjusted to taste for an ideal sky.

Figure 8.

Then I created another mask using Select Sky (Figure 9), and I inverted that to mask the landscape instead. Again I cooked to taste, being extra careful not to over-boost the shadows and accentuate the noise in them.

I also got rid of sky junk, of which I found a surprising amount (Figure 10).

Figure 9.

Figure 10.

Once I got my adjustments down, I synchronized them across all the images. (Note: When you have one of the new AI-created masks and you sync it across images, you have to go in and recalculate each of them. Adobe, are you listening?)

After confirming that each of the eight pano images was processed correctly, I used the Export to PTGUI menu command and chose TIFFs with Lightroom Adjustments.

In PTGUI Pro, I moved through many of the different projections, looking for one that provided an ideal, natural perspective.

Figure 11.

Figure 12.

I ended up with Equirectangular (Figure 11) and reduced the field of view to 270 degrees (Figure 12). A final step in PTGUI was to drag in crop lines from each edge for a final composition (Figure 13).
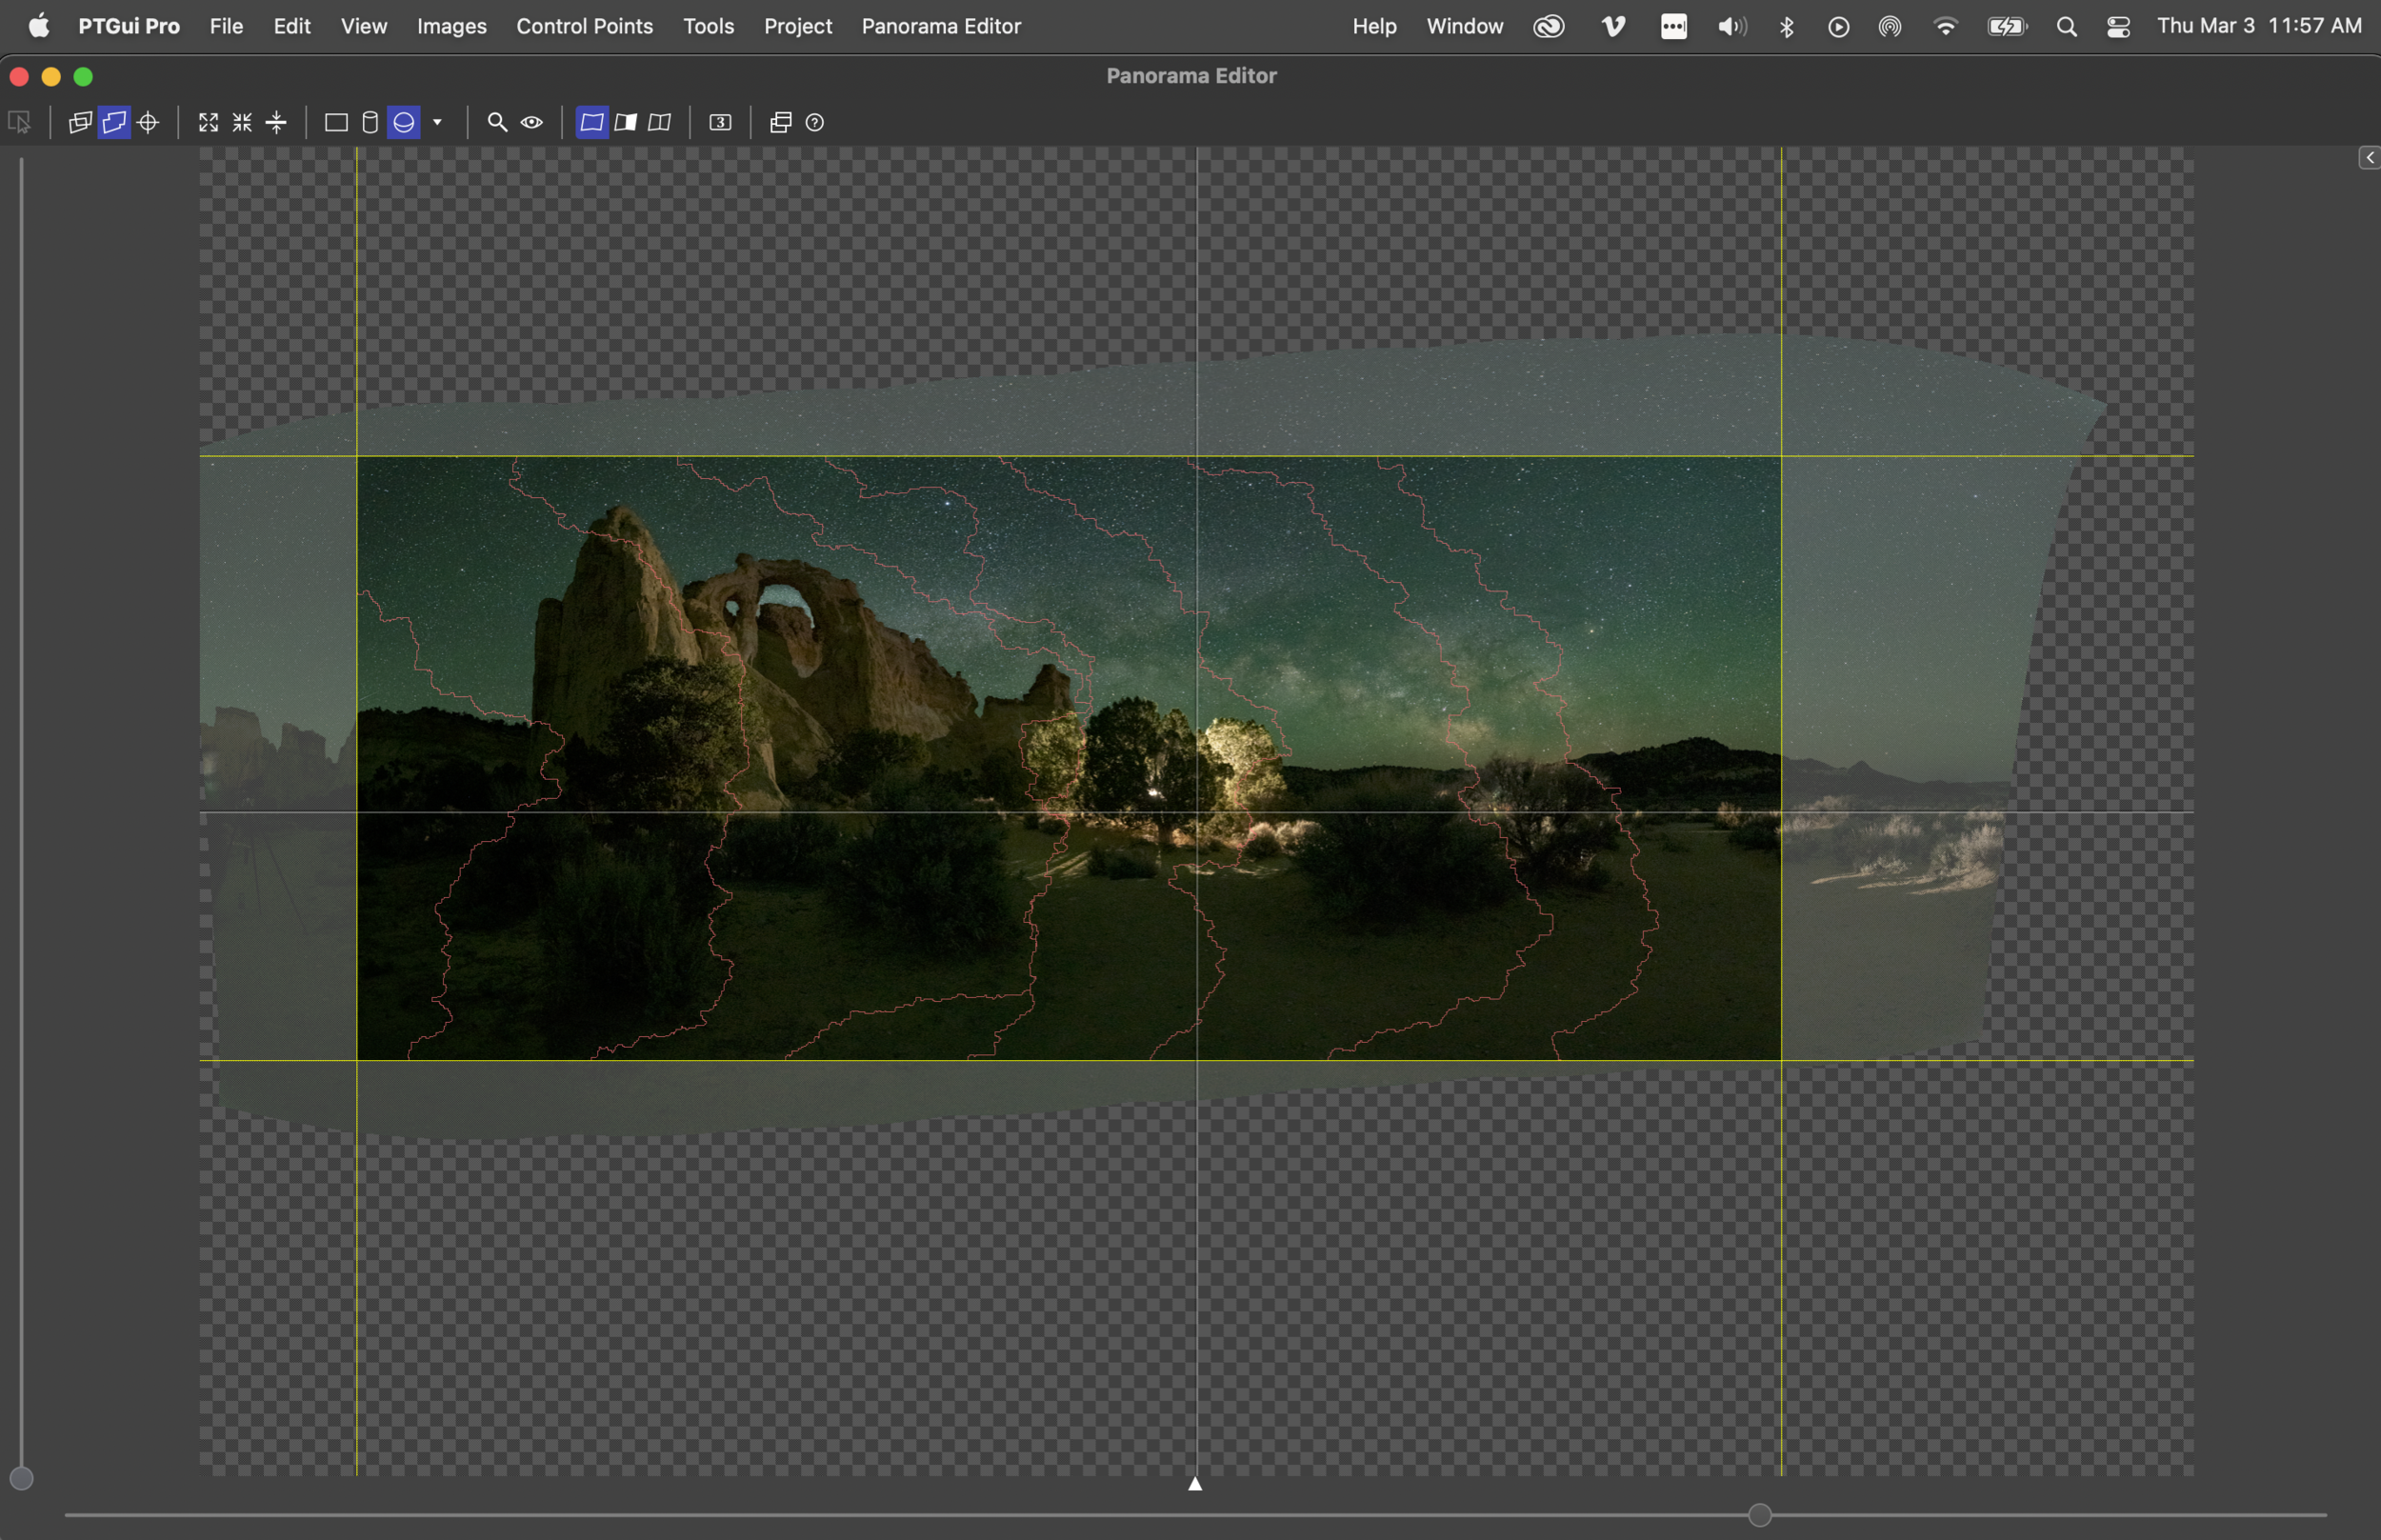
Figure 13.

I exported from PTGUI to the same folder as the raw files, then synchronized the folder in Lightroom Classic to get that final image back into my catalog. Then I studied the image one last time. I noticed the trees in the foreground got bright again, despite careful processing before stitching, so I brushed in a local exposure reduction (Figure 14).

Figure 14.

Then it was time to make a final crop. I feel that the classic 3:1 ratio is perfect for this photo (Figure 15). It balances all the important elements in the scene.

Figure 15.

Wrapping Up

I find the final image (Figure 16) very true to the planning and preparation that went into this.

Figure 16. Nikon Z 6II with an Irix 15mm f/2.4 Firefly lens and FTZ Adapter, mounted on a Novoflex VR-System Slim Panorama System, lit with two Luxli Fiddle LED panels. Eight frames shot at 15 seconds, f/3.2, ISO 12,800 and stitched in PTGUI Pro.

It always pays to know when your celestial objects are going to be in the right place. PhotoPills was crucial in planning this from the hotel in Kanab.

What’s also essential is to look at a scene and have a bunch of other “tools in your toolbelt.” In this case, I was laser-focused on making a pano with the Milky Way arch, but it wasn’t the only photo I made that night. I made star trails, star point stacks and even a vertorama (not included here).

Making other photos while waiting on your dream image is the right way to warm up and to work out the kinks in any scene.

I hope you enjoyed coming along with me to one of the jewels in the crown of Grand Staircase-Escalante National Monument. Seize the night!

Further Learning

If you want to learn more about planning with PhotoPills, sign up for the waitlist for our PhotoPills Bootcamp: Bryce Canyon and be sure to get on our mailing list, as we’re sure to offer more PhotoPills workshops in the future.

If you want to shoot scenes like this under the amazing dark skies of the Kanab area, another outstanding opportunity to learn more about astro-landscape photography is by joining the outstanding group of instructors at the 2022 Nightscaper Conference April 26-29. Limited early bird tickets are available now.

Just for fun.

Matt Hill is a partner and workshop leader with National Parks at Night. See more about his photography, art, workshops and writing at MattHillArt.com. Follow Matt on Twitter Instagram Facebook.

UPCOMING WORKSHOPS FROM NATIONAL PARKS AT NIGHT

Five Questions: Remote Setups, Induro Tripods, Acceptable Noise and More

Answering questions about night photography is our livelihood, and it’s our passion. We do it on workshops, we do it at conferences, we do it here. And we’re happy to do it in all those places.

This installment of our “Five Questions” series features inquiries about remote setups, multi-row night panoramas, tripods, high ISO noise and controlling a Luxli via Bluetooth.

If you have any questions you would like to throw our way, please contact us anytime. Questions could be about gear, national parks and other photo locations, post-processing techniques, field etiquette, or anything else related to night photography. #SeizeTheNight!


1. An Overnight Remote Setup

Question:

I live 5 miles from a spectacular 30,000-acre nature preserve of Sonoran desert. I have never seen a nighttime star or Milky Way image of this location, and I want to do one. The problem is that the preserve adamantly closes at sundown. I thought maybe I could take a camera and intervalometer and tripod just before sundown, set it up in an untraveled area and throw a bit of camouflage cloth over it. I can pull it off, but how do I keep my Nikon from powering down? If I use a muted wireless strobe to add a touch of fill, how do I keep the strobe from turning itself off ? Will an intervalometer let me program an 8- or 9-hour delay? — Jim

Answer:

The Vello Shutterboss II—set for a 9-hour delay.

First, is there any chance the preserve would give you special access, knowing what you’re trying to do, and that the photos could be used to help support the preserve? As my lawyer step-father always says, you never get what you don’t ask for.

That approach aside, and barring a coyote mistaking your tripod for a saguaro (if you catch my drift), I think your plan would work.

Yes, you can set an intervalometer to delay the start of its program. My Vello Shutterboss II allows me to set a delay of up to 100 hours, so 9 hours certainly wouldn’t be an issue. I would, however, make sure the batteries are fresh, just in case.

The camera should stay on without a problem, again, as long as the battery is fresh. (See a pattern?) If you want to be really sure, you could use an external battery, like the Tether Tools Case Relay. If you’re going to be running long exposures back-to-back all night, I would do the latter for sure, or just let the camera stop when it stops.

As for the strobe, it’s probably a nonstarter. If you have one that can use an external high-voltage battery pack, and/or if you can turn off low-power mode, or if the camera’s signal will wake the unit via the hot shoe, PC cord or wireless trigger, then technically you’re all set. But the bigger issue is that a flash would definitely be noticeable even from a distance. A flash in the dark is hardly discreet. It would also likely be quite startling to wildlife, so cue that coyote to exact its revenge. However, you might be able to use a Luxli Viola set at very low power—i.e., Low-level Landscape Lighting, which can be surprisingly discreet, as well as relatively non-distressful to critters.

Finally, before trying this on-location, I’d give it a test run overnight in your backyard. Set up exactly how you would in the preserve, and let it all run. Once you perfect the approach, then bring the setup out for its overnight wilderness experience.

I’m very eager to hear how this turns out. Please send the results! — Chris

2. Foreground and Background for Panos

Hovenweep National Monument, Utah. Two multi-row stitched pano frames shot at different exposures. © 2017 Gabriel Biderman. Nikon D750 and Nikon 14-24mm f/2.8 lens set at 14mm. Sky: 20 seconds, f/2.8, ISO 3200; foreground: 3 minutes, f/2.8 ISO, 1600.

Question:

Is it possible to shoot panos with a well-exposed, moonlit foreground, not move the camera, then after moonset shoot a Milky Way pano background, then blend them in post-production? — S.W.

Answer:

In short, yes! You got it right. If your tripod doesn’t move, then you can do exactly what you’re talking about, exactly as you described. Ideally your tripod head’s tilt angle will be parallel with the ground—in other words, no angle at all, just perfectly straight and level. Then you can make one pano pass for moonlight at a low ISO for the foreground and one after moonset at a high ISO for star points.

Here are a few of our blog posts that might help you make the panos:

3. Induro a Good Low-Cost Option?

The Induro CLT303 Classic Series 3 Stealth carbon fiber tripod.

Question:

I’m interested in purchasing a tripod, and I’m hoping that I can stretch my dollar. I have my eye on the Induro line, which Lance suggested as a reliable option in his book. I like to shoot wildlife (birds, especially) so I’m wondering if the Series 3 tripods (which I know would serve that purpose) would be stable enough for night photography, or do I need to go with Series 4 or 5? What are you using? — Christopher Z.

Answer:

I think that you’ll be fine with the Induro Series 3 tripod. For less money, you could consider the Series 2 or 3 Benro, but the former is a considerably better tripod. Also, check out their new Animal Series, featuring the Tortise, Bat and Rhino models.

There are a lot of good options out there, so it’s worth looking around.

I’ll offer two further suggestions:

  1. See our e-book Three Legs to Stand On: A Guide to Tripods. There’s a lot of info in there that you might find helpful.

  2. If or when you can, make a trip into Manhattan and visit B&H Photo, where you can put your hands on pretty much all the options, and also get expert in-person advice. If that’s not an option, try to attend a photography trade show or large conference where you can do the same.

I’m currently using (and am very happy with) a Gitzo Traveler tripod and Acratech head—but that’s a $1,100 combo. — Lance

4. How Much Noise is ‘Acceptable’?

© 2019 Gabriel Biderman. Nikon Z 6 with a Nikon 14-24mm f/2.8 lens. 15 seconds, f/2.8, ISO 12,800.

Question:

I’ve read your article “The Z 6 is the Best Camera for Night Photography.” I’ve been set to purchase a Nikon D750 because of its low noise, specifically at ISO 3200. But actually your observation of the “highest acceptable ISO” more precisely zeroes in on the most important camera characteristic for a Milky Way photographer. Since you’ve photographed the night with both cameras, what’s the highest acceptable ISO for the Nikon D750? — Bill W.

Answer:

The “highest acceptable ISO” is subjective. Your high ISO threshold might be different than mine, which might be different than Lance’s, etc. It’s all about what’s acceptable to you. Though I will say that for night photography—and especially for Milky Way images—we tend to be more forgiving, because the noise of the higher ISOs blends in with the natural granularity of stars.

Another thought to consider is that noise from the same high ISO is more prevalent in darker moonless images than in brighter moonlit images—especially if we need to open up the shadows in post-production.

That all being said, I am comfortable shooting my D750 at ISO 6400 and I try not to go any higher. ISO 6400 is very workable, but if I go to 12,800 then I need to really massage that image in post, or I need to shoot multiple frames for stacking sharp stars and reducing the noise with Starry Landscape Stacker.

However, while the D750 still holds its own at ISO 6400 and has excellent color and image quality, a lot of the rest of the technology behind it dates back to 2014. So I would consider investing in a D780 (if you want to stay on the DSLR route).

In his post “Best of Both Worlds,” Lance does an excellent job comparing the D750 versus the D780 versus the Z 6. We feel that the D780 is the perfect marriage of the D750 and Z 6. You get a very similar sensor to the Z 6, and improved live view and autofocus over the D750. — Gabe

5. Remote-Controlling a Luxli

Nelson ghost town, Nevada. © 2019 Chris Nicholson. Nikon D850 with a Nikon 24-70mm f/2.8 lens, light painted with a Luxli Viola (interior) and Coast HP7R (exterior). 16 minutes, f/4.5, ISO 64.

Question:

After your presentation at the Optic 2020 conference, I bought the Luxli Viola and am starting to play with it. I’m curious if you guys ever use the Luxli Composer app and Bluetooth control? There seems to be a dearth of instructional stuff on the many useful options. Perhaps all I need is to dial in the desired color temperature and “go for it”? — Steve W.

Answer:

I do use the Composer app! Not all the time, but it’s usually great when necessary. For example, I might want to place my Viola in a place that’s hard to reach, such as on top of some high rocks. Instead of climbing up and down every time I need to make a change, I can use the app to alter the settings remotely.

Another example is when putting the light someplace within the frame, where I might not want to walk through mid-exposure to turn it off—instead, again, I can do that remotely with the app. The image above is a good example of when I took that approach. Even at the dimmest setting, the Viola inside the General Store was too bright to leave on for the whole exposure. To avoid walking into the scene mid-exposure to turn it off, I used the Composer app to snuff the light after 8 minutes.

To learn how to use Composer, check out this YouTube tutorial that Luxli put together:

For our take on how to use Luxli lights, check out Matt’s 2017 blog post “How to Master Color at Night with the Luxli Viola.” — Chris

Chris Nicholson is a partner and workshop leader with National Parks at Night, and author of Photographing National Parks (Sidelight Books, 2015). Learn more about national parks as photography destinations, subscribe to Chris' free e-newsletter, and more at www.PhotographingNationalParks.com.

UPCOMING WORKSHOPS FROM NATIONAL PARKS AT NIGHT

How to Plan, Shoot and Edit a Milky Way Arch Panorama (Part II)

Note: This is the second in a two-part series about creating a Milky Way panorama. Part I covered planning and shooting. Below we go over how to put it all together in post.


In last week’s blog post, Matt demonstrated how to create the raw materials for a Milky Way panorama arch. I really enjoyed the post and was glad that he asked me to follow up with a tutorial on processing the frames he captured to stitch the final image.

Computer Software

To create a panorama from multiple images, you’ll need some type of software for your computer. When it comes to software, I like to keep it simple—until I can’t. For me, keeping it simple means working with software I already own and understand. In this case, that means working with Adobe Lightroom Classic and Photoshop. While there are other stitching programs out there, I have always been satisfied with the Adobe products. I already own them, so again, I keep it simple.

In general, both Lightroom and Photoshop are seriously robust and each have their own advantages and disadvantages. When it comes to processing panoramas, both programs work well. Lightroom is the more convenient of the two, and Photoshop offers more options and tends to create more realistic results when you have less-than-perfect captures.

What are less-than-perfect captures? In short, images that the software finds difficult to stitch together. This could be frames taken without a nodal rail or frames that don’t overlap enough, etc. In last week’s article, Matt showed how to create perfect captures that will be easy enough for either program to stitch.

Pre-Stitch Processing

Once you download your images, it’s time to start processing them. If you are planning to stitch (or “merge”) the images together using Lightroom, there’s very little processing that’s necessary beforehand. The reason is that the result of Lightroom’s Merge function is a panorama that is still a RAW file. This means you can do all your processing to the final pano after it’s created, rather than to each individual file before stiching.

Figure 1.

However, there is one exception to that, and that exception is Lens Correction. Why? Because correcting lens quirks will help the rest of the process go better, particularly in regard to vignetting. Removing vignettes will help the exposure look consistent across the whole panorama.

The Lens Correction panel (Figure 1) lives in the Develop module, and it’s the one place you must visit before merging your images into a panorama. Here you can see I’ve checked the Remove Chromatic Aberration box as well as the Enable Profile Corrections box.

Checking both of these boxes tells Lightroom to correct any aberrations associated with that particular lens. At this point Lightroom will typically recognize which lens you’re using and apply the correct profile corrections automatically. However, if you are using a very old lens, or if you’re using a lens brand that’s different than your camera brand, you may need to manually input the type of lens you used. In the example in Figure 1, I had to choose Zeiss from the Make drop-down menu for before Lightroom recognized the lens as the Zeiss Milvus 2.8/15 ZE.

Once you have set the Lens Correction panel on one image, it’s time to sync that change across all the images of that set. From the thumbnails at the bottom of the page, first click on the image with the Lens Corrections. Next, hold down the shift key and click on the last image in that set. This will highlight (select) all of the images in the series. Notice in Figure 2, the cell for the first image I clicked on (the one with the changes) is white, while the remainder of the selected cells are light gray. This means that all the images are selected, but the white image is the “active” image. When we sync, the active image is the one that shares all of its settings with the others.

(If the image with the Lens Corrections is not white, simply click on the correct image. All images will remain selected—you will have just changed the active image.)

Figure 2.

With all of the images selected, click the Sync button (circled in red in Figure 3). (If the Sync button is not available, that means you have only one image selected. Return to the Filmstrip at the bottom and reselect the images.)

Figure 3.

Now, click the Sync button to open the Synchronize Settings dialog (Figure 4).

Figure 4.

Click the Check All button and then finish by clicking the Synchronize button. This will close the box and copy all of the settings from the active image to the selected images.

Figure 5.

Merging Using Lightroom

With all of your images selected and synchronized, it’s time to merge them into a panorama. From the Lightroom menu, choose Photo > Photo Merge > Panorama (Figure 5).

The next thing you’ll see is the Panorama Merge Preview box (Figure 6). The choices here are quite minimal. Projection (Spherical, Cylindrical and Perspective) is what determines the overall shape and look of your image. Simply choose the one that best represents your original vision. Because Matt used a nodal rail when shooting, the difference between Spherical and Cylindrical is nearly impossible to discern. This may not always be the case. Again, just choose the setting that produces a result you like.

Figure 6.

With this image, when I choose Perspective, I get the error “Unable to merge the photos(Figure 7). If you get this error, simply choose another projection. It may or may not work. As I mentioned earlier, while Lightroom’s Merge to Panorama is convenient, it may not work in all circumstances.

Figure 7.

The remaining options are really just that—options. My preferred settings (which appear in Figure 6) are:

  • I keep the Boundary Warp at 0 and I check the Auto Crop box. This keeps Lightroom from stretching the image to fill in blank spaces around the edges, and instead crops out those stray spaces.

  • I keep the Auto Settings box unchecked. This keeps Lightroom from auto-tuning the basic adjustments in the final pano. I prefer to make my own adjustments.

  • I check Create Stack so that the panorama file is stacked with all of its source images in the Library module. This just helps keep things organized.

Click the Merge button at the bottom right of the Panorama Merge Preview dialog to create your panorama. Lightroom will begin merging your images, and you can track its progress in the taskbar in the upper left portion of your screen (Figure 8).

Figure 8.

Once finished, your image will appear back in Lightroom (as a RAW file), all ready for you to apply your favorite Milky Way edits!

Comparing Lenses

As you may remember from last week, Matt shot the raw materials with three lenses—the Zeiss 15mm Distagon f/2.8, Viltrox 20mm f/1.8 and Sigma 35mm f/1.4 Art. Here are those three panos created with Projection set to Spherical.

Figure 9. Nikon Z 6 with a Sigma 35mm f/1.4 Art lens. Multiple stitched frames shot at 8 seconds, f/2.8, ISO 6400.

Figure 10. Nikon Z 6 with a Viltrox 20mm f/1.8 lens. Multiple stitched frames shot at 14 seconds, f/2.8, ISO 6400.

Figure 11. Nikon Z 6 with a Zeiss 15mm Distagon f/2.8 lens. Multiple stitched frames shot at 16 seconds, f/2.8, ISO 6400.

The first thing you might notice is that the panos shot with longer lenses are darker, with fewer stars appearing in the sky. That’s because Matt needed shorter exposure times for the longer lenses, in order keep the stars sharp.

The next thing you’ll notice is that the images from the widest-angle lens—the 15mm (Figure 11)—do not merge well. The sky on the left side of the image appears uneven. Lightroom may sometimes have problems merging panoramas made with superwide-angle lenses.

Merging Using Photoshop

When using a very wide lens, or if you didn’t use a nodal rail—or if Lightroom is having trouble with the pano for any reason, discernible or not—you may have to take your images into Photoshop to do the stitch. The steps are very similar to merging in Lightroom. In fact, the first three steps are exactly the same:

  1. Select first image in the series and go to the Develop module.

  2. Go to the Lens Corrections panel and check Remove Chromatic Aberration and Enable Profile Corrections.

  3. From the thumbnails at the bottom of the page, click on the image with the Lens Corrections (this should already be selected if you were just working on it), hold the shift key and click on the last image in the pano series. With all of the images selected, click the Sync button.

Now we start to detour from the Lightroom pano workflow. Before exporting to Photoshop, you can edit your images before merging. Stick with the big overall changes in the Basic panel, such as White Balance, Color Profile and the fundamental tonal adjustments. Remember you’ll be syncing these changes across all of your images in the set, so don’t make a change that might adversely affect one of the other images.

Once that first frame is suitably adjusted, sync the settings across the whole set in the same way as described above. Then look at each image to ensure that the settings work well with each frame. If they don’t, return to the settings and adjust as needed. Then synchronize them again.

Once all the frames in the set look right, select the whole series by clicking the first and shift-clicking the last. Then, from Lightroom’s menu, choose Photo > Edit In > Merge to Panorama in Photoshop (Figure 12).

Figure 12.

Next you’ll see the Photomerge dialog in Photoshop. Choose Auto from the Layout panel on the left and check Blend Images Together (Figure 13). You don’t need to check Vignette Removal or Geometric Distortion Correction, because you already fixed those issues in Lightroom; you don’t need to check Content Aware Fill Transparent Areas because we’ll tackle that manually later.

Figure 13.

Click OK. Photoshop will now start to create the panorama. This could take a minute or so. For our example, Figure 14 shows the final image that Photoshop creates.

Figure 14.

Next, from the Photoshop menu, choose Layer > Flatten Image.

For the simplest way to wrap up, choose File > Save and then File > Close and your image will return to Lightroom ready for your magic touch in the Develop module. However, if you are even somewhat Photoshop literate, there are some advantages to keeping the file open and continuing to work on it before sending it back to Lightroom. Read on. …

More Photoshop Edits

One of Photoshop’s more powerful features is Content Aware Fill, which is perfect for filling in gaps at pano edges that you would otherwise need to chop off with the Crop tool. In this example I wanted to keep a bit of sky over the Milky Way arch, so I left the blank corners, as seen in Figure 15. Content Aware Fill will help us quickly and intelligently fill in those blanks.

Figure 15.

After I crop the image (as seen above), I choose Layer > Duplicate Layer from the Photoshop menu. This keeps all of my edits on a separate layer and protects my original pano as a background layer.

Next I select the Lasso tool and draw a circle around the area that I want to fill (Figure 16). I don’t want to include too much excess area, but I also don’t want to cut it too close.

Figure 16.

After making the selection, I select Edit > Content Aware Fill, which is where a lot of magic can happen. In the Content Aware Fill dialog, everything masked with green is where Photoshop will look to sample data to fill in the blank area (Figure 17).

Figure 17.

By default, the Subtract paint brush is selected. Simply paint away any areas of green that you feel don’t need to be included in the sample; likewise, you can add to the sample by holding Alt (Windows) or Option (Mac) and painting to add green. Figure 18 shows how I painted away areas not similar to the area I want to fill. For example, I don’t want Photoshop to sample a starry sky when trying to fill foreground rocks. The Preview box on the right foretells the final effect.

Figure 18.

When finished, click OK, which will apply the fill and close the dialog. Figure 19 shows the result. Photoshop has literally made up information (based on the green-masked sample) and filled the blank area.

To continue filling in the corners, I return to the pano copy layer by clicking on it (Figure 19). Again I make a selection and proceed as above until all of the corners are filled. (Remember to return to the Layer 0 Copy layer between edits.)

Figure 19.

Once you are finished, you can flatten the image (Layer > Flatten Image), choose File > Save and then File > Close, and your panorama will return to Lightroom ready for final edits.

In Summary

Both Lightroom and Photoshop can create seamless panoramas of the night sky. Lightroom excels at being simple and convenient when using source images that are easy to merge. Photoshop can be used when images are less than perfect. This includes images made from superwide-angle lenses or frames that don’t overlap as much.

Regardless of which tools you use, making the time investment to learn how to create Milky Way panoramas will open up a whole new area for creativity in night photography.

Whether you’ve been making Milky Way panos for years or will start after reading this post, we’d love to see your images! Please share in the Comments section below or on our Facebook page.

Tim Cooper is a partner and workshop leader with National Parks at Night. Learn more techniques from his book The Magic of Light Painting, available from Peachpit.

UPCOMING WORKSHOPS FROM NATIONAL PARKS AT NIGHT

How to Plan, Shoot and Edit a Milky Way Arch Panorama (Part I)

Note: This is the first in a two-part series about creating a Milky Way panorama. Part I, below, covers planning and shooting. Come back next weekend for Part II, in which Tim Cooper goes over how to put it all together in post.


We’re a little more than half way through “Milky Way Season”—the time of year when it’s easiest to see and photograph our galaxy. And there’s plenty of time left to shoot Milky Way panoramas—the technique that results in the iconic image of the galaxy arching from horizon to horizon (which I like to call “starbows”).

Here are a few examples from myself and my National Parks at Night partners:

This technique requires shooting multiple photographs, which means you’re creating a composition that will require stitching during post-processing.

Let’s walk through all the steps it takes to make a Milky Way panorama happen—from planning to scouting to gear to shooting—so that you can go forth and make your own!

When is the best time of year?

You can capture the Milky Way any time of year, but capturing the galactic core—the brightest and most notable portion—happens only at certain times of the year. The galactic core is what most people want to see and shoot. Similarly, you can see the arch of the Milky Way any time of year—it’s just without the core during certain months.

Furthermore, capturing an arch that spans from horizon to horizon, that includes the galactic core and that happens during nighttime—this all comes together during a limited window of the calendar. And this varies a bit depending on where you live.

Northern World

In the northern hemisphere, the galactic core can be photographed from the end of March to the beginning of October. Common wisdom is that “prime” viewing dates are late April to late July, because that’s when the galactic center is visible for longer during the night. But every season has disadvantages to be aware of:

  • In early spring the core rises very late—or early, depending on how you look at it—either way, well after midnight. Most people don’t want to stay up that late or get up that early.

  • In midsummer the core is technically above the horizon longer, but there are fewer hours of darkness to shoot in. Late sunsets = less night.

  • As of August the core is too high above the horizon to create panoramas with the longer range of wide angle lenses (e.g., 35mm), so you’ll be cornered into using the superwide family—think 15mm, 14mm, 11mm. (More on lens choice later.) You might even need to let the Milky Way arch out of the composition (see Chris’ Devils Tower pano above).

  • In September and early October the core is setting not terribly long after twilight ends—so again, not a lot of time to shoot.

Southern World

In the southern hemisphere, the galactic core is visible from February to the beginning of October. Between April and August are the best months to photograph the Milky Way because of the much longer nights, but the prime of that time falls in the middle of winter (brrrr).

For the rest of this article, I will focus on the Northern Hemisphere, where I spend most of my time. But the techniques apply to our southern night photographer friends as well.

For ideal lack-of-light conditions, consider shooting during the few days before and after new moon.

When is the ideal moon phase?

To best capture the delicate features of the Milky Way in all its glory, you ideally want to shoot when the moon is not lighting the sky. That means the four nights prior to or after the new moon.

But this poses a problem: Without moonlight, how do you illuminate the foreground?

Being an astro-landscape photographer, I want the people viewing my images to see context. So the landscape needs light. You can make a Milky Way pano image while the moon is present. But keep in mind, you will lose the dimmest of the stars to moonlight in the atmosphere. So I like to choose a time when the moon is 60 to 90 degrees away from the core—i.e., a crescent. And the dimmer, the better—around 20 percent is ideal, give or take.

If you shoot in complete darkness, to reveal the foreground, consider Low-level Landscape Lighting, traditional light painting, or making a second run of panoramic images at a longer exposure length and perhaps a lower ISO for more quality. (For more on that last option, see Gabe’s write-up about his Hovenweep photo.) Or … embrace the dark. Use silhouettes with intent. Darkness is OK if harnessed with skill.

Scouting

First, check your weather. I prefer the Weather Underground app, but use whatever works for you.

Weather Underground’s prediction for Bryce Canyon National Park. Looks great for night photography!

Choose someplace dark. Why? The Milky Way has a lot of subtle, faint parts, so give yourself the best chance for success by choosing a location away from light pollution. When shooting in Bryce Canyon with Tim Cooper this past June—specifically, in Fairyland Canyon, where we intended to make a pano—we knew we could expect great dark skies, because we had e-scouted the location with Light Pollution Map:

Light Pollution Map rendering of the Bryce Canon region.

I also love using the PhotoPills app to drop a pin and then scrub though which night is best. I look for when twilight is just ending, and the arc of the arch.

PhotoPills Planner view of the Fairyland Canyon pano.

Gear

In addition to a capable camera for night photography and an intervalometer, I recommend the following:

● good tripod (like my trusty Gitzo Traveler Series 2)

● panoramic leveling base (like my Acratech)

● good ball head (like my Acratech GP-ss)

● nodal rail (like my Acratech Nodal Rail)

● L bracket (like my Acratech Universal L Bracket)

● a lens focal length somewhere between 14mm and 50mm—preferably 20mm to 35mm, and preferably a prime lens

Starting from the ground up:

  1. Get your tripod legs spread wide. Get it tightened up and as stable as possible.

  2. Mount the leveling base on the tripod legs. Level it. (If you don’t have a leveling base, then level the tripod itself using a built-in or external bubble level, adjusting each leg accordingly.)

  3. Mount your ball head on top of the leveling base. Level that.

  4. Mount your nodal rail to your ball head.

  5. Secure your L bracket on your camera and mount the camera on the tripod in vertical position. (Vertical frames will give you more information to work with than horizontal frames will. Always shoot pano frames vertical.)

  6. Mount your lens. Historically I used my Sigma 35mm f/1.4 Art lens for pano stitches. I find its flat field makes stitching easier with less overlap. But lately I’ve fallen in love with the Viltrox 20mm f/1.8, because it comes in a Nikon Z-mount and is crazy-easy to focus manually.

  7. Attach your intervalometer.

Why the nodal rail?

If you have elements in your foreground that have to be stitched, using a nodal rail properly will eliminate parallax. That will make your pano stitching software very happy.

Essentially, to set up a nodal rail, you place something tall and skinny close to your camera, such as a street sign, lamp post or tree, or even another photographer’s tripod with the center column raised. Then rotate your pano base left and right, observing the item. Slide the nodal rail forward and backward until the test object doesn’t move left or right when you swing your camera. That’s the point at which you’ve eliminated parallax.

Camera Settings

OK, let’s lock down a few variables and settings to get the pano shot right.

Focus

If possible, focus during daytime and tape it down with gaffer tape. (Or, use other ways to get proper focus.)

Exposure

Now we are getting serious! You have to choose—are you shooting to:

●       share on a small to medium screen, or

●       print and/or sell

If the former, use the 400 Rule to determine your longest viable shutter speed; if the latter, use the NPF Rule. I want sharp stars, so I use the NPF Rule on Default. But I’m not making wall murals, so I don’t choose the Accurate setting.

Here are my settings for the Bryce Canyon pano:

  • ISO: 6400

  • Aperture: f/2.8

  • Shutter speed (with intervalometer): To test different focal lengths, I used the NPF Rule with three lenses—the Zeiss 15mm Distagon f/2.8 (18 seconds), Viltrox 20mm f/1.8 (14 seconds) and Sigma 35mm f/1.4 Art (8 seconds). (More on the results when we get to the post-processing in Part II.)

Framing

Face east. This is the center of your panoramic image. Look left, then right. Your pano stitch will begin to the north and end facing south. And this will move more to the right as the galactic core rises and the Milky Way rotates clockwise. (Reminder: I’m speaking specifically about the Northern Hemisphere.)

Then you shoot, one frame at a time, moving left to right, overlapping at least one-third. (That is, including one-third of what was in the last frame in the current frame—overlapping visual information, so the software has context when it starts stitching.) Repeat as many times as you need to cover the range of your composition.

Notice I say at least one-third. I always overshoot panoramas. Meaning, I overlap each frame way more than I geometrically need to—approximately 50 percent, to be approximately precise. Why? I want to give the post-processing program as much information as possible to stitch a great pano; those extra pixels are a good hedge on your photo bets. If you don’t give your stitching program enough to work with, you fail—and going back is kinda hard, right?

When rotating the camera between frames, I do not use the markings on the base of my ball head. With my eye, I look at something in my frame that is in the middle, then loosen the pano base and rotate the camera until that object almost hits the left edge of the frame.

PhotoPills angle of view data for my 20mm mounted on my Z 6.

Yes, you can instead use the degree markings on your ball head to do this more precisely. I choose not to, and I see no ill effect on the final image due to opting for this preference. But if you want to use math to capture accurately spaced pano slices in the fewest number of frames, then look up the angle of view for your lens (you can do this in PhotoPills—and remember to look up the angle for portrait mode), then divide it by 2 or 1.5. The result is the number of degrees you rotate the panning base on your ball head between each frame.

For example, see the included screen shot. PhotoPills reveals that the angle of view for my 20mm mounted on my Z 6 is 61.72 degrees. To make the math easy, let’s call it 60 degrees. (Even when being precise, we really only need to be approximately precise.) Divide 60 degrees by 2, and that tells me to rotate my camera 30 degrees between frames. On a ball head with markings at the base, it’s more than easy to see when you’ve moved the camera 30 degrees.

Shooting

Now … go for it! You are ready. Make those exposures.

All my frames for the Bryce Canyon pano, from each of the three lenses.

Points to Review

Your keys to success:

  • Lock and unlock your pano head for every exposure. It’s a pain, but one little slip in your sequence and you cannot stitch it! It’s soul-crushing. Believe me.

  • Use the start-stop on your intervalometer (as opposed to pressing the body’s shutter release) to eliminate camera shake.

  • Make the pano exposures back to back, one immediately after the other. Don’t dally. Stars move a lot in 8, 10, 20 seconds. Too much time between your frames will make bad panos or awkward duplications of stars in the overlapped areas. Astronomers and pixel-peepers will notice.

Post-Production

Those are the nuts. Now for the bolts. (And by “now” we mean “next week.”)

I’m going to hand off this topic to Tim, who in our next post will cover how to process these frames into a glorious stitched panoramic image. Stay tuned!

Matt Hill is a partner and workshop leader with National Parks at Night. See more about his photography, art, workshops and writing at MattHillArt.com. Follow Matt on Twitter Instagram Facebook.

UPCOMING WORKSHOPS FROM NATIONAL PARKS AT NIGHT