light painting

How I Got the Shot: Star Trails and Tufa Spires at Trona Pinnacles

Star Trails and Tufa Spires, Trona Pinnacles, California. Nikon D5 with a Nikon 24-70mm f/2.8 lens, light painted with a Coast HP7R flashlight with 1/2 CTO and -1/8 green gels. 20 minutes, f/2.8, ISO 100.

I’ll admit—Trona Pinnacles National Natural Landmark was not in my crosshairs. I was not aiming to photograph it, nor even to visit. I really had never even thought about the place. But while planning a Death Valley workshop with my friend Susan Magnano last year, she asked if afterward I’d be interested in shooting at Trona with her for a couple of nights. I’m always happy to spend time with Susan (if you knew her, you would be too), so I said yes.

And gosh am I glad I did.

The Place

Trona Pinnacles is a 3,800-acre piece of BLM land that’s accessed via a 5-mile dirt road in the Southern California region of the Mojave Desert. Not far from Death Valley National Park, not far from Alabama Hills, Trona features one of the most surreal landscapes of the whole Owens Valley.

The primary photography targets are the 500-plus tufa spires that rise as much as 140 feet from a dry bed in the Searles Lake basin. Standing amid them, you could be forgiven for thinking you’re on another planet—the area looks so much like a foreign world that it’s been used on numerous occasions to depict exactly that. If you’ve watched sci-fi films and TV shows such as Battlestar Gallactica, Lost in Space and Planet of the Apes, then you’ve seen Trona Pinnacles.

It’s a great place for photography. The formations can be mixed and matched and juxtaposed to create endless possibilities for compositions. The groups of pinnacles are far enough apart to make for a relatively expansive park, yet close enough to make walking around relatively easy, and the landscape is open enough to provide plenty of space to move around and create angles for light painting.

Star Circles over Trona Pinnacles, California. Nikon D5 with a Nikon 24-70mm f/2.8 lens. 31 minutes, f/4, ISO 100.

The Scout

On our first night of shooting, I mostly focused on the grand landscape—the pinnacles as a foreground for big-sky compositions. On our second night, I honed in on the rock formations as primary elements of more intimate compositions. The image at hand is one of those, and was the second-to-last that I made on the trip.

During our daytime scouting, this was exactly the kind of composition I’d been looking for: a group of three pinnacles that juxtaposed nicely to form a triangle effect. My first preference was to find a triad in front of where the Milky Way or North Star would be, but this was the group I liked the best in terms of the shape they combined to create.

With the afternoon sun shining on the landscape, I walked around the pinnacles to find the best spot for the tripod, and made a rock note about where that spot was so I could find it hours later at night. (What’s a rock note? I placed three golf ball-size rocks next to the tripod feet, kind of like I was marking my ball on the green. They were pretty easy to find later, and I knew exactly where to set up.)

Then I strolled around the scene again, envisioning the angles I could light paint from—not only where the light would look the best, but also where I could safely walk in the dark.

The Shoot

After first shooting night scenes in other places we’d scouted, Susan and I returned to this spot at about 12:45 a.m. The moon had set a few hours earlier, so aside from a little of light pollution from the community of Trona to the north and the city of Ridgecrest to the west, we were working in pretty dark conditions.

Figure 1. The base exposure before light painting: 15 seconds, f/2.8, ISO 8000.

Figure 1. The base exposure before light painting: 15 seconds, f/2.8, ISO 8000.

I set up my tripod, mounted my Nikon D5 and 24-70mm f/2.8 lens, and quickly found the composition I’d visualized earlier. I shined a Coast HP7R flashlight on the front spire, which was plenty of light for the D5’s autofocus to lock onto. We’d been shooting for a while, so I already knew what the base exposure would be: 15 seconds, f/2.8, ISO 8000. I fired a test shot (Figure 1) to make sure everything looked right.

I knew the spot I wanted to light paint from, but the one thing I hadn’t been able to test in daytime was the light itself. Now that it was dark, I could start doing that.

When light painting by myself (Susan was a few hundred yards away working on her own photograph), I like to use a wireless shutter trigger—specifically, the Vello FreeWave Micro. This allows me to get into position before firing the camera, rather than pressing the shutter button and running into the landscape to start lighting. (Another option is to use a timer, but I sometimes find that from a distance I don’t hear the shutter open. I also might not be in position when the camera fires, or conversely might be standing around waiting for it to fire. The wireless release solves all those issues for me.)

I made a few test exposures, adjusting the lighting strategy with each (Figure 2). I’d fire, light the pinnacles, return to the camera to see the results, then get into position and start again. (This is a great way to stay in shape.)

My concern in this particular composition was lighting each spire about equally, but with the front-and-center one just a little brighter. They look close to together in the image, but they were actually far enough apart, and at different enough distances from the light source, that each required a different amount of light. For each formation, I just counted how long I was lighting it—perhaps 2 seconds for the first, 3 seconds for the second, 4 seconds for the third. (I don’t recall the exact amount of light I used for each—the concept is more important than the specific number.)

Figure 2. Different light painting trials (all of them failures—albeit positive failures, because they led to something that worked).

Once I got the timing down, I tried changing the color temperature of the light. For the initial test shots I was using my HP7R with a gel combination of 1/2 CTO and -1/8 green (see Tim’s post “Level Up With Light Painting: Correcting the Color of Your Flashlight”). Just to be sure that’s what I liked best, I also tried a few without the color correction, opting for the naturally cool temperature of the LED flashlight (Figure 3).

Figure 3. Testing a cooler color temperature.

I decided I liked the warm look better (Figure 4), as it nicely complemented the warm tones of the clouds reflecting the street lights of Ridgecrest.

Figure 4. The light painting approach I settled on—or so I thought.

Going Long

The next step was to adapt the lighting strategy for a long exposure. I wanted to shoot for 8 minutes, which with a focal length of 31mm and facing west I thought would give me star trails long enough to be compositionally relevant. To get my exposure from 15 seconds to 8 minutes, I dropped the ISO from 8000 to 200. (The 1/3 stop less of exposure was to compensate for the light reflecting off the clouds, which had grown a little denser.)

Figure 5. To test the light painting for the long exposure, I kept the shutter open just long enough to test what I was adding with my flashlight. The idea was to keep the test short by evaluating only that one piece—I didn’t care if the background went to black.

At the new, less sensitive exposure, clearly a few seconds of light would not have been enough to illuminate the foreground. But how much light was right? I obviously didn’t want to use an 8-minute exposure to find out, especially if I needed two or three tries, which would have resulted in 16 or 24 minutes of testing. That’s not time spent well.

The good news is that for a test shot, I don’t need to care about the background—just the light painting. So I opened my shutter, tried the light, then closed the shutter. The background was nearly black, but I could see if the light painting was correct. Lucky me, it was! (Figure 5. I hardly ever get this right on the first try.)

At this point I felt ready to fire the long exposure. I turned on Long Exposure Noise Reduction, opened the shutter, applied my tested light painting, and waited out the rest of the 16 minutes (8 minutes of shutter time plus 8 minutes of LENR).

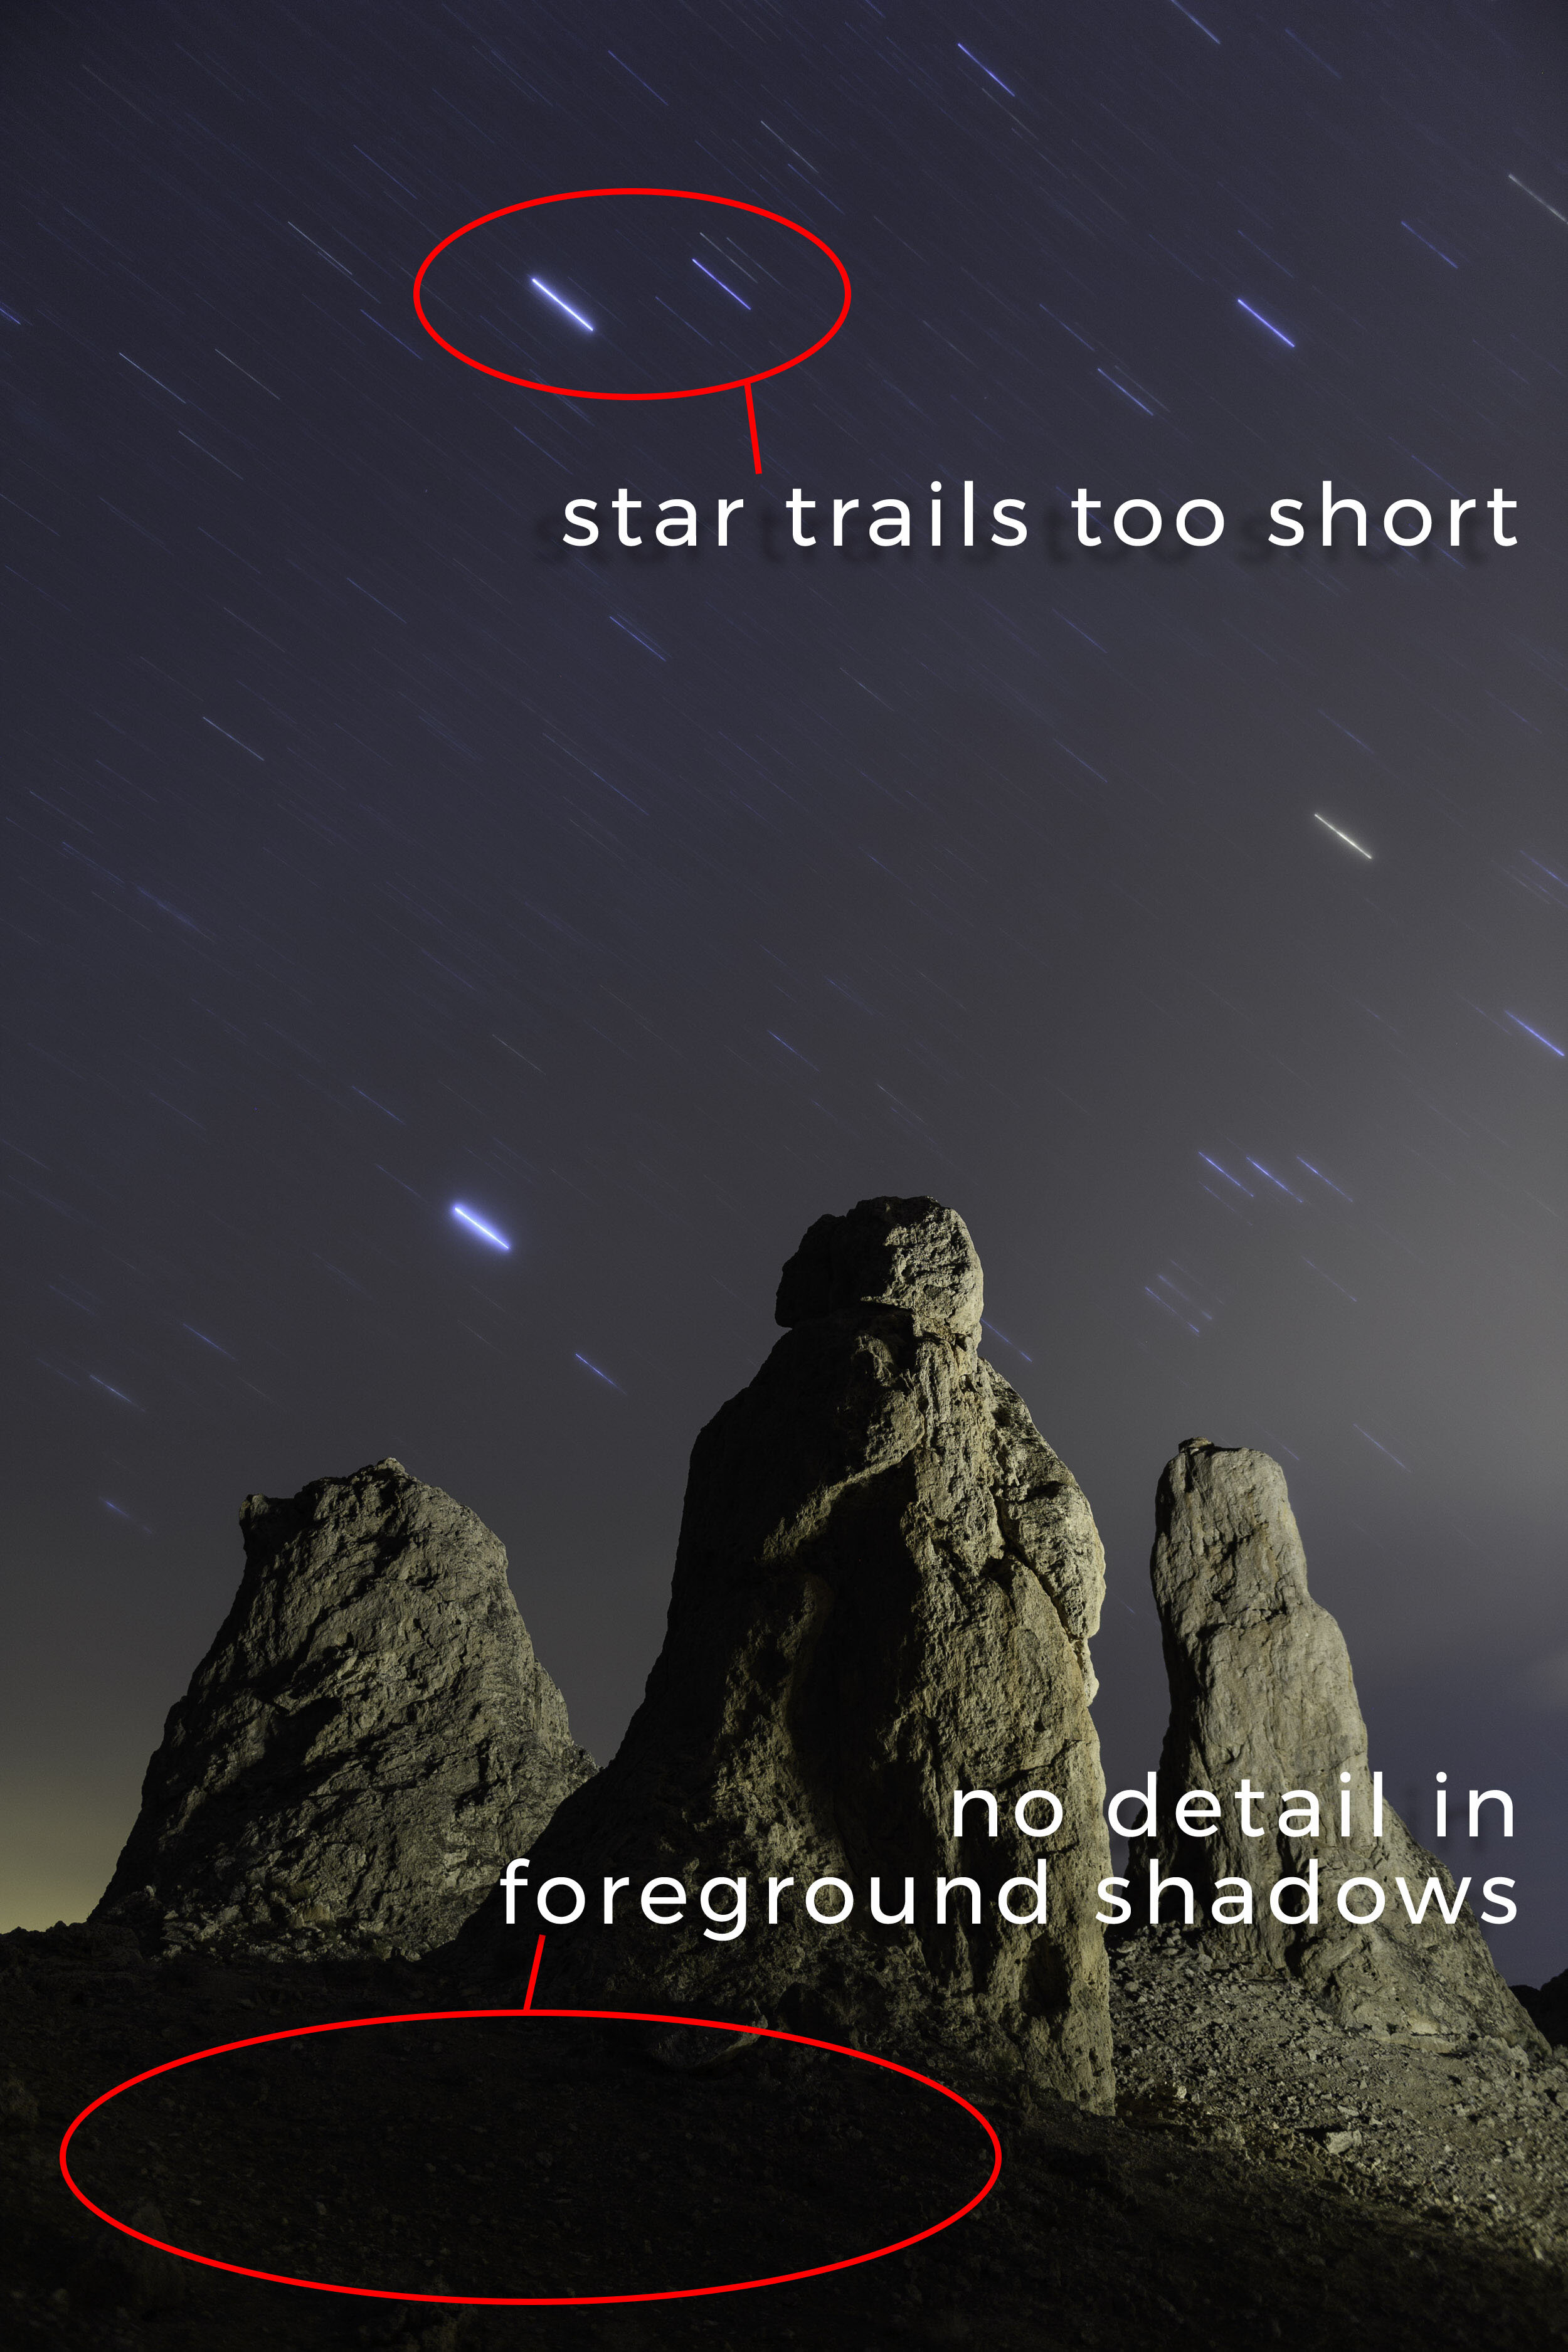
Once the camera was finished cooking, I looked at the result on the LCD (Figure 6). The exposure was right, as was the light painting. Alas, the stars were too short. Another issue I noticed is that the ground in front of the pinnacles was completely black, which I didn't like.

Figure 6. Problems to solve for the final exposure. 8 minutes, f/2.8, ISO 200.

Figure 6. Problems to solve for the final exposure. 8 minutes, f/2.8, ISO 200.

I didn’t want to spend another half hour on a photo I'd thought was almost done, but I preferred that idea to investing all that time and not getting the image right. So I went at it again.

I turned off LENR (so as not to unnecessarily double the test-exposure time), dropped the ISO to 100 and started re-testing the light painting. First I shined some light on the ground, adding just enough to reveal a bit of detail—which took me three tries to get right. Then I re-tested the light on the formations (compensating for the lower ISO), combining it with the foreground light to make sure everything would look good in the final, even longer long exposure (Figure 7).

Figure 7. Testing some light to draw out detail in the foreground shadows. The first take was too much light, the second just about right, and the third combined the new foreground light painting with the light on the spires.

Once I was (relatively) confident the painting approach was sound, I turned on LENR again, opened the shutter, set a timer for 16 minutes, light painted, strolled around gazing at amazing night skies for 12 minutes, then closed the shutter. When the LENR finished, I finally had my shot (Figure 8).

The Final Image

Taking the time in the field to work out the kinks meant that the final image required very little post-processing—just some basic tweaks in Lightroom’s Basic panel to optimize contrast and color.

Figure 8. The final image with 20-minute star trails and all the light painting.

Want to shoot this great space with us in 2020? We have one ticket left for our Trona Pinnacles & Alabama Hills workshop. Sign up today!

Chris Nicholson is a partner and workshop leader with National Parks at Night, and author of Photographing National Parks (Sidelight Books, 2015). Learn more about national parks as photography destinations, subscribe to Chris' free e-newsletter, and more at www.PhotographingNationalParks.com.

UPCOMING WORKSHOPS FROM NATIONAL PARKS AT NIGHT

How I Got the Shot: Stars and a Rock in Lassen Volcanic

Lassen Volcanic National Park. © 2018 Chris Nicholson. Nikon D5 with a Nikon 14-24mm f/2.8 lens, light painted with a Coast HP7R flashlight. 25 seconds, f/2.8, ISO 6400.

The Location

Last summer, Lance and I visited Lassen Volcanic National Park to shoot for a few days (er, nights). For both of us, it was our first time there, and we quickly discovered that this Northern California wilderness is one of the best kept secrets of the national park system. The scenery is beautiful, bewildering and varied: volcanoes of different types and shapes, snowcapped peaks, reflecting lakes, babbling brooks, lush meadows, multicolor pumice fields, steaming geothermals and more await photographers and their cameras. Not to mention … deliciously dark skies.

On our second day in the park, we stopped at a visitor center to talk to a ranger about possible places to photograph in the dark. She gave us a lot of great information, including an auto-tour map with suggested sites to see, and she marked the areas that she thought would be of interest to us. We ventured out for our daytime scouting, driving the main road (the aptly named Lassen National Park Highway), hiking short trails, making daytime photos (gasp!) and all-in-all enjoying the experience of being in the outdoors in such a captivating space.

Along the way we stopped at a trailhead parking lot that afforded a 360-degree view of mountain peaks and valleys, all with great visual lines to the sky above them—i.e., no trees, cliffs and so on that would block our sky views in any direction. In other words, it was a perfect place to set up for a night shoot. And then we spotted what turned out to be the star of the scene: a massive boulder perched at the edge of a cliff.

A scouting photo of the boulder.

A scouting photo of the boulder.

We were both pretty excited about the rock as a subject, as it has an interesting shape, is in an interesting place visually, is in front of an interesting background from all available angles, and we could safely set up and shoot from about 180 degrees around it. In other words, this was going to be a lot of fun.

Moreover, because the cliff faces south, we knew we could get the Milky Way galactic core in the composition. So we pulled out PhotoPills to see exactly when and where the Milky Way would appear, planned our shots, and then continued exploring the park with the knowledge that we would definitely return to this spot after sundown.

The Shoot

We arrived back at our shoot location early in twilight—so early that we couldn’t see the Milky Way yet, but that was fine because we were surrounded by many other creative opportunities. Lance ventured a little east on the cliff edge to work on a separate idea with a twisted tree, and I stationed a camera at the far end of the parking lot to rip some longish exposures over the mountain ridge to the west (Figure 1).

Figure 1. Star trails over a Lassen ridge. Nikon D850 with a Nikon 80-200mm f/2.8 lens. 6 minutes, f/6.3, ISO 64.

As the sky grew darker, I started working with the boulder. The Milky Way was not yet apparent in the sky, so I worked on some alternative compositions with the mountains in the background, using the silhouette of the distant ridge as a leading line into the rock (Figure 2).

Figure 2. Nikon D5 with a Nikon 14-24mm f/2.8 lens. 15 seconds, f/8, ISO 4000.

Once I was done with that, I looked south, and there it was: the galactic core rising over the valley. So I repositioned my camera and tripod to start working on the photo I was there to create.

The valley below the cliff is a scenic wonder in daylight (in moonlight too), but in pitch-dark it was just vast blackness—so I lowered my tripod to get it out of the frame (Figure 3). The real stars of the composition were the Milky Way and the boulder.

Figure 3. Working on the composition, but with a poor-choice white balance of Daylight.

Figure 3. Working on the composition, but with a poor-choice white balance of Daylight.

I worked the composition a little more, and then changed my white balance. I’d been using Daylight during the blue hour portion of the shoot, but once the sky darkened, I wanted a white balance that would help the sky look more like “night” and that would also help draw out the delicate colors of the Milky Way. So I switched the white balance of my D5 to manual and dialed it in to 3800 K (Figure 4). (For more on this, see Matt’s blog post “How to Choose the Right White Balance for Night Skies.”)

Figure 4. White balance at 3800 K.

Figure 4. White balance at 3800 K.

At this point you can see that Lance was in the background doing his light painting on a different subject. This didn’t bother me. First, I was only making test shots. I didn’t care about someone else’s light; I cared only about the specific elements that I was testing for, i.e. composition, focus, exposure, white balance, etc. Second, once I was ready to start executing my “real” image, I knew Lance and I could communicate and take turns light painting our different setups, and that when his flashlight was off, he and his camera would disappear into the shadows.

For focus, a quick check of a hyperfocal distance chart confirmed that I could lock in on the boulder and still have the stars sharp. So I shined my Coast on the rock and auto-focused. Easy peasy.

The exposure was pretty simple too. I knew I wanted sharp stars for a sharp Milky Way. Using the 400 Rule with a 14mm focal length, that gave me a top shutter speed of 25 seconds (400 / 14 = 28.57, rounded down to 25 for safety), which I shot at f/2.8 and ISO 6400.

Then I started working on the light painting. Using a Coast HP7R flashlight with a homemade color-warming filter, I worked from the left of the frame. I chose this angle for three reasons:

  1. Working from the right was nearly impossible because of the cliff drop. I could have done it if I learned how to fly, but I didn’t have time for that in the middle of the shoot.

  2. When light painting, I usually want the direction of the added light to “make sense” visually, to almost look like the illumination could be coming from something else in the scene—in this case, the galactic core. Of course no one will think that the Milky Way was actually bright enough to illuminate the boulder, but I find that the visual suggestion of it works better.

  3. When light-painting a subject on the right side of the composition, I usually like to have the light coming from the left, across the majority of the frame. (And vice-versa for a subject on the left.) If I’d painted from the other side (Figure 5), then the brightest, highest-contrast parts of the boulder would have been way over on the right edge of the frame, separated from the secondary subject of the image (the Milky Way) by a large shadow. That would have been far less compositionally effective. (This is a personal guideline, and an effective one. But it’s not a rule. In fact, you can see that I went against this guideline in the image above of the boulder without the Milky Way.)

Figure 5. I moved as close to the edge of the cliff as I could to light paint from camera-right, and the result proved the efficacy having the light come across the majority of frame. Also, it was nearly impossible to paint from that angle without h…

Figure 5. I moved as close to the edge of the cliff as I could to light paint from camera-right, and the result proved the efficacy having the light come across the majority of frame. Also, it was nearly impossible to paint from that angle without having the light hit the sapling too.

The final step was just a matter of playing around with the light painting, trialing-and-erroring, repeatedly coming back to the LCD to review my results. I was evaluating factors such as:

  • how out far out of the frame I needed to stand so the camera couldn’t see the flashlight

  • whether to use direct light (harder, more contrast) or reflected (softer, less contrast)

  • which angle to paint from to create the most texture

  • which angle would illuminate enough of the boulder to be interesting but not so much that I was light painting everything (which is boring)

  • which angle accomplished all that without lighting the sapling to the right of the rock, which I deemed a compositional distraction

  • how long to keep the light on so the boulder would be bright enough to draw interest yet subtle enough to not be garish or overwhelming

Failed iterations of my light painting approach. Or, rather, honing by trial and error.

Once I’d made all of my decisions, I was ready to make the final photograph. By that point Lance had joined me at the boulder, and we took turns light painting our individual setups. Again, the key was communication, so that we didn’t inadvertently ruin each other’s images—each of us asking if the other was in the middle of an exposure before turning our flashlights on.

I loved how everything came together. One of my field rules is that when I finish executing my idea, before changing the setup I always try something I wasn’t planning, just to push myself out of the immediate box and see if I stumble across a great idea. In this case, I tried backlighting the rock (Figure 6). I hated it—so I moved on. …

Figure 6. The failed backlighting idea.

Figure 6. The failed backlighting idea.

Incidentally, while I was doing all of this, I still had my second camera, a D850, capturing star trails from the top of the hill, creating the image in Figure 7. That’s a great use for having two cameras in the field—one for long exposures and one for doing other work during the wait.

Figure 7. Star trails over Lassen Peak. Nikon D850 with a Nikon 80-200mm f/2.8 lens. 13 minutes, f/2.8, ISO 160.

The Post-Production

This particular photography didn’t need a lot of work in post.

I cropped out the bright star that was sitting immediately on the right edge of the frame, where it served as only a visual distraction, pulling attention far away from both the primary and secondary subjects.

Using the Spot Removal tool, I cloned out a patch of snow that was picking up just enough light to be seen in the background, as well as one bright and three faint plane trails (Figure 8).

Figure 8.

I boosted Exposure (+20) and Whites (+34) to increase overall brightness, then Clarity (+19), Dehaze (+24) and Vibrance (+8) to add some punch to the sky (Figure 9).

Figure 9.

Usually I’ll go over the galactic core with a custom Milky Way brush, but I didn’t think this image needed it. Sometimes not doing something is the best decision.

Figure 10.

Figure 10.

The Final Adjustment

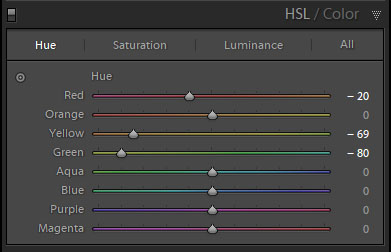
The last correction was one I couldn’t make by myself. The combination of using a CTO filter and shooting with a white balance of 3800 K made the light kind of green. I’m red-green color blind, so I asked Tim if he’d be a second (better) set of eyes while I tried to get the color of the rock accurate. Using the targeted adjustment tool in the Hue section of the HSL panel, we clicked a green sample in the rock and dragged down, which brought the Yellow slider to -69 and the Green to -80. The rock was then a little too warm, so we manually pulled Red down to -20. (Figure 10.)

There are two lessons here:

  1. Knowing how to work around your limitations can be critical. Much thanks to Tim, my sister Ann and several past girlfriends for helping me color-correct through the years.

  2. In the field, knowing my limitations and when shooting at a non-Daylight white balance, I should have used a Luxli Viola LED panel for the painting. Why? Because that would have allowed me to dial in the color temperature of the light to 3800 K or slightly warmer—then I would have known the color was accurate even if I can’t see it. (Another way to do this is to use a combination of color-correcting gels to alter the Coast’s output accordingly. Check out Tim’s post “Level Up With Light Painting: Correcting the Color of Your Flashlight (Part II).”)

Figure 11. The final image.

Wrapping Up

I finished my photo before Lance finished his. I tooled around with a few other image ideas in the same area (Figures 12 and 13), but soon settled on light painting Lance while he worked, creating a portrait of one night photography’s true masters in his element (Figure 14). By this time the moon had risen, which illuminated the valley in the background, adding more of a sense of place to the scene.

Figure 12. Tail end of the Milky Way over Lassen Peak. Nikon D5 with a Nikon 14-24mm f/2.8 lens. 20 seconds, f/2.8, ISO 8000.

Figure 13. Milky Way disappearing in the moonrise. Nikon D5 with a Nikon 14-24mm f/2.8 lens. 25 seconds, f/2.8, ISO 6400.

Figure 14. Lance at work. Nikon D5 with a Nikon 14-24mm f/2.8 lens, light painted with a Coast HP7R flashlight and a Luxli Viola LED panel. 25 seconds, f/2.8, ISO 6400.

Afterward we moved on to our second shoot location of the night, a placid alpine lake just up the road, where we ripped some long exposures of star-circle reflections above Lassen Peak.

Lassen Volcanic is truly an extraordinary national park. I have no idea when I’ll be back, but the day I am can’t come soon enough.

Want to explore Lassen Volcanic with Lance and Gabe on an epic night photography adventure workshop this August? Sign up here!

Chris Nicholson is a partner and workshop leader with National Parks at Night, and author of Photographing National Parks (Sidelight Books, 2015). Learn more about national parks as photography destinations, subscribe to Chris' free e-newsletter, and more at www.PhotographingNationalParks.com.

UPCOMING WORKSHOPS FROM NATIONAL PARKS AT NIGHT

Five Questions: Light Painting Headlights, Moonrises and Sunsets, Auroras and More

You ask questions, we give answers. (When we’re not shooting. Which is why we don’t do this feature more often.)

This installment of our “Five Questions” series features inquiries about light painting headlights, tripods, open hours for national parks, moonrises at sunset and lens choices for aurora.

If you have any questions you would like to throw our way, please contact us anytime. Questions could be about gear, national parks or other photo locations, post-processing techniques, field etiquette, or anything else related to night photography. #SeizeTheNight!

1. Light Painting Headlights

Pickup in Nelson Ghost Town, Nevada. © Tim Cooper. Nikon D4, Nikon 24-70mm f/2.8 lens. 3 minutes, f/8, ISO 100.

Q: When light painting old cars/trucks at night, how do you get the headlights to look like they are on? I have an old tractor in a field that I would like to practice on. — Brien R.

A: We love light painting, especially old cars! Who doesn’t?

Light painting the headlights is a tricky but rewarding thing to practice.

If the headlights have the glass still intact, use a very low-power light source (e.g., a Maglite or a Coast G5). Stand about 2 to 3 feet from the headlight, but to the side so you aren’t blocking the camera. Shine the flashlight into the headlight briefly—1 to 3 seconds is generally enough. Then walk over to the next headlight and do the same.

Here’s a key to this working: Stay invisible. Be careful and use your body to block the light source (i.e., the bulb) from being seen by the camera—we want to capture only the light reflecting from the headlights. I also advise dressing all in black, including black gloves. Sometimes the light bouncing off the headlights can freeze your hand or face in the frame, and you end up being ghosted in the picture. If that is the case, you’ll need to move farther out of the scene and then snoot your flashlight with a long tube— think PVC or a paper towel core. This will give you a more precise paintbrush to place the light.

Finally practice, practice, practice! And then feel free to share your results with us. — Gabriel

2. Lance’s Tripod

Q: I’m trying to figure out which tripod Lance showed in your CreativeLive class. I went back and watched the class again and figured out that it may be a Manfrotto 190 carbon fiber with a leveling center column. Can you please confirm this? Also, for a tripod this size would you still suggest that setup or has something else come out that you like better? Finally, which ball head would you suggest for this combo? — Marc S.

A: You are correct that I was using the Manfrotto 190 with a leveling head in the video. The head is great, but only for panoramas. It’s unnecessary otherwise.

If I were to buy today, I’d go with the Manfrotto 190go! Carbon Fiber M-Series Tripod with MHXP RO-BHQ2 XPRO Ball Head RC2 Kit. I like the twist locks better than the flip locks, which can pinch if you are not careful. However, these days I’m mostly using my Gitzo Series 2 Traveler Carbon Fiber Tripod with Center Ball Head.

Several of us at National Parks at Night are big fans of the Acratech GP-ss Ballhead With Lever Clamp. It is designed for compact travel tripods. It’s not quite as compact as the Gitzo head, but is easier to work with and the lever clamp is awesome. — Lance

3. Hours at National Parks and Monuments

Arch Rock, Valley of Fire. © 2014 Matt Hill. Nikon D750, Nikon 14-24mm f/2.8 lens at 14mm. 30 seconds, f/2.8, ISO 500.

Q: Thank you for your recent article on whether light painting is allowed in national parks. However, it seems there is an even more important issue, which is if visitors are actually allowed to enter certain parks at night. My wife and I visited a number of national parks and monuments in recent years, but in places like Valley of Fire, Hovenweep or National Bridges we were told by rangers that we’d be in trouble if we were seen out there at night. On the other hand I have seen plenty of photos taken by the National Parks at Night team or other professionals at exactly these places. Are there different rules for the average photographer? — Lambert

A: Most of the 400-plus National Park Service units are open 24 hours to all visitors—including Natural Bridges National Monument, so I’m not sure why that ranger told you otherwise. In fact, night skies are part of how Natural Bridges actively entices people to visit. It’s also a feature that Hovenweep plays up, though only some sections of the park are open at night.

All of the national parks are open 24 hours per day, except Petrified Forest, but you can get a camping permit to stay overnight, or pay for a Special Use Permit to shoot after hours. Some of the national seashores are closed at night unless you have a camping or special use permit. National wildlife refuges are mostly closed at night, but those are units of U.S. Fish and Wildlife, not the NPS.

The Oliver Cabin is one of the many wonderful night photography subjects in Great Smoky Mountains National Parks’ Cades Cove region. Cades Cove is closed to vehicles at night, but you can walk or bike the 11-mile loop road all night if you’d like. © 2017 Chris Nicholson. Nikon D3s, 17-35mm f/2.8 lens, light painted with a Coast HP7R flashlight. 30 seconds, f/5.6, ISO 3200.

However, note that even if a park is open at night, there’s a chance that certain features are closed. In addition to Hovenweep, this is also the case at Mesa Verde National Park, which closes access to the ruins after sundown. Another example is Great Smoky Mountains National Park (where we’re hosting a workshop this April): Cades Cove, an amazing place to shoot; it is closed to motor vehicles at night, yet remains open to foot traffic.

As for Valley of Fire, that’s a state park, and as with any state land is run under local regulations that the NPS guidelines don’t affect. For night access to Valley of Fire, you need either a permit or to be camping in the park. (Or you to be on our workshop this April, which happens to have one spot remaining.)

No matter where you’re going to shoot at night, we always recommend checking the hours and letting the rangers (or other appropriate authorities) know what you’ll be up to. Not because you necessarily need permission to engage in night photography on public lands, but because it sometimes makes their jobs easier if they know you’ll be out there. Not to mention that they might share some valuable local knowledge about the location. — Chris

4. Aurora Lenses

Aurora over Westfjords, Iceland. © 2012 Lance Keimig. Canon 5D Mark II, Nikon 20mm f/3.5 lens. 15 seconds, f/5.6 ISO 3200.

Q: I’ll be traveling to Iceland in March to shoot auroras. Which lens would you recommend between a Sigma 20mm f/1.4 and a Sigma 14mm f/1.8? Or is there another lens you’d recommend instead? I’m shooting with a Sony a7R III. — Jeff

A: Congrats on your Iceland trip! Our No. 1 bit of advice is to get off of the main ring road and explore the random back roads to avoid the crowds. It can be busy over there!

As for your lens question, the wider-aperture model will probably be more useful, but it’s always good to have options. If the sky really lights up, you’ll want the widest lens you can get, but the 14mm is crazy wide for general shooting. Also, you don’t necessarily need superfast lenses—with a good aurora, you will probably be stopping down a few stops anyway.

For more advice on shooting the northern lights, see our two blog posts “Capturing Clouds of Light: How to Photograph the Aurora Borealis.” and “Northern Exposure: 8 Illuminating tips for Photographing Auroras.” — Lance

5. Moonrises at Sunset

Day before full moon, Death Valley National Park. © 2005 Tim Cooper. Canon 1Ds, 16-35mm lens at 31mm. 4 seconds, f/8, ISO 100.

Q: We learned from PhotoPills that sunsets can be spectacular when the moonrise and sunset occur within an hour of each other. But the moon rises in the east and the sun sets in the west, so we’re stumped. Any ideas? — Barbara E.

A: I suggesting thinking about it this way: What will be illuminated from the west when you’re facing east, with a great view of the moon rising behind it? The idea isn’t to shoot the sun and moon together, but rather to shoot the full moon rising among beautifully sunlit scenery or among the delicate light of a just-set sun.

The other advantage to this scenario is that the brightness of sunset balances well with the moon, which equalizes the intensities to get it all in one shot (as opposed to having to HDR the scene, which is so often the need when trying to shoot the moon over a landscape).

For a crispy moon, keep those exposure times short—don’t be afraid to ramp up your ISO to keep things sharp. Ideally, you want a big ol’ moon coming just off the horizon with gentle, ruddy sunlight kissing your subjects.

Grab your phone and scout with PhotoPills! Use it to see just where that moon will peek up to be sure you will see it during that sweet spot of sunset with the moon on the horizon.

And please send us photos of your success! — Matt

Chris Nicholson is a partner and workshop leader with National Parks at Night, and author of Photographing National Parks (Sidelight Books, 2015). Learn more about national parks as photography destinations, subscribe to Chris' free e-newsletter, and more at www.PhotographingNationalParks.com.

UPCOMING WORKSHOPS FROM NATIONAL PARKS AT NIGHT

Five Questions: Yes, Light Painting is Allowed in National Parks, and More

You ask questions, we give answers. (For the record, we do other things too. And we assume you do as well. But we all love night photography, so here we go.)

This installment of our “Five Questions” series features inquiries about light painting in national parks (hint: yes), focusing at night, an amazing national park in Utah, better batteries for the Luxli Viola, and the direction of star trails.

If you have any questions you would like to throw our way, please contact us anytime. Questions could be about gear, national parks or other photo locations, post-processing techniques, field etiquette, or anything else related to night photography. #SeizeTheNight!

1. Yes, Light Painting is Allowed in National Parks

A great example of low-level lighting: In Joshua Tree National Park, Arch Rock, at 30 feet high, was light-painted by just three battery-operated votive candles. Illumination barely visible to the naked eye even from close-up. Six stitched frames sh…

A great example of low-level lighting: In Joshua Tree National Park, Arch Rock, at 30 feet high, was light-painted by just three battery-operated votive candles. Illumination barely visible to the naked eye even from close-up. Six stitched frames shot with a Nikon D750 and a Tamron 15-30mm f/2.8 lens at 15mm Photo © 2017 Lance Keimig.

Q: I saw an article online that said light painting is no longer allowed in national parks. Is this true? — Pretty Much Everyone Who Has Emailed or Spoken to Us in the Last 18 Months

A: The headline of that article misled the reality of the situation. About 18 months later we still get this question, so let’s set the record straight.

First of all, it is true that a few National Park Service units have gotten hesitant about light painting. However, as far as we are aware, this has happened at only five NPS units—out of about 420. So to insinuate that night photography is being hampered at all national parks is a massive overstatement.

It should also be noted that of those five units, four (Arches National Park, Canyonlands National Park, Natural Bridges National Monument and Hovenweep National Monument) are administered by the same office, so it’s mostly just one rule that’s affecting a few places. It’s not like a bunch of parks have independently decided they don’t like night photography. In fact, we find that almost every park we visit loves the night, loves night photography, and encourages visitors to enjoy the darkness of the parkness either without or with a camera.

Those four Utah NPS units acted with exactly that feeling in mind. Michael Hill, who works in the district, and with whom we have communicated, is very clear that they felt light painting “confuses visitors” and they leave because of this confusion. We get that, and we are respectful of it.

However, that rule has been amended. As of earlier this year, those Utah parks allow Low-level Landscape Lightning (LLL), which is essentially very low levels of light that build up over the course of a long exposure.

In Lassen Volcanic National Park, Lance and I used a pair of Luxli Viola panel lights to illuminate Cinder Cone, which is approximately 1,000 feet in diameter. We were relatively far away from our giant subject with relatively dim illumination. We could barely see where the light was hitting, but over the course of a 15-second exposure at a high ISO, that little bit of light was enough to do the job. Nikon D5 and 14-24mm f/2.8 lens. 15 seconds, f/3.2, ISO 6400. Photo © 2018 Chris Nicholson.

For example, at our workshops we often employ LLL by using a Luxli Viola set to 1 percent brightness. That gentle glow is barely visible to the naked eye, but is extraordinary for cameras at high ISOs. That works out very well, and we cannot imagine that it would ruin the experience of any non-photographer who might happen to be there too. (For the record, usually no one else is there. We find it rare to encounter anyone else out at 1 a.m. other than—seldom but occasionally—other night photographers.)

In the case of the Utah parks, how low is acceptably “low-level”? Good follow-up question. When in Canyonlands last month, I asked a ranger, and he admitted the threshold is a bit subjective. He added that as long as the light isn’t disturbing wildlife or interfering with the enjoyment of other park visitors, then it’s probably OK. For commercial groups, the permit regulations stipulate that waving flashlights around is a no-no, but low-level static lighting is fine.

(Note: Since publication, this rule has since been amended again. As of 2020, no light painting—not even LLL—is permitted in the four Utah parks mentioned above. In 2021, Capitol Reef also prohibited light painting, bringing the total to six National Park Service units doing so.)

So, that’s the scoop with that set of four Utah units. The fifth unit in question is Grand Teton National Park in the beautiful state of Wyoming.

Grand Teton is an interesting case, because the park’s concern appears to really be in regard to shining artificial light on wildlife. We’re on board with whatever helps in that regard. Of course we don’t want to use flashlights for “spotting” wildlife, which in hunting is known as “jacklighting.” As people who use the parks for artistic inspiration and growth, we also have a responsibility to respect and preserve the natural environment, and that includes not disturbing the animals that call those places home.

There are many ways to photograph Grand Teton National Park in low light without light painting—such as by moonlight. Nikon D3 and 28-70mm f/2.8 lens. 1/50, f/ 4, ISO 400. Photo © 2012 Chris Nicholson.

That said, Grand Teton curbing light painting is a curious decision, as the park has a highway that runs right through it, along with plenty of private property that people drive on. Cars have headlights. There’s also an international airport that’s in park boundaries, and airplanes have lights too. The however-many cars and planes in the park each night illuminate far more than a few photographers’ flashlights do. So we’re not sure why photographers are the ones getting their lights extinguished. (We’ve heard of at least one photographer who light-painted by “accidentally” sweeping his flashlight across the scene. Perhaps that kind of behavior has something to do with photographers being mistrusted there.)

Regardless of our personal feelings about any of this, National Parks at Night always preaches respect for the land, and that means respect for the park regulations, for equal access for all visitors, and for the rights of animals not to be blinded with sun-guns.

To that end, on our workshops we are very clear that if someone from outside our group approaches with a light on or wants to walk where we are shooting, they have a right to do so. If they want to linger in the same place we’re shooting, they have a right to that too. We should all share the space, and we should all share the darkness. If what we as photographers are doing will disrupt another visitor’s enjoyment of the park, we can find another way or another moment to do it.

Let’s end with this thought: Rather than making negative assumptions and predictions based on some (very few) new obstacles at a tiny minority of parks, we instead implore our fellow night photographers to ensure this does not become an actual issue anywhere else.

How? By being responsible with our practices. That could be by employing LLL lighting techniques, or by light painting at a location only when alone or with other night photographers, or by shooting just the dark skies. Whatever works for you in the moment.

And finally, by encouraging other night photographers to do the same. — Chris

2. Focusing from Foreground to Infinity

Pemaquid Point, Maine, sharp from front to back after focusing to a hyperfocal distance of 18 feet. Nikon D750, Sigma 24mm f/4 lens. 488 seconds, f/3.5, ISO 800.

Q: On a recent night shoot at the Devils Garden in Utah, I was really disappointed in the fuzziness (not in good focus) of the rocks in the foreground of my shots. I may just have screwed up the focus on infinity, and I should have zoomed in on the first few shots to ensure clarity. Should I have focused on infinity and assured/assumed that the depth of field would maintain focus throughout the range, or should I have focused on a hyperfocal distance to ensure the full range of focus, which would have included my foreground rocks and out to infinity? — Michael D.

A: Anytime you have foreground subject matter, hyperfocal (providing it is done accurately) is the way to go. It’s a technique that is designed to maximize the available depth of field rather than focusing at infinity and sacrificing sharpness in your foreground.

To learn more about that technique, read my 2016 blog post “Use Hyperfocal Distance to Maximize Depth of Field at Night.” Then follow that up with a post that Chris wrote, “Staying Sharp: 8 Ways to Focus in the Dark.” — Lance

3. Capitol Reef Night Programs

The night skies of Capitol Reef National Park are worth a trip. Nikon D750, Zeiss 15mm Distagon f/2.8 lens. 154 seconds, f/4, ISO 100. Photo © 2016 Matt Hill.

Q: I would love to go to Capitol Reef National Park to see the stars. Are there any nighttime programs available? — Nancy

A: There certainly are! Capitol Reef is an awesome place to view and photograph night skies—and they know it, and they’re happy to help you enjoy what they have.

Check the Ranger Programs resource on the park website. They recommend the following special programs (check at the visitor center for schedules and meeting points):

  • guided hikes—60 to 90 minutes

  • star programs—tour the night sky in a gold-tier International Dark Sky Park

  • full moon walks

Have fun, send pictures! — Matt

4. Superpowering the Luxli Viola

Q: I was first introduced to Matt and Chris through a seminar held at B&H Photo in New York City. I proceeded to order the Luxli Viola LED light and am looking forward to working with it. I recall a reference to a better battery to use with the Viola than the one that comes with it (due to the short life of the battery), but I can’t find it in my notes. Please help me find the best battery for this kit. — Debi F.

A: First, I wouldn’t say the Viola’s battery has a short life. In fact, Chris claims to recharge his only every couple of months or so. That’s because he shoots mostly still photos, and he uses it only at night when very little power is needed to light a scene.

But if your usage drains your Viola faster than you prefer, you can get more run time by using the Watson NP-F550 replacement battery, which from my experience is very reliable.

If you want even longer run time for other applications—say, if you’re shooting video, when you’d probably leave the light on for hours at a time at full power—you can get the even larger Watson NP-F770 battery. That should about double your run time.

If you want to spend a little more, the Sony versions of the NP-F battery are supposedly the best to be found. — Matt

5. Stars Trailing in Different Directions

Sotheast view in Sedona, Arizona. Nikon D4s, 14-24mm f/2.8 lens. 4 minutes, f/4, ISO 200. Photo © Tim Cooper.

Q: In Tim’s recent blog post “Making the Move to Manual White Balance,” I can’t figure out how, in the last pair of photos outside Sedona, he managed to get the stars moving other than in concentric circles. Were some of them mirror-imaged to fill in areas where there was too much light, to let the stars show through? Thank you for satisfying my curiosity! — Marilyn O.

A: No mirror-imaging involved or required! Star trails move in different directions, angles and arcs depending on which direction you’re facing.

  • You get concentric rings from star trails only when you are shooting due north.  

  • When you are shooting east, they move from upper right to lower left.    

  • When you are facing west, stars move from upper left to lower right.

  • When facing due south, the stars go nearly horizontal across your frame.

For the image in question, I was facing southeast, so you are seeing the divergence of the east and south views.  If I had turned right a little bit more (south), I would have ended up with nearly all horizontal trails. If I had turned a little more to the left (east), the trails would have moved from upper right to lower left. I shot this photo with a very wide 14mm lens—so wide that I actually captured a little of both views! — Tim

Chris Nicholson is a partner and workshop leader with National Parks at Night, and author of Photographing National Parks (Sidelight Books, 2015). Learn more about national parks as photography destinations, subscribe to Chris' free e-newsletter, and more at www.PhotographingNationalParks.com.

UPCOMING WORKSHOPS FROM NATIONAL PARKS AT NIGHT

Five Questions: Flashlights, Big Bend, Fireflies and More

Once again, we’re ready to take a swing at the questions you pitch. This installment of our “Five Questions” series features inquiries about light painting tools, built-in timers, hot parks, dewy lenses and bright bugs. If that all seems fuzzy, read on and it will all come into focus.

If you have any questions you would like to throw our way, please contact us anytime. Questions could be about gear, national parks or other photo locations, post-processing techniques, field etiquette, or anything else related to night photography. #SeizeTheNight!

1. Shedding Light on Coast

The Twins, Capitol Reef National Park. Nikon D750, Zeiss Distagon 15mm f/2.8, Coast HP7R flashlight. 26 seconds, f/3.2, ISO 6400. © 2018 Matt Hill.

Q: Can you tell me what you like in particular about Coast flashlights? Other than sturdy durability, which seems obvious. Are the beams adjustable? The couple of times I’ve fooled around with light painting, I found it was difficult to be exact with what I had. — Therese I.

A: You hit it the nail on the head. The Coast flashlights feature an adjustable zoom optic. At its widest, it is an even illumination with a crisp edge. This is fantastic for slowly illuminating a large area evenly. At its narrowest, it is very intense with a rapid falloff from center to edge. This is ideal for lighting something distant.

We often add a Light Painting Brushes Universal Connector as a snoot for very small detail work, or we cup our hands around the end and squeeze open a small crack for fine lighting work. On top of that, Coast lights are waterproof and the rechargeable versions have long-lasting batteries you can charge via USB.

The only downside is that the color temperature of Coast lights is kind of cool for night photography work. But a small CTO gel fixes that. Warms it right up. (You can read more about this in Tim Cooper’s blog post “Level Up With Light Painting: Correcting the Color of Your Flashlight.”)

Light painting is part science and part art. Exact is something you obtain only after thousands of hours of practice. And even then it’s generous to call the craft exact. — Matt

2. Built-In Intervalometers

Q. I just got a Fuji X-T2 and I have a question. Do I still need an intervalometer? There’s one built in, so I’m not sure if I need another. — Anne K.

A: Generally speaking, the built-in intervalometers are more complex to use than an external intervalometer. There’s also the issue that in many cameras, the length of the shutter speed is limited (often to a maximum of 30 seconds) with the internal option. Not ideal for long-exposure work.

However, with the X-T2 in particular, I’ve used the built-in intervalometer with star stacks and had no problem. The built-in shutter speeds for that camera (with the latest firmware upgrade) go to 1 minute, 2 minutes, 4 minutes, 8 minutes, 15 minutes! It’s awesome. If you are comfortable with the internal option, then go for it! If not, nothing wrong with using an external option. — Chris & Tim

3. Big Bend in Summer

Agave on the South Rim, Big Bend National Park. Nikon D850, Nikon 14-24mm f/2.8. 2 minutes, f/5, ISO 1000. Light painted with a Coast HP7R. © 2018 Chris Nicholson.

Q: I noticed you haven’t offered a workshop at Big Bend last year or this year. I am headed there this summer in hopes of photographing the Milky Way and other nighttime objects under a new moon sky. Do you not offer workshops there because the location just isn’t that great? I’m wondering if you’d turn me on to any spots that are preferred for astro-landscape photography. — Alison C.

A: It’s not that we don’t offer a workshop in Big Bend, just that we haven’t yet. I can assure you that this Texas park is amazing for photography, day or night.

However, as for your trip, not to dissuade you, but summer is an incredibly uncomfortable time of year to be in Big Bend. There’s always a chance that you’ll catch a break with the weather, but generally summer there is stifling and unbearable. Moreover, that same heat at night will likely create considerable long exposure noise in your Milky Way photos. I’d avoid any exposures over 30 seconds or so (depending on your camera), and I’d certainly use Long Exposure Noise Reduction.

As for locations, probably the best in the park is the South Rim, but I wouldn't advise hiking out there in summer. There are a lot of fantastic spots accessible via the primitive roads, but again, I can’t advise venturing out those ways at this time of year, because of safety in the extreme heat should the car break down or get a flat tire.

However, you can find plenty of great spots to photograph that are closer to the safety of the main roads. I would definitely check out the Chisos Basin and Santa Elena Canyon, and you can find interesting ruins in the surrounding towns that are good for light painting.

No matter where you go, always have a good supply of extra water in the car—not just enough to drink for the shoot duration, but enough to drink in desert heat should you run into car issues. Have I mentioned this place is hot in summer? — Chris

4. Aurora and Condensation

Aurora, Westfjords, Iceland. Nikon D750. © Lance Keimig.

Aurora, Westfjords, Iceland. Nikon D750. © Lance Keimig.

Q: I’ve taken an interest in nighttime photography in Canada to capture the aurora. It appears to my eyes to be just a white glow (only my rods are sensing the light), but when I take the photo, voila, it is green! One of the main problems I’ve had—both in Yellowknife, Northwest Territories, in February (-24 C), and in Ontario in September—is condensation on my lens or filter as the camera cools off. I recently purchased a wrap-around lens heater, and am excited to try it in Ontario this August during the Perseids meteor shower. — Gil J.

A: Yes, faint aurora can be hard to differentiate from plain old clouds sometimes, which is why using an app like Aurora Forecast can give you a heads-up to be on the lookout.

As for lens wraps for condensation, they can make the difference between the end of your night and a killer shot. Once the temperature reaches the dew point, condensation can form quickly. I’ve been in situations where I had to wipe the lens mid-exposure, which can introduce all sorts of problems. For a DIY version, I’ve cut a beer koozie so it can wrap around the lens, and put a chemical hand warmer inside. Sometimes even a hand warmer with a rubber band to hold it to the lens will work in a pinch! — Lance

5. Fireflies

Fireflies in Cuyahoga Valley National Park. Nikon D3s, Nikon 24-70mm f/2.8. 90 seconds, f/2.8, ISO 1600. © 2018 Chris Nicholson.

Q: I have a pressing summer question: How does one photograph fireflies? I’ve seen them and I want to try it! — Susanne H.

A: That’s a fun question, and definitely a fun thing to do. We’re about to start our workshop on the Blue Ridge Parkway, and we’re hoping to see some fireflies on those mountain nights!

I recommend a few strategies:

  • Get into into a dark, wooded area, or at the edge of one, that has lots of firefly activity.
  • Focus on the closest trees or a solid subject.
  • Use a fast telephoto lens, like a 70-200mm f/2.8, so that you can zoom into the area of activity and concentrate a bunch of fireflies in the frame. I was recently trying with a wide-angle lens and didn’t get any good results.
  • Shoot wide open to collect all the light.
  • To really maximize the effect, shoot a lot of frames and stack them in Photoshop (using the Lighten blend mode, just like we do for star stacking).

Have fun and please share your results in the Comment section! — Gabe

Chris Nicholson is a partner and workshop leader with National Parks at Night, and author of Photographing National Parks (Sidelight Books, 2015). Learn more about national parks as photography destinations, subscribe to Chris' free e-newsletter, and more at www.PhotographingNationalParks.com.

UPCOMING WORKSHOPS FROM NATIONAL PARKS AT NIGHT