
I recently led a few photo tours to Iceland to photograph the northern lights, and our groups each had the good fortune to experience several nights of clear skies and brilliant displays of aurora.
It's an amazing experience, both to photograph and simply to see. One of the high seasons for aurora is nearly upon us, so I chose to write a primer on how to tackle this exciting genre of night photography.
Where and When to Find Aurora
The aurora borealis, as the northern lights are also known, occurs when electrically charged particles from the sun are carried by solar wind toward Earth and collide with gases in the upper atmosphere. Those gas particles—most commonly oxygen (green aurora) and nitrogen (pink aurora)—are “excited” by the collisions, and release photons of light.
Earth’s magnetic field deflects most of the solar particles, but that field is weakest at the poles. This is why the aurora is mainly seen near the polar regions. (Toward the South Pole, they're called the aurora australis, or southern lights.) In general, the chances of viewing the aurora in the Northern Hemisphere are best at latitudes above 55° N, and between the months of September and March. Historically, March and October are the best months for aurora viewing.
There are a number of apps to help locate the aurora. The one we at NPAN have used the most is Aurora Forecast. Some of the newer apps seem to have more favorable reviews, and may be worth trying. Whichever app you choose, set the preferences to send you an alert for a Kp rating of 5 or higher, for middle latitudes if you live at or below 55° N latitude, and high latitudes above 55° N. Kp is the unit of measurement for geomagnetic conditions responsible for the aurora.

Aurora and sodium-vapor, Reykjavik, Iceland. 20 seconds, f/4, ISO 2500.
The frequency of clear skies is also a big a factor in seeing the aurora, but broken cloud cover can add a lot of visual interest in aurora photographs. The phenomenon can appear at any time when the sky is dark, but the best viewing times are typically from 10 p.m. to 2 a.m.
Solar activity peaks and falls on an 11-year cycle. The winter of 2012-13 was the peak of the current cycle, which was theoretically the best chance to see auroral activity for the next decade. Luckily for us though, there has been plenty of auroral activity every winter since 2012.
Iceland lies between 64° and 66° N, and is ideally suited for viewing and photographing the aurora. Despite being so far north, its position on the Gulf Stream keeps the winters relatively mild compared to other good aurora-viewing places such as Scandinavia and Alaska. During my two Iceland tours in 2015, we had good viewing conditions and good sightings for nine out of 17 nights, and really spectacular displays on three of those nights.
Photographing the aurora is relatively straight-forward once you understand the basics. The remainder of this article is intended to provide the basic information required for aurora photography.
Prepare for the Cold
It’s obvious that you’ll be photographing in cold weather conditions, and there are a few things you can do to protect yourself and your equipment from the cold.

Warming hut. 20 seconds, f/5.6, ISO 3200.
Dress in layers, making sure that your innermost layer is synthetic rather than cotton. Synthetic fibers wick moisture away from the body, keeping you warm and dry. Dress as if it will be colder than it really will be. Standing around for hours on end will make you feel much colder than if you were active or if you were outside for only a short while.
Your best options are:
- heavyweight merino wool and synthetic-blend socks
- insulated boots with wool or sheepskin liners
- long underwear
- lined pants, wind pants or long underwear with ski pants
Make sure your neck is covered, and find just the right hat. The best bet for your hands is flip-top mittens with chemical hand warmers and potentially thin, form-fitting glove liners. (We particularly like the Trigger Mitt by our friends at Vallerret.) If you’re going to Alaska, or somewhere frigid, extreme cold weather clothing can be expensive, but is essential.
Camera gear for Aurora Photography
Photographing the aurora tests the limits of our gear, so this is a case where using the best equipment really makes a difference in the quality of your images.
Cameras and Lenses
Cameras with full-frame sensors are ideal, as are fast, ultrawide-angle lenses. Cameras such as the or D750, Pentax K1, Sony A7R2 or A7S2, and Canon EOS 6D or EOS 5D Mark IV are particularly well-suited to this work. The next best option is an APS-C camera, such as the Nikon D500. But if you will be using an APS-C camera, I recommend sticking with newer models that perform better at high ISOs.
Fast, wide to ultrawide angle lenses in the 14mm to 24mm range are the most useful for full-frame cameras, and those manufactured by Samyang under the brand names of Samyang, Bower and Rokinon offer a great value for about one-third the price of the comparable Canon and Nikon lenses, and they suffer less from coma at wide apertures. It’s recommended to test these lenses thoroughly after purchase, as quality control is notoriously inconsistent.
The best zoom lenses for this type of photography are the Tamron 15-30mm f/2.8 and Nikon 14-24mm f/2.8. A lens hood is helpful not only for preventing flare, but also for protecting the front element from frost and condensation.

Wellhead and aurora. 30 seconds, f/4, ISO 3200.
Tripods
A sturdy tripod is essential of course, and those with three leg sections are generally more stable than those with four or five. One exception to the three-section leg rule is the Gitzo Series One Traveler. This is one of our favorite travel tripods, as it packs small and is incredibly sturdy. A more economical alternative is the Manfrotto 190Go! Carbon Fiber Tripod Kit with Ball Head.
Insulated leg sections are easier to handle, especially on aluminum tripods. Ball heads are better suited for this work than traditional pan-tilt heads because they can be adjusted quickly to track quickly changing aurora.
Miscellaneous Gear
Since exposures are generally 30 seconds or less, a remote release or intervalometer is helpful, though not required. In fact, the cables can freeze and break in extremely cold weather, so if the temperature is below zero F, you’re better off without one. If you are working without a remote release of some sort, be sure to use the 2-second delay on the self-timer to avoid camera movement when depressing the shutter button.
The only other equipment you’ll need is an extra camera battery or two. You’ll want to keep your extra batteries close to your body in an inner pocket, as they will not last as long in the cold. You can also consider connecting to an external power supply with the Tether Tools Case Relay Camera Power System.
Remove any filters from your lenses, and be sure to use your lens hoods, which will help minimize frost or condensation buildup on the front element. A neoprene beer/soda cozy with the end cut off can be used to hold one or two chemical warmers to your lens, which also can prevent the lens from fogging over.
Lastly, you'll want some flashlights. We recommend carrying at least two: a dim or preferably red one (such as Coast's FL75 headlamp) for finding things in your bag or making adjustments to your camera, and a very bright flashlight to use as a focusing aid or for light painting. (As usual, we can't recommend the Coast HP7R enough. Use the coupon code “parksatnight” for 25 percent off of all merchandise at CoastPortland.com.)
Ambient Light and Aurora Photography
Ambient light from towns and cities will obscure all but the brightest aurora displays, so make sure you are well away from urban areas. That said, the distant glow from streetlights or the last glow of a fading sunset on the horizon can add another element of color to your photographs. Sodium-vapor streetlights reflecting off of low clouds is another possibility to add contrasting color to aurora photos.

Aurora and sodium-vapor clouds. 20 seconds, f/3.5, ISO 3200.
Lunar phase and lunar elevation in the sky both have a profound impact on night photography in general, and on aurora photography in particular. Photographing without any moonlight will mean primarily silhouetted foregrounds, and longer exposures at higher ISOs. Photographing under a full moon will mean much brighter foregrounds (especially if there is snow on the ground), shorter exposures at lower ISOs and fainter aurora in your photographs.
You can photograph the aurora at all phases of the lunar cycle, and the results will vary fairly dramatically; it’s just a matter of what kind of images you are looking for. My preference is to photograph between the first quarter and waxing gibbous phases, as there is sufficient moonlight to illuminate the landscape without overpowering the aurora. The first-quarter moon rises around noon, sets around midnight, and then rises about 45 minutes later each day until it is full. The full moon rises at about sunset and sets at about sunrise.
If you include interesting foreground elements, you may want to add light painting, especially when there is little or no moonlight present.
Camera Settings and Exposure for Aurora Photography
Aurora photography pushes the limits of even today’s best DSLR cameras. Because of the low light levels, and the need to keep exposures relatively short due to the moving nature of the aurora, you’ll be photographing at the highest usable ISO of your camera and the widest aperture that will yield sufficient sharpness and depth of field.
Determining your highest usable ISO is simply a matter of testing your camera by making a series of low-light exposures at increasing ISOs, and then scrutinizing the shadow areas of each exposure, preferably by making final-size prints of the images. (See Matt Hill’s post, “Keep the Noise Down: How to Take an ISO Test with your Camera.”) For me, 1600 is the highest ISO I use for print-quality images and 6400 for web-quality with my 5D Mark II.
Similarly, you’ll want to test your lenses for coma at wide apertures. A form of optical distortion, coma causes stars to appear as if they have “tails” like a comet, or sometimes like a bird in flight. Test your lenses by shooting starry skies at maximum aperture and then stopping down in half- or third-stop increments until you get to f/5.6, and then looking at the resulting images at full magnification for signs of coma. It’s generally found near the edges of the frame in images shot at or near maximum aperture. The Canon and Nikon 24mm f/1.4 lenses both suffer from fairly severe coma problems. (Coma is another topic we will discuss in more detail in the future.)
“Aurora photography pushes the limits of even today’s best DSLR cameras.”
Exposures for aurora photography range from approximately 30 seconds, f/2.8, ISO 6400 for faint to average aurora on a moonless night, to 4 seconds, f/4, ISO 800 for bright coronal aurora on a full-moon night. The intensity of the aurora can vary dramatically—sometimes it’s barely visible to the naked eye but shows up nicely in photographs, and sometimes it can be so bright as to illuminate the landscape.
Determining exposure is accomplished by viewing a combination of the RGB histogram and the blinking highlight indicator. At a minimum, you should have a histogram that shows no shadow clipping—it can be a left-biased histogram, but the histogram should not be touching the left edge of the graph. Images with more exposure will have cleaner shadows with less noise. Ideally, you should not have to lighten your image in post-processing. Use the blinking highlight indicator to make sure that you are not overexposing the aurora or any highlights created by light painting. Use the LCD image preview primarily for confirming composition and focus.
Key camera settings
Here’s a rundown of the camera settings most important to photographing aurora, and my recommendations for how to set them.
- Set file quality to RAW.
- Use your camera’s highest usable ISO setting, hopefully between 1600 and 6400.
- Set white balance to between 3700 K and 4100 K when shooting under moonlight, or between 4000 K and 5500 K when there is no moon.
- Set your camera’s Long Exposure Noise Reduction (LENR) to Auto (if available) or on.
- Enable your camera’s RGB histogram to use as the primary exposure determinant in natural light.
- Enable the blinking highlight indicator to ensure that you do not clip the aurora.
- Set the LCD brightness to “auto” or reduce it manually to almost the lowest setting.
- Set exposure mode to Manual.
- Set focus to Manual.
- Turn off IS/VR lens functions
- For focusing, use magnified Live View with the assistance of a flashlight to illuminate your focal subject, or use conservative, well-executed hyperfocal distance.
For more information and a complete list of camera settings, download my PDF “Basic Camera Settings for Milky Way and Aurora Photography.”
Getting Out There
As with any type of photography, you’ll get better results with experience and practice. It’s very helpful to have a basic understanding of night photography, and to be completely familiar with your equipment before departing toward one of the poles. Simply working in the cold and darkness complicates photography exponentially, so do your homework, and be prepared. Don’t expect to get perfect results on your first attempt.
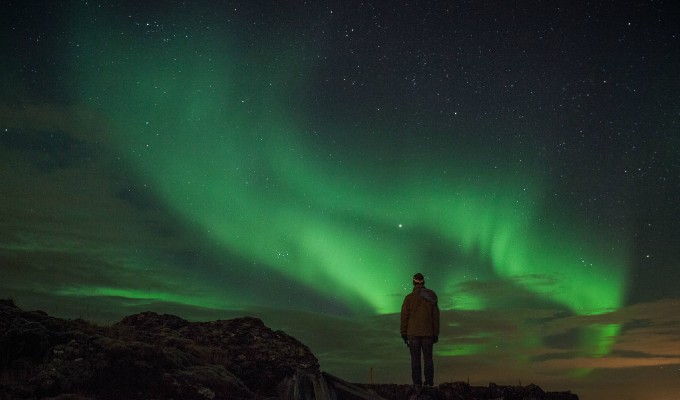
Taking a moment to enjoy the aurora.
Photographing the northern lights can be like photographing a close friend or family member’s wedding: You’re so focused on the task at hand that before you know it, the event is over and you’ve completely missed out on the experience! Make sure that you take some time to simply step back, look up, and enjoy the magnificence of this special phenomenon.
Note: National Parks at Night's 2017 Westfjords, Iceland, Photo Tour is sold out, but there are at least a half a dozen U.S. national parks with opportunities to photograph aurora borealis, (and a few national parks in Iceland that we won't get to on this year's trip). To get early notifications of our 2018 workshops and tours, be sure that you are signed up for our mailing list.


