
When I make a star stack sequence, I’m at a crossroads for my editing choices.
Do I remove the plane trails? If so, do I live with the tiny gaps in those star trails left behind by the removal process?
It’s a hard decision. On the one hand, the journalistic approach is, “That’s what happened in front of my camera—it’s the truth.” If that’s your creed ... you’re done! Make whatever levels and color adjustments you want and move on.
But when I desire to have a final image without plane trails, I spend some time to make sure it’s done right, and that I’m making a quality photograph.
Want to learn some techniques on how to do this? Is there a method—without having to be a professional photo retoucher—that doesn’t leave gaps? Read on, my fellow night photographer.
Note:
If you are unfamiliar with how to create a star stack, see these previous blog posts:
- “How I Got The Shot: Star Stacks and Sea Stacks in Olympic National Park,” by Chris Nicholson
- “How I Got the Shot: Waterfall and Clements Mountain in Glacier National Park,” by Tim Cooper
Prep: How to Find Which Layers Have Plane Trails
I used the same image stack for all the demos below. Shot in the Fruita Orchard of Capitol Reef National Park during our workshop in June 2018.
Gear:
Exposure details:
- 63 images shot at 30 seconds, f/5.6, ISO 6400
- total exposure duration: 31.5 minutes
I knew I wasn’t going for star points, so I chose a 30-second exposure to keep long exposure noise down in the high desert summer heat. The temps weren’t that bad, but I wasn’t taking any chances.
For expediency, I exported full-resolution JPGs from Lightroom to Photoshop. Stacking TIFFs straight from Lightroom with this many files can really choke a computer. As it was, the PSB file was 4.2 GB when saved.
Note:
Do not apply lens profile corrections before making a star stack. It can lead to irreparable moire in the final stacked image. If you want to do apply lens corrections, do so after stacking and flattening.
How to Find the Planes
- Create your image stack in Photoshop and save as a PSD or PSB file (the latter when the file is over 2 GB—don’t worry, Photoshop will prompt you if it’s needed).
- Identify which layers have plane trails. But how, you ask?
- I like to turn on all the layers and apply the Lighten blend mode to each so I can see everything.
- Then I click and hold on the eyeball icon at left of each layer and drag downward in groups of ten or so, while staring at the image. This gives me kind of a faux animated preview of the layers being added one by one. (See video below.)
- If I see plane trail (or a portion of one) disappear, then I click the eyeball on each layer, one by one, upward from the bottom until it disappears. That’s how I know I found the offending layer.
- I make that layer a color to identify it for further work later.
An alternative way to do this is by revealing only one layer at a time, from top to bottom. Which strategy to use is just personal preference. Unless you’re on a PC, apparently. Chris is a PC user, and the trick I detail above and in the video doesn't work for him. What he does is group the layers ten or so at a time, changes the blend mode of all the groups to Lighten, then hides each group one by one, which helps him narrow down the locations of trails more quickly. Finally, he goes into the offending groups and finds the offending planes.
Either way, this process is time-consuming. So be patient. Find those planes. For the photo in the video below, the process above took me about five minutes. (I made it faster for you to watch.)
Note:
You may also find meteors and satellites in there. We have another blog post coming soon on how to identify the differences between them.
4 ways to remove plane trails in a star stack with Layer Masks
- Remove plane trails in a flattened image in Lightroom.
- Use the black paint brush in Photoshop.
- Use the spot healing brush in Photoshop.
- Use layer masks in Photoshop.
Which one is best? I am going to explore all four and compare them, so you can decide which works best for you. And, you can bet that I will have an opinion about what works best for me, too. ;-)
Removing Plane Trails in a Flattened Image
This is the fastest method, but also the least likely to be effective in terms of quality. If you must have it fast, try this first. If you don’t like the results, try one of the options that follows.
- Open your flattened image with plane trails in Lightroom.
- Select the Spot Healing Brush.
- Click once at the beginning of the trail. (See note below.)
- Hold Shift on your keyboard.
- Click once again at the end of the plane trail.
- Repeat for every plane trail on every layer.
NOTE:
You can paint freehand with the trackpad on your laptop (most awkward), with your mouse (somewhat awkward) or with a tablet like a Wacom (hardly awkward at all). This applies to subsequent techniques too.
I find that using keyboard arrow keys to move the healing brush target around is easier to manage than just using a mouse or trackpad. But it causes “jaggies” (below) more often than not, no matter how precise you are.
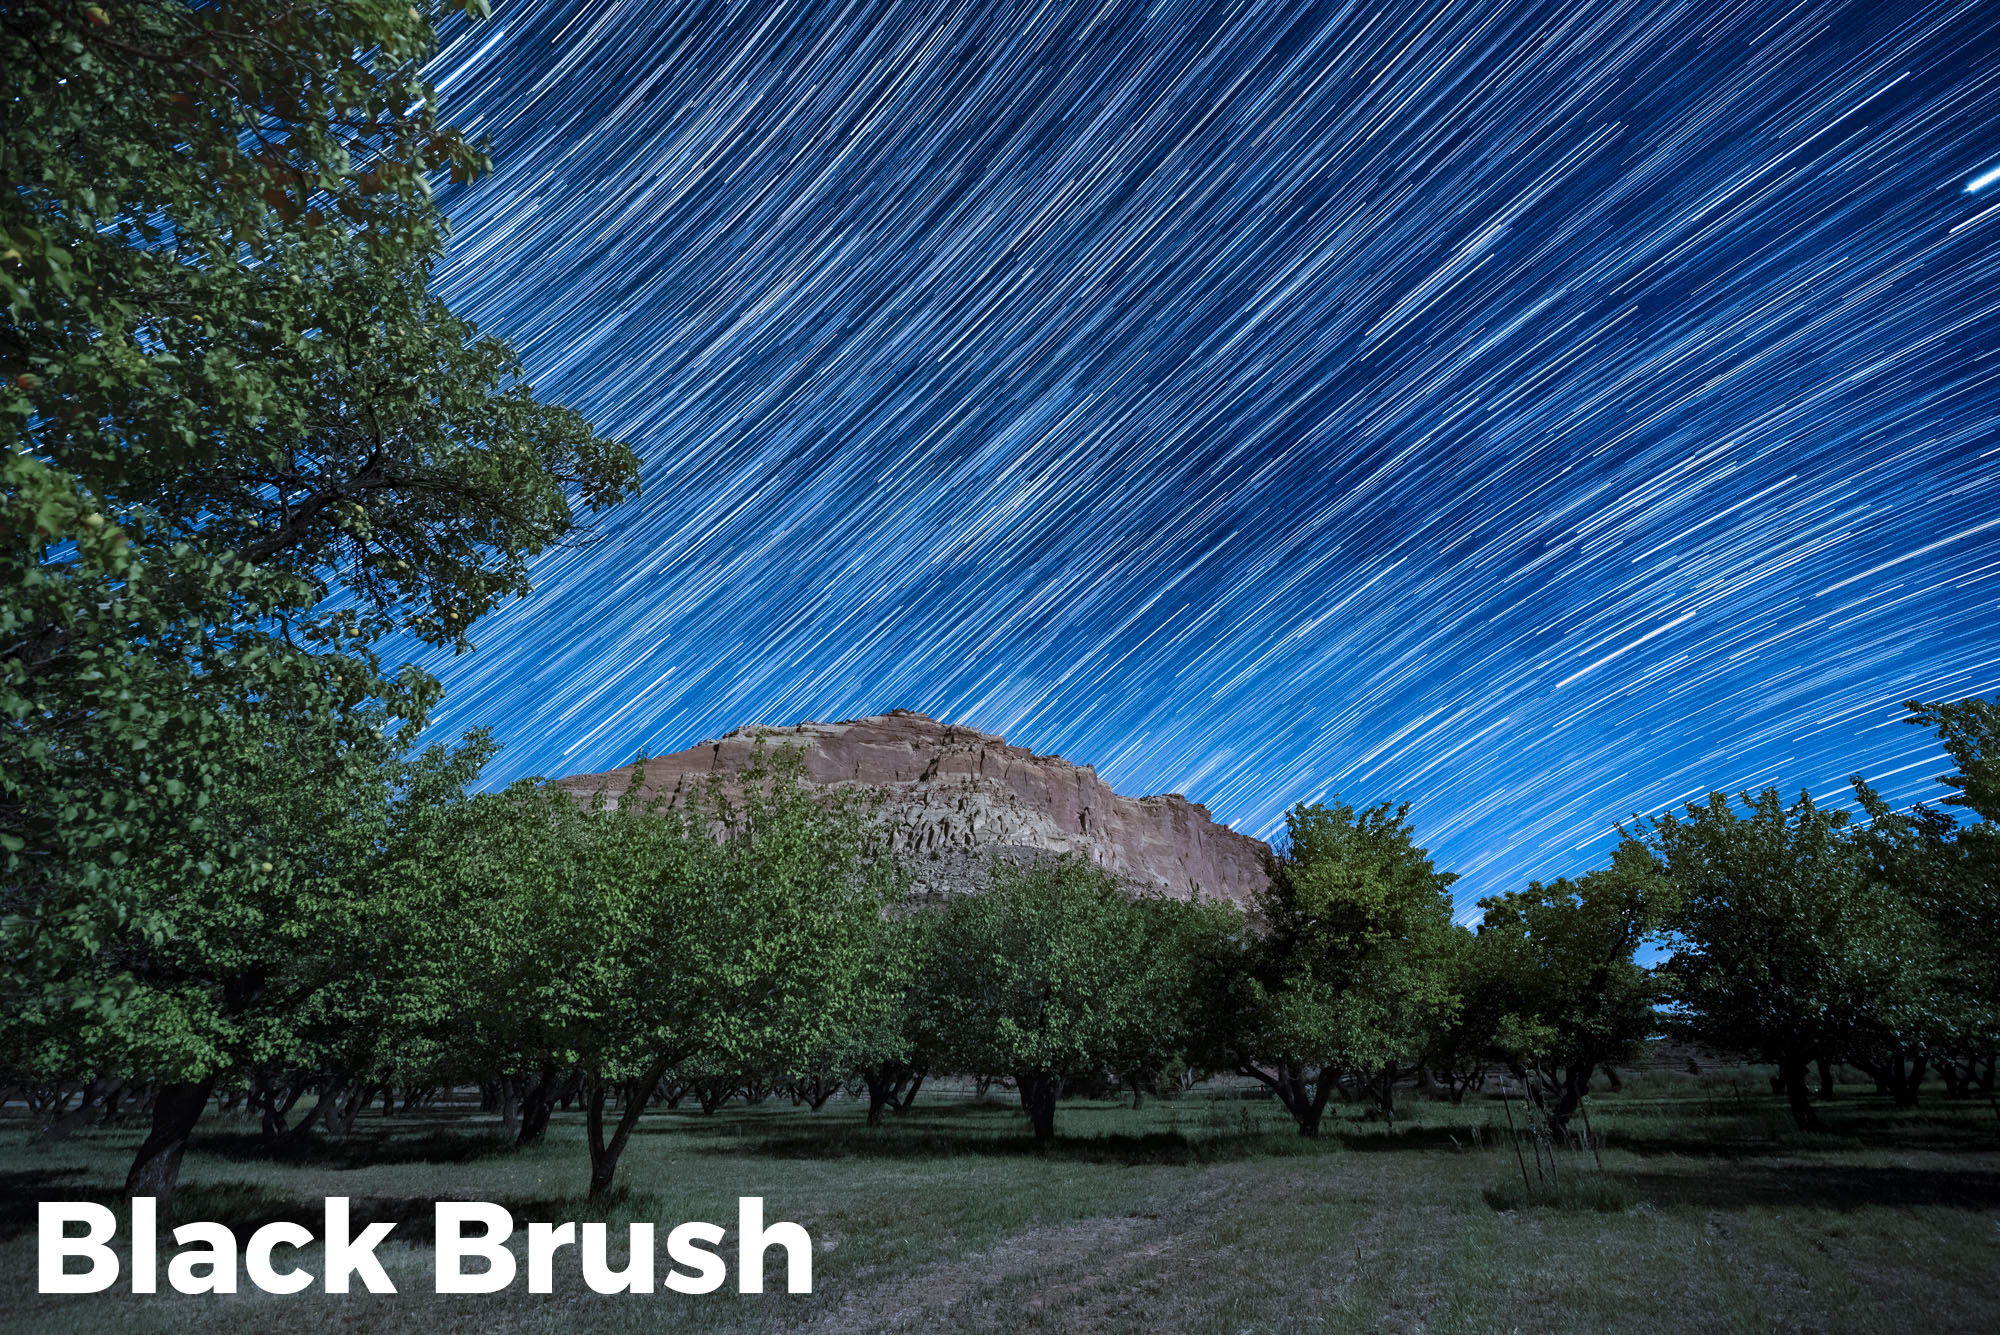
Using a Black Paint Brush in Photoshop
Since the Lighten blend mode for layers reveals the brightest pixels in a scene, painting with a black brush right on the image layer will make trails (which are bright) disappear.
- Select the Brush Tool with these settings: Opacity at 100 percent, Flow at 100 percent and Color at 100 percent black.
- Make your brush slightly larger than the width of your plane trail. (You may have to adjust this up and down, depending on the trail.)
- Paint over the plane trails. But only over the plane trails.
- Repeat for every plane trail on every layer.
- Merge layers or flatten when done with all.
Resulting image after using black brush to remove plane trails. Click to enlarge.
100 percent zoom crop to an area where a plane trail was removed.
In this video, I used the process of identifying layers first and then color-coding them before blacking out the trails. Even then, I discovered more along the way.
Note:
This is a destructive process. No going back. Unless you duplicate each layer you paint on and turn off the duplicate, but that increases your PSD/PSB size.
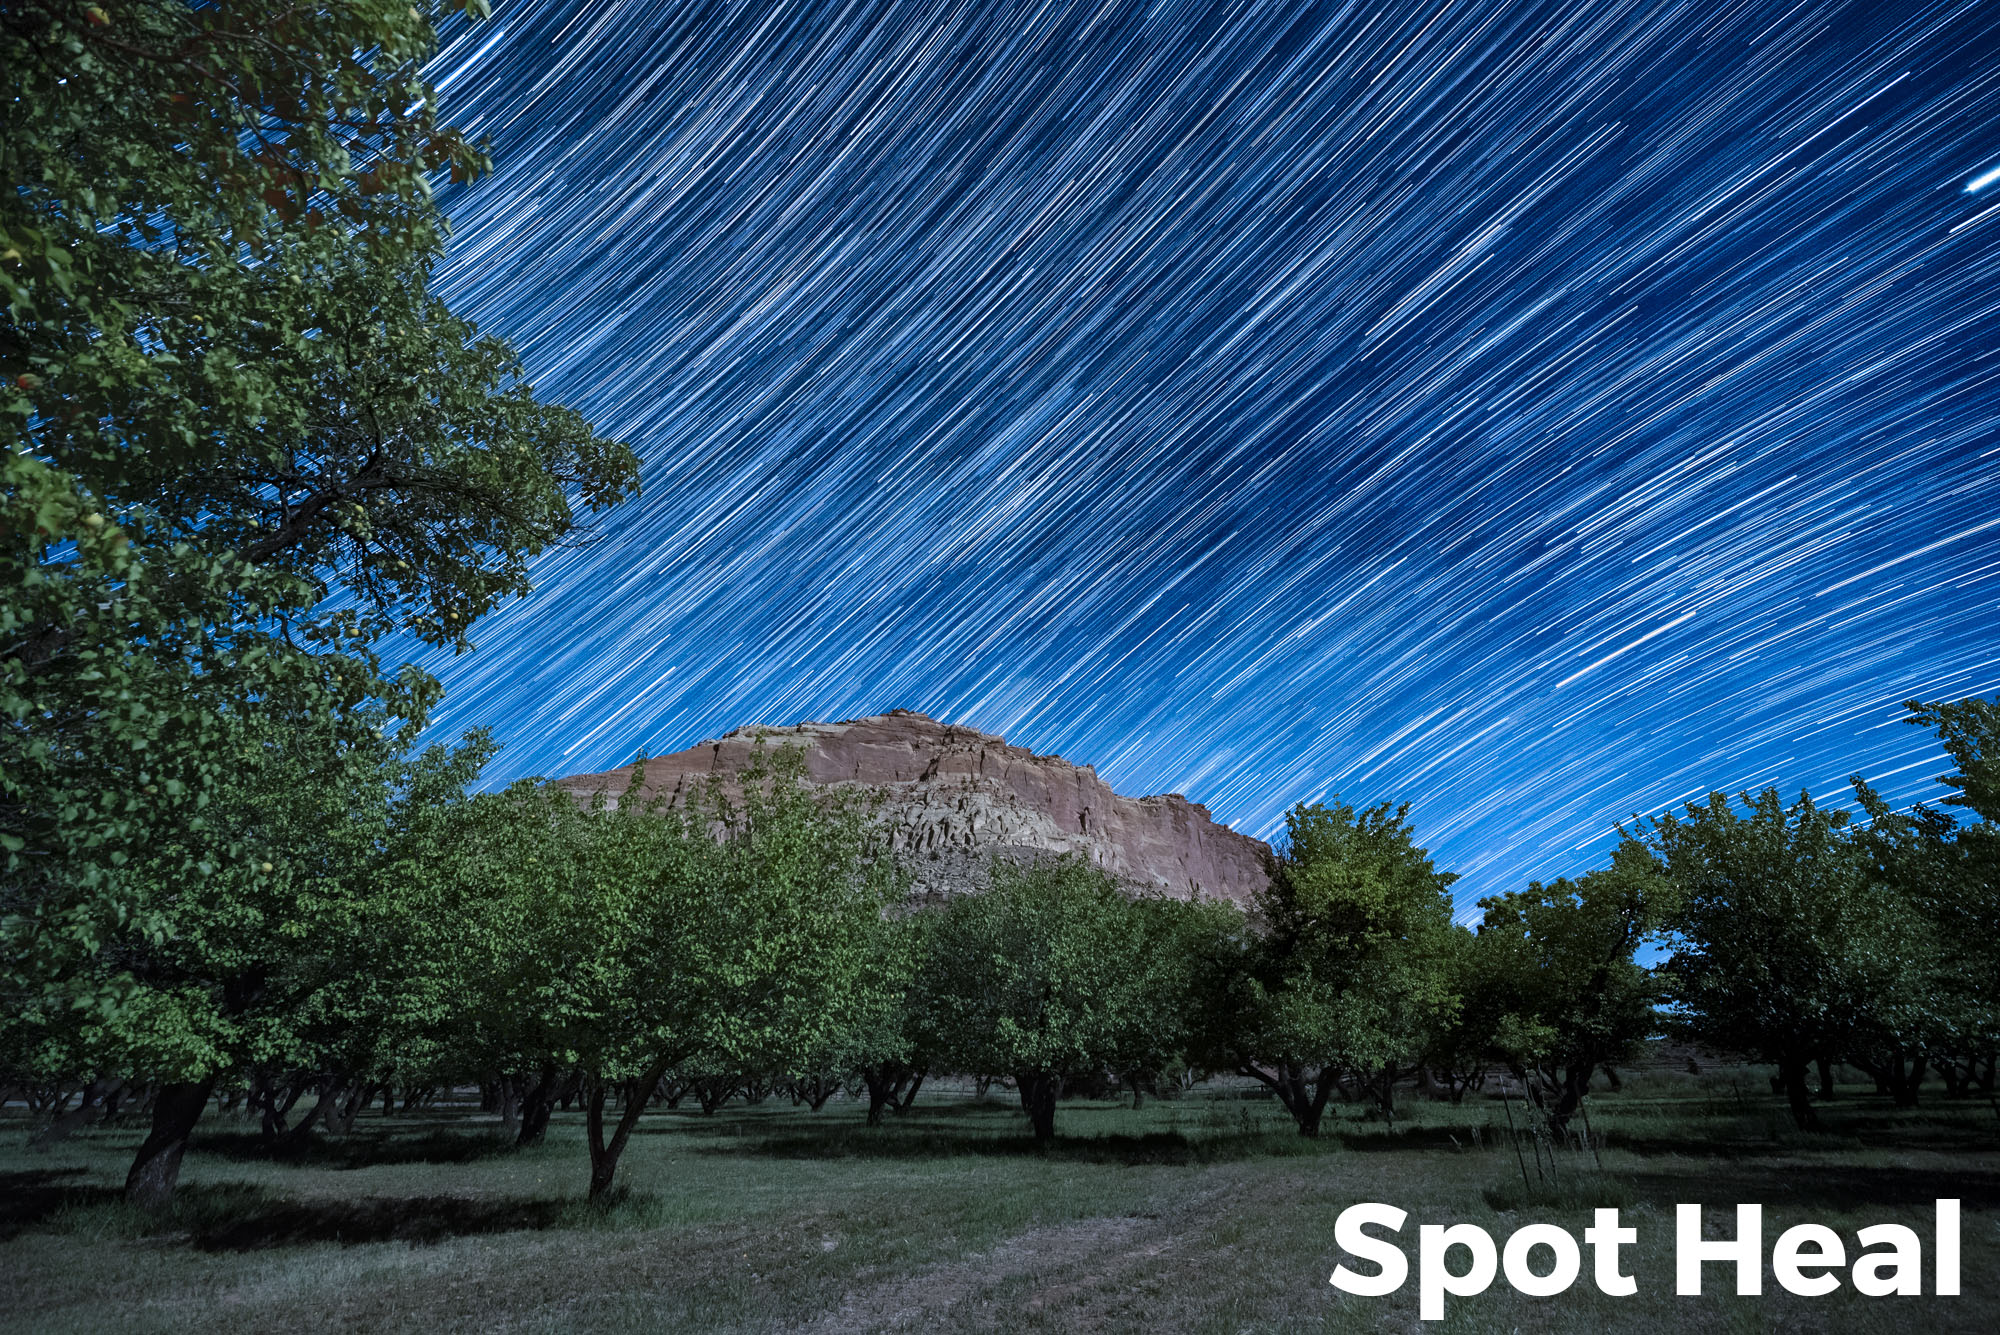
Using the Spot Healing Brush in Photoshop
I recently discovered this. While mucking about in Photoshop, editing my star stacks from Capitol Reef National Park earlier this year, I had a What If? moment. …
I asked myself, “What if I try using a different tool to remove star trails?” (I usually use layer masks, which we’ll get to in a little bit.)
- Select the Spot Healing Brush tool, and change the Type to Content-Aware.
- Make your brush slightly larger than the width of your plane trail.
- Click once at the beginning of the trail.
- Hold Shift on your keyboard.
- Click once again at the end of the plane trail.
- Repeat for every plane trail on every layer.
- Merge layers or flatten when done with all.
It works. I love this method, despite it being a destructive process.
Resulting image after using Spot Healing Brush to remove plane trails. Click to enlarge.
100 percent zoom crop to an area where a plane trail was removed.
In this video, I simply went from top to bottom to eliminate trails in each layer without color-coding them. I missed one plane trail, because I was kinda tired doing both back to back.
Note:
As mentioned, this is also a destructive process. No going back. Unless you duplicate each layer you paint on and turn off the duplicate, but that about doubles your PSD/PSB size.
Comparing the Methods
Let’s take a look at how the methods stack up against each other. (See what I did there?)
The edit in Lightroom of a completed, flattened stack? I immediately abandoned it. It was janky to complete, and undesirable:
And when your stars go the wrong way, it’s really hard to make it match:
So, all that’s left are the two competitors we’ve looked at so far. Below you can see the final images from each:
And here are some comparisons I made while viewing both simultaneously in Lightroom:
Above you can see that there isn’t really much difference between the two methods. At least in terms of image quality.
But … what did my time cost?
Painting Black
Pros: Easy to see if you covered a plane trail.
Using Spot Heal Brush
Pros: I just feel better seeing an image versus black lines all over. The trails are gone, and the layers still looks like a photograph.
Both methods have the same cons:
- destructive to pixels
- makes some gaps in the trails (thought remarkably few)
- no way to go back on edits unless you duplicate your PSD/PSB beforehand
To Identify or not to Identify
I spent eight minutes identifying layers with stuff to eliminate.
I spent 30 minutes using the black brush on those layers I identified.
I spent 27 minutes using the Spot Healing Brush, layer by layer, without color-coding or pre-identifying layers.
It’s up to you which method helps you get through the process better. I can operate without color-coding in the future. One-by-one is the way for me.
Conclusion: Which Method Wins?
Guess what? Both strategies are just as effective. Yay!
And here is the proof: When gaps appear, they do so in the same places using both methods.
The above were from testing my own hypothesis that Spot Healing would work better. Surprise! I’m delighted to discover that for this test, both techniques performed the same.
Both methods create gaps. But you can meticulously fill them in with Photoshop prior to flattening. Use the clone tool, if you have the extra hours. ;-)
The Fourth Way—Using Layer Masks in Photoshop
This is how I’d always done it before my recent discovery. This method is non-destructive—if you save your PSD/PSB, you can always roll back the edits or modify them. (The downside, of course, is that an unflattened, many-layered file could be downright huge. If you’re not planning to save an unflattened file, this doesn’t provide much benefit.)
- Add a mask to a layer with a plane trail.
- Select the Paint Brush tool with these settings: Opacity at 100 percent, Flow at 100 percent and Color at 100 percent black.
- Make your brush slightly larger than the width of your plane trail.
- Click once at the beginning of the trail.
- Hold Shift on your keyboard.
- Click once again at the end of the plane trail.
- Repeat for every plane trail on every layer.
- Make your final contrast, color and other finish adjustments.
Give it a shot. You may like this better, especially if you are already masking out other things in your scene.
Et al.
Here are some examples of other stacks I’ve done using these techniques:
So go forth and capture, my fellow lovers of the night sky. And fear not the airplanes arcing across the heavens, for you can make their presence just a memory.


