Technique

How to Plan, Shoot and Edit a Milky Way Arch Panorama (Part I)

Note: This is the first in a two-part series about creating a Milky Way panorama. Part I, below, covers planning and shooting. Come back next weekend for Part II, in which Tim Cooper goes over how to put it all together in post.


Weโ€™re a little more than half way through โ€œMilky Way Seasonโ€โ€”the time of year when itโ€™s easiest to see and photograph our galaxy. And thereโ€™s plenty of time left to shoot Milky Way panoramasโ€”the technique that results in the iconic image of the galaxy arching from horizon to horizon (which I like to call โ€œstarbowsโ€).

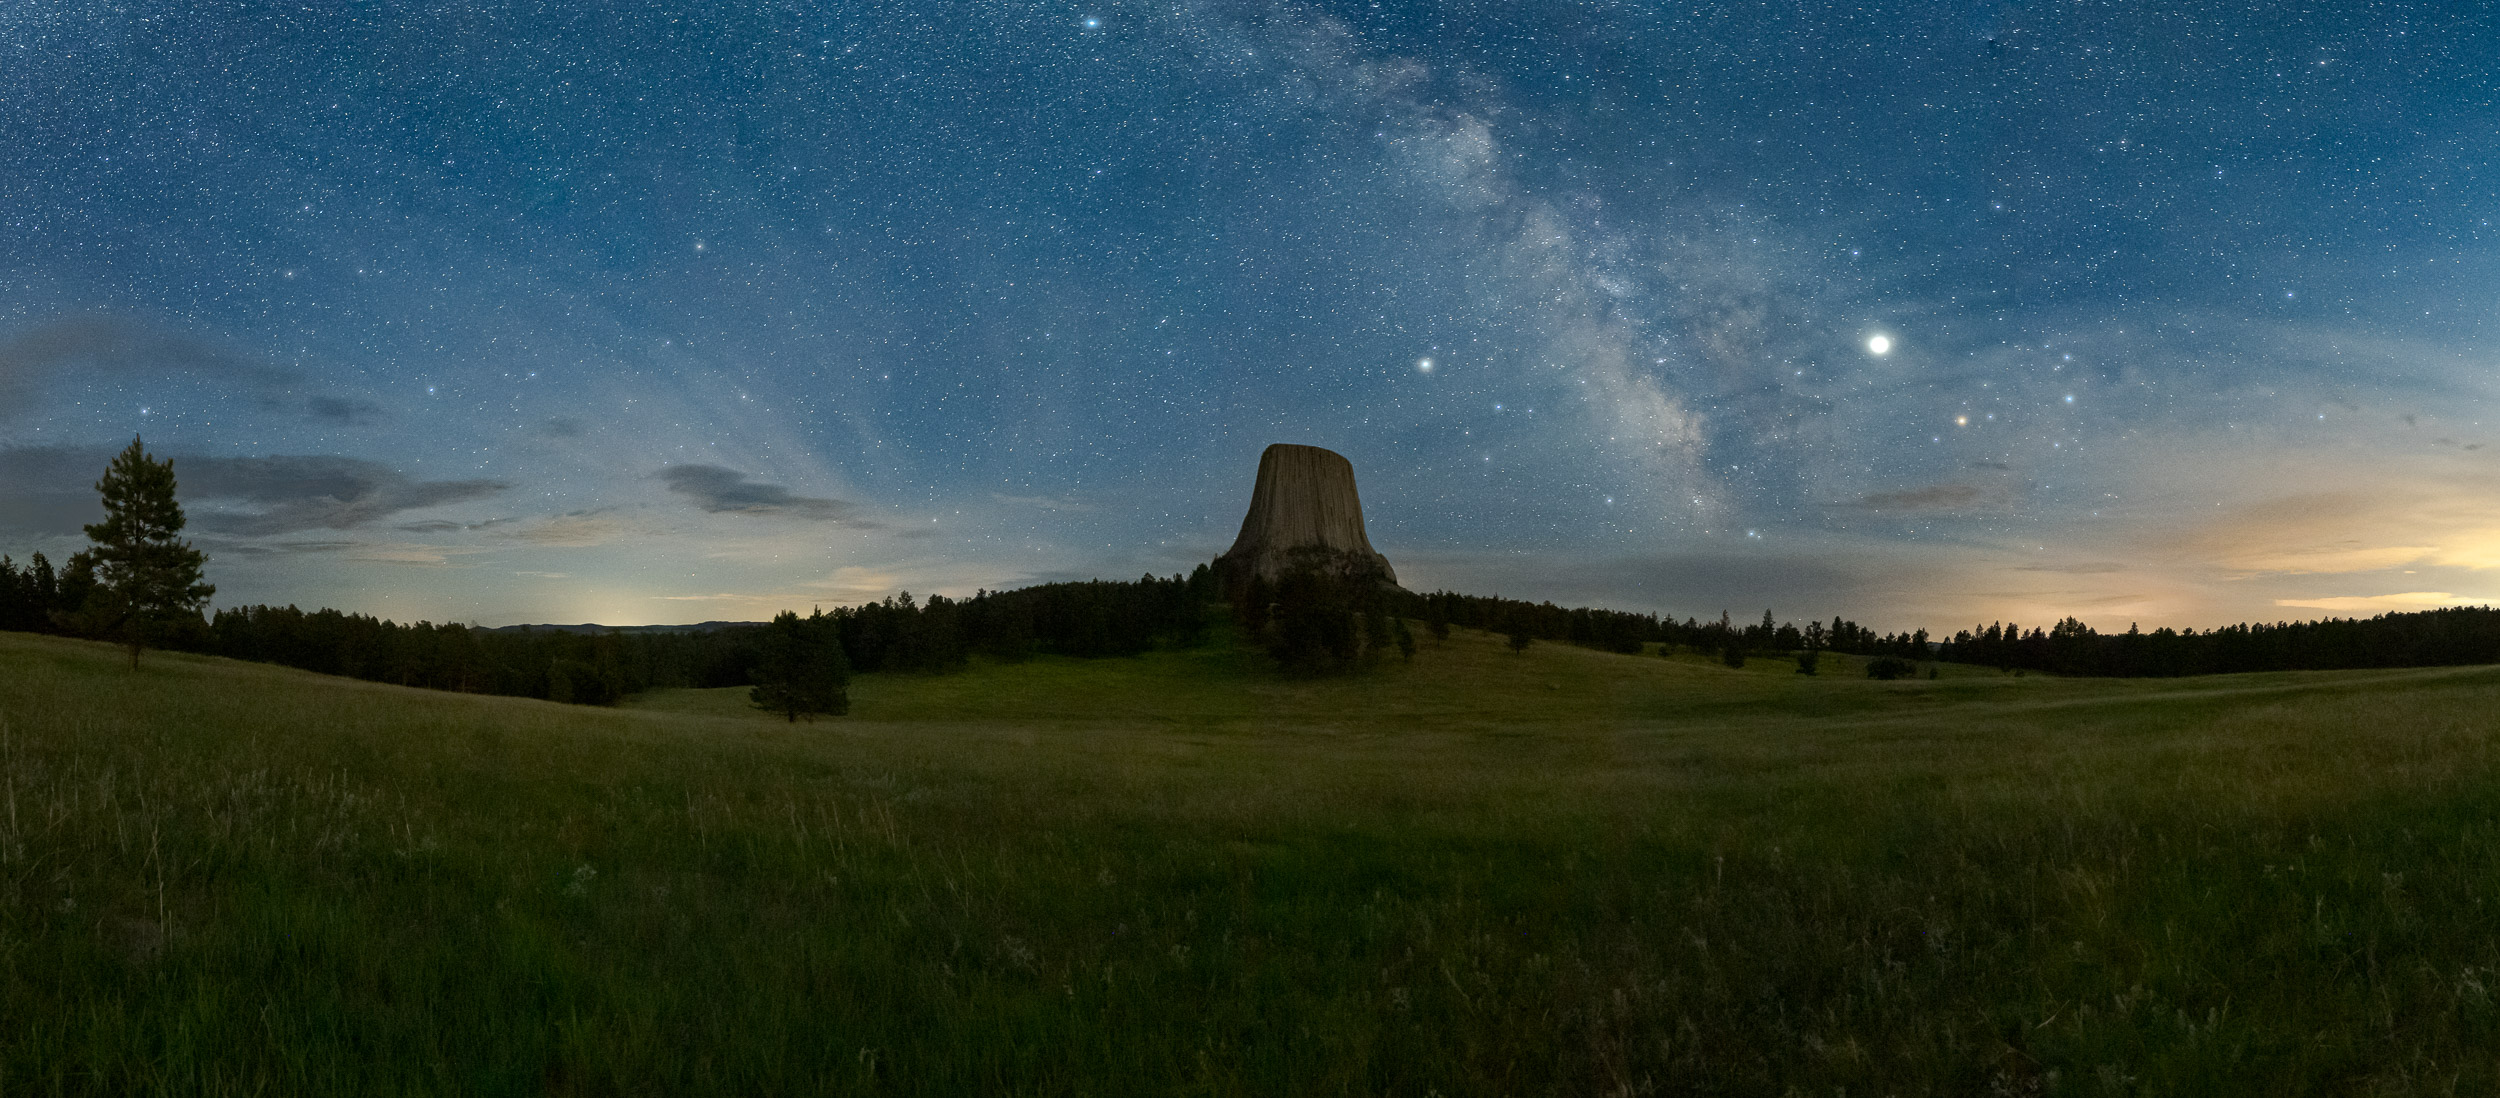
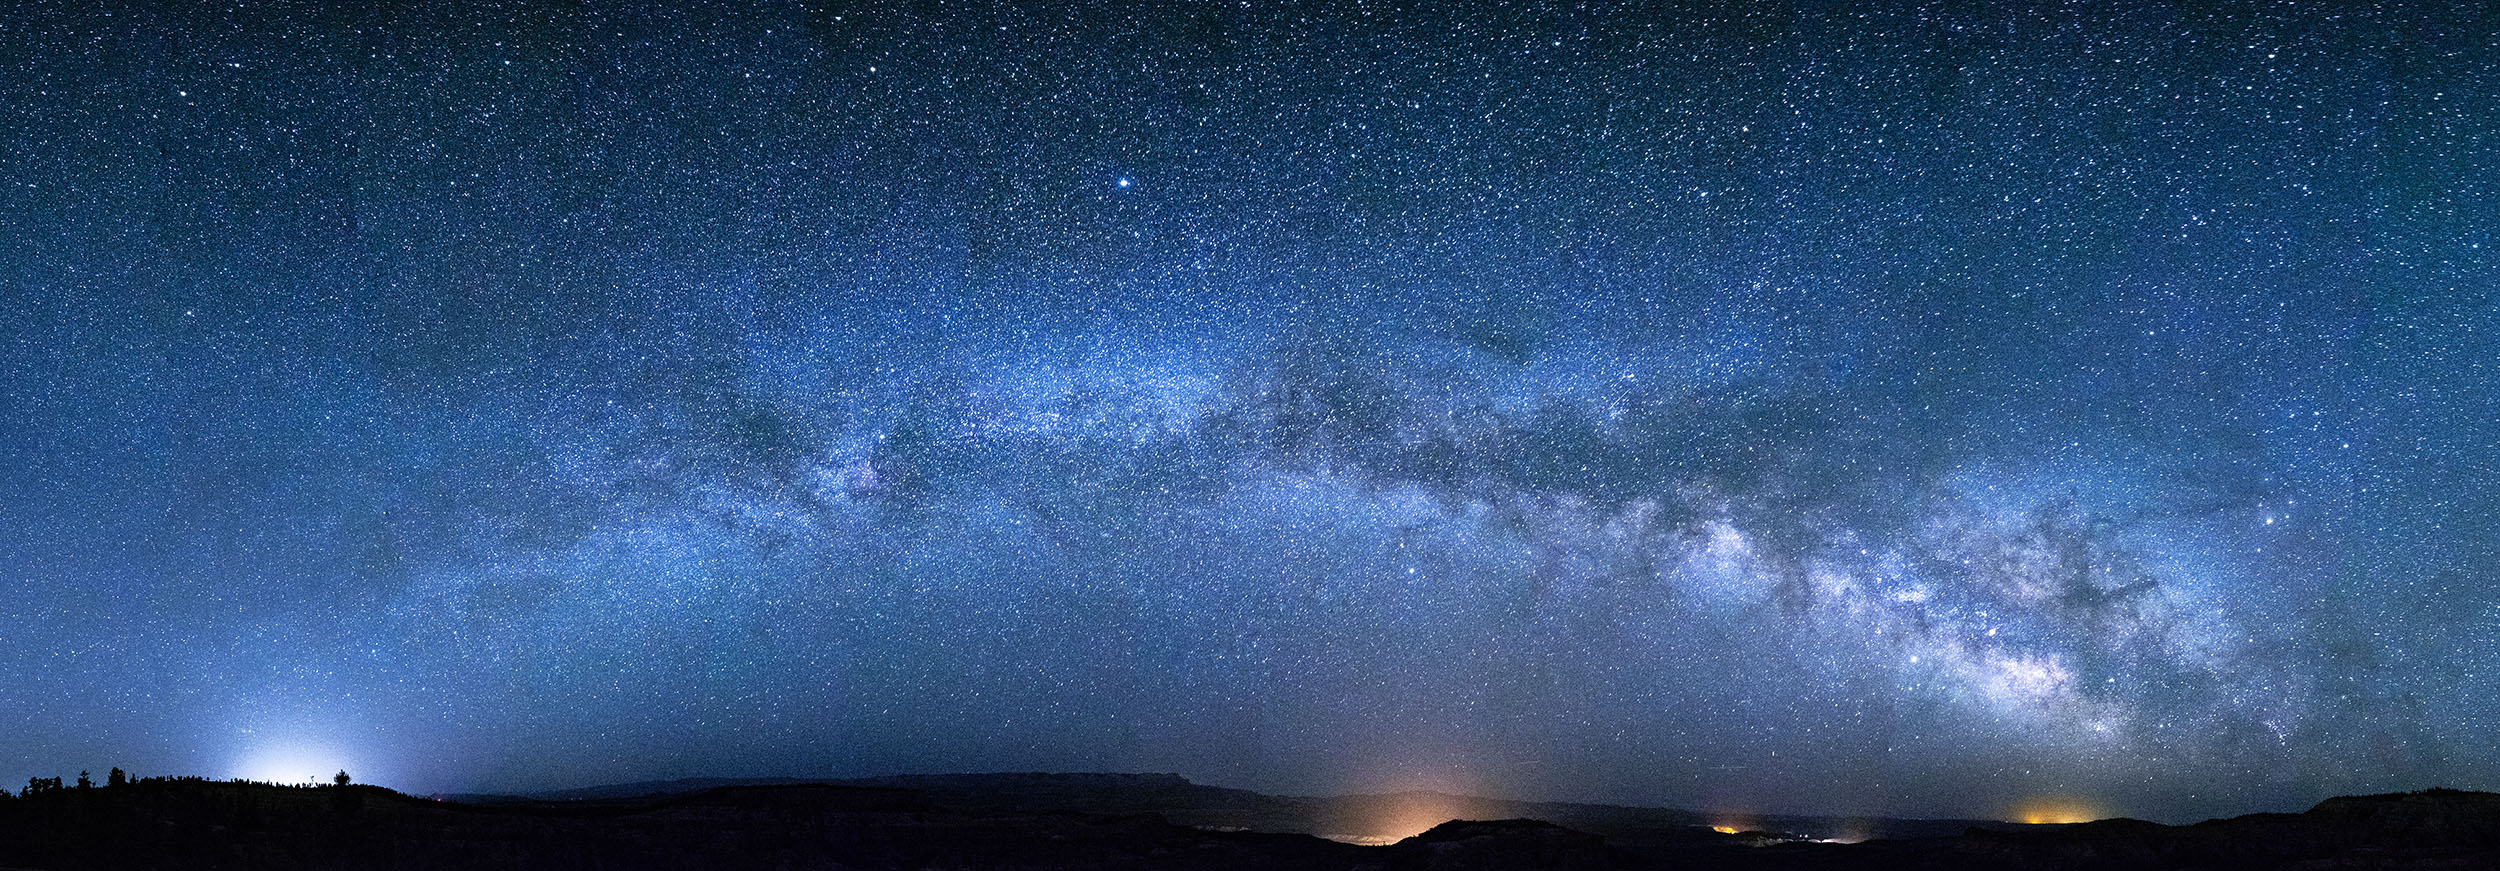
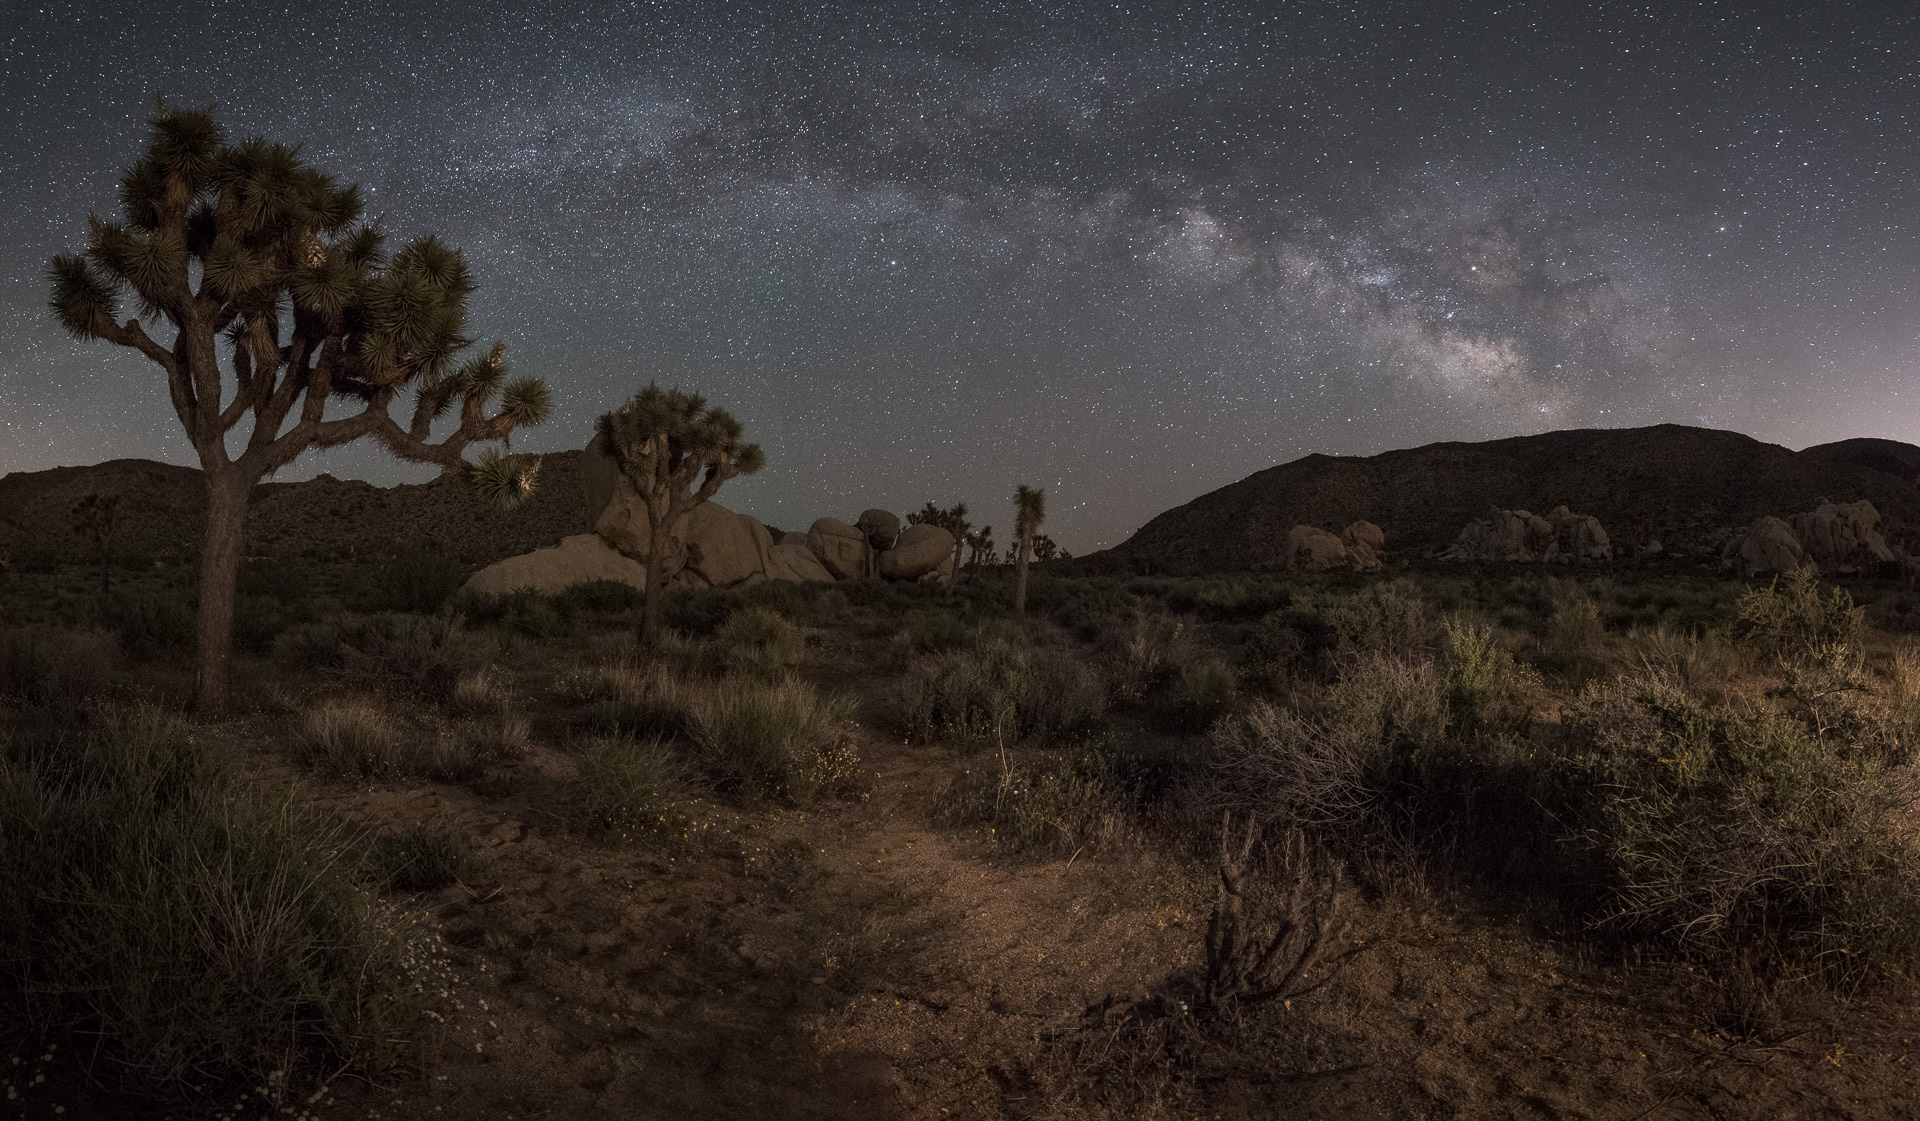
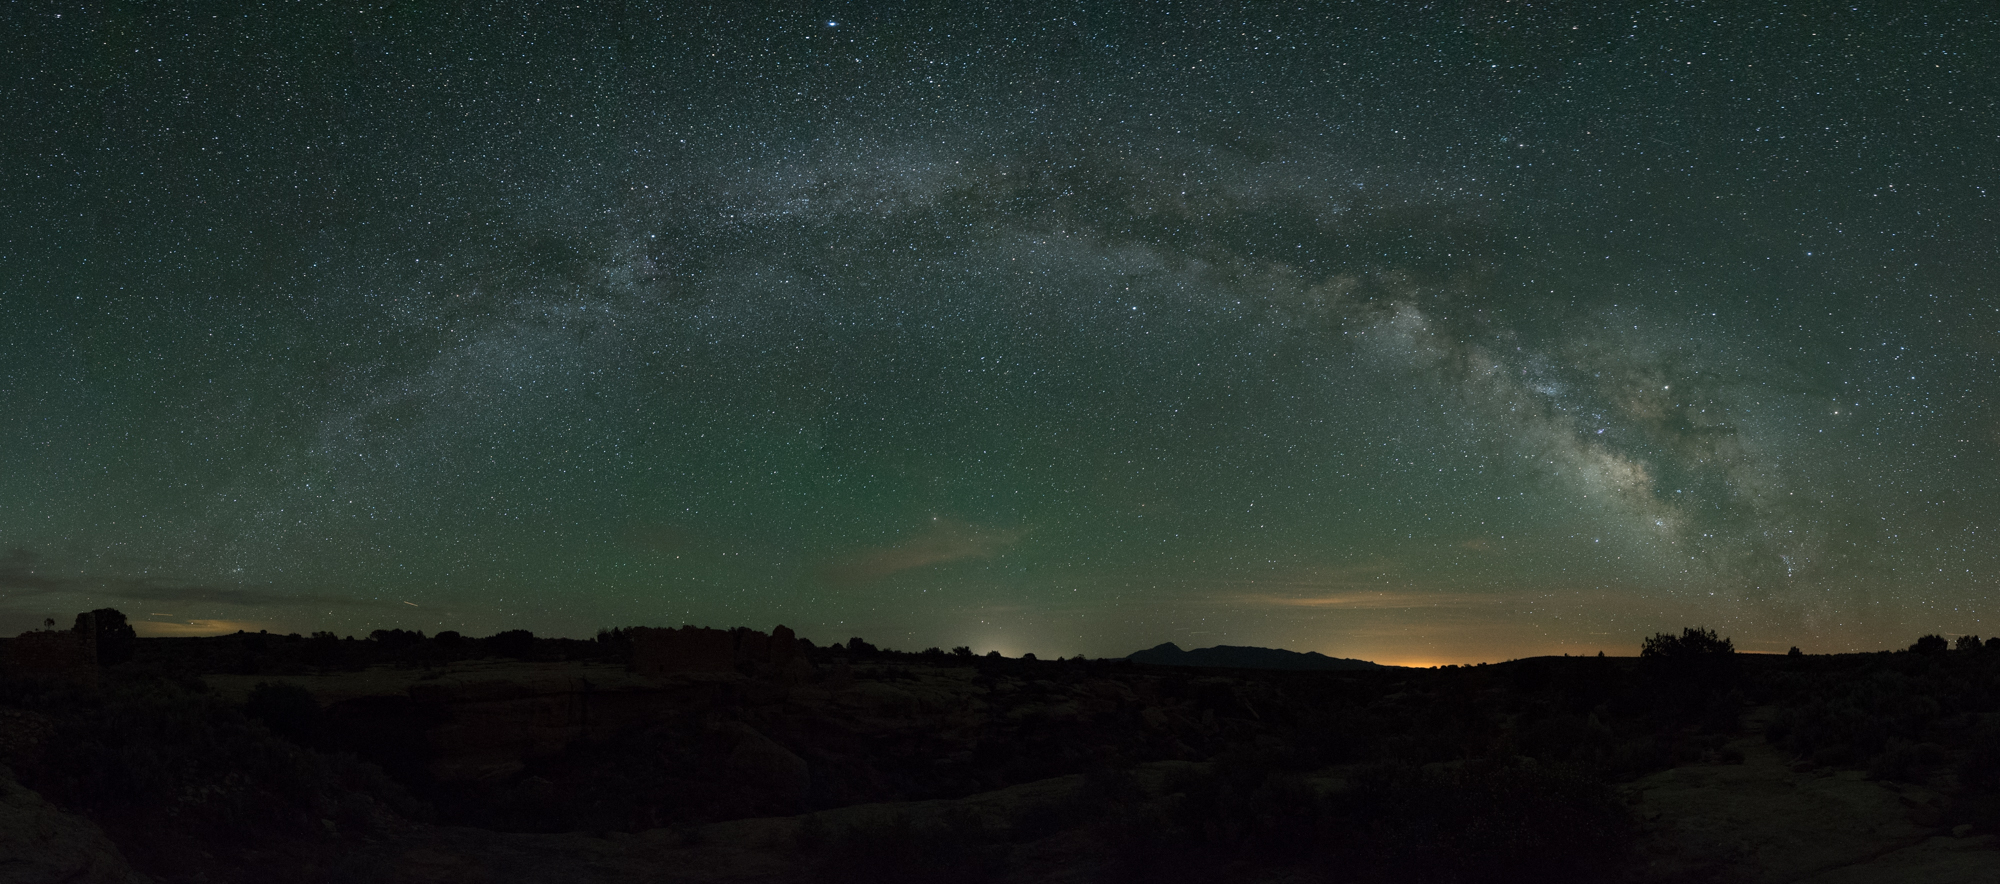
Here are a few examples from myself and my National Parks at Night partners:

This technique requires shooting multiple photographs, which means youโ€™re creating a composition that will require stitching during post-processing.

Letโ€™s walk through all the steps it takes to make a Milky Way panorama happenโ€”from planning to scouting to gear to shootingโ€”so that you can go forth and make your own!

When is the best time of year?

You can capture the Milky Way any time of year, but capturing the galactic coreโ€”the brightest and most notable portionโ€”happens only at certain times of the year. The galactic core is what most people want to see and shoot. Similarly, you can see the arch of the Milky Way any time of yearโ€”itโ€™s just without the core during certain months.

Furthermore, capturing an arch that spans from horizon to horizon, that includes the galactic core and that happens during nighttimeโ€”this all comes together during a limited window of the calendar. And this varies a bit depending on where you live.

Northern World

In the northern hemisphere, the galactic core can be photographed from the end of March to the beginning of October. Common wisdom is that โ€œprimeโ€ viewing dates are late April to late July, because thatโ€™s when the galactic center is visible for longer during the night. But every season has disadvantages to be aware of:

  • In early spring the core rises very lateโ€”or early, depending on how you look at itโ€”either way, well after midnight. Most people donโ€™t want to stay up that late or get up that early.

  • In midsummer the core is technically above the horizon longer, but there are fewer hours of darkness to shoot in. Late sunsets = less night.

  • As of August the core is too high above the horizon to create panoramas with the longer range of wide angle lenses (e.g., 35mm), so youโ€™ll be cornered into using the superwide familyโ€”think 15mm, 14mm, 11mm. (More on lens choice later.) You might even need to let the Milky Way arch out of the composition (see Chrisโ€™ Devils Tower pano above).

  • In September and early October the core is setting not terribly long after twilight endsโ€”so again, not a lot of time to shoot.

Southern World

In the southern hemisphere, the galactic core is visible from February to the beginning of October. Between April and August are the best months to photograph the Milky Way because of the much longer nights, but the prime of that time falls in the middle of winter (brrrr).

For the rest of this article, I will focus on the Northern Hemisphere, where I spend most of my time. But the techniques apply to our southern night photographer friends as well.

For ideal lack-of-light conditions, consider shooting during the few days before and after new moon.

When is the ideal moon phase?

To best capture the delicate features of the Milky Way in all its glory, you ideally want to shoot when the moon is not lighting the sky. That means the four nights prior to or after the new moon.

But this poses a problem: Without moonlight, how do you illuminate the foreground?

Being an astro-landscape photographer, I want the people viewing my images to see context. So the landscape needs light. You can make a Milky Way pano image while the moon is present. But keep in mind, you will lose the dimmest of the stars to moonlight in the atmosphere. So I like to choose a time when the moon is 60 to 90 degrees away from the coreโ€”i.e., a crescent. And the dimmer, the betterโ€”around 20 percent is ideal, give or take.

If you shoot in complete darkness, to reveal the foreground, consider Low-level Landscape Lighting, traditional light painting, or making a second run of panoramic images at a longer exposure length and perhaps a lower ISO for more quality. (For more on that last option, see Gabeโ€™s write-up about his Hovenweep photo.) Or โ€ฆ embrace the dark. Use silhouettes with intent. Darkness is OK if harnessed with skill.

Scouting

First, check your weather. I prefer the Weather Underground app, but use whatever works for you.

Weather Undergroundโ€™s prediction for Bryce Canyon National Park. Looks great for night photography!

Choose someplace dark. Why? The Milky Way has a lot of subtle, faint parts, so give yourself the best chance for success by choosing a location away from light pollution. When shooting in Bryce Canyon with Tim Cooper this past Juneโ€”specifically, in Fairyland Canyon, where we intended to make a panoโ€”we knew we could expect great dark skies, because we had e-scouted the location with Light Pollution Map:

Light Pollution Map rendering of the Bryce Canon region.

I also love using the PhotoPills๏ปฟ app to drop a pin and then scrub though which night is best. I look for when twilight is just ending, and the arc of the arch.

PhotoPills Planner view of the Fairyland Canyon pano.

Gear

In addition to a capable camera for night photography and an intervalometer, I recommend the following:

โ— good tripod (like my trusty Gitzo Traveler Series 2)

โ— panoramic leveling base (like my Acratech)

โ— good ball head (like my Acratech GP-ss)

โ— nodal rail (like my Acratech Nodal Rail)

โ— L bracket (like my Acratech Universal L Bracket)

โ— a lens focal length somewhere between 14mm and 50mmโ€”preferably 20mm to 35mm, and preferably a prime lens

Starting from the ground up:

  1. Get your tripod legs spread wide. Get it tightened up and as stable as possible.

  2. Mount the leveling base on the tripod legs. Level it. (If you donโ€™t have a leveling base, then level the tripod itself using a built-in or external bubble level, adjusting each leg accordingly.)

  3. Mount your ball head on top of the leveling base. Level that.

  4. Mount your nodal rail to your ball head.

  5. Secure your L bracket on your camera and mount the camera on the tripod in vertical position. (Vertical frames will give you more information to work with than horizontal frames will. Always shoot pano frames vertical.)

  6. Mount your lens. Historically I used my Sigma 35mm f/1.4 Art lens for pano stitches. I find its flat field makes stitching easier with less overlap. But lately Iโ€™ve fallen in love with the Viltrox 20mm f/1.8, because it comes in a Nikon Z-mount and is crazy-easy to focus manually.

  7. Attach your intervalometer.

Why the nodal rail?

If you have elements in your foreground that have to be stitched, using a nodal rail properly will eliminate parallax. That will make your pano stitching software very happy.

Essentially, to set up a nodal rail, you place something tall and skinny close to your camera, such as a street sign, lamp post or tree, or even another photographerโ€™s tripod with the center column raised. Then rotate your pano base left and right, observing the item. Slide the nodal rail forward and backward until the test object doesnโ€™t move left or right when you swing your camera. Thatโ€™s the point at which youโ€™ve eliminated parallax.

Camera Settings

OK, letโ€™s lock down a few variables and settings to get the pano shot right.

Focus

If possible, focus during daytime and tape it down with gaffer tape. (Or, use other ways to get proper focus.)

Exposure

Now we are getting serious! You have to chooseโ€”are you shooting to:

โ—       share on a small to medium screen, or

โ—       print and/or sell

If the former, use the 400 Rule to determine your longest viable shutter speed; if the latter, use the NPF Rule. I want sharp stars, so I use the NPF Rule on Default. But Iโ€™m not making wall murals, so I donโ€™t choose the Accurate setting.

Here are my settings for the Bryce Canyon pano:

  • ISO: 6400

  • Aperture: f/2.8

  • Shutter speed (with intervalometer): To test different focal lengths, I used the NPF Rule with three lensesโ€”the Zeiss 15mm Distagon f/2.8 (18 seconds), Viltrox 20mm f/1.8 (14 seconds) and Sigma 35mm f/1.4 Art (8 seconds). (More on the results when we get to the post-processing in Part II.)

Framing

Face east. This is the center of your panoramic image. Look left, then right. Your pano stitch will begin to the north and end facing south. And this will move more to the right as the galactic core rises and the Milky Way rotates clockwise. (Reminder: Iโ€™m speaking specifically about the Northern Hemisphere.)

Then you shoot, one frame at a time, moving left to right, overlapping at least one-third. (That is, including one-third of what was in the last frame in the current frameโ€”overlapping visual information, so the software has context when it starts stitching.) Repeat as many times as you need to cover the range of your composition.

Notice I say at least one-third. I always overshoot panoramas. Meaning, I overlap each frame way more than I geometrically need toโ€”approximately 50 percent, to be approximately precise. Why? I want to give the post-processing program as much information as possible to stitch a great pano; those extra pixels are a good hedge on your photo bets. If you donโ€™t give your stitching program enough to work with, you failโ€”and going back is kinda hard, right?

When rotating the camera between frames, I do not use the markings on the base of my ball head. With my eye, I look at something in my frame that is in the middle, then loosen the pano base and rotate the camera until that object almost hits the left edge of the frame.

PhotoPills angle of view data for my 20mm mounted on my Z 6.

Yes, you can instead use the degree markings on your ball head to do this more precisely. I choose not to, and I see no ill effect on the final image due to opting for this preference. But if you want to use math to capture accurately spaced pano slices in the fewest number of frames, then look up the angle of view for your lens (you can do this in PhotoPillsโ€”and remember to look up the angle for portrait mode), then divide it by 2 or 1.5. The result is the number of degrees you rotate the panning base on your ball head between each frame.

For example, see the included screen shot. PhotoPills reveals that the angle of view for my 20mm mounted on my Z 6 is 61.72 degrees. To make the math easy, letโ€™s call it 60 degrees. (Even when being precise, we really only need to be approximately precise.) Divide 60 degrees by 2, and that tells me to rotate my camera 30 degrees between frames. On a ball head with markings at the base, itโ€™s more than easy to see when youโ€™ve moved the camera 30 degrees.

Shooting

Now โ€ฆ go for it! You are ready. Make those exposures.

All my frames for the Bryce Canyon pano, from each of the three lenses.

Points to Review

Your keys to success:

  • Lock and unlock your pano head for every exposure. Itโ€™s a pain, but one little slip in your sequence and you cannot stitch it! Itโ€™s soul-crushing. Believe me.

  • Use the start-stop on your intervalometer (as opposed to pressing the bodyโ€™s shutter release) to eliminate camera shake.

  • Make the pano exposures back to back, one immediately after the other. Donโ€™t dally. Stars move a lot in 8, 10, 20 seconds. Too much time between your frames will make bad panos or awkward duplications of stars in the overlapped areas. Astronomers and pixel-peepers will notice.

Post-Production

Those are the nuts. Now for the bolts. (And by โ€œnowโ€ we mean โ€œnext week.โ€)

Iโ€™m going to hand off this topic to Tim, who in our next post will cover how to process these frames into a glorious stitched panoramic image. Stay tuned!

Matt Hill is a partner and workshop leader with National Parks at Night. See more about his photography, art, workshops and writing at MattHillArt.com. Follow Matt on Twitter Instagram Facebook.

UPCOMING WORKSHOPS FROM NATIONAL PARKS AT NIGHT

Nights, Camera, Action! 5 Videos from Gabe and B&H to Help You Photograph the Dark

We all thought it was really cool that a recent episode of Game of Thrones was shot for 50 straight nights. While not as epic as that, I recently spent the last six months creating a โ€œNight Photography Seriesโ€ of videos with the amazing crew at B&H Photo.

The videos were shot in the cold and snow of Maine, the urban ruins of Sloss Furnaces National Historic Landmark in Alabama, as well as throughout New York City. We thought weโ€™d organize them all in one place so you can easily learn with us. They cover a lot of topics, from camera settings to gear to light painting and more.

While the series was created for people new to the night, we think everyone can find a few helpful reminders and tips in each installment. The videos are fairly short, from 6 minutes to 20 minutes. Good lengths to get inspired to #SeizeTheNight!

(Special shouts out to Kelly Mena for proposing this project, and to Robert Sansivero who did a fantastic job filming and editing.)

Best Camera Settings for Night Photography

In this very snowy video, I discuss the night logic behind making certain choices about ISO, shutter speed, aperture and white balance. It all leads down the path to mastering manual mode so you can take control of your night visions.

How to Photograph Star Trails

When most of us think about night photography, we think about the stars. In this video I give tips on making those jaw-dropping star trail shots, both in-camera and by stacking them together in post.

How to Light Paint

Once youโ€™ve focused on the stars, we step it up and gain a better understanding of adding light to a night composition. I look at the gear you need to capture, the light painting tools to create, and how to balance the ambient light with the additional light you bring into the scene. Get inspired and more comfortable with your light painting!

Create AMAZING Photos with Light Writing

I turn out the lights, don my favorite black fedora, and take a look at a bunch of fun tools that make writing with light fun and easy. I share my top tips, I do a live demo, and I break down some of my favorite images to show how you can bring a very unique vision to the night.

Best Cameras for Night Photography

In the last video, I compare the current batch of full-frame mirrorless cameras, looking specifically at which features best suit the night photographer. There is also an extended, 1-hour version wherein I compare similar images shot with different cameras in the same conditions, allowing us to really gain a better understanding of what these bodies are capable of producing.

And โ€ฆ Cut!

Let us know if you find these videos helpful and what subjects youโ€™d like us learn more about next. You can type out your thoughts in the Comments section below or on our Facebook page.

Finally, fun fact: I wear a different hat in each video!

Gabriel Biderman is a partner and workshop leader with National Parks at Night. He is a Brooklyn-based fine art and travel photographer, and author of Night Photography: From Snapshots to Great Shots (Peachpit, 2014). During the daytime hours you'll often find Gabe at one of many photo events around the world working for B&H Photoโ€™s road marketing team. See his portfolio and workshop lineup at www.ruinism.com.

UPCOMING WORKSHOPS FROM NATIONAL PARKS AT NIGHT

NPF: The New Rule for Shooting the Sharpest Stars in the Sky

Kareem (@wildnkrazykid) searching for the sharpest stars in the sky. Nikon Z 6 with Irix 15mm f/2.4 lens. 20 seconds, f/2.4, ISO 16,000.

In this golden age of night photography that we live in, the quest for the sharpest stars seems to be the most elusive. But itโ€™s certainly an achievable goal, and weโ€™re here to help you reach it โ€” to reach for the stars, you might say.

Sharp stars can mean two things: Focus and proper exposure. We discussed the multiple ways you can master focus in Chris Nicholsonโ€™s article โ€œStaying Sharp.โ€ Today we are going to take a deep dive into working out the best exposure for your camera and lens combination to create tack-sharp stars that donโ€™t trail.

The 600/500/400/250/200 Rules

When I first started shooting digital night photography a decade ago, we used a simple rule to figure out the best shutter speed for star point photography. That was the 600 Rule. Divide 600 by the focal length of your lens, and the result was your maximum shutter speed for achieving pinpoint stars. For example:

600 / 20mm lens = 30 seconds.

This seemed to work fine, but for those of us who were making prints bigger than 8.5x11 inches, we were noticing that those stars werenโ€™t as round as they should be. In reality, they were tiny lines.

So we adapted the rule to 500:

500 / 20mm = 25 seconds

The 500 Rule became the standard for many night photographers and worked fairly well with larger prints and cameras under 20 megapixels. However, as cameras increased the millions of pixels they put into their sensors and with the variety of different size sensors, we needed to adapt again. Over the last 4 to 5 years we have been using the 400 Rule for full-frame cameras under 30 megapixels, the 250 Rule for APS-C sensors and the 200 Rule for Micro Four Thirds. (For an explanation of why this all works, see Lanceโ€™s two-part blog post โ€œWhatโ€™s the Longest Usable Shutter Speed for Astro-landscape?โ€)

400 / 20mm = 20 seconds

250 / 20mm  = 12.5 seconds

200 / 20mm = 10 seconds

These results were more accurate than the previous 500/600 rules and were customized to our sensor sizes. However, if you were to zoom in to 100 percent, or get close to a large print, you would definitely still see slight movement in those luminous points in the sky.

Add to the equation that higher-megapixel cameras (40-plus megapixels) were actually doing a decent job at higher ISOs, which meant our images were showing more detail than ever before. More detail means that trailing stars become more noticeable.

Not to mention that those โ€œrulesโ€ are just guidelines to get you in the right ballpark for shutter speed. Other factors affect how quickly stars begin to trail, including declination (i.e., your place on the globe) and which compass horizon youโ€™re facing. The point is (see what I did there? point?), if you want to be precise about getting sharp star points, thereโ€™s a lot that goes into figuring that out.

A Modern Solution for a Modern Problem

A couple of years ago, Frรฉdรฉric Michaudโ€”a French photographer and amateur astronomerโ€”devised the ultimate formula for the Astronomical Society of Le Havre. That formula is called the NPF Rule. Donโ€™t bother trying to decipher the acronym; the letters arenโ€™t initials, theyโ€™re variables:

N = aperture
P = pixel pitch
F = focal length

Iโ€™ll be honestโ€”the formula is a bit complex. Besides the focal length of your lens, it also takes into account the cameraโ€™s megapixels, physical size of the sensor, aperture, pixel pitch and the minimal declination of the stars in your frame.

This is a lot to figure out in the field, and the cheat sheets arenโ€™t small. To take a look at Frรฉdรฉricโ€™s formula, visit the Astronomical Societyโ€™s website (or Googleโ€™s English translation).

Fortunately for night photographers, thereโ€™s a simple way to apply this complex concept: I am happy to report that our friends at PhotoPills have incorporated the NPF Rule into their app, under the Spot Stars section.

Below is what the PhotoPills calculator looks like, followed by the five easy steps to figure out the best shutter speed for sharp stars.

When you open PhotoPills, the Spot Stars module is located near the bottom, so scroll down and tap.

Input your information and PhotoPills will do the NPF Rule calculations for you,

Hereโ€™s how to use it:

  1. Select your camera in the upper right corner. PhotoPills uses this to determine some of the necessary numbers to plug into the NPF Rule algorithm, such as using the sensor size and megapixels to figure out the pixel pitch.

  2. Choose the focal length of the lens (the one written on the lens, not the full-frame equivalent).

  3. Input the aperture youโ€™d like to use. We typically choose an aperture one-third to 1 stop less than wide open. For example, for a f/1.4 lens weโ€™d shoot at f/1.8 or f/2.

  4. For declination, tap the AR (Augmented Reality) button on the lower left corner and angle/aim the AR to the area in the sky youโ€™d like to compose around. Note that at the bottom of your screen PhotoPills will now show your maximum exposure in landscape and portrait modes, as well as your minimum declination.

  5. The final setting to look at is Accuracy (upper right). It should say โ€œDefault.โ€ If you keep it at Default, youโ€™ll get a longer shutter speed and be able to use realistic ISOs such as 3200 and 6400. However, if youโ€™re a pixel-peeper and look at the stars at 100 percent, that will result in you still seeing slight movement. You can switch from Default to Accurate and then there will be no trails at all. However, youโ€™ll also be cutting your maximum shutter speed in half. I wouldnโ€™t recommend this unless you are making 17x22 or larger printsโ€”but even then, that results in the negative trade-offs that come with shooting at sky-high ISOs, which are also more prevalent in larger prints. Decisions, decisions.

Old vs. New

Letโ€™s take a look at the old and new math.

Using our beloved Irix 15mm lens on a standard-resolution, full-frame camera, the 400 Rule gives us a 25-second exposure (400 / 15mm = 26.6 seconds).

Using the NPF Rule in PhotoPills, at a declination of 0 and set in Default mode, with the Irix lens at f/2.8 on our new favorite camera, the 24.5-megapixel Nikon Z 6, we get a maximum shutter speed of 17.26 seconds. Iโ€™d probably round that out to 15 seconds. (You want to round down, not up, to ensure sharpness.)

However, if we then shifted to Accurate mode, our maximum shutter speed would be 8.63 seconds. Iโ€™d round that to 8.

So, using the NPF Rule in Accurate, Iโ€™ve lost pretty much 2 stops of light from ye olde 400 Rule and 1 stop of light off the NPF Default mode. On a moonless night we would typically use ISO 6400 under the 400 Rule. Now, with the NPF Rule, weโ€™d have to shoot at ISO 12,800 or 25,600 in order to get perfectly sharp stars. The Nikon Z 6 can handle those ISOs, but not many others can.

Real-World Testing

Theory is nice. But shooting for real is where we really learn some things.

I was out on the sand dunes of Death Valley a few weeks ago, and I brought my new Z 6. Curious about how the bigger sensors and higher-megapixel cameras would perform, I also borrowed the medium format 51.4-megapixel Fujifilm GFX 50R as well as my friend Kareemโ€™s 42-megapixel Sony a7R III.

Fujifilm GFX 50r with 23mm f/4 lens

400 Rule: 400 / 18mm = 22.22 seconds

The 23mm lens is equivalent to an 18mm on a full-frame sensor, so for the 400 Rule this equaled a 22.22 maximum shutter speed. I rounded down to 20 seconds at f/5.6, ISO 6400. The resulting stars are slight dashesโ€”elongated oblongs. They are sharp and skinny, which makes me feel I could live with this. However, if you are shooting with a 50-megapixel camera, then youโ€™re probably making big prints, so maximum sharpness is important.

Full image from Fujifilm GFX 50r with 23mm f/4 lens. 20 seconds, f/5.6, ISO 6400.

100 percent view from Fujifilm GFX 50r. 20 seconds, f/5.6, ISO 6400.

NPF Default = 10.71 seconds

I used 10 seconds, but I was afraid to go any higher than ISO 6400 on the GFX 50rโ€”so I just underexposed. (Not trying for art here, just testing efficacy.) To be honest, Iโ€™m seeing only the slightest of movement in the stars, not even oblong, mostly round but some of the brighter ones slightly oval. Iโ€™d be happy with these stars, event in a big print.

Full image from Fujifilm GFX 50r. 10 seconds, f/5.6, ISO 6400.

100 percent view from Fujifilm GFX 50r. 10 seconds, f/5.6, ISO 6400.

NPF Accurate = 5.35 seconds

With NPF Accurate, weโ€™re squeezed even further. Again we are still dealing with an underexposed image, but the stars are certainly tack-sharp.

Full image from Fujifilm GFX 50r. 5 seconds, f/5.6, ISO 6400.

100 percent view from Fujifilm GFX 50r. 5 seconds, f/5.6, ISO 6400.

Takeaways: The GFX has the most megapixels of the sub-$5,000 cameras on the market, clocking in at 51.4. The dynamic range and detail are amazing, but the higher ISOs are a struggle. ISO 3200 is workable but 6400 needs some finessing. Match that with their widest lens, for which the fastest aperture is f/4, and itโ€™s a challenge to do any dark sky work with this combo.

Nikon Z 6 with Irix 15mm f/2.4 lens

400 Rule: 400 / 15mm = 26.66 seconds

Here was my first shot using the 400 Rule, which gave me a 25-second maximum shutter speed. This forced me to use a wide-open aperture of f/2.4 and an ISO of 12,800. It looks good in standard view in Lightroom, and if posted to social media there would be no issues. However, the 100 percent crop definitely show the stars as small lines.

Full image from Nikon Z 6 with Irix 15mm f/2.4 lens. 25 seconds, f/2.4, ISO 12,800.

100 percent view from Z 6. 25 seconds, f/2.4, ISO 12,800.

NPF Default = 17.26 seconds

The stars are definitely rounder, a little oblong, but I would find this result totally acceptable.

Full image from Z 6. 15 seconds, f/2.4, ISO 12,800.

100 percent view from Z 6. 15 seconds, f/2.4, ISO 12,800.

All that disturbs me is the coma distortion that is affecting the brighter stars. Most lenses display some coma at their widest aperture, mainly near the edges of the frame and in brighter stars. With the Irix, this can be minimized by stopping down to f/2.8 or f/3.5.

Note the distortion in the brighter starsโ€”they look like UFOs with a bright line intersecting them. This is called โ€œcomaโ€™ and is found in many lenses. You can correct for coma by closing down your lens 1 to 3 stops.

NPF Accurate = 8.63 seconds

The NPF Accurate exposure was for 8 seconds, so I had to push my ISO up to 32,000 to get a good histogram. The stars are definitely rounder and less oblong, but it is a challenge to live in those higher ISOs. The coma is also still prevalent.

Full image from Z 6. 8 seconds, f/2.4, ISO 32,000.

100 percent view from Z 6. 8 seconds, f/2.4, ISO 32,000.

Takeaways: Iโ€™m starting to feel that I can live with the Default NPF setting in PhotoPills, which is still pushing cameras into the ISOs of 12,800 and higher. The Z 6 handles those higher ISOs very well, but I barely got the right exposure in the sky and the foreground is suffering. Blending a longer foreground exposure would be key to balancing the overall image (such as Tim did for his Bryce Canyon photo in last weekโ€™s post).

Sony a7R III with 16-35mm f/2.8 lens

400 Rule: 400 / 19mm = 21.05 seconds

I stopped down the lens to f/4 and the shutter speed to 20 seconds for our 400 Rule shot. The Sony a7R III does an excellent job at ISO 6400 and the Big Dipper looks very sharp. Looking west (left) I do notice the stars are becoming oblong.

Full image from Sony a7R III with 16-35mm f/2.8 lens. 20 seconds, f/4, ISO 6400.

100 percent view from a7R III. 20 seconds, f/4, ISO 6400.

NPF Default = 11.75 seconds

Rounding down the NPF Default to 10 seconds yields excellent results. Only a few bright stars to the far left look oval, and this is being nitpicky.

Full image from a7R III. 10 seconds, f/4, ISO 6400.

100 percent view from a7R III. 10 seconds, f/4, ISO 6400.

NPF Accurate = 5.88 seconds

We rounded up the NPF Accurate shutter speed to 6 seconds and the stars are wonderfully round. I donโ€™t see any distortion at all.

Full image from a7R III. 6 seconds, f/2.8, ISO 25,600.

100 percent view from a7R III. 6 seconds, f/2.8, ISO 25,600.

Takeaways: I was very impressed with how the higher-megapixel Sony handled ISO 6400, and the 16-35mm lens did a superb job resolving sharp, round stars. In my testing, ISO 12,800 is also easily attainable with the a7R III, whereas ISO 25,600 is the breaking point for me, as a layer of grainy noise covers the whole image. This is still a very admirable result for a camera that gives loads of detail.

Final Thoughts

If you are a star-point seeker then youโ€™ll definitely want to start using the NPF Rule in your workflow. Iโ€™ll be switching over from the 400 Rule to the NPF Rule at the Default setting in PhotoPills. If the shot is an absolute beautyโ€”a 5-star shot (so to speak) that I know Iโ€™ll want to printโ€”then Iโ€™ll use the NPF Accurate mode.

Either way, with an f/2.8 lens we will be using an ISO from 6400 to 25,600, which isnโ€™t ideal for any camera. Donโ€™t get me wrong, there are certainly a few cameras that handle these higher ISOs admirably, but for the best print quality we always want lower ISOs.

Because of that reality, Iโ€™ll also start committing to shooting multiple frames of a star-point scene that I can blend in post-production to reduce noise. This requires using Starry Landscape Stacker (SLS), a Mac-only software application that does an excellent job of reducing high ISO noise while keeping stars sharp. Sequator is the PC equivalent. Look for our in-depth reviews of these excellent pieces of software soon.

For the test photos above, the foregrounds were all very dark due to the moonless night and the fact that the area we were shooting was too large to paint with light. In these scenarios, Iโ€™d also advise taking an additional exposure between 3 to 5 stops brighter than your sky exposure, perhaps with LENR turned on. This will provide more detail and information in the foreground, which can be blended into the stacked SLS or Sequator image.

Applying the NPF Rule

Now here is the hardest part about new knowledge: Do you use it?

Itโ€™s up to you. We just want you to realize that star point photography is a constant balance, wherein you want to weigh the trade-offs of noise at higher ISOs versus slightly trailing stars. Understanding how your gear performs and then deciding which sacrifices to make in the field will help you create the best possible image based on the specific conditions you are shooting in.

Run some tests so that you know your personal tolerance for star sharpness versus how your camera performs at higher ISOs, then apply the 400 Rule or NPF Rule as needed while you #seizethenight!

Note: If you want to take a deeper look at some of the other โ€œnight testingโ€ you can perform on your camera, check out Gabeโ€™s latest video with B&H that takes a deep dive into recently released full-frame mirrorless cameras.

Gabriel Biderman is a partner and workshop leader with National Parks at Night. He is a Brooklyn-based fine art and travel photographer, and author of Night Photography: From Snapshots to Great Shots (Peachpit, 2014). During the daytime hours you'll often find Gabe at one of many photo events around the world working for B&H Photoโ€™s road marketing team. See his portfolio and workshop lineup at www.ruinism.com.

UPCOMING WORKSHOPS FROM NATIONAL PARKS AT NIGHT

Staying Sharp: 8 Ways to Focus in the Dark

One of the most common issues we hear about from people learning to photograph at night is the challenge of getting the subject in focus when you canโ€™t โ€ฆ well, when you canโ€™t see anything.

Is focusing in the dark a trick? A skill? An art? A science?

In fact, itโ€™s all of the above. You have options. Focusing a lens in the dark is not only possible, but itโ€™s possible to do in many ways, some of which are better in some circumstances than others.

Below are eight techniques for ensuring your night images are always sharp.

1. Use a Manual-Focus Prime Lens

This is the simplest way to focus in the dark. If youโ€™re focusing on infinity (which is the case for many, many night scenes in natural spaces), then itโ€™s remarkably quick and simple to mount a manual-focus prime lens to your camera and turn the focus ring to infinity. Boom. Done.

For this photo in Big Bend National Park, the rock ridge was far enough away so that I knew I could focus on infinity and get everything sharp. So I did the easiest thing possible: I used a manual-focus prime lens (in this case, the Irix 15mm f/2.4) and moved the focus ring to the infinity mark (which, with this lens, clicks into that setting). Nikon D850. 20 seconds, f/2.8, ISO 6400.

2. Auto-Focus in Daylight

Focusing might be more difficult in the dark, but itโ€™s a cinch in daylight, particularly with modern autofocus technology literally at our fingertips. When youโ€™re wrapping up your daytime shoot, autofocus your lens(es) to infinity (or on your scouted subject), then turn off your autofocus and immobilize your focus ring with some gaffer tape. Once dark settles over the landscape, youโ€™ll be ready to shoot without having to worry about focusing again.

While shooting with Gabe and Matt in Capitol Reef National Park, we all autofocused on infinity at sunset and taped down our focus rings before photographing Chimney Rock under the stars. Nikon D3s with a Nikon 28-70mm f/2.8 lens. 15 seconds, f/2.8, ISO 4000.

3. Auto-Focus on a Distant Light

Yes, you can actually autofocus at night, as long as you have some light to focus on. The more contrast, the better, and you canโ€™t get a much harder edge than a bright light source surrounded by black. Unless youโ€™re in the hinterlands, in the wildest areas of wilderness, you can often find such a light.

If you want to focus to infinity, you donโ€™t need that light source to actually be at infinity. A street light 50 feet away will probably sufficeโ€”as far as a lens is concerned, thatโ€™s far enough to resolve infinity pretty sharply. Alternatively, autofocus on a city skyline, or on a car down the highway, or on anything that gives you a faraway bright spot to lock onto.

To find infinity in Iceland, I autofocused on a radio tower light about 75 feet down the road from my tripod (which can be seen in a photo by Lance, who was working nearby). Nikon D5 with a Nikon 24-70mm f/2.8 lens. 6 seconds, f/2.8, ISO 8000

4. Auto-Focus on the Moon

If youโ€™re shooting on a moonlit night, know that our biggest and brightest satellite is plenty bright enough for an AF system to lock onto. Point your lens up at the moon, autofocus, remount the camera to your tripod, and youโ€™re ready to shoot.

The moon was shining over The Grandstand in Death Valley National Park. I needed to focus on infinity, so quickly autofocused on the moon. Nikon D3s with a Nikon 14-24mm f/2.8 lens. 25 seconds, f/8, ISO 2000.

5. Shine a Flashlight on the Subject

The above methods work great for focusing on infinity, but sometimes you need to focus on a closer element of the composition. Perhaps itโ€™s a windmill, or a Joshua tree, or a ferocious dinosaur eating the Milky Way. In those cases, try shining a bright flashlight on the subject, and see if thatโ€™s enough for the autofocus to lock on. (Except, come to think of it, maybe donโ€™t do this with the ferocious dinosaur. Use another method for that.)

In Joshua Tree National Park, I used my Coast HP7R to illuminate the rock, which was plenty of light for autofocus to work. Nikon D5 with a Nikon 14-24mm f/2.8 lens. 20 seconds, f/5.6, ISO 4000.

6. Put a Flashlight in the Scene

If illuminating your subject doesnโ€™t create enough light and contrast for your AF system, then walk into the scene and place your flashlight on or near your subject. (Again, probably not the best strategy for the dinosaur. Also not a great technique when your subject is 10 feet past the edge of a cliff.)

At Arctic Henge in Iceland, the fog made it tricky to illuminate our subject from a distance, so I put a Coast HP5R flashlight on the rock and autofocused on the lit bulb. Nikon D5 with a Nikon 14-24mm f/2.8 lens. 30 seconds, f/4.5, ISO 3200.

7. Use Live View & a Loupe

If neither flashlight method above enables you to autofocus, try a similar strategy with manual focus instead. Illuminate your subject or place a flashlight in the scene, then use your cameraโ€™s live view to focus on the subject. Using a loupe on the LCD makes this even easier and more accurate.

In the very dark skies of Death Valley National Park, I found a bright star in live view and used a Hoodman HoodLoupe to fine-tune the focus manually. Nikon D5 with a Nikon 17-28mm f/2.8 lens. 20 minutes, f/2.8, ISO 100.

8. Use the Hyperfocal Method

Chances are that the first seven methods will get you into focus. But even though itโ€™s No. 8 here, the No. 1 surefire way to get sharp photos in the dark is to use hyperfocal distance. Hyperfocal is not easy to learn, but itโ€™s an excellent educational investment, because it will allow you to focus on everything from your subject to the horizon without the need for AF, flashlights, or so on. (And itโ€™s by far the safest method for focusing on a dinosaur.)

For a great primer on this method, see Lance Keimigโ€™s blog post โ€œUse Hyperfocal Distance to Maximize Depth of Field at Night.โ€ (Alternatively, see Lance literally walk through the process in our Creative Live course.)

At the Goldwell Open Air Museum just outside of Death Valley National Park, I used hyperfocal distance to know that if I focused 3 feet, 10 inches away, then everything from about 2 feet to infinity would be sharp. Nikon D850 with a Nikon 14-24mm f/2.8 lens. 23 stacked exposures shot at 2 minutes, f/5.6, ISO 250.

Bringing it into the Field

When you want to make every frame count at night, try our eight suggestions for staying sharp. Nothing is more painful than well-composed, well-exposed images that end up being soft.

To make this a little easier to remember while youโ€™re out shooting, weโ€™ve created a handy infographic. Download it here, and feel free to keep it on your phone or print a copy to keep in your bag for when you're in the field and wondering what to do.

Staying-Sharp-8-Ways-to-Focus-in-the-Dark.png

Pocket Guide

   "Staying Sharp: 8 Ways to Focus in the Dark"

Chris Nicholson is a partner and workshop leader with National Parks at Night, and author of Photographing National Parks (Sidelight Books, 2015). Learn more about national parks as photography destinations, subscribe to Chris' free e-newsletter, and more at www.PhotographingNationalParks.com.

UPCOMING WORKSHOPS FROM NATIONAL PARKS AT NIGHT

Shooting for the Moon: How to Photograph Earth's Little Cousin

Humankind has been fascinated with the moon since the birth of photography. One of the first things that was attempted during the daguerreotype days was to try to record the moon in all its detail. John Williams Draper was the first to successfully mount a camera box onto a handmade telescope and track a full moon for 20 minutes using a heliosat.

Oldest surviving image of the moon. John Williams Draper, 1840.

That print from 1840 has unfortunately sustained extensive damage and now looks like a bubbly surreal etching. But this effort kick-started astrophotography, and we have many remaining images of our satellite from that early era. The first detailed images are credited to John Adams Whipple, who starting in 1849made daguerreotypes of the moon using the telescope at the Harvard College Observatory in Cambridge, Massachusetts. Other early successes include an image by Henry Draper (Johnโ€™s son), shot from Hastings-on-Hudson, New York, in 1863.

"View of the Moon,โ€ by John Adams Whipple, 1852.

โ€œPhoto of the Moon,โ€ by Henry Draper, 1863.

Modern Moon Photography

Photographically speaking, the moon is closer than ever before, so how can we improve our moon shots before we start colonizing?

The three things to consider when shooting the moon are:

  1. the phase (as it relates to brightness)
  2. cycle (angle)
  3. elevation (how high is the moon in the sky?)

Also remember that moonlight is actually sunlight reflecting off a gray surfaceโ€”so itโ€™s pretty bright. Most of the time the tricky part is that the moon is brighter than the rest of the scene. For this blog post, we will focus on shooting the moon while it is full and most luminous.

Exposure

The Looney 11 Rule continues to be a great starting point for figuring out the correct exposure for a craterlicious moon. The rule is:

For astronomical pictures of the moonโ€™s surface, set your aperture to f/11 and match the shutter speed to your ISO.

For example: 1/125, f/11, ISO 100.

However, please rememberโ€”and I canโ€™t stress this enoughโ€”that the formula above does not always give you an exact correct exposure, but rather a starting point. Use the formula to get an exposure that will likely be close, and then adjust to precision using your histogram as a guide.

Gear

One challenge to consider is that ideally you need a long lens to focus in and get close to the moon. How many of you have taken pictures of a little while circle in the sky? Minimally, Iโ€™d use a lens that can get to 300mm, but the closer the better!

We were very fortunate at our โ€œBlue Supermoonโ€ workshop in Biscayne National Park in January, as Nikon sent us their majestic telescope of a lens, the 800mm f/5.6. This is currently Nikonโ€™s longest lens. The 800mm generally attracts the high-end market of wildlife and sports photographers, but for shooting the moon, nothing else of this quality gets you closer. The lens comes with a matched 1.25X teleconverter that, when mounted, makes this a 1000mm lens!

We still didnโ€™t think that was close enough, so we attached the lens to Nikonโ€™s top APS-C camera, the D500. The crop sensor on the D500 turned our 1000mm lens into a 1500mm! Talk about extreme close-up!

The moon photographed at a focal length of 100mm.

โ€ฆ 300mm.

โ€ฆ 1200mm.

โ€ฆ 1500mm.

The challenge we encountered with the 1500mm-equivalent lens is that it was very big and heavy. We mounted it to a Wimberley Gimbal head on a Gitzo mountaineer tripod. This allowed us more precise control so that we could easily track the moon, as the magnification caused it to be out of the frame in just about a minute. Even mounted on this rig the lens would easily shake in the breeze, so later in the evening we added a second tripod (a Gitzo 3543) under the lens hood for two-point contact and stability.

Henry Draperโ€™s setup in 1863 versus ours in 2018.

Freezing the Action

Which brings me to the next factor when photographing the moon: If you are shooting handheld or with a large lens (400mm or longer), then your shutter speed should match your focal length. We found the shutter speed of 1/1000 to be acceptable for our setup, which (per the Looney 11 Rule) meant we had to boost our ISO to 1000.

Craterlicious moon, Biscayne National Park. Nikon D500 with a Nikkor 800mm f/5.6. 1/1000, f/11, ISO 1000.

Find a Foreground

If you want to level up your moon game, the next challenge is finding a foreground for the moon to intersect or play against. This will give more context and tell a better story about your lunar experience.

In order to do this youโ€™ll need to do some planning. The best tool to help with this is the PhotoPills app. You can go into the Planner mode, drop your pin anywhere in the world and see where and when the sun and moon will rise and set in that exact location on any day of the year.

When I was scouting to shoot a supermoon in late 2016 (below), using PhotoPills I could see the time and path of where the moon would rise. I was interested in having it intersect with an icon of New York City. So I dropped my pin at various positions until I found the best pier at South Street Seaport to see the moon rise through the Brooklyn, Manhattan and Williamsburg bridges.

I needed a 3-minute window for the supermoon to shine through the clouds and bridges, a juxtaposition of time and place that required some serious planning with the PhotoPills app. Nikon D750 with a Tamron 150-600mm f/5-6.3 lens set to 370mm. 1/2, f/11, ISO 400.

In the PhotoPills Planner mode we can see the color code of the tableโ€”light blue means moonrise, which was going to happen at 5:14 p.m. that evening (November 11). I set the pin to where I would stand and the light blue line showed the path (azimuth) of the moon from that point. (See Figure 1, below.)

Figure 1.

Figure 2.

You can use the touchscreen on your phone or tablet to move the bottom time bar back and forth to see how the path of the moon (or sun) will change throughout the day. (Figure 2.)

Shoot During Twilight

Shooting the full moon is usually most effective the day before itโ€™s 100 percent full. Thatโ€™s when the moon will be rising just before sunset, allowing you to shoot it approximately 30 minutes prior to sunset and into civil twilight. This gives you more time to photograph the moon in better and more balanced light. (For more about working at this time of day, see Timโ€™s excellent blog post โ€œOut of the Blue: The Importance of Twilight to the Night Photographer.โ€)

The next full moon we will encounter will be next Saturday, March 31 (which, incidentally, will be our second blue moon of the year). According to PhotoPills, at my home in New York City that day the moon will rise at 7:38 p.m. and the sun will set at 7:20 p.m. Civil twilight will be from 7:20 p.m. to 7:48 p.m. This would give us only 10 minutes to shoot the moon during ideal light, all during civil twilight.

However, the day before (Friday, March 30), the moon will rise at 6:31 p.m., the sun will set at 7:19 p.m. and civil twilight will end at 7:46 p.m. This will give us over an hour of shooting the moonโ€”during golden hour, sunset and then blue hour. The moon will also be higher in the sky, providing more opportunities to play it against any interesting foregrounds.

This image was taken during  golden hour, providing the opportunity for a rich and balanced exposure. Sony RX100 set at 92mm. 1/60, f/10, ISO 125.

I was able to just eke out this shot of the full moon and get some detail in the buildings during nautical twilight. Fuji X-Pro1 with a Fuji 55-200mm f/3.5-4.8 lens set at 200mm. 1/250, f/8, ISO 400.

Wrapping Up

We hope these tips have inspired you to incorporate the craterlicious moon more into your night work! Weโ€™d love to see what you do. As you photograph the full moon March 30 and other months, please post your images in the comments section.

Gabriel Biderman is a partner and workshop leader with National Parks at Night. He is a Brooklyn-based fine art and travel photographer, and author of Night Photography: From Snapshots to Great Shots (Peachpit, 2014). During the daytime hours you'll often find Gabe at one of many photo events around the world working for B&H Photoโ€™s road marketing team. See his portfolio and workshop lineup at www.ruinism.com.

UPCOMING WORKSHOPS FROM NATIONAL PARKS AT NIGHT