light pollution

How to Deal With Light Pollution, Part III: Creativity

Note: This is the third in a three-part series about one of the most common questions we get: How do you deal with light pollution? We have three answers: with filters, with post-processing, with creativity. In this week’s blog post, Chris Nicholson discusses the latter of those solutions: using light pollution creatively.


As Matt and Lance showed in our two previous blog posts, you can quite effectively mitigate light pollution in your night photographs, either by using filters or post-production techniques. There’s a third way too: Instead of avoiding light pollution, find ways to use it to create images you couldn’t create without it.

Many folks believe, innately, that the key to creativity is having the mental space to relax and to work free of boundaries. But the reality is that the opposite is more often true—discomfort in process triggers ingenuity. Sure, easy conditions are conducive to productivity, but they don’t challenge your brain, and they don’t test and stretch your limits.

In fact, psychology studies have shown that most people’s minds are at their most creative when creative mental space is limited. Why? Because unwelcome boundaries force us to seek alternatives and solutions we might otherwise not.

This is precisely why working with light pollution, rather than trying to eliminate it, can lead you to thinking and photographing outside your normal box, and can result in some work that might pleasantly surprise you.

The approach is basically adopting a tone of “If you can’t beat ’em, join ’em.” Or maybe we can say about light pollution, “If you can’t lose it, use it.”

Below are a few ways you can employ this strategy.

Backlight the Horizon

If you’re shooting on a dark night in a dark location, grand landscapes can sometimes be challenging to photograph. Why? Because the horizon can get lost in the exposure when the dark landscape blends with the dark sky. But when light pollution is in the background, it will silhouette the horizon, backlighting the interesting things that lie at the transition from earth to sky.

Figure 1 is an example of this. I was shooting the Milky Way from high in the tundra of Rocky Mountain National Park—high enough that the grand mountains below were relatively small in the background. Framed against a dark horizon, they would have been much harder to discern in the composition. However, the light pollution from nearby Denver helped—it provided the backlight necessary to create separation between the mountains and the stars.

Figure 1. Milky Way in Rocky Mountain National Park. Nikon D810 with a Nikon 24-70mm f/2.8 lens. 15 seconds, f/2.8, ISO 8000.

Silhouette a Subject

In precisely the same way that light pollution can backlight a horizon, it can also backlight a nearer subject, and you can use that to silhouette distinct objects in your composition just like you might with a sunset.

I made the photograph in Figure 2 on the outskirts of Borrego Springs, California. It’s of two of Ricardo Breceda’s famous iron sculptures that dot the surrounding desert. The horizon light is pollution from a distant town. In this image, that light pollution not only helps define the horizon, but also separates the sculptures from the background and artistically defines their shapes without revealing their details.

Figure 2. Borrego Springs, California. Nikon D5 with a Nikon 24-70mm f/2.8 lens. 16 minutes, f/8, ISO 400.

Light pollution is caused not only by distant cities—it can also be a local issue. Bright streetlights, nearby power plants, passing car headlights, etc., can all throw unwanted light into your night scenes. Instead of avoiding them as intrusions, keep your mind open to incorporating them into your compositions.

Car headlights were a “problem” in Joshua Tree National Park when I was shooting there one night in 2017. I kept waiting for occasional vehicles to pass before starting and re-starting star exposures, because the headlights were spilling unwanted light on the trees and rocks. But then I noticed how those lights were backlighting those same trees and rocks, as well as the dust in the high-desert air. So I changed my strategy from waiting to shoot between cars to waiting for cars to come around the distant bend and backlight the landscape. The result is the photograph in Figure 3 (with a little extra light painting on the leaves).

Figure 3. Joshua Tree National Park. Nikon D5 with a Nikon 24-70mm f/2.8 lens, light painted with a distant car and a Coast HP5R flashlight. 15 seconds, f/4, ISO 6400.

Light the Clouds

One of my favorite ways to use pollution also solves another night photography problem: overcast skies. A solid ceiling of clouds can prove challenging at night, particularly in new-moon conditions when they can make for a dead sky. But if there’s a little light pollution nearby, that can illuminate the underbelly of those clouds and give you an interesting background to work with.

That’s precisely the visual dynamic that I liked when creating the photograph in Figure 4. Lance and I were shooting with a few participants of our 2019 workshop in Cape Cod. Clouds rolled in, obscuring the stars. But the clouds were catching the lights of nearby Provincetown, Massachusetts, creating a moody background for the lighthouse.

Figure 4. Highland Lighthouse, Cape Cod National Seashore. Nikon D5 with a Nikon 14-24mm f/2.8 lens, light painted with two Luxli Viola LED panels. 30 seconds, f/4, ISO 1600.

Go Surreal

One of the reasons most night photographers don’t like light pollution is because it doesn’t look natural—it doesn’t look “real.” But rather than avoiding light pollution for that reason, you can deliberately use it to create surreal images.

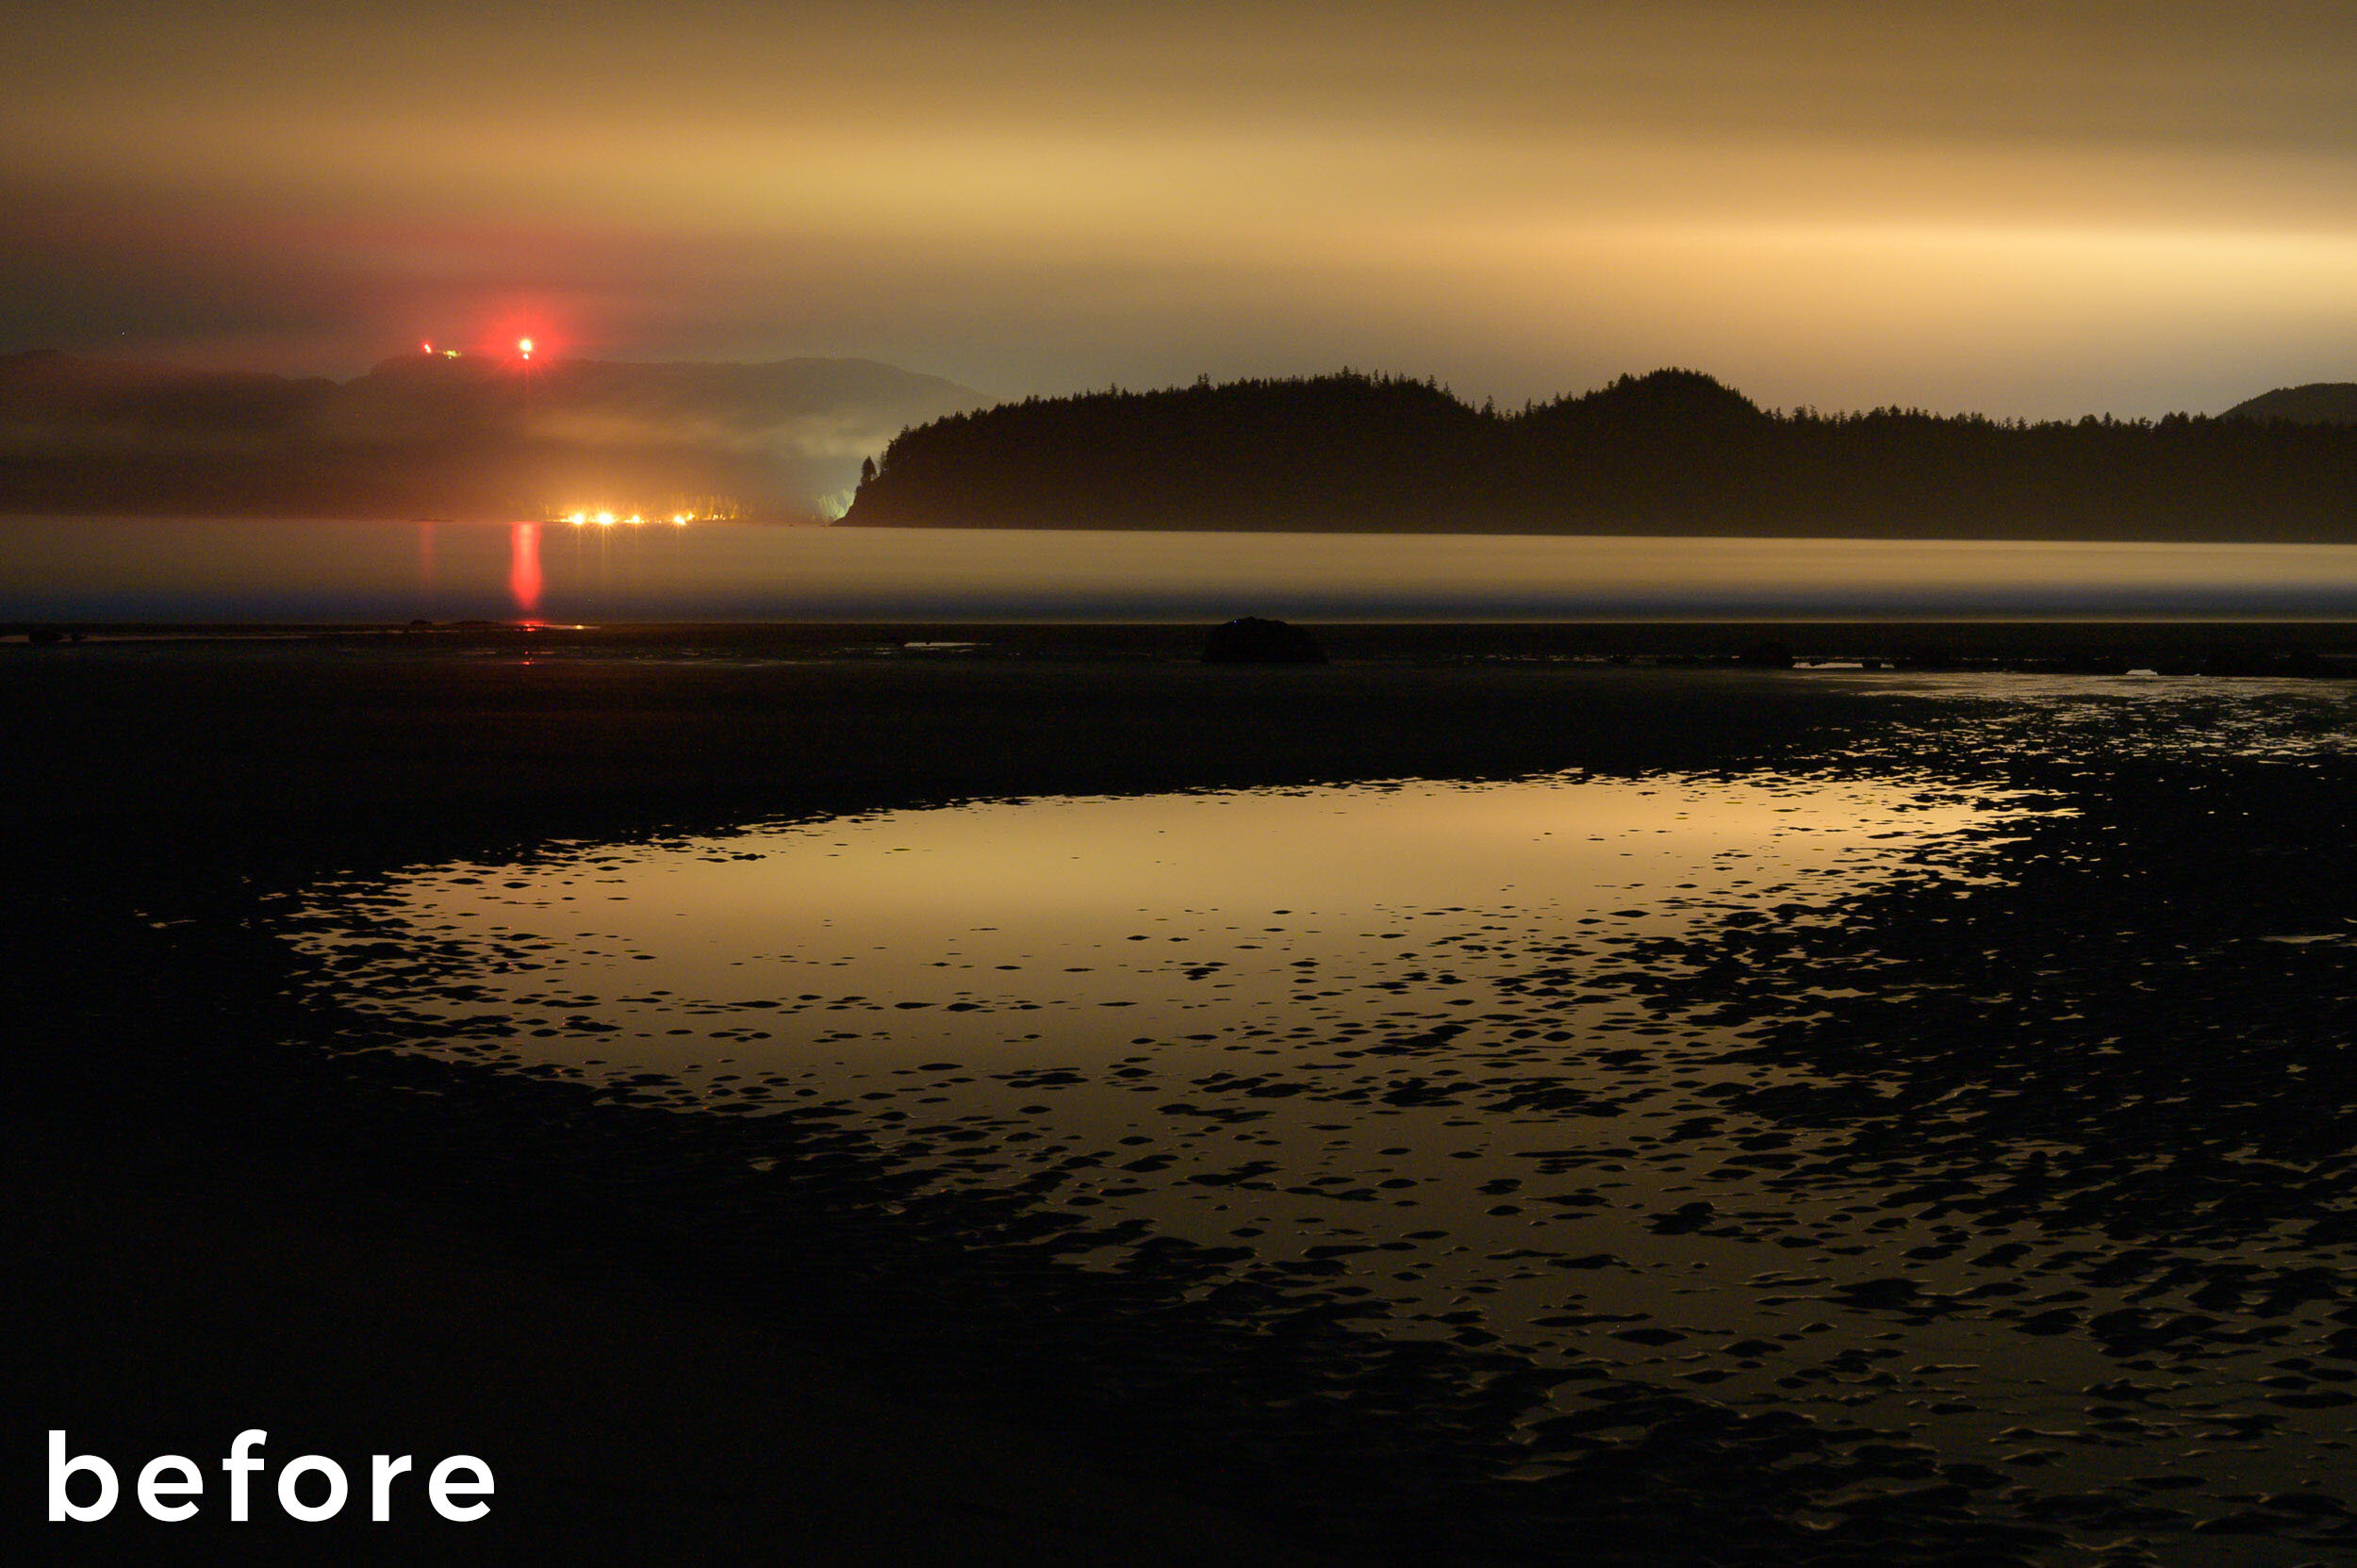
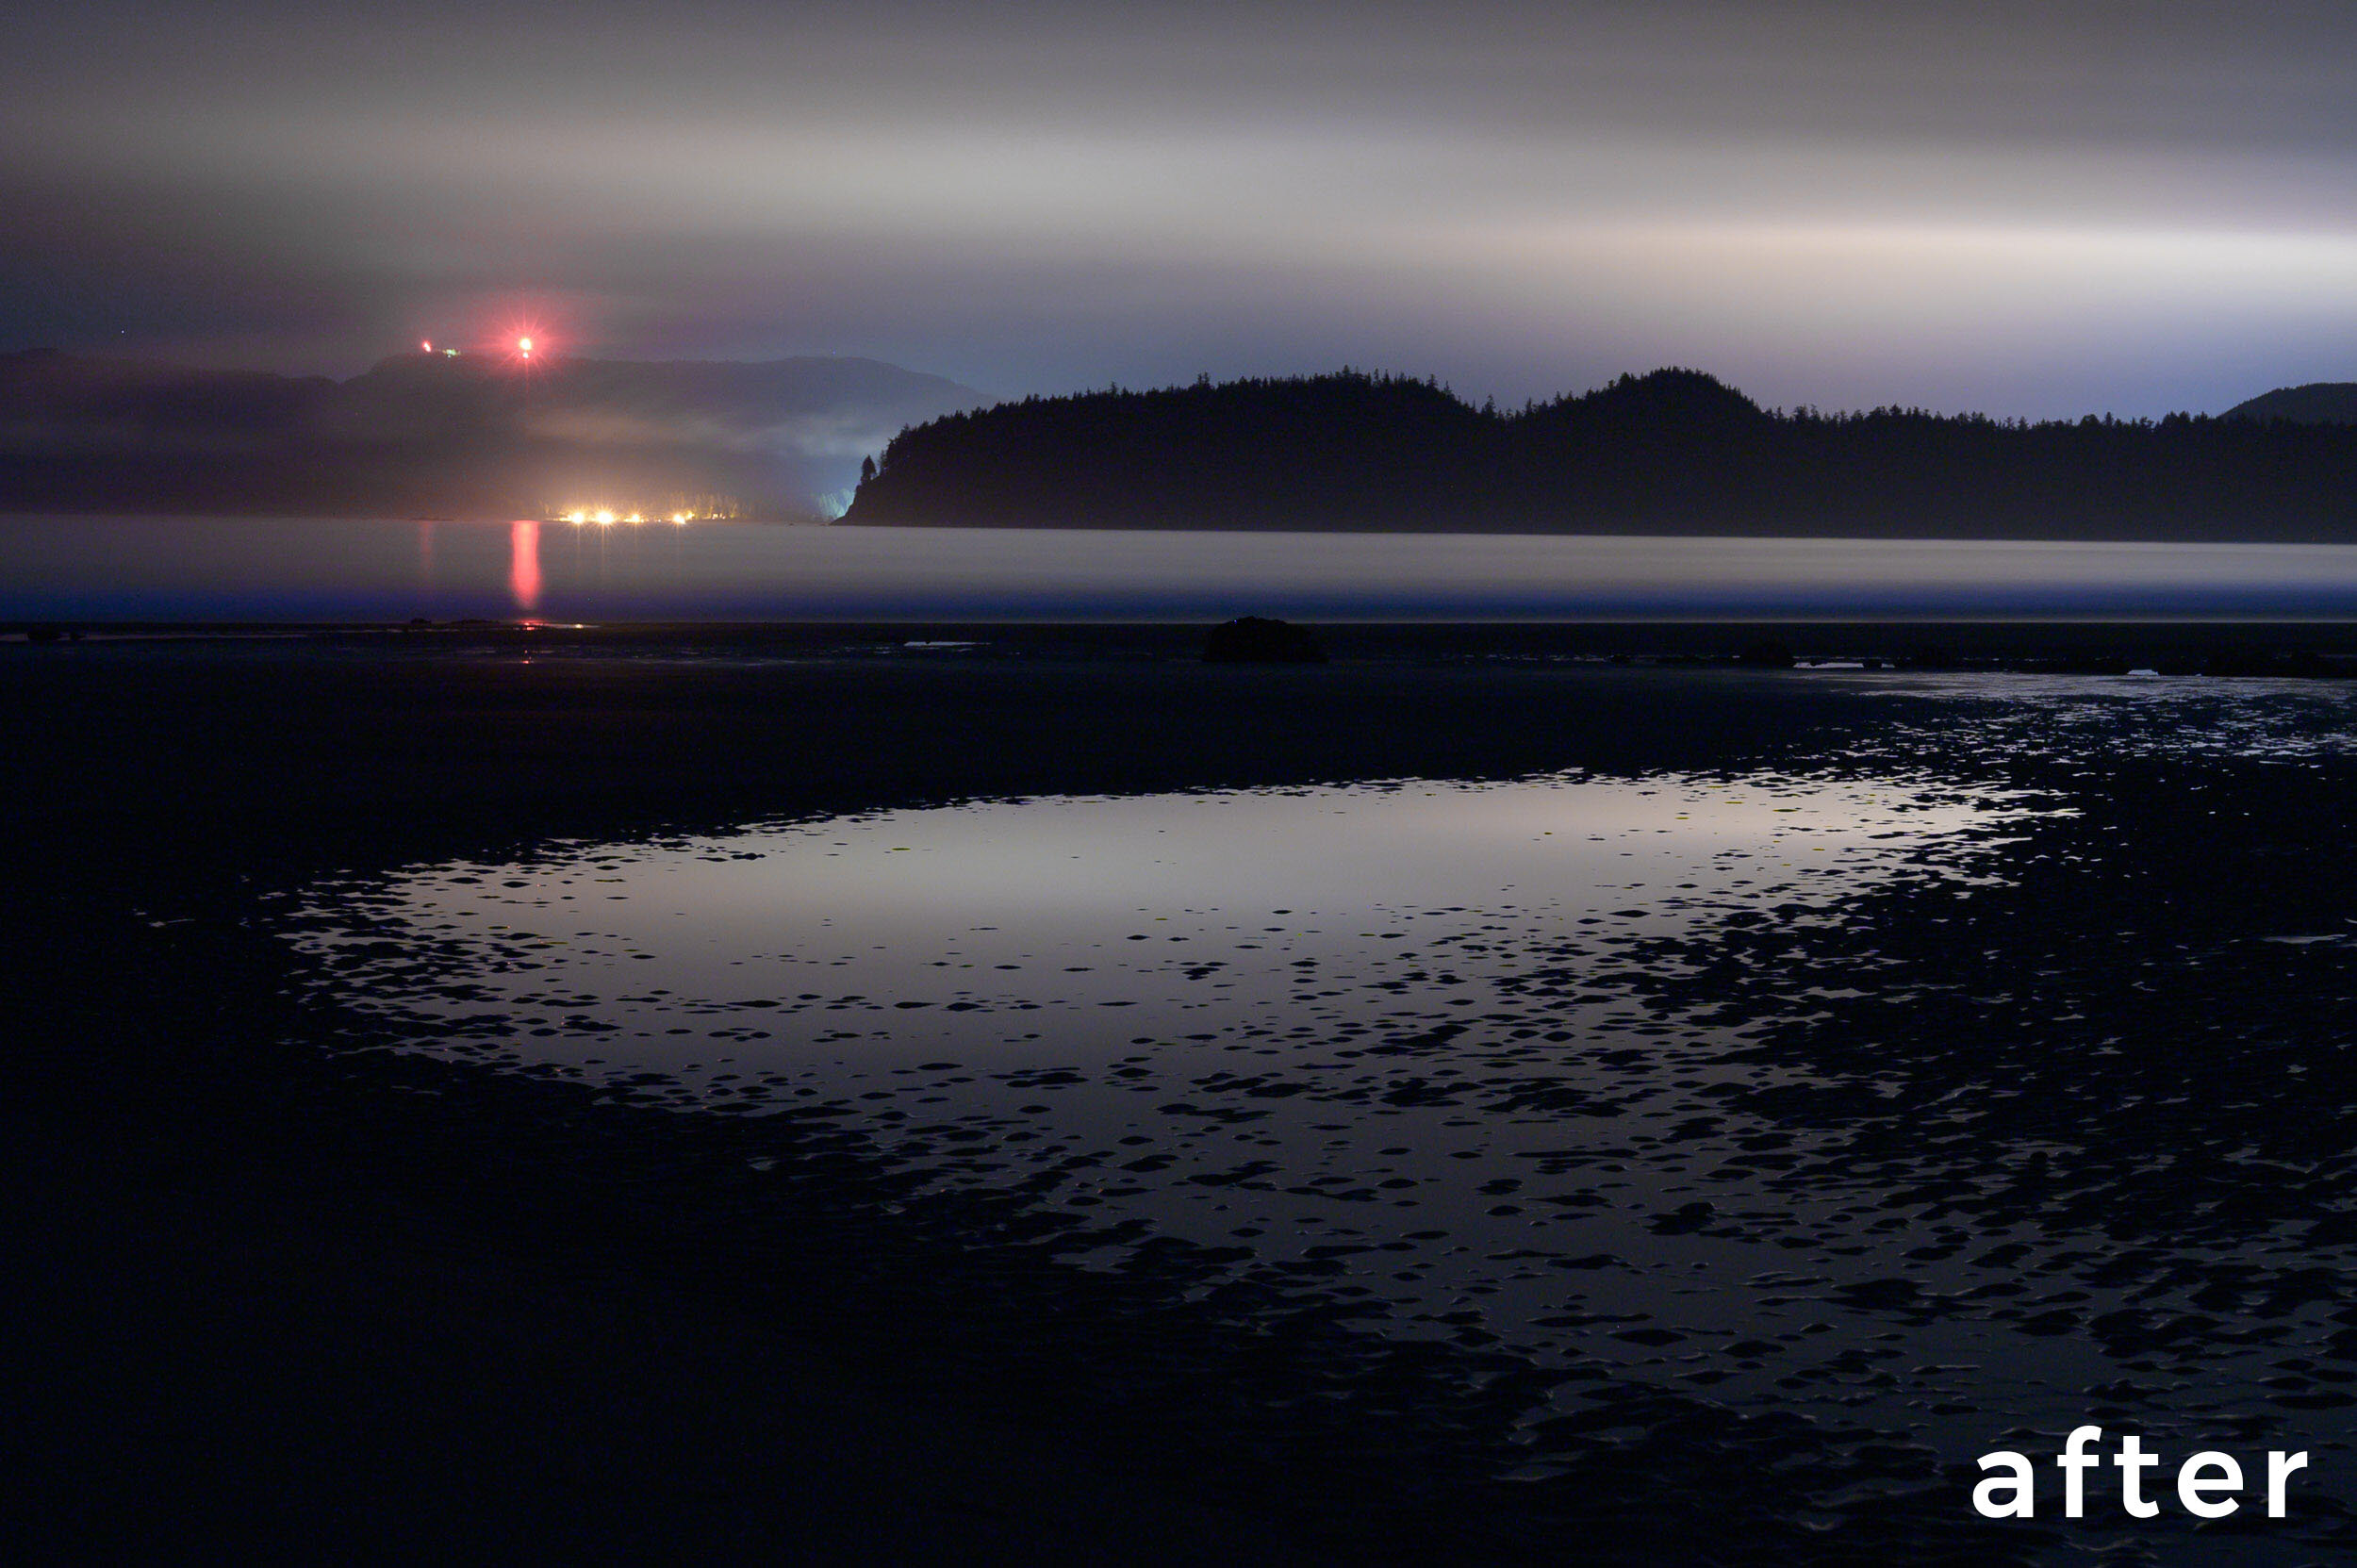
A fine example of this is an image (Figure 5) that Tim shared in a recent blog post on color. He was shooting in the San Francisco area on a foggy night, and the fog was saturated with the colored lights from the city. But rather than correct or avoid the orange sky, he used it to create a hypnotic, dreamlike, apocolyptic-type background.

Figure 5. San Francisco. © 2019 Tim Cooper. Nikon Z 6 with a Nikon Z 24-70mm f/4 lens, light painted with a Coast HP7R flashlight. 15 seconds, f/4, ISO 800.

Seize the Light Pollution!

There are surely countless other ways you can use light pollution to create unique night imagery. Even if working this way is not your normal style, it is still a good creative exercise. Again, anything that squeezes our boundaries or forces us out of them is good for creativity.

I’m not suggesting that including light pollution in your photographs is always the correct solution, but it should be a method you’re comfortable employing. This approach is just as valid as using filters or post-production to deal with the same problem. All three strategies are tools that are good to learn how to use, so that you can always be ready with the best solution for whatever creative problem you need to solve in a given situation.

What are some ways you’ve found to be creative with light pollution in your night photographs? We’d love to see! Share your images in the comments section or on our Facebook page, or post them on Instagram and tag us (@nationalparksatnight).

Chris Nicholson is a partner and workshop leader with National Parks at Night, and author of Photographing National Parks (Sidelight Books, 2015). Learn more about national parks as photography destinations, subscribe to Chris' free e-newsletter, and more at www.PhotographingNationalParks.com.

UPCOMING WORKSHOPS FROM NATIONAL PARKS AT NIGHT

How to Deal With Light Pollution, Part II: Post-Production

Note: This is the second in a three-part series about one of the most common questions we get: How do you deal with light pollution? We have three answers: with filters, with post-processing, with creativity. In this week’s blog post, Lance Keimig discusses the second of those solutions: processing in Lightroom.


Last week, Matt wrote about his experiences testing a couple of light pollution filters, and he showed how they can be useful for neutralizing color casts in clouds from artificial lights, in reducing atmospheric haze, and especially for taming the beasts known as sodium vapor lights.

He showed that the two filters he tested work primarily by filtering out a narrow band of intensely orange light that is particular to sodium vapor lights. Before the widespread adoption of LED street lighting, high pressure sodium vapor was the most common form of street lighting used worldwide. These lights are still quite common, and until they are eliminated altogether, light pollution filters will probably be the first line of defense against the color shifts they cause in photographs.

The image above is a good example of the types of artificial light sources that cause light pollution. The intensely yellow lights are low pressure sodium vapor, and the others in the scene are high pressure sodium vapor. Canon EOS 6D with a Nikon 28 mm f/3.5 PC lens. 6 seconds, f/8, ISO 200.

When we consider the problem of light pollution in night photography, there are two conundrums:

  1. unwanted color casts in the clouds and in the sky

  2. stray light that obscures the stars in our images

Light pollution filters can address both of those issues, providing that the bulk of the light pollution is from sodium vapor lights.

However, if you don’t use a light pollution filter, post-processing offers an alternative method to correcting unwanted color casts from light pollution in night photographs. In this post and the accompanying video (you can jump to it here), I’ll show you examples of how you can employ post-processing techniques to minimize unwanted color casts from light pollution. All of these examples utilize Lightroom Classic’s White Balance, Hue, Saturation and Luminance (HSL) and local adjustment tools to achieve the desired effects.

The first example (Figure 1) is one that I made last year during our Shi Shi Beach adventure in Olympic National Park. In this case, the lights from Victoria on Vancouver Island reflected off the low cloud cover and turned the sky yellow. A simple white balance adjustment took care of the yellow, and then a little HSL work with the targeted adjustment tool helped with the red and magenta from the beacon on the hill. I could not remove all of the red and still have the image look natural, so I just toned it down a bit.

Figure 1. Light Pollution over Vancouver Island. Nikon Z 6 with a Nikon Z 24-70mm f/4 lens. 693 seconds, f/5, ISO 800.

I made the next image (Figure 2) at the Owens Valley Radio Observatory in California. Light pollution on the horizon to the south shows a yellow glow from sodium vapor lights. HSL adjustments took care of removing the unwanted yellow from the image.

Figure 2. ORVO and Milky Way. Canon EOS 6D with a Nikon 20 mm f/3.5 AIS lens. 20 seconds, f/4, ISO 6400.

The image from Lassen Volcanic National Park (Figure 3) also had yellow light pollution at the horizon, but also a fair amount of yellow and orange in the soil at the foreground, so an HSL adjustment would have affected more of the image than needed. In this case, I used a local adjustment brush and desaturation to solve the problem.

Figure 3. Cinder Cone, Milky Way, Jupiter, Saturn and Mars. Nikon D750 with an Irix 15mm f/2.4 lens. 25 seconds, f/3.2, ISO 6400.

Dealing with light pollution in urban environments tends to be a bit more involved, and also subject to taste in how the image is presented. Below are two examples from Lowell, Massachusetts, an environment primarily lit by sodium vapor with a host of other light sources thrown in for good measure. For this first one (Figure 4), I used a gradient on the sky to remove the color cast without affecting the foreground.

Figure 4. Lawrence Mills, Lowell, Massachusetts. Canon EOS 5D with a Nikon 28mm f/3.5 PC lens. 74 seconds, f/8, ISO 100.

In this last example (Figure 5), setting the white balance by using the eyedropper on the clouds eliminated the color cast from the ambient sodium vapor lights, but exaggerated the cyan from the metal halide lights on the structure. A selection with the local adjustment brush enabled me to desaturate the cyan on the building without affecting the rest of the image.

Figure 5. Lawrence Mills, Lowell, Massachusetts. Canon EOS 5D with a Nikon 28mm f/3.5 PC lens. 73 seconds, f/8, ISO 100.

Video Tutorial

In the video below, I offer more detail on how I accomplished the edits I mentioned above, walking you through all the steps for achieving the same results in your own photos affected by light pollution.

Wrapping Up

As you can see, if you don’t have a light pollution filter, or even if you do, post-processing techniques offer another option for dealing with light pollution in nocturnal images. The techniques are most effective at minimizing color casts from gas discharge lights such as sodium or mercury vapor, or metal halide lights.

However, be aware: If the stars are obscured by scattered light in the atmosphere and are thus not recorded by the sensor, no amount of post-processing can bring them back. However, judicious use of the Dehaze slider will help bring out the stars that are present, and can also compensate for the loss of contrast from light reflected off of particulates in the low atmosphere that are the source of the problem.

In Part 3 next week, Chris will write about learning to live with light pollution in night images, and how to turn a hindrance into an unexpected bonus. Stay tuned, as the more tools you have at your disposal, the better your chances of a successful image regardless of the light conditions!

Lance Keimig is a partner and workshop leader with National Parks at Night. He has been photographing at night for 35 years, and is the author of Night Photography and Light Painting: Finding Your Way in the Dark (Focal Press, 2015). Learn more about his images and workshops at www.thenightskye.com.

UPCOMING WORKSHOPS FROM NATIONAL PARKS AT NIGHT

How to Deal With Light Pollution, Part I: Filters

Note: This is the first in a three-part series about one of the most common questions we get: How do you deal with light pollution? We have three answers: with filters, with post-processing, with creativity. In this week’s blog post, Matt Hill discusses the first of those solutions: light pollution filters.


Light pollution is a reality. It affects humans’ quality of life. And it’s not addressed in a serious manner by most local governments.

When it comes to night photography, it’s purely up to individual aesthetic if light pollution is positive, negative or neutral.

I like to think of the problem as a coffee metaphor. Would you make coffee without a filter? No. That would be sacrilege (and like drinking mud). The same principle applies to photography. There are certain situations wherein a filter does exactly the right job and is therefore necessary. Neutral density and polarizers are perfect examples.

But as light pollution filters are relatively new to the photography world, the question stands about whether they fall into the same category. So I set out to understand if and when light pollution filters are useful. After some deep testing experimenting in post-processing and hours thinking about the issues, I have some observations and suggestions for you.

The bottom line is this: Yes, light pollution filters are very helpful in certain situations. Read on to find out when I’d suggest using them.

Note: This will not address deep-sky light pollution filters used typically for strict astrophotography. I focused on what we do best: astro-landscape and suburban/urban night photography.

The Problem(s)

1.  exactly what light pollution filters do is not clearly described.

The manufacturers of light pollution filters claim they remove unwanted color casts from night photography. But very few, if any, provide graphs or data showing which wavelengths of light are blocked. On top of that, very few laypeople know what the heck those mean anyway—so maybe that’s why they aren’t just readily available on the manufacturers’ websites.

In short, the makers say that the filters block a yellow glow. And most often they claim the glow comes from sodium lights. But there are distinctions in this range. As we see in Figure 1, low-pressure sodium vapor lamps typically emit at 589 nm (nanometers).

Figure 1. Source: Wikipedia

The Irix website provides the chart in Figure 2, which clearly shows 589.3 nm as the wavelength being narrowly blocked with only 15 percent transmittance. This means only 15 percent of the light at that wavelength passes through the filter. And it slopes up on either side, so some other nearby wavelengths (colors) are also affected.

Figure 2. Source: Irix.

By comparing the two charts—the emitted light spectrum and the filter’s blocking profile—we see that this is a very specific filter. In fact, it has only one job: to block light at a very narrow wavelength.

Mercury vapor lamps are trickier to filter for, since there are many wavelengths and uses for them. But when used as overhead street lighting, they typically show as blue (435.8 nm) and green (546.1 nm) to our eyes. There is a yellow-orange variant too, which emits at 578.2 nm. This latter one is likely also blocked using (what I can discern as being) typical light pollution filters.

Figure 3. Source: Wikipedia.

We also need to consider the LED revolution. Many cities and townships are in the process of (or have completed) converting all street lamps from the often-beautiful mixed-color lighting to very consistent and “clean” LED lighting. The color temperatures from LEDs may vary widely from warm to slightly cooler than daylight. They also emit more of the color spectrum and will thus render colors better (though not as well as a true tungsten light source). Keep reading to see examples.

So it feels like this wave of light pollution filters is about 10 years too late. But is it?

2. how to best use light pollution filters is not clearly described.

Not one manufacturer source that I researched suggests a white balance setting, nor any post-processing settings. None even mention the filter factor (i.e., how much light the filter eats and how much to compensate for it).

It seems to me that photographic lens filters are a sunset product. Meaning, they are mostly outdated and unnecessary except for the aforementioned specialty filters that have very narrow, specific jobs that cannot be reproduced by post-processing. Their effect must be in-camera. Because this category of products is basically fading away, there are very few passionate manufacturer advocates who put energy into clearly explaining what the filters are for and how to use them. This is a personal gripe I have and my own observation. But it makes sense, right? I wish more technical and instructional information existed in the filter market in general, and definitely for such a new type of filter that’s been generating such buzz.

3. Using filters is inconvenient.

Screw-on filters are a PITA to mount and unmount. I get so anxious doing it. Especially since I often have my camera over a precipice, railing or bridge. I dread that the filter will fall out of my hand or not thread properly and splash/crash.

Some forward-thinking manufacturers now use a magnetic mount system. I have not tested this, but the premise of it addresses my pain directly. My concern (again, having not used it) whether the filter remains in place if I forget it’s on and move my tripod around with the camera mounted. I am not sure how strong those magnets are.

Drop-in filters are also painful to use. Resin filters damage the optical quality of your images too much to even consider. And glass drop-in filters, even though they are chemically hardened, are still glass and therefore fragile. So transporting them to the shoot location and them keeping them safe as you move around is another concern.

Bottom line: You have to care about the problem to use the solution.

The Gear

For these tests I used the following camera gear:

Testing Methods

I shot one control and two tests with the following process:

  1. Photograph without a filter at Tungsten white balance.

  2. Photograph with an Irix screw-in filter.

  3. Photograph with a Benro drop-in filter.

To avoid bumping the camera, I gently screwed in the Irix filter, shot, unscrewed it, and then used the quick-mount Irix filter holder with the Benro glass filter in it. Minor camera movements happened—despite my process.

Locations

I chose a few locations with varying light pollution. I did not go to a place without light pollution, as that would negate the need for the filters.

  1. Athens, New York—Bortle 4 (rural/suburban transition)

  2. Catskill, New York—Bortle 5 (suburban)

  3. Astoria, New York—Bortle 8-9 (city sky / inner city sky)

Let’s Talk About Color

Visible light occurs between 400 and 750 nm. Some light sources emit full-spectrum light (such as tungsten lighting) and some emit less of the color spectrum (such as sodium vapor).

So I brought along my favorite tool for getting a) the most accurate color in-camera, b) a reliable color reference for comparison and c) a reliable neutral for color balancing. That tool? The X-Rite ColorChecker Passport Photo 2.

Color management is not voodoo. And color science is not as daunting as it seems.

Here is how I use it:

Building a camera profile

When I want to make sure I have the colors represented as closely as possible to correct, I photograph the object in Figure 4:

From Lightroom, using the ColorChecker plugin, I export that image to build a profile (Figure 5).

Figure 5.

Then after restarting Lightroom, under “Profile” in the Basic panel of the Develop Module, I choose the new camera profile.

Figure 6.

The process of building a camera profile is simply one of asking science to place all the color values where they should be (Figure 7). Know this: You may want to build camera profiles for different light sources, such as midday sun, moon, flash, flashlight, sodium vapor, etc. Even if you don’t use a white balance adjustment, the colors will render more true to life.

Figure 7. It’s science. Color science. And don’t the colors look more “right” as you both profile and apply a white balance?

Let’s compare them side by side without a profile and without color balance adjustments, as seen in Figure 8:

Figure 8. Nikon Z 6 with an Irix 15mm f/2.4 lens. Tungsten white balance; 30, 50 & 50 seconds (left to right), f/2.5, ISO 125.

It’s easy to see what a sodium vapor light source does to color when you have a series of calibrated color patches. None of them look right without correction. That’s because that light source is not full spectrum, so different-colored objects reflect it differently.

And when you put a filter on the lens to filter out that light source, you are compounding a problem again. First, the light source didn’t emit at full spectrum, so expecting it to render anything “naturally” is not just unreasonable, it’s impossible. The color patches above demonstrate this. You can come closer via profiling and white balancing, but never true to a full-spectrum light source.

Figure 9. Note the dramatic change in contrast on the stone bench arm beneath the ColorChecker Passport, as well as the neutralization and color change in the streetlamps in the background.

But when you apply a light pollution filter to block that spectrum, you can prevent it from affecting (or, polluting) your image.

That’s when these light pollution filters become viable. Even necessary.

I provide all the above to help you understand the side-effects of filtering out that spectrum and the ideal ways to approach correcting this. I will explain what I have learned.

OK, let’s get out of the science weeds and into the practical application.

One more note before we continue: I love my ColorChecker Passport Photo 2 for daylight and flash camera profiling. It’s invaluable. But for night photography it falls short; often due to the partial spectrum light sources we use. I highly recommend owning one but its applications for night photography are limited to primarily white balancing. It was, however, an excellent tool to demonstrate the color shifts and missing color spectrum.

Light Pollution Filters in the Field

The first time I saw a practical benefit for a light pollution filter was when facing … well, light pollution. (Amazing, right?)

When photographing the Perseids this year, I set up my Nikon D750 as a second camera facing due north from Athens, New York, toward Albany, New York. That city is 45 miles north and yes, it brightened the sky.

Figure 10. Nikon D750 with an Irix 15mm f/2.4 lens, no filter. White balance 3200 K, 260 seconds, f/2.8, ISO 100. Note the warm clouds and cool sky.

Figure 11. Nikon D750 with an Irix 15mm f/2.4 lens, with an Irix Edge Light Pollution Filter. White balance 3200 K, 257 seconds, f/2.8, ISO 100.

Figure 12. Nikon D750 with an Irix 15mm f/2.4 lens, with a Benro TrueNight filter. White balance 3200 K, 252 seconds, f/2.8, ISO 100.

All of the images in Figures 10 to 12 were “cooked to taste” in Lightroom.

With the Irix and Benro filters, a few things happened:

  • The clouds became neutral.

  • The haze in the sky decreased dramatically.

  • The Benro filter seemed to be even more aggressive in neutralizing the yellows.

  • I noticed about one-half to two-thirds of a stop of light loss, and I often increased exposure time to compensate.

The second point above piqued my curiosity. So as I tested more, I looked for evidence of haze being removed from the sky, but found instead that the strong yellow cast from a sodium vapor streetlight was completely removed from the light on the side of the house (Figure 13). This has major implications for urban night photographers because white balance and post-processing do not offer great solutions for color correcting sodium vapor lights, due to their limited spectral emissions as noted earlier.

Figure 13. Nikon Z 6 with an Irix 15mm f/2.4 lens, with no filter (left) and an Irix Edge Light Pollution Filter (right). 61 seconds, f/4, ISO 800.

Here is a Lightroom screen capture zoomed in:

Figure 14.

Note I did not go turn off that light source. I put on the Irix filter. That’s it.

So now I am thinking to myself: All those times I sighed heavily when trying to color correct an image that had heavy orange/yellow streetlights in it—this filter could have prevented a headache.

Figure 15 shows the light source that was hitting the side of that house, without and with a filter (for effect!). It’s not an artful shot, but check out the contrast on the blacktop, as well as the contrast in the sky and on the side of the house:

Figure 15. Nikon Z 6 with an Irix 15mm f/2.4 lens. 61 seconds (left) and 86 seconds, f/4, ISO 100.

Figure 16 shows how you can make a brick church look a little more like a church:

Figure 16. Nikon Z 6 with an Irix 15mm f/2.4 lens. 60 seconds, f/2.8, ISO 100.

The pair in Figure 17 is especially dramatic. Notice how the yellow glow in the water foreground disappears, along with many reflections. But the sky gets more contrast as the yellow/orange is removed:

Figure 17. Nikon Z 6 with an Irix 15mm f/2.4 lens. 441 seconds, f/4, ISO 100.

Now, in Figure 18, an example that addresses the burning question in our night photographer hearts: “Will it help my Milky Way images?” I processed each of these individually to taste. Applying the ColorChecker camera profile to the no-filter image helped. It did not help the others, so I applied the Adobe Landscape profile and processed to them look similar. They probably look the best they can:

Figure 18. Nikon Z 6 with an Irix 15mm f/2.4 lens. 10 seconds, f/2.8, ISO 6400.

The examples in Figure 19 have mixed light sources. The lamp on the side of this building is a CFL (compact fluorescent) bulb. The light hitting the side of the building is from multiple sodium vapor streetlamps. Note that the fill light almost disappears, yet the CFL lamp remains unaffected. Wavelength filtration at its finest.

Figure 19. Nikon Z 6 with an Irix 15mm f/2.4 lens. 15, 25 and 25 seconds (from left to right), f/11, ISO 400.

Finally, I decided to pay a visit to the mecca of light pollution, New York City. I visited Astoria Park’s waterfront and shot downstream toward the Hellgate and RFK bridges. I think I got just about every kind of light source one can get in a single frame.

Figure 20. Nikon Z 6 with an Irix 15mm f/2.4 lens. 8, 13 and 13 seconds (from left to right), f/5.6, ISO 800.

I processed those (Figure 20) to be similar to each other. I found that the skies in the images shot with filters were a bit duller, so I had to boost the luminance and sometimes tweak the hue. Otherwise, global adjustments were all that were necessary.

To me, the shot without the filter seems better. But this was just this night at that location with those skies.

In Conclusion

Using and testing light pollution filters, I learned:

  • If you have some particular man-made lights that are vexing, and you have a filter that can block them, light pollution filters are useful.

  • If you like your clouds to be a neutral cast, light pollution filters are useful.

  • Your image ends up being more blue, which will require additional post-processing.

  • I can imagine that this helps immensely in situations where the horrid orange yellow light makes skin tones look terrible or prevents you from editing a color image properly.

  • It’s surprising to just be able to subtract that light source without affecting much else.

If you absolutely hate carrying filters and using them, none of this matters. 🙂 But if you find any of the above effects attractive, perhaps you will make room in your bag.

Big thanks to Irix for their support. We use their lenses all the time and love them. Getting to know their other products has been a privilege.

Also thanks to Benro for loaning us the TrueNight glass filter.

If you want to learn more about light pollution, please visit or join the International Dark-Sky Association. They provide a wealth of educational materials, conversation starters and resources for those who want to help address the light pollution issues that affect nearly everyone on the planet. Please consider becoming a member or donating money to support the pursuit of dark skies.

Questions?

I hope so! Lay ’em on in the comments below, on our Facebook page, or via email to adventure@nationalparksatnight.com. In the future I plan on doing a big shootout of all the light pollution filters I can get my hands on. So what you ask now will help me develop a better testing schema.

Thanks! Seize the night.

Ready for another solution to light pollution? Read “How to Deal With Light Pollution, Part II: Post-Production.”

Matt Hill is a partner and workshop leader with National Parks at Night. See more about his photography, art, workshops and writing at MattHillArt.com. Follow Matt on Twitter Instagram Facebook.

UPCOMING WORKSHOPS FROM NATIONAL PARKS AT NIGHT

Five Questions: Very Large Files, Pollution Filters, Fuji lenses and More

This installment of our “Five Questions” series features inquiries about large image files, light pollution filters, lenses for Fuji, organizing files in Lightroom and old Canon cameras..

If you have any questions you would like to throw our way, please contact us anytime. Questions could be about gear, national parks or other photo locations, post-processing techniques, field etiquette, or anything else related to night photography. #SeizeTheNight!


1. Giant Files Missing from Lightroom

A 4 GB, 38-layer PSB file from Matt. Files this big don’t show up in the Lightroom catalog.

Q: I have run into an issue with large file sizes when image stacking. In Lightroom, after I choose Open as Layers in Photoshop, the final layered file is greater than 2 GB. I saved it in PSB large document format. The file was saved to the disk, but is not showing up in my Lightroom catalog like PSD files do, nor does it show up in the Import window in Lightroom. It looks like Lightroom cannot see the file at all. So I tried flattening the file, but then I got a moiré pattern in the image. Have you seen this before? What is your process for saving and working with very large Photoshop files? — Craig

A: That is correct—for some reason, Adobe hasn’t allowed Lightroom to see PSB files. So your options are to either work with that file only in Photoshop, or to flatten it so it saves as a smaller PSD file.

But yes, flattening can occasionally create its own challenges. We have seen that moiré issue with stacked photos before. It happens sometimes, but not others, and we haven’t been able to identify a pattern of when or why. We’ve asked others who are Adobe-knowledgeable, and haven’t found an answer—but we’ll keep trying! What I can tell you is that the moiré seems to happen more often when working with images from higher-resolution cameras, and that sizing down the image a little before flattening seems to help. — Chris

2. Filtering Light Pollution

Light pollution from Miami over Everglades National Park. Nikon D3s, Nikon 17-24mm f/2.8. 20 seconds, f/2.8, ISO 6400. © 2013 Chris Nicholson.

Q: Do you use light pollution filters of any kind? I don’t remember any of you mentioning them, and I don’t see them in your gear list. Are they just a scam? It seems like such a filter would help when you can’t get to a dark sky area. — Brien

A: Night sky filters mostly help with color shifts from light pollution, and can increase contrast in the sky. We’ve tried a couple of them, but have not tested them scientifically––yet. There will be a blog post comparing them for effectiveness before too long.

That said, I think the general consensus is these filters they can improve skies somewhat, but probably don’t provide $250 to $300 worth of improvement, which is what they tend to cost. I wouldn’t call them scams, but I also probably wouldn’t call them a great investment if resources are limited.

If you decide to try one, please let us know what you think by sharing in the Comments section or on our Facebook page. — Lance

3. Night Lenses for Fuji

Q: I own a Fuji X-T2 and have a 14mm f/2.8 lens. I notice that at least one of you has posted photos using an X-T2 with their 10-24mm f/4 lens. These photos look great. I have been looking at that lens and/or the Fuji 16mm f/1.4 to get a stop or two of additional light, given that the tests I see appear to indicate the corners are much softer at f/1.4, better at f/2 and pretty good at f/2.8. My interest in the 10-24mm is the flexibility and range down to 10mm, but I am concerned about the stops of light I would give up. What is your experience with these lenses, and do you think I should instead look more deeply at a Samyang or Rokinon 12mm or 10mm? — Larry G.

fuji lenses.jpg

A: Several of us have been shooting with Fujifilm since the X system came out, and our two favorite lenses for the night are the Fuji 10-24mm f/4 and the 16mm f/1.4.

The 10-24mm gives an excellent zoom range that’s good for including lots of night sky. The f/4 does limit light, which makes it challenging for Milky Way shots, but if you were to shoot at ISO 6400 or 12,800 and use Starry Landscape Stacker, then you could get away with it. However, the 16mm f/1.4 would be our preferred Milky Way lens for Fuji—it’s an excellent focal length and you can shoot wide open or stop down to f/2 without a worry.

That being said, if I were to buy into the Fujifilm lens system now, I’d have to give their new 8-16mm f/2.8 lens some serious consideration. It’s wider, faster and heavier than the 10-24mm, but the f/2.8 aperture gives it the versatility to shoot in any day or night situation.

On the higher end of tried-and-tested night lenses, I’d also recommend:

For budget and manual focus lenses:

  • I’m not a fan of the Rokinon/Samyang lenses—I’ve had too many with soft, out-of-focus edges. (Though I might try Samyang’s new 10mm f/2.8.)

  • Matt and I both own the inexpensive 7Artisans lenses—the 12mm f/2.8 is pretty good and Matt really likes his 7.5mm f/2.8 fisheye.

Finally, with adapters, any lens can be at your disposal:

  • Our favorite night lens is the Irix 15mm f/2.4 that comes in Canon, Nikon and Pentax mounts. It’s manual focus with a click stop at true infinity, it has hyperfocus markings, and you can lock your focus. It comes in two versions: Firefly and Blackstone. Optically they’re the same, but the Firefly is polycarbonate and the Blackstone is magnesium alloy. The former is lighter, and is best for hikers and photographers who are otherwise weight-conscious; the latter is more rugged, made for extreme situations, and has engraved fluorescent markings that are easy to read at night. — Gabriel

4. Organizing Photos in Lightroom

Q: I really want to move into Lightroom, but I do not organize my images by date. It just won’t work for me because I really want to group photos by place and such so I can look at a “place” together with all times I’ve been there. I know that’s what collections are for, but I cannot even begin to fathom reorganizing everything into dates and collections. Can I use Lightroom that way? — Therese I.

A: You’re in luck, because the Lightroom engineers designed the catalog to be pliable enough to use in whatever way feels comfortable to individual photographers. So when organizing photos, do whatever makes sense to you.

There are two strategies I see most often:

  • Organize into folders by date, and use keywords, collections, etc., to catalog and find them. This is what I do. That works very well for the way I think, because I have a very good memory for dates—show me an image of mine and I can tell you the month and year I shot it. A folder in my catalog might be “2016-05-20_Acadia.” So I do have location info in the folder name, but it’s only secondary. However, this approach doesn’t necessarily work so well for a fair number of other people whose brains don’t categorize information the same way mine does. Many other folks tend to …

  • Organize images into folders by region, country, city, etc. So there might be a folder structure of United States -> Southwest -> Arizona -> Grand Canyon. Using this strategy, you could still search by date, as that info is built into the metadata.

Really, it just comes down to which way your brain tracks these things better. Like I said, I’m in Group 1, as are Gabe, Matt and Lance. Tim is in Group 2. Lightroom is flexible enough to make your own system within the confines of the software. The important thing is to pick a strategy that is easy enough to implement while effective enough to be useful, and then to be diligent about sticking with the procedure you choose so that you can always find your images quickly and effortlessly. — Chris

5. Old Canon vs. New Anything

1561852319_1346734.jpg

Q: What is your thought on the Canon XSi for landscape and night photography? I was thinking of upgrading to a their DLSR cameras, but was wondering if a Nikon camera would be a better option. — Nichole P.

A: The Canon XSi is more or less an entry level camera from 2008, and, to put it mildly, would be a subpar choice for night photography. We recommend a current camera that is at least one notch up from entry level.

To an extent, it matters what kind of photography you’d like to do. If you want to photograph the Milky Way, then the above recommendation is a minimum, and we’d encourage you to step up to a full-frame camera like the Canon 6D Mark II, or even the original 6D (which you could get on eBay for about $500) if you are on a tight budget. Over at Nikon, the D750 is an outstanding value, or the D5500 or D5600 would be OK.

Most importantly, I recommend buying a current generation camera. Even with lower-priced models, current cameras are far superior to those that were made even just a few years ago. — Lance

Chris Nicholson is a partner and workshop leader with National Parks at Night, and author of Photographing National Parks (Sidelight Books, 2015). Learn more about national parks as photography destinations, subscribe to Chris' free e-newsletter, and more at www.PhotographingNationalParks.com.

UPCOMING WORKSHOPS FROM NATIONAL PARKS AT NIGHT

Five Questions: Offering Answers on Gear, Techniques and Etiquette

As you might imagine, we get emails from time to time asking us questions about night photography. We’re always happy to respond personally to those questions. However, there’s also the (largely correct) theory that for every person who asks a question, there are a hundred others who want to know the same thing but didn’t ask.

Therefore, we have decided that from time to time we will collect five of the questions that have recently been asked of us, and share them, along with our answers, with all of our blog readers. We hereby commence this “Five Questions” series today.

Our first foray into shedding some light on night photography conundrums includes some excellent questions on gear, techniques and etiquette.

1. SharpStar2 and the Nikon 14-24mm

Q: I have the Nikon 14-24mm f/2.8 lens. I have just finished reading about the SharpStar2. In my very limited experience with photographing stars, I have yet to obtain anything close to a sharp focus on them. Thus I’m intrigued by the SharpStar2. Can this be used with the lens I’ve mentioned? I’m assuming I would have to purchase the appropriate square filter holder and the appropriate size SharpStar 2 filter. Could you tell me what size to order, and which filter holder you’d recommend? — Liela N.

A: Although the Nikon 14-24mm is one of the best lenses for night photography, it’s actually not one I can recommend for combining with the SharpStar2. In fact, I’m not sure there’s a way to get it to work at all. The issue is that lens has the bulbous front element, which means a flat filter can’t be used without retrofitting a holder. There’s a great article on Naturescapes titled “Adapting Filters to Fit the Nikon 14-24mm Lens” that explains why and offers a DIY solution, but it requires a 150mm filter, and the largest that SharpStar2 comes in is 100mm.

But I would definitely hold on to that lens for night photography! If you’d like to work on other techniques for focusing in darkness, I’ll offer three suggestions:

  1. Use Live View. It’s infinitely easier than trying to focus through your viewfinder.
  2. Try presetting your lens to infinity during daylight, then turn off autofocus and tape down the focus ring.
  3. Use hyperfocal distance.

Incidentally, if you’re interested in purchasing the SharpStar2 for other lenses, we have a discount code we can share with you. Use “NPAN10” to receive 10 percent off the SharpStar2 on LonelySpeck.com. — Chris

2. Stack-a-Matic

Q: I use Photoshop/Lightroom CS6. I am a new user to Photoshop so obviously still learning. I tried to download your recommended Stack-A-Matic but I get an error that says I need Photoshop 12 or higher. What is a good stacking program that goes with CS6? — Sue W.

A: Stack-a-Matic works with CS5 thru CC (latest). Did you download it from my website, and use the manual installation instructions? Sometimes it’s a little bit finicky, but it does work. You might have to do a restart, or possibly walk through the installation twice, but it’s worth it.

I’m sorry that I can’t offer more tech support than this for Stack-a-Matic; I’m just hosting it for Russell Brown. Alternatively, you can try StarStax for Mac, and Startrails.exe for PC. — Lance

3. Light painting in Arches National Park

Arches National Park. © 2016 Tim Cooper.

Arches National Park. © 2016 Tim Cooper.

Q: I heard/read that Arches National Park has closed the permits for night photography. Does this mean for workshops or personal? — Juan Aguilera

A: Yes, Arches (and Canyonlands National Park) did institute a rule change this year, but it applies only to instructor-led groups using an official CUA (Commercial Use Authorization) permit, and for the moment it applies only to light painting.

If you go on your own as a photographer, there are no restrictions—for now. But if photographers don’t collectively respect that environment (i.e., behave ourselves), who knows what might change? While we don’t agree with a blanket rule change in Arches, we do understand why it was implemented. We always talk about the etiquette of doing night photography in a way that doesn’t negatively affect others who are enjoying the same dark skies that we’re photographing. (See the early sections of the “Night Photography in National Parks” presentation Lance and Chris did at the B&H Event Space a few months ago.)

However, it’s also good to note that if you’re planning to shoot in Arches in 2017, the park will be closed at night every Sunday through Thursday due to road construction. So you can do night photography only on Fridays and Saturdays, until the expected November completion date. — Matt

4. Aurora in New England?

Q: Is there any chance of seeing aurora in New England? And is there a good app that you use for potential activity? HersheyArtImages

A: The aurora can occasionally be seen in southern New England, but it is usually just a little bit of green near the horizon in the northern sky, when seen from a dark beach with a view to the north. In the northern parts of Vermont, New Hampshire and Maine, it is seen a little more frequently.

We use an app called Aurora Forecast, which is available for both iOS and Android. Once you download it, you can customize the settings to send you an alert for a kp (the unit of measurement of auroral activity) of 6 or higher in the middle latitudes. If the activity is much less than that, you are not likely to see anything.

You will never see aurora from a light-polluted area so far south. Really strong displays can sometimes be viewed right in the center of Reykjavik –– but that is a much smaller city, with much smaller suburbs. — Lance

5. Dealing with light pollution

In this photo from Everglades National Park, light pollution from distant Miami builds up in a 30-second exposure to provide depth to the scene. © 2013 Chris Nicholson.

In this photo from Everglades National Park, light pollution from distant Miami builds up in a 30-second exposure to provide depth to the scene. © 2013 Chris Nicholson.

Q: I am struggling with processing wide-field astrophotography images (starscapes, Milky Way, etc.). In particular, with how to remove light pollution, which is an unfortunate fact of life for those of us living in the eastern part of the country. For wide-field photographs, the light pollution is usually graduated over the image, being brightest at the horizon and diminishing at you go higher. I would very much appreciate any tips you might have in this area. — David T.

A: Honestly, I generally don’t do anything to try to rid light pollution from my night photos, but rather try to use that extraneous light creatively. Specifically, I use the distant light to create silhouettes of mountains, for example, or to light clouds in the sky. Both of those tactics can provide depth to otherwise pitch-dark scenes.

If you do want to negate the color effect of light pollution in the night sky, a tech option is to try one of the new filters for eliminating the color cast in the sky that can be caused by light pollution. Our friends at Lonely Speck recently released the PureNight filter, which is made from a special didymium glass that reduces the transmission of light from sodium vapor lamps. We have yet to try it, but they know their stuff, so it’s likely an excellent solution. We also just heard about the NiSi Natural Night Filter from Ikan, but again, we haven’t had the pleasure of trying it yet. — Chris

Chris Nicholson is a partner and workshop leader with National Parks at Night, and author of Photographing National Parks (Sidelight Books, 2015). Learn more about national parks as photography destinations, subscribe to Chris' free e-newsletter, and more at www.PhotographingNationalParks.com.

UPCOMING WORKSHOPS FROM NATIONAL PARKS AT NIGHT