For one last moment, as a group, we’re taking time to reflect on the incredible journey we embarked on in 2018. We visited even more destinations and had even more adventures than the previous year.
All in all, it’s a moment where I say, “I am so proud to be doing this with these people.” That not only includes my esteemed National Parks at Night partners and fellow educators, but also the workshop attendees who make this all worth it. Bravo and brava to all of you for inspiring us to be more and to do more every day.
And now, the hardest assignment of them all: The five of us choose only our two favorite images each from the entire year, and tell the stories behind their births.
This is our final look back—and then it’s all 2019, baby!
Gabriel Biderman
Reality is Outside the Skull. Nikon D750, Nikon 14-24mm f/2.8 lens. Light painting exposure: 80 seconds, f/2.8, ISO 1600, painted with a Coast HP5R; star exposure: eight frames at 15 seconds, f/2.8, ISO 10,000 blended in Starry Landscape Stacker.
I love revisiting locations to search for new visions. I’ve been very lucky to travel to one of our favorite dark sky parks, Joshua Tree, for each of the last two years. The first time is always the discovery phase—getting to know the place. You can do all the research prior, but nothing beats being on location, and for Joshua Tree you feel like you are in a Dr. Seuss book.
This year, for me, the park was all about the rocks. On one of our scouts during the day I had discovered this wide-open area that had tons of smaller but randomly wonderful rock formations. I found so many scenes to get lost in! When I happened upon this “skull rock” with its eye open to the southeast, I immediately went to the Night AR in PhotoPills to confirm the orientation of the formation. Indeed, I could see that on that night the core of the Milky Way could be placed inside the “eye of the skull.”
The scene reminded me of the George Orwell quote from 1984: “Reality is inside the skull.” However, in this case the breathtaking reality of the Milky Way is outside and available to all.
It was a very challenging shot because I needed to position the camera about 3 to 4 feet from the skull. Hyperfocusing wasn’t a viable solution because the foreground subject was just too close. I was shooting with my favorite rig: the Nikon D750 and 14-24mm f/2.8 lens at 14mm, low to the ground. After a few test shots it seemed like my best option was to do a focus blend—take one shot focused on the close rock formation and then a second shot with the focus on infinity to keep the stars sharp.
The light painting was added to an exposure of 80 seconds, f/2.8, ISO 1600 with two passes of a Coast HP5R flashlight from an oblique angle. I then refocused and took eight shots for the stars at 15 seconds, f/2.8, ISO 10,000. I stacked those images in Starry Landscape Stacker to get a cleaner, sharper sky with minimal star movement. That result was then blended as masked layers in Photoshop with the light-painted frame. It took a while to finesse this image, and even though I shot it eight months ago, it is an image that I’ve cherished but not shown until recently.
Ironically this image had gotten inside my skull, from original concept, to complex capture and blend, to finally being able to release it to the world. A reminder that a wonderful reality can be found just outside our mind.
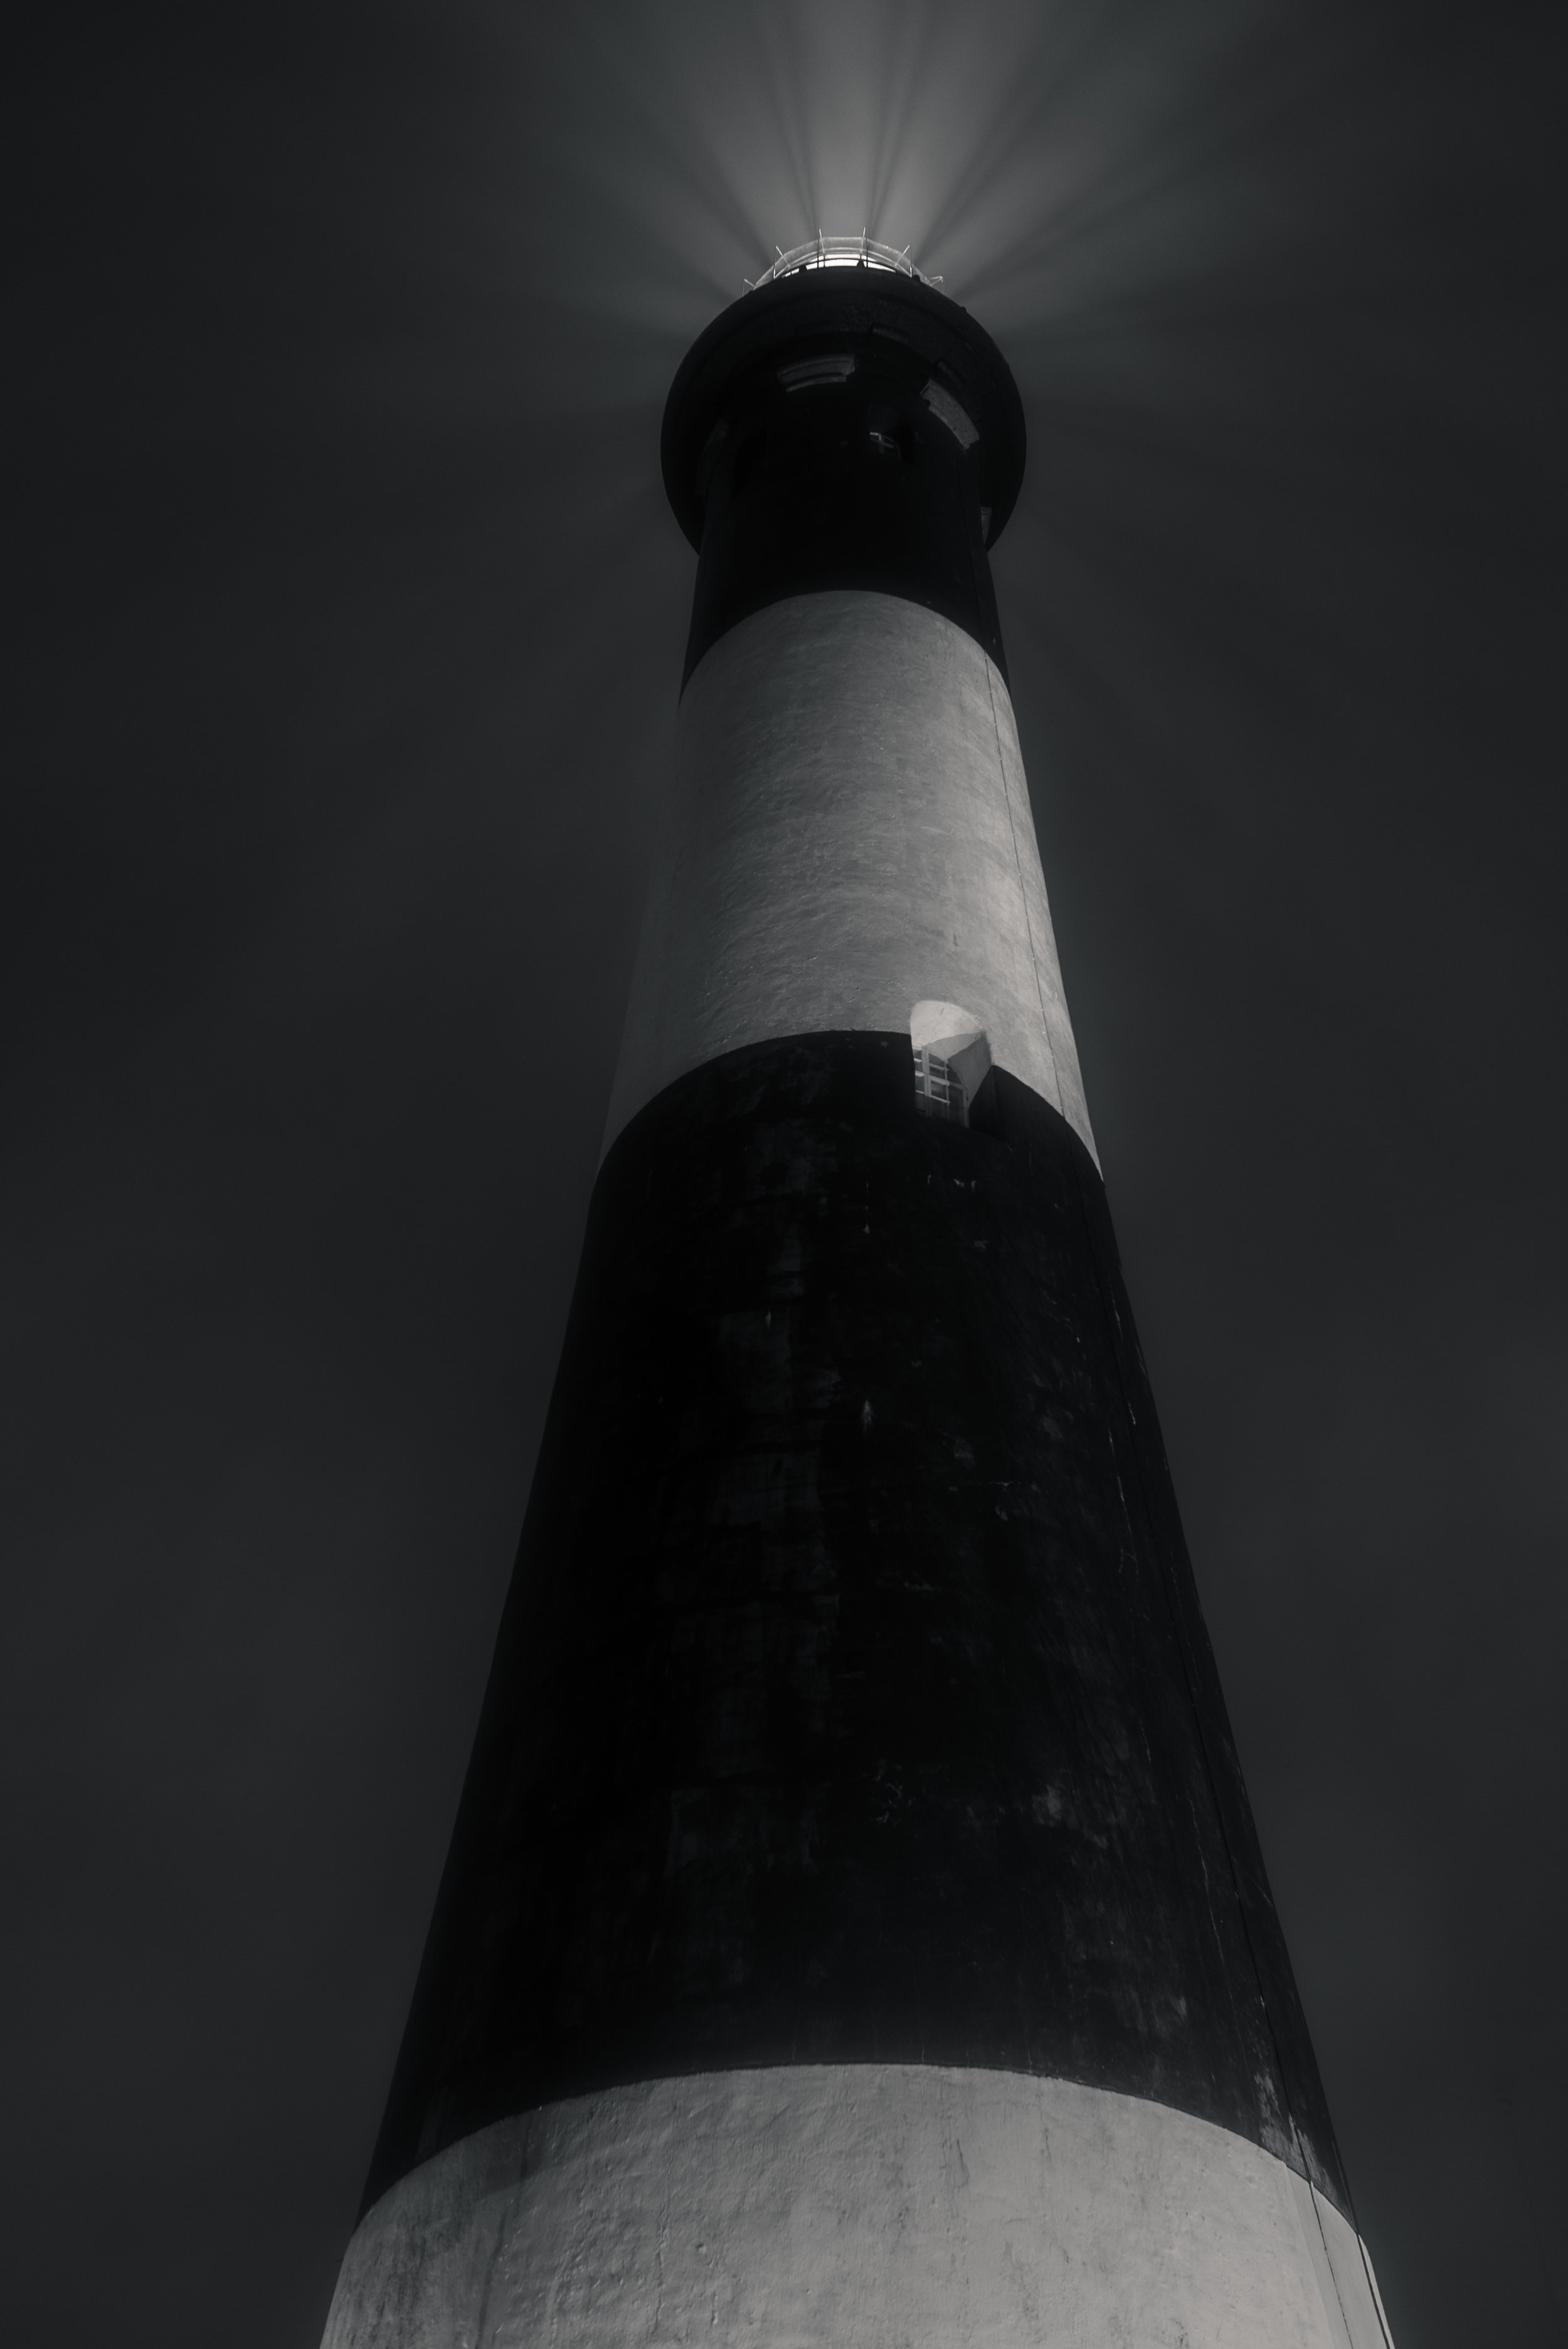
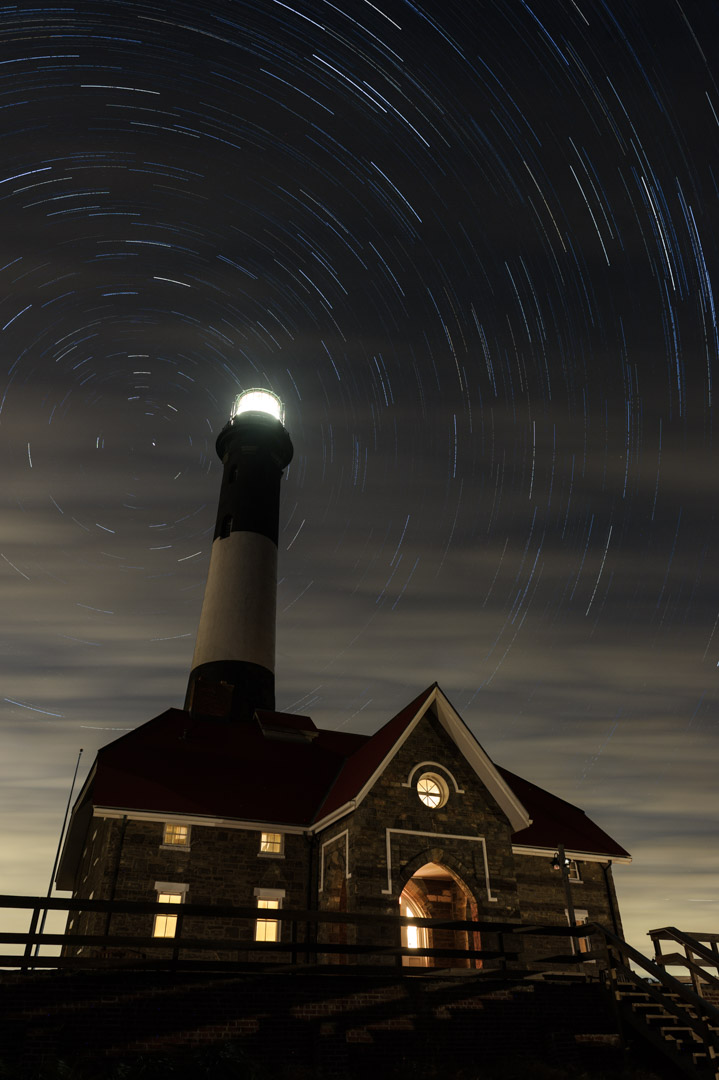
Fire Island Lighthouse. Nikon D750, Irix 15mm f/2.4 lens. Multiple exposures at 1/2 second, f/2.4, ISO 6400.
When we were preparing for our New York Night Photography Summit shoot at the Fire Island lighthouse, one of the main questions was, “What if we have bad weather?” The obvious tendency is to get disheartened when you’re expecting stars and then the clouds cover the sky.
However, we love all the challenges of the night. Well, maybe not 60 mph winds mixed with rain, sleet and snow, but there are many opportunities to create unique images in inclement weather. So many that we decided to teach a class on it at the summit, and it totally prepared us for the first night!
When we arrived at Fire Island, our minds were blown—the light precipitation was capturing the light beams and extending them out to the farthest reaches of the ocean. Our previous clear nights of photographing this location were good, but this was awesome! The light beams on a clear night don’t have the added benefit of passing through particles and clouds that reflect the light back. An overcast night is actually the perfect time to shoot a lighthouse, as the beams are truly defined and the lighthouse effect is remarkably enhanced!
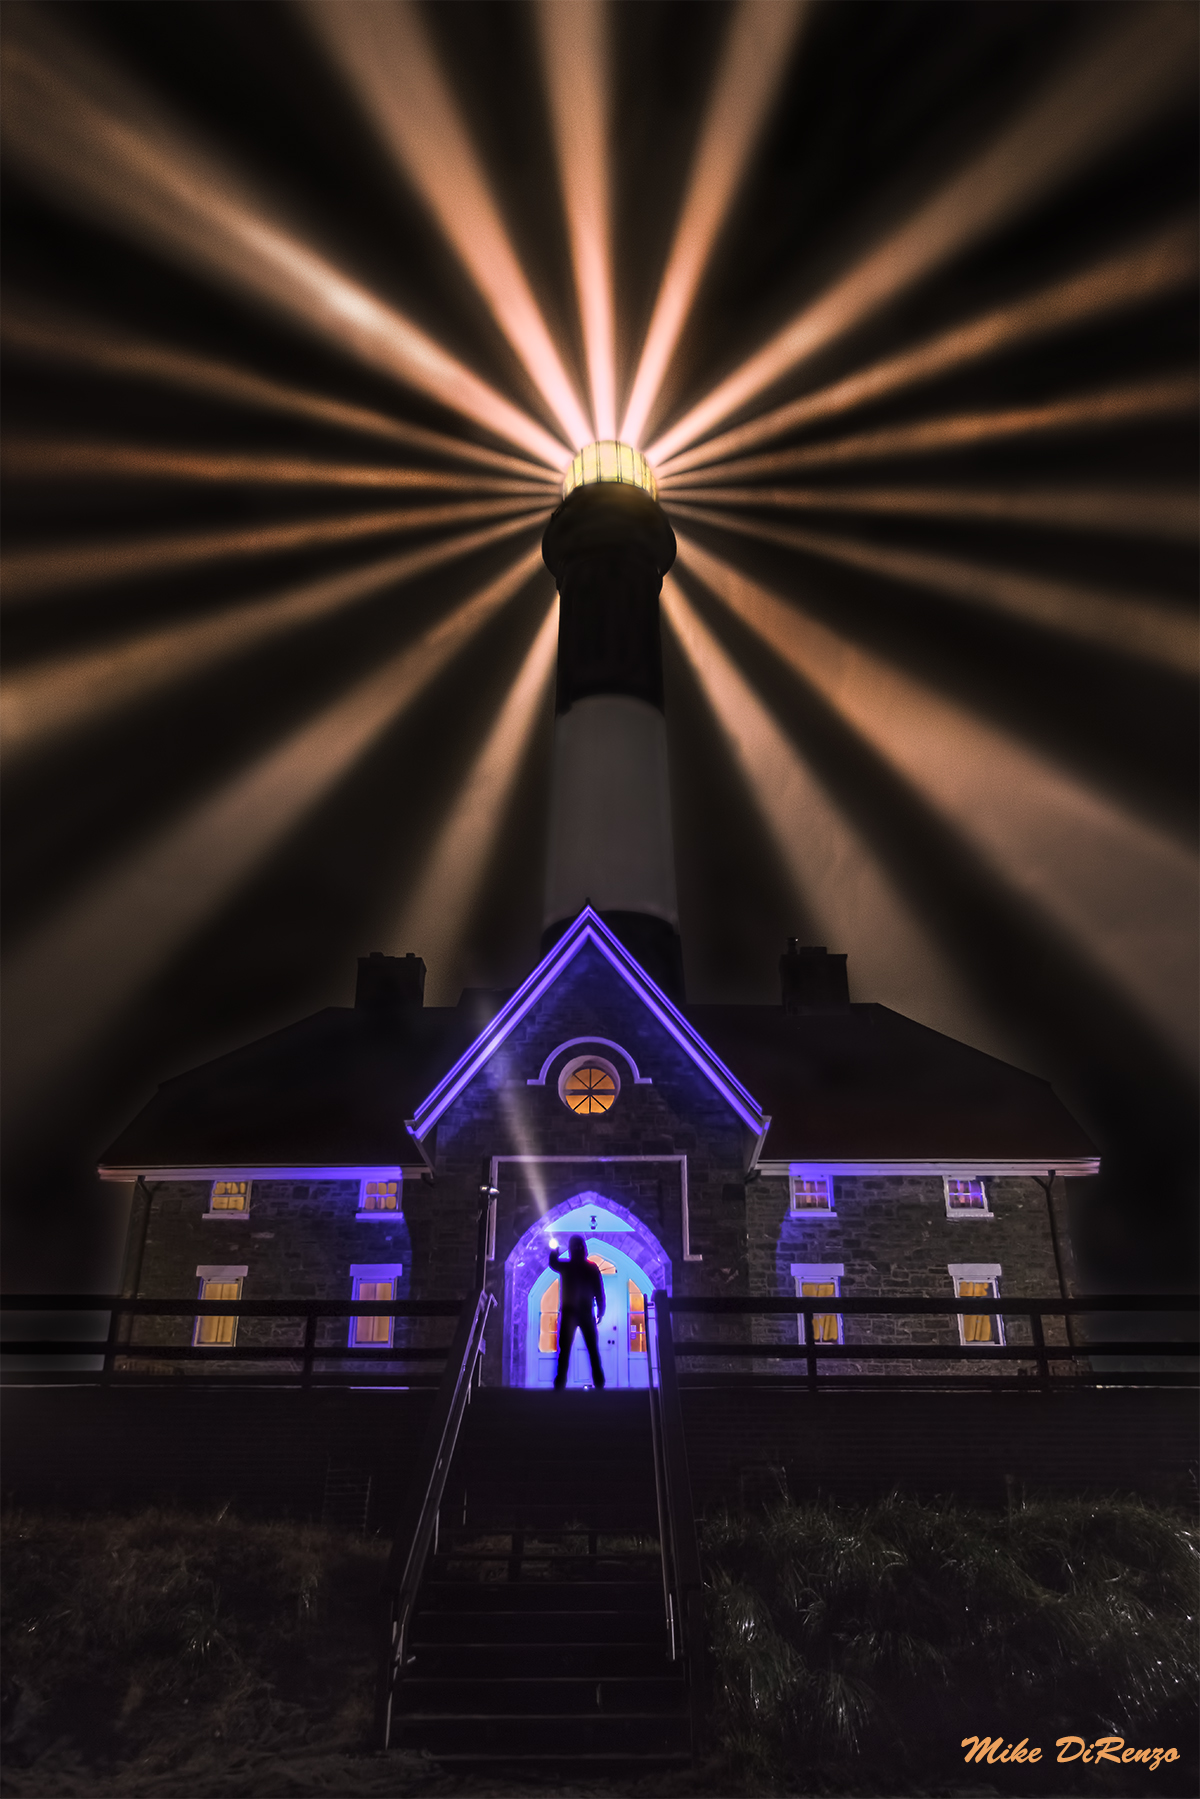
On this particular night, everyone who had been so bummed to be shooting in the rain and under the clouds was now elated with this new heightened experience. There wasn’t a bad angle to capture the ever-reaching beams, but this symmetrical angle ended up being my favorite. I worked together with a group of friends to light paint the foreground and to get the timing of the beams down. (I’ll be sharing a more in-depth capture-and-post breakdown of this image in a “How I Got the Shot” blog this winter, so stay tuned.)
In the end, the “bad” conditions were a boon. I’m now excited to go shoot in the fog, snow and overcast conditions more than ever. I hope this inspires you too!
Lance Keimig
Raufarhöfn, Arctic Henge. Nikon D750, Nikon 24-120mm f/4 lens. Lit by four Luxli Viola lights controlled remotely via the Luxli Conductor phone app. 30 seconds, f/4.5, ISO 5000.
For the second year in a row, one of my favorite photographs is from Iceland. Last year’s was a simple image of a familiar place, and what made me choose it was how it transported me back to Djupavik, one of my favorite places on the planet.
This year’s image is a different story altogether. It was made in a place I had never been before, and one that required determination, spontaneity and flexibility on the part of the group I was traveling with, along with a significant amount of expectation management. If you read our 2018 first-half workshop wrap-up, you may remember that our plans in Iceland were derailed by some truly awful weather, and that the group came together with clarity and force to reorganize and change our itinerary midway through the trip.
That change of plans made for some serious logistical hoop-jumping, but in the end it was truly worth the effort as we saw some wonderful aurora, we mostly avoided the horrid weather, and when we did encounter some, we were able to work with it.
Once we had changed course and wandered into uncharted territory in the north of Iceland, we came across images of Arctic Henge in the far northeast of the country. We were intrigued.
The aurora forecast called for a level of 5 Kp, meaning a very high probability of seeing the northern lights. We were starting from 4-plus hours away, but guided by the seemingly boundless spirit of our group, we decided to make the drive and see what this henge thing was all about. Through hour after hour of lonely road, and mile after mile of increasingly overcast skies, our confidence was wavering. But the weather forecast insisted we would have clear skies, so we doggedly soldiered on, despite what our eyes (and windshield wipers) were telling us.
We arrived at the beginning of twilight to find an enormous but only partially finished stone henge. And it was moist. Very moist. The tiny nearby village was shuttered—there were no open shops, hotels or (most importantly for some) bathrooms.
Moreover, there was no clear sky. So we made do, and adjusted our expectations. Out came the Luxli lights, and we made a few images, many of them looking more like a Las Vegas spectacle than a pagan ritual site. As the natural light faded and the sodium vapor lights from the village a few miles away began to lend their orangeness into our images, a magical transformation occurred. The spaceship appeared in the sky above the henge, and a lone alien life form was transported to the surface, conveniently positioned in front of our cameras.
Nah, I’m kidding. Chris walked into the scene and positioned himself in front of the light from the nearest Luxli, and history was made.
Marshall Point Lighthouse, Port Clyde, Maine. Nikon D750, Tamron 15-30mm f/2.8 lens at 15mm. 110 seconds, f/4, ISO 400 for the foreground, plus a second exposure at 20 seconds, f/4, ISO 100 for the lighthouse. Light painted with a Luxli Viola at about 20 percent brightness, swept across the foreground to illuminate the dark rock.
Just like the Arctic Henge image, this one required a bit of luck––being in the right place at the right time. In the opposite of the way that the world conspired against our Iceland group to create a perfect storm of challenges, this night at Marshall Point Lighthouse in Maine presented a perfect storm of photographic opportunities.
I was at the lighthouse with a class from Maine Media Workshops. It’s a place I always bring my classes to when I teach in Maine. Marshall Point is a fixed beam lighthouse, meaning that the light is always on. Not flashing, pulsing, rotating or anything else. It just shines—and oh, does it shine.
A couple of years ago the old incandescent light was replaced with a far brighter and cooler LED light that makes it more difficult to photograph. In order to get a good shot of the Lighthouse without majorly blown highlights, one has to get almost directly below the tower, which obscures the light source from the camera. This is a precarious activity, as it requires crossing a rocky beach that’s covered with slimy, seaweed-encrusted round stones. You have to be there at low tide, and you have to be sure-footed.
Luckily for us, conditions were perfect. The tide was receding, and there was enough moisture in the air to show beams of light around the lighthouse, exaggerated by the shadows of the lighthouse window frames. There was a small tide pool in the foreground where I was able to position myself in such a way to get the lantern room reflected in the water, the tower with its glorious beams, and—the icing on this maritime cake—a lightning storm in the distance seen below the bridge that leads from the shore to the lighthouse. Boom!
I did have to make a second, shorter exposure for the light to complement the longer exposure. The latter allowed enough time to light paint the dark foreground stones, and to capture the rest of the scene and a few bolts of lightning. But the image came together quickly and easily once I found the right spot.
Tim Cooper
Serpent—Borrego Springs. Nikon D4s, 14-24mm f/2.8 lens set at 24mm. Three exposures at 15 seconds, f/4, ISO 6400.
Two years ago, I had never heard of Borrego Springs, California, or of Ricardo Breceda, or of the art he has created. Even after I heard about all of this, I was not prepared for the scope of beauty and sheer volume of the installation. So, I thank the intrepid explorers at Atlas Obscura and our NPAN partner Gabriel Biderman for introducing me to this truly unique collaboration of earth, man and sky.
I was lucky enough to visit the area with 14 curious photographers during our 2018 Ambassador Series workshop with Atlas Obscura titled Dark Skies, Desert Beasts. With over 130 free-standing metal sculptures in the desert surrounding Borrego Springs, it was hard to choose a favorite. But I did really like the serpent.
I chose this as one my favorites for the year for several reasons. The first is that the photograph was a collaborative effort on the part of the workshop participants and myself. Taking turns as director of the shoot and working together on light painting is a great way to learn and use the many hands to help bring a vision to life.
The second reason is the serendipity of the cloud mimicking “smoke” coming from the serpent’s mouth. Sometimes you just get really lucky. I could go back there a hundred times and never see it like this again.
The last reason is the serpent itself. As a lover of light painting, I’m always looking for interesting subjects to illuminate against the night sky. I couldn’t have asked for a more detailed, textured and beautifully sculpted subject. Couple that with the clear dark skies of the desert, and you’ve got a recipe for night of fun!
(FYI, we just announced new dates for another Dark Skies, Desert Beasts workshop with Atlas in 2019.)
Star Trails over Golden Gate Bridge. Fuji X-T2, Fuji XF 10-24mm f/4 lens set at 10mm. Sixty exposures, each 30 seconds, f/4, ISO 200.
San Francisco is set in one of most beautiful locations in this country. The headlands, the bay, the shoreline and the city are all just simply gorgeous. I also really, really like The Bridge. I can’t say why, precisely. Perhaps it’s the engineering. Maybe it's the color. Or most likely a combination of those things plus its location. Whatever the reasons, I can’t go to San Francisco without visiting the headlands and making images of the bridge as the sun goes down.
I can’t count how many times I’ve stood in this spot and contemplated the view as I made image after image. Most of the time, however, I was there only for dusk and blue hour. Rarely did I get a chance to stay well into the night, and when I did the skies were not conducive to star trails.
This night proved to be different. All of the elements came together for a star trail shot. The trick here was to capture the stars without overexposing the city and the bridge. When you give enough exposure to reveal the stars, the bridge and city lights completely blow out. If you limit the exposure to make the city look good, the stars are barely visible. To address this dichotomy, my plan was to break up the exposures into separate ones for the bridge and city lights and ones for the sky and the star stack.
After focusing, I took several test shots and settled on a focal length, composition and initial exposure. I found that using an ISO of 200 for 30 seconds at f/4 produced an exposure that made the stars visible, but overexposed the bridge. A 15-second exposure at the same ISO and aperture retained highlight detail in the bridge and city. I made these two images and proceeded to the next step.
I set the intervalometer on my Fuji X-T2 to shoot 60 images at 30 seconds with a 1-second delay between frames. Once I plunged the shutter, I sat back for half an hour to enjoy the view.
When I returned to the computer, I opened all 60 frames in Photoshop, selected all of the layers and then chose the Lighten blend mode to create the star trails. My next step was to flatten the file to minimize its footprint on the hard drive. I then opened the 15-second exposure and copied it onto a layer in my first file. This darker image allowed me to mask in the properly exposed city lights and bridge while keeping the lighter sky with the stars.
Shooting star trails near cities takes a little planning and some post-processing work, but it’s also a ton of fun. I can’t wait to return to San Francisco this year with Gabriel Biderman to run our Golden Gate National Recreation Area & San Francisco Workshop in November!
Chris Nicholson
Boathouse near Campbeltown, Scotland. Nikon D5, Nikon 24-70mm f/2.8 lens. Light painted with a Luxli Viola. 30 seconds, f/4, ISO 2000.
I’m an ardent believer in the idea that a good photograph should not be just of something, but also about something. And this image is definitely about something important to me.
When I was four years old, I lived in Scotland for about half a year because the U.S. Navy stationed my father at the Royal Air Force Machrihanish base at the tip of the Kintyre peninsula. We lived in nearby Campbeltown, and I still carry a fair number of memories from the experience.
So when National Parks at Night began scheduling a night photography tour of The Hebrides for the spring of 2018, I knew for sure that I wanted to work it. I hadn’t been to Scotland since my family left in 1976, and this was an excellent chance to revisit one of my childhood haunts. So it was that Lance and I jumped over the pond a few days before our tour began and drove up to the Kintyre peninsula.
The couple of days I got to spend in Campbeltown were incredible. I found our old apartment on Queen Street, traced the steps I used to make to the nearby beach, and drove downtown past my old playground and along the fishing port. We stayed overnight at an old captain’s house we found on Airbnb, and that’s where we based our night shoot.
I focused all my attention on this old boathouse. I set up the camera on a jetty, and walked back onto the land atop some rocks to light paint the structure and water with a Luxli Viola. My goal was to mimic the warm tones of the light with the warm twilight sky, and to illuminate the crashing waves just enough to capture some motion and reveal some detail.
I liked the resulting photograph enough so that it truly is one of my favorites of 2018. I like the light, the color, the composition. But the most important part of the image for me is the experience of those two days: reconnecting with memories of my mom, who I talked to several times while strolling the streets, and with memories of my dad, who passed in 2006, and with memories of who I was 42 years ago as a little boy in a faraway land.
Moonlight in Santa Elena Canyon, Big Bend National Park. Nikon D850, Nikon 14-24mm f/2.8 lens at 17mm. 20 seconds, f/2.8, ISO 5000.
If you’ve ever been to Big Bend National Park and photographed Santa Elena Canyon, you know that the light at this amazing location can work well at both ends of the day. You can shoot in the morning when the sunrise light hits the face of the canyon, or you can shoot at the end of the day when the setting sun bounces into the canyon and reflects off the walls. The latter is a more challenging exposure, but often results in more satisfying creative options.
So when I saw in PhotoPills that the moon would be setting behind the canyon during my winter 2018 trip to the park, I had the idea to use that same late-day strategy for shooting there at night—having no idea if it would work well or not.
Well, it worked splendidly. The night was perfectly clear, which allowed for a spectacularly starry sky, and the setting moon did exactly what I was hoping: It bounced into the canyon, lighting up the 1,500-foot cliff face that flanks the Rio Grande.
Shooting from a low angle with a wide lens portrayed the magnitude of Santa Elena’s size. It also—for me, anyway—inspired another adventure. Looking at the moonlight spilling into the canyon, I could imagine the thrill of canoeing the river at night. Next time, perhaps?
Matt Hill
Zig When They Zag. Nikon D500, Nikon 50mm f/1.4G lens. 30 seconds, f/2, ISO 125.
My two favorite images of 2018 reflect my developing tastes in composition and motion. And they both happened at Rocky Mountain National Park.
After hiking up the Tundra Communities Trail, I faced west (to catch my breath). Whilst helping workshop attendees, I saw the switchback leading toward the visitor center in the distance, and my eyes were drawn to the car traffic there.
I popped on my Nikon 50mm f/1.4G lens for a nice composition of thirds that allowed me to pit the energy of the cars passing to and fro against the stars angled almost perpendicular against this zigzag of light. After shooting four frames at 30 seconds each, I knew I had enough car trails to make the stack and moved on to another breathless scene. You know, the air is really thin up there. ;-)
Moonset Over Tyndall Gorge. Nikon D850, Sigma 35mm f/1.4 Art lens. Ten frames at 10 seconds, f/5, ISO 6400.
The second Rocky Mountain image was from the hike down from Emerald Lake during our add-on adventure a few nights later. We got to this spot just in time to see the setting moon scraping across this vast valley and mountain range.
After fiddling with my circular polarizer experiment for a bit, I saw that the moon would soon set in the trees to my right, so I hustled to swap in my Sigma 35mm f/1.4 Art lens, go vertical, level out the Acratech GP-ss head on the leveling base and throw on the nodal rail.
This is a 10-frame pano stitch, with each frame shot at 10 seconds, f/5, ISO 6400, then assembled in Lightroom Classic CC. At the time, I did not see the crazy cool things the clouds were doing. I was, after all, a bit exhausted from the 650-foot-in-1.5-mile ascent at altitude while wearing “the kitchen sink” (my Shimoda 60L backpack full o’ gear). During the edit, I was simply astounded by the soft yet kinetic cloud movements and so darn happy that I’d timed it just right to get the moonset in the tree line.
Your Turn!
Now that you’ve seen our favorite photos from 2018, we’d like to see yours! Join us in the fun and post your favorite night photography image from the past year in the comments section below or on our Facebook page, and tell us a little about it. And if you’re on Instagram, give us a follow. We will soon be announcing a contest of your best night shots of 2018!
Next, start 2019 strong. Put on your mittens (or shorts if you’re in the Southern Hemisphere) and get shooting. Let’s make 2019 the biggest year for night photography yet.
With stars in our eyes and gratitude in our hearts, thank you from the entire National Parks at Night team. Hugs.