The Write Stuff: Sergey Churkin and the Light Painting World Alliance

In 2011, Russian photographer Sergey Churkin founded what is now known as the Light Painting World Alliance (LPWA). Its goal is not only to unite artists who practice this niche within a niche within a niche, but also to help light writers around the globe develop their own skills as a way to elevate the quality of the art form as a whole so that it’s more globally recognized in the art world. It’s a lofty goal. And it’s one we applaud.

Since its inception, LPWA has brought light writers together in various ways, including its website, Facebook and Instagram presences, international exhibitions, award presentations, meetups, and meetings and conferences hosted throughout the world.

Fighting in the Rain. Light writing artwork done in collaboration with Nikolay Trebukhin. Olympus E-M1, Olympus M.Zuiko 12-40mm f/2.8 lens. 5 minutes, f/22, ISO 500. © Sergey Churkin and Nikolay Trebukhin.

The group has announced its newest venture: International Light Painting Day (ILPD), which will occur on May 16—the date that UNESCO declared as the International Day of Light. “As in any social action, participation is even more important than results,” reads the ILPD website. “International Light Painting Day will attract people to our art, give them a new way of self-expression, and will make friends between participants.”

LPWA encourages night photographers everywhere in the world to participate, whether through official ILPD events, with a local photography group, or even just by sharing the art form with friends and acquaintances at personal gatherings.

Recently we were able to chat with Sergey about his own growth as a light writer, how all of this got started, where it’s going, and what to expect on May 16.

(We should note a terminology difference. What LPWA calls “light painting” is largely what we at National Parks at Night term as “light writing.” We define the former as illuminating a subject with a light source, and the latter as recording the actual light source as part of the composition. For the purposes of being consistent for our audience, we will use our terminology and definitions in this post, except when mentioning the official names of organizations and events.)


Q: Can you tell me about your passion for light writing? How did you start doing it, and how has it affected your development as an artist?

Sergey: In my work I am constantly looking for new visual forms and new technologies. In 2008, when I first saw light graffiti, I thought it was computer graphics, and I wondered how to achieve the same effect. So I tried drawing something like it on my computer, but all my attempts were futile. That upset me. I thought, “How is it someone else can draw this, but not me?” Then I discovered that the picture I was trying to model wasn’t computer graphics—it was photography with patterns of light!

That’s when I discovered a galaxy called Light Writing. Almost at the same time, my eldest son showed me his own drawings with light.

Relax Time. From the series “Real Life of Unreal Person.” Canon 5D Mark II with a 28-135mm f/3.5-5.6 lens. 202 seconds, f/8, ISO 200. © Sergey Churkin.

Everything came together for me. I understood this technology. I realized that in my hands was a new, powerful and versatile tool for design.

I spent nearly a year attempting to combine light writing with video, but it turned out that the specialties of drawing light impose fairly strict limits on its use in video projects. I do not like  restrictions in the art process, so I decided that photography would give me more opportunities to express myself. Since then, I paint with light.

I’m a professional video designer, so I know a lot about designing nice images. Light writing for me is another way to express my visual fantasies, with much more effective and natural execution. So, I already was a visual artist before falling into light writing. But light writing taught me to be more patient—to spend more time for planning and preconstruction of my artworks. I started to develop my own techniques and tools, which could give me limitless purposes. Thus, light writing brings the sense into my life.

Q: What are some of your favorite light writing tools?

Sergey: I prefer to use light tools like I would use real paint brushes. And I love handmade tools. Manufacturer’s tools bring comfort in making art, but also limitations of art itself. That is why I also try to develop my own techniques and my own tools.

Portrait of Sergey's friend Vikthor Clarke, part of the series “Friends in Light.” Created with a handmade custom light brush. © Sergey Churkin.

Q: What prompted you to spread this passion by forming LPWA?

Sergey: I realized that our genre had two problems. First was low awareness, both among the ordinary public and among the art business. Most people simply do not know what light writing is. Second was the problem of quality. Too many people were doing light drawing just for funny snapshots.

After some thought, I came to the conclusion that anyone alone does not change anything. By improving my own skill, I can achieve success and recognition, but that wouldn’t resolve those problems. To promote light writing to the masses needed a collective effort. I had a little experience with creative associations for Russian TV designers and promoters in the 2000s, so I saw what a collective mind with an active nucleus can do. I figured, why not do the same for artists writing with light?

But of course, it would be ridiculous to think that all the work of making this huge Alliance since 2011 was done just by one person. It was done mostly by artists themselves. I only help them with ideas, inspiration and courage. I am happy to be friends with dozens, or even hundreds, of artists around the globe. And I am very grateful to all my light friends for their countless support, which really makes LPWA what it is.

Dissected Guitar. Canon 5D Mark II with a 28-135mm f/3.5-5.6 lens. 19 seconds, f/13, ISO 160. © Sergey Churkin.

Q: How quickly did LPWA grow?

Sergey: Since 2011, the Alliance has grown to about 650 registered members. In fact, after 2015 I didn’t pursue more members as a goal anymore. What’s most important for me now is to inspire the community to be more active in making and learning art. The things we’ve been doing the last two years have showed me that this goal is very possible.

Now I am concentrating more on organizations, developing relationships between LPWA and museums, galleries, festivals and other cultural institutions.

Q: What’s next for LPWA—how do you hope it evolves?

Sergey: Honestly, right now I am at a crossroads regarding LPWA’s future. Eight years of effort has told me that sometimes I need to take a break, to analyze past experiences. I see how much our community has grown since 2011, I see what is going on in our industry, and I see how new trends are born and die. So I keep that all in mind.

Some of the goals of our starting years were realized successfully, and now the community requires new ones. We’d like to get regular columns in the world's largest magazines about art and photography, and over time would like to publish our own magazine, Light Painted World.

Red Treble Clef. Image made with customized light blades. © Surgey Churkin.

We’re also working to develop close contact with manufacturers of software and light tools, because they are not necessarily light painters and don’t always know what features should be in these devices. We need fine-tuned software and new light tools for professional light writing.

We’d also like to develop close contacts with interior designers, the manufacturers of decoration accessories, and fashion designers. Light writing should be more than only photos or prints—we can use our artworks as a basis for many more goods.

And off course, a major aspiration for the near future is to get official recognition from UNESCO for our art form, in the form of May 16—International Light Painting Day!

Q: you have organized some huge collaborations of photographers working on one image. Can you talk about that?

Sergey: It’s another inspiring and powerful way to involve an audience with the light writing world, to do these massive collaborative artworks.

Our first experience like this was done in 2013 at our second LPWA worldwide exhibition in Paris, when 20 artists all together made a light writing animation on Place Concorde. Next was a massive collaboration on Plaza de la Gesta in 2014, when 34 artists made the IYoL2015 logo; and at the Dorum (Germany) LightHouse Meet-up, 24 artists created the same logo. An outstanding collaboration was made in Longhushan, China, where 13 light painters created a massive image and animation.

This is a very, very cool activity for all our artists.

Collaboration light writing made during the LPWA Roma Meet-up 2017. Olympus OM-D E-M5 Mark II, Olympus M.Zuiko 7-14mm f/2.8 lens. 1.3 minutes, f/6.3, ISO 200. Click here to see all credited artists.

Q: Why do you think light writing is such an intriguing part of night photography?

Sergey: For me, all parts of night photography are intriguing. Choosing a location, waiting for the proper time, finding particular details of a scene that can make this place magic, testing camera settings and tools.

But light writing itself is an endless experience with an indeterminate end. Mostly I know what I want to draw, but I always pray for a lucky chance that could give me a moment of something incredible. Experiences like that are what really intrigue me.

Q: What is your advice for someone who wants to get started in light writing, or someone who wants to learn more about it?

Sergey: The only good advice is to start with regular tutorials, regular tools and then just copy the masters. Get your first experience—try to feel the light. Make a lot of senseless images just to understand how you can use light.

Then forget all of it. Throw everything away and start to make your own light art. That is when you start following your own way, and when you no longer copy others.

Lion and His Guest. Made with light brush by Bernhard Rauscher. Canon 5D Mark II with a 28-135mm f/3.5-5.6 lens. 116 seconds, f/8, ISO 250. © Sergey Churkin.

Q: Tell us about Light Painting Day. What is the goal, and how can people get involved?

Sergey: International Light Painting Day is intended to give anyone—not only light artists—more motivation to learn about light painting and light writing. I really think that light writing is a much more inspiring art than more traditional drawing and painting. I would love to see light writing become a “family art.” Whole families could make this kind of art as a good and kind collaboration of father, mother and children! The best gratification for me could be if International Light Painting Day became a widely observed family celebration.

Of course, light painting is not just for May 16—we can celebrate this art form 365 days a year. So, International Light Painting Day is not for only professional photographers, but also for their friends, mates, family or even neighbors.

For more information about attending an International Light Painting Day gathering, see the official Event Programme. Sergey encourages individuals, camera clubs, and other groups and organizations to coordinate their own ILPD events as part of the global celebration. More more information, visit the ILPD webpage.
Chris Nicholson is a partner and workshop leader with National Parks at Night, and author of Photographing National Parks (Sidelight Books, 2015). Learn more about national parks as photography destinations, subscribe to Chris' free e-newsletter, and more at www.PhotographingNationalParks.com.

UPCOMING WORKSHOPS FROM NATIONAL PARKS AT NIGHT

The Night Photography Mindset: Seeing Beyond the Milky Way

Ever since the introduction of cameras that were capable of producing quality images at high ISOs, night photographers have understandably been obsessed with photographing the Milky Way. For the first time in the history of photography, it was possible to make images of the starry night sky with short enough exposures to register stars as points of light rather than as star trails. It’s hard to understate the significance of this development, as it allowed us for the first time to see in a photograph the densest part of the Milky Way galaxy in the context of our place in the universe.

Keys Desert Queen Ranch, Joshua Tree National Park, 2018. Nikon D750, Sigma 24mm f/1.4 lens. 15 seconds, f/2.8, ISO 5000.

Beginning in late 2008 with Nikon’s introduction of the D700 and then the D3S a year later, photographers began making nighttime exposures in nature by starlight. By using the previously unheard-of ISO of 6400 with an f/2.8 lens, one could expose the landscape under a starry sky for 20 or 30 seconds and end up with a clear image of the galactic core of the Milky Way in all its glory. In the decade since, even entry-level cameras have become capable of producing decent-quality images at high ISOs, making astro-landscape photography accessible to almost anyone with a tripod.

Today, such images are commonplace enough to be taken for granted by people who have never stood under a sky dark enough to see the Milky Way with their own eyes. I’m reminded of Edward Steichen’s images of Rodin’s Balzac taken by moonlight in 1908. The authenticity of these remarkable images was questioned repeatedly because it was believed to be impossible to make photographs by moonlight.

Edward Steichen, Rodin’s plaster cast of his Balzac Sculpture, photographed by moonlight in 1908. Some of the earliest extant photographs made by moonlight are Steichen’s series of Rodin’s sculpture made in France in 1908 over a period of three nights. Steichen experimented with a range of exposures and lighting, resulting in a series of images that are now considered among his most important works.

Fast-forward to today and it feels like the concept of night photography is synonymous with astro-landscape, the term we now use for short-exposure high-ISO photography of the night sky. Most night photography workshops are planned around the new moon phase when the sky is darkest, and we giddily await the return of “Milky Way Season” (which coincidentally is just starting as I write this). In April, the galactic core rises above the horizon very late at night, and those who venture out two or three hours before dawn will be rewarded with the rich sight that the rest of us have to wait until late May to see at the “more reasonable” time of two hours after sunset when the sky first gets dark.

However, as all of the images made before the era of astro-landscape photography have taught us, night photography is about much more than just the Milky Way. This is a point I discussed in this space last summer (see “Beyond the Milky Way”). I ended that piece suggesting that night photographers create images that are “about more than just that great big galactic cloud in the sky.”

That sentiment is something I’d like to elaborate on now. The remainder of this article is about the attitudes and approaches of working in different nighttime conditions.

Urban Night Photography

Most people’s first attempts at night photography are made in brightly lit urban environments because that is where most of us live. Photographically speaking, the city is a sea of darkness punctuated with pools of light, and the main challenges are finding light that’s interesting and controlling contrast in the scene.

An SUV waits at the rail crossing, Houston, Texas, 2011. Canon 5D Mark II with a 50mm f/1.4 lens. 15 seconds, f/8, ISO 200. Everything came together in this spontaneous image–– the timing of the train, the composition and the lighting. The red warning light at the crossing provides a color accent and the cool xenon headlights of the SUV illuminate the passing train.

Broad cityscape images made at night often yield disappointing results. Images can be exposed for the overall scene, which leads to clusters of blown-out highlights or to dark, underexposed scenes with puddles of well-exposed highlights near the light sources. Learning to “see” what works for urban night photography is a skill that takes some time to develop.

In my own experience, I tend to see light before subject matter in these conditions. The alluring combination of different-colored light sources or the strong interplay of light and shadow draw me to a scene first, and then I try to find an interesting composition that takes advantage of that light. The best photographs are the ones where the light and subject matter complement each other. In situations with a dominant monochromatic light source, such as low pressure sodium vapor or mercury vapor, I often plan to convert to black and white. The quality of light from these sources is usually appealing only when used in conjunction with a contrasting light source.

Photographing By Moonlight

When I first began teaching night photography back in the late 1990s, workshops were always scheduled around the full moon, because film and early digital cameras were not capable of making usable images by starlight. Exposures of 15 minutes to an hour or more were the norm. The moonlit landscape is a subtle environment, and one that naturally leads a photographer to slow down and quietly observe the world around them. The romantic notions often associated with the night––loneliness, solitude, mystery and danger—can easily be appreciated by a long walk alone under a full moon. The best photographs made by moonlight often reflect these sensitivities.

Study Butte, Texas, 2007. The moon rises behind a rock formation in the Texas desert. I achieved careful exposure and backlight by placing the rising moon behind the rock, which made this a much more interesting photograph than it would have been if it were front-lit and fully exposed. Canon 5D, lens unrecorded. 268 seconds, aperture unrecorded, ISO 100.

In contrast, fully exposed moonlit images often lack those very qualities that make moonlight special. If one follows traditional exposure guidelines and exposes for a right-biased histogram, any sense of mystery is lost and the result is a strangely bluish scene that looks like weak sunlight. I often say that a good night photograph leaves the viewer with more questions than answers. Rather than revealing everything there is to know about a scene, a successful moonlit image pulls the viewer into the scene, and it evokes that irresistible but slightly uneasy voyeuristic feeling of being somewhere or doing something that we shouldn’t. Careful underexposure, supplemented with well-conceived light painting, can lead to powerful images that are suggestive rather than revelatory.

Astro-Landscape Photography

I’ve often thought of those first few years of astro-landscape photography in the same way as the earliest incarnations of Adobe Photoshop, when filters and silly composites ruled the day, because We Could. Another example might be the heady days when Photomatix was first released, along with those briefly seductive and garish HDR images we are all trying to forget. Perhaps it wasn’t quite that bad, but the idea was the same.

The Discovery, Death Valley National Park, 2015. Nikon D750, Tamron 15-30mm f/2.8 lens at 26mm. 25 seconds, f/3.5, ISO 6400. The combination of bizarre subject matter and light painting make this photograph about more than just the Milky Way. There’s a story here, and the viewer is left with more questions than answers after studying the image.

Likewise, astro-landscape photography was something new, and there was a pervasive energy to explore and test the limits–– the very qualities that lead to advances in art and science in the first place. Now that we are a bit more accustomed to seeing and photographing the Milky Way, galactic imagery has become a bit more sophisticated. Technically, it’s a relatively straightforward process to make a galactic core photograph. Be in the right place at the right time, point your camera in the right direction, focus carefully, and make an exposure.

What makes for the most successful images is context. Rather than just a simple horizon line and starry sky, strive for more complex images where the Milky Way core is just one element of the photograph. Compose an image where that element relates to the foreground, and use the foreground to convey the scale of the night sky and all those stars. Pay attention to the principles of design, and place the various elements smartly within the confines of the image frame the same way that you would with any other good photograph.

Bring It Home, Make It Yours

Some people have strong preferences about where and when they like to photograph at night. Perhaps the energy of the city at night, the pensive solitude of the moonlit landscape or the awesome grandeur of the Milky Way in one of our great national parks is what most attracts you. By all means, follow your heart, and do what you love. Just know that great night photographs can be made at any time of the year and during any phase of the lunar cycle, in the middle of Manhattan or deep in Yosemite.

Different skills or approaches may be required. No self-respecting daytime photographer would limit themselves to photographing at only certain times of the month or during only a few months of the year, and neither should you. Be an anytime, anywhere photographer and make the most of the conditions that you find before you.

Lance Keimig is a partner and workshop leader with National Parks at Night. He has been photographing at night for 30 years, and is the author of Night Photography and Light Painting: Finding Your Way in the Dark (Focal Press, 2015). Learn more about his images and workshops at www.thenightskye.com.

UPCOMING WORKSHOPS FROM NATIONAL PARKS AT NIGHT

Five Questions: Moon Lenses, Smoky Summer Landscapes, Noise Tests and More

We get a lot of questions. We hope we have a lot of answers. Today, at least, we have the same number of each. Five, to be specific. Five questions from night photographers just like you, and five answers from the five of us.

If you have any questions you would like to throw our way for a future Five Questions blog post, please contact us anytime. Questions could be about gear, national parks or other photo locations, post-processing techniques, field etiquette, or anything else related to night photography. #SeizeTheNight!

1. Moon Lenses

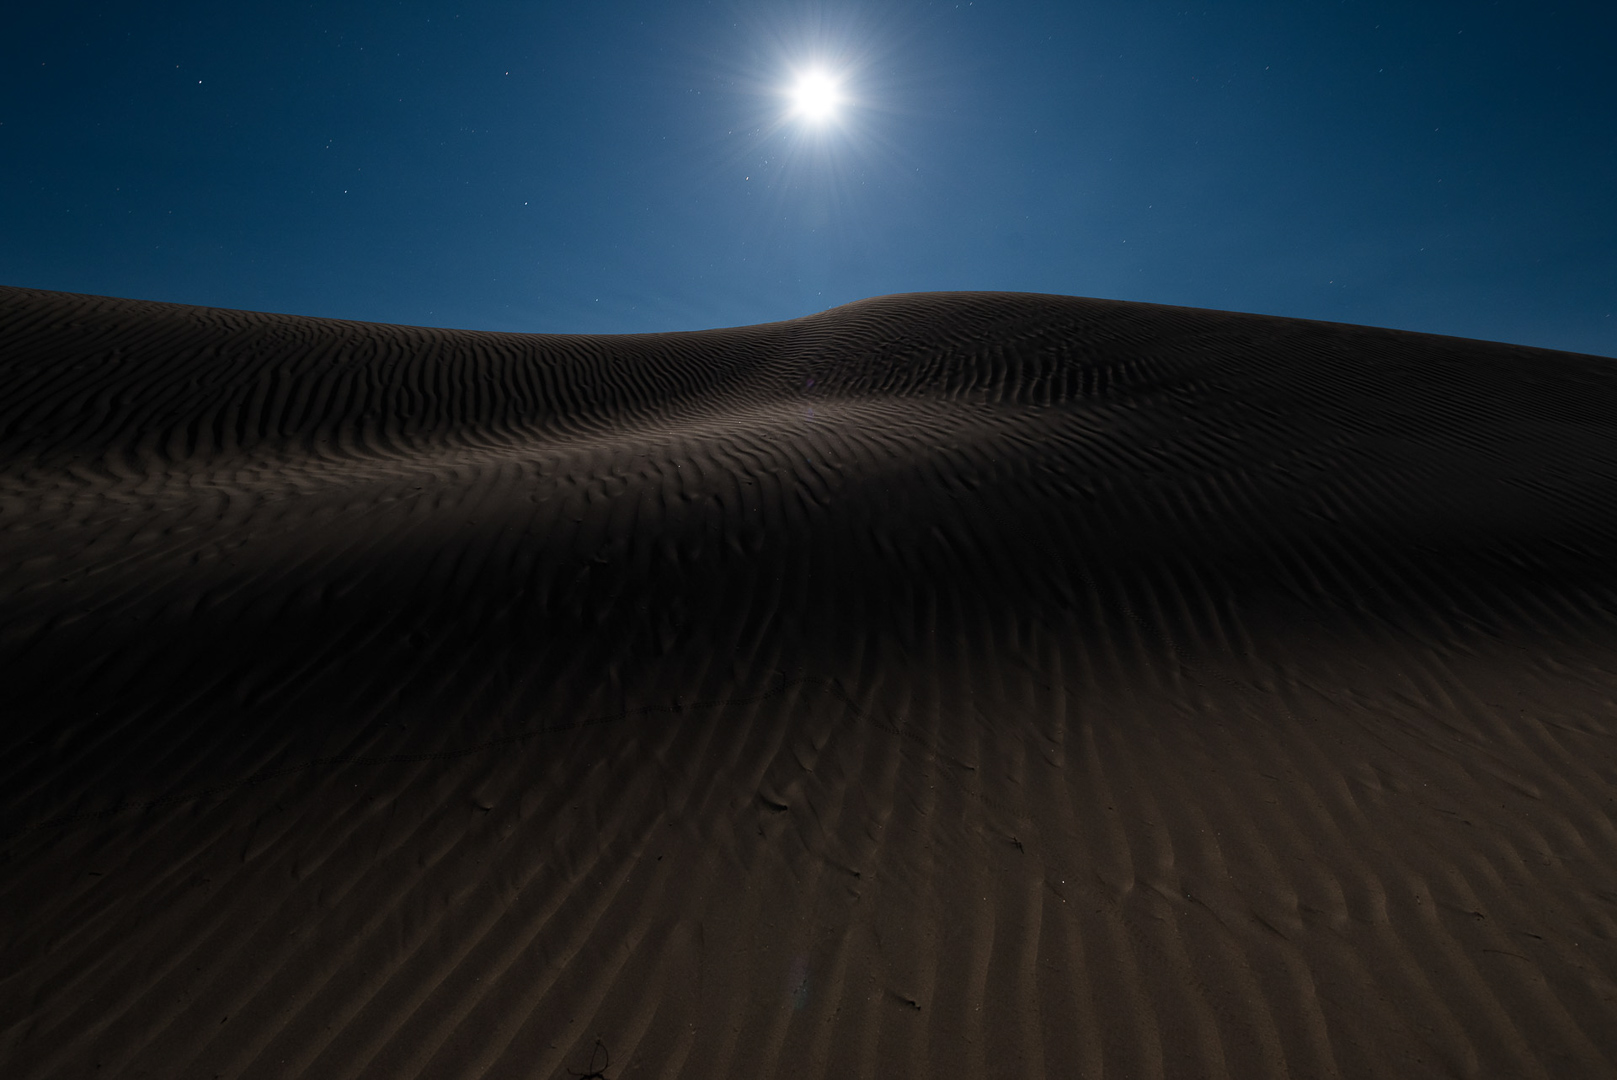
The moon rising over Mesquite Flat Dunes, Death Valley National Park. Nikon D750, Tamron 15-30mm f/2.8. Dunes light painted with a Coast HP5R flashlight. © 2016 Lance Keimig.

The moon rising over Mesquite Flat Dunes, Death Valley National Park. Nikon D750, Tamron 15-30mm f/2.8. Dunes light painted with a Coast HP5R flashlight. © 2016 Lance Keimig.

Q: I wanted to get a shot of the recent super blue moon full lunar eclipse, but I wasn’t sure which lens would be a good one to use. I wanted to get the moon as part of the landscape, with an in-camera shot (rather than just a zoomed shot of the moon). It would have been OK if the moon wasn’t super huge in my shot—I just wanted a nice overall image. This was with my Nikon D750, and I have a 70-200mm lens. For the next time, should I rent something zoomier (a 200-500mm)?  — Tracy W.B.

A: Lens choice questions are really hard to answer. So much depends on the shot that you have in mind. We recommend using PhotoPills (see their website or in-app links for tutorials and ideas) to plan your shot if you have a location in mind, and then plan your strategy from there. If you don’t have a specific location in mind, then start by thinking about places you could shoot with a good view of the moonrise, figure out exactly where the moonrise will be using PhotoPills, and do some test shots beforehand to see which focal length will work best.

You shouldn’t need to rent a lens since you don’t have a specific shot in mind. Instead, build a shot around the lens you already have! — Lance

2. Cords vs. L-Brackets

Q: When I shoot in portrait orientation with my L-bracket on, I have the problem of not having access to my USB port to connect a remote release, since it is on the left side of the camera where the mounting bracket also is. Do you know of a way to solve that issue? — Michael M.

Custom-designed L-brackets (such as the Kirk model for the Nikon D750, pictured here) allow the photographer to access all the jacks, ports, controls and so on.

A: I love that you’re using an L-bracket! I could barely survive on a shoot without mine. But yes, I understand your issue, as it’s one I’ve had.

First, if you’re using a generic L-bracket, that could certainly cause this issue. Generic models have the advantage of being less expensive. But the more-expensive custom models (such as those made by Really Right Stuff and Kirk Photo) are designed for specific camera bodies. One of the advantages is that space is left around each jack and port, so you should have ready access to plug in anything you want.

However, that doesn’t mean you can’t still run into problems. For instance, on my Nikon D3s with the Kirk L-bracket attached, I can’t connect a proprietary power cable to an external battery because of the way the plug is designed. Another example is exactly what’s happening to you: Plugs that stick straight out from the jack (rather than at a right angle) might not work when the L-bracket is mounted to a tripod head vertically (which kinda defeats the reason for using the bracket).

I suggest contacting the manufacturer of the accessory you’re trying to plug in and asking if they can supply or recommend an alternative cable. Or, if the accessory is the cable, only buy one with that right-angle-type connector.

Ironically enough, this could also be a case where a generic L-bracket could serve you better; one that’s designed a little taller than your camera could allow enough space to mount the vertically oriented body off-center, providing room for your connector underneath, out of the way of the tripod head. — Chris

3. Wildfires and Smoke in the Northwest U.S.

Q: My experience living in the Pacific Northwest is that, over the past four to five summers, forest fires in Washington, Oregon, Idaho, Montana and British Columbia have produced serious haze conditions for both day and night photography in July, August and September. You’re doing a workshop in Glacier National Park this summer. How would you adjust shooting for this possibility? — Dave E.

A: Yes, the past couple of years have been kind of smoky up here! I live in Montana, so I know what you mean.

However, I have been visiting Glacier National Park in summer for over 20 years and have been unable to make images only a couple of times. The images below are from last summer during the height of the fire season and during the infamous Sprague Fire in Glacier that burned down the Sperry Chalet. (Which, incidentally, is being rebuilt!)

Night photos in Glacier National Park during the 2017 Sprague Fire. Nikon D4s. © 2017 Tim Cooper.

That’s not to say there is no risk, but wind conditions, locations of fires, etc., play such a big part. It’s really hard to guess when fires will happen and when they will inhibit photography.

That being said, if I did run into an abundance of smoke, I would be looking all over the park and surrounding areas for clearer skies. All of us at National Parks at Night love light painting, full-moon shooting and all types of night photography. Shooting the Milky Way and star trails is just one part of what we focus on, so smoke certainly wouldn’t make us pack up the cameras for the night. I’ve been in many situations where the skies were overcast and the image-making was great due to other aspects of the scene. — Tim

4. Intervalometers for Fuji X-T Bodies

Q: I recently attended one of Matt’s speaking engagements and it definitely sparked an interest to experiment with some night photography in the coming months. I have a Fuji X-T2 kit that includes a 10-24mm lens, along with a nice stable tripod. I’m planning to purchase an intervalometer cable release next week. Have you used a wired or wireless intervalometer shutter release with an X-T2 with success? — Elliot R.

A: Yup. There are two intervalometers that I find work well with the X-T2. For a wired model, I recommend the Vello ShutterBoss II (ignore that it says it’s for Canon—it also works with your Fuji!). For wireless, I recommend (surprise!) the Vello Wireless ShutterBoss II.

I use the wired model all the time with my X-T1 for time-lapses. Gabe uses an X-T2 with the same wired release.

However, before choosing, I do recommend considering the pros and cons of a wired versus wireless intervalometer. See my 2017 blog post “Remote Question: Wireless or Wired Intervalometers for Camera Triggering?” — Matt

5. Noise With Varying-Quality Cameras

A side-by-side comparison of ISO 100 (left) and ISO 51,200 (right) images from a camera noise test.

Q: In the descriptions of your workshops you say to know your DSLR or high-end mirrorless, but I’m not sure what is considered “high-end.” I have a Sony Alpha a6000. I have tried a few times doing night photography using that with a Samyang 12mm f/2. I also see you guys mention full-frame; how important is full-frame versus crop sensor when doing night photography? I have seen amazing night photography pictures using the Sony a6000. — Kylee W.

A: While there are plenty of crop-sensor cameras that do well with night photography, I have found the a6000 and a6300 get rather noisy with long exposures. But everything is definitely subjective, and my tolerance for noise might be less than yours. The best advice I would offer is to test your camera, figure out how noisy it gets and establish your own parameters. You can run this test either in the field or in the comfort of your home.

Take a picture of something that has shadows in it (because noise appears in the shadow areas first). Put your camera on a tripod and take a series of shots at ISOs of 1600, 3200, 6400, etc.

Then (and, for this, you might have to turn your lights low and stop down your ISO and apertures), do a series of images at various shutter speeds: 15 seconds, 30 seconds, 1 minute, 2 minutes. ... Keep doubling your time and adjust your ISO and apertures (or lighting), and end at somewhere around 8 minutes.

Do these tests with your camera’s noise reduction features off, and then again with the noise reduction features on. See if that makes a difference.

Download the images to your computer and inspect them at 100 percent. Look for two things:

  1. When your image gets too grainy for your taste, that is the ISO that you will want to avoid.
  2. In your long-exposure images, look for red, purple and other colored specks. That is color noise from the long exposures. Again, determine the ISO at which that becomes unacceptable to you.

This test will help you establish the parameters in which you can successfully operate your camera (according to your own tastes) with both the high ISOs and the long shutter speeds that are needed for most night photography.

If you’d like to see a more detailed rundown on how to perform a high ISO test, along with sample images, see our 2016 blog post “Keep The Noise Down: How To Take An ISO Test With Your Camera.” — Gabriel

Chris Nicholson is a partner and workshop leader with National Parks at Night, and author of Photographing National Parks (Sidelight Books, 2015). Learn more about national parks as photography destinations, subscribe to Chris' free e-newsletter, and more at www.PhotographingNationalParks.com.

UPCOMING WORKSHOPS FROM NATIONAL PARKS AT NIGHT

How Lightroom Classic CC 7.3's New Features Help the Night Photographer

Since Adobe has shifted their products from the old model of owning a piece of software to the more recent pay-per-month lease model, we have seen more frequent updates and upgrades. While many of these updates don’t make a big splash, occasionally we get a real treat. That’s the case with Adobe Lightroom’s most recent release, CC 7.3.

A particular few of these changes make life a little easier and allow some more creative options for the night photographer. We produced a video to help you navigate these changes and to learn how to maximize them for night work. We cover:

  • workflow and editing tools that have been moved to more convenient places
  • the new Adobe Color profile
  • how to use these tools to improve night imagery

Check out the following video to see what Adobe has added to our toolbox, and how night photographers can use these new and recalibrated features to craft powerful imagery!

Tim Cooper is a partner and workshop leader with National Parks at Night. Learn more techniques from his book The Magic of Light Painting, available from Peachpit.

UPCOMING WORKSHOPS FROM NATIONAL PARKS AT NIGHT

How I Got the Shot: Waterfall and Clements Mountain in Glacier National Park

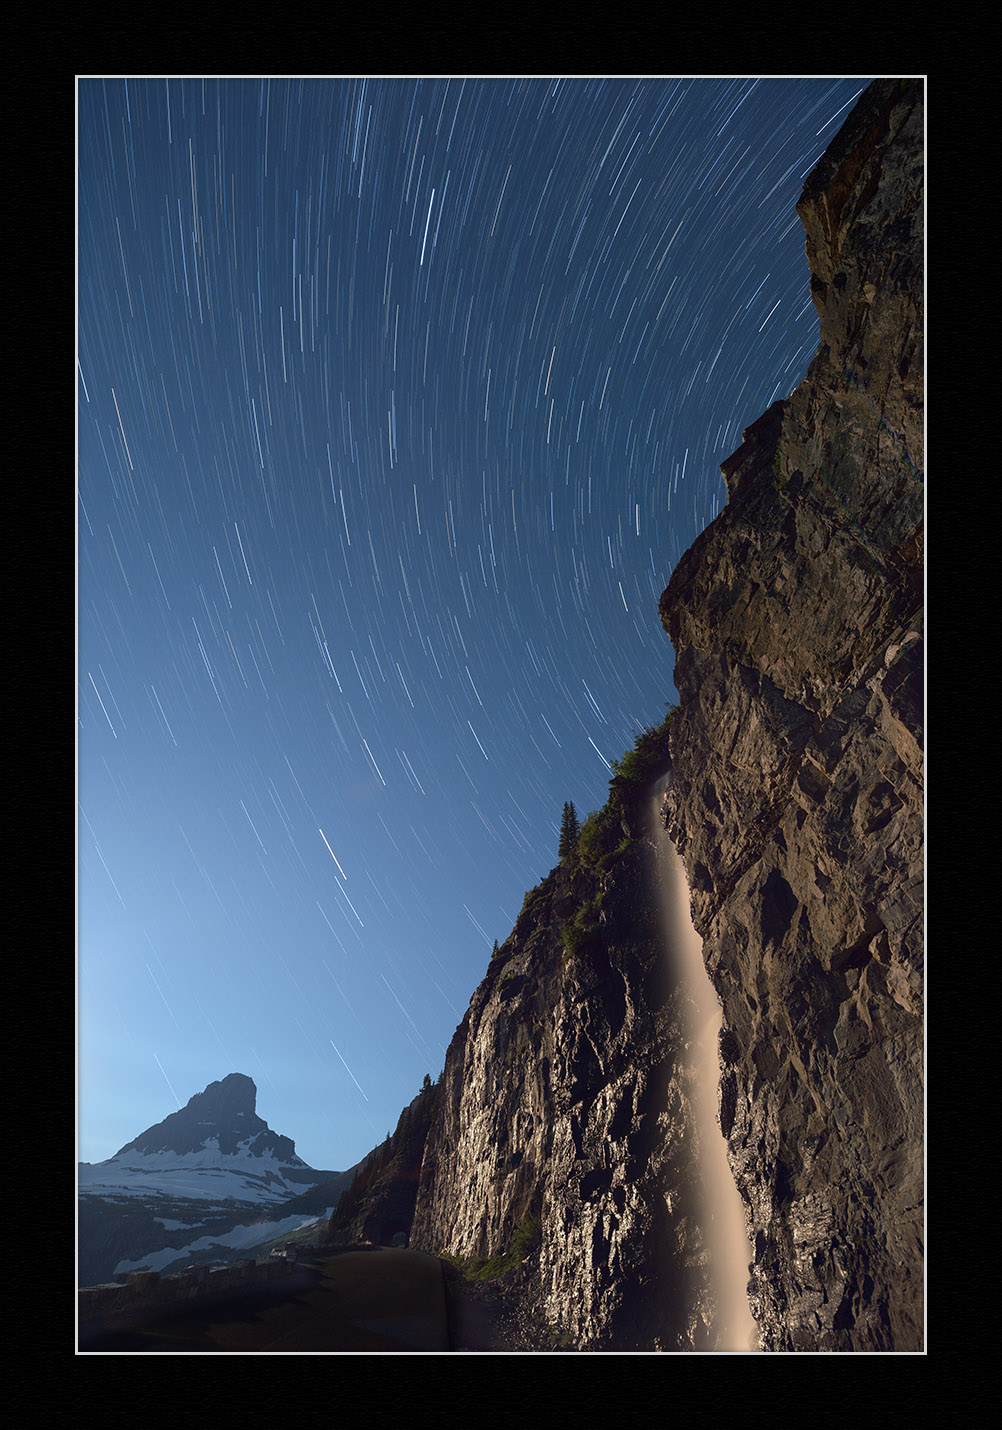
“Clements Mountain, Star Trails, Waterfall.” © Tim Cooper.

Clements Mountain, Star Trails, Waterfall.” © Tim Cooper.

The Location

I am fortunate to live in Montana. It’s a beautiful state filled with wonderful people and fantastic landscapes. My “backyard” is Glacier National Park. Glacier is truly one of America’s great alpine experiences—from gorgeous glaciated peaks to alpine meadows carpeted with wildflowers to the host of wildlife visible on a near daily basis. I take every chance I can to get up to the park.

Early last summer I made this image while scouting for our upcoming National Parks at Night workshops in August and September. (While the first week of this workshop is already filled, the second week still has some spots available. Check out our workshop page for more information.)

Luck vs. Planning

When it comes to photography, I always give luck a little credit. Did the clouds cover the sky? Or did they add a nice accent? Did it rain on the night I had planned to shoot? There are so many small blessings that are easy to overlook.

Luck, however, is no substitute for planning. If you read this blog often then you have seen us discuss many times the importance of planning a night shoot. My familiarity with Glacier helped enormously with planning this shot. I already knew the location of the waterfall and exactly where I wanted the moon to be so that it would backlight the water. It was just a simple matter of using the indispensable phone app, PhotoPills, to determine when the moon would reach the necessary spot in the sky (see Figure 1).

Figure 1. The zoomed-out and zoomed-in views of the shoot location, as seen in PhotoPills’' Planner mode. The blue lines told me where the moon would be at different times of the night, which told me when to shoot for the effect I wanted.

The Exposure

I wanted to use the moon to illuminate the falls, but I also envisioned star trails rather than star points in my image. To create the effect of star trails, you have to make a very long exposure—15 minutes, 30 minutes, an hour or even longer. This makes the stars appear as if they are trailing through the sky. Another method to create these trails is to break up the exposure time into shorter chunks, and then stack the resulting set of images in post-production. This is especially helpful under bright moon situations or when you want to light paint.

Using multiple short exposures was my plan for this setup. The first step was to calculate an exposure using a high ISO test (i.e., the 6 Stop Rule). Setting my Nikon D4s to ISO 3200 and f/4, my final test shot (Figure 2) was exposed for 30 seconds.

Figure 2. Test shot at 30 seconds, f/4, ISO 3200.

The Shoot

Typically night photographers use an ISO of 6400 for test shots because, according to that 6 Stop Rule, we know that an exposure time of X seconds at ISO 6400 equals X minutes at ISO 100. This is a very handy little trick for calculating long exposures easily.

Because my successful test exposure was 30 seconds at ISO 3200, which equals 15 seconds at ISO 6400, then my long low-ISO exposure would be 15 minutes at ISO 100. Or—to shorten things up a bit—8 minutes at ISO 200. Using this exposure, I could shoot multiple frames at 8 minutes and blend them later in post using the star-stacking technique.

This evening, however, I either miscalculated or mistakenly set my camera wrong. My final exposures (Figure 3) ended up being shot at 5 minutes, f/4, ISO 100. That’s about two stops underexposed!

Figure 3.

I didn’t notice that at the time. I finished shooting and had to leave immediately, so there was no time to reshoot the frames. I was destined to have to fix it later in post.

Post-Processing

After downloading my images, the first post-processing edit was adjusting the Exposure slider to account for the underexposure out in the field. After increasing the exposure, the final set of images looked like this:

Figure 4.

The next step was to blend all the frames together to create the star trail effect. I began by selecting all of the images in Lightroom. Next, from the menu I selected Photo > Edit In > Open as Layers in Photoshop. This opens all of the images into Photoshop as layers within one file.

Once the file opened, I clicked on the top layer, held down the Shift key, then clicked on the bottom layer. This selects all of the layers in the file.

Next, in the Blending Mode drop-down list (circled in red in Figure 5), I selected Lighten (Figure 6).

Figure 5.

Figure 6.

This blending mode allows the brightest part of each layer to show through on the final image, which in this case creates the effect of the stars trailing across the sky. Figure 7 shows the result of blending the images with this technique.

Figure 7.

Did you notice the multiple car headlights that showed up after blending the layers? They were in the first, second and last photo frames (Figure 8). Because using the Lighten mode reveals the brightest parts of each layer, all the headlights showed up after blending.

Figure 8.

So, the next step was to remove the unwanted car lights. One of the benefits of stacking frames rather than taking one long exposure is that you can use layer masks to remove unwanted artifacts that show up in just a few frames rather than overwhelming an entire final photo. To do this, I clicked on the first layer that contained headlights to select it. Then at the bottom of the Layers palette I clicked on the Add a Mask icon (Figure 9).

Figure 9.

Figure 10.

Next I selected the paintbrush tool and chose black as my foreground color. Then I just painted on the mask over the area I wanted to remove. Notice in Figure 10 how I painted over the tunnel where the car headlights appeared. Also notice the corresponding black area on the white mask thumbnail, indicating the shape and location of the mask.

I followed the same steps for the other two layers with the artifact, painting out the headlights further up the road. Figure 11 shows the three masks with black painted on them covering up all of the headlights that exist on the different layers.

Figure 11.

Figure 12.

Finally, I wanted to separate the cool tones of the sky from the foreground waterfall. I clicked on the bottom layer, chose the Quick Select tool and then selected the foreground waterfall and cliff face (Figure 12).

Then I created a Color Balance layer by choosing Layer > New Adjustment Layer > Color Balance. Adding some warmth via the Red and Yellow sliders started to really separate the warm colors in the foreground from the cool colors of the background.

Figure 13 shows the final image.

Figure 13. Five stacked frames, each shot at 5 minutes, f/4, ISO 100 with a Nikon D4s and Nikkor 14-24mm f/2.8 lens zoomed out to 14mm.

While this may sound like a lot of work, after a little practice in Photoshop, you’ll find that completing these types of images takes no time at all!

Tim Cooper is a partner and workshop leader with National Parks at Night. Learn more techniques from his book The Magic of Light Painting, available from Peachpit.

UPCOMING WORKSHOPS FROM NATIONAL PARKS AT NIGHT