2018 Night Photography Workshops: From Sea to Shining Sea

Where will you go?

As we enter our third year (can you believe it?), we are delighted to share our list of dream locations for night photography workshops in the U.S. and abroad in 2018.

In 2018, we continue to present two kinds of learning experiences: Passport Series and Adventure Series workshops.

At Passport Series workshops, we take you to a national park and teach to the landscape, sky and celestial events.

At Adventure Series workshops, we take you to other interesting natural wonders that may be on or near national and/or protected lands, perhaps during singular events (like a solar eclipse), sometimes focusing a little less on instruction and more on field time, exploring and creativity, or sometimes focusing on advanced night photography techniques.

We’re also offering some cool options this year. The Biscayne and Redwood workshops will include a coordinated gallery show with both national park offices. Tim and I will be offering night portraiture classes at our headquarters in Catskill, New York. Chris and Gabe will take you on a road trip along the Blue Ridge Parkway on our most mobile workshop yet. Lance and I will take you to a sacred space for a light painting intensive camping workshop. And Gabe and Chris are offering a black-and-white light painting workshop at a steamy industrial space.

Are you curious? Click on …

Calendar

Dates Location
Series
Jan 29-Feb 3
Biscayne National Park
Passport
March 1-9
Iceland South Coast
Adventure
March 12-20
Iceland South Coast
Adventure
April 27-29
Catskills Night Portraiture
Adventure
May 13-23
Scotland: The Hebrides
Adventure
June 17-22
Capitol Reef National Park
Passport
June 25-30
Redwood National Park
Passport
July 29-Aug 4
Blue Ridge Parkway
Adventure
August 26-31
Glacier National Park
Passport
September 15-20
Rocky Mountain National Park
Passport
September 23-26
Chaco Culture Advanced Light Painting
Adventure
October 12-14
Catskills Night Portraiture
Adventure
November 15-18
Sloss Furnaces
Adventure
Browse all 2018 Workshops
 

The Amazing Locations

You can click on any of the links above to learn a lot more about all the workshop locations. They include the inspiring landscapes of five U.S. national parks, national historic sites, a national parkway, an island nation, European old country and more. For a quick read about what each experience will entail, read on below …


Passport Series

Biscayne National Park

Welcome to the land of the forever horizon, where the clear blue waters and big sky envelop you from all directions. With 95 percent of this park underwater, we will use the marine night skies as a beautiful and surreal backdrop to a variety of unique subject matter. Stilt houses, ornamental lighthouses, grounded chug boats, and the many mangroves that protect Biscayne Bay will be just a few of our stops in Biscayne National Park.

Dates: January 29-February 3, 2018
More information: Biscayne


Capitol Reef National Park (Sold Out)

Join us for the gently moon-kissed cliffs, canyons, domes and bridges of the classic Utah red-rock Waterpocket Fold. From the lush orchards of Fruita to the rich geological history within Navajo Sandstone, we’ll explore the deep skies of this Gold-Tier Dark Sky Park.

Dates: June 17-22, 2018 (add-on experience June 15-16)
More information: Capitol Reef


Glacier National Park

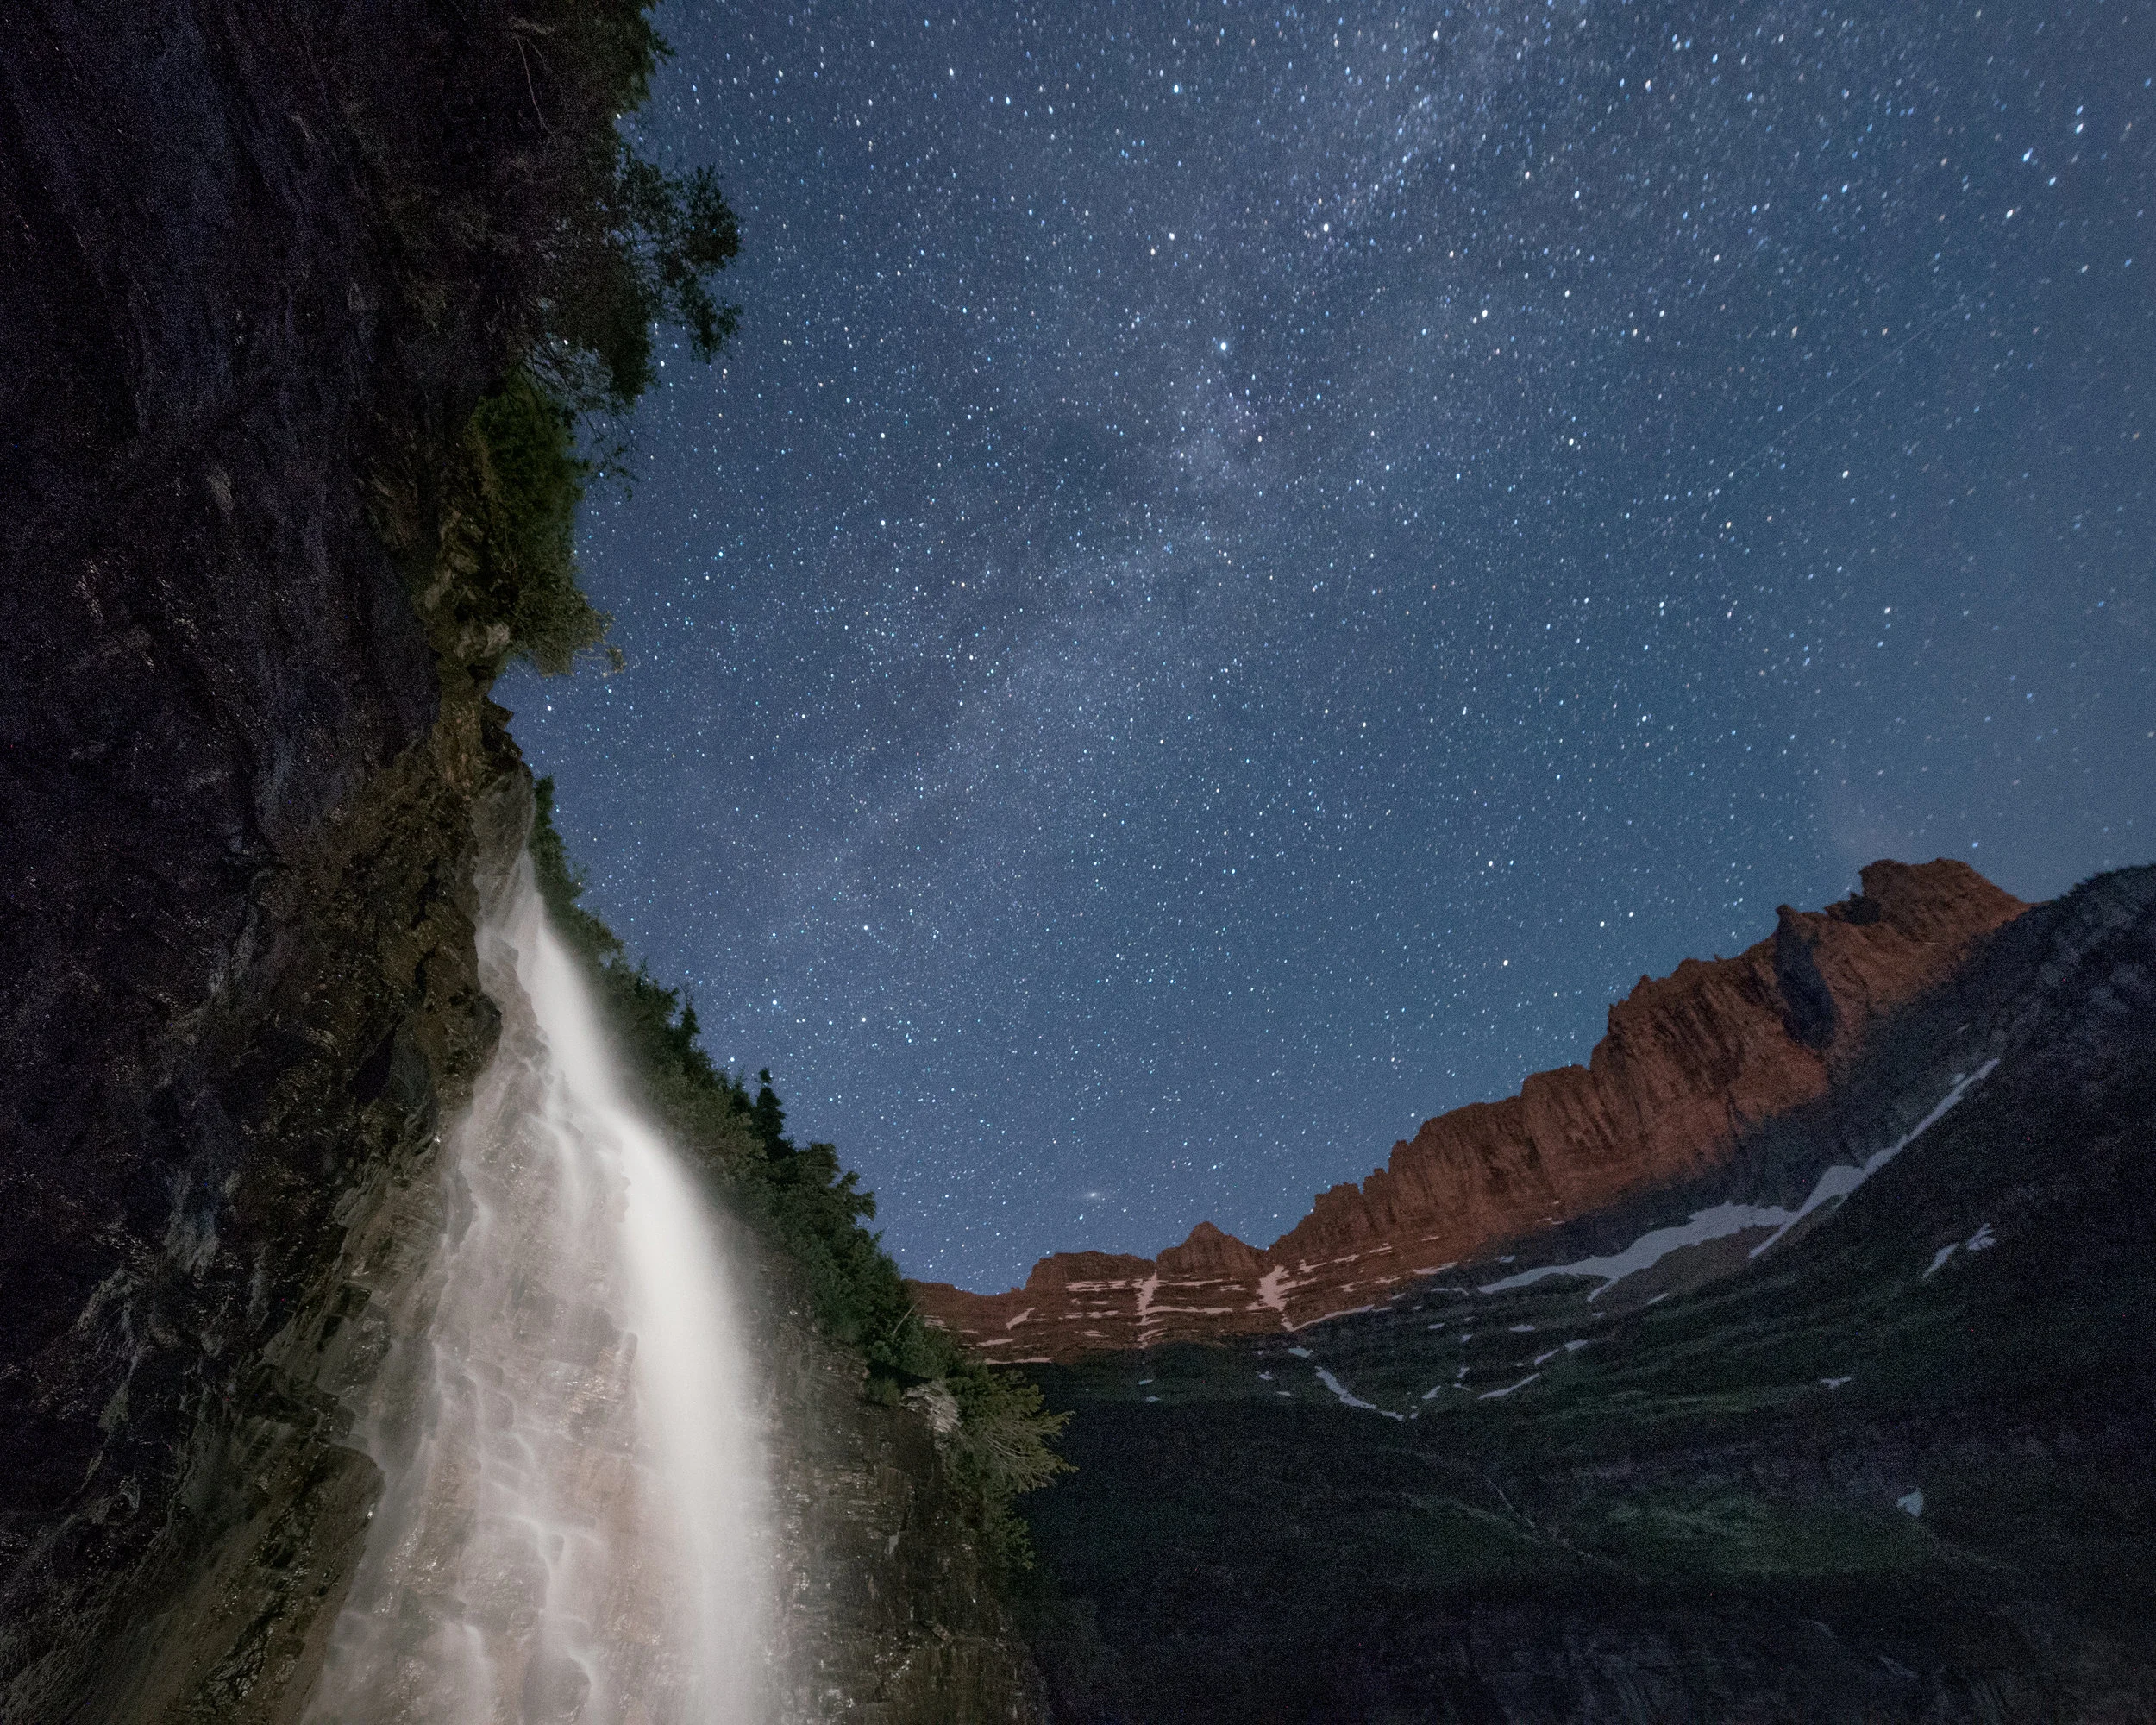
This northwestern Montana park contains some of the most wild and diverse ecosystems in the country. Waterfalls, subalpine tundra, soaring rocky mountain peaks, high plains and crystal-clear rivers create breathtaking foregrounds for our night skies.

Dates: August 26-31, 2018
More information: Glacier


Redwood National Park

Redwood National and State Parks is composed of three distinct environmentsβ€”a rocky coastline with steep cliffs and the ubiquitous coastal fog, upland prairies, and of course the magnificent redwood forests that give the park its name. During this workshop, you’ll have the opportunity to develop your night photography skills in all three.

Dates: June 25-30, 2018
More information: Redwood


Rocky Mountain National Park

Within the wilds of Rocky Mountain National Park lie alpine lakes, boulder-strewn tundra, aspen groves that turn gold in fall, and a Milky Way so radiant that you’ll feel you could reach to the sky and brush it with your fingertips. We will venture together into the mountains to photograph all this and more, in one of the most wondrous landscapes in all the national parks.

Dates: September 15-20, 2018 (add-on experience September 20)
More information: Rocky Mountain


Adventure Series

Blue Ridge Parkway

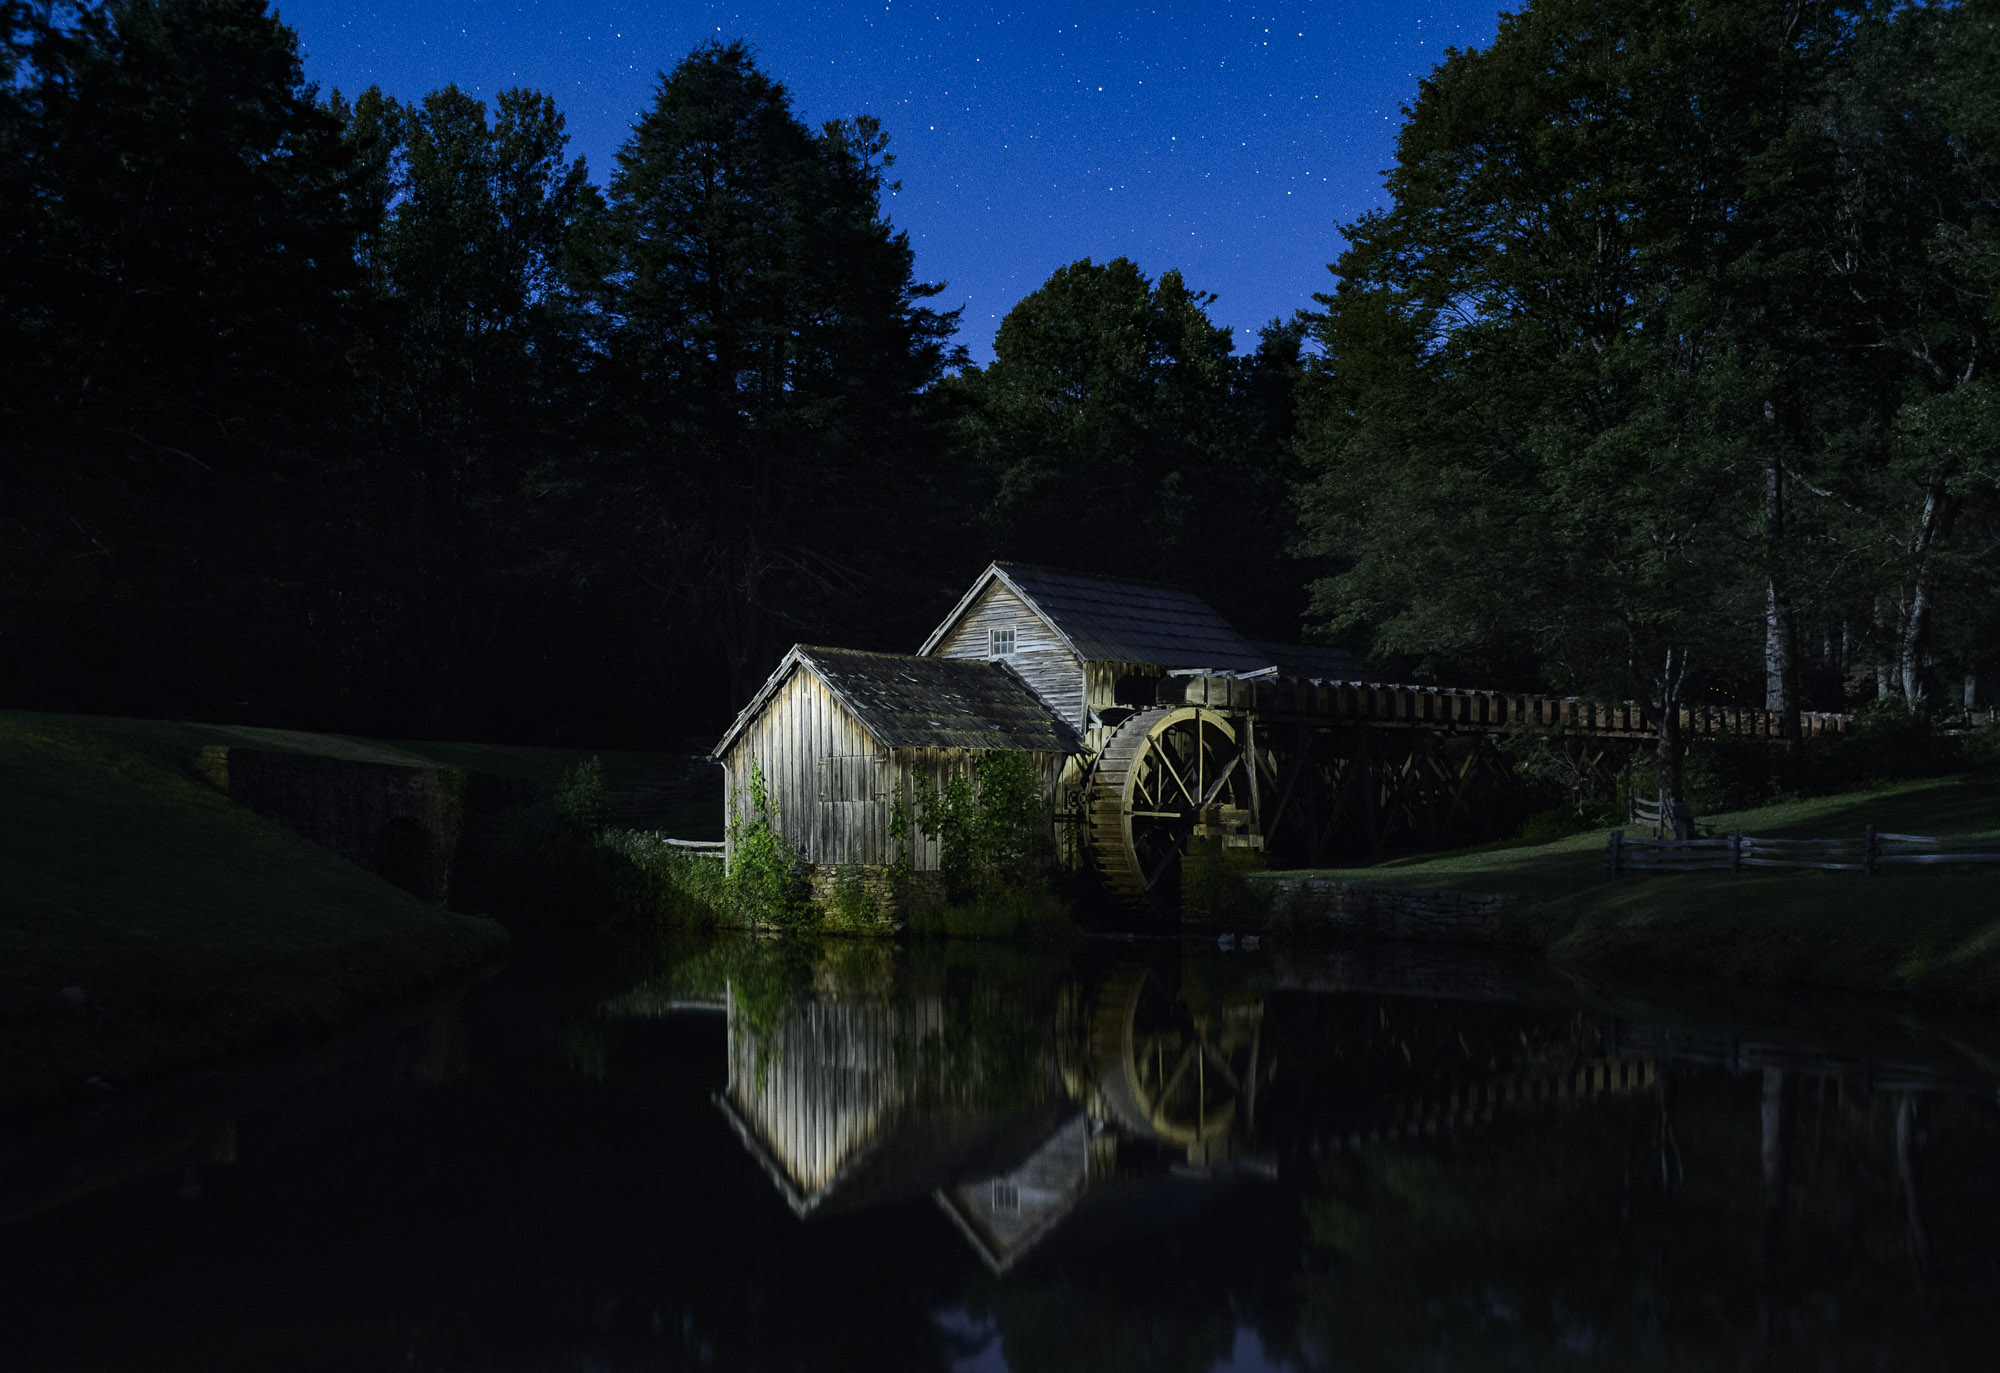
The night is falling, and the road is calling. And we will be there, driving and photographing America’s greatest scenic byway. When the sun fades, we’ll bring our cameras along the 469-mile ribbon of national parkland that stretches atop mountain ridges, through farming communities, past historic cabins and mills, alongside meadows and more, while the stars and moon gently shine on the great blacktop river called Blue Ridge Parkway.

Dates: July 29-August 4, 2018
More information: Blue Ridge Parkway


Catskills Night Portraiture

Master the fundamentals of night portraiture. Mash up night photography with classical portrait lighting to create dramatic long exposure portraits. Unleash your creativity.

Dates: April 27-29, 2018, and October 12-14, 2018
More information: Catskills Night Portraiture


Chaco Culture Advanced Light Painting

The Ancestral Puebloan ruins at Chaco Canyon are the centerpiece of Chaco Culture National Historical Park, and are also a UNESCO World Heritage Site. The park was also designated as Gold Tier by the International Dark-Sky Association in 2013. Who could ask for more from a night photography location? National Parks at Night aims to do just that. In addition to having rare nighttime access to photograph the park, we will have a ranger-led tour and meet with others with deep knowledge of the Puebloan people and the ruins on New Mexico. This is a full-immersion experience.

Dates: September 23-26, 2018
More information: Chaco Culture


Iceland South Coast

This photo tour will take us along the famous south coast of Iceland, where we will experience the capital city of Reykjavik, bizarre geothermal landscapes, magnificent waterfalls, glacial lagoons, an ice cave, and, with luck, the northern lights. Iceland has seen a huge surge in tourism in recent years, and we will strive to find a balance between getting you to the most important locations, but also some off-the-beaten-path places that are much less visited but equally as interesting.

Dates: March 1-9, 2018, and March 12-20, 2018
More information: Iceland South Coast


Scotland: The Hebrides

Come explore and photograph some of Scotland’s most interesting places and dramatic landscapes on this first of National Parks at Night’s photo tours of the islands of Scotland. The Hebrides are a widespread and diverse archipelago off the west coast of the mainland. The culture of the residents has been affected by the successive influences of Celtic-, Norse- and English-speaking peoples. We will spend our time on the largest of the inner Hebrides, the Isle of Skye, and the largest of the outer Hebrides, Lewis and Harris. The history of these islands is ever-present in the landscape in the form of Neolithic, Mesolithic and Iron Age archaeological sites. We will explore cultures past and present along with the stunningly diverse landscapes we’ll encounter along the way.

Dates: May 13-23, 2018
More information: Scotland


Sloss Furnaces National Historic Landmark

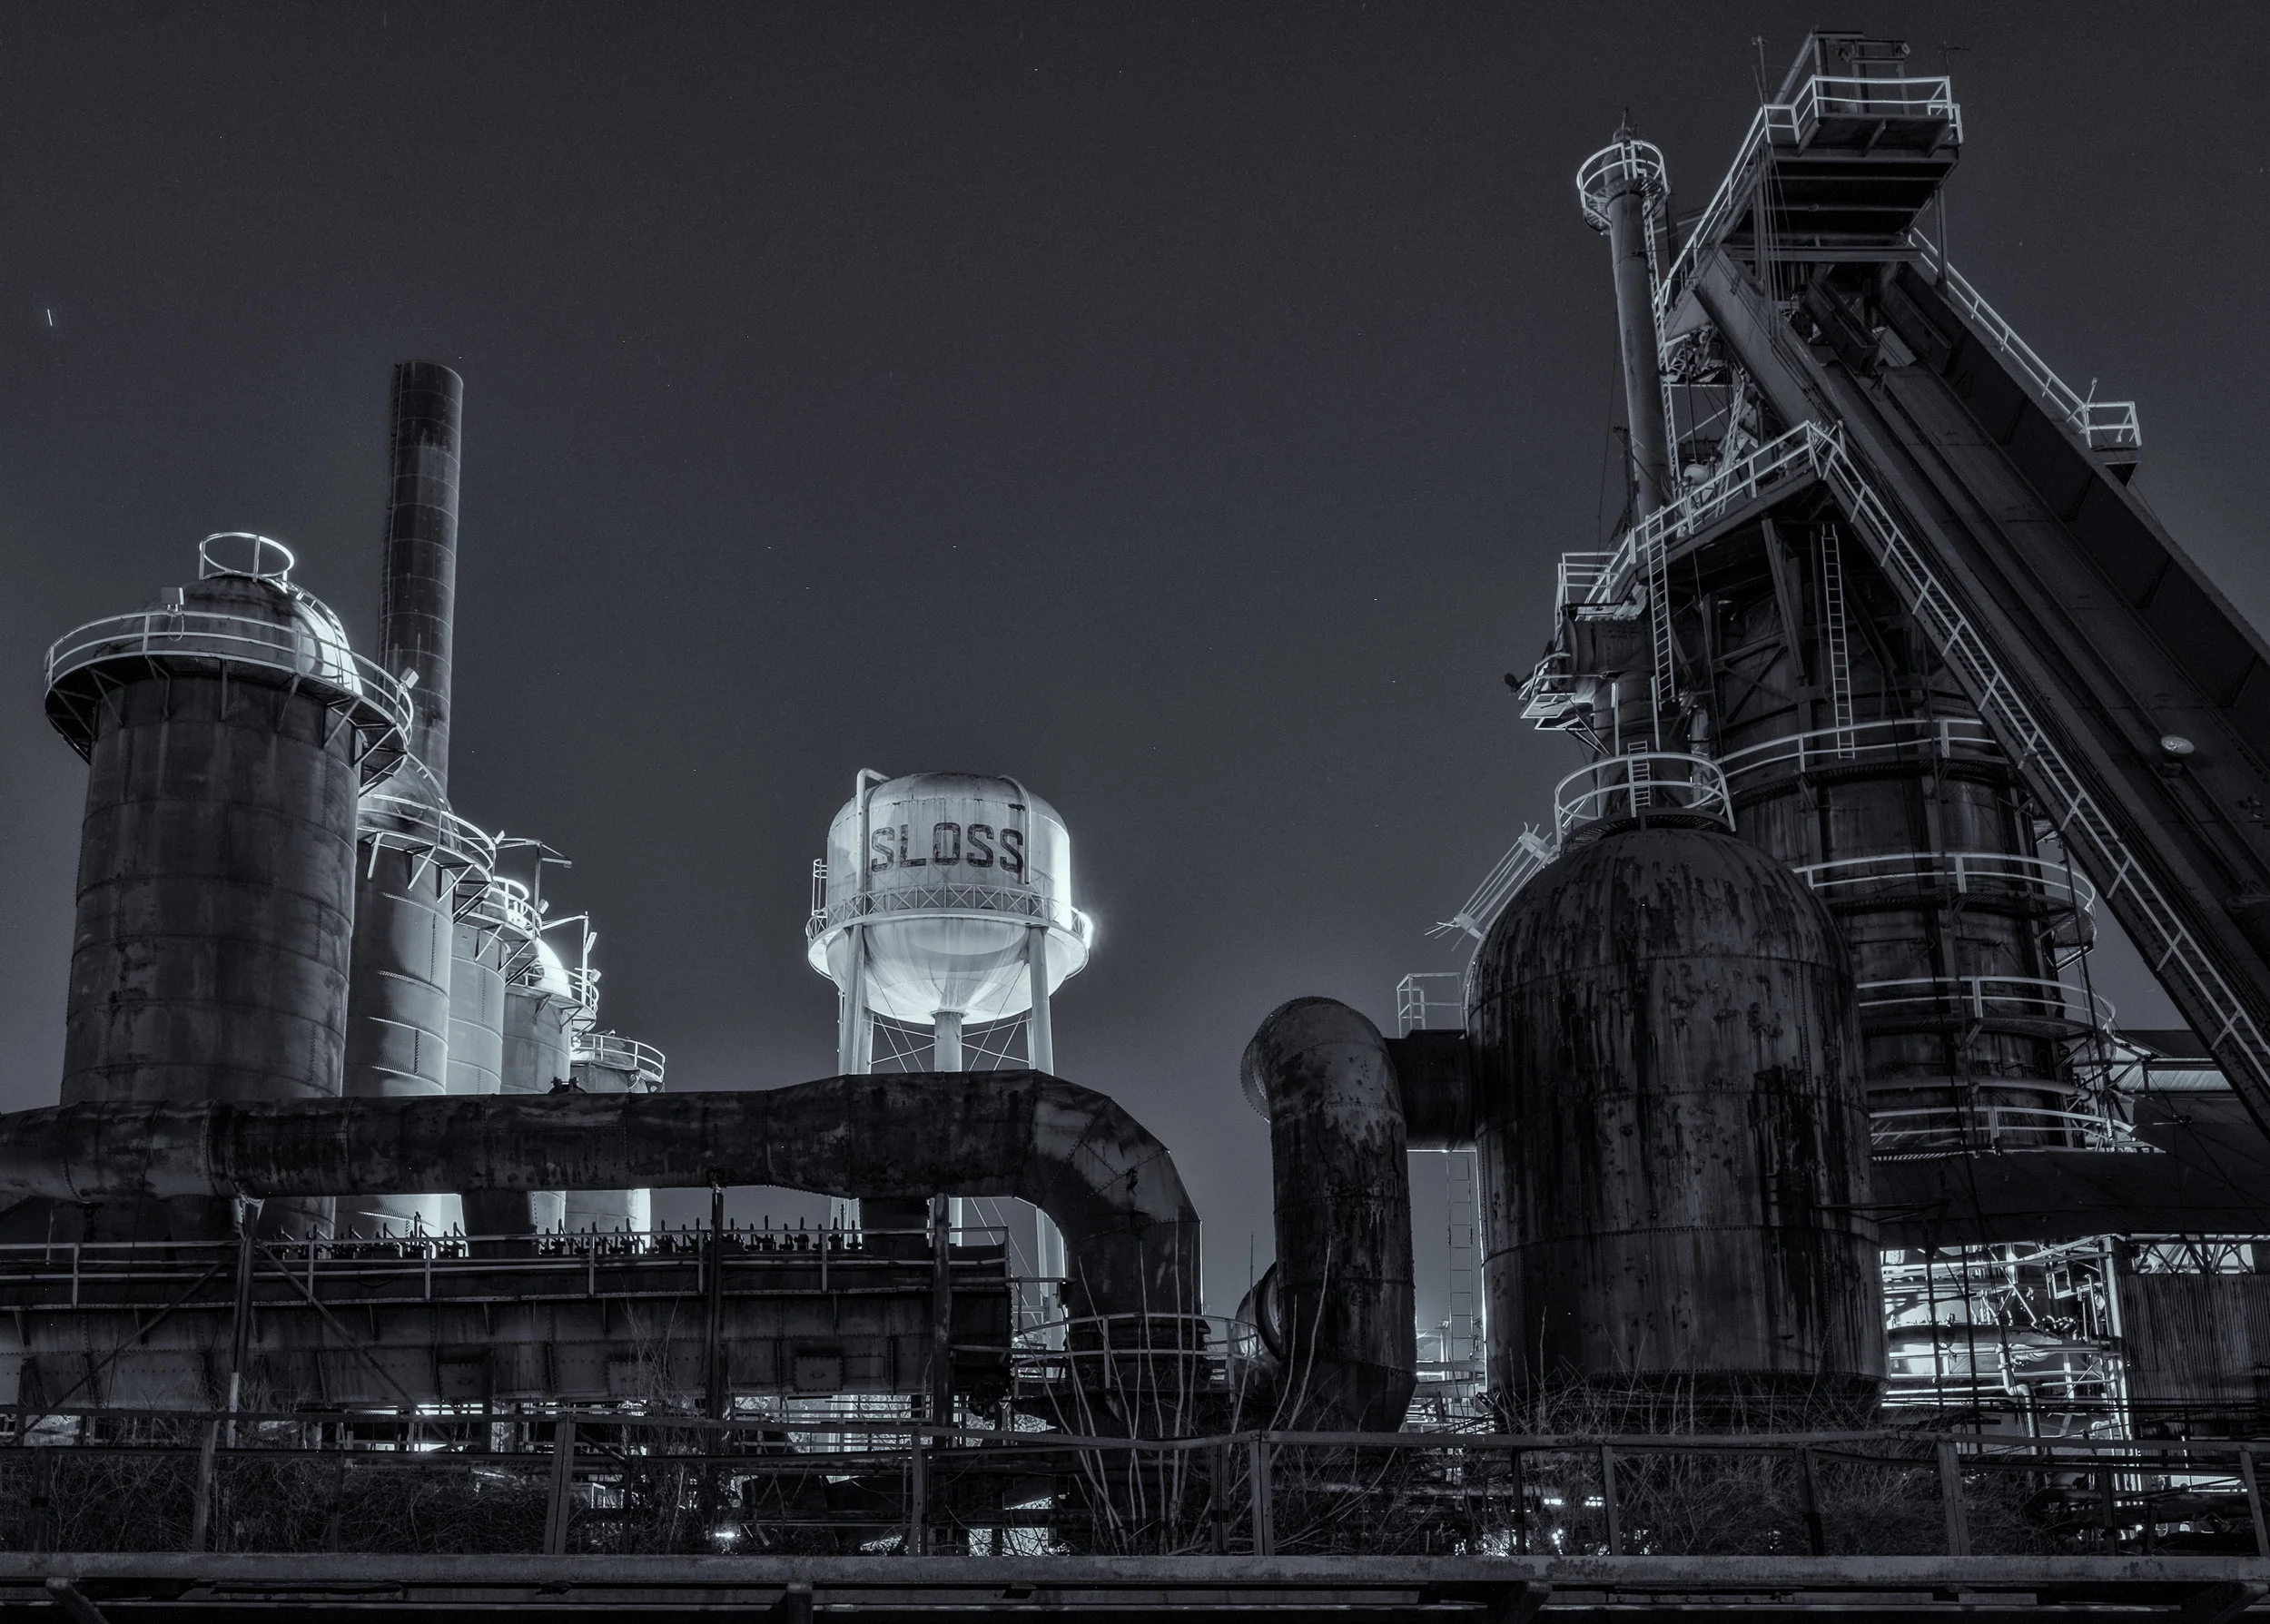
The focus of this night photography workshop will be a deep dive into light painting, composition, and black and white photography. Sloss Furnaces National Historic Landmark is an incredible hulk of 20th century metal machinery located on the eastern edge of downtown Birmingham, Alabama. Don’t expect to see many stars in the city, however we will use moonlight and light painting to breathe fire back into the furnaces.

Dates: November 15-18, 2018
More information: Sloss Furnaces


Don't Want to Wait for 2018?

Olympic National Park

If you'd like to come with us on a workshop even sooner, we have great news: We opened up a second week at Olympic National Park next month: September 24-29, 2017. Join Chris Nicholson and Matt Hill on the rugged mountains, in the vibrant rainforests and along the pristine coastline of Washington state’s Olympic Peninsula, in one of the most beautiful and diverse national parks in the U.S.

Dates: September 24-29, 2017
More information: Olympic


Blasts from Our Pasts

Finally, as we embark on our third year, we’d like to express thanks to all our alumniβ€”the 200 fine photographers who have accompanied us over the past two years to wonderful night photography locations such as Acadia, Dry Tortugas, Death Valley, Zion, Great Sand Dunes, Cape Cod, Centennial Valley and more. We appreciate you so very much.

Do you want to see their work? Check out this playlist of all the workshop slideshows.

Matt Hill is a partner and workshop leader with National Parks at Night. See more about his photography, art, workshops and writing at MattHillArt.com. Follow Matt on Twitter Instagram Facebook.

UPCOMING WORKSHOPS FROM NATIONAL PARKS AT NIGHT

Out of the Blue: The Importance of Twilight to the Night Photographer

Twilight is one of the most beautiful times of day to shoot. It is also the perfect time to finalize compositions and setups for your eventual night photography.

The famous β€œmagic hour” for photography extends for over two hours on either side of the setting and rising of the sun. As the sun moves closer to the horizon, it bathes our subjects in a beautiful warm and soft light considered by many to be the prime time to shoot daytime landscapes. Then, as it dips below the horizon after sunset, the exceptionally warm light illuminates the sky, and the clouds become brilliant and saturated.

As time moves on and the sun sinks even further below the horizon, soft, blue light provides an otherworldly glow. This has come to be known as β€œblue hour”—and it’s an amazing time to start your night photography.

Shades of Blue

Hawaii in the blue hour. Nikon D4. 15 seconds, f/11, ISO 400.

To better understand twilight and its relevance to the night photographer, let’s a take a look at the different moments that occur around sunset (these moments also occur in the opposite order around sunrise). Following are definitions of terms compiled from the U.S. Naval Observatory website:

  • Horizonβ€”Wherever one is located on or near the earth's surface, the earth is perceived as essentially flat and, therefore, as a plane. The sky resembles one-half of a sphere or dome centered at the observer. If there are no visual obstructions, the apparent intersection of the sky with the earth's (plane) surface is the horizon, which appears as a circle centered at the observer.
  • Sunset (and sunrise)β€”The times when the upper edge of the disk of the sun is on the horizon. This means the ball of the sun is no longer visible, as it is just below the horizon.
  • Civil twilightβ€”The center of the sun is 6 degrees below the horizon. This is the time of day just after the actual sunset.
  • Nautical twilightβ€”The center of the sun is 12 degrees below the horizon.
  • Astronomical twilightβ€”The center of the Sun is geometrically 18 degrees below the horizon.

As photographers, we are concerned with light. Specifically, usable light. We are also concerned with being in the right place at the right time! During twilight and at times of the setting and rising sun, the light changes very rapidly. We must be prepared, having scouted and found our ideal shoot positions, or a series of ideal positions, subject matter and viewpoints. This is crucial for the night photographer, because once darkness settles in, all of those things are much harder to find.

Civil Twilight

Civil Twilight color at Jekyll Island in Georgia. Canon EOS 10D. 30 seconds, f/19, ISO 100.

From the time the sun sets until approximately a half-hour later is civil twilight. This is when color starts to hit the highest clouds in the sky. We should rename it β€œPhotographer’s Twilight” for the millions of photographs taken at this marvelous time of day. This is usually when we take what we consider β€œsunset” shots.

Notice the cloud positions. Are they low clouds? These will receive light for only about 15 minutes after sunset. High clouds? They will retain color for longer. While not β€œnight photography,” this is a great time to begin scouting, planning and capturing the beautiful light of the end of the day.

Bonus:

The end of Civil Twilight is the best time to shoot cityscapes. The fading light of the sky matches the emerging city lights perfectly.

Last of civil twilight on a cityscapeβ€”Inner Harbor in Baltimore. Nikon D700. 4 second, f/8, ISO 400.

Nautical Twilight

This is the blue hour. Nautical twilight begins when civil twilight ends and lasts for roughly another half-hour to 45 minutes. The light is beginning to fade and we are transitioning into night. This is the time for finalizing locations, compositions and focus. It’s much easier to set your camera up in this dim light as opposed to starting from scratch in the dark.

Bonus:

In addition to readying yourself for the stars, this is a great time to photograph straight-up landscapes. The dim blue light at this hour serves to create haunting and peaceful scenes. Nautical twilight is also a great time to begin light painting; it’s dark enough to allow for light painting but bright enough to safely move around the scene.

Car trails and fog at nautical twilight. Nikon D4. 4 seconds, f/16, ISO 200.

Astronomical Twilight

The moment you have been waiting for! Astronomical twilight begins approximately 1 1/2 to 1 3/4 hours after sunset. It is the beginning of dark, dark. No sky light. You can now begin to get your star-point shots.

Start by testing your exposure and checking your focus. A good starting point is 30 seconds, f/2.8 or f/4, ISO 3200 or 6400. (For more info on star-point exposures, check out Lance’s blog post, β€œWhat’s the Longest Usable Shutter Speed for Astro-Landscape?”). Next, how does your white balance look? Does your foreground complement the sky? Check to ensure your long exposure noise reduction is turned off for shorter exposures.

Once astronomical twilight ends, the sky is as dark as it’s going to get. Now you’re firmly entrenched in β€œnighttime.” You can certainly continue with star-point and Milky Way shots, but now is a great time to get those really long star trails. Depending on the phase of the moon, exposures into the hours can be achieved after astronomical twilight.

Astronomical twilight at McDonald Lake in Glacier National Park. Nikon D4s. 30 seconds, f/2.8, ISO 6400.

Tackle the Twilights

As you can see, knowing the exact times of the different twilights is necessary for planning and executing great photographs.

There are a great many places on the web as well as various smartphone apps that will give precise twilight times for any given day of the year in almost any location worldwide. One of our favorites here at NPAN is PhotoPills. This app will help you plan not only your night shoots, but also full-moon shots, sunset and sunrise excursions, and Milky Way captures.

Take some time to become accustomed to the terms and rhythm of the twilights to greatly expand and enhance your photographic experience!

Tim Cooper is a partner and workshop leader with National Parks at Night. Learn more techniques from his book The Magic of Light Painting, available from Peachpit.

UPCOMING WORKSHOPS FROM NATIONAL PARKS AT NIGHT

Beyond the Milky Way: There’s More to Night Photography Than the Trendy

Pemaquid Point Lighthouse, Maine. 20 seconds, f/3.5, ISO 6400. Pano of six stitched frames, with clouds, Milky Way and light pollution.

A couple of years ago during a conversation about trends in night photography, a friend of mine (who shall remain nameless) said, β€œIf I see one more Milky Way picture, I’m gonna puke.”

While I don’t exactly share the sentiment, I understand where he was coming from. Since the advent of digital cameras that perform well at high ISOs––the Nikon D700 and Canon 6D are the best early examplesβ€”night photographers have understandably been obsessed with photographing the core, or galactic center, of our galaxy.

Experiencing the Milky Way for the first time under a truly dark sky is an unforgettable experience. Seeing the core light up the LCD on the back of your camera screen for the first time is another β€œHoly Shit!” moment for many people. It’s easy to be smitten with the Milky Way, with its 100 billion to 400 billion stars. Every star we see in the sky from anywhere on Earth is part of the Milky Way galaxy, which is one of an estimated 100 billion galaxies in the universe.

Lady Boot Arch, Alabama Hills. 15 minutes, f/2.8, ISO 200 for the foreground, combined with 20 seconds, f/2.8, ISO 6400 for the sky, with tea lights and flashlight.

Lady Boot Arch. 15 minutes, f/2.8, ISO 200, with tea lights and flashlight.

Spend any time on social media or photo sharing websites like Flickr or 500px, and you’ll find hundreds of thousands of images of the Milky Way core. Many of them are heavily processed and rendered in an unrealistic way. They remind me of the images of early HDR enthusiasts––wild, colorful and dynamic, but full of post-processing artifacts, and far from believable. Nowadays, people use HDR imaging more responsibly, and the true power of the technique comes through in stunning examples.

With Milky Way photography, we are just starting to get to that point. Rather than simply photographing the core because it was suddenly possible, without much consideration for anything else, many night photographers are now including the Milky Way in their images in much more fulfilling ways.

Steve’s Rock, Olmsted Point, Yosemite National Park. 30 seconds, f/5.6, ISO 800. Clouds back-lit with moonlight high in the Sierra with light from a Coast HP5R filtered with two gels, a 1/2 CTO and a 1/8 minus green.

Instead of images of the core rising over a dark and empty foreground, I’m seeing much more interesting compositions where the Milky Way is just one component of a composition. People are developing more sophisticated ways of capturing and processing foreground detail combined with core exposures. Panoramas of the arch of the Milky Way have been popular for some time, but now photographers are using the arch to frame interesting foreground subjects. This trend is encouraging.

Where we’ve come from

Throughout the history of night photography, photographers were limited to long exposures in natural light situations due to the limited sensitivity of film or early digital sensors. Star trails, rather than star points, were the norm.

Reciprocity failureβ€”which caused film to become less sensitive the longer it was exposedβ€”also played a part in making star point or Milky Way photography next to impossible. Most films began to show signs of reciprocity failure in as little as 1 second! Fuji’s amazing Neopan Acros was a game-changer, as it maintained its sensitivity up to 2 minutes, and then only slowly lost it with longer exposures. Acros is only a 100 speed film however, which means star point exposures were not an option.

2 minutes, f/4, ISO 6400. Star points, clouds and light pollution over the Sound of Rassay on the Scotland’s Isle of Skye.

15 minutes, f/4, ISO 400.

In late 2002, students at my night photography class at the New England School of Photography began showing up with new digital cameras: first the Nikon D100, and then a few months later the Canon 10D. For the first time, non-professional photographers began to take digital photography seriously, and these cameras made reasonably good night images––at 100 ISO and if the exposures were kept to 30 seconds or less.

Later, when the D700 came out in 2007, and the 5D Mark II the following year, digital night photography took a huge leap forward. A few brave souls cranked up their ISOs to 1600, 3200 and beyond, and began making exposures under moonless skies. They discovered that not only was it possible to record stars as points of light, but it was also possible to show the incredible galactic core of the Milky Way. A new chapter in the history of night photography had begun.

Where we are now

These days, it’s not uncommon for National Parks at Night to encounter other night photographers, or even other workshops, when we are out in the field with our groups––if we happen to be holding a workshop during the new moon.

Joshua Tree National Park. 20 seconds, f/3.5, ISO 6400. Lingering twilight in the western sky combined with light painting on the foreground.

But when we hold workshops around the full moon, or first or last quarter, we rarely encounter anyone else. This is almost the opposite of when I first started teaching workshops, in that we went out to photograph only within a day or two of the full moon, because that was the only time the light was strong enough to be particularly useful for film work.

It’s great to have amazing locations at Joshua Tree National Park or Yosemite to ourselves, but I feel like we are keeping a secret. For all of those photographers who never shot at night with film, or with those first-generation DSLRs, don’t limit yourselves to photographing just during the high Milky Way season at 20 seconds, f/2.8, ISO 6400 around the new moon! There are amazing photographs to be had all year long, during all phases of the moon, at all ISOs.

Where do we go next?

One of the things we try to emphasize in our workshops is just that point: There’s never a bad time for night photography!

Maine. 20 seconds, f/4, ISO 6400. Clouds and the light from Marshall Point Lighthouse on the distant shore and foreground, combined with lingering twilight.

Make your images about more than just that great big galactic cloud in the sky. By all means, photograph the Milky Way and show it in all its glory. But try to push outside of the boundaries of your comfort zone. How about a Milky Way trail image, or a moon trail? Combine star points and the Milky Way with partly cloudy skies, rather than cursing the clouds. Shoot under a quarter or crescent moon. Combine a light-painted foreground with the Milky Way. See if you can photograph star trails in the city.

Most importantly, challenge yourself to learn new techniques and to make images that are different from what you have done before.

Note: Please read Michael Frye's excellent related blog post for a tangential view on this topic. I encourage you to subscribe to Michael's blog, as he always has interesting, relevant content, outstanding images, and frequently photographs at night and writes about night photography.

Lance Keimig is a partner and workshop leader with National Parks at Night. He has been photographing at night for 30 years, and is the author of Night Photography and Light Painting: Finding Your Way in the Dark (Focal Press, 2015). Learn more about his images and workshops at www.thenightskye.com.

UPCOMING WORKSHOPS FROM NATIONAL PARKS AT NIGHT

Night in Day: How are you Preparing for and Shooting the Eclipse?

Note: This article is also featured in our brand new free e-book Here Comes the Sun: 2017 Solar Eclipse Guide. The e-book also includes the articles β€œParks in the Dark,” a travel guide to all the National Park Service units that the total eclipse will pass over, and β€œThe Right Stuff,” a detailed buyer’s guide for all things related to eclipse photography. Download your copy today!

If you haven’t heard the buzz yet, the continental United States will be experiencing a solar eclipse on August 21. If the weather is good, we will all be able to see … most of it. But lots of lucky folks will be driving to a spot along the path of totality to experience something very rare and surreal: the total eclipse, when day turns into night. For approximately 1 to 2 minutes you’ll be able to see the stars during the day and the wild corona light dance from behind the moon.

The last total solar eclipse to touch the lower 48 was on February 26, 1979. The last time we experienced a total solar eclipse crossing our entire nation from the Pacific to the Atlantic was on June 8, 1918. That was a long time ago; it’s pretty rare.

The good news is that, at least this time around, it won’t be rare for long. The next total solar eclipse in the U.S. after 2017 will be in 2024, when the path of totality will cross from Mexico into Texas and will leave via northern New York and New England on its way to New Brunswick and Newfoundland. So any specialized gear you get now, you can put to good use in seven years!

The last trans-U.S. total solar eclipse happened … well, awhile ago.

Gear you Need to See and Capture

As you have probably guessed in life, it is not a good idea to stare at the sun. The most important thing you can purchase to prepare for the eclipse is a pair of solar glasses for your eyes and solar filters for your camera lenses. Technology continues to get better in this field and the newest international standard rating is ISO 12312-2. If you do not see this certification on the product, you shouldn’t purchase it. Solar filters absorb the ultraviolet, visible and infrared energy of the sun, making our star safe to view and photograph.

Protect your eyes with solar glasses. (Helmet is optional.)

B&H Photo, home of my day job, has been a great resource for embracing the best products and knowledge. To that end, I have been recently practicing shooting the sun and want to share this knowledge with you.

As far as glasses go, any simple paper pair will do, as long as it has the aforementioned ISO rating. A cool thing that B&H is doing is packaging free solar glasses with most of their solar filters! So you can kill two birds with one stone, all while not killing your eyes or camera sensor.

Let’s focus on the filters from a photographic point of view. There are three types of solar filters you can choose from:

  • screw-in filter
  • glass drop-in filter for a filter holder system
  • inexpensive and universal paper or adjustable aluminum alloy filters that are easy to take on/off

The screw-in filter is the one I would least recommend. Even though it seems to be the most popular, think of this: The common strategy for shooting the eclipse is to have a filter over your lens so that you can capture a properly exposed and non-flaring sun. Once we enter the small window of totality, when the moon will eclipse the sun, it will be safe to take the filter off and adjust your exposure accordingly for that beautiful shot of dark sky and the white ring around the moon. You must wait until after the β€œdiamond ring effect”—when the sun flares one last time from behind the moonβ€”before taking off the filter. You don’t want to waste precious time (5 to 10 seconds) unscrewing a screw-in filter when you could instead take 1 to 2 seconds to remove a drop-in filter or universal filter cap. The average time of totality will be from 1 to 2 minutes and you want to photograph it but also experience it. Don’t waste precious time fumbling around with your gear!

If you want to look into the available filters and other eclipse equipment, an easy way is to search all the gear and articles that B&H has been working on for the last year. Type β€œSolar Eclipse” into the search engine at www.bhphotovideo.com and you’ll be taken to this very resourceful page:

Start Practicing Now

The first time you shoot the sun shouldn’t be on August 21. Get some solar filters and start practicing shooting the sun now! I’ve been doing this over the summer, which has given me a chance to test exposures and specific gear before the big day.

I recently purchased the Solar Eclipse Filter by Lee for my Wine Country Filter Holder system, as well as the Daystar universal solar lens filter. My MrStarGuy Adjustable Objective filter is on back order, but should be shipping soon.

Lee is one of the top-end filter companies. Their filter mentioned above is equivalent to a 20-stop neutral density, but also is ISO certified and should be used only for solar workβ€”not for long-exposure landscape photography.

Wine Country Filter Holder system and 100-400mm lens.

The Lee filter is made of glass, and I find the image quality is excellent. The suggested settings from Lee with this filter are 1/800, f/8, ISO 800. Think crazy eights! This was pretty spot-on while the sun was high in the sky around 2 p.m.

With Auto white balance, I found the Lee filter produced a clean white sun. I experimented with the white balance and preferred cranking it to 10,000 K for a nice yellow/orange sun that is more visually familiar. You can see the two compared below:

I also tested the Daystar slip-on filter and found that to be of very good quality as well. It was a bit deeper orange/yellow than the Lee with the white balance set to 10,000 K. I also found the Daystar to be 1 1/2 stops faster than the Lee, as my final exposure setting was 1/500, f/5.6, ISO 800.

Sun shot with Daystar filter at 10,000 K white balance. 1/500, f/5.6, ISO 800.

Sun shot with Daystar filter at 10,000 K white balance. 1/500, f/5.6, ISO 800.

Lens(es) and Game Plan

There are multiple ways to capture and create some unique images of the eclipse. Search Google Images to see what resonates with you.

I definitely recommend using a telephoto lens and getting a somewhat tight shot of the different phases of the eclipse. The careful thing to consider is not getting in too tight. When the total eclipse starts you’ll see the breathtaking corona light start to spill out from behind the moon. This can spread pretty far and create some beautiful patterns. If you are in too tight, you’ll frame it out.

When testing, I was using a 100-400mm lens on an APS-C crop sensor, and the far end of that focal range seemed like the sweet spot for a good telephoto capture. That’s 600mm to 800mm with a full-frame sensor, which you can achieve with really big glass or with a 1.4X or 2X teleconverter. But if you have a crop-sensor camera, that would be the one I’d lean on for this project.

The trick to the telephoto shots will be tracking the sun as it quickly moves through your frame. Depending on how tightly composed your shot is, this setup could require constant attention and adjustments. Having a sturdy tripod is a must, especially if you add a tracking device to a long lens and camera. Make sure your tripod head and legs are rated to hold the combined weight over a long period of time.

Many people will be using digiscoping (attaching a camera to their telescope) to get even closer images of the sun and eclipse. We really haven’t experimented with digiscoping at NPAN, but our good friend Todd Vorenkamp at B&H Explora discuses those considerations in his very informative article, β€œHow to Photograph a Solar Eclipse.”

I’d also bring another, separate camera setup for capturing a wider view that includes the landscape. The telephoto phases of the eclipse are cool to capture, but they are generally featured against a dark black sky. If you use a medium telephoto or wide-angle, you can include some subject matter that gives your composition depth and scale. You’ll still need to have that solar filter on to capture more phases of the sun, but you’ll also want to get a properly exposed foregroundβ€”ideally once the uneclipsed sun is well out of the frameβ€”to layer together in Photoshop.

Two tips to consider when using that technique:

  1. Underexpose the foreground shot so all the solar disks will stand out against that hopefully deep blue sky.
  2. Once the eclipse starts to happen, keep an eye on your settings and make adjustments to open up your exposure as the sun gets thinner and fainter.

Be Flexible and Keep an Eye on the Weather

This is going to be the most viewed and recorded solar eclipse ever. You’ll be able to watch it in and around populous cities such as Kansas City, St. Louis, Nashville and Charleston, as well as in national parks such as Great Smoky Mountains and Grand Teton, and in many rural national and state forests.

Do you want to experience this event in a city or town with tons of people and lots of rooftops and amenities, or do you want to go someplace more remote and get a darker sky?

Staying flexible with weather is key. There are plenty of apps (we like Weather Underground) that can share predicted cloud cover. It’s a good idea to have a Plan B and C that are within a 1- to 3-hour drive from your Plan A. You obviously want to avoid overcast and thick cloud cover, but sometimes stray clouds and wisps are unavoidable. Do your best to adapt or adjustβ€”we are wishing you the clearest of skies, of course!

Most hotels are sold out within the path of totality, but campgrounds and private property are β€œrenting” space to eclipse chasers. I will be leading a sold-out workshop with NPAN at a private ranch in the Centennial Valley in Montana, but we will dip down into Idaho to get into the path of totality. We will also be participating with Atlas Obscura and B&H Photo on a Total Eclipse festival in eastern Oregon that just sold out. (There is a wait list that they might open upβ€”click here for more info.)

To find more events in areas that you will be close to, check out these listings:

Don’t forget to enjoy and EXPERIENCE it!

Sure, most of the United States will be watching the eclipse on TV, and that is … two-dimensional. But to actually experience the eclipse is something very special. Animals and humans both react to this astronomical phenomenon in extraordinary ways, and nothing can really prepare you for when the darkness takes over the land and sky. There is a reason people become eclipse chasers and travel the world to keep searching out this experience. Each eclipse and location is unique and different. We look forward to sharing photos of ours with you and vice versa.

A couple of other fun things to prep you for the eclipse:

  • Read Tyler Nordgren’s book Sun, Moon, Earthβ€”A History of Solar Eclipses from Omens of Doom to Einstein and Exoplanets. We are also a big fan of Tyler’s other book, Stars Above, Earth Belowβ€”A Guide to Astronomy in National Parks. He makes the science of astronomy very engaging, easy to understand and to get excited about.
  • Send an eclipse to someone you love! The United States Postal Service has released a unique Total Eclipse of the Sun forever stamp. The stamps show the total eclipse, but when you touch them with your finger the eclipse reveals the moon. They used thermochromic ink that reacts to the heat of your finger! So stock up on these stamps and send a letter or post card from wherever you are experiencing the eclipse!

Download our Eclipse E-book

Finally, if you want to learn some more about how and where to photograph the eclipse, download our free Here Comes the Sun: 2017 Solar Eclipse Guide e-book today! It includes this article, along with a travel feature about all the units of the National Park Service in the path of totality, as well as recommendations about photography gear and services, and eclipse information and swag.

Carpe eclipse!

Gabriel Biderman is a partner and workshop leader with National Parks at Night. He is a Brooklyn-based fine art and travel photographer, and author of Night Photography: From Snapshots to Great Shots (Peachpit, 2014). During the daytime hours you'll often find Gabe at one of many photo events around the world working for B&H Photo’s road marketing team. See his portfolio and workshop lineup at www.ruinism.com.

UPCOMING WORKSHOPS FROM NATIONAL PARKS AT NIGHT

Tech Support: 10 Apps that Will Power Up Your Night Photography

We live in amazing times. Awesome people are making tools that solve problems for niche areas, like night photography! What once took days of research, trips to the library, learning esoteric maths, using arcane lore or even saying, β€œI'll wing it because this is too complicated ...” is now in the palm of your hand.

Our team uses a variety of apps to explore locations and plan shoots, plus understand the moon, stars and celestial events. We’ve curated some of the most useful ones here for you. The age of informed precision is here, and it’s waiting in your pocket.


Chris Nicholson

Sun Surveyor

There are several excellent apps for showing where and when the sun and moon will be. Sun Surveyor is a relatively new one that I love because it makes visualizing the movement of the sun and moon so easy. The placement of each in the sky is portrayed in a virtual-3D arc on your phone or tablet screen. As you turn, or as your device tilts, so does the graphical representationβ€”so as you’re standing on-site, you can see exactly where to expect the sun and moon to be at any time.

Website: www.sunsurveyor.com
Cost: $9.99 (iOS), $7.99 (Android)


Chimani

IMG_0898.PNG

If you have questions about locations in a national park, Chimani is a great place to start looking for answers. They have a travel-guide app for all 59 national parks, each of which contains GPS-enabled maps, and each of which covers topics such as where to lodge or camp, trails to wander or hike, and tips for places to see and explore. Moreover, Chimani recognizes photography as one of the top three activities practiced in the parks, so they also build in photo advice, location tips, sunrise/sunset/moonrise/moonset/blue-hour/golden-hour times, and so on. Andβ€”ready for this?β€”all the apps are free and work without an internet or cell connection.

Website: www.chimani.com
Cost: Free


Matt Hill

WeatherUnderground

There are many weather apps, but I prefer WeatherUnderground (WU) for a few reasons:

  • Their presentation of precipitation, temperature and sky conditions is easy to understand at a glance on a daily or hourly basis.
  • You can add β€œSmart Forecasts,” including Star Gazing and Landscape Photographyβ€”plus edit those presets to taste (see above screenshots).
  • You can add multiple locations, much like the other night photography apps we use, to monitor weather in places you are traveling to or want to shoot.

If you’re generous enough to confirm the conditions in your area, you’re part of the community that contributes to the excellent reporting. It’s like Waze for weather. It rocks. And you’ll rock. 

Website: www.weatherunderground.com
Cost: Free


Pablo

Wanna practice your light painting and see what you did and when? Then download Pablo and start practicing. It uses your smartphone’s camera to record images in sequence to create either one final photograph or an animated GIF/video that shows how you built up to the exposure. It’s pretty hip, so wear shades. 

Website: www.hipablo.com
Cost: Free or Pro version $2.99 (check out this video for Pro version)


Gabriel Biderman

PhotoPills

If I were to be stranded in a national park with no cell service and all my gear, Photo Pills would be the one app that I would use to help me navigate my day and night photographic experience. Photo Pills is rich with multiple tools to help you visualize and plan where the sun, moon and Milky Way will be at any location in the world. You can also use it help you figure out your maximum depth of field and hyperfocal distance, as well as to calculate time-lapse intervals, photos and total memory usage.

My two favorite sections that I use all the time are Planner and Night AR. The Planner lets you drop a pin in any location and then easily read important night photography info for that spot: when the sun and moon will rise and set, twilight times, when the Milky Way will rise and set, and what elevation and angle the galactic core will be at any time during the night. You can save those settings and really plan when would be the best time of the year to visit those locations. And when on location, I’m constantly using the Night AR feature to see the when, where and what angle the Milky Way and other constellations will appear against the mountains and other key foreground elements I’m standing in front of.

There’s lots of info to be had with Photo Pills, and I advise visiting their blog to access tons of training on how to maximize your experience with their app.

Now available for the Droids as well!

Website: www.PhotoPills.com
Cost: $9.99


Ricoh Theta+

I’m a big fan of the Ricoh Theta 360-degree camera, now in its fourth generation. The inexpensive camera lets you take and share 360-degree images that you can view immersively in Facebook, Tumbler, Twitter or YouTube, or view in VR goggles. Each camera has made a major leap forward in image quality and user experience. I’ve even had some success with night photographyβ€”it is a great way to capture the space and place.

While you use the regular Theta app to capture the image, I always quickly switch over to the Theta+ app to do some quick editing. It provides you the best way to flatten the image for more universal viewing, offering Mirror Ball, Little Planet, Flat or Straight options. I default to either the β€œtiny planet” or panoramic β€œflat” viewpoint, and then can apply an Instagram-style filter (I like Libra) as well as do some additional editing. The final step is how you want to save to share the image. I always choose the crop image as it saves the image flat but when posting to most social sites will read as a 360. β€œSave as 360 image” links your post to the slightly more engaging Theta website, but typically posts small on Facebook and doesn’t get as many views because the viewer needs additional clicks.

So take a leap into the world of 360 with the Ricoh Theta camera and Theta+ app!

More info: www.theta360.com
Cost: Free


Tim Cooper

Compass

As Chris mentioned above, there are several excellent apps for showing where and when the sun and moon will be. Why then have a compass app? Because it’s quick and easy. While apps like Sun Surveyor and PhotoPills are invaluable, they are also multitaskers. A simple app like Compass is a one-trick pony whose trick is really important. I don’t know how many times I just wanted to quickly locate west on a cloudy day. Compass app makes this determination effortless. The iPhone version also comes with a simple altimeterβ€”it’s always fun knowing how high you are!

More info: www.macworld.com
Cost: Free native app on iOS6 and iOS7; similar apps available for purchase for both iOS and Android


Tide Graph Pro

Tides? What do they have to do with night photography? Well, admittedly they don’t have much influence over our skies. But having a tide chart will help you plan a night shoot at low tide with some stunning sea stacks or tide pools in the foreground. Tide Graph Pro allows you to locate the nearest tide station via a map or by name search. Once you’ve located your nearby station it’s a simple matter to determine the highs, lows and even the height of the tides. The time/date tool and tide graph are both very intuitive and easy to use.

Website: www.tidegraph.com
Cost: $2.99 (iOS), $1.99 (Android)


Lance Keimig

Field Tools

Field Tools is a simple, straight-forward, and customizable depth of field and hyperfocal distance calculator. Despite not having been updated since 2012, it still works perfectly on iOS 10.3, and is the best of several DoF calculators that I have used.

Website: www.appadvice.com
Cost: Free (iOS only)


Sky Guide

Sky Guide is a richly featured but easy-to-use astronomy app with a beautiful interface and a great augmented reality.

Website: www.fifthstarlabs.com
Cost: Free (iOS only)


Bonus

The Photographer’s Ephemeris

When we work on things like this, we’re kind of democratic about it, and we also just let each other run with where our thoughts take us. Because of that, none of us chose to mention perhaps the most obvious app to mention, because each of thought another of us would. So, from Chris...

The Photographers Ephemeris (TPE) is a mainstay, and one of the granddaddies of this space. They’ve been making their product and providing their service since before not just tablets and smartphones were around, but before even PDAs. Their original app (which you can still download for free) was designed to run on … ready for it? … desktop computers!

As opposed to many pieces of modern technology, age does not work against TPE. Not only have they spent their years making updates and improvements, but it still does great what it’s always done great. Every photographer should have it and use it.

What does it do? It graphically tells you exactly where and when the sun and moon will rise and set at any time of day and year anywhere in the world, along with the same data for the Milky Way. Very, very powerful information for scouting a photo location either on-site or from your couch at home.

Yes, other apps do this too. TPE did this first.

Website: www.PhotoEphemeris.com
Cost: $8.99 (iOS), $4.99 (Android)


Your Turn

There are certainly more than 10 (well, 11) apps that help out with a night photography shoot, and we will certainly cover more of them in the future.

In the mean time, what are you favorite apps that make national park or night photography just a little easier or more fun? Tell us in the Comments section below!

Matt Hill is a partner and workshop leader with National Parks at Night. See more about his photography, art, workshops and writing at MattHillArt.com. Follow Matt on Twitter Instagram Facebook.

UPCOMING WORKSHOPS FROM NATIONAL PARKS AT NIGHT