Equipment

How to Deal With Light Pollution, Part I: Filters

Note: This is the first in a three-part series about one of the most common questions we get: How do you deal with light pollution? We have three answers: with filters, with post-processing, with creativity. In this week’s blog post, Matt Hill discusses the first of those solutions: light pollution filters.


Light pollution is a reality. It affects humans’ quality of life. And it’s not addressed in a serious manner by most local governments.

When it comes to night photography, it’s purely up to individual aesthetic if light pollution is positive, negative or neutral.

I like to think of the problem as a coffee metaphor. Would you make coffee without a filter? No. That would be sacrilege (and like drinking mud). The same principle applies to photography. There are certain situations wherein a filter does exactly the right job and is therefore necessary. Neutral density and polarizers are perfect examples.

But as light pollution filters are relatively new to the photography world, the question stands about whether they fall into the same category. So I set out to understand if and when light pollution filters are useful. After some deep testing experimenting in post-processing and hours thinking about the issues, I have some observations and suggestions for you.

The bottom line is this: Yes, light pollution filters are very helpful in certain situations. Read on to find out when I’d suggest using them.

Note: This will not address deep-sky light pollution filters used typically for strict astrophotography. I focused on what we do best: astro-landscape and suburban/urban night photography.

The Problem(s)

1.  exactly what light pollution filters do is not clearly described.

The manufacturers of light pollution filters claim they remove unwanted color casts from night photography. But very few, if any, provide graphs or data showing which wavelengths of light are blocked. On top of that, very few laypeople know what the heck those mean anyway—so maybe that’s why they aren’t just readily available on the manufacturers’ websites.

In short, the makers say that the filters block a yellow glow. And most often they claim the glow comes from sodium lights. But there are distinctions in this range. As we see in Figure 1, low-pressure sodium vapor lamps typically emit at 589 nm (nanometers).

Figure 1. Source: Wikipedia

The Irix website provides the chart in Figure 2, which clearly shows 589.3 nm as the wavelength being narrowly blocked with only 15 percent transmittance. This means only 15 percent of the light at that wavelength passes through the filter. And it slopes up on either side, so some other nearby wavelengths (colors) are also affected.

Figure 2. Source: Irix.

By comparing the two charts—the emitted light spectrum and the filter’s blocking profile—we see that this is a very specific filter. In fact, it has only one job: to block light at a very narrow wavelength.

Mercury vapor lamps are trickier to filter for, since there are many wavelengths and uses for them. But when used as overhead street lighting, they typically show as blue (435.8 nm) and green (546.1 nm) to our eyes. There is a yellow-orange variant too, which emits at 578.2 nm. This latter one is likely also blocked using (what I can discern as being) typical light pollution filters.

Figure 3. Source: Wikipedia.

We also need to consider the LED revolution. Many cities and townships are in the process of (or have completed) converting all street lamps from the often-beautiful mixed-color lighting to very consistent and “clean” LED lighting. The color temperatures from LEDs may vary widely from warm to slightly cooler than daylight. They also emit more of the color spectrum and will thus render colors better (though not as well as a true tungsten light source). Keep reading to see examples.

So it feels like this wave of light pollution filters is about 10 years too late. But is it?

2. how to best use light pollution filters is not clearly described.

Not one manufacturer source that I researched suggests a white balance setting, nor any post-processing settings. None even mention the filter factor (i.e., how much light the filter eats and how much to compensate for it).

It seems to me that photographic lens filters are a sunset product. Meaning, they are mostly outdated and unnecessary except for the aforementioned specialty filters that have very narrow, specific jobs that cannot be reproduced by post-processing. Their effect must be in-camera. Because this category of products is basically fading away, there are very few passionate manufacturer advocates who put energy into clearly explaining what the filters are for and how to use them. This is a personal gripe I have and my own observation. But it makes sense, right? I wish more technical and instructional information existed in the filter market in general, and definitely for such a new type of filter that’s been generating such buzz.

3. Using filters is inconvenient.

Screw-on filters are a PITA to mount and unmount. I get so anxious doing it. Especially since I often have my camera over a precipice, railing or bridge. I dread that the filter will fall out of my hand or not thread properly and splash/crash.

Some forward-thinking manufacturers now use a magnetic mount system. I have not tested this, but the premise of it addresses my pain directly. My concern (again, having not used it) whether the filter remains in place if I forget it’s on and move my tripod around with the camera mounted. I am not sure how strong those magnets are.

Drop-in filters are also painful to use. Resin filters damage the optical quality of your images too much to even consider. And glass drop-in filters, even though they are chemically hardened, are still glass and therefore fragile. So transporting them to the shoot location and them keeping them safe as you move around is another concern.

Bottom line: You have to care about the problem to use the solution.

The Gear

For these tests I used the following camera gear:

Testing Methods

I shot one control and two tests with the following process:

  1. Photograph without a filter at Tungsten white balance.

  2. Photograph with an Irix screw-in filter.

  3. Photograph with a Benro drop-in filter.

To avoid bumping the camera, I gently screwed in the Irix filter, shot, unscrewed it, and then used the quick-mount Irix filter holder with the Benro glass filter in it. Minor camera movements happened—despite my process.

Locations

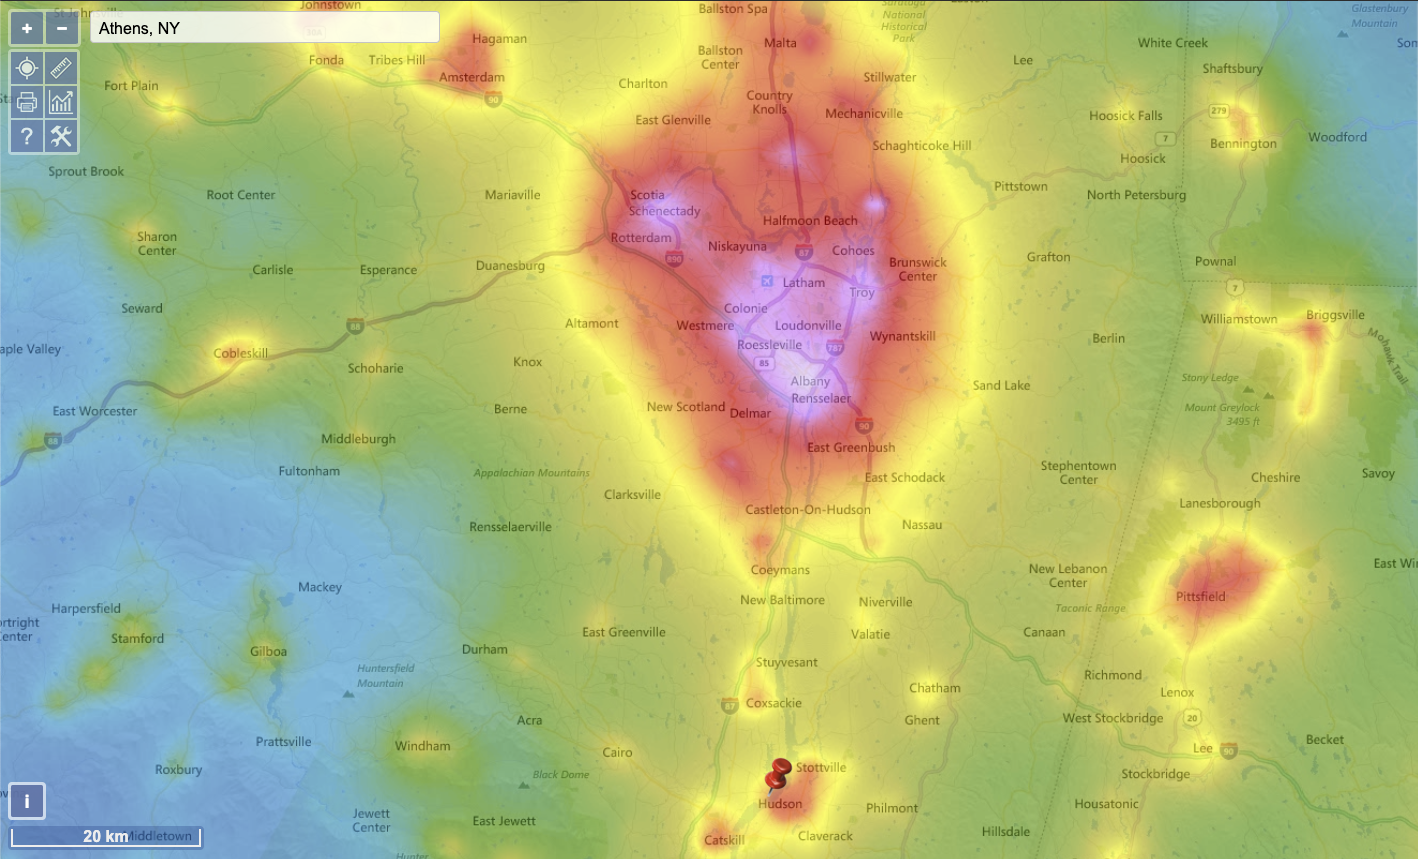
I chose a few locations with varying light pollution. I did not go to a place without light pollution, as that would negate the need for the filters.

  1. Athens, New York—Bortle 4 (rural/suburban transition)

  2. Catskill, New York—Bortle 5 (suburban)

  3. Astoria, New York—Bortle 8-9 (city sky / inner city sky)

Let’s Talk About Color

Visible light occurs between 400 and 750 nm. Some light sources emit full-spectrum light (such as tungsten lighting) and some emit less of the color spectrum (such as sodium vapor).

So I brought along my favorite tool for getting a) the most accurate color in-camera, b) a reliable color reference for comparison and c) a reliable neutral for color balancing. That tool? The X-Rite ColorChecker Passport Photo 2.

Color management is not voodoo. And color science is not as daunting as it seems.

Here is how I use it:

Building a camera profile

When I want to make sure I have the colors represented as closely as possible to correct, I photograph the object in Figure 4:

From Lightroom, using the ColorChecker plugin, I export that image to build a profile (Figure 5).

Figure 5.

Then after restarting Lightroom, under “Profile” in the Basic panel of the Develop Module, I choose the new camera profile.

Figure 6.

The process of building a camera profile is simply one of asking science to place all the color values where they should be (Figure 7). Know this: You may want to build camera profiles for different light sources, such as midday sun, moon, flash, flashlight, sodium vapor, etc. Even if you don’t use a white balance adjustment, the colors will render more true to life.

Figure 7. It’s science. Color science. And don’t the colors look more “right” as you both profile and apply a white balance?

Let’s compare them side by side without a profile and without color balance adjustments, as seen in Figure 8:

Figure 8. Nikon Z 6 with an Irix 15mm f/2.4 lens. Tungsten white balance; 30, 50 & 50 seconds (left to right), f/2.5, ISO 125.

It’s easy to see what a sodium vapor light source does to color when you have a series of calibrated color patches. None of them look right without correction. That’s because that light source is not full spectrum, so different-colored objects reflect it differently.

And when you put a filter on the lens to filter out that light source, you are compounding a problem again. First, the light source didn’t emit at full spectrum, so expecting it to render anything “naturally” is not just unreasonable, it’s impossible. The color patches above demonstrate this. You can come closer via profiling and white balancing, but never true to a full-spectrum light source.

Figure 9. Note the dramatic change in contrast on the stone bench arm beneath the ColorChecker Passport, as well as the neutralization and color change in the streetlamps in the background.

But when you apply a light pollution filter to block that spectrum, you can prevent it from affecting (or, polluting) your image.

That’s when these light pollution filters become viable. Even necessary.

I provide all the above to help you understand the side-effects of filtering out that spectrum and the ideal ways to approach correcting this. I will explain what I have learned.

OK, let’s get out of the science weeds and into the practical application.

One more note before we continue: I love my ColorChecker Passport Photo 2 for daylight and flash camera profiling. It’s invaluable. But for night photography it falls short; often due to the partial spectrum light sources we use. I highly recommend owning one but its applications for night photography are limited to primarily white balancing. It was, however, an excellent tool to demonstrate the color shifts and missing color spectrum.

Light Pollution Filters in the Field

The first time I saw a practical benefit for a light pollution filter was when facing … well, light pollution. (Amazing, right?)

When photographing the Perseids this year, I set up my Nikon D750 as a second camera facing due north from Athens, New York, toward Albany, New York. That city is 45 miles north and yes, it brightened the sky.

Figure 10. Nikon D750 with an Irix 15mm f/2.4 lens, no filter. White balance 3200 K, 260 seconds, f/2.8, ISO 100. Note the warm clouds and cool sky.

Figure 11. Nikon D750 with an Irix 15mm f/2.4 lens, with an Irix Edge Light Pollution Filter. White balance 3200 K, 257 seconds, f/2.8, ISO 100.

Figure 12. Nikon D750 with an Irix 15mm f/2.4 lens, with a Benro TrueNight filter. White balance 3200 K, 252 seconds, f/2.8, ISO 100.

All of the images in Figures 10 to 12 were “cooked to taste” in Lightroom.

With the Irix and Benro filters, a few things happened:

  • The clouds became neutral.

  • The haze in the sky decreased dramatically.

  • The Benro filter seemed to be even more aggressive in neutralizing the yellows.

  • I noticed about one-half to two-thirds of a stop of light loss, and I often increased exposure time to compensate.

The second point above piqued my curiosity. So as I tested more, I looked for evidence of haze being removed from the sky, but found instead that the strong yellow cast from a sodium vapor streetlight was completely removed from the light on the side of the house (Figure 13). This has major implications for urban night photographers because white balance and post-processing do not offer great solutions for color correcting sodium vapor lights, due to their limited spectral emissions as noted earlier.

Figure 13. Nikon Z 6 with an Irix 15mm f/2.4 lens, with no filter (left) and an Irix Edge Light Pollution Filter (right). 61 seconds, f/4, ISO 800.

Here is a Lightroom screen capture zoomed in:

Figure 14.

Note I did not go turn off that light source. I put on the Irix filter. That’s it.

So now I am thinking to myself: All those times I sighed heavily when trying to color correct an image that had heavy orange/yellow streetlights in it—this filter could have prevented a headache.

Figure 15 shows the light source that was hitting the side of that house, without and with a filter (for effect!). It’s not an artful shot, but check out the contrast on the blacktop, as well as the contrast in the sky and on the side of the house:

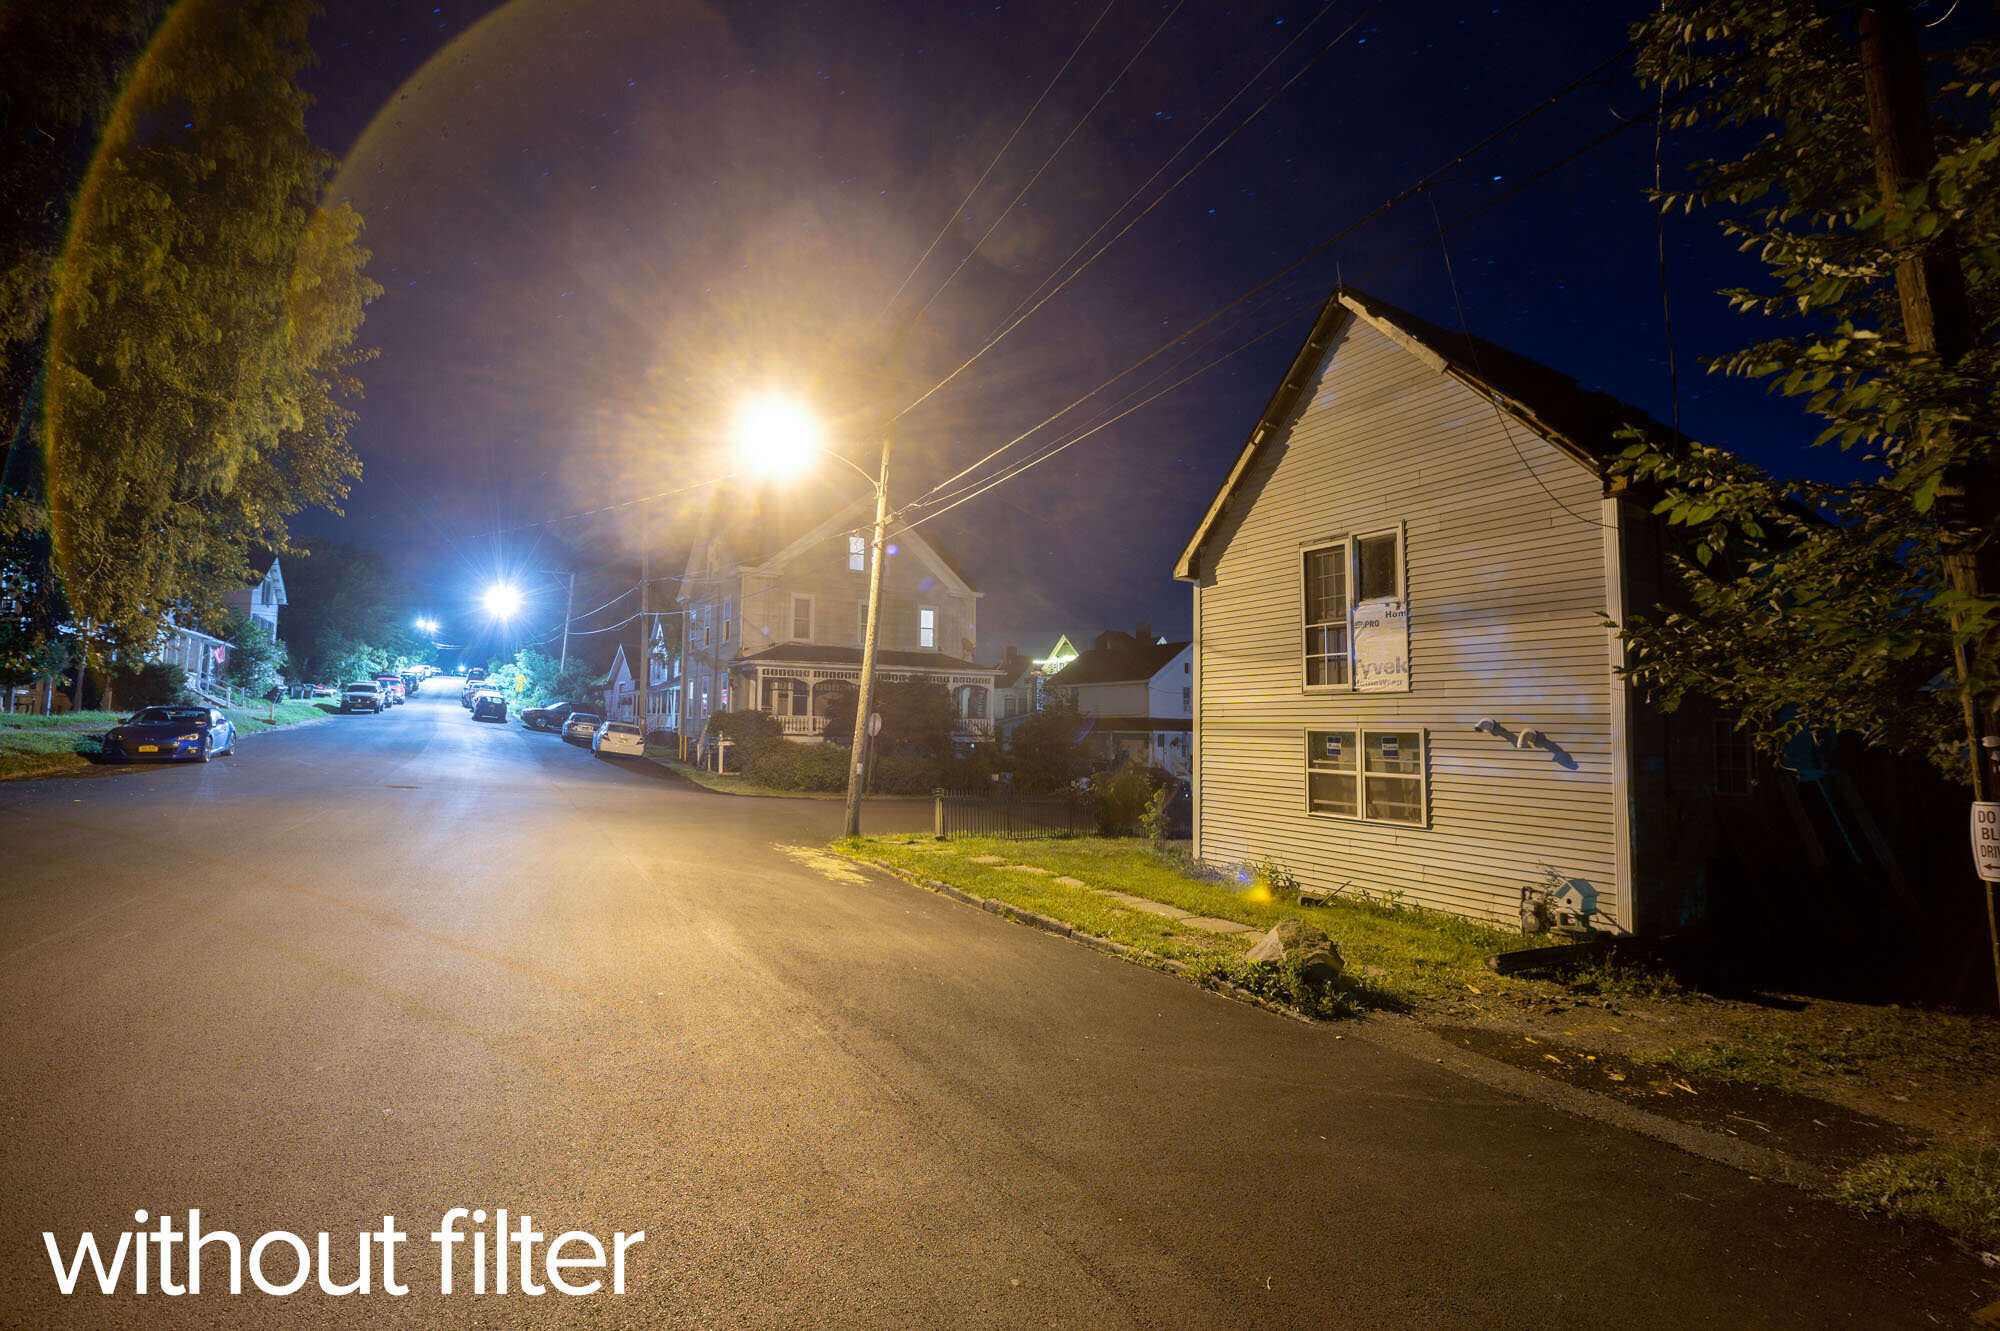
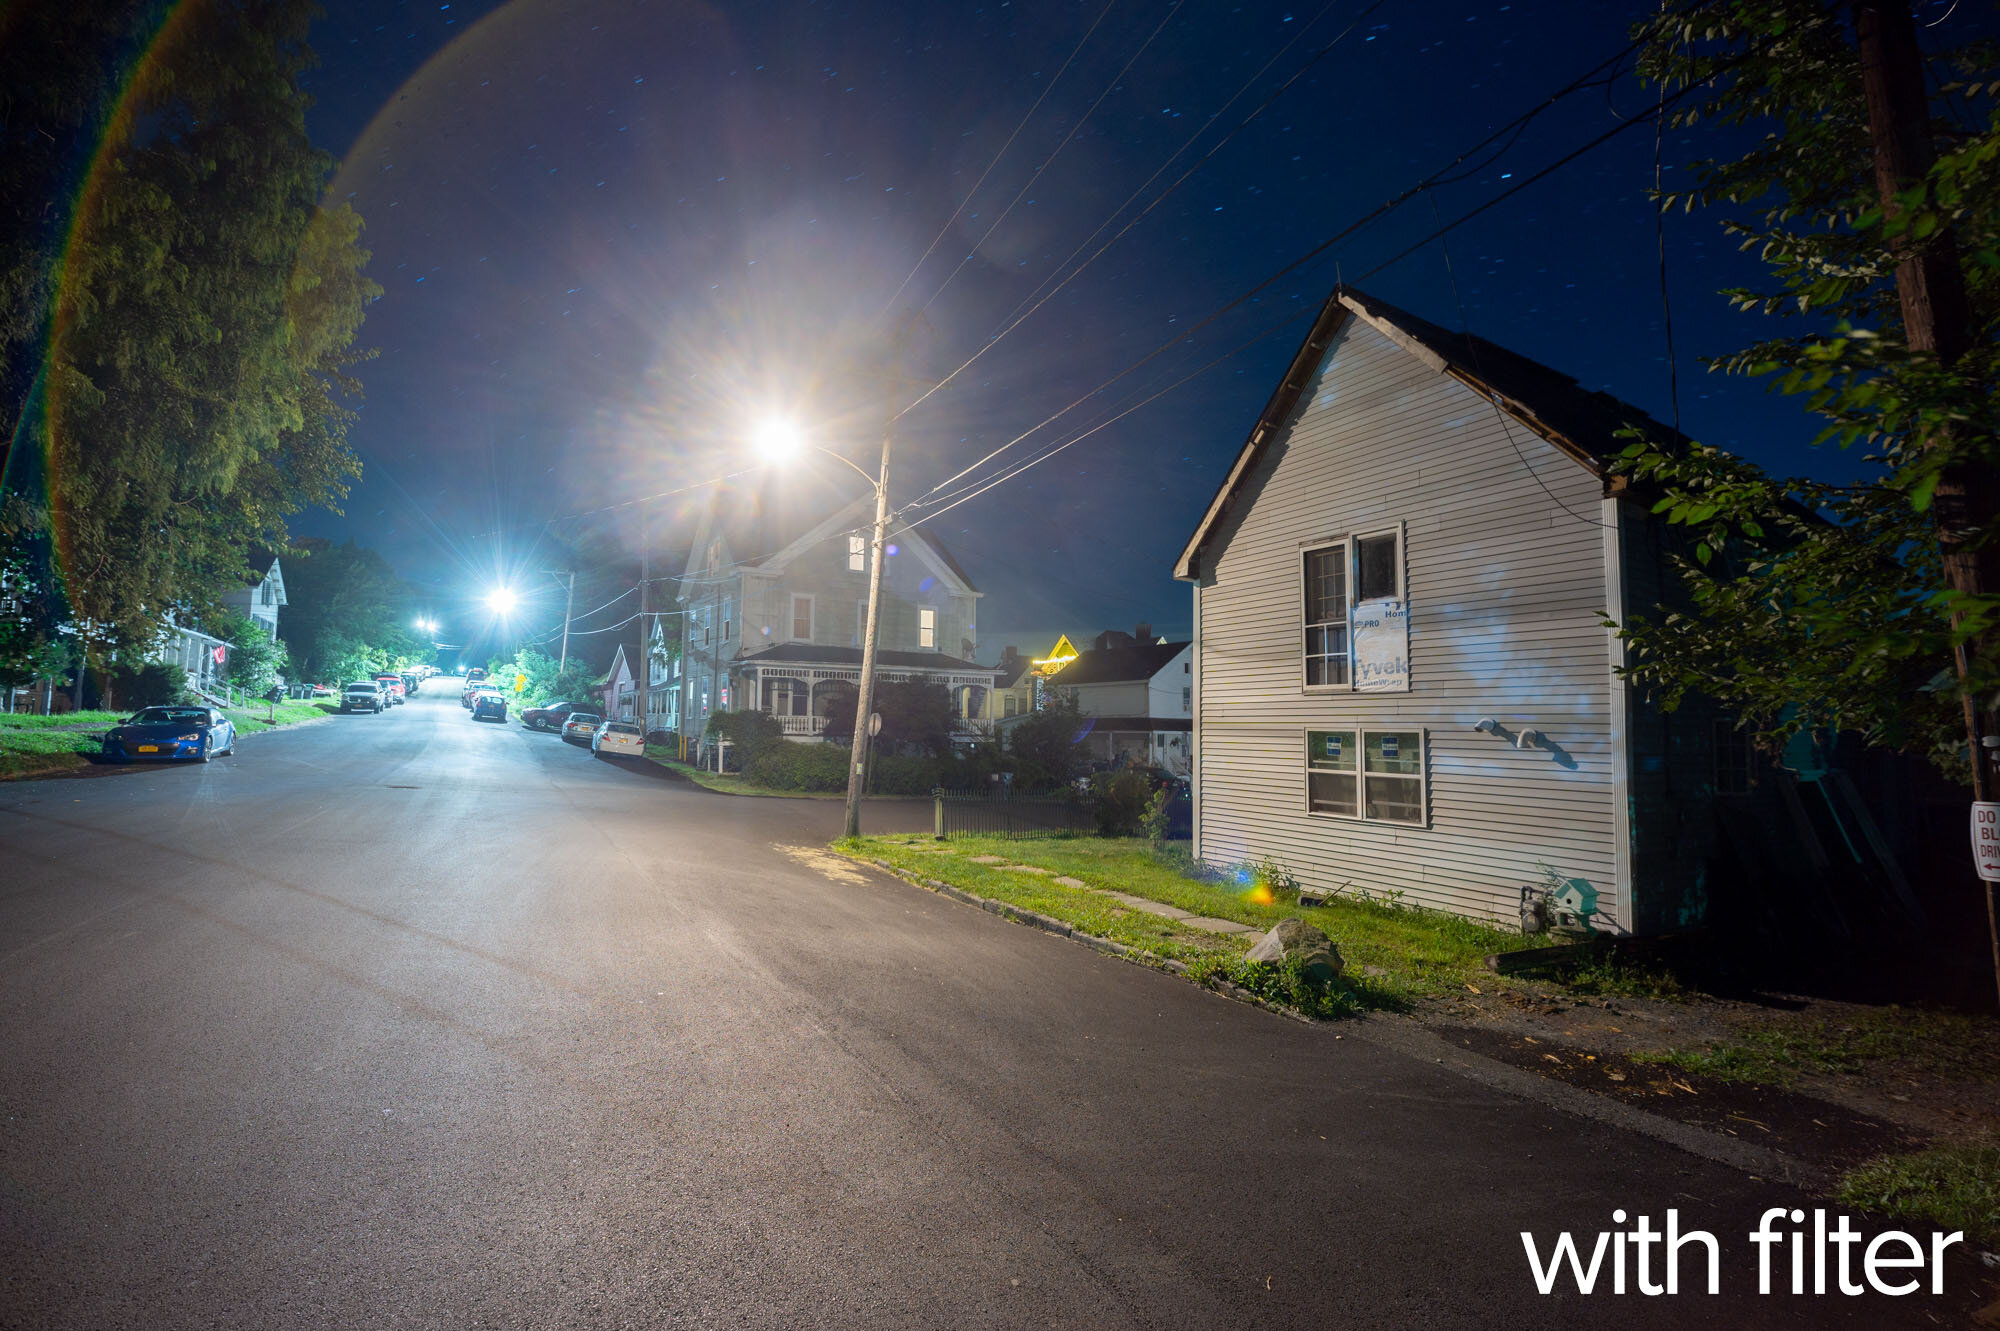
Figure 15. Nikon Z 6 with an Irix 15mm f/2.4 lens. 61 seconds (left) and 86 seconds, f/4, ISO 100.

Figure 16 shows how you can make a brick church look a little more like a church:

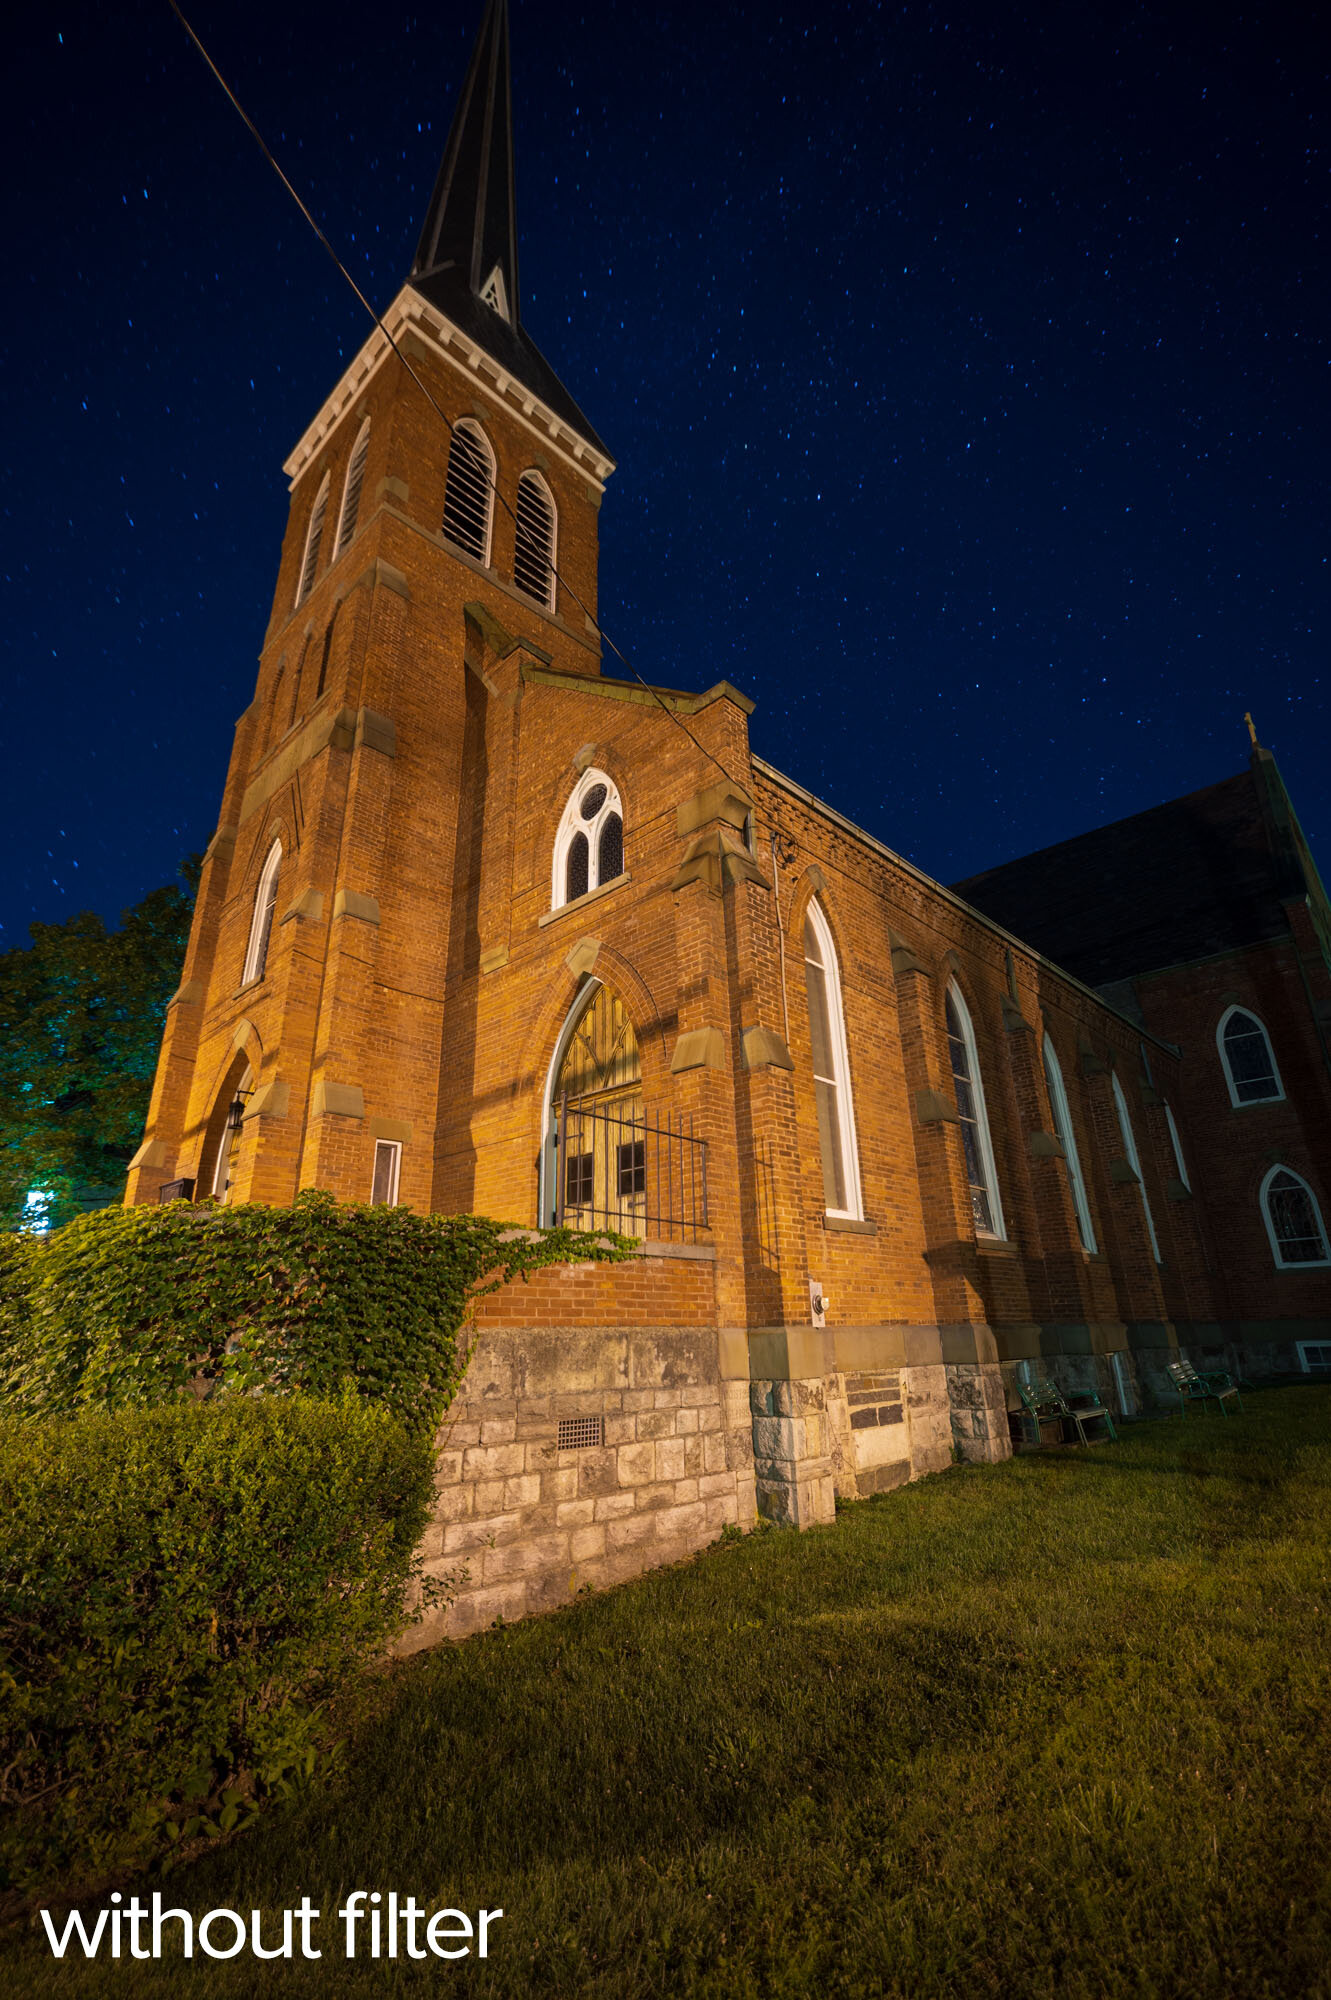
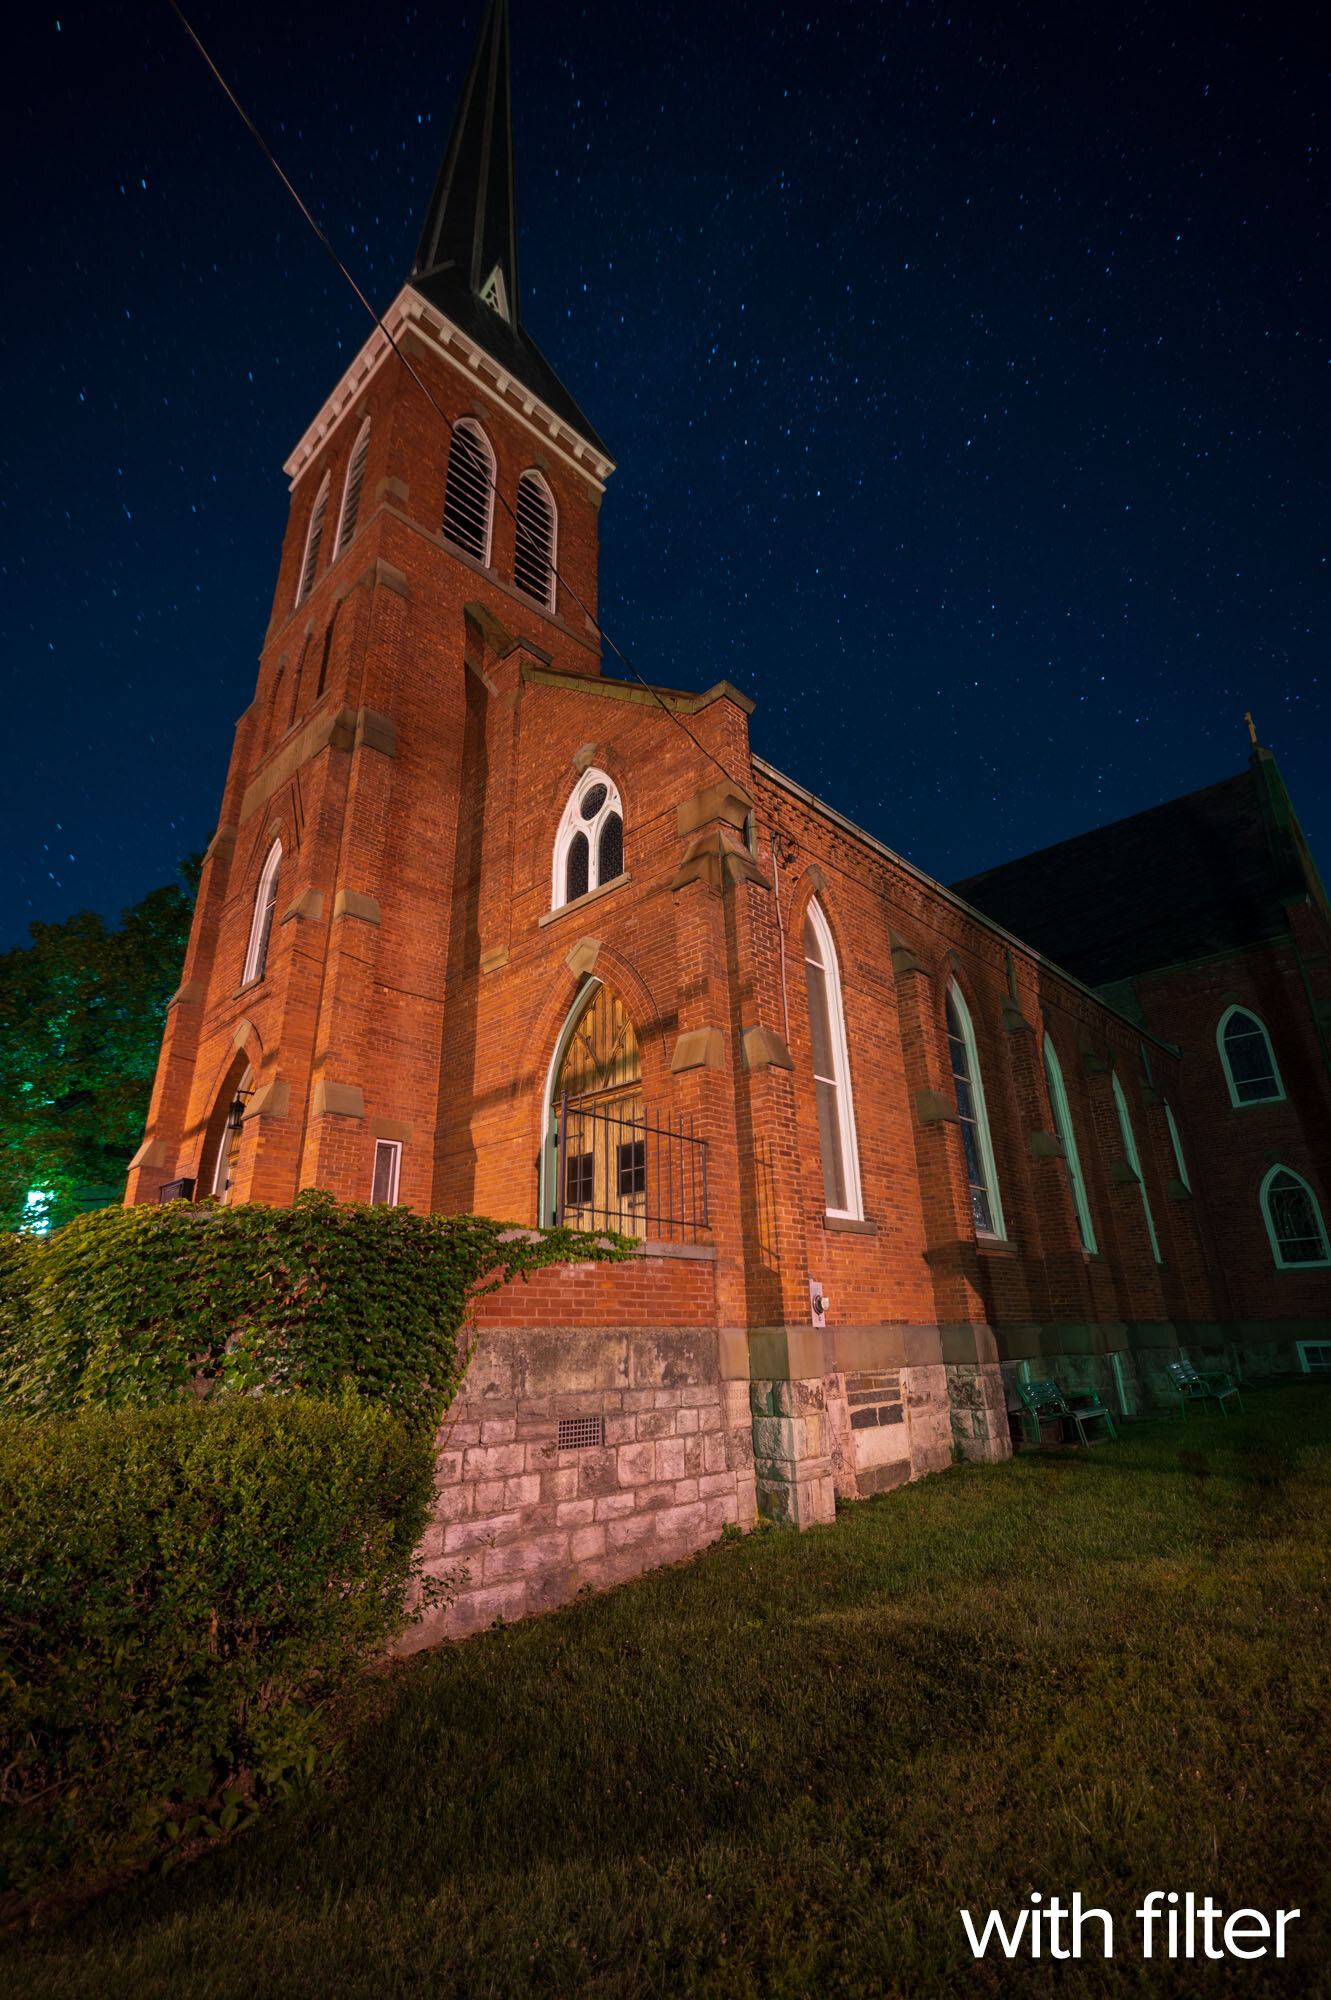
Figure 16. Nikon Z 6 with an Irix 15mm f/2.4 lens. 60 seconds, f/2.8, ISO 100.

The pair in Figure 17 is especially dramatic. Notice how the yellow glow in the water foreground disappears, along with many reflections. But the sky gets more contrast as the yellow/orange is removed:

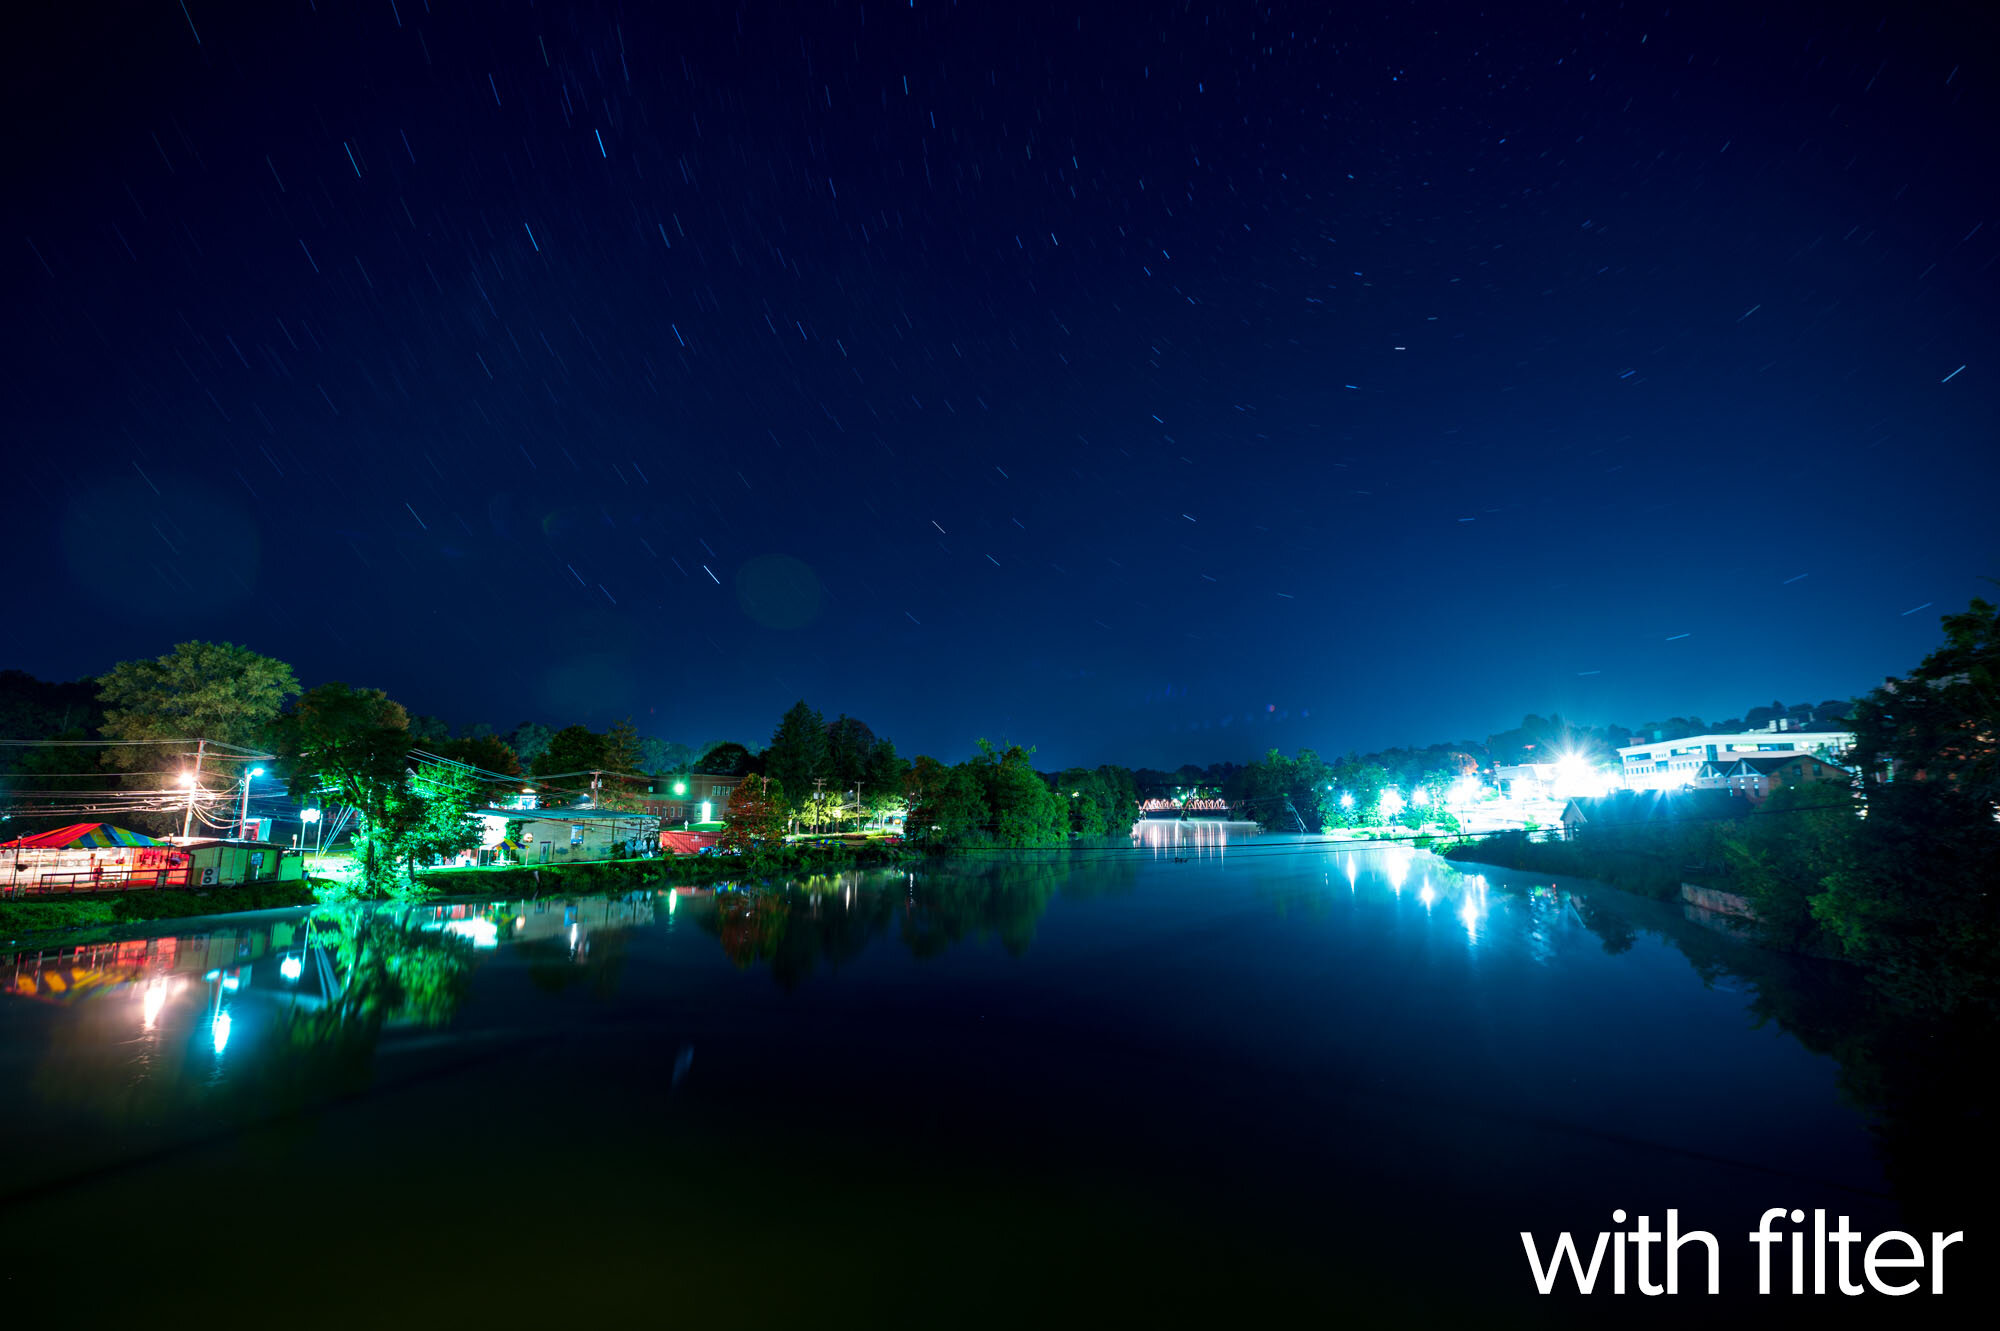
Figure 17. Nikon Z 6 with an Irix 15mm f/2.4 lens. 441 seconds, f/4, ISO 100.

Now, in Figure 18, an example that addresses the burning question in our night photographer hearts: “Will it help my Milky Way images?” I processed each of these individually to taste. Applying the ColorChecker camera profile to the no-filter image helped. It did not help the others, so I applied the Adobe Landscape profile and processed to them look similar. They probably look the best they can:

Figure 18. Nikon Z 6 with an Irix 15mm f/2.4 lens. 10 seconds, f/2.8, ISO 6400.

The examples in Figure 19 have mixed light sources. The lamp on the side of this building is a CFL (compact fluorescent) bulb. The light hitting the side of the building is from multiple sodium vapor streetlamps. Note that the fill light almost disappears, yet the CFL lamp remains unaffected. Wavelength filtration at its finest.

Figure 19. Nikon Z 6 with an Irix 15mm f/2.4 lens. 15, 25 and 25 seconds (from left to right), f/11, ISO 400.

Finally, I decided to pay a visit to the mecca of light pollution, New York City. I visited Astoria Park’s waterfront and shot downstream toward the Hellgate and RFK bridges. I think I got just about every kind of light source one can get in a single frame.

Figure 20. Nikon Z 6 with an Irix 15mm f/2.4 lens. 8, 13 and 13 seconds (from left to right), f/5.6, ISO 800.

I processed those (Figure 20) to be similar to each other. I found that the skies in the images shot with filters were a bit duller, so I had to boost the luminance and sometimes tweak the hue. Otherwise, global adjustments were all that were necessary.

To me, the shot without the filter seems better. But this was just this night at that location with those skies.

In Conclusion

Using and testing light pollution filters, I learned:

  • If you have some particular man-made lights that are vexing, and you have a filter that can block them, light pollution filters are useful.

  • If you like your clouds to be a neutral cast, light pollution filters are useful.

  • Your image ends up being more blue, which will require additional post-processing.

  • I can imagine that this helps immensely in situations where the horrid orange yellow light makes skin tones look terrible or prevents you from editing a color image properly.

  • It’s surprising to just be able to subtract that light source without affecting much else.

If you absolutely hate carrying filters and using them, none of this matters. 🙂 But if you find any of the above effects attractive, perhaps you will make room in your bag.

Big thanks to Irix for their support. We use their lenses all the time and love them. Getting to know their other products has been a privilege.

Also thanks to Benro for loaning us the TrueNight glass filter.

If you want to learn more about light pollution, please visit or join the International Dark-Sky Association. They provide a wealth of educational materials, conversation starters and resources for those who want to help address the light pollution issues that affect nearly everyone on the planet. Please consider becoming a member or donating money to support the pursuit of dark skies.

Questions?

I hope so! Lay ’em on in the comments below, on our Facebook page, or via email to adventure@nationalparksatnight.com. In the future I plan on doing a big shootout of all the light pollution filters I can get my hands on. So what you ask now will help me develop a better testing schema.

Thanks! Seize the night.

Ready for another solution to light pollution? Read “How to Deal With Light Pollution, Part II: Post-Production.”

Matt Hill is a partner and workshop leader with National Parks at Night. See more about his photography, art, workshops and writing at MattHillArt.com. Follow Matt on Twitter Instagram Facebook.

UPCOMING WORKSHOPS FROM NATIONAL PARKS AT NIGHT

Three Legs to Stand On: Helping You Choose and Use Your Tripod

Tripods hold a singular place in the growth of a photographer. Often at first they’re considered an obstacle to working quickly—if they’re considered at all. Then eventually they’re considered a necessary evil, grudgingly worth in dollars maybe somewhere between a filter and a small lens. Then later, we realize the true value of standing on three legs.

Eventually most photographers come to appreciate how a tripod makes them better. It makes them more stable, sure—but it also makes them more deliberate, more calculated, more consistent, more creative. A tripod becomes an ally.

We begin to view lesser tripods as deficient, and we see quality tripods as worth double what we think we can afford to pay. A great tripod—a BMW tripod, a Lexus tripod, heck even a Rolls-Royce tripod—comes to feel essential.

20170921_191636_HDR_for blog.jpg

The investment is wise. A good tripod will last far longer than today’s in-vogue digital camera, and will even outlive the efficacy of many lenses. It will go places with you. It will be solid, it will be your rock. It will pick up scratches and scars, growing proudly haggard as your skills and artistry develop and flourish. It will be with you through the long and glorious haul toward becoming the photographer you are meant to be.

But that all needs to start with buying a good one. Whether entry-level or expert-level, a tripod must be reliable and must meet the task of supporting your collection of cameras and lenses and the way you want to use them.

That can be a hard charge in this world of more tripod options than we can count—not to mention the hundreds of heads, and the innumerable accessories. So National Parks at Night is here to help. We have put together a 71-page e-book titled Three Legs to Stand On: A Guide to Tripods.

In the book you’ll find:

  • a primer on how to choose a tripod

  • an article on how to get the most from your tripod

  • a personal story about a lost tripod that found its way home

  • tripod field tips from all the NPAN instructors

  • a buyer’s guide breakdown of over 60 tripods, heads and accessories

  • and more!

Just like our recent guide to photographing meteor showers, we’re offering Three Legs to Stand On as a pay-what-you-want publication. Feel free to download it for free, or to indulge us with payment of what the book is worth to you.

Either way, we’re happy you’re interested, and we’re thrilled if we can help you decide which tripod to buy next and how to best use it in the field.

You can download the e-book by clicking here:

Seize the night! Seize the legs?

Chris Nicholson is a partner and workshop leader with National Parks at Night, and author of Photographing National Parks (Sidelight Books, 2015). Learn more about national parks as photography destinations, subscribe to Chris' free e-newsletter, and more at www.PhotographingNationalParks.com.

UPCOMING WORKSHOPS FROM NATIONAL PARKS AT NIGHT

A Better Intervalometer: The Phottix Aion

Most night photographers struggle with the most basic requirement to make long exposures: an intervalometer. I believe I’ve found the solution: the Phottix Aion.

What is an intervalometer?

The object of my study (some call it an obsession) is a tool called an intervalometer, which is essentially an external cable release on steroids.

Example of a simple external shutter release.

A standard external cable release is simply a switch. Press the button, the shutter opens. Let go, it closes. Sometimes it has a lock that can hold that button down.

What an external cable release cannot do is execute timed intervals between exposures. This, along with programming shutter speeds, is necessary for goals such as star-trail stacking and time-lapses. For whatever the purpose, an intervalometer can make multiple programmed exposures.

Note: Some cameras now include this as a firmware feature. Hooray for progress! If yours does, then you may not need an external intervalometer. But before deciding, test it out. Many internal intervalometers can be confounding to configure, and most can’t overcome the camera’s native maximum shutter speed, which for most cameras is way too short for long exposures.

The Problems I Have With Intervalometers

So why do I care about this hard-to-pronounce camera accessory? It affects me when it does not work as expected. And it affects all our workshop attendees in the same manner. And it affects all night photographers in general. Here is a list of common issues:

The Cable Connection Breaks

This applies only to wired intervalometers, which is what most people own. Where the camera cable meets the body of the intervalometer, there is a “stress relief” molded into the cable. Despite that, all the rigors this connection goes through—bending back and forth during normal use, living all wrapped up in a backpack or bag, hanging off a camera or tripod—will eventually break the solder inside.

Then when we are inevitably someplace remote and interesting, suddenly the intervalometer stops firing the camera, and we start trying to hold the cable at just the right angle to reseal the connection and make it work. Which is does … sometimes.

Vello dedicated wired Shutterboss for Nikon DC2 connection.

The Cable Connection is For Only One Camera

Again, this applies only to wired intervalometers. You are locked into the cable that works with your camera. Which is good—unless you switch systems, upgrade to a new model or rent a different body.

I understand this makes it easier for manufacturers to sell to people looking for something specific, to not waste resources and to give people only what they need. But not all manufacturers make it easy to order a replacement cable or a different cable.

The Backlight Lasts Only 10 Seconds

This is exactly one second less than it takes to make an adjustment. Just kidding. But seriously, the light should last longer. Ten seconds is hardly ever long enough to adjust a programmed setting, and never long enough to create one.

The Status Indicator Light Ruins Photographs

The little red light blinks to tell you an exposure or sequence is running, which is a nice gesture. But if the cable twists forward to where your lens is pointing, you can ruin your image and others’ around you. Yes, that little LED can shed enough light to be picked up on a long exposure.

There Can be Too Many Modes

This is particularly true of wireless intervalometers. Many that I’ve used default to a mode that has nothing to do with night photography. Right?! How dare they pander to daytime photography. Geesh.

Joking aside, you may have to cycle through modes to get to the classic “intervalometer mode” we require for night photography. Every … time … you … turn … it … on.

I do not Want to Use My Phone

There are some very interesting exposure controllers out there that require your phone’s computing power to perform programmed exposures or sequences. I have tried many, and none are for me. I want to be “present” during my night photography experience, I want to preserve my night vision, and I want to save my phone battery.

The Phottix Aion transmitter (left) and receiver.

So What is the Best Option?

After much testing and firsthand experience with many, many manufacturers’ intervalometers—both in my own photography and by playing with what people bring to workshops—I affirm that the Phottix Aion is the best intervalometer you can buy. Here’s what I love about it:

You Can Set Exposure Durations in Tenths of Seconds

This matters when you are using the NPF Rule to determine star-point exposures, which can be very precise. Let’s say your NPF exposure is 11.72 seconds. With a standard intervalometer, you would have to round down to 11 seconds. Seven-tenths of a second doesn’t sound like much, but in this case it’s nearly 10 percent of the exposure. With the Aion, you can open the shutter for 11.7 seconds.

NPF exposures (seen here in PhotoPills) are almost always precise into the tenths (and hundredths) of seconds.

It Comes with all The cables for Nikon, Canon and Sony

Well, not all the cables, but if you have a camera that uses one of these connections, you are covered:

  • Canon 2.5mm sub-mini

  • Canon 3-pin

  • Nikon 10-pin

  • Nikon DC-2

  • Sony Multi-Terminal

(Sorry, Fuji, Pentax and Olympus owners.)

The Aion connectors.

It Remembers Its Mode

If you turn the Aion off and on, it will return to the last mode you used. Yay for efficiency and time management!

The Crosspad Buttons are Separated

One of the most frustrating things to watch is when someone new to night photography is trying to make an adjustment to the exposure or interval settings on a traditional intervalometer. A big part of the issue is that due to the control button’s one-piece construction, the difference between side-to-side and top-to-bottom adjustments is so minute that photographers easily change to the next setting instead of changing the value. Heck, it happens to me too. And I hate it.

The Aion fixed that—thank you! It features four separate buttons for up, down, right and left.

Most intervalometers have one main “arrows” button to press multiple directions; the Aion has the improved feature of four different arrow buttons, so you always know what direction you’re pressing.

You Can Use it Wirelessly or Wired

This is not a new feature to wireless intervalometers. But I still enjoy it.

Here are some examples of when it’s ideal to have a wireless trigger that is also an intervalometer:

Group shots that you’re in. (I’m sitting in the middle. Hi!)

Creative portraits that require many tries to execute.

Light painting far from the camera with short exposures.

The Countdown Time Shows Quantity of Exposures Remaining

This is not very important, but is good to understand. The Vello Shutterboss shows the exposure number you are currently on. The Phottix Aion shows how many remain. I prefer the latter. It lets me know not how much work is done, but rather how much work is left to go.

You Can Disconnect the Pieces

The issue with stressing the connection by continually wrapping up the cable and eventually breaking it is completely avoided. How? With the Aion, you can disconnect the cable when stowing the units. That alone will guarantee many more nights of photographing under the stars.

The cable plug pulls out, eliminating the biggest stress point of traditional intervalometers.

Selfies are Easier

Since you have a wireless transmitter with on-screen countdowns, making self-portraits under the stars, or including yourself as a human element in the scene, is easy. Doing so wirelessly is also safer than running back and forth to and from the camera in darkness.

Half-Press for Focus

The large button is for normal “Bulb” exposures: Press and hold to open the shutter then release to close it. But the button also has a two-stage functionality similar to the shutter release on your camera. You can half-press the button to autofocus. Combined with the wireless capability, you could focus on yourself in the scene!

What Could be Better

As much as I love the Aion, I’d love to see a few improvements in the next model. A few things I can nitpick:

  1. It doesn’t include batteries. Four AAAs are inexpensive and easy to source. Not all wireless receivers use standard batteries.

  2. The Mode button is where the backlight button is on other intervalometers. I am still re-training my fingers to find the backlight button without having to look for it, or to return to the “delay” or top-most mode.

  3. The crosspad buttons are smaller than traditional intervalometers. And the keys are slick and rounded. (But the separated buttons are still better than the single crosspad button of other intervalometers.)

Video

If you’re more of a watch-what-I-mean kind of person, please enjoy this video comparison:

(And don’t forget to subscribe to our YouTube channel!)

Wrapping Up

The Phottix Aion is a big improvement over our previous intervalometer of choice, the Vello Shutterboss II.

Yes, the Aion costs nearly twice as much (actually on par with the Vello Wireless Shutterboss). So you can choose to carry two wired Shutterboss units for the same money, or one Aion that is likely to be more reliable.

Sadly, this is not the perfect solution. That still does not exist. I am not saying this to throw shade on any manufacturers. Night photography, despite its popularity, is still a niche. And perhaps the opportunity to make the right tool is too small for many manufacturers.

(If you are a manufacturer reading this post and want to collaborate with NPAN to make the ideal intervalometer, we are ready. In fact, we have begun the long-term process of defining the ideal solution. Ping us to start the conversation.)

For all of you night photographers out there, we hope this helps you make better star-point stacks, star trails, time-lapses, portraits, and whatever genius and creative ideas you realize with your cameras.

Let us know what you think in the comments or on our Facebook page, especially if you own or an Aion.

Matt Hill is a partner and workshop leader with National Parks at Night. See more about his photography, art, workshops and writing at MattHillArt.com. Follow Matt on Twitter Instagram Facebook.

UPCOMING WORKSHOPS FROM NATIONAL PARKS AT NIGHT

Best of Both Worlds—The Nikon D780 Combines the Advantages of the D750 and Z 6

A little over 2 years ago, I did some extensive testing of the Nikon D5, D750, D810 and the then-newly released D850. The comparison was to determine which was the best camera for night photography. I concluded that the answer depended on your needs and budget––I recommended the D750 as a great camera at an extraordinary value, the D850 for those who make large prints on a regular basis, and the D5 for sports and wildlife photographers who also shoot at night and who have a healthy budget.

Then, in September 2019, Gabe wrote a post exclaiming hands-down that “the Nikon Z 6 is the best camera for night photography.” I’ve had a few opportunities to use the Z 6 at night since then, and it’s an awesome camera for sure.

Then I recently had the chance to work with the newly released Nikon D780, courtesy of B&H Photo. It’s widely reported that the Z 6 and D780 share the same sensor, and the comparative images I’ve shot indeed look very similar. But there is one subtle difference that makes the image quality of the D780 ever so slightly better than that of the Z 6, especially for night photography in extreme low light. More on that later.

This rundown of the D780 is not intended to be a general review for everyone considering a new camera, but is rather tailored to the needs of the night photographer. If you are a wedding, wildlife or sports photographer, or someone who shoots a lot of video, then my review may be of limited usefulness to you. In this article, I’ll evaluate the camera based on image quality at high ISOs in extreme low-light situations, for long exposures, and also in mixed artificial low-light situations typically found in urban areas at night. I’ll also be discussing the various features and functions as they relate to night photography in general.

Rattle Dragon meets its match. Nikon D780 with an Irix 15mm f/2.4 lens. 1.3 seconds, f/4, ISO 6400. This image has been processed in Photoshop for effect.

Key Features

The camera features a 24.5-megapixel FX-Format BSI CMOS sensor and EXPEED 6 Processor, which is reported to be the same sensor as that of the Z 6––with one slight modification.

Similar to its predecessor, the D780 features a tilting screen. The 3.2-inch, 2.36m-dot LCD is also a touch screen that functions well for intuitive control over playback and menu navigation, as well as touch control over autofocus and shutter functions. It would be nice if the screen had an articulating arm; as it is, the tilt screen is of limited usefulness in the vertical orientation, but is great for working from high and especially low angles in the horizontal orientation.

The D780 sports dual SD memory card slots like the D750, rather than the single XQD slot of the Z-system cameras. The former supports both overflow recording and simultaneous recording on both cards for peace of mind. It also accommodates the UHS-II standard, enabling fast write speeds for video and multi-shot sequences.

When used with the D780, the EN-EL15b lithium-ion battery is rated for an impressive 2,260 shots per charge without live view enabled, or 360 with live view. The battery can be charged via USB-C. For comparison, I recently got 554 25-second exposures out of a relatively new battery in the D750 (with live view and playback disabled) when shooting the Lyrid meteor shower.

The camera has variable aspect ratios of 1x1, 3x2 and 16x9, an in-camera monochrome mode, meter capabilities down to -3 EV, and shutter speeds down to 900 seconds (or 15 minutes).

Long Exposure

Yes, you read that right. Hallelujah! We finally have a Nikon DSLR with onboard shutter speeds that go beyond 30 seconds. There is a menu setting to enable extended shutter speeds, but once you turn it on, it’s a sticky setting, unlike Canon’s awkward Bulb Timer mode on the 5D Mark IV that requires going to the menu every time you use it.

We night photographers would have preferred even longer shutter speeds, but the D780 does have the Time mode, which, unlike the D750, does not automatically shut off at 1,694 seconds. Camera manufacturers have long been reticent to have programmed long-exposure times out of fear of long-exposure noise.

The primary implication of the extended shutter speeds is the elimination of the need for an external intervalometer in many situations. The extended shutter speeds combined with the internal intervalometer (or the easier-to-use but more limited self timer) allow for shooting stack sequences up to 2 hours, 15 minutes with the self-timer and virtually any length with the internal intervalometer.

I’ve been using the Time setting on the D750 and D850 and timing exposures either with my phone, or more often just by feel, because I never liked dealing with the fiddly and fragile intervalometers. For many night photographers, the onboard long shutter speed is a game-changing feature, even if it is only a convenience and has no effect on image quality.

Echo Canyon Road, Death Valley National Park. An example of the range of tones in a black and white image shot under moonlight. Conversion in Lightroom, Adobe Monochrome profile, with no additional software. Nikon D780 with an Irix 15mm f/2.4 lens. 1 minute, f/5.6, ISO 400.

Autofocus

One of the things that has improved the most over the D750 is autofocus performance in both the viewfinder with a 51-point autofocus system, and also a hybrid system for live-view focusing. The hybrid system is adopted from the Z-series cameras, and switches between phase-detection and contrast-detection autofocus based on conditions. It covers approximately 90 percent of the frame with 273 focus points, making it easy for the camera to focus on subjects at the edges.

There is a low-light autofocus mode that extends autofocus capabilities down to -6 EV. The viewfinder autofocus system is accurate down to -3 EV. Under ideal conditions, this should allow for autofocus with live view in light as low as a quarter moon, and with the viewfinder under the light of a full moon. But autofocus on the Milky Way core is a long ways off still, as it is about -10 or -11 EV.

Velociraptor, Borrego Springs, California. Nikon D780 with a Tamron 15-30mm f/2.8 lens at 22mm. 1 minute, f/5.6, ISO 500. A collaborative light-painted image made during a recent workshop under cloudy moonlit skies.

Live View

The live view interface is derived from the Z 6. It’s mostly familiar for Nikon DSLR shooters, but requires a little getting used to. The good news is that live view image quality in low light is much improved, and focusing on stars, or on dark foreground subjects with a flashlight, is much easier than with older Nikons.

I did find that I got the best live view image in low light conditions using the video mode set to the slowest possible shutter speed, just like with the D750. This is a workaround—not an ideal field workflow—as you must remember to turn off the live view before taking the picture, or the RAW file will be cropped to the 16:9 aspect ratio. Still, it is a big and welcome improvement.

780 tilt with photo for social.jpg

Customization

A customizable 12-position menu can be accessed by pushing the i button on the back of the D780 or tapping the i icon in live view. The i menu is an easily accessible place to store settings that you change frequently. The camera allows users to customize different i menus for shooting stills through the optical viewfinder, for shooting stills in live view and for shooting video.

The D780 offers two customizable buttons on the front of the camera that can be set to any one of a long list of functions; you can view them all here. Additionally, the AF-On and AE-L/AF-L buttons can be customized, and the bracket button on the front of the camera can also be customized to shoot multi-exposure images or HDRs.

Build Quality

Comfortable in the hand and familiar to any Nikon user, the D780 offers a solidly built camera with full weather sealing in a relatively lightweight body. On first glance, it looks very much like the D750, but is just a little smaller with a few button changes. For a full-frame DSLR as capable as the D780, it’s compact and ergonomic. It’s basically a D750/Z 6 hybrid.

A Few Random Features

The live view activation button has been moved up to the right of the viewfinder, and the video record button is on the top deck, next to the newly located ISO button.

These changes require some adaptation, but the new position of the ISO button will be familiar to users of the newer Nikon cameras. It is a better and more logical position than on the D750, which has it second from the bottom on the button stack to the left of the rear LCD. Testing the D780, I inadvertently activated video recording several times while reaching for the ISO, but my fingers learned relatively quickly which button was which.

780 top.jpg

I know that I said I wouldn’t talk about video in this review, but quickly: Video shooting is much improved, and the D780 can shoot UHD 4K at up to 30 frames per second, or HD at up to 120 frames per second.

Moreover, there is now the option to create time-lapses from images shot with the Interval Timer Shooting mode instead of the Time-Lapse Movie option of the D850, which means you can keep the RAW files and still produce an in-camera time-lapse on the go. The D780 also has the same focus stacking mode as the D850.

The D780 is compatible with most Nikon F-mount lenses, including AI-S and all Nikon AF models.

On the negative side, there is no option for a battery grip, and the pop-up flash of the D750 is absent from its descendant. I suspect some people will miss these features, but they are relatively minor issues for a night photographer. Also, the intervalometer connects with the same fussy DC2 port. It’s difficult to identify the correct orientation of the plug, especially in the dark. Fortunately, it’s necessary only for timed exposures longer than 15 minutes.

Wish List

Although the D780 has most of the features that I would want on my dream camera, there are a few things would make it the hands-down ideal for a night photographer:

  • Extended shutter speeds down another couple of stops to 1 hour. I’m grateful for the extension to 15 minutes, but why stop there?

  • Image quality at ISO 25,600 comparable to what we get at 6400 on the D750/Z 6/D780. Those extra 2 stops would provide the much-needed wiggle room that astro-landscape photographers often need with our exposure variables. NPF Rule, anyone?

  • An easier way to access the brightest possible live view image in low-light situations. The live view interface of the D780 is the same as the Z 6 and much cleaner and easier to use than that of the D750. However, a workaround is still required to get the best possible live view image at night.

  • The flip lever to close the optical viewfinder (which prevents light from entering the back of the camera during long exposures) that’s found on the D810, D850 and D4-D6.

  • The D500, D850 and D5-D6 have backlit buttons for ease of use in the dark. Their absence on the D780 is a distinction from the top-of-the-line models that cost considerably more.

Fern and Waterfall, Portland, Oregon. A daylight image showing the dynamic range and color depth of the D780 sensor. Nikon D780 with a Nikon 24-120mm f/4G lens at 120 mm. 1/50, f/8, ISO 100.

A couple of features from other manufacturers that would be amazing to see developed for Nikon:

  • Many Canon cameras have the ability to hold images in the buffer and process Long Exposure Noise Reduction while you keep shooting new images. They also have an auto-LENR feature that applies noise reduction as needed and that doesn’t necessarily double the exposure length. I’d like both these features in a Nikon body. Imagine being able to use LENR for all your shots without having to wait for it!

  • The Astrotracer feature of the Pentax K1 for getting around the longest usable shutter speed limitation in astro-landscape photography is based on in-camera image stabilization. It’s not likely ever to appear on a Nikon camera, but it sure would be sweet to have.

Image Quality

What surprised me when I began comparing images from the D750, Z 6 and D780 was not how good the D780’s image quality is, but how well the 6-year-old D750’s images stood up to the newer cameras. That’s not to say that the D780 is in any way a disappointment––to the contrary, the overall image quality is among the best of any 24-megapixel camera that I’ve used.

In the limited testing I was able to do, any difference in image quality at ISO 6400 and 12,800 was negligible. There may be slightly less noise in the shadows on the newer cameras up to ISO 12,800. It was only at ISO 25,600 where the D780 and Z 6 were noticeably better. At ISO 25,600 on the D750, colors begin to bleed outside of detail boundaries and the image really starts to fall apart.

This begins to happen in a similar way at ISO 51,200 with the D780 and Z 6. The newer cameras essentially add one stop of usable ISO, but most photographers will probably still not want to shoot higher than 6400 or possibly 12,800 for nighttime landscape imaging. (There are pixel-peeping opportunities at the end of this post.)

Inyo Mine, Death Valley National Park. Examples of the D780’s high ISO capabilities. The RAW files can be downloaded for evaluation purposes (see the link at the end of this post). Nikon D780 with a Tamron 15-30mm f/2.8 at 20mm. From left to right: 6 seconds, f/4, ISO 12,800; 3 seconds, f/4, ISO 25,600; 1.6 seconds, f/4, ISO 51,200.

I did get to shoot in a contrasty mixed-light urban environment, and was impressed with the ability to pull detail out of deep shadows while preserving highlights, but wasn’t able to do side-by-side comparison testing of different cameras in that environment. DXO Mark rates the sensor on the Z 6 (and the D780 by extrapolation) at 14.3 stops at base ISO compared to 14.5 stops for the D750. This minor difference of one-third of a stop probably cannot be appreciated in real-world situations as opposed to in the testing lab. More importantly, the new sensor tests at a full stop more (9.3) dynamic range at ISO 6400, which is the standard setting for astro-landscape photography.

The Kenworth of my Dreams, Portland, Oregon. The D780 is remarkably well-suited to urban night photography. Highlight and shadow detail is preserved and color rendering is gorgeous. Nikon D780 with a Nikon 28mm f/3.5 PC lens. 30 seconds, f/11, ISO 100.

Despite having the D780 for a while, I didn’t have the chance to photograph with it under starlight conditions––mostly due to lunar phase timing while I had it in California and an extended period of overcast skies here in Vermont. I have used the Z 6 for astro-landscape photography, and it produces some of the best Milky Way images I’ve ever seen. Assuming that the D780 has the same sensor as the Z 6, albeit with a few tweaks in how the images are processed, then both are class-leading for astro-landscape imaging.

ISO Invariance

Like the D750 and D850, the D780 sensor is ISO-invariant, meaning that you can underexpose by several stops to preserve highlights and bring up the shadows in post-processing without majorly compromising overall image quality. This is likely due to the dual-gain sensor that has been featured in many of the best-performing cameras released in the last few years.

The pixels in dual-gain sensors have two readout modes, the first at native and modestly increased ISOs for maximum dynamic range, and another for lower noise at higher ISOs at the expense of dynamic range. The D850 high-ISO readout mode kicks in at ISO 1600. I have not been able to determine when it switches over in the Z 6 and D780, but it’s probably similar to the D850.

The Orange Chair, Portland, Oregon. An example illustrating the ISO invariance of the D780 sensor. Intentional underexposure by 3 stops preserves the highlight detail in the windows. Nikon D780 with a Nikon 28mm f/3.5 PC lens. 20 seconds, f/11, ISO …

The Orange Chair, Portland, Oregon. An example illustrating the ISO invariance of the D780 sensor. Intentional underexposure by 3 stops preserves the highlight detail in the windows. Nikon D780 with a Nikon 28mm f/3.5 PC lens. 20 seconds, f/11, ISO 100.

Lightroom basic settings for “The Orange Chair” photograph. Deep shadow detail recovered with only minimal added noise in post-processing. The RAW file adjustments on the image show an increase of +3.00 on the Exposure slider.

A Final Note on Image Quality

At the beginning of this article I mentioned a slight image quality improvement over the Z 6, and this has to do with the on-sensor phase-detection autofocus system. This is an advantageous feature, because it allows for phase-detection autofocus during live view. However, some of the pixel sites on the sensor are utilized for autofocus, which can cause a subtle banding effect in very deep shadows—especially when the exposure is raised in post-processing.

The D750 does not have this on-sensor system, and thus does not have this issue. The D780 does feature on-sensor phase-detection autofocus (the first Nikon DSLR to do so), but the banding issue has been resolved.

Conclusion

With so many great cameras to choose from, night photographers are not lacking for options. These days the debate is often about whether or not to make the switch from DSLR to mirrorless.

The D780 offers the best of both worlds in the form of a hybrid of the D750 and Z 6. The D780 has the phase-detection autofocus, the 4K video and the live view features of the Z 6 in a solid, compact DSLR body with a backside illuminated dual-gain sensor with great image quality at native, high and extreme ISOs. And don’t forget about the extended shutter speeds down to 15 minutes that virtually eliminate the need for an external intervalometer.

It’s not the perfect camera for night photography––we’re still waiting for that one, and likely always will be—but the D780 comes very close.

Many photographers have made the switch to mirrorless for the reduction in size and weight, and others have resisted the change because they are not ready to sacrifice their FX lenses or don’t want to deal with an adapter to use them. Personally, I prefer the user experience of the DSLR, and don’t feel that the modest decrease in size and weight of switching to mirrorless is worth the trade-offs. When I reviewed the D850 2 years ago, I concluded that upgrading from a D750 to D850 wasn’t worth it for me, as the primary benefit was increased resolution that I didn’t need and backlit buttons that were convenient but not worth the added cost or extra weight in my bag.

Now with the introduction of the D780, it’s once again time to consider an upgrade. I’m buying one.


which night photographers is the D780 for?

D750 owners

As one of Nikon’s most successful cameras ever, the D750 is hard to beat, though it is getting a little long in the tooth, having been released in 2014. With the D780, there’s a modest gain in image quality, especially at higher ISOs. However, most of the improvements have more to do with an updated user experience than better image quality. If you love your D750, but it has seen better days, or you are simply ready for an upgrade, you will not be disappointed with the D780.

Older Nikon full-frame camera owners

If you’ve been holding on to that D600, D610, D800 or even the D810, it’s time to upgrade. For D810 owners who need the higher resolution for huge prints, the D850 is probably a better choice for you.

Canon Shooters

Specifically, those who are dissatisfied with high ISO image quality, or struggle to use live view for focusing in the dark with their 5D Mark IV. Canon’s live view used to be one reason for a night photographer to choose Canon over Nikon. That changed with the inability to get a bright enough image for live view focusing with the 5D Mark IV and the greatly improved low-light live view performance in the Nikon Z 6, Z 7 and D780. The D780 has superior high ISO image quality for astro-landscape photography and wider dynamic range for urban night photography than any Canon camera.

APS-C Camera Owners

Yes, you. It’s time. It’s true that recent crop-sensor cameras do a much better job at high ISO than the older ones, but they cannot compare to the image quality of a modern full-frame sensor. For those on a budget, the D750 is still an outstanding value at $1,500. The $1,800 Z 6 is also a great option—it just depends on your preference for mirrorless or a DSLR. If you can afford it, get the D780. It’s worth the extra cost.

Z 6 Converts Who Love Their New Camera, but Miss Their DSLR

I know of at least one person who bought a Z 6 but switched to a D780 for this very reason. If I had bought a Z 6, I’d probably be in this category too.


Pixel Study: High ISOs

ISO 6400

ISO 12,800

ISO 25,600

Nikon D780 with an Irix 15mm f/2.4 lens. 1/4, f/5, ISO 51,200.

I shot the same image on the same night with the same lens and settings to test image quality at high ISOs between the D750, D780 and Z 6. The images were made under clear, moonlit skies, and the subject was illuminated with a Luxli Viola on a light stand. The lighting was unchanged during the testing, except that the moon rose higher into the sky, which altered the shadows.

I tested each camera at ISO 6400, ISO 12,800 and ISO 25,600. There is very little difference between the three cameras at ISO 6400 and ISO 12,800, but the D750 image starts to deteriorate at ISO 25,600.

I also tested the D780 at ISO 51,200. At this extreme ISO, the image from the D780 deteriorates in the same way as the D750 does at ISO 25,600. The colors start to bleed outside of contrast edges. Color noise is still easily managed by Lightroom’s default correction, and there is no sign of background pattern noise. Luminance noise is significant.


Download Test Images

So you can make your own evaluations, we are providing a selection of images made during the testing I did for this article at npan.co/D780testimages. They are mostly DNG files with embedded metadata. Feel free to download the files and manipulate them for evaluative purposes.

Warning: It might take awhile to download these, and we recommend not doing so with a mobile device using a cellular data connection. The files total nearly half a gigabyte.

(All images are © 2020 Lance Keimig, and may not be printed or republished without express written consent of the author.)


Your Thoughts

Have you had a chance to shoot with the Nikon D780 yet? We’d love to hear your impressions and see your night images! Please leave your thoughts and photos in the comments below, or on our Facebook page.

Lance Keimig is a partner and workshop leader with National Parks at Night. He has been photographing at night for 30 years, and is the author of Night Photography and Light Painting: Finding Your Way in the Dark (Focal Press, 2015). Learn more about his images and workshops at www.thenightskye.com.

UPCOMING WORKSHOPS FROM NATIONAL PARKS AT NIGHT

When the Pen is Mightier: Using a Graphic Tablet For Spot-Editing

As I was working on an image the other day, I realized how much I depend on my Wacom tablet for post-processing. I also realized that I don’t often get the chance to mention this incredible tool when teaching workshops.

So I figured it was high time I share the joys of editing with this indispensable tool. Below I’ll talk a little about the advantages of a tablet when editing, and then show a video detailing how I configure mine to function best for the kind of photo work I do.

Graphic Tablets

A graphic tablet is an input device that replaces a mouse and consists of the tablet itself as well as a pen. They are also referred to as drawing tablets or pen tablets. Wacom is the brand that I use and is generally considered to be the gold standard of this niche.

A typical graphic tablet with its pen.

At the most basic level, the pen and tablet are used as a substitute for the relatively unwieldy mouse or track pad. Instead of working with an unergonomic mouse, you can use the more natural and ergonomic pen and tablet to click your clicks, dab at spots and draw your masks.

These devices are very popular with graphic designers who need to “draw” and “paint” on the computer. Imagine how difficult/impossible it would be to draw a realistic scene with a clumsy mouse. Now put a pencil in your hands. Feel the control? Ah, much easier.

When to Use a Graphic Tablet

For most of our processes in night photography (or photography in general), we don’t need the extreme level of control some of these tablets offer. But the natural feel of the pen does reduce hand strain and does make many of our tasks much easier. When I was recently working on a Death Valley image that needed a lot of spot removal, I was reminded of the convenience of my Wacom.

I’d been shooting on one of those nights when long-exposure noise was creeping into images. (The temperature had been fairly cool when I made the shot, so I didn’t turn on long exposure noise reduction for the series of 3-minute exposures. The night was, however, very dry. This is a phenomenon that I first heard about from Lance Keimig: In dry, desert-like environments, long exposure noise becomes visible at shorter exposures than usual at the same ambient temperature.)

In this example, the long exposure noise hadn’t completely ruined the image, but I definitely had to do a lot of spot removal to salvage the shot. Using the Wacom tablet and pen made my job much easier. Instead of fussing around from hot pixel to hot pixel with a mouse, trying to microadjust the position of the pointer, trying and missing and undoing and redoing ad nauseam, I was able to just pinpoint each spot with my tablet pen.

The image in question, before eediting the long exposure noise. Click to enlarge to see how many pixels need to be spotted out.

Final image with long exposure noise removed. Death Valley National Park. Nikon D4s with a Nikon 14-24mm f/2.8 lens at 14mm. Ten exposures at 3 minutes, f/4, ISO 320.

That’s one prime example of when a tablet makes my life easier. For basic image editing (moving the sliders about), I generally don’t use one, as I am fairly comfortable with the mouse and trackpad for those tasks. But the moment I need to perform serious spot removal, I plug in the Wacom and revel in its ease of use. I also use the tablet extensively when I’m working on creating masks for local adjustments in both Lightroom and Photoshop. Basically I use it anytime I imagine that a pen would be a more efficient tool than a brick … I mean, a mouse.

That being said, I know plenty of photographers who use the pen and tablet the whole time they are editing. They just find it all-around more comfortable.

Setting Yourself up for Success

Many models and varieties of tablets are available at different price points. Wacom’s most popular are the Intuos and the Intuos Pro lines. I prefer the Intuos Pro (Medium) for the extra size of the tablet for resting my wrist. It also has better pressure sensitivity for when that may be needed.

A lot of folks find their first few attempts at working with the tablet to be somewhat frustrating. I know I did. The reason is that it is truly designed for extreme control. This means the pen has pressure sensitivity to regulate how hard you need to press to paint, draw or click. Also, a tablet has a fairly large active area (the surface that’s sensitive to the touch of the pen). In some cases this means you have to move your whole arm to get your cursor/pointer/tool from one corner of the display to another. That can seem like a lot of wasted movement for folks accustomed to nudging their mouse an inch to reach the far end of the screen.

Those aspects of pen and tablet are great for exerting precision strokes, but (I believe) are unnecessary for the average photographer. The folks at Wacom would cringe if they heard how I basically “dumb down” the whole setup for my editing. But, hey, it works for me!

In the following video, I’ll show how I set up my Wacom Intuos Pro. I won’t cover all of the myriad options the tablet offers, but rather just the ones that pertain to my way of working.

Wrapping Up

Using a tablet is a great way to gain comfort, precision and efficiency while editing images, in addition to making certain tasks (such as spot removal and local adjustments) much, much easier. I couldn’t live without mine.

Tim Cooper is a partner and workshop leader with National Parks at Night. Learn more techniques from his book The Magic of Light Painting, available from Peachpit.

UPCOMING WORKSHOPS FROM NATIONAL PARKS AT NIGHT