Walking in a Photo Wonderland: Our 2019 Holiday Gift Guide

NPAN 2019 Holiday Gift Guide cover_v2.png

It’s that time of year again. Time for snow and mistletoe, time for libations and decorations, time for cheer and time for gear.

As for the latter, you might have a wish list to add to, or you might have a photographer in your life who needs a perfect gift. Our gift to you is to be here to help.

Below you’ll find almost 50 ideas for the night photographer and/or park aficionado in your life. From apps to lenses, tripods to games, nicknacks to artβ€”you’re sure to find something deserving of wrapping.

Note: If you decide to purchase any of the items in this gift guide, please consider using the links included, as many generate a small commission that helps us improve the National Parks at Night workshop program.


2046 Print Shop

Super Blood Wolf Moon Print

Did you freeze your tuchus off photographing the super blood wolf moon this year? Matt did. What he didn’t know is it would have been easier to just order this totally gorgeous three-color screen print instead. 2046’s supertasty design reminds us of the targeting system from the Star Wars Death Star. Despite that, we spent hours looking at it on screenβ€”just imagining how much you’d enjoy this on the walls of your home or office. Grab it now, because this is a limited edition of only 100 prints.

Acratech

GPX Ball Head

Acratech makes the finest ball heads and their GP series has long been our favorite. New with the GPX is the ability to hold an outstanding 50 pounds! That’s double the already sufficient 25 of the GPSS model. We especially like the lever version, which adds additional security for your camera mounting. The new knob markings make it easier to operate and the overall finesse job they did on the updated lever clamp, tension and torque knobs make this the ultimate ball head.

Special offer: 10 percent B&H discount with promo code β€œSEIZEGIFT19.” Valid on the full line of Acratech gear from November 29 to December 7, 2019.

AeroPress

AeroPress Go Travel Coffee Press

We’ve been fans of the original AeroPress for years, and we travel with it rather than suffer through miserable hotel coffee on the mornings after night shoots. Now, just in time for the holidays, there’s the new AeroPress Go for people who enjoy fine coffee on the move. It’s compact, lightweight and durable, making it ideal for coffee lovers who wish to enjoy their favorite brewed beans while away from their kitchen. The AeroPress Go travels self-contained in its mug, making it easy to fit in a suitcase, with camping gear or in an RV. It’s a cinch to clean, and makes a delicious espresso, Americano or cold brew coffee.

Atlas Obscura

An Explorer's Guide to the World's Hidden Wonders

The second edition of Atlas Obscura’s Explorer's Guide to the World's Hidden Wonders brings the reader on an adventure to some of the world’s most fascinating and quirky places. Includes 100 new places to visit and explore while you travel the world in search of obscure adventures.

B&H Photo

Gift Card

If you don’t know what to give to the shutterbug in your life, there’s one thing that’s guaranteed to make them smile: anything at B&H. As in, the gift that gives more, a B&H gift card. Available in increments from $25 to $500, and they can be delivered directly via email in seconds.

Bay Photo

Metal Print

You know we are passionate about printing and celebrating our work, and Bay Photo is our top choice when we’re ready to put image to paperβ€”or to other surfaces. Bay has many ways to easily share our images, be it books, cards or prints. While we love the versatility of the Xpozer print, nothing sings like a professionally done metal print. Bay has five finishes, ranging from high gloss to satin, to suit every taste.

Special offer: Save 10 percent on any size metal print using our exclusive promo code β€œNPANM10.” Expires December 10.

BenQ

27-Inch Display

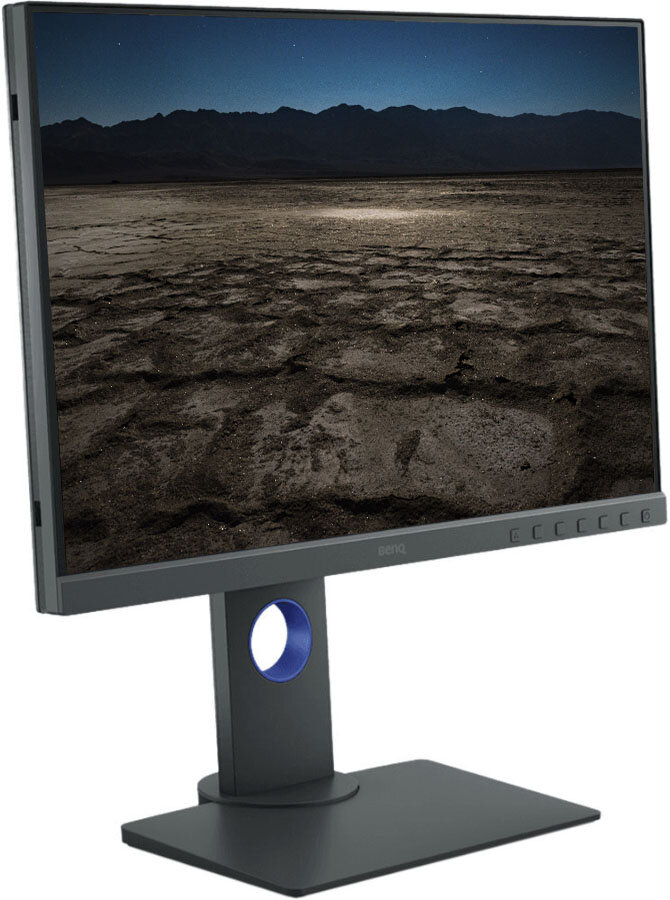
Color management isn’t sexy. We get that, but most photographers don’t give enough thought to how their images are displayed and perceived. Starting with great hardware is a step in the right direction. BenQ 27-inch displays offer 99 percent coverage of the Adobe RGB color space for color accuracy, and come in a choice of resolutions and features. All five of us at National Parks at Night use BenQ displays to work on our images in the best possible light. Compare the options and choose the one that’s right for the photographer in your life, or take your own images to the next level with BenQ.

Special offer: B&H discount of $50 off BenQ 27-inch displays through December 2, 2019.

Chimani

National Park Guide App

Our favorite national park guide app is now available as a subscription, with elevated levels of information and service. Includes 64 detailed national park guides, GPS-enabled offline maps, over $2,500 in discounts for national park-related products and services, and more.

Coast Portland

HX5R

We love our Coast flashlights and can’t seem to get enough of them! The new HX5R is a less expensive alternative to the HP5R. It’s compact; very bright; has high, low, and strobe modes; and uses a single CR123 battery or a USB rechargeable Coast battery.

Special offer: Get 35 percent off using the code β€œPARKSATNIGHT” at coastportland.com.

CreativeLive

Night Photography Week Video Course

Can’t make it to a workshop this year? No problem, we’ve got you covered. Our team got together and spent a week recording our favorite night photography topics. Our Night Photography Week videos from CreativeLive covers everything from night photography fundamentals to astro-landscape photography and light painting. Great for the photographer new to night photography as well the seasoned enthusiast.

Special offer: 70 percent off all courses at CreativeLive.com, including Night Photography Week, for a limited time.

Eleanor Lutz

All the Stars You Can See Poster

The name says it all. A stellar poster depicting every star that’s visible with the naked eye from Earth, printed on semigloss paper. Options include 22x15-inch, 33x21-inch and 47x30-inch. Also available as a T-shirt, phone case, photographic print and more.

Grafo Map

Personalized Map Prints

Give Grafo an address and get a custom-designed map. It’s that simple. Choose from 11 design and six finishing options to create a print that shows exactly what/where you want. With options to customize the labels and icons, you can truly make it express a geographic moment in time.

Groove Bags

Photography Socks

No one wants to go into the field unprepared. For the photographer, socks are every bit as important as cameras and lenses. So we think it just makes good sense to have both cameras and lenses on your feet. With a premium fabric blend to enhance moisture wicking, these photography socks will keep you dry as well, all while proudly displaying the typical photographer’s aversion to fashion. Win-win.
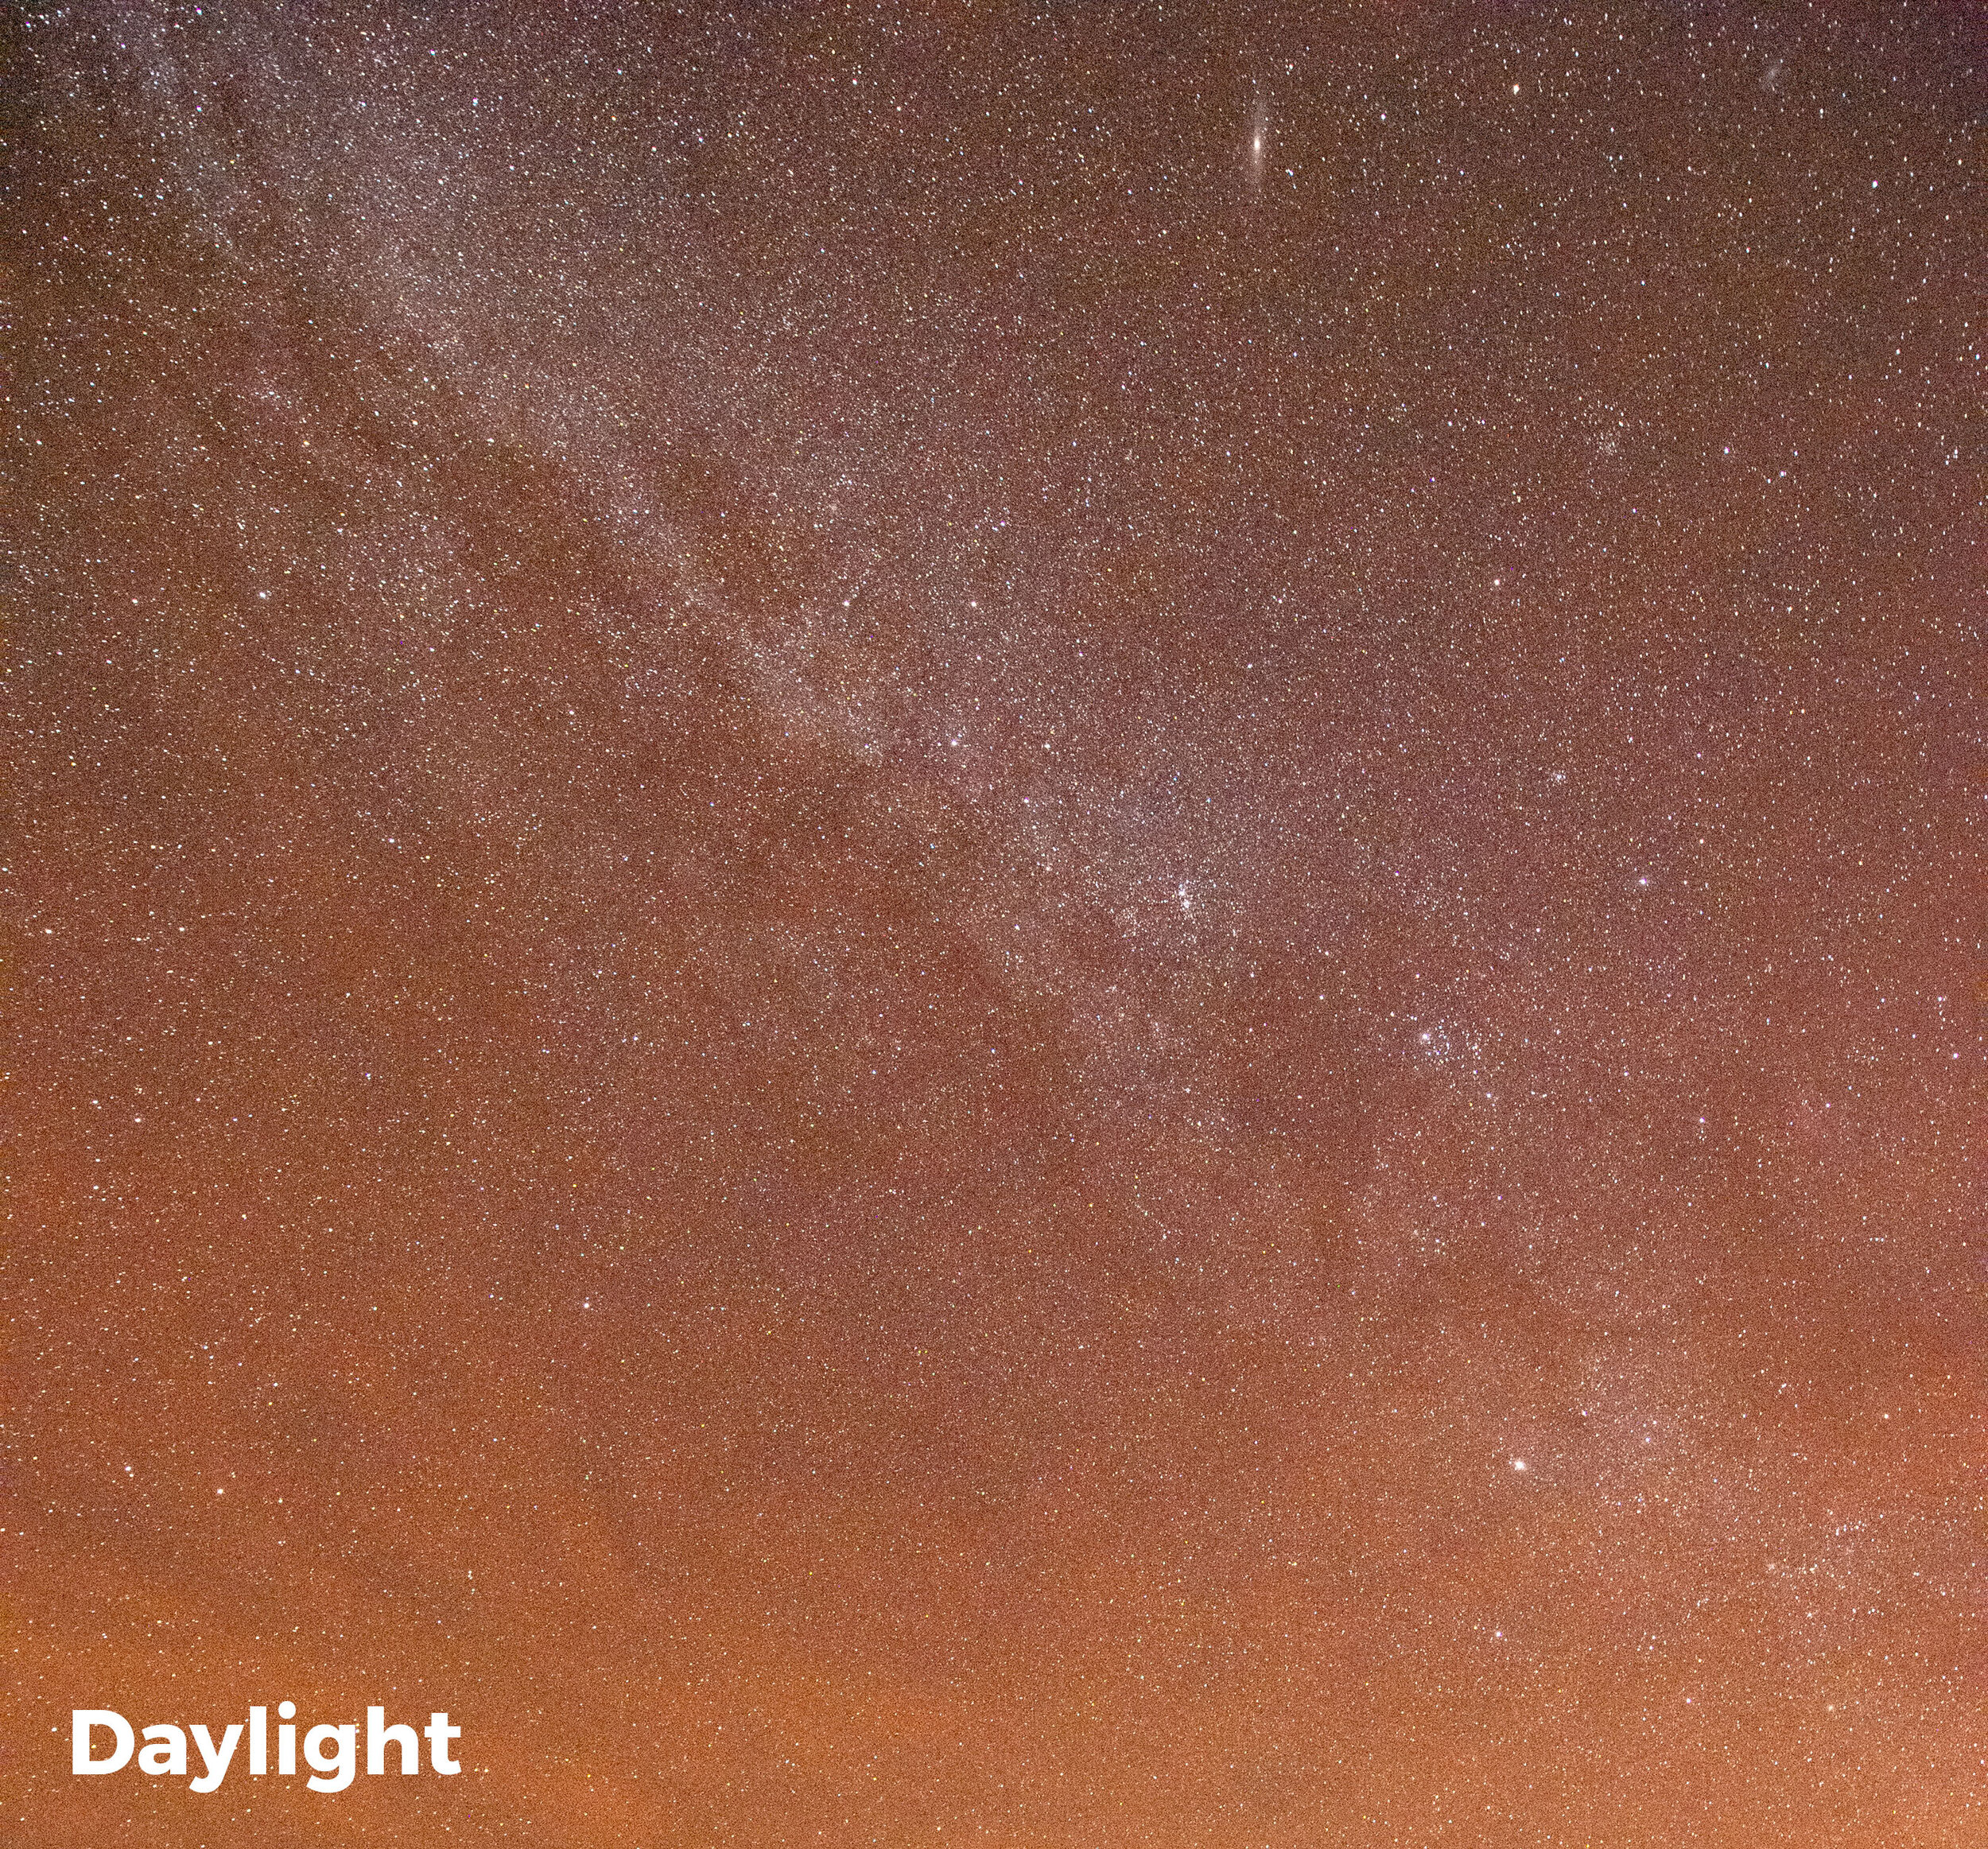
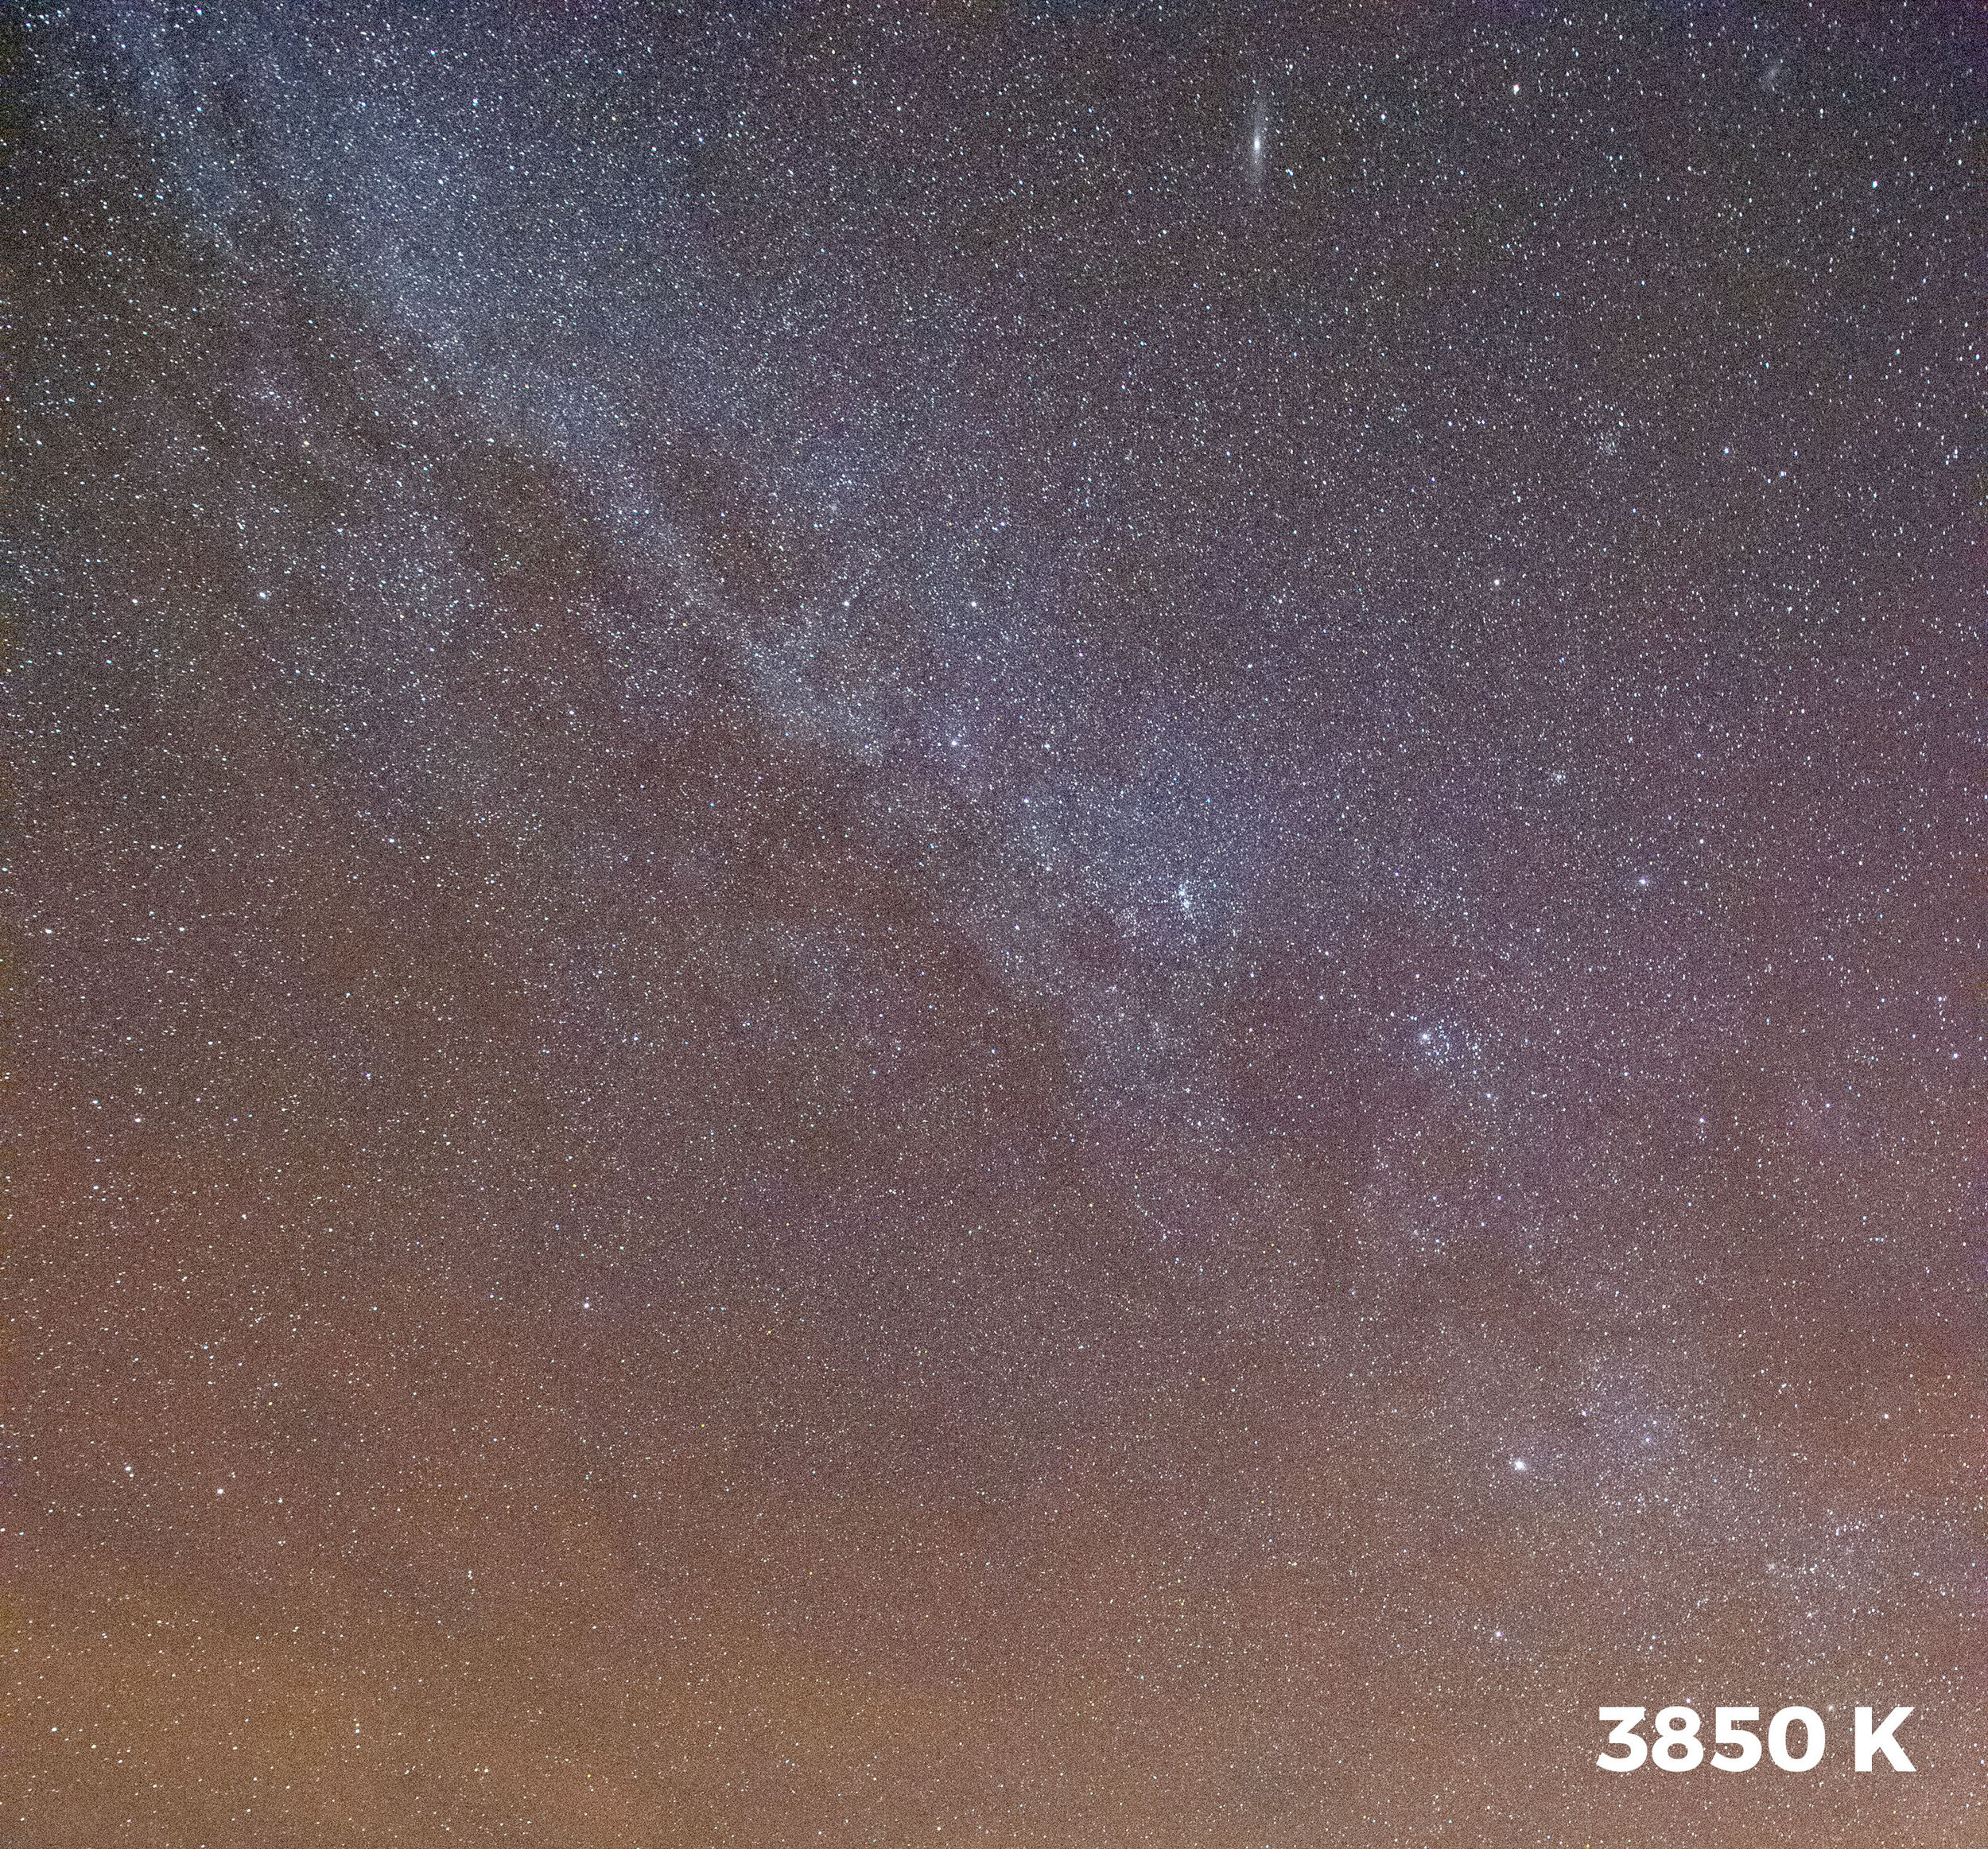
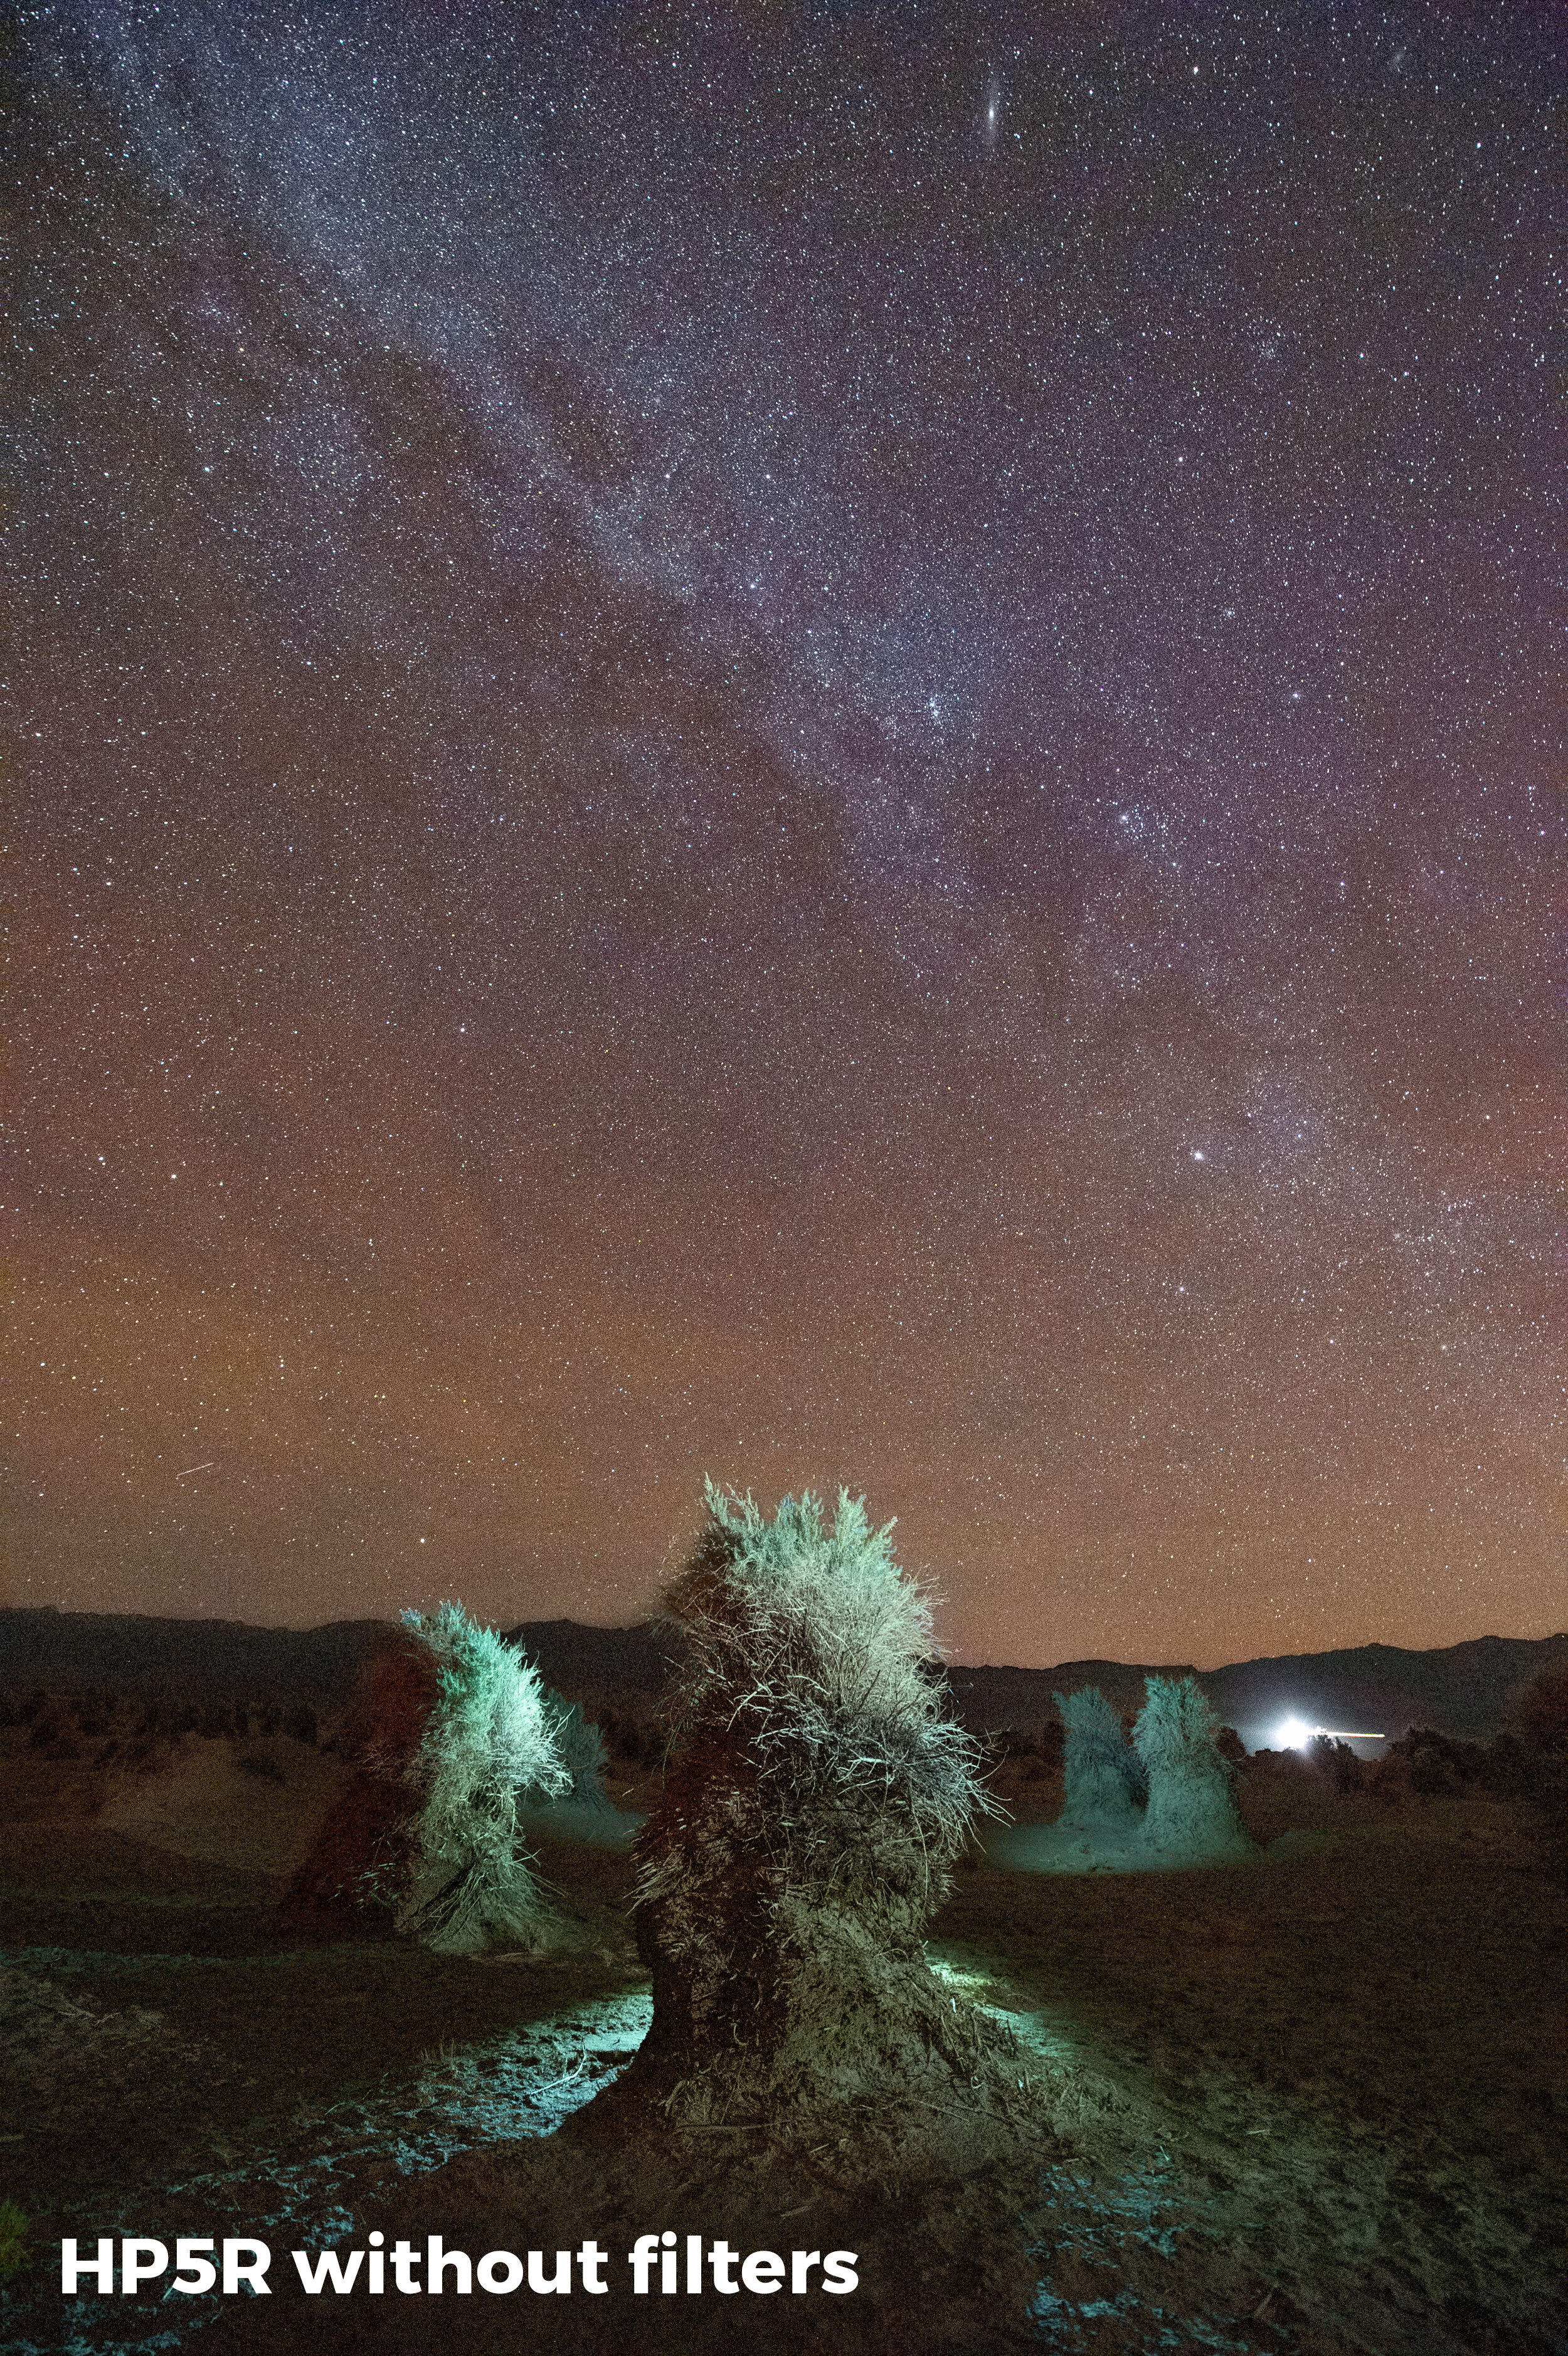
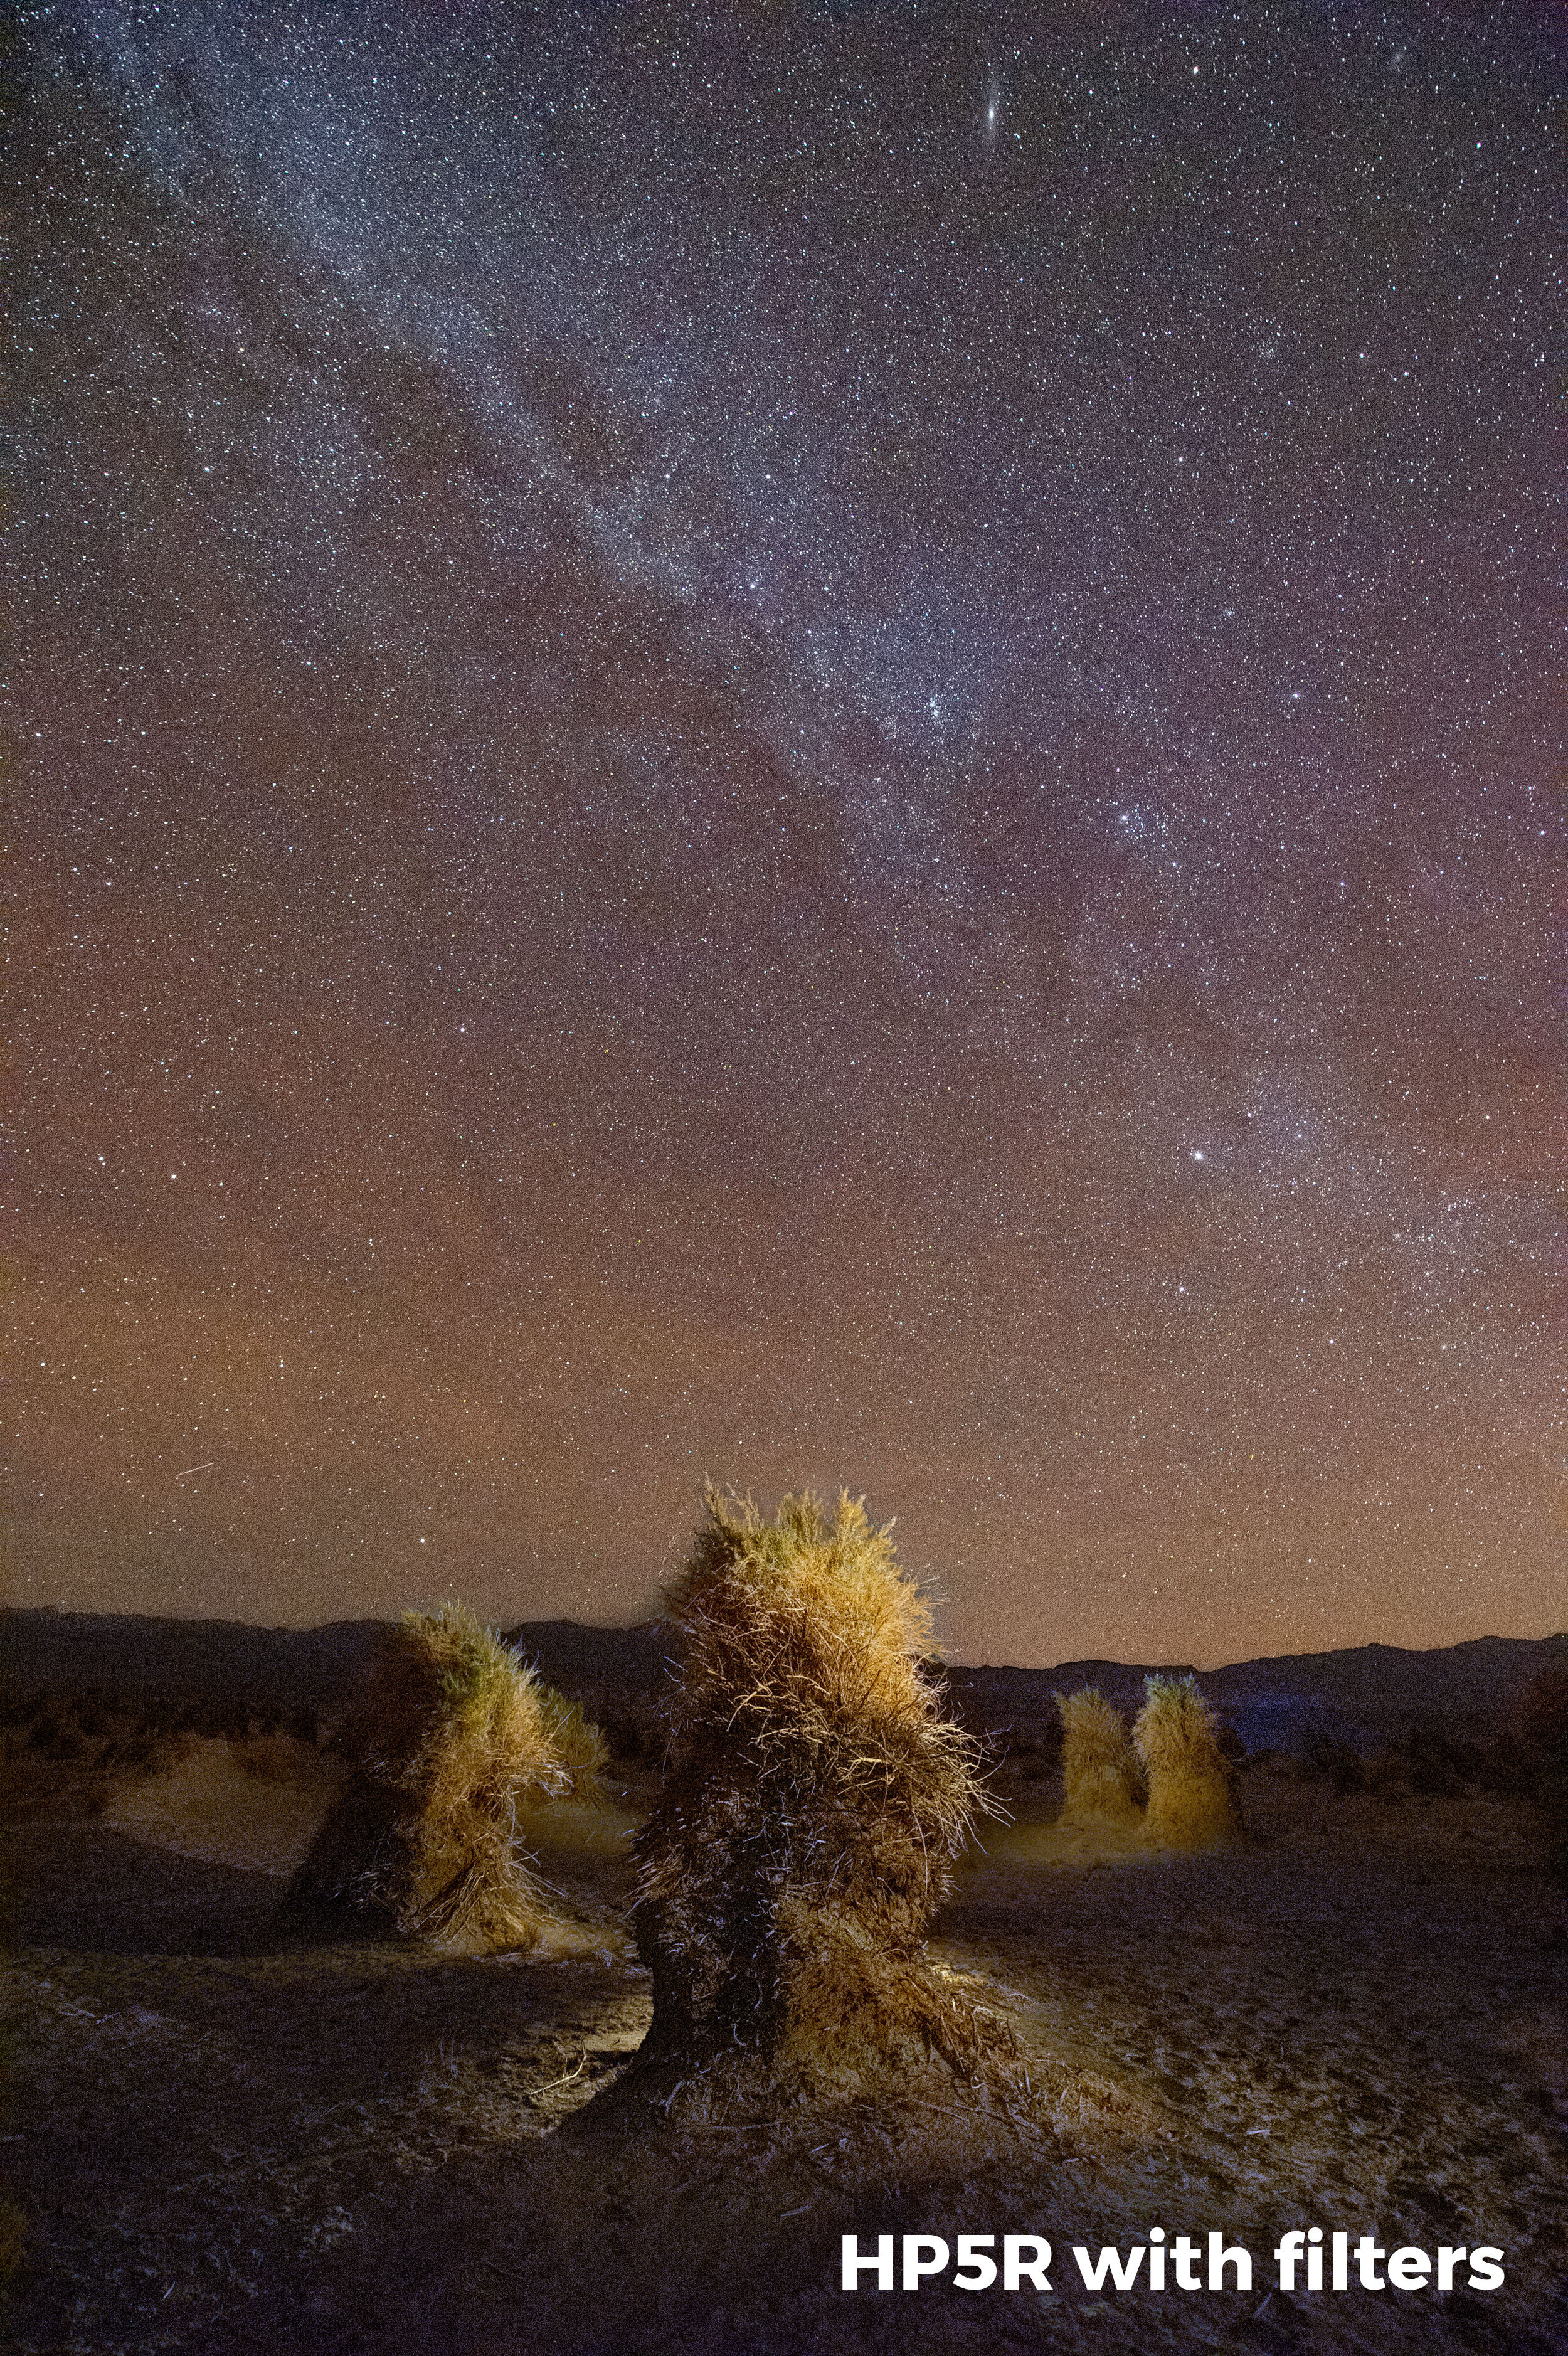
Irix

15mm f/2.4 Blackstone Lens and Night Photography Filter

The Irix 15mm f/2.4 ultrawide-angle lens made a big splash in the night and landscape photography world when it was announced a couple of years ago, and for good reason. 15mm is a great focal length for night photography, as it allows the inclusion of lots of night sky and stars in our images. The manual focus 15mm Blackstone is wicked sharp, displays very few aberrations, is easy to focus with an infinity detent, and stays focused with its unique locking ring. Combine it with the Irix Edge Light Pollution filter to weed out light pollution from sodium and mercury vapor streetlights, and you have a powerful combination to help you seize the night.

JBL

Clip 3 Portable Bluetooth Speaker

The sounds of the nighttime world are sometimes all we need, but when you want to listen to your tunes while out photographing, the JBL Clip 3 Portable Bluetooth Speaker is just the thing. This portable speaker is designed with a built-in carabiner clip, so you can easily attach it to your backpack, belt loop or camera bag. Its rugged rubber housing protects your speaker on your nocturnal (or daytime) adventures. On a full charge, the Clip 3 gives you up to 10 hours of playback, but if you use the included micro-USB cable then you can recharge the speaker with a power bank.

Kevin Adams Photo

Digital After Dark LensMuff

A common problem experienced by night photographers is dew forming on the surface of lenses. At specific combinations of temperature and humidity, water in the air condenses on cold surfaces, and the front element of a camera lens is highly vulnerable. Kevin Adams has created a simple, secure and adaptable solution for preventing condensation on your optics. The LensMuff is a compact and lightweight wrap that can hold one, two or three hand warmers against your lens to keep it from reaching the dew point. It’s made of tough, water-resistant nylon pack cloth, and it secures quickly and easily with Velcro to almost any lens.

LaCie

Portable SSD Hard Drive

Creating the images to stack star trails or star points can quickly eat up storage space. We have been big fans of traveling with LaCie’s supersmall and insanely fast SSD drives this year, and it has definitely made a difference. Our favorite is the LaCie 2TB Portable USB 3.1 Gen 2 Type-C External SSD.

Special offer: B&H discount on select LaCie products through December 29, 2019.

LR/Timelapse

Lightroom Plugin

Creating a time lapse can be a time-consuming process. LR/Timelapse makes it easier and more seamless. Gone is the tedious step of exporting the thousands of required images from your catalog just to re-import into other softwareβ€”with this brilliant plugin you can begin to create your time lapse directly from Lightroom.

Luxli

ViolaΒ² LED Light

Our favorite Low-Level Lighting LED panel got an upgrade. The ViolaΒ² features include one more LED color in the array, which means even better color rendering in CCT mode. Also included are some trippy lighting effects and 15-plus digital gel filters that allow you to match to your other light sources (such as a flashlight). This pocket-size lighting multitool is a must-have for night photography.

Middle Earth’s Maps

Lord of the Rings-Style National Park Maps

British artist Dan Bell set out on a journey: to create maps of real places in the style of J.R.R. Tolkien’s Middle Earth’s Maps. And oh boy, are they epic! Want to put a precious depiction of a favorite national park on the wall? Death Valley, Olympic, Zion, Yosemite, Yellowstone, Everglades, Isle Royale, Shenandoah and Great Smoky Mountains are all available, as are other parks around the world. And if those don’t fit the bill, Bell also accepts commissions.

Monogram

Creative Console

Our good friends at Palette Gear recently rebranded as Monogram, and they’re about to release a newly redesigned set of sleek products. The Creative Console of intuitive buttons, sliders and dials will help any photographer streamline the post-production process, whether working in Lightroom, Photoshop or other software. Ships in February, but you can buy now and give the gift of anticipation!

Special offer: $80 off all consoles at monogramcc.com through December 2, 2019.

National Geographic

Natioanal Parks Maps Collection

Beautiful to display, as well as extraordinarily useful, this boxed set of much-coveted National Geographic National Parks Trail Maps is the must-have for long backcountry hikes, or even for just driving around a national park with little to no cell service. The set includes maps from the 10 most popular parks, and are waterproof as well as tear-resistant, for years of continued enjoyment and use.

National Park Service

National Park Service Tours App

This app is a β€œranger in your pocket” opportunity to listen to over 70 guided audio tours from your smartphone (both Apple and Android). Also included is a map showing both your location and available tours, as well as points of interest with location-aware geo-alerts and GPS-enabled maps. Some locations include photos and audio tours. Using this app is a great way to learn more about a destination you want to visit, and to augment your visit when you arrive.

National Parks at Night

2020 Calendar

What are you doing next year, for all 366 days? Don’t know? The National Parks at Night 2020 Calendar is here to help. Our fourth annual wall calendar will help the photographer stay inspired by and for the night throughout 2020. It’s 12x12-inches, printed on heavy-stock photographic paper, and coil-bound for easy flipping from month to month. In addition to 14 photos by the National Parks at Night instructors, the calendar includes dates for National Park Service events and holidays, astronomy holidays (yes, there are some), new and full moons, supermoons and blue moons, equinoxes and solstices, meteor showers, eclipses, and more.

Night Photography Adventure Workshop

We simply love being outdoors, teaching and helping people get great pictures. Many of our Season 5 workshops are full, but we do have a few slots open on some. Overseas destinations include the mysterious Easter Island, Norway’s Lofoten Islands and Scotland’s Orkney Islands. Looking to stay stateside? The Maine Coast is a night photographer’s dream destination, as is Virginia’s Shenandoah National Park. Or delve into the unfettered creativity of Night Portraiture, or do a deep dive into Lightroom and Photoshop with our Post-Processing Intensive.

Photography Books

NPAN books strip.jpg

Looking for some national park and night photography inspiration and education that you can always have at your fingertips? Choose from one of four books written by members of the NPAN team!

  • Photographing National Parks by Chris Nicholson is a portable and concise look at each of our national parks and how to best capture them. Includes best locations, times and great info on each park to help you plan your next adventure.

  • Have someone new to the night? Gabriel Biderman and Tim Cooper’s book Night Photography: From Snapshots to Great Shots (now in its third printing) is an introduction to night photography, and it inspires you to get out there and seize the night!

  • Want an even deeper dive into the night? Lance’s book Night Photography and Light Painting: Finding Your Way in the Dark has long been the ultimate tome for those interested in a deep dive into the genre! The latest edition has an amazing chapter on the history of light painting and does an excellent job of balancing theory, history and enthusiasm for taking your night visions to the next level.

  • Light Painting is the most creative expression in night photography, and Tim Cooper’s ebook The Magic of Light Painting is a detailed exploration of all the illuminating possibilities that can happen when we practice the craft.

Nikon

14-24mm f/2.8 Lens

If we were on a deserted night sky island and could have only one lens, it would be the Nikon 14-24mm f/2.8. Incredibly sharp with a superversatile zoom range, and suffers from very little coma when shot wide open.

Path and Oak

3D Wooden Wall Landscape Art

Featuring combinations of classic woods such as walnut, cherry, red oak and aspen, as well as exotic woods such as yellowheart, wenge and padauk, these ready-to-hang works of 3D Wooden Wall Landscape Art are an ideal gift for the parks lover on your list. Path and Oak offers designs including Hidden Lake at Glacier, Grand Teton Skies, the El Capitan ascent, Mount Rainier and more. In particular, check out Yosemite 1868, which depicts John Muir’s first visit to Yosemite Valley. Lovingly crafted and assembled in Berkeley, California.

Peak Design

Travel Tripod

Peak Design has reinvented the tripod! Gone are the round tube legs and any wasted space. Their Travel Tripod gives new meaning to the definition of compactβ€”it’s the size of a large water bottle when fully collapsed. The carbon fiber (our favorite) weighs in at 2.81 pounds with the ball head! It also extends to 51.25 inches, or 60 inches with the center column raised. Shipping in early March.

Special offer: 20 percent off select items at peakdesign.com through December 1, 2019.

PelayoHouse

Topographic Wood Puzzle

Etsy seller PelayoHouse has transformed the terrains of some of the most beloved national parksβ€”such as Yosemite, Grand Canyon and Great Smoky Mountainsβ€”into wooden 3D topographic puzzles. The striking result of milling hardwood plywood reveals a natural contour map. The natural grain of the wood contributes to the topographic surface. Moreover, you get to play with it and feel the surfaces as you work on assembling the puzzle with friends and family.

PhotoPills

Photo-Planning App

PhotoPills is an all-in-one app that helps photographers plan and execute their images in a wide variety of situations. Individual components (i.e., pills) track, calculate and help you visualize the paths of the sun, moon and Milky Way, as well as list the times of different twilights and magic hours. Additionally, you can use PhotoPills to determine star point exposures and hyperfocal distances, as well as to compute the parameters needed to collect sequences of images for creating time lapse videos, and with their brand new feature you can scout meteor showers! A truly dense app, this amazing tool is indispensable for any type of photography.

Special offer: 50 percent off app license at PhotoPills.com through December 1, 2019.

Phottix

Aion Wireless Timer and Shutter Release

Intervalometers are both a blessing and a curse for night photographers. They’re a blessing when they work and a curse when they don’t (which happens all too often with most). The Phottix Aion is simply the best intervalometer we’ve tested (and, ohhhh, we’ve tested many!). It comes with all the cables you might need for your camera (Nikon, Canon or Sony), it’s accurate to one-tenth of a stop (ideal when using NPF-calculated exposure times for star points), and can be used wired or wirelessly. And because the cable is removable, there is less chance of it breaking.

Poplove

Miniverse Bracelet

Poplove asserts that β€œYou are the sun!” when you wear this Miniverse Bracelet that includes our solar system’s planets lovingly polished from semi-precious stones. Mars is pink agate, the moon is moonstone, Earth is lan ven agate, Venus is tiger eye, Mercury is howlite, Pluto is brownstone, Neptune is frosty agate, Uranus is cyan agate, Saturn is matte map, and Jupiter is brown agate. Gift someone you love with all the heavenly bodies in orbit around Sol.

Scott Kelly

Infinite Wonder: An Astronaut’s Photographs from a Year in Space

Who is the best night photographer in the galaxy? That would be astronaut Scott Kelly, who spent a year in space and then published this stellar photo book about his journey. Infinite Wonder: An Astronaut’s Photographs from a Year in Space offer an unparalleled view of our home from orbit, and it covers many topics near and dear to our heartβ€”such as aurora, the moon, light pollution and natural weather events. Scott’s unique vocation helps him provide a perspective that few others can experience. Give the celestial dreamer on your list this book, and enjoy their delight.

Sigma

14-24mm f/2.8 Art Lens

We mentioned above that the Nikon 14-28mm f/2.8 is our favorite zoom lens for night photography, and we stand by that. But we recognize that not everyone shoots Nikon. For those folks an excellent alternative is the Sigma 14-24mm f/2.8 Art lens, which comes in Sony, Canon, Nikon, Leica L and Pentax mounts.

StoryPeople

Art Print

If you’re a peopleβ€”particularly an artistic peopleβ€”then StoryPeople should be part of your life. And if you’re a night photographer, or just an appreciator of the night, or even just a connoisseur of imagination, then the beautiful β€œBlue Squares” should be on the wall.

Syrp

Genie Mini II

Interested in doing some moving time lapse work at night? The Syrp Genie Mini II is a supercompact and easy-to-use device that also gives you room to grow. Version II adds improved Wi-Fi and Bluetooth support as well as longer battery life and a fast USB Type-C connection. The Genie interface is operated via their app. You set the panning motion and time, and away you go! Add the Pan Tilt Bracket and an additional Genie, and you have a compact panning and tilting kit.

Special offer: B&H discount of $50 through December 13, 2019.

Tafilu

Limited Edition National Parks Poster

Park nerds rejoice! This 16x24-inch poster lists all current β€œBig 61” national parks, in order of, and including, their creation year. A perfect display of park affection, this WPA-style poster is a great edition to any park lover’s display, or a fun way to track your own national parks journey. Thumbtacks not included.

Tentree

Constellation Juniper Hoodie

The Constellation Juniper Hoodie not only embraces the night sky but also the natural landscape. Made of organic cotton and recycled polyester, this sweatshirt is stylish and incredibly comfortable. But that isn’t even the best partβ€”Tentree plants trees for every item sold! They have planted over 34 million trees, and their goal is 1 billion by 2030. Get something special while giving back to our planet.

TetherTools

Universal Tablet System

On a recent shoot one of our attendees brought his iPad and used his camera app to review, trigger and edit his images in the field. It was great to see the photos on a tablet screen instead of the typical 3.2-inch LCD on the camera. Nifty as it was, his setup was rather cumbersome and he could have benefited from the Universal Tablet System by Tether Tools, which lets you mount your tablet to your tripod leg for true hands-free integration. What a great way to help you trigger and review images in the field!

Tim Cooper Photography

Lightroom Training Videos

Understanding how to organize, find and enhance your images in Lightroom is an essential skill for any photographer. Produced by our colleague and noted author Tim Cooper, Lightroom Training: Library and Develop is as beneficial to the first-time user as it is to those who have been using the program for years. This 33-part, 6-hour training video starts at the very beginning with catalog creation and image organization, and ends by demonstrating high-end image enhancement. Concentrating on only the Library and Develop modules allows Tim to fully explain and demonstrate the most relevant aspects of this powerful program. Previously available only on DVD, this course is now available for download!

Special offer: Use coupon code β€œnight” for 20 percent off until December 31, 2019.

Troy Paiva

Boneyard: SoCal’s Aircraft Graveyards at Night

One of our favorite night photography books this year was Troy Paiva’s Boneyard: SoCal’s Aircraft Graveyards at Night. Troy’s inspiring stories and images from over 20 years of shooting in these forbidden and surreal locations offer a fascinating history lesson on the broken-winged angels of the Mojave. Troy is a modern master of light painting and his multicolored vision perfectly matches his β€œLost America” theme. A must-have book for any night photographer’s collection. (Purchase on Amazon via the link above, or order a signed copy directly from Troy.)

Underdog Games

Trekking the National Parks Game

Family night wouldn’t be complete without this MENSA award-winning national parks board game. Players compete by making strategic decisions to become the first to reach a national park. Interesting facts and lovely illustrations make this game fun and educational, which makes it the perfect gift for the board game or outdoor enthusiast.

Vallerret

Photography Gloves

Norwegians know a thing or two about winter. The makers of Vallerret photography gloves put their hearts and souls into keeping our hands warm. For temperatures down to about freezing, choose the improved Markhof Pro II, or for when the weather gets really cold, the Ipsoot model is a heavier duty deep winter glove. Both models have 100 percent merino wool liners and Thinsulate insulation, and Flip-Tech finger tips with magnets to hold them open while you access your camera controls. The Markhof is a slim-fit glove and runs a bit small, so consider ordering one size up, especially if you want to add a hand warmer inside.

Special offer: 10 percent B&H discount with promo code β€œSEIZEGIFT19.” Valid on the full line of Vallerret gear from November 29 to December 7, 2019.

Wanderer Bracelets

Custom Coordinates Bracelet

β€œThere’s one dot on the map that holds more of your deepest memories than any other place. It’s where you fell in love, found your community, or risked it all. It’s where you were bornβ€”or reborn into a braver, stronger version of you.” We couldn’t have said it better ourselves. Handmade in Bali, these sentimental Custom Coordinates Bracelets will take your favorite coordinates and inscribe them on upcycled materials so you can wear that location always and in style. While ordering, you can also customize your color and closure.


Happy Holidays!

Just like holidays, and just like gifts, gift guides are meant to be shared! Please feel free to forward this to anyone and everyone you think might be interested. Particularly if it’s someone who buys a gift for you!

From all of us at National Parks at Night, we wish you and your loved ones a wonderful holiday season.

Chris Nicholson is a partner and workshop leader with National Parks at Night, and author of Photographing National Parks (Sidelight Books, 2015). Learn more about national parks as photography destinations, subscribe to Chris' free e-newsletter, and more at www.PhotographingNationalParks.com.

UPCOMING WORKSHOPS FROM NATIONAL PARKS AT NIGHT

Level Up With Light Painting: Correcting the Color of Your Flashlight (Part III)

In 2017 I wrote a two-part blog post titled β€œLevel Up With Light Painting: Correcting the Color of Your Flashlight,” which discussed the color biases of flashlights and how to filter them to neutralize that color when shooting at different white balance settings.

In the first part I talked about the pros and cons of LED flashlights, color theory, white balance, testing your flashlight’s color and how to fashion your own custom filters. This all revolved shooting at Daylight white balance.

In the second part I followed up with how to filter Coast HP7R and HP5R flashlights to provide a neutral color when the white balance is set to 3200 K. This is a common setting for shooting in urban areas at night, as most streetlights and other city lights are rendered overly orange when white balance is set to Daylight.

In both of those posts I used a decidedly unscientific method of performing the color tests. While the results were close to accurate, this past summer I decided to look for more precision, so I set about running color tests with the aforementioned flashlights (my favorite two to use). Now I can paint with neutral light at any white balance.

The Color Tests

For this I needed a color meter. Admittedly, color meters are expensive and not generally used by the average photographer. They are, however, an invaluable tool in commercial/advertising photography and in the film industry. Since I don’t own one, the generous folks at MAC Group arranged to loan me a Sekonic C-800 SpectroMaster. (Thank you, MAC Group! Your gracious loan benefits us all.)

My goal for the tests was to determine the proper filtration for the HP7R and HP5R with a camera set to the white balances most often used for night photography. (For a rundown on these, see Matt’s post β€œHow to Choose the Right White Balance for Night Skies” and my post β€œMaking the Move to Manual White Balance.”) I tested each of nine white balance settings (5500, 5000, 4800, 4500, 4200, 4000, 3850, 3500 and 3200 K), with each flashlight set at both high and low power. I then determined which Lee Filters gels would neutralize the color while also adding a little warmth to the light.

Then we put all the results into a guide to assist other night photographers who would like to remove unwanted color casts from their Coast lights. You can download the guide by clicking here or on the image below.

Click image to download

While the chart is extensive, I would suggest not getting too wrapped preparing for all the optionsβ€”it’s unlikely that you’ll be shooting at nine different white balances. For my kit, I created filters for 3850 K and 3200 K for each of my flashlights. This gives me enough flexibility for most situations I encounter.

When shooting on a white balance setting of Daylight, I use my 3850 K filter combination to add slight warmth to my flashlight. When setting my camera’s white balance to 3850 K, I use the 3850 K filter combo for a neutral light or the 3200 K filter combo for a warmer effect. Likewise, when using the 3200 K filter with the camera’s white balance set at 3200 K (i.e. Tungsten), the flashlight provides a nice neutral color.

Putting it into Practice

Let’s look at an example of this in action.

My favorite white balance for capturing the Milky Way is 3850 K. Why? Because when shooting night skies using Daylight (about 5500 K), even in dark sky environments it’s not uncommon for the resulting image to have an orange cast to it. Using 3850 K creates a cooler, more natural look to the sky while maintaining some warmth in the colors of the galaxy.

In Figure 1 you can see the result of shooting the Milky Way in Death Valley National Park with my white balance set to Daylight compared to 3850 K. The latter better represents how I want the night sky and the Milky Way to appear in a photo.

Figure 1. The color difference between shooting the Milky Way at a Daylight white balance versus 3800 K.

If shooting the Milky Way is all I wanted to accomplish, setting my white balance to 3850 K would provide great results. But for those who know me, you know I love light painting!

At Death Valley’s Devils Cornfield, I captured the first image (left) in Figure 2 with a white balance setting of 3850 K. For the light painting I used the low-power setting on my Coast HP5R. Notice the overly blue/green effect that the unfiltered flashlight created?

To get my added light to accurately render the colors of the scene, I filtered the flashlight to look good at that white balance of 3850 K. According to my test results, that meant I needed a combination of 1/2 CTO + 1/8 CTO + 1/4 Minus Green.

That fixed the incorrect color cast, but I really wanted my flashlight to put out a slightly warmer rather than neutral color, because I like the visual effect of warm light. So instead of using the filter combo for 3850 K, I used the combo for a 3200 K setting: 3/4 CTO + 1/8 CTO + 1/4 Minus Green + 1/8 Minus Green. That gave me exactly the color I was hoping for (Figure 2, right).

Figure 2. Devils Cornfield, Death Valley National Park. Nikon D4s with a Nikon 14-24mm f/2.8 lens. 20 seconds, f/4, ISO 6400, with a white balance of 3850 K. Light painted with a Coast HP5R unfiltered (left), and filtered (right) with Lee 3/4 CTO + 1/8 CTO + 1/4 Minus Green + 1/8 Minus Green gels.

One last point: It can be a bit tedious to hold filter gels in front of a flashlight while running around in the dark. The solution? I create a β€œdisc” filter that attaches right to the front of the flashlight. To see how I do this, look back on Part I of this series.

Tim Cooper is a partner and workshop leader with National Parks at Night. Learn more techniques from his book The Magic of Light Painting, available from Peachpit.

UPCOMING WORKSHOPS FROM NATIONAL PARKS AT NIGHT

Putting Pictures to Paper: How Printing Can Make You a Better Photographer

Last year Gabriel Biderman wrote a post about making printing part of your photographic process. I loved it. Then this past week our partners at Bay Photo Labο»Ώ hung out with us during our night photography workshop at Golden Gate National Recreation Area.

Both of these things brought my thoughts back to my earliest days of photography, and got me thinking about why we printed then and how the print compares to the modern digital equivalent. It also led me to thinking about how printing is more than just another way to show our images in yet another medium. Printing can actually make you a better photographer.

Patrick (above, at left) from Bay Photo visited our workshop in San Francisco last week, to help spread the word about how important printing can be to improving photography skills. Me (right), more than a few years ago, loading my 4x5 camera with filmβ€”in the days when a print was the only final format.

A World of Myriad Media

Printing was always a huge part of my creative process. An image wasn’t complete until I mounted and framed the finished print and shared it with others. So how does that differ from today?

Well, these days we share our work a bit differently. For many, the final destination may very well be Facebook, an iPhone or an Instagram account. The share is so much faster. Immediate. And share we do. Perhaps we even overshare.

This rarely happened beforeβ€”because printing took so much longer (and was much more expensive and time-consuming), it was inevitable that we wouldn’t be able to show as much of our work. Only the best images made it out of the darkroom or returned from the lab. This made us much more selective about what we presented to the world.

Modern tech has now made it fairly easy for us to us get our images in front of others. This ease, in turn, has made it tempting to share a lot more images. In many ways, this is good. It gets us out shooting, which provides the practice we need to get better, hones our skills at seeing light, and helps us improve our composition skills.

The downside is feeling compelled to put out images even when we know they are not our best. Today’s climate certainly rewards those who share frequently. But we have to remember the old adage: You are only as good as the weakest photo in your portfolio.

The majority of anyone’s images are just thatβ€”kinda weak. No one makes awesome images every time they pick up their camera. Most of our work is simply the attempt at making stunning images, but the true masterpieces are far between and few.

That being said, photography is one of those art forms that has many uses. As such, many of us don’t strive for a masterpiece with every exposure. A selfie in front of the Lincoln Memorial means something completely different than the same shot without you in it. There are as many reasons to take photographs as there are to share them. We just need to consider which work we want to share, how we want to share it, with whom, and for what reason. Your family will be most forgiving of technical errors in an image showing your vacation in Europe, while the audience at the coffee house may be decidedly more critical, and the visitors at a gallery more critical still.

Chris Nicholson recently made a 40x60 Bay Photo Xposer print of one of his Big Bend National Park imagesβ€”just to put in his living room.

So, Why are We Printing?

To my mind, there are three good reasons for making a print:

1. To celebrate your masterpieces.

They are not easily achieved. Be proud of the hard work you’ve invested to create them. There is no reason to make prints of every snap you’ve made. But it’s really nice to honor your best pieces by creating prints of them. Putting them in books or placing them up on your wall will ensure they live on.

2. To slow yourself down.

It will take extra time, knowledge and money to make prints, so you will want to be selective. You will want to be more deliberate during the culling process. Really get in and examine your images. For each photograph you’re considering committing to paper, ask yourself:

  • Is it sharp?

  • Is the light right for the scene?

  • How was your timing?

  • Could you make a better photo if you returned?

When you’re spending more time and money on printing your photos, you may find you become much pickier.

In 2010, Lance Keimig printed for a Simmer Dim exhibit at New England School of Photography, showcasing his work from Scotland.

In 2010, Lance Keimig printed for a Simmer Dim exhibit at New England School of Photography, showcasing his work from Scotland.

3. To become a better photographer.

Yup, creating prints will make you better. How? Through attention to detail. A good-size print won’t hide the flaws in your photo. In fact, it may highlight them. It’s beyond frustrating to spend a lot of money to get a large print made only to find out that there’s a technical problem with the shotβ€”that it’s out of focus, for example, or that you missed a bunch of dust spots in the sky.

On the bright side, this type of lesson really hits home. It teaches you to be more careful so that the same mistake will not happen again. (On the other hand, when simply replacing an online photo with a fixed version, the inconvenience barely registers. No pain, no gain.)

Printing as a Way to Improve

Another part of the problem of oversharing our less-than-stellar work arises from the way we view the images. The small screens of the phone and tabletβ€”and the small sizes of the images shown on themβ€”do a great job at hiding imperfections. They don’t hide poor composition or uninteresting imagery. This makes it difficult to ascertain the quality of craftsmanship. We can cheat, or we can post images that we wouldn’t otherwise show. As it turns out, it’s not hard to hide poor technique on an iPhone.

The print however, can shed an extra ray of light on laziness and negligence.

Attendees of our 2018 Sloss Furnaces workshop had their favorite images printed for an exhibit at the national historic landmark’s visitor center. Photo Β© Ron Clemmons.

Now, take that same less-than-stellar image and try to make a print.

  • Does it look the same?

  • Does it have the same impact?

  • Will it stand up to the continued scrutiny of being viewed every day?

  • Is it as good as you thought it was, now that you see it large?

Making prints will make you a better photographer. The person who spends time perfecting the craft and paying attention to detail will ultimately produce far better photography.

And I don’t mean just technically superior imagery. I also mean more meaningful photography. The whole process of slowing down and working in a more meticulous manner will not only benefit your technical chops, but it will also improve your composition and seeing skills. That, arguably, is even more important.

As Gabe says, β€œSeize the print!”

Tim Cooper is a partner and workshop leader with National Parks at Night. Learn more techniques from his book The Magic of Light Painting, available from Peachpit.

UPCOMING WORKSHOPS FROM NATIONAL PARKS AT NIGHT

Photographing Phantoms: How to Capture Ghosts and Spirits in Night Images

β€œDarkness falls across the land, the midnight hour is close at hand.”
— Vincent Price

I recently spent an incredibly fun night at the historic Sleep Hollow Cemetery in New York with the B&H Video team and the wonderful model @seashellspells. Our mission was to make an educational video on how you can create β€œghosts” and β€œspirits” with long exposures.

You can view the video below, and then read all about how I approach making β€œghost” images at night.


Humankind has been fascinated with spirits for a very long time. And that includes photographers. Some of the first photographs ever made focused on β€œspirit photography,” which was incredibly popular from the 1860s until the early 20th century.

Figure 1. Haunted Lane, by Melander & Bro, 1889. A well-choreographed image taken during the height of spirit photography.

Figure 2. Brown Lady of Raynham Hall. One of the most famous ghost photographs of all time, taken by Captain Hubert C. Provand and Indre Shira on assignment for Country Life. This β€œghostly image” is on the negative and was probably created by long exposure and movement.

Early in my career, I was influenced by the modern photographer Duane Michals, who created beautiful and whimsical storyboard tales that often incorporated spirits.

Figure 3. The Spirit Leaves the Body, 1968. Duane Michals was the master of double exposures to create apparitions in his story telling.

Of course, we’ve all seen a ghosting effect in some of our imagesβ€”when our exposures get longer and a person moves through. But rather than the effect being an accident, how can we control it and bring these β€œspiritual beings” into existence?

Ghostly Gear

No specialized camera gear is needed. Any body and lens that has manual controls and manual focus options will do.

A tripod is keyβ€”you need something solid to put your camera on so you can capture the spirits moving through the frame. A Vello Shutterboss II or remote release will help you achieve exposures longer than 30 seconds, which can be very helpful in darker scenarios.

Another item is something we don’t always use as much in our regular night work: a flash. While you can use flashlights and LEDs to create more abstract ghosts, a flash is a must for β€œcapturing” a spirit with more detail. Take your flash off your camera and trigger it by hand or with a wireless remoteβ€”this will also create more depth to your scene.

Finally, a neutral density filter will help you attain longer exposures, especially if you want to β€œcatch a ghost” during the day.

The Boo Basics

First, figure out your base exposure. You will need dim conditions (or that neutral density filter) to achieve a long exposure. Whether you turn off all the lights in the room or go outside during the day or night, you will need an exposure between 10 and 20 seconds to form a proper ghost (Figure 4).

Think about mass and time. If you have a 10-second shot and your model moves out of the scene after 5 seconds, the camera will continue to expose and you’ll be able to see through their body. If the model stays for more time, they will be more solid; if less time, you’ll see through them even more.

Figure 4. I always start with putting the model in the image for half the exposure and then adjust accordingly. Here we see the model in the 10-second shot for (from left to right) 5 seconds, 3 seconds and 2 seconds. I liked the 3-second shot the best, but the 2-second could be interesting to use if I wanted something more ethereal. Nikon Z 6 with a Nikon Z 14-30mm f/4 lens at 30mm. 10 seconds, f/5.6, ISO 6400.

Background Considerations

Be aware of your background and choose contrasting clothes according to your goals. A couple of examples:

I created one of my first ghost photos back in the film days (Figure 5). I had the model dress in a white slip and we photographed in a recently abandoned house during the day. I was able to obtain a long exposure of 10 to 20 seconds by stopping down my aperture. I directed her to move from sitting on the bed to touching the black dress hanging on the wall. Because she moved around, her mass wasn’t in one place too long. But just as important was that most of the room was light-colored, just like her clothes, so she appeared in the image only when she was standing in front of the darker background of a dress hanging on a wall (Figure 1).

Figure 5. Pentax K1000. Approximately 10-second exposure on Kodak TriX 400 film.

My next stab at making a ghost was a self-portrait at the Circus Maximus in Rome (Figure 6). This fared much better. The steps were white marble and my clothing was darker. The exposure was 3 minutes and I sat on the steps for half the time.

Note that my ghost is fairly sharp. No one can stay still for 1 second, let alone 1.5 minutes. I was able to achieve this two ways:

  1. Sitting on the steps with my arms on my lap provided a very stable position for me to hold still and count to 90.

  2. I’m small in the image. If your model is larger in the compositionβ€”either because you’re honed in with a longer lens or because you place them closer to the cameraβ€”then any movement will be magnified.

Figure 6. Self-Portrait Ghost. Pentax K1000. 3 minutes on Trix 400 film.

Let’s return to Sleepy Hollow (Figure 7) for a few more examples about backgrounds.

I asked our model, Christine, to wear her dark green dress against light grey walls. She stood still for 5 seconds and then walked out of the frame. The total exposure was 10 seconds. Look at the lower portion of the imageβ€”her dress blends into the dark background because the contrast is similar. But the ghost of her pops out in the areas of higher contrast (i.e., her skin and where the dress is against the lighter brick background).

I liked that shot, but Christine isn’t very sharp in it. So for the second attempt, I had her lean her body against the brick wall. This stabilized her form and made her a clearer spirit during half the exposure.

Christine then changed into a lighter outfit that provided further contrast against the background and made her pop even more.

Figure 7. All images shot with a Nikon Z 6 and Nikon Z 14-30mm f/4 lens at 30mm. 10 seconds, f/5.6, ISO 3200. Model was in the scene for half the time, or 5 seconds.

Along the same lines, always be aware of the sky, especially in overcast conditions and in bright urban areas. When the sky is the background, it can be challenging to create a ghost in front of it. Figure 8 provides a more extreme example and is definitely something we need to be aware of to either avoid or embrace. Note how much detail we can see in the white dress against the darker background, but that same detail disappears into a silhouette against the bright sky.

Figure 8. Nikon Z 6 with a Nikon Z 14-30mm lens at 30mm. 13 seconds, f/5.6, ISO 3200. Model was in the scene for 5 seconds.

Experiment with Spectral Movement

Ghost photography can be even more fun when the spirits move within the scene. We gave this a try in Sleepy Hollow by having our spirit rise from the grave (Figure 9). Christine lay down for half of the 10-second exposure and then sat up and stayed still for half. The first shot didn’t work out because of the background interferenceβ€”her ghost was blending too much into the statue behind her. I readjusted my composition and we experimented with the timing of her various movements.

Figure 9. Nikon Z 6 with a Nikon Z 14-30mm lens at 14mm. 10 seconds, f/5.6, ISO 3200. Model was in the scene for 5 seconds.

Another way you can create an eerie sense of movement is by adding β€œmultiple personality ghosts.” You can do this a few different ways.

Have your spirit stand in two places during the exposure. Experiment with time, but a good starting point for a 10-second exposure is to have the model stand in one spot for 4 seconds, move in 2 seconds, and hold the second position for the remaining 4 seconds.

Another way to do this is with multiple exposures, which you can shoot in a single frame if your camera has a multiple exposure mode.

I had a lot of fun with my grandparents one day with my Mamiya C220 film camera (Figure 10). Once I metered the scene and figured out the exposure, I divided the shutter speed in half and took two shots that would equal the whole exposure. We used this multiple exposure technique to create a ghost of my grandmother surrounding my grandfather.

I then took the multiple-exposure strategy to the next level by creating an image in which you can see through my grandmother’s hands to her face. I did this by opening the shutter when her hands were over her face, then, while holding her head very still, she lowered her hands. This proved to be a very effective layered image.

Figure 10. Using multiple exposures can be an effective and easy way to create ghosts. Mamiya C220 film camera.

Most modern cameras have a multiple exposure mode that does all the metering for you. You select how many images you want to take, it figures out the overall exposure. The cool thing is that once you take the first shot, you can often see that image on the LCD before taking the second shotβ€”that way you can be very precise with your layered composition.

Freezing Phantoms with Flash

You can also create multiple versions of the same ghost, as well as a more defined ghost, by using a flash to freeze your model. Instead of having them hold still for seconds, you can just pop the flash, have them move to the next position and pop the flash again, or have them walk out of the scene.

The flash creates highlights that will be reflected back and forever etched into the image. You still need to be aware of how a bright background can eat through your ghost, but I find that the flash opens up many creative opportunities for storytelling in a single long exposure.

To start, I generally set my flash to its lowest power and then adjust accordingly. In Sleepy Hollow, for the first exposure (Figure 11) I discussed with Christine the idea of creating multiple ghosts in the same frame, advising that each pose should be different, and that they should be interacting. We did a walk-through of the positioning so she could familiarize herself with the space that she had to work with. I moved around the scene as well to make sure the flash would be evenly fired at the same distance and angle.

Figure 11. Nikon Z 6 with a Nikon Z 14-30mm f/4 lens at 18mm, with a Profoto A1 flash. 20 seconds, f/5.6, ISO 1600.

Figure 11. Nikon Z 6 with a Nikon Z 14-30mm f/4 lens at 18mm, with a Profoto A1 flash. 20 seconds, f/5.6, ISO 1600.

We decided to challenge ourselves with a triple flash ghost shot that added depth to the scene (Figure 12). For this 30-second photograph, we started with the closest position so that I could ensure it was focused and sharp. I popped my Profoto A1 flash at level 5, at a 45-degree angle and 10 feet away. Christine then moved to the predetermined spots in the background, carefully spaced so there was minimal overlap of the ghosts. We adjusted the flash to power 4 and kept it at the same distance and angle for each pose.

Figure 12. It was important to have a more powerful burst of flash on the closer ghost and slightly less in the more distant ghost. This helps us layer the scene better. Nikon Z 6 with a Nikon Z 14-30mm f/4 lens at 16mm, with a Profoto A1 flash. 30 seconds, f/5.6, ISO 1000.

Putting it all together

When working with models and creating ghosts, you need to be a director. Talk through your vision of what you want to convey. You and your model should bounce ideas off each otherβ€”it is definitely a collaborative process! You’ll need to direct the movement, call out the seconds and, as discussed, be aware of the background. Do you want to create contrast to give more detail to the spirit or less contrast/movement to form something more ethereal?

Let’s put it all together and reconstruct how we created what ended up being our favorite shot of the night. We used time, movement and flash to create a very unique and elegantly eerie spirit!

During the 20-second exposure we started by popping a flash on Christine in the distant position. She then used the remaining time to walk slowly toward the camera and then stopped right in front about 1 or 2 feet away. She held that position for 3 to 4 seconds. It took a few attempts, but I’m thrilled with what we created (Figure 13β€”the unlucky ghost number!).

Figure 13. Nikon Z 6 with a Nikon Z 14-30mm f/4 lens at 30mm, with a Profoto A1 flash. 20 seconds, f/4, ISO 1600.

Wrapping Up

As the nights become longer, I hope this inspires you to do a little ghost hunting of your own!

Share your spirits with us in the comments below, on our Facebook page, or by tagging #nationalparksatnight on Instagram.

Note: Want to learn these techniques and more during a hands-on workshop? Our Night Portraiture in Catskill workshop is the perfect match!

Gabriel Biderman is a partner and workshop leader with National Parks at Night. He is a Brooklyn-based fine art and travel photographer, and author of Night Photography: From Snapshots to Great Shots (Peachpit, 2014). During the daytime hours you'll often find Gabe at one of many photo events around the world working for B&H Photo’s road marketing team. See his portfolio and workshop lineup at www.ruinism.com.

UPCOMING WORKSHOPS FROM NATIONAL PARKS AT NIGHT

A Grave Collection: Five Nighttime Photos of Cemeteries

Halloween. The time of year when fright seems right. Ghouls and goblins, phantoms and fantasyβ€”crisp leaves floating from trees, a frosty chill in the breezeβ€”all meld to make us feel unsettled … uneasy … unsure of what lingers in shadows.

That, of course, can scare up our creativity and inspire us to photograph subjects that by nature seem to belong to the night. And one of the obvious choices is cemeteries.

Last year Lance Keimig wrote about β€œWorking in (and with) the Dead of Night,” which explored topics such as photographing in rural versus urban graveyards, modern versus historic sites, seeking proper permission, safety, lighting and more. This year, we decided we’d each choose one of our favorite cemetery night images and share the story behind it.

So come with us, into the boneyards at night, above the tombs, amid the doom of Allhallows Eve. We promise: There’s nothing to be afraid of in the dark. (Except for intervalometers. They can be kind of scary.)


Greenwood Cemetery

by Gabriel Biderman

Greenwood Cemetery, Brooklyn, New York. Fujifilm X-T1 with a 10-24mm f/4 lens. HDR blend of seven images made at f/8 with different ISOs and shutter speeds.

History and proximity have made Greenwood Cemetery one of my favorite places to photograph.

The idea of a large modern cemetery that we are all familiar with did not exist in America until 1831. In fact, the transition from small family plots to β€œrural cemeteries” ushered in the era of our first public parks. That’s rightβ€”cemeteries like Sleepy Hollow, Greenwood and Woodlawn were known for their rolling hills, winding paths, extravagant stone work and scenic views, and were visited by the masses for their peaceful sylvan feel in a quickly industrializing age. Ironically, these sprawling cemeteries would later inspire more green spaces like Central Park and Boston Common.

I’ve long been fascinated with these elegant outdoor museums and their dichotomy against the modern urban landscape. And I’m not the only oneβ€”the statue of Minerva in Greenwood Cemetery was placed at the highest point in Brooklyn facing and saluting her sister in the sea, Lady Liberty.

One night, I wandered around Greenwood looking for more intriguing intersections between the bright lights of the living and the darker city of the dead. That’s when I found this scene. According to the Ancient History Encyclopedia, obelisks have been a powerful symbol since ancient times, and they were often raised in pairs β€œkeeping with the Egyptian value of balance and harmony; it was believed that the two on earth were reflected by two in the heavens.”

This is one of my favorite pictures of Greenwood, taken soon after the completion of One World Trade Center. Balance and harmony.

Burial Hill Cemetery

by Lance Keimig

Burial Hill Cemetery, Plymouth, Massachusetts. Canon 5D Mark II with a Nikon 50mm f/1.4 lens. 43 seconds, f/2, ISO 320.

Somehow I often find myself wandering alone in graveyards at night. I’m not inclined to dress in black––the goth look or lifestyle doesn’t really suit meβ€”but I do find solitude in these somber places. I’m not prone to getting creeped out, so spending some time wandering among the stones, taking time to read the inscriptions and wondering about the lives of those who ended up below my feet, is at once stimulating and relaxing.

There are so many beautiful graveyards I’ve visited in my travels: HΓ³lavallagarΓ°ur in Reykjavik, which probably contains half of the trees in Iceland in a couple of square blocks; PΓ¨re-Lachaise in Paris, the final resting place of MoliΓ¨re, Chopin and Jim Morrison; Sleepy Hollow in Tarrytown, New York, of Headless Horseman fame; or any number of churchyards in the west of Ireland with their gorgeous Celtic crosses.

I think my favorite has to be Burial Hill in Plymouth, Massachusetts. This cemeteryβ€”in the place where the Pilgrims established the first permanent colony in North Americaβ€”is rich in history and is the final resting place of many of the Mayflower passengers and descendants. It’s also quite photogenic and contains a fascinating collection of well-preserved headstones dating back to the 17th century.

The stone pictured above marks the grave of Joshua Bramhall, who died in 1763. The exceptionally spooky carving on the slate is unlike any other I have seen in any Colonial New England cemetery.

I used a 50mm lens at a wide aperture for shallow depth of field, and a low camera angle to come in tight on the stone with minimal distortion. I lit the stone from directly above with a Coast LED flashlight to emphasize the carving and the lichen. In addition to the frightening face with the crazy hair, also interesting to note are that the carver’s guidelines are still visible, lightly etched into the slate to mark the place where the inscription would go.

Clonmacnoise Monastery

by Matt Hill

Clonmacnoise, Athlone, Ireland. Nikon D750, Zeiss 15mm Distagon f/2.8 lens. 91 seconds, f/4, ISO 100.

My wife Mabel and I were on tour around Ireland, driving spontaneously from place to place and finding a bed-and-breakfast each evening wherever we were. It was a simply magical way to experience the west and north coasts of this beautiful island nation.

We were so enchanted with the countryside that we decided to skip cities and drive straight from the Giants Causeway back to the west coast. We saw that the monastery of Clonmacnoise was along that route and we chose a B&B nearby, in the town of Athlone. Upon arrival we asked our hosts if it was possible to enter the cemetery at night. They grinned and informed us that if we chose to visit the local graveyard, there just happened to be an open gate from that to Clonmacnoise (wink!).

We went at dusk and encountered a local camera club finishing up their sunset/twilight shoot. Lovely people. They were, however, surprised that Mabel and I were staying for moonrise. I guess they were not night photographers.

As the moon was ascending, it turned into a crisp, strong light source that etched the cathedral, churches, high crosses, round towers and graveslabs. I found it very hard to leave. I was enthralled.

I framed the moon behind the high cross and used the bright sky and light clouds to create a halo effect and to etch the shapes of the structures. I went far to the left and right to light paint the grass, cathedral wall, graveslabs, high cross and the one small headstone.

To this day, the memory of that trip beckons me to return to Ireland. And we shall.

Terlingua Cemetery

by Tim Cooper

Terlingua, Texas. Nikon Z 6 with a Nikon Z 24-70mm f/4 lens, light painted with a Coast HP5R flashlight and a Luxli Viola. 2 minutes, f/4, ISO 200.

I’m not sure why I love photographing graveyards, but I do. Maybe it’s the locationβ€”so many cemeteries seem to be set in beautiful areas. Perhaps it's the ornate headstones, although I find the simple ones just as attractive. Maybe it’s the repetition of the shapesβ€”I’ve always been a sucker for patterns. Whatever it may be, I am definitely drawn to graveyards for night photography.

Just last week I had the pleasure of photographing in one of the most unique cemeteries I’ve ever visited, in the ghost town of Terlingua, Texas. This extraordinary little town was the home base for our Big Bend National Park workshop. This image was made during our first night’s shoot while I was working with a gentleman who was very new to night photography. He and I set up this shot so I could demonstrate the basics of light painting.

The repetition of the crosses immediately caught my eye and I knew I wanted to highlight them against the dark overcast sky. We began by finding an ambient exposure that provided both a dark sky and enough time for me to wander around the scene to light paint with my Coast HP5R. Next we set up a Luxli Viola on a small travel tripod behind the front-right headstone to provide the main source of backlight. After some tweaking we found the right balance between the Luxli and the sky.

Once these two were balanced I began walking through the scene to paint the different areas I wanted to highlight. While the crosses were the hero of the shot, I did want to subtly illuminate the stone structures and the falling fence so the crosses were not floating in a sea of darkness. The trick here was the amount of time spent illuminating each item. The crosses reflected much more light than the stones, so it took many attempts to get the balance just right.

Finally, after 12 attempts, I made the image you see here. I hope it was a great learning experience for the attendee, as it demonstrated not only many different angles and levels of illumination, but also the fact that not even seasoned night photographers get the shot right on the first try.

Sleepy Hollow Cemetery

by Chris Nicholson

Sleepy Hollow Cemetery, Sleepy Hollow, New York. Nikon D3s and 24-70mm f/2.8 lens, light painted with a Coast HP7R flashlight. 6 minutes, f/7.1, ISO 200.

Like many Americans, especially those from the Northeast, Sleepy Hollow holds a chilling place in my nostalgia. As a kid I of course read the story The Legend of Sleepy Hollow, and on a class field trip I even saw the play. I watched a movie adaptation on TV, though I don’t remember if it was the Jeff Goldblum or Shelley Duvall version. Maybe it was both. One thing I am sure of is that I had a healthy fear of decapitated equestrians. As we all should. (Though, come to think of it, riding a horse that well when you don’t have a head is actually a rather impressive skill.)

Because of the truly legendary status of the story, when I learned that three of my NPAN business partners had standing permission to photograph at the Sleepy Hollow Cemetery at night, I suggested an autumn outing there. We photographed right in the middle of Halloween season, which, as you can imagine, is high time to be in the area. There’s a festival, which includes live music, a street fair, hot cider and donuts, and (obviously) a horseman without a head.

It was all entertaining (and delicious), but for me the real fun of the night was photographing in the cemetery. The old gravestones, vaults, mausoleums, memorials, chapel and suchβ€”as well as the rustic charm and mystiqueβ€”make for an inspiring setting for night photography.

We spent a few hours photographing many of those features, working individually and in teams. But it wasn’t until my final setup of the evening that I finally created an image I really liked: a long exposure in the mid-1850s Cooper plot.

The exposure part was easy, as it was just a 6-minute opening of the shutter, which with a 62mm focal length and the camera facing west was plenty of time for the stars to trail.

The light painting, however, took nine tries to get right. Standing to the right of the frame, I painted from a 90-degree angle with the focused beam of a Coast HP7R, which made the lettering of the gravestones stand out. But at that extreme an angle, standing 15 feet away, my aim had to be precise. As I got each stone to look right, I made a mental note of exactly where I was standing and aiming, as well as how many seconds I lit each marker. Then I put it all together for the final exposure.

You might say the precision and the detail required to light this simple scene were enough to make one lose their head. (I’m sorry.)

Have you photographed in a cemetery at night? Share your images and stories in the comments below or on our Facebook page.

Chris Nicholson is a partner and workshop leader with National Parks at Night, and author of Photographing National Parks (Sidelight Books, 2015). Learn more about national parks as photography destinations, subscribe to Chris' free e-newsletter, and more at www.PhotographingNationalParks.com.

UPCOMING WORKSHOPS FROM NATIONAL PARKS AT NIGHT