How the New Lightroom Range Mask Feature Helps Night Photographers

As you may have heard, last week Adobe made some big changes to its suite of photo-editing software, the biggest component of which was announcing the successor to Lightroom CC 2015/16. That software’s new name is Adobe Photoshop Lightroom Classic CC.  For short we’re calling it Classic. The reason the name is important is because of a new version of Lightroom announced at the same time. This new software is called Lightroom CC. Perplexed yet? The new Lightroom announcement is bound to cause a little bit of confusion, so here’s a link to a full explanation of the two versions by Tom Hogarty of Adobe

While there are some great performance upgrades to the Lightroom, the coolest new feature for night photographers lies in the ability to fine-tune the masks we create with our local adjustment tools. The new feature is called Range Masking, and it can become a serious way for you to level up your post-processing and your photography.

Follow along in video below as I show you how night photographers can make the most of this new tool!

Tim Cooper is a partner and workshop leader with National Parks at Night. Learn more techniques from his book The Magic of Light Painting, available from Peachpit.

UPCOMING WORKSHOPS FROM NATIONAL PARKS AT NIGHT

A Look Through the Yearsβ€”How Night Photography has Changed, and How it Hasn't

Lance Keimig, "Sand Pit," 2016. This image could have been made 30 years ago when I started photographing at night, but it was shot a year ago, in October of 2016.

Recently Chris and I were chatting about how various aspects of night photography have changed with the advances in technology, and how others haven’t. It was a lively conversation, and he suggested that I write a blog post on the subject. I thought it was a great idea, especially as it would allow me to talk about my favorite subject: historic night photographers!

Delay Tactics

One of my favorite early night photography stories is about the English photographer Paul Martin, who began photographing at night in earnest in 1895. Others had made the occasional foray into night photography before him, but it was Martin who really set the wheels in motion, and whose work caught the attention of Alfred Stieglitz and his colleagues at the Camera Club of New York.

Martin wrote in his 1939 autobiography, Victorian Snapshots, that at one point he had decided to continue to photograph in darkening conditions after the sun went down, making longer and longer exposures and altering his development to get the best results. Eventually these early night images were published as the book London by Gaslight.

Like with most pioneers or innovators, the general public seemed to think Martin was crazy. People approached to tell him that it wasn’t possible to take pictures in the dark, and that he should go home to his wife, or maybe back to the asylum! On more than one occasion he was accosted by the β€œbobbies,” who questioned his motives.

These are experiences shared by almost anyone who has been photographing at night for more than a few years. Though, for better or worse, night photography has become so commonplace today that unless you find yourself on the wrong side of a fence, you rarely have to explain your motives to the police or anyone else.

Paul Martin, "A wet night on the embankment," 1895. Martin covered his camera lens during the exposure to shield it from a curious policeman’s lantern.

Back in the 1890s, police carried kerosene lanterns with them on their beats, because flashlights (or what the British call β€œtorches”) hadn’t been invented yet. On more than one occasion, Martin had a long exposure ruined when a policeman walked in front of his camera and raised a lantern to get a better look at the photographer and his gear. (Remember that in those days, street lights were dimmer, and far fewer in number, so the nighttime environment was considerably darker in London than it is today.) Eventually Martin was able to anticipate and react to impending disaster by removing his hat and placing it over the lens until the policeman’s curiosity was satisfied!

New Jersey Photographer Laureate George Tice’s best-known image is the remarkable β€œPetit’s Mobile Station, Cherry Hill, NJ, 1974.” Tice told me some years ago that the 2-minute exposure on 8x10-inch film actually required about 10 minutes to make because he had to cover the lens whenever cars passed in front of the camera. He would get only 10 or 15 seconds of exposure on the film before a car pulled into the station or passed on the road on the left side of the image. Each and every time, he covered the lens.

George Tice, "Petit’s Mobil Station, Cherry Hill, NJ, 1974." Tice’s best-known image was a 2-minute exposure on 8x10 film that took 10 minutes to expose because the photographer had to repeatedly cover his lens due to cars passing through the scene.

No doubt many of us have employed this same device used by Martin and Tice to prevent an unwanted car or plane trail in our compositions; it’s something I’ve done for decades in my own images. Some things never change.

But most do.

Deliberation

Many of the changes in night photography since digital replaced film are obvious. The ability to β€œchimp” is a good example. Night photography has become far more accessible because of the instant feedback we get from the image preview, the blinking highlights and the histogram.

Other related changes are less obvious unless you have had the experience of shooting at night with film. There is certainly a great satisfaction in knowing that you’ve β€œgot the shot,” but what is lost is the sense of anticipation that comes from not knowing until you unwind the wet film from the reel in the darkroom.

β€œWorking so deliberately usually leads to a higher success rate, and that’s one aspect of my field workflow that I have maintained as much as possible.”

The combination of low sensitivity and reciprocity failure meant that night photographers shooting film were lucky to make 10 or 15 exposures per night, and without the ability to review images in the field, we generally took a slow and methodical approach to our work. When considering variations for exposure uncertainty and complex light painting, a good night meant one or two β€œkeepers.” Working so deliberately usually leads to a higher success rate, and that’s one aspect of my field workflow that I have maintained as much as possible over the years. Still, there have been nights in the digital age when I’ve made over 100 exposures––quite a lot for a night photographer.

Justification

I have already alluded to one of the other changes I’ve noticed over the course of my career. Back in the 1990s, I would be questioned all of the time by passers-by wondering what I could be photographing in the dark. Non-photographers would say things like, β€œThere isn’t any light, how can you take a picture?” or β€œAre you a ghost hunter?” or β€œThere’s nothing there, why are you photographing that old building?” Sometimes I still get those questions, and if the person seems genuinely interested, at least now I can show them the back of the camera.

That leads to another change worth noting. I used to carry a small selection of prints in my camera bag to show to the police or security guards who invariably caught me on the wrong side of the fence. More than once, being able to show a print or two along with a business card eased the concern of the authorities and kept me from being arrested, or at least from being detained. They could somehow understand that an β€œartist” with a camera was not a threat. In the jittery years following 9/11, that was a real concern. Although to my knowledge there has never been a terrorism event that involved photography, somehow night photographers have often been suspected of bad intent.

Balboa Park. It looks like they mean it.

Gear

We all know how much technology has changed the way we work. Our cameras have improved to the point where almost any can record sharp images of the Milky Way, whereas cameras used to be limited to long exposures and star trails. Moreover, lenses are sharper, batteries last longer, tripods are lighter and flashlights are brighter.

Until very recently, one incredibly frustrating camera feature remained stubbornly stuck at 30 seconds: the shutter speed dial! Over the years, I’ve spoken with numerous camera company reps about why their camera’s shutter speeds don’t go any longer than 30 seconds, and unfailingly I’d get the same answer: β€œWhy would you need to expose for longer than 30 seconds? You could just raise the ISO.” Despite the relative ease and lack of engineering required to enable longer shutter speeds, it wasn’t until the Nikon D750 that we even had a Time setting at our disposal.

Many recent cameras have built-in intervalometers, but again with exposures limited to 30 seconds. Finally, with the release of the Canon 5D Mark IV and 6D Mark II, we have DSLRs with programmable shutter speeds that extend exposures not just to minutes, but as long as 99 hours! Hopefully other manufacturers will follow suit with their future models.

Color

Mixed lighting was always the bane of architectural photographers, especially when natural color rendering was important. For night photographers, it’s often that same mixed lighting that attracts us to a scene in the first place. The early work of photographer Jan Staller was a major influence on me, and his technique of printing to correct for one light source while allowing the others to do what they would created some of the most surreal images I had ever seen.

Lance Keimig, "Mixed Lighting Examples," 1995. These two images were shot on Fuji color negative film in 1995 under a combination of sodium and mercury vapor lights. There is no right or wrong white balance here–– whatever looks right to the photographer, is right.

The incredible control we have over color in our pictures, and the flexibility to set white balance after the image has been captured, both give today’s photographer a flexibility that was inconceivable only 20 years ago. Back then, if you couldn’t control the light sources, you either shot black and white or accepted the crazy colors as they were recorded.

Composition

One thing that hasn’t changedβ€”and will never changeβ€”are the principles of composition and design. A good photograph will always be a good photograph, and a crummy one will always be a crummy one regardless of the technology that was used to create it. For that, we can sleep well in the morning.

Lance Keimig, Stromness, 2008. Shot on Fuji Neon Across 120 film with an Ebony 23SW view camera and Nikkor 65mm f/4 lens. 10 minutes, f11. This image was made in the tiny fishing village of Stromness on Orkney in northern Scotland. It was the house of the poet George Mackay Brown. The technology doesn’t matter, the image works because of the combination of vision and craft.

Lance Keimig is a partner and workshop leader with National Parks at Night. He has been photographing at night for 30 years, and is the author of Night Photography and Light Painting: Finding Your Way in the Dark (Focal Press, 2015). Learn more about his images and workshops at www.thenightskye.com.

UPCOMING WORKSHOPS FROM NATIONAL PARKS AT NIGHT

Conferences, Clubs and Excursions, Oh My! Come Join Us for an Event This Fall

One of our favorite parts of doing what we do is getting out into the photography community to meet and talk with like-minded photographers. It gives us a chance to share what we know, to learn from the experiences of others, and to swap stories about working in the dark and working in the parks.

We do this all year round, but autumn seems to be the time when some of the biggest opportunities fall into a line of quick succession. It’s kind of like the β€œConference District” of our collective schedule.

With that in mind, we wanted to share some of the events we’ll be participating in this fall. We hope you can join us at some of these amazing gatherings!

Out of Acadia Photography Conference

Bar Harbor, Maine

This one actually just ended, and was the first landscape photography conference organized by the Out of Chicago group. They’ve been running tours, workshops and walks in their home city since 2011, and conferences since 2016. Gabe and I were honored to speak and lead walks at their Out of New York Photography Conference last year, and last week I did the same at their conference in Maine’s Acadia National Park.

I taught a class on photographing the night sky, and delivered the conference’s closing session, β€œFrom Acadia to Zion: 59 Parks to Inspire Your Photography.” In addition to the myriad classes and presentations by the instructors and leaders, the conference had a very shooting-friendly format. Each morning, afternoon and night featured scores of photo walks and excursions, to places like Monument Cove, Boulder Beach, Cadillac Mountain, Bass Harbor Head Lighthouse, Schoodic Peninsula and many, many more.

Me, during an Out of Acadia photo excursion up to North Bubble. Great photo courtesy of conference attendee and new friend Ron Johnson.

Me, during an Out of Acadia photo excursion up to North Bubble. Great photo courtesy of conference attendee and new friend Ron Johnson.

Out of Acadia was a dynamic event that left the attendees, instructors and organization exhausted (in a good way) and creatively fulfilled. If you were there, you’re probably still sorting through images. If you weren’t there, you can look into attending their next landscape event: the Out of Moab Photography Conference, to be held in October 2018. I’ll be there too!

PhotoPlus International Conference + Expo

New York City, New York

It’s one of the kings of the photo-conference world, held in New York City at the famous Jacob K. Javits Convention Center. And we’ll be speaking there on the final morning, for the third successive year. This time, we’re sponsored by one of the biggest supporters of the National Parks at Night workshop program: NIKON.

On Saturday, October 28, from 10:15 a.m. to 12:15 p.m., Matt, Gabe and I will deliver a two-hour presentation titled β€œSeize the Nightβ€”Taking your Night Photography to the Next Level.” From the session description:

β€œThe National Parks at Night Team is excited to share their expertise and nocturnal visions with you. Go behind the scenes of some of their most challenging shots and see how they prevailed or failed. Take a look at the many aspects of night photography: astro-landscape, light painting, urban and Milky Way. Have your work reviewed and get valuable feedback on how you can elevate your night photography. You'll learn about essential gear, post-production tips, light painting, star trails, star points and urban night photography.”

If you’re not yet registered for PhotoPlus and would like to do so at 15 percent off, feel free to use our speakers’ link.

Lance Keimig will also be at PhotoPlus, delivering two presentations at the Irix booth during the day (at 11 a.m. and 2 p.m.), and leading a night photo walk on the famed High Line (from 6 to 8 p.m.). For more information, see the event page on Facebook.

The Great Smoky Mountains Photography Summit

Townsend, Tennessee

From November 1-5, I’ll be on the road again, this time to Tennessee and North Carolina, where I’ll be speaking at this singular event held at one of the jewels of the park system, Great Smoky Mountains National Park.

Clouds in the valleys of Great Smoky Mountains National Park. Β© 2013 Chris Nicholson.

Clouds in the valleys of Great Smoky Mountains National Park. Β© 2013 Chris Nicholson.

I’ll be one of 12 instructors delivering presentations, offering image critiques and leading field sessions in the park. I’ll be talking about light painting and national park photography, and others will be discussing topics as diverse as metering, creativity, master field techniques and more. There’s also a print competition, with a grand prize of a Fuji X-E3 kit.

If you’ve never been to or photographed the Smoky Mountains, this is an excellent opportunity. See the Great Smoky Mountains Photography Summit website for more information about how to register.

Camera Clubs, etc.

After mid-fall, things slow down for us a bit in terms of speaking at conferences. But that doesn’t mean we won’t be out and talking about photography whenever we get the chance. We’re currently booked to speak at camera clubs in four states between now and mid-winter, including the Churchville Photography Club in Pennsylvania, the New Haven Camera Club in Connecticut, the Englewood Camera Club in Florida and the Greater Lynn Photographic Association in Massachusetts.

Last year we partnered with the New York Adventure Club, sponsored by by B&H photo and Hudson Mercantile, to host a light painting class on a secret rooftop in Manhattan.

Last year we partnered with the New York Adventure Club, sponsored by by B&H photo and Hudson Mercantile, to host a light painting class on a secret rooftop in Manhattan.

And we’ll happily add more to the schedule! If you belong to a club that might like to hear about night photography and/or national parks, etc., feel free to contact us. There are numerous topics we’re prepared to talk about. We’re also eager to speak and/or lead photo walks for podcasts, trade shows, outdoors groups, night sky festivals, arts councils, museums, educational institutions and … well, probably for anyone interested in participating in engaging discussion about the topics we are crazy-passionate about! :-)

To keep updated about where and when we’ll be presenting at any given time, reference our Speaking Engagements webpage, or sign up for our event notification emails.

We look forward to meeting you all out in the photography community at some point soon. Until then, seize the night!

Chris Nicholson is a partner and workshop leader with National Parks at Night, and author of Photographing National Parks (Sidelight Books, 2015). Learn more about national parks as photography destinations, subscribe to Chris' free e-newsletter, and more at www.PhotographingNationalParks.com.

UPCOMING WORKSHOPS FROM NATIONAL PARKS AT NIGHT

Northern Exposure: 8 Illuminating tips for Photographing Auroras

Witnessing an aurora is one of life’s truly magical experiences. Watching the pulsating light and soaking in the surreal green glow fills you with excitement, awe and wonder. As photographers, however, we’re not content to just stand by and watch. We want to capture this spectacle, share it with others, and relive it again and again.

To help you do that even better, Lance, Gabe and I put together eight killer tips for seizing the northern (or southern!) lights.

(For a primer on this topic, read Lance Keimig’s February blog post β€œCapturing Clouds of Light: How to Photograph the Aurora Borealis.”)

15 seconds, f/3.3, ISO 3200. Shot with Nikon D750 and 24mm lens. Β© Lance Keimig.

Lance Keimig

1. Aurora Exposures

The correct exposure for an aurora can vary dramatically depending on both its intensity and movement. Sometimes there may be a relatively stable band of light in the sky that grows in intensity over time. This is easy to photograph, and usually does not change the exposure from what the normal landscape exposure would be.

For a static aurora, typical exposures are equivalent to landscape exposures based on corresponding moonlight or artificial light.

If you’re lucky, the band will grow into the magical dancing lights that can become so bright as to illuminate the landscape with green. To photograph a dancing aurora, it is important to keep the shutter speed as short as possible to prevent the crazy shapes from blending into electric pea soup.

For a rapidly changing aurora, try to keep exposures in the neighborhood of about 2 to 10 seconds. I recommend setting the ISO based on the ambient landscape lightβ€”i.e., not factoring the aurora into your exposure determination. So, for new moon conditions, shoot at ISO 1600 to 6400, and for full moon conditions, shoot at 400 to 800. From there, pick a wide aperture that gives adequate depth of field for the scene, usually stopping down 1 or 1 1/2 stops from wide-open, depending on the focal length and quality of your glass. Lastly, vary the shutter speed as needed to get a balance between a decent exposure and stopping the movement of the dancing lights.

6 seconds, f/3.3, ISO 3200. Shot with Nikon D750 and 14mm lens. Β© Lance Keimig.

6 seconds, f/3.3, ISO 3200. Shot with Nikon D750 and 14mm lens. Β© Lance Keimig.

2. Finding the Aurora: What the Camera sees Versus what You See

Because human eyes lose sensitivity to color in low light, an aurora may sometimes fool you into thinking it is just a cloud. The show often begins as a faint glow in one location in the sky, and it may not be very impressive. If there is a high probability of auroras, it’s a good idea to take test images of different parts of the sky while you are waiting in case there is something that your eyes don’t pick up.

If you live inβ€”or will be traveling toβ€”extreme northern or southern latitudes where auroras are commonly seen, it’s a good idea to have an app like Aurora Forecast (Apple, Android) or Aurora Alerts (Apple, Android) on your phone, and set notifications for specific activity levels. Auroral strength is measured on a scale of 0 to 9 Kp. In high latitudes like Alaska or Iceland, a Kp of 4 or higher indicates a high probability of photographable auroras. In middle latitudes like New England or the Pacific Northwest, a Kp of 5 means that you just might see something on the northern horizon. In mid-latitudes, a Kp of 6 or higher makes it worthwhile to seek out the lights.

In high latitudes, auroras may appear in any part of the sky. In middle latitudes, they are generally seen only as a faint green glow on the northern horizon.

Four-frame panorama shot at 20 seconds, f/4, ISO 6400. Nikon D750 with a 24mm lens. Β© Lance Keimig.

Gabriel Biderman

3. Keep Clicking and Make a Time-lapse

Bring two rigs and set up one for a time-lapse. If the auroras are really active, this is a great way to show off how much they dance in the sky. Once you figure out your exposure, use an intervalometer to make sure the camera keeps firing for at least 30 minutes. The longer you let it rip, the longer the β€œmovie” will be.

Here’s a time-lapse I did of aurora in Iceland:

4. Look for Interesting Foreground and Subjects

When chasing after an aurora, look for interesting foregrounds to play against the dancing green lights. Trees, mountains and other landscape elements are common subject matterβ€”so look for dramatic compositions to include them.

On our last workshop in Iceland, we were fortunate enough to have the ruins of an old herring factory, old boats and other striking buildings beautifully collide with the auroras. And on our recent workshop in Olympic National Park, Matt, Chris and the participants were able to photograph an aurora alongside a massive sea stack.

10 seconds, f/2.8, ISO 6400. Nikon D750 with a 14mm lens. Β© Gabriel Biderman.

5. Create an Aurora Portrait

Try to capture your experience under the northern/southern lights. There is such a sense of wonder and amazement when you are experiencing an aurora, so take a portrait of yourself or your friends under the night sky! A flash can be your friend for freezing the portrait with one pop, as your shutter speeds will generally be 2 to 4 seconds.

We had an amazing time taking our Iceland participants’ portraits during a night when the auroras just wouldn’t stop! My base exposure was 4 seconds, f/2.8, ISO 6400, so we just needed 1/64 power from the flash to make the night portrait complete.

Lance under an Icelandic aurora. 4 seconds, f/2.8, ISO 6400. Nikon D750 with a 14mm lens. Β© Gabriel Biderman.

Tim Cooper

We should always strive to get the perfect picture in-camera, and shooting the auroral lights is no different. Composition and exposure (f-stop and shutter speed) are crucial. Severe cropping and exposure changes will damage your photo, and fixing shutter speed or depth of field is impossible after the fact.

That being said, there are several things that can be altered in post-production that have no bearing on the initial capture. In fact, some of these things you can’t even accomplish in-camera.

6. Change Your White Balance

White balance can and should be set correctly for the initial capture. While it’s difficult to give an exact white balance setting for all situations, it’s safe to say that you’ll probably want to run a bit cooler than a typical Daylight (direct sun) setting. In the comparison below, the first image was made with a Daylight white balance, while the second was made at 4200 K. (Both images shot at 20 seconds, f/4, ISO 1600 with a 14mm lens.) Notice how the cooler white balance setting of 4200 K separates the color and makes the image feel more dynamic.

Experiment while out in the field to find the best look. If you find your images are too warm when back in Lightroom, slide the Temp slider toward the blue end.

7. Add Whites

It would seem odd to address the Whites slider in Lightroom’s Basic panel while working aurora images, but it really works! This has to do with the underlying algorithm of the tool itself. Moving the slider to the right has the effect of increasing overall contrast, thereby adding more snap and pop to your images. In the comparison below, the first image (10 seconds, f/2.8, ISO 1600 with a 14mm lens) is as shot, while the second has been adjusted in Lightroom with Whites at +49, and therefore has more pop.

8. Add Dehaze

The Dehaze slider is the night photographer’s secret weapon. It increases contrast and saturation in the low-contrast portions of the image. Be careful here. This slider can be seductive. Adding too much can make your image look really fake. Start slow and add small increments at a time. Continue to compare your adjustments with the original by clicking on the before-and-after view (circled below).

We hope some of these tips will help make your aurora photographs even more stellar!

Are there any tips or techniques you’d like to share? How about some amazing aurora images? Feel free to post in the Comments section below!

Tim Cooper is a partner and workshop leader with National Parks at Night. Learn more techniques from his book The Magic of Light Painting, available from Peachpit.

UPCOMING WORKSHOPS FROM NATIONAL PARKS AT NIGHT

How to Master Color at Night with the Luxli Viola

Luxli Viola 5" On-Camera RGB LED Light

Luxli Viola 5" On-Camera RGB LED Light

Rarely do I find a tool that causes a paradigm shift in creativity or efficiency. The Luxli Viola 5" LED light is one of them. Why? Simply put, I can be very, very deliberate and accurate with the color of light I choose when light painting.

Prior to this, only a few tools really made me say, "Now I can really do something different/better." Those were:

  • a 4x5" view camera (total control over the image)
  • PocketWizard flash triggers (those changed photography forever, and for the better)
  • a light/flash meter (because I could focus on being creative instead of finding the right exposure)
  • the on-camera histogram (this unlocked the High ISO Test so we can all nail a proper long exposure)
  • the Pixelstick (because, damn … its potential for creativity as a light writing and painting tool is limitless)

Each one of these tools opened new realms of creativity. Once I started using them, I was eager to experiment, and I found new efficiency in what I could do (well, except for view camerasβ€”they slowed me down in a truly terrific way).

As with these other tools, the single most important characteristic of the Luxli Viola is that it solves a technical problem. The result is that it allows me more time to focus on being creative.

The Real Problem this Solves

This problem is illustrated best when light painting using multiple flashlights, which often happens when working in a group. In the images below, you can see the color difference between my flashlight and Gabe's:

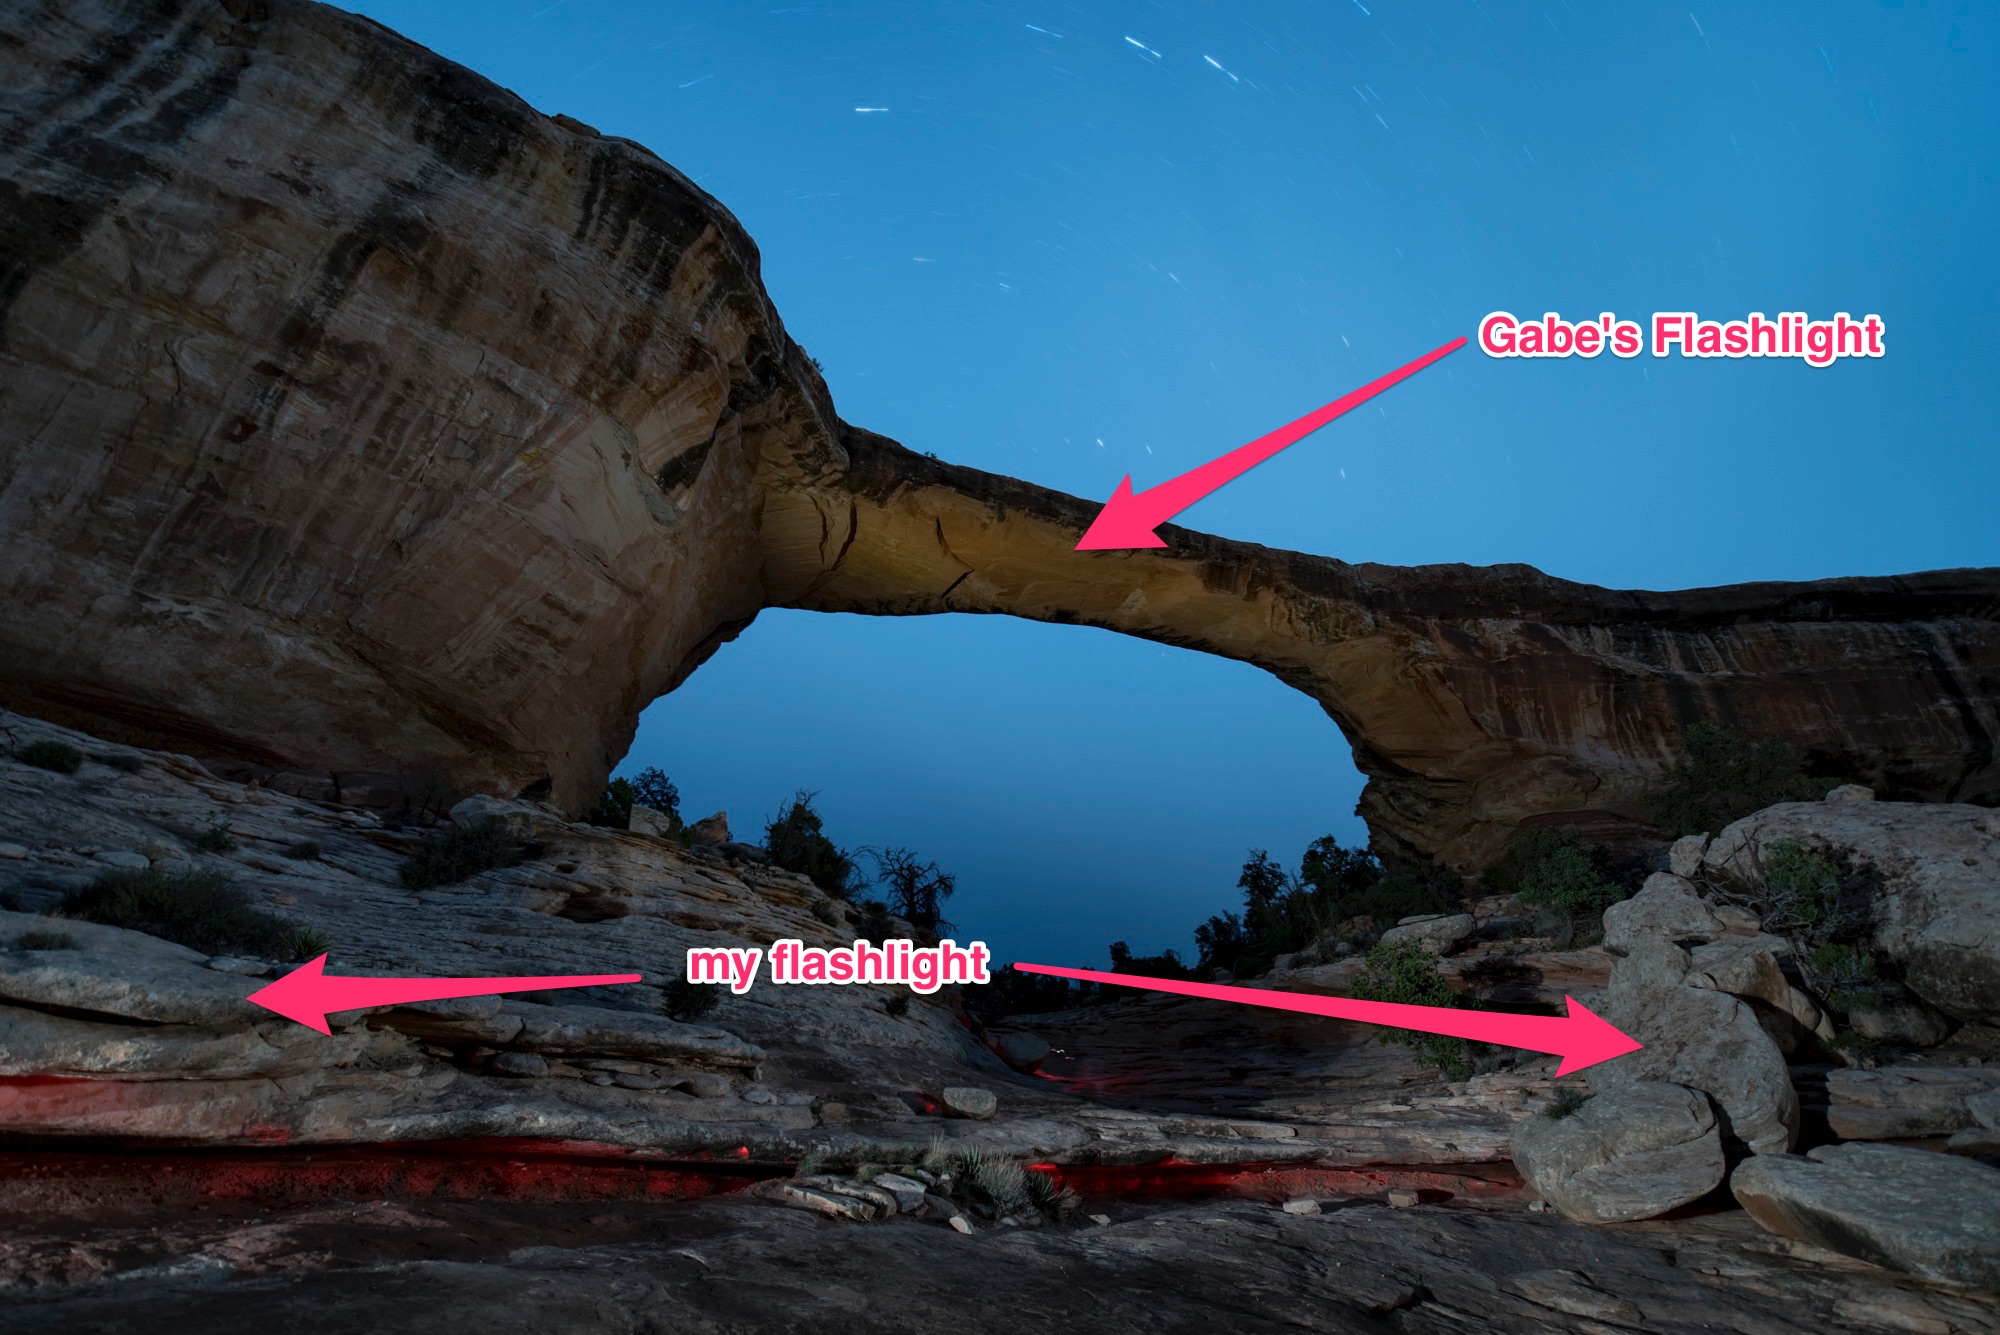
Note that Gabe's flashlight is warmer than mine. When I choose one flashlight source as neutral at 2600 K, the other is warm. If we had the same model flashlight and same strength and color gels, it would be the same. But we didn't. It doesn't look wrong, but I started to notice when it happened and thinking about how to collaborate better to create group masterpieces. You can even see the difference in the original 4000 K captures in-camera. 

My 2017 Self-Challenge

At the beginning of the year I asked myself, "What makes me uncomfortable? What should I be better at doing, but perhaps am avoiding putting time into practicing?"

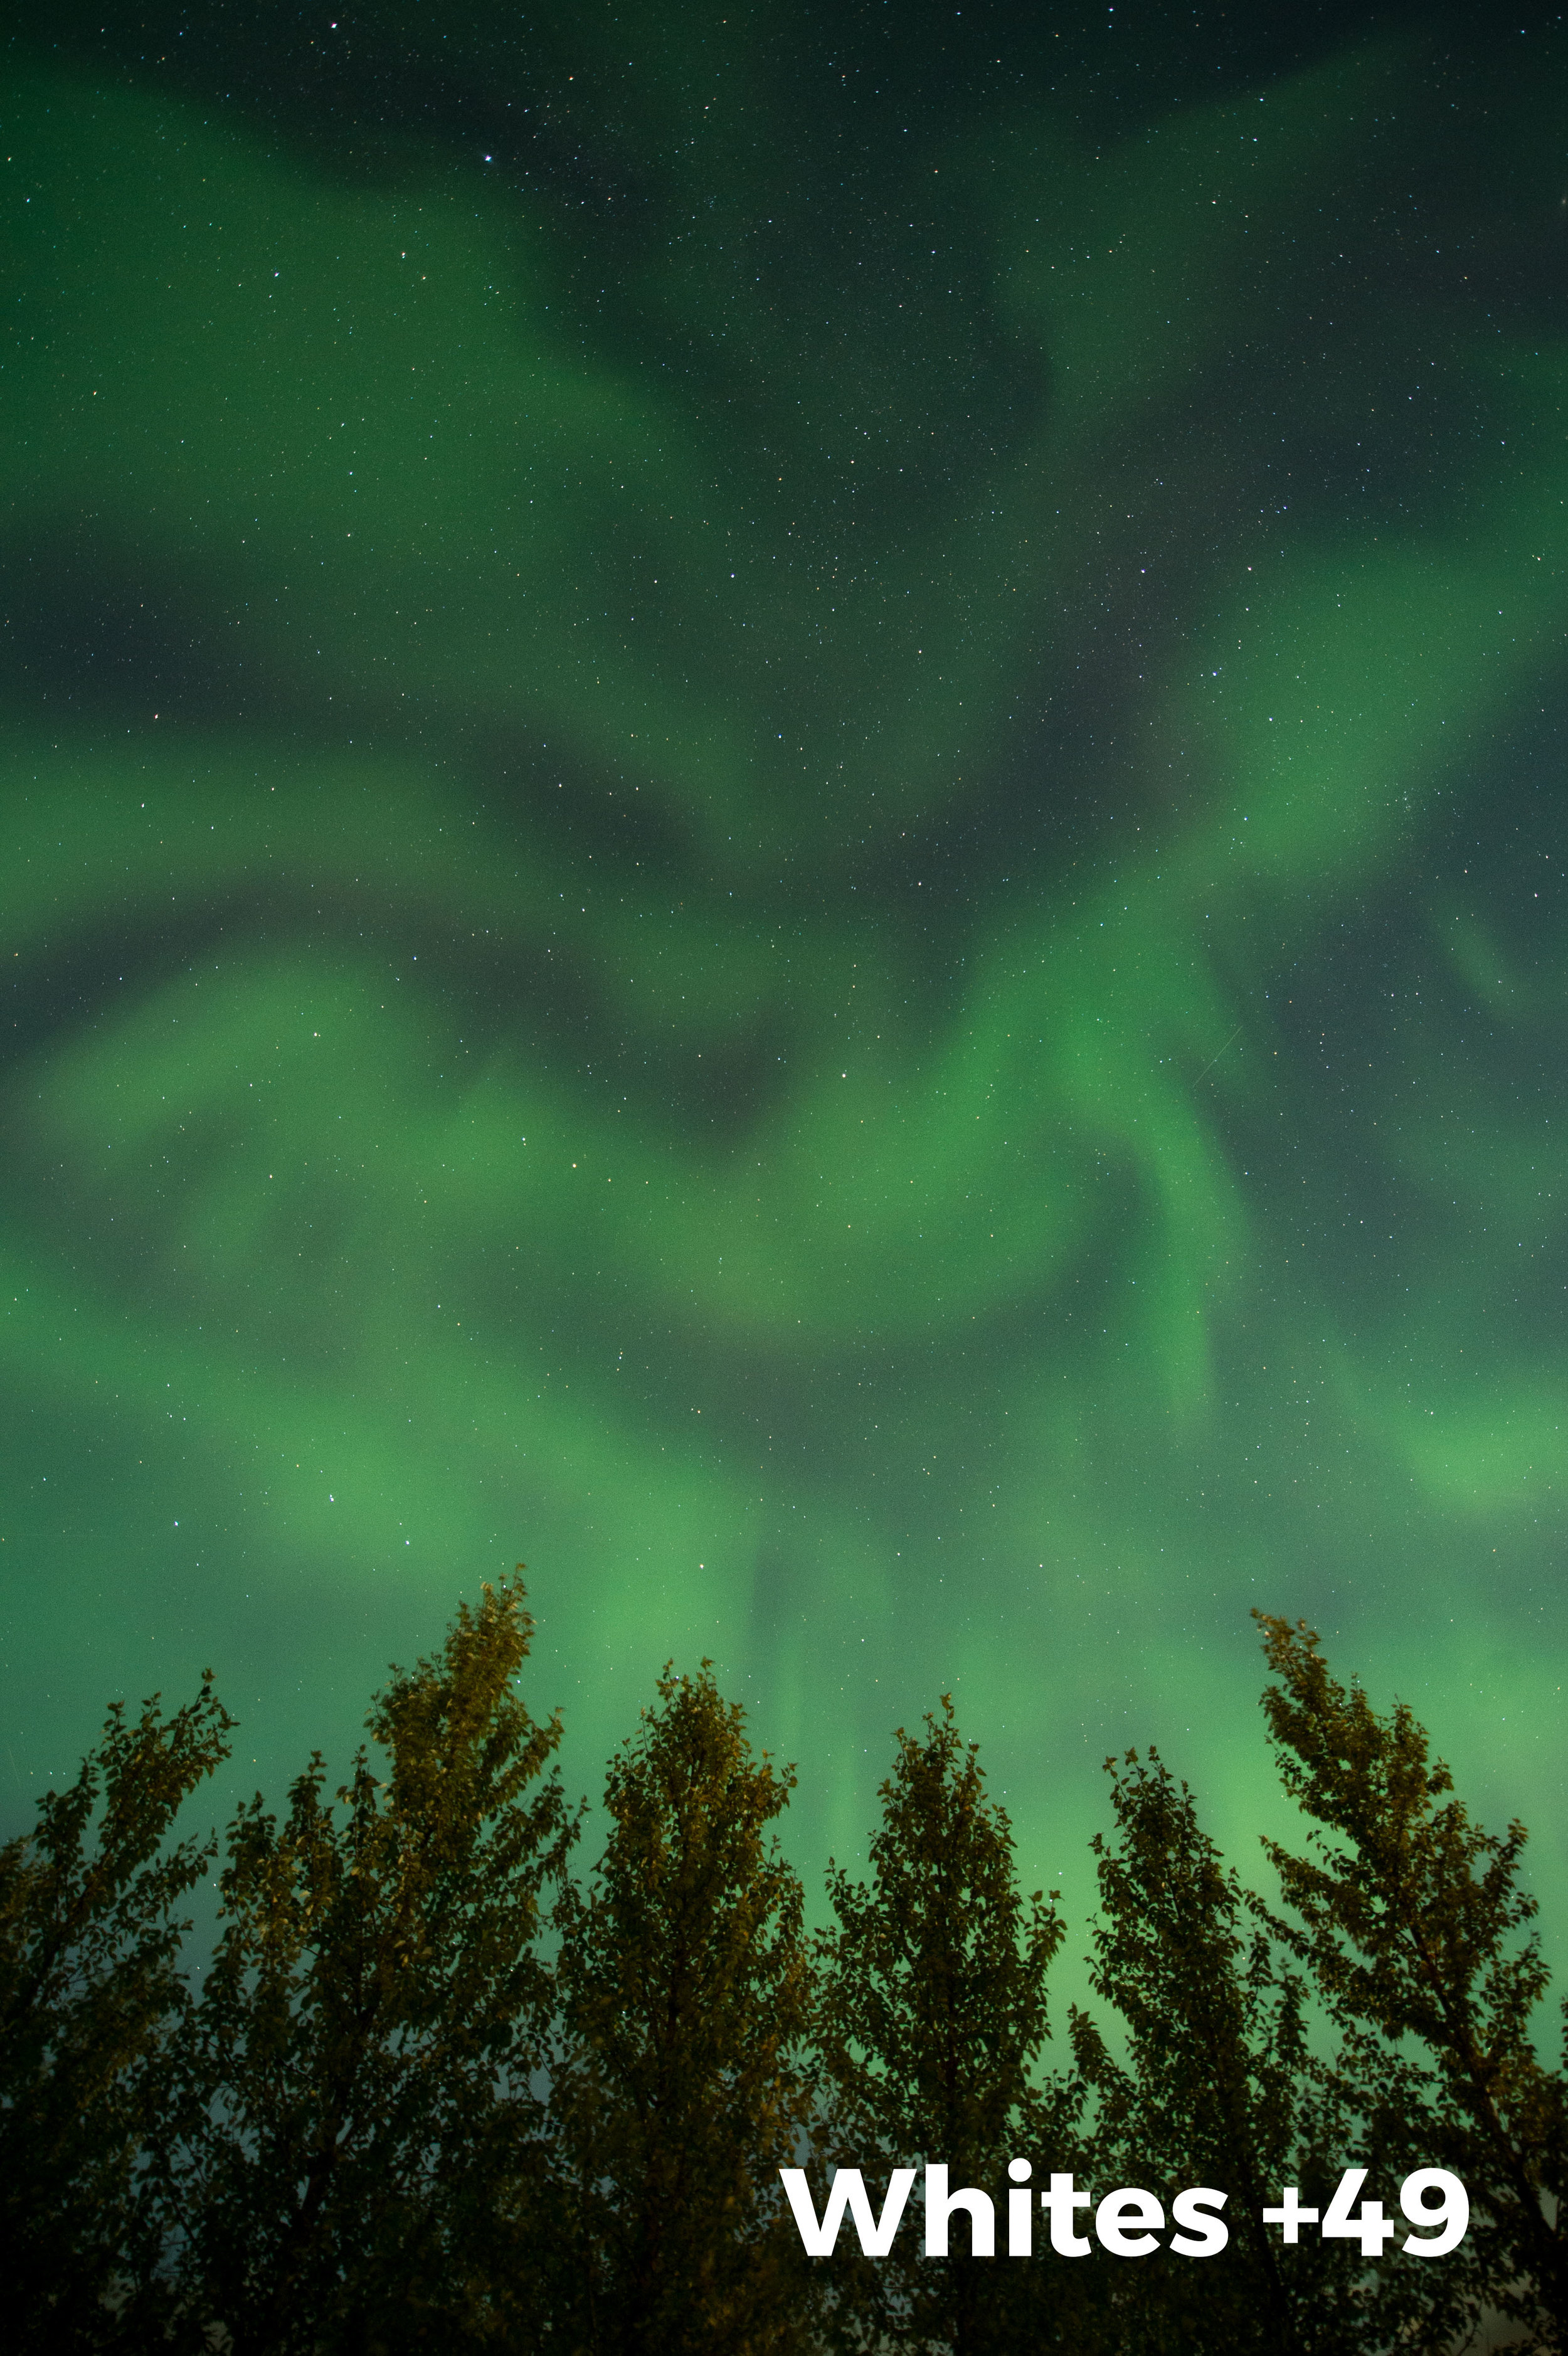
Well, I am very fond of black and white photography. I love it so much that I practice it almost as exclusively as I do night photography. So I challenged myself to master color. And not just color in general, but being very particular and deliberate with how I use color.

My new BFF

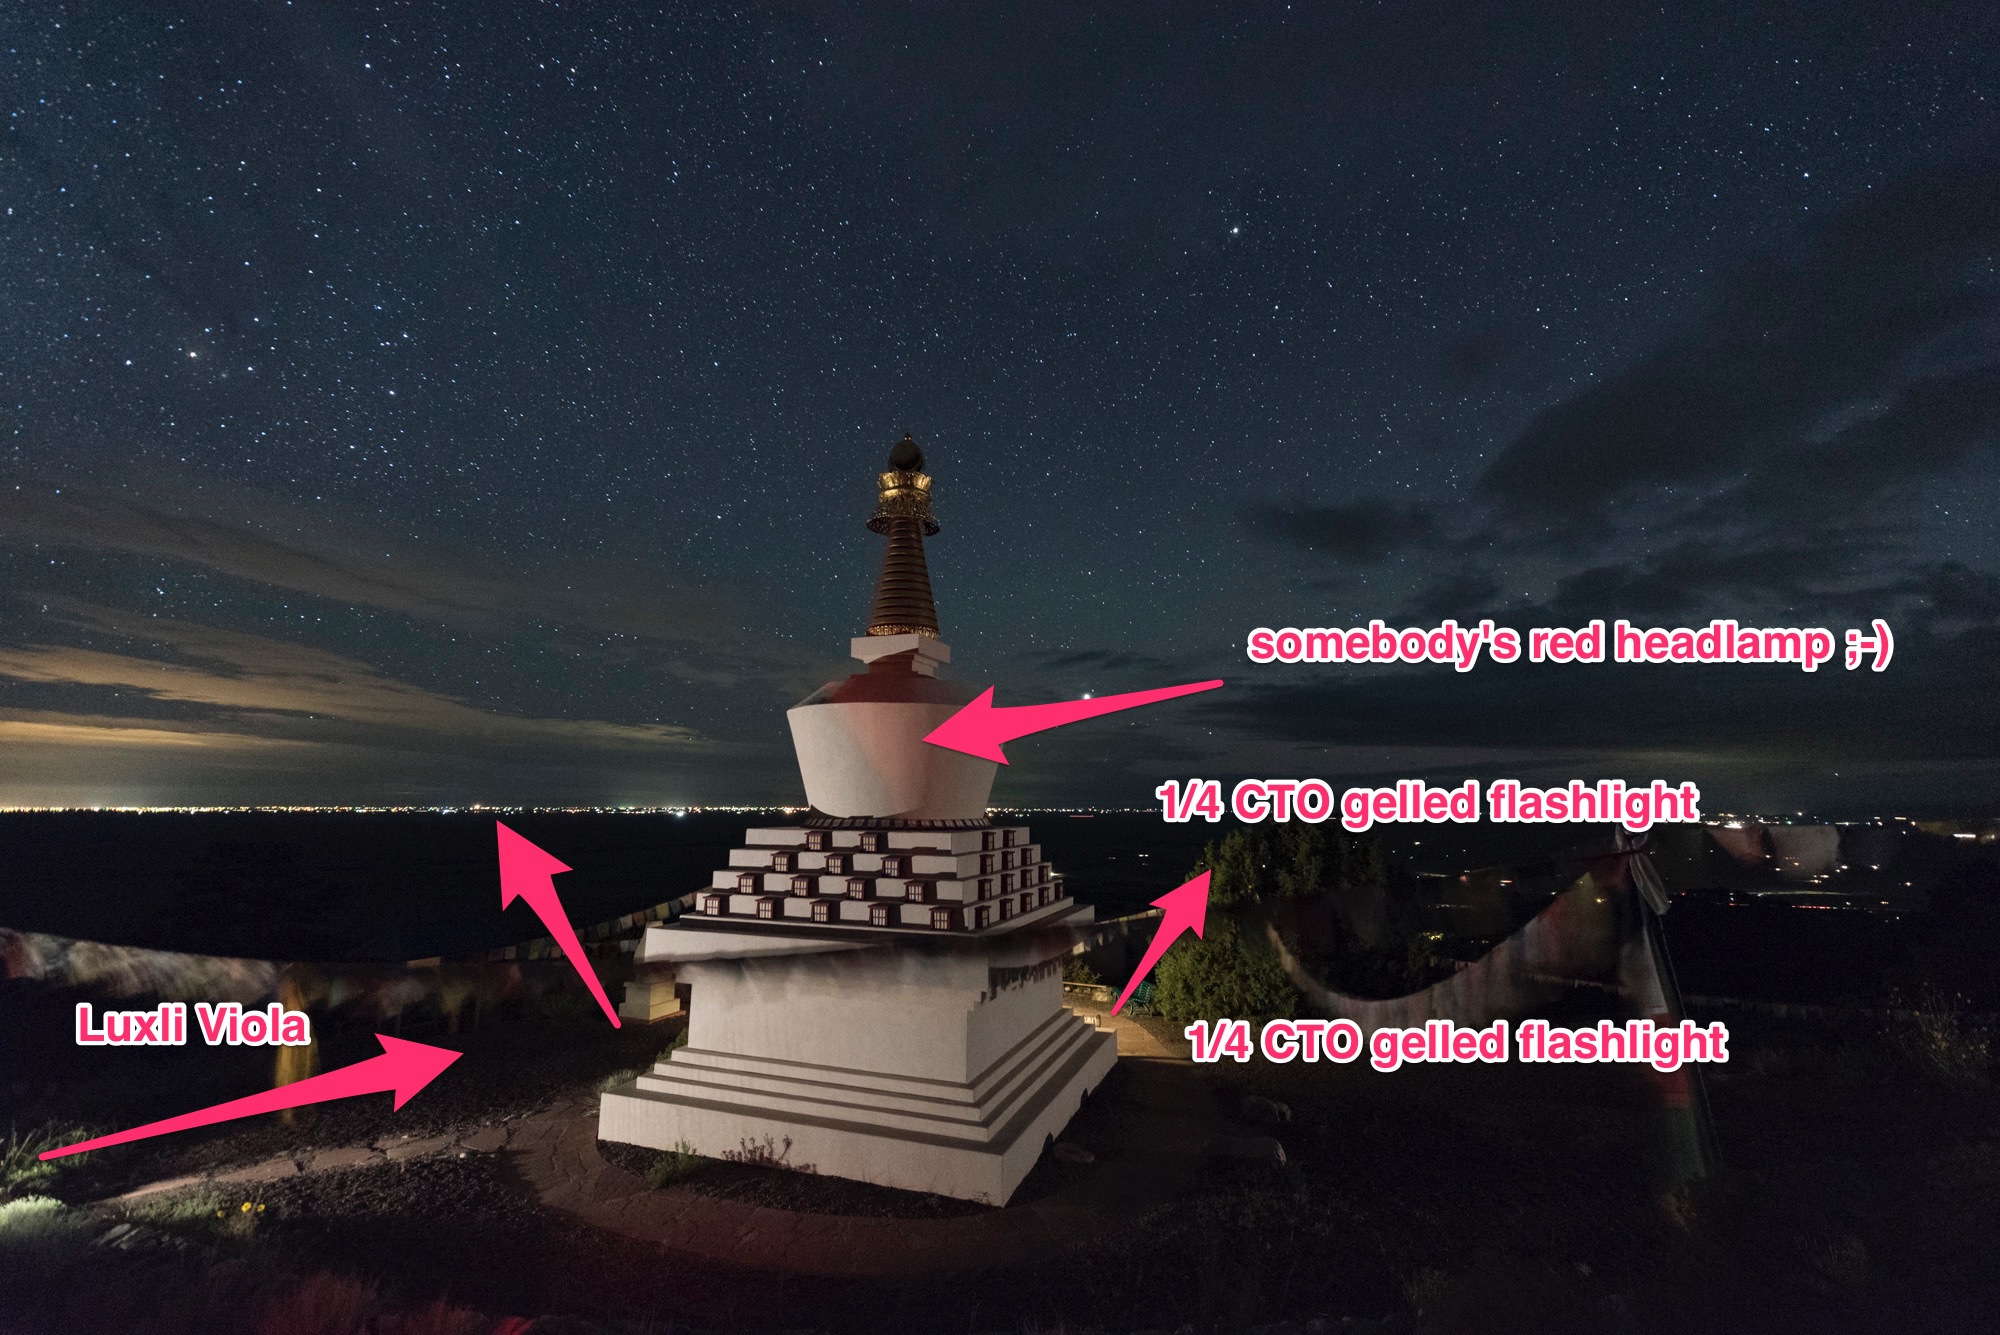
Then in walks this rather humble-looking LED source. There are tons of on-camera LEDs for video. What sets the Luxli Viola apart and directly applies to my night photography is that it 1) renders all color temperatures from 3000 K to 10,000 K and 2) renders any hue on the color wheel that I desire. Why, you may ask, is that so groundbreaking?

Well, I've been gelling flashlights for years and frankly I hate doing it. It's awkward. It reduces the output. Sometimes I lose them. And most of the time, the color correction of blueish LED sources doesn't quite render the 3200 K or 3000 K or whatever warmer tone that I want. Sometimes it's too warm and causes the delicate reds and yellows of my beloved desert featuresβ€”such as arches and bridgesβ€”a bit too garish. 

Knowing I can simply roll a dial on this LED panel and nail a color temperature got me so excited.

How I make the sausage

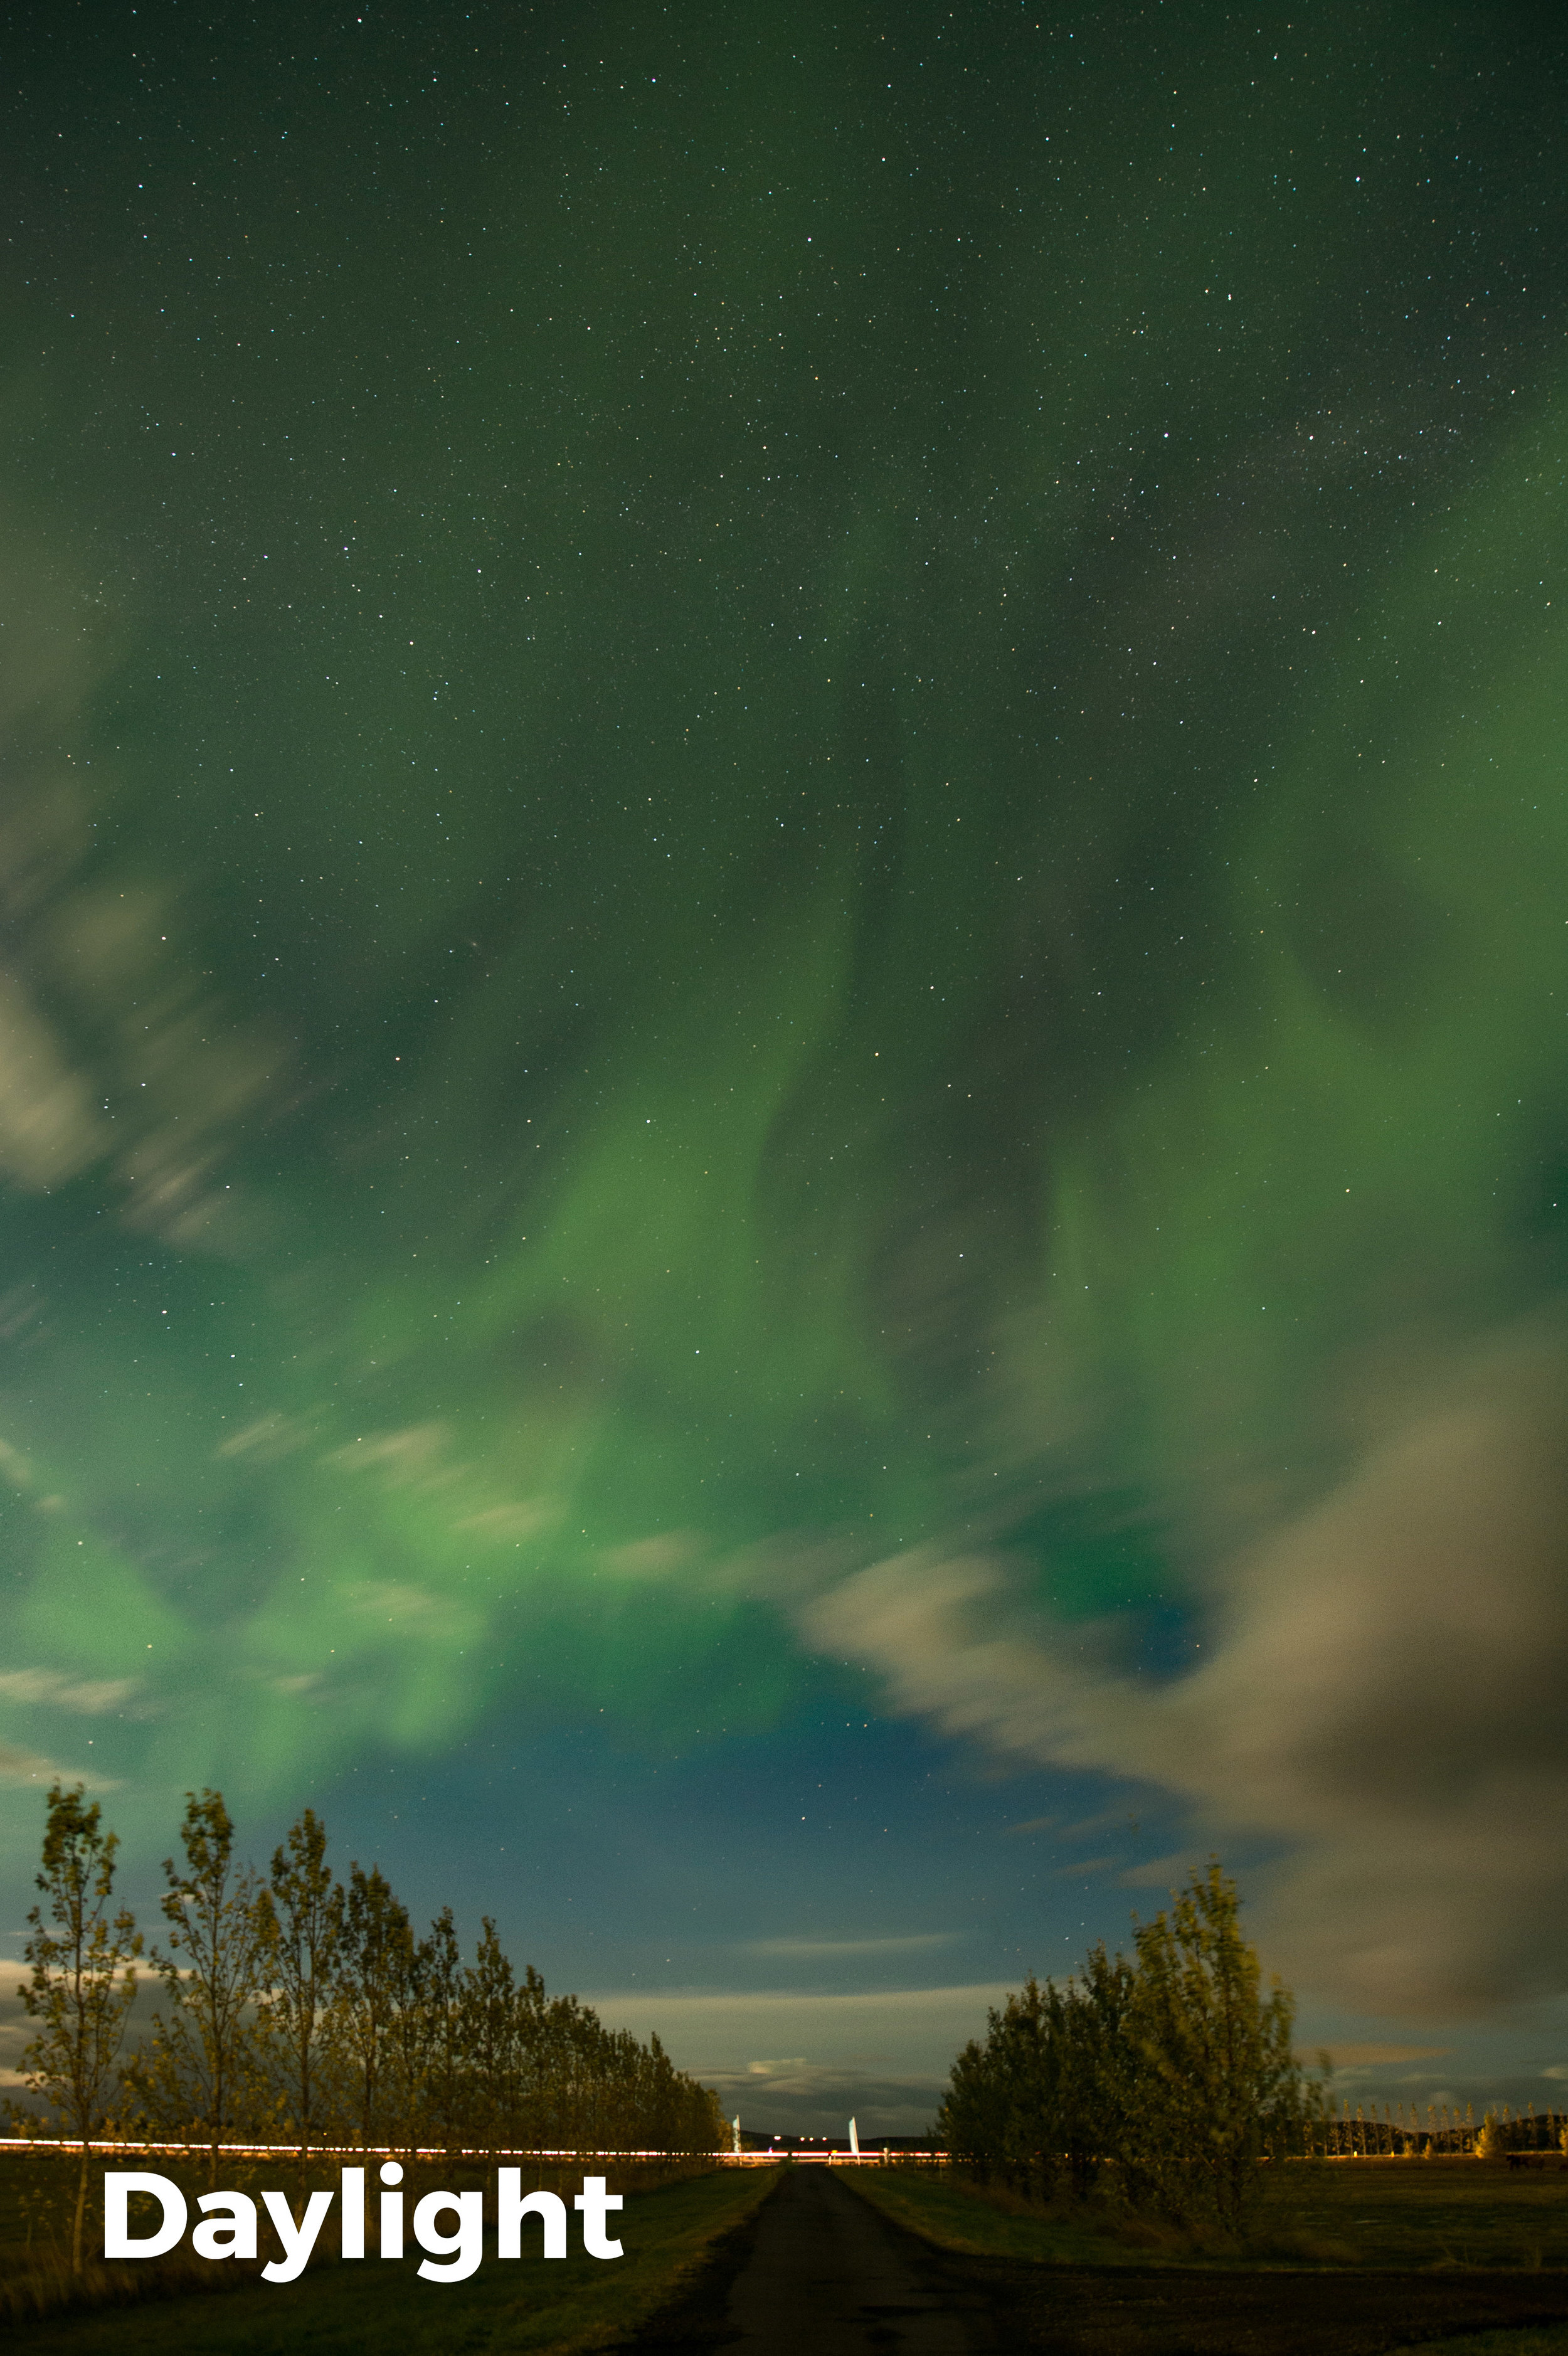
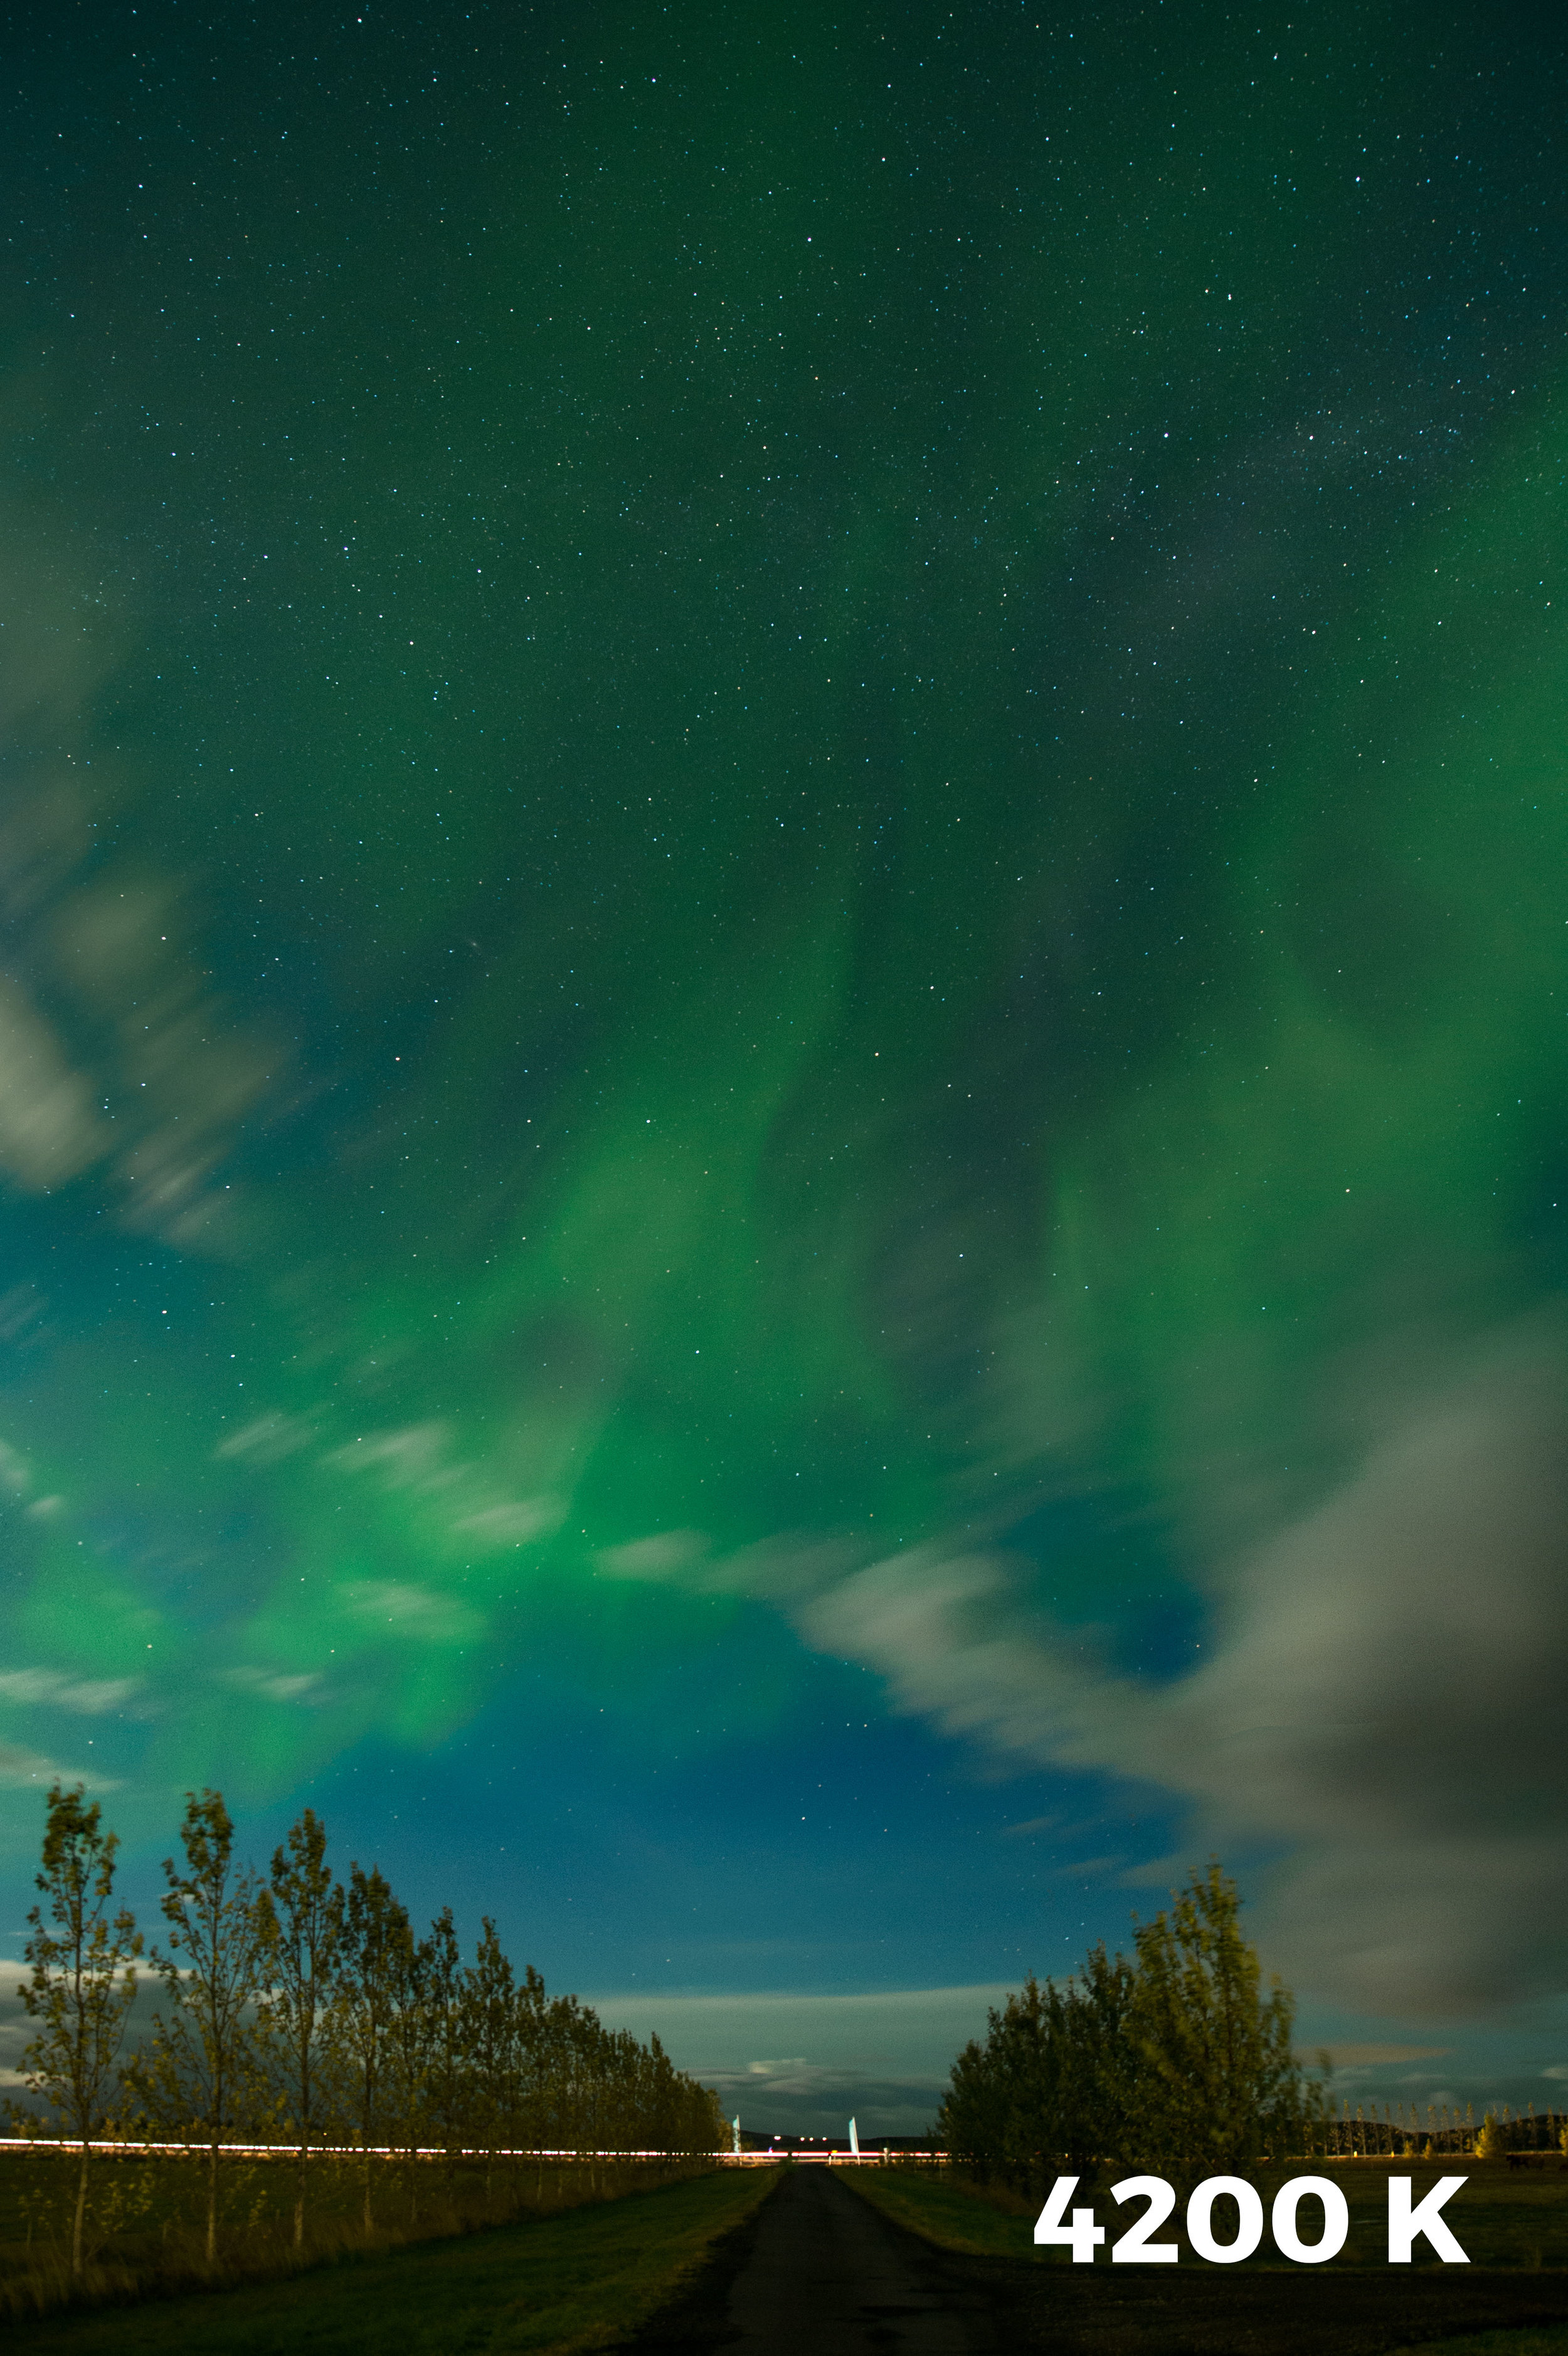
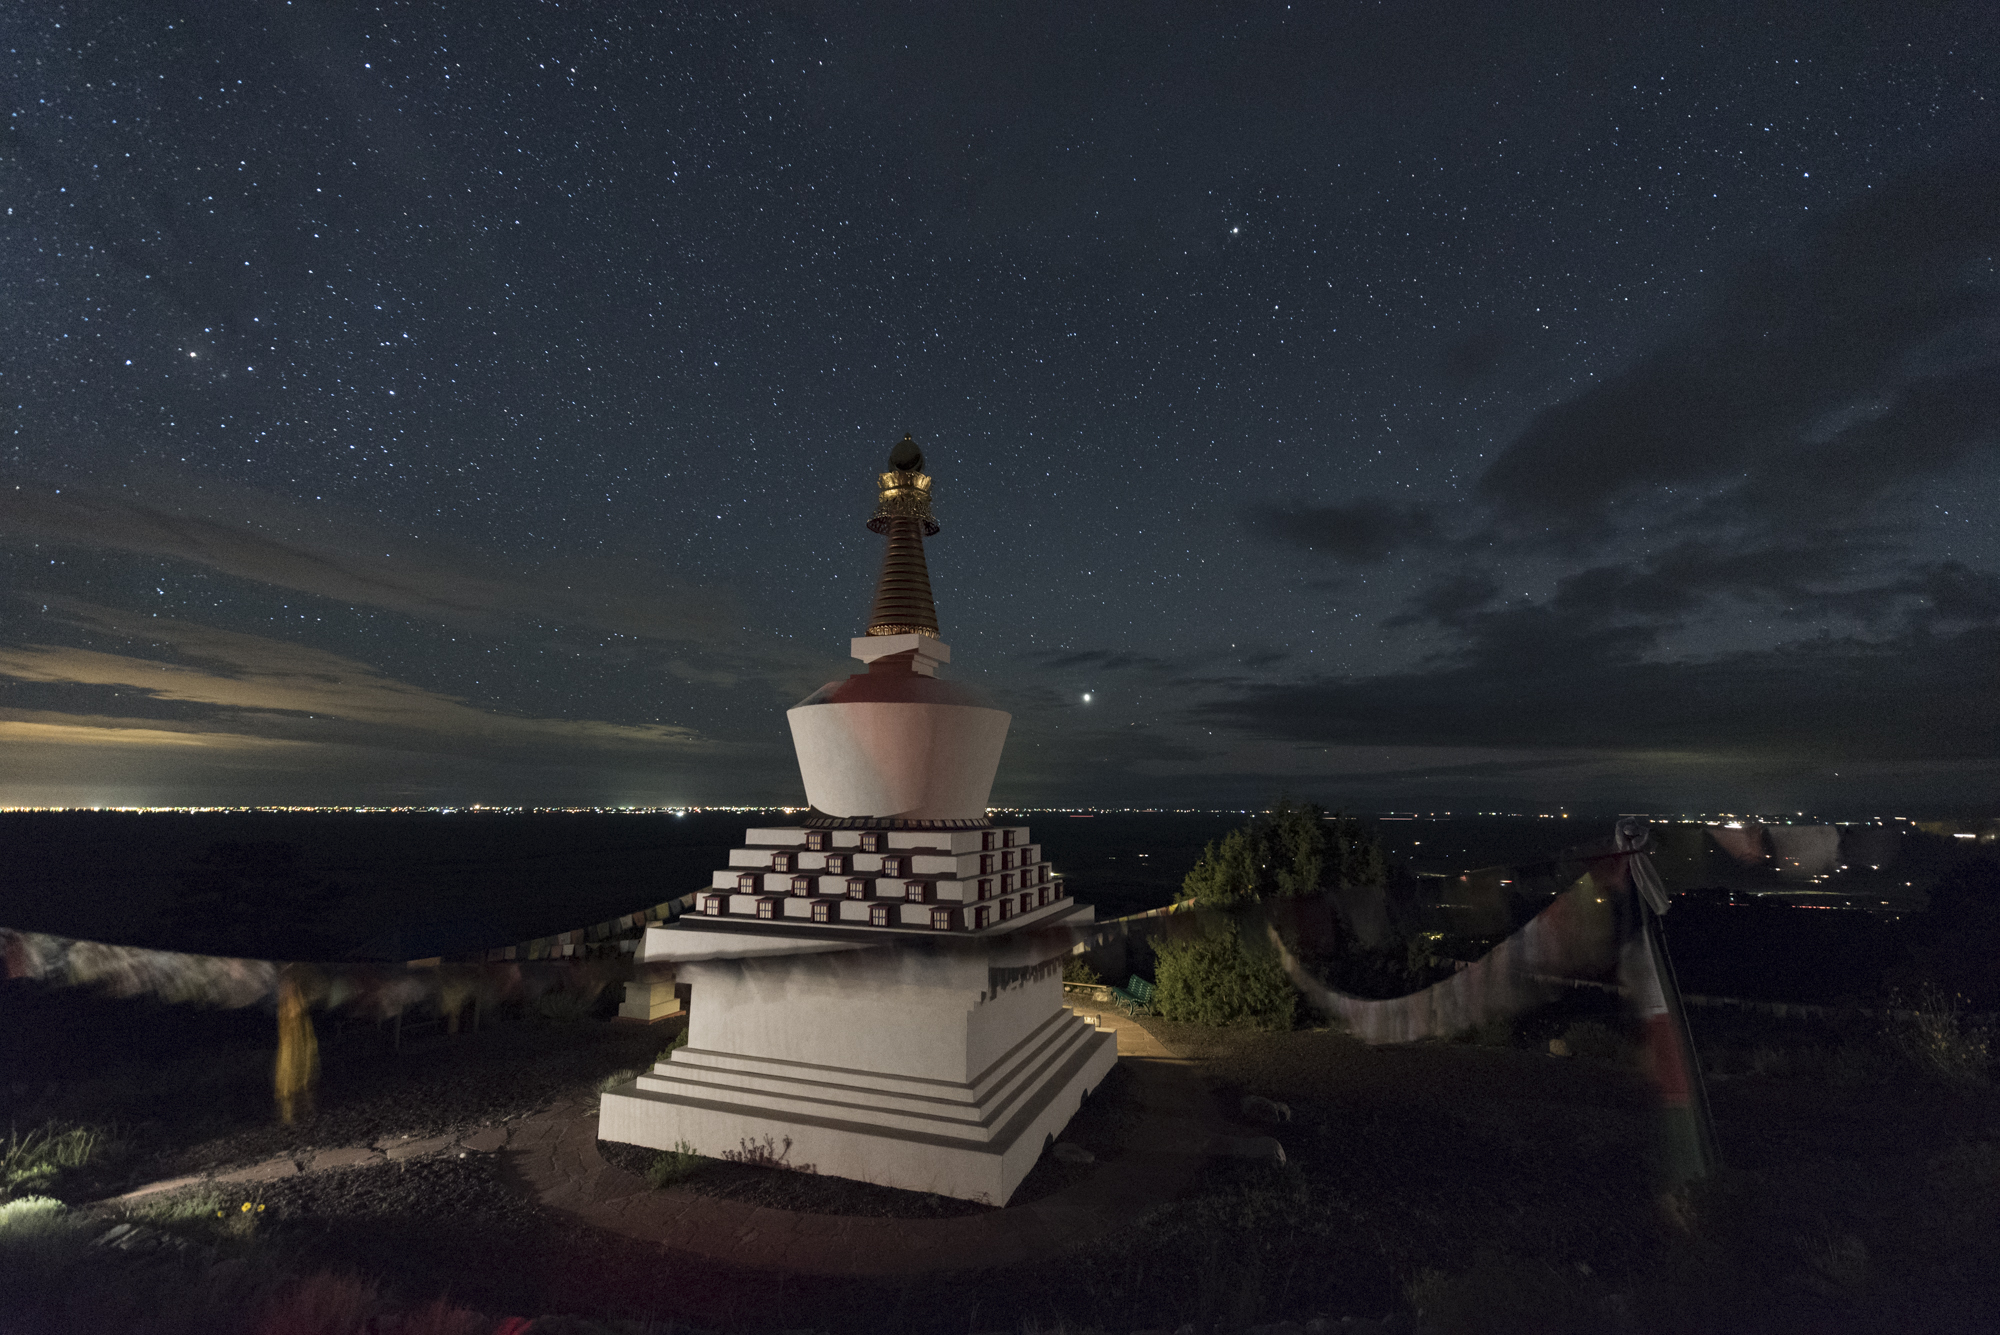
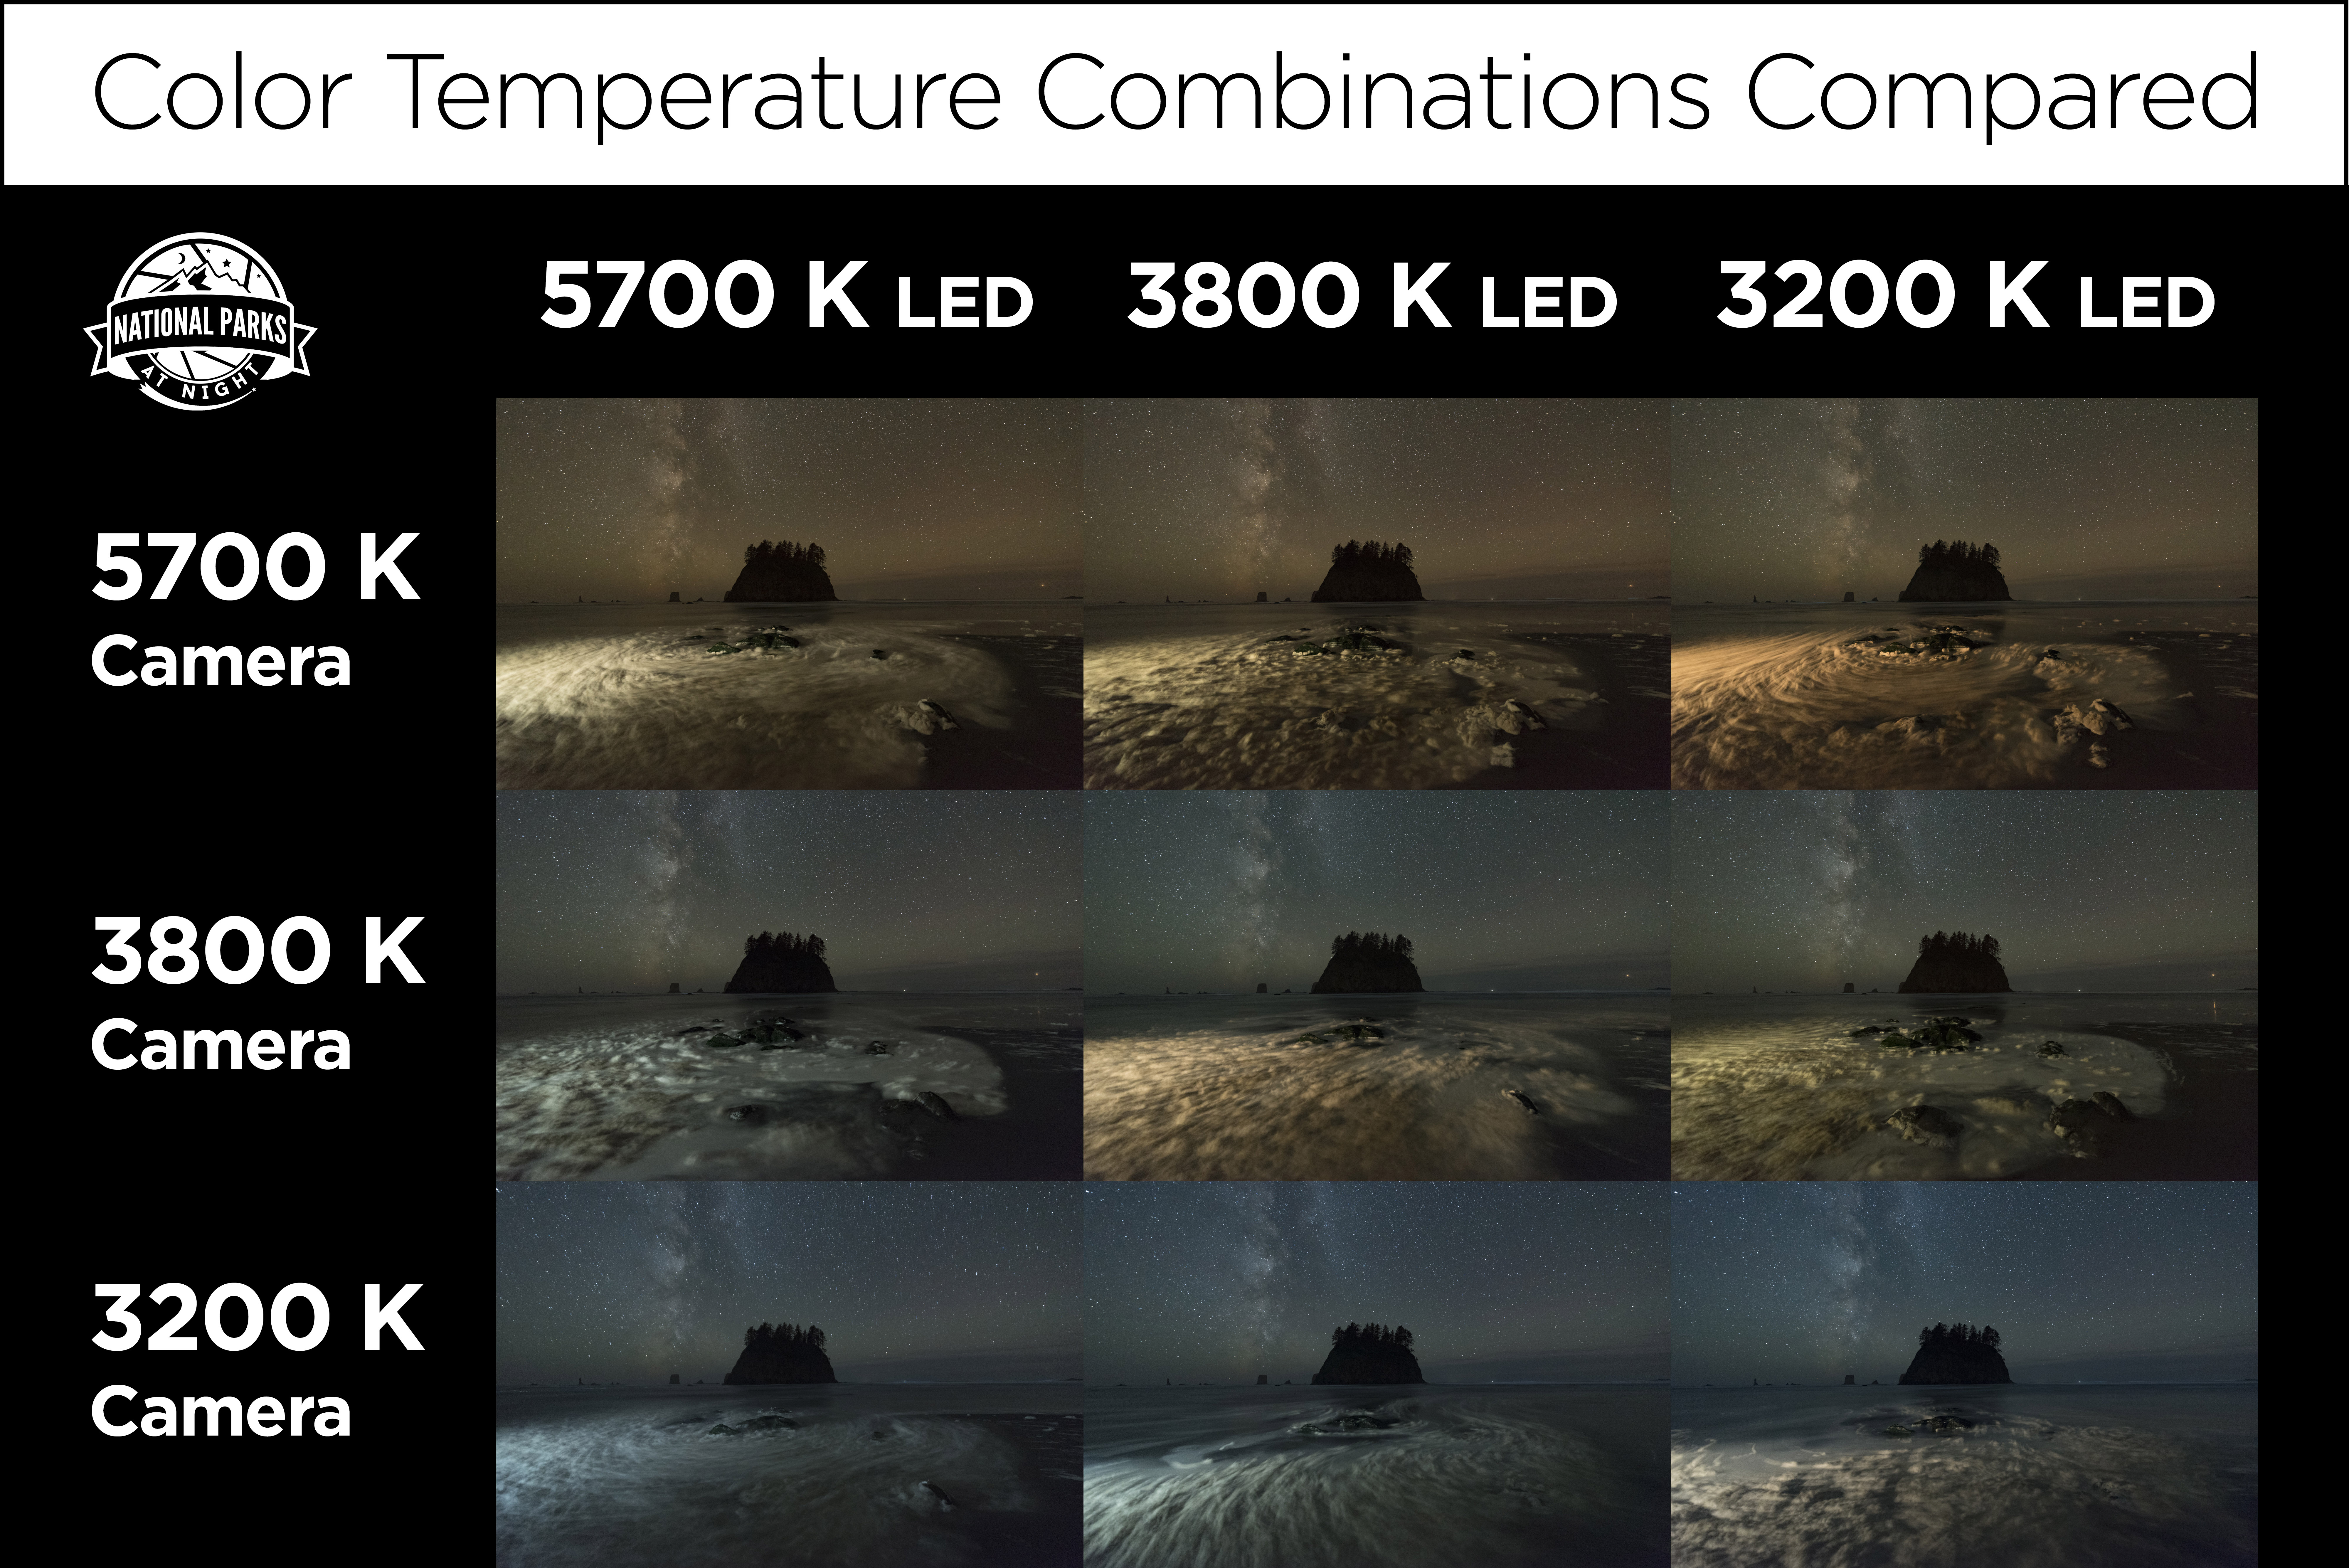
The first place the Viola really made an impact was when shooting Milky Way star point exposures. I'm consistently using a 3800 K white balance to accurately render the galactic core. What if I want a neutral light source for the foreground? Easy. Dial the Viola in to 3800 K.

With a flashlight instead, the illumination may end up too cool with a light CTO gel, or too warm and slightly tinted red with a bastard orange gel. But with this LED, no fuss. If I want something a little warmer, I cheat down to a lower color temperature. If I want cooler, I do the opposite. So easy. If I want to go crazy and use straight hues for color accents, I switch to color mode and dial in any darned color I want.

The only other tool I've heard of that exceeds the Viola is the ProtoMachines LED8, which is a light painter's dream (and a also pretty serious investment at $559). Anyone familiar with Troy Paiva's work has witnessed the power of this tool in the hands of a master. I just discovered that ProtoMachines released the Radium light painting wand, an upgrade to the LED2 that runs only $275. However, I have heard is that patience is sometimes required to obtain one, since they hand-build these tools.

Figure 1. Owachmo Bridge at Natural Bridges National Monument. Shot with a Nikon D750 and Distagon T* 15mm f/2.8 lens. 22 seconds, f/2.8, ISO 6400, blended with a dusk image shot at 78 seconds,
f/2.8, ISO 400.

The Luxli Viola 5" LED is also spectacular when applying the Low-Level Landscape Lighting technique. For the photo in Figure 1, I set the Viola to 1 percent output and placed it below Owachmo Bridge. The panel provided a constant, barely perceptible glow that complemented the exposure time needed for star points and the Milky Way. (This image was then blended with an indigo dusk photo for the shadowsβ€”more on that in our recent post, "Finishing Touches: 3 Killer Post-Production Tips For Night Photography.")

Figure 2. Tower Point at Hovenweep National Monument. Split exposure of 22 seconds and 480 seconds, f/2.8, ISO 400.

When it's really hot out, sometimes you have to make two exposuresβ€”one for a low-noise foreground, and one for the spectacular dark skies you get in southern Utah in June. For the photo in Figure 2, I made a 480-second exposure to blend with the sky of a 22-second frame. For the long exposure, I didn't to add light the entire time. So I used another of the Viola's cool features: Bluetooth control. I turned on and off the light for a few seconds at the beginning of the long exposure with my phone. How convenient, right?

I placed the LED to craft textures and faithfully render the bricks' delicate colors at the same 3800 K that I'd set my D750 to. I was so confident about the results that I simply sat back and enjoyed the view. ;-)

At Tashi Gomang Stupa (above), we used a Luxli Viola on a low-to-ground tripod at the bottom left corner to illuminate the main body of the structure. The camera and Viola's white balance were set to 3200 K. If you observe at the light spilling out from behind the stupa, you'll see a warmer light from a 1/4 CTO-gelled flashlight. See the difference between a color-corrected source and one that is simply correct?

Now, aesthetics also come into play. I wanted a warmer splash behind, so this was intentional. But the flashlight-plus-gels scenario is limited to what you carry, and also eats time while setting up. I am enamored with starting with a neutral light source and then cooking the color to taste. 

Mixing and Matching Color Balances

Because of the I put this to the test in the field at Olympic National Park. At Second Beach, I found a sea stack in the distance with some rocks in a tide pool in the foreground. The tide was coming in and making sweet swirls around the rock. This effect was also aided by the thick foam (which Chris commented wiggled like Jello-O when prodded with a toe).

Figure 3. All images above shot at 26 seconds, f/2.8, ISO 6400 with a Nikon D750 and Zeiss Disatgon 15mm f/2.8 lens. Download a high-res version of this chart here.

Keep in mind that there is no right or wrong when it comes to color temperature. There is knowing what affects your sky and foreground in a manner that you find pleasing. For the scene in the test above, I prefer the 3800 K camera and 5700 K LED. I was surprised by thatβ€”I had thought I'd like the 3800/3800 combination. Test and experiment!

Night Portraits

The Viola is also hella cool to use for night portraiture. It's not a flash, so don't expect crispy edgesβ€”people do move. But if you use the Viola briefly and your models hold still enough, it can be a great light source. 

Figure 4. The B&H marketing crew and astrophysicist Summer Ash at the Atlas Obscura eclipse event in August.
Nikon D750, 22 seconds, f/2.8, ISO 6400. White balance 3800 K (camera and LED).

For the photo in Figure 4, I matched the color temperature of my Viola to my CTO-gelled flashlight at 3800 K. The Viola is on the left of camera and the flashlight is low on the right.

Bonus: Bluetooth!

On top of all this, as mentioned earlier, the Luxli Viola has Bluetooth that allows you to control up to nine lights. When is this useful? When you want to simulate a flash, but can't use one, like for this group photo of our workshop participants at Olympic National Park last month:

I'm operating the lights with my phone behind Chris' back at left. Camera is set on intervalometer. 10 seconds, f/4, ISO 6400.

Wrapping it all up

I am enjoying the process of thinking critically about color and its application. I feel like I've grown as an artist and have another vital tool in my toolbox. I am equally excited about color and black and white imagery, but I think the results were worth going outside my comfort zone. And I'm keeping the Luxli Viola in my bag. Now I have to decide what to vote off the island, since gels didn't really occupy all that much space. ;-) 

Here is a recap of the benefits I find using a Luxli Viola:

  • Constant light makes it easy to repeat lighting effects, including exact shadows, intensity and placement.
  • Choosing a color temperature that matches my color balance in-camera will faithfully render the color of the objects in the scene.
  • Choosing a warmer or cooler color temperature can add creative flair.
  • It's very light and small.
  • When running at 1 percent power (which is most often for me), it will run all night and then some.
  • Adding the collapsible diffuser kit gives me a soft snoot to kill light spill at the edges, plus an even softer effect. 

There are a few disadvantages, however:

  • It's $350* (way more than a good Coast flashlight and gels).
  • The optional diffuser kit (which is amazing) is another $100*, or you can get both together for $429*.
  • An LED array is many little lights in rows and columns. It will never throw as far as a flashlight with a focused reflector on the front. So, you'll likely not be able to use it as a focusing aid, or for illuminating things very distant, unless you go for a longer exposure, or walk it deep into your frame and point it toward the thing you want to light up.
  • It's bigger than a flashlight. (That's a hint! hint! for any manufacturers out there who want to put these features in a flashlight form!)

* At the time of writing, these are the prices listed on B&H. Prices can fluctuate, so check back. 

Let's talk about color in the comments! How do you feel about your control and use of color? What tools do you use? How are you challenging yourself to grow? 

Matt Hill is a partner and workshop leader with National Parks at Night. See more about his photography, art, workshops and writing at MattHillArt.com. Follow Matt on Twitter Instagram Facebook.

UPCOMING WORKSHOPS FROM NATIONAL PARKS AT NIGHT