Technique

Casting Out Shadows: When HDR is the Right Choice for a Night Scene

The acronym HDR stands for High Dynamic Range. The term can refer to a computer program, or a photograph that has been processed by an HDR program, or the technique of taking multiple photographs with the intention of blending them together in an HDR program.

Let’s begin with the phrase β€œdynamic range.” Dynamic range refers to the amount of separation between the brightest and darkest parts of a scene. A scene low in dynamic range has a limited range of brightness tones (as seen below).

Example of a low dynamic range photo, from Death Valley National Park.

Example of a low dynamic range photo, from Death Valley National Park.

On the other hand, a scene such as this Moraine Lake photograph (below) contains a large range of brightness values. This huge difference between values is what makes a scene high in dynamic range. (β€œHigh contrast” is another phrase used to describe such a scene.)

Example of a high dynamic range photo., of Moraine Lake in Canada'a Banff National Park.

Example of a high dynamic range photo., of Moraine Lake in Canada'a Banff National Park.

The problem, of course, is that even the best cameras cannot capture a scene with an extreme amount of dynamic range. In the example of the Moraine Lake photo, to reveal the detail in all of the tones, I made five different exposures of the scene by using different shutter speeds (1/125, 1/60, 1/30, 1/15 and 1/8β€”all at f/11) and blended them together in an HDR program called PhotoMatix.

Final image created by blending five different exposures.

Final image created by blending five different exposures.

Night Applications

While HDR is a common technique in daytime photography, the definition of high contrast certainly describes many nighttime scenarios. Not all night scenes are high in contrast, though. A landscape illuminated by a full moon, for example, can be fairly low in dynamic range.

Low-contrast scene illuminated by the full moon, in Zion National Park.

Low-contrast scene illuminated by the full moon, in Zion National Park.

But any scene that contains deep shadows and very bright highlights is a candidate for the HDR processβ€”even if it's after dark. This scenario is especially common at night when we mix deep shadows and man-made light sources, such as city lights or car trails.

High-contrast scene mixing Las Vegas city lights and deep shadows.

High-contrast scene mixing Las Vegas city lights and deep shadows.

Below is a final image I made in Las Vegas after shooting three separate exposures of 1 second, 2 seconds and 4 seconds (all at f/11) and blending them together in PhotoMatix. This process reveals details in the dark shadows while allowing the city lights to retain texture while remaining bright.

Final image after HDR treatment.

Final image after HDR treatment.

Cuyahoga Case Study

I don’t use the HDR process for every nighttime image, but when confronted with deep shadows, bright city lights or brightly lit buildings, I’ll certainly consider it. This is exactly what happened to me while scouting and shooting for our upcoming night photography adventure workshop in Cuyahoga Valley National Park. I wanted to take a picture of the rail crossing and station at Boston Mill. In order to capture detail in the "Boston Mill" sign on the depot, I had to use an exposure of 8 seconds, f/8 at ISO 100.

At Cuyahoga Valley, an exposure of 8 seconds, f/8 at ISO 100 recorded detail in the highlights.

At Cuyahoga Valley, an exposure of 8 seconds, f/8 at ISO 100 recorded detail in the highlights.

However, this exposure left the sky and foreground very dark. Therefore, it was time for HDR. I needed to create a few more exposures that were brighter so I could get some detail in the darker areas of the image. Varying only the shutter speed to alter exposures left my f-stop constant, which in turn created the same amount of depth of field in each image.

Exposures of 15 seconds at f/8, 30 seconds at f/8, and 1 minute at f/8.

After viewing the histogram of the 1-minute exposure, I decided that the shadows had received enough light, and I didn’t need to open them up any more. Later, I took all four exposures and blended them together in PhotoMatix.

HDR blend of the four exposures.

HDR blend of the four exposures.

Blending the images together kept the highlight detail of the Boston Mill sign intact while brightening up the shadow portions of the image.

At this point I had all the exposures necessary to reveal the desired detail, but I had not captured the car trails that I was hoping for. Leaving my camera in position, I waited for more traffic and made a few more exposures. To create the final image (below), I used Photoshop to add a few more exposures with car trails to the HDR blended image above.

The final image of the HDR frame (four exposures combined) layered with car-trail exposures.

The final image of the HDR frame (four exposures combined) layered with car-trail exposures.

When making images at night, we’re faced with all sorts of challenges. In the case of the Boston Mill shot, the difficulty lay in the extreme contrast between the lit sign, the dark foreground and even darker sky. By taking multiple exposures and blending them together in HDR I was able to control that high contrast.

Like with any photography discipline, a firm grasp of the basics and being familiar with your gear will carry you through many situations. Knowing a few cool techniques like HDR, however, can greatly expand the possibilities.

For more information about shooting and processing HDR images, check out Tim Cooper’s books The Realistic HDR Image and HDR Photography: From Snapshots to Great Shots. If you are interested in using Tim’s HDR program of choice, click for a 15% discount on PhotoMatix.

UPCOMING WORKSHOPS FROM NATIONAL PARKS AT NIGHT

No Legs to Stand on: How to Take Night Photos Without a Tripod

About a month ago, fellow NPAN instructor Chris Nicholson and I had the honor of teaching at the Out of New York Photography Conference. During the event we led a night walk, but when we met the students, there was a surprise for usβ€”none of them brought tripods!

Tripods had been listed as required gear on the instructions list, but … well, I guess things happen. We could have cancelled the walk, but Chris and I chatted and decided on a different tack: Let’s teach how to overcome the challenge of shooting at night without a tripod! There are thousands of makeshift tripods on the streets of NYCβ€”so we went out to find them.

What happened next was a magical β€œletting go” and a total embrace of what the night has to offer. We started by leaning our cameras against poles, buildings and even mailboxes (yes, there are a few left in NYC!). We challenged the students to place the cameras higher and lower than their normal point of view, and the sidewalks and stairs became our stabilization. We searched for movement in cars, people and water fountains, and we braced our cameras against chairs, tables and benches.

It was one of the most fun nights out that I have had in a long time. We were constantly searching for something stable, and we were smiling back to each other whenβ€”Eureka! We got it! This forced all of us way out of our normal clicking boxes, which is always an excellent place to be.

With that in mind, I wanted to share a few of the tips that helped us survive a night without tripods. As much as good support is some of the most important night-photography gear, these tips will help you in a pinch, not to mention stretch your creative capacity.

Bursting for sharpness

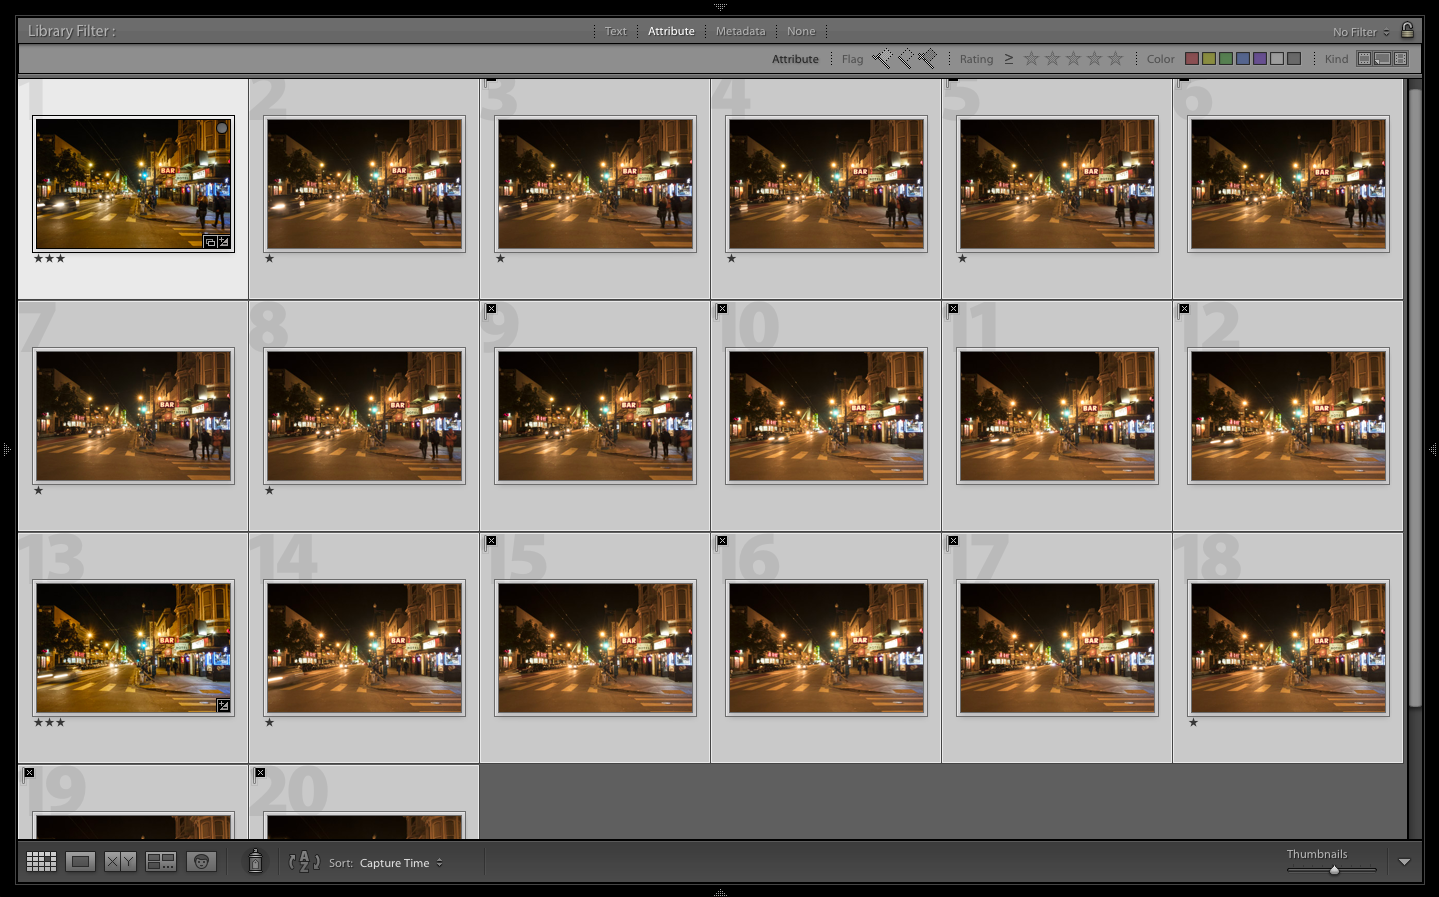
Burst Rate is your friend. I like it for a few different reasonsβ€”it greatly helps your β€œhit rate” when shooting handheld below 1/60 second (but no longer than 1/4 second). Set your camera to its fastest frame rate, hold the camera as still as possible, then fire off a bunch of frames.

Your first couple of shots will be blurry because of the shake created by triggering the shutter, as will your last few because of taking pressure off the shutter release. But if you keep your finger on the button for 10 to 15 shotsβ€”you’ll most likely get 2 or 3 in the middle that are acceptably sharp.

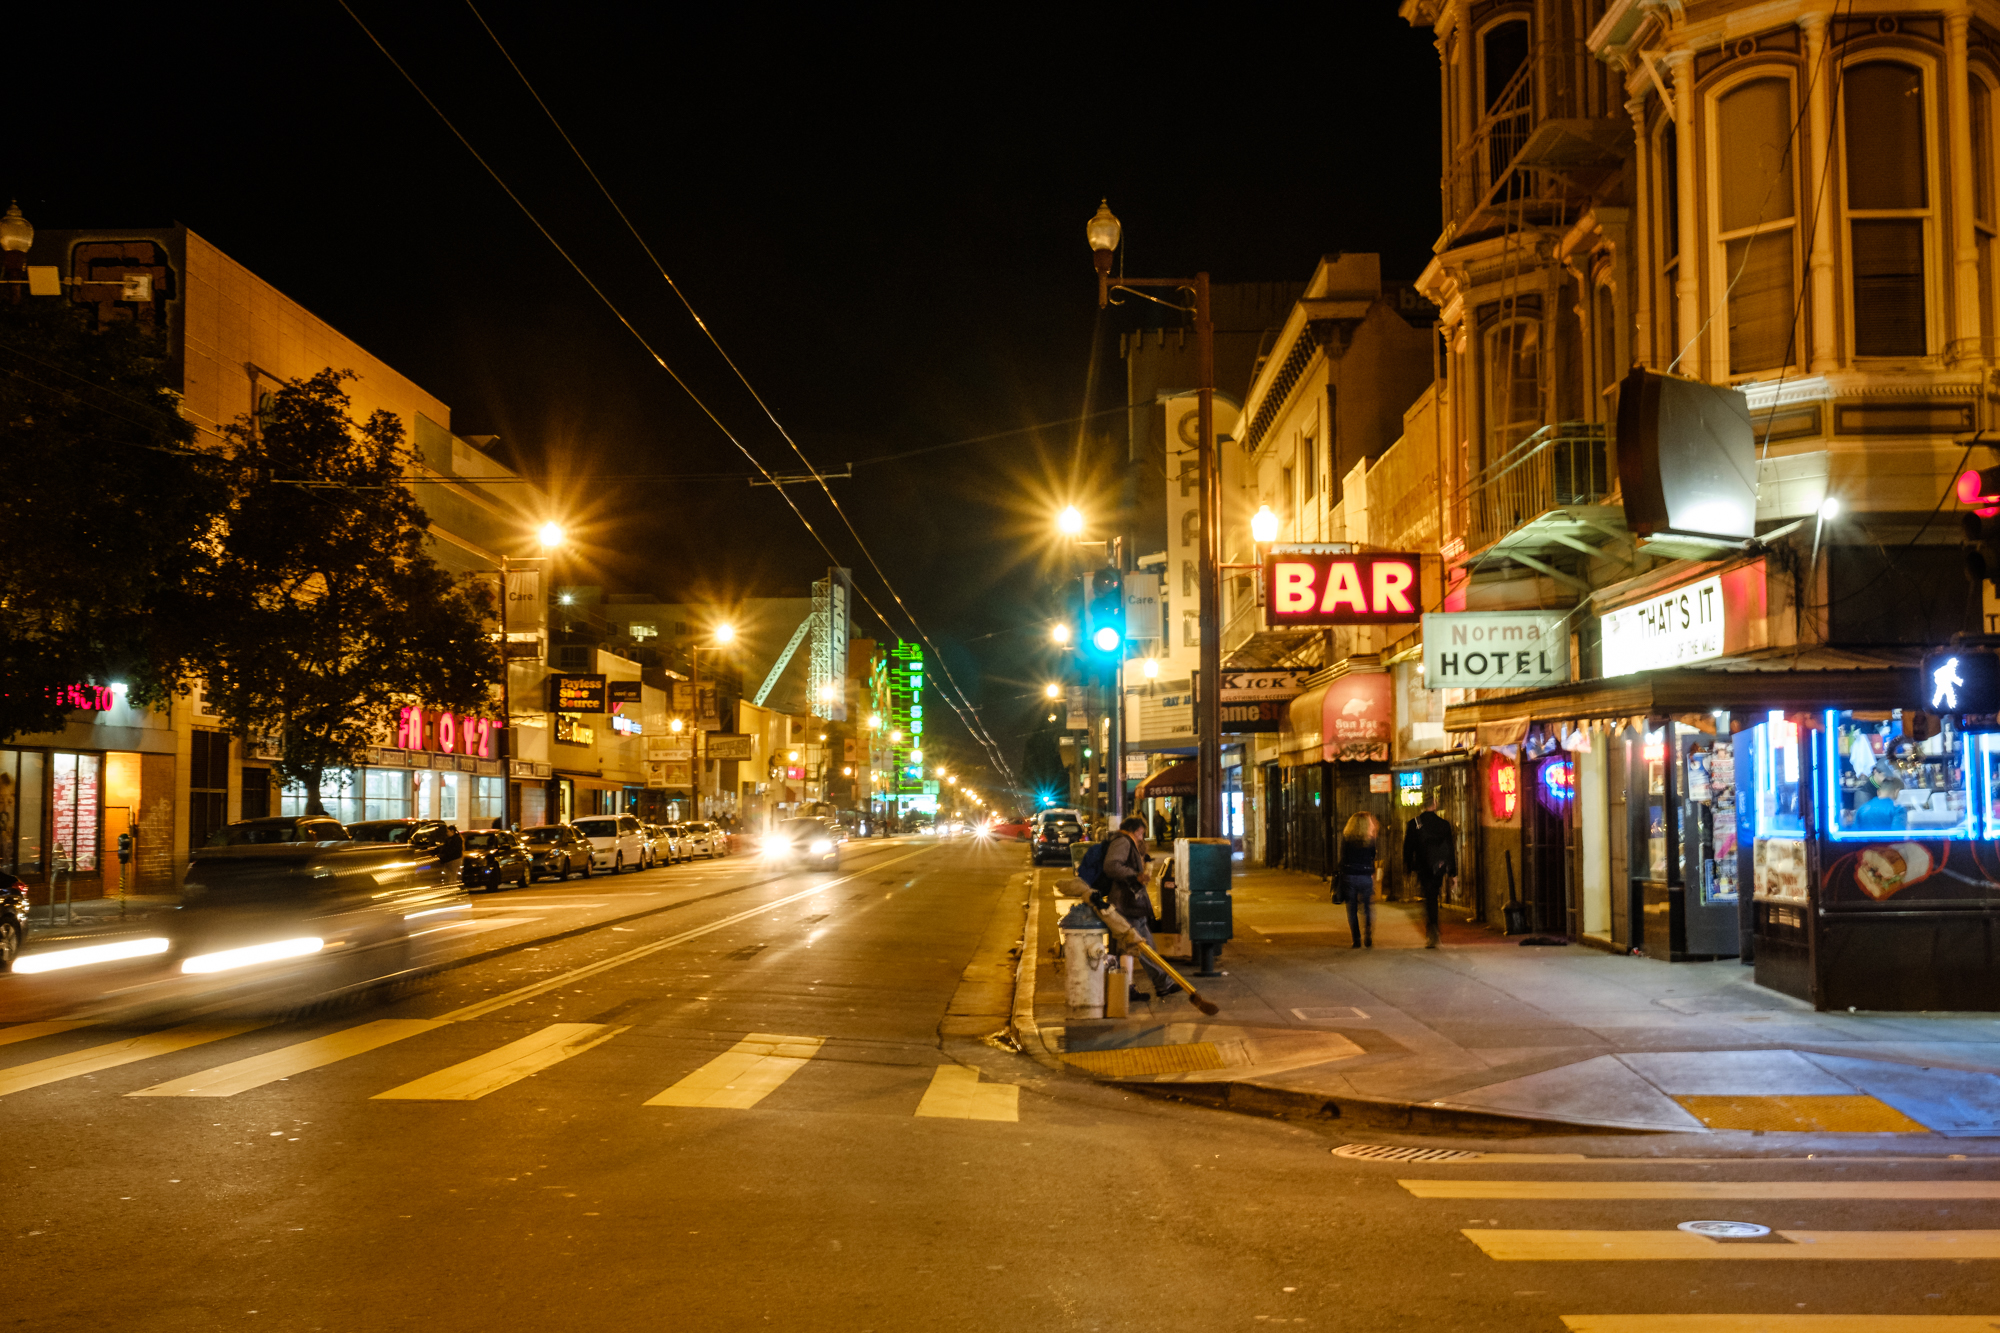
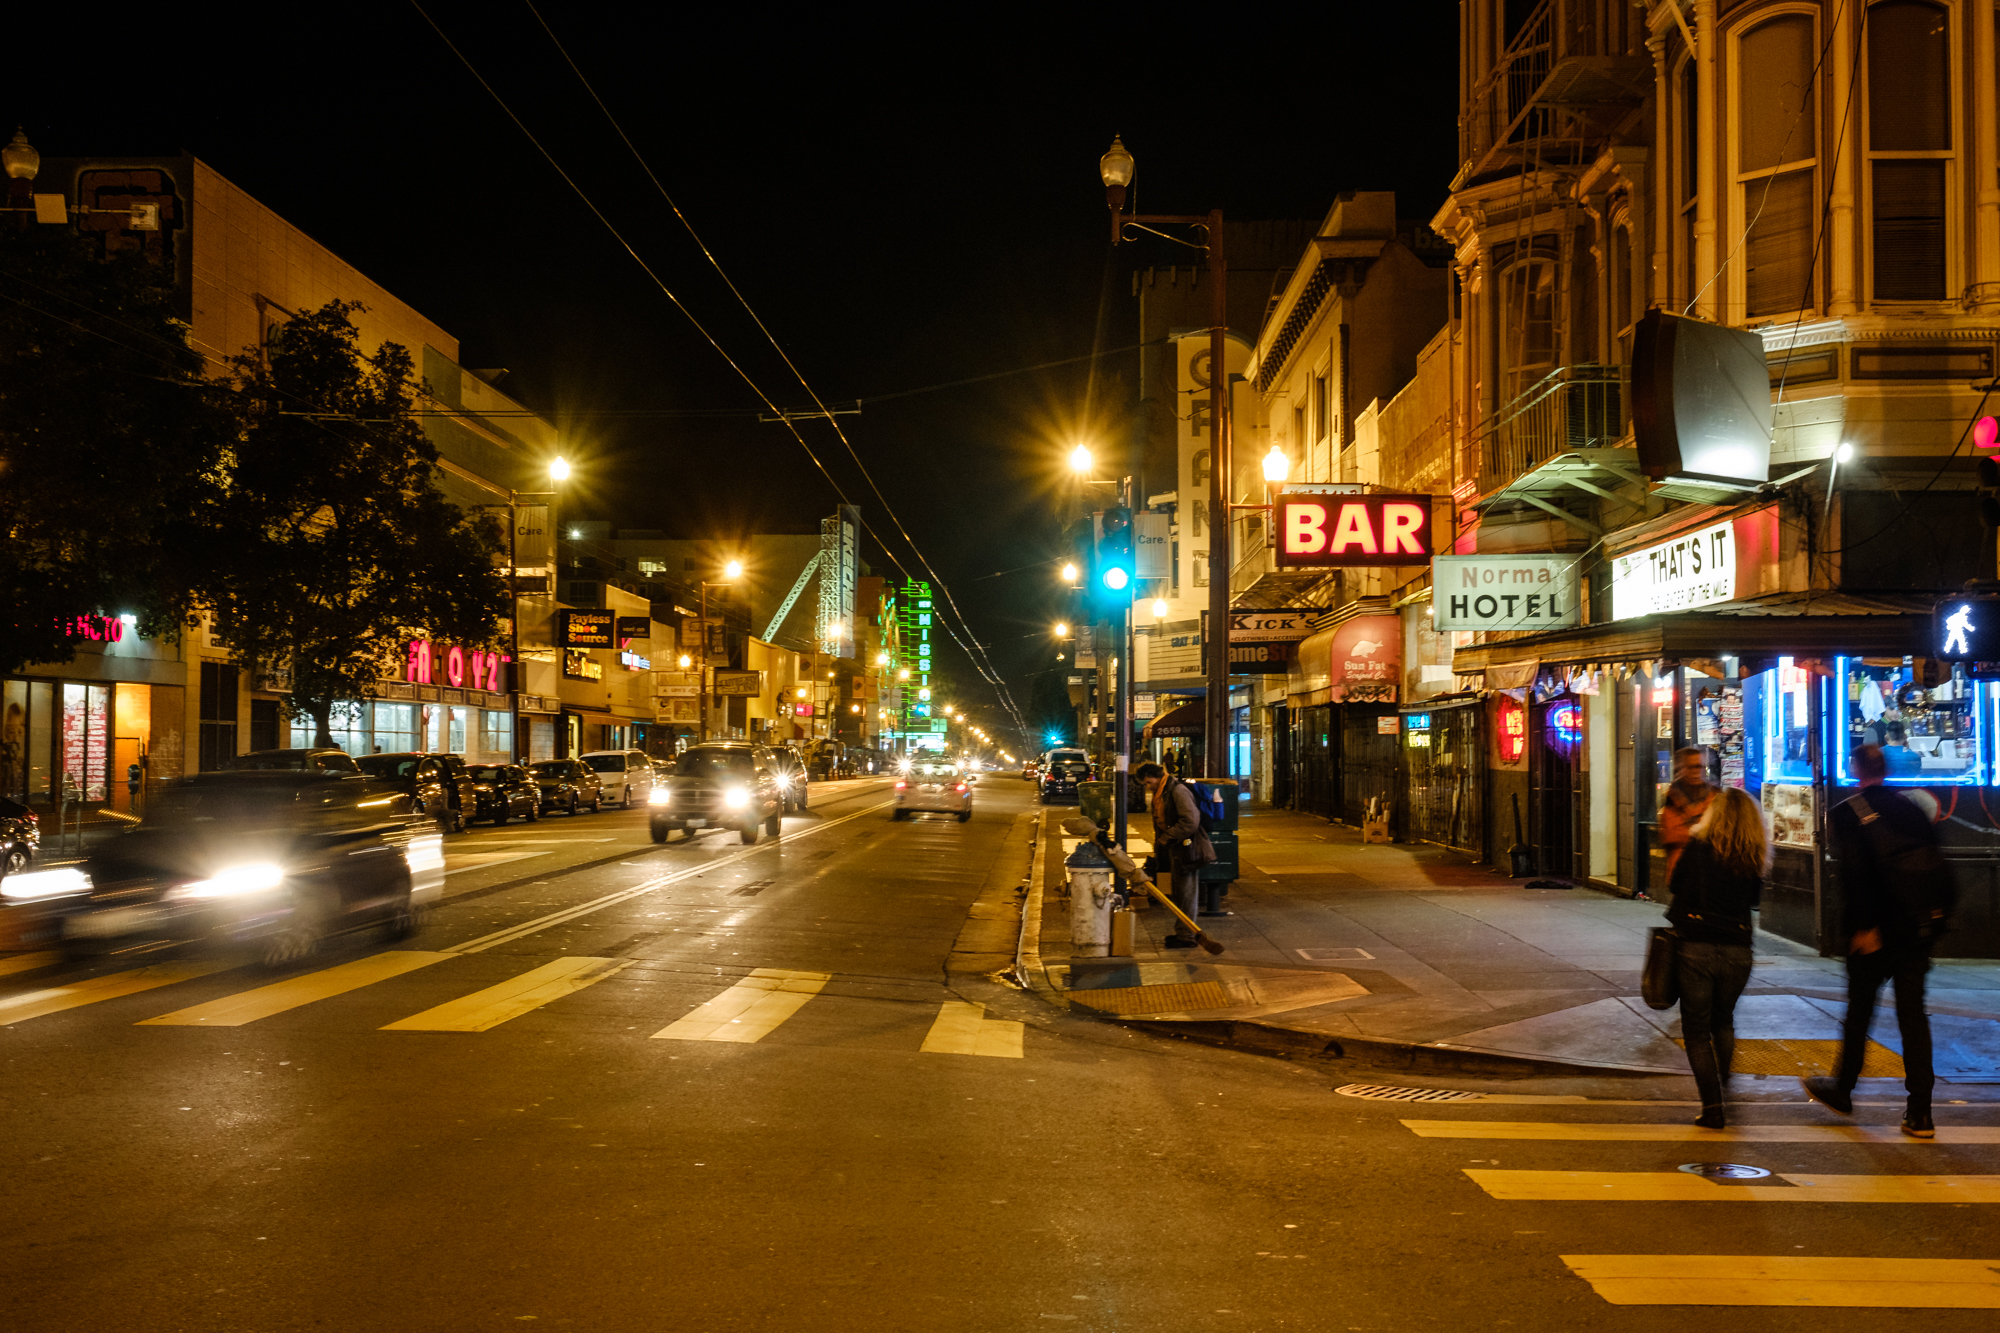
Above you can see the two bursts of approximately 10 shots I did at shutter speeds of 1/8 and then 1/4 to get more movement in the cars. The starred frames are the ones sharp enough to use and the ones flagged with an X are too blurry. (Click the β€œNext” arrow to see the two sharpest frames.)

To gain a little more stability, here’s a more advanced technique: If your camera has a strap, wrap the strap around your neck, and then extend your arms and the camera until the strap is taut (see below). The tautness will help you keep the camera a little more stable while shooting your burst.

And as for all those extra photos, you don’t necessarily need to delete them. It will require more editing afterward, but you could see how they look as an animated GIF. That is my second reason to shoot in burst modeβ€”I love creating little GIFs or flip books of these moments.

Animated GIF created from a burst of photos.

Animated GIF created from a burst of photos.

Grounding for stability

Of course, everyone has their limit to how steady they can hold a camera. I can typically shoot as slow as 1/4 second, but if I need to go 1/2 second or 1 second, I’ll tuck in my arms and try to lean against a wall to create more stability. Breath in and then trigger that burst on the exhale. Your hit rate will be substantially less with these longer exposuresβ€”maybe 1 in 10 frames will be sharp enough to use.

I typically don’t advise hand-holding for exposures longer than 1 second. When opening the shutter for that long, you need find something solid to place your camera on. Be creative. In an urban environment, find stable objects like we used in NYC. In the wilderness, use the ground, a boulder, a ledge, a tree stump, a sturdy branch, etc.

Hand-held at 1/15.

Hand-held at 1/15.

If you happen to have a cable release, greatβ€”use it. But chances are, if you forgot your tripod then you probably didn’t bring your cable release! In that case, use the camera’s self-timerβ€”generally 2 seconds is sufficient. That way any vibration caused by you pressing the shutter release will subside before the shutter opens.

Also, many modern cameras have a built-in intervalometer. This is a good solution for shooting car trails, or anything else with lots of constant motion. When using the built-in intervalometer, turn off the self-timer. Set the interval timer to fire every 2 seconds for 10 to 20 frames or more. The first shot might be blurry because of manually triggering the camera, but the subsequent ones should be sharp.

I hope these tips will help you keep on clicking for longer exposures even when you forget your tripod. We had so much fun that night that we are thinking of offering an annual no-tripod night walkβ€”stay posted for that!

Traveling light

Lastly, one final tip. If you didn’t β€œforget” your tripod but rather just don’t like the idea of carrying one around, then at least consider investing in a travel or lightweight model. Even though the above tips can save your night, using the right tool for the jobβ€”a quality tripodβ€”will guarantee you get the steadiest shot possible.

Our favorite travel tripod at NPAN is the Gitzo 2545, which weighs only 4 pounds and can hold up to 26 pounds of gear (which is well under pretty much any DSLR and lens combo). This tripod can easily fit into a messenger or tote bag and is a professional joy to always have with you. It is pricey, but that’s because it’s one of the best. Moreover, it will last you a lifetime.

If you are on a budget, check out the Manfrotto 190go! tripod (available in aluminum or carbon fiber), which you can match with the head of your choice.

Gabriel Biderman is a Brooklyn-based fine art and travel photographer, and author of Night Photography: From Snapshots to Great Shots (Peachpit, 2014). During the daytime hours you'll often find Gabe at one of many photo events around the world working for B&H Photo’s road marketing team. See his portfolio and workshop lineup at www.ruinism.com.

Upcoming workshops from National Parks at Night

Holiday Special: Tips for Getting the Most Explosive Fireworks Photos

Unless you live in the upper or lower latitudes, you can do night photography pretty much any day of the year. But opportunities for fireworks photography arise only every now and thenβ€”particularly, in the U.S., on and around Independence Day.

With that in mind, National Parks at Night wanted to offer some tips for those of you who might be heading out this weekend with cameras and tripods and perhaps some trepidation.

One thing to note: You’re in luck! This year Independence Day is falling right smack in the middle of a full moon, affording you skies as dark as local conditions allow.

Another note: Fireworks are prohibited in national parks. However, many other National Park Service units (especially national historic sites and national battlefields) hold special events over this holiday. You can photograph flag displays, battle reenactments, parades, etc. For more information about what’s going on near you or near where you’re traveling, a great resource is the National Park Service Event Calendar.

NPS Photo

NPS Photo

Perhaps the best-known of those celebrations, of course, is the fireworks display at the National Mall in Washington, D.C. The show is launched from the Reflecting Pool in front of the Lincoln Memorial. Various vantage points in the area allow you to frame the fireworks along with the U.S. Capitol, Washington Monument, Vietnam Veterans Memorial, Martin Luther King Jr. Memorial, and so on.

Also, just because you can’t see fireworks in a national park doesn’t mean you can’t see them from a national park. For example, Bar Harbor, Maine, hosts a popular show over Frenchman Bay, which can be seen from many spots in Acadia. One of the hippest viewpoints? On top of Cadillac Mountain!

Now, from the NPAN crew, a few tips for getting some explosive images, no matter where you decide to photograph them.

Β 

Lance Keimig:

I want to start this off by pointing out that fireworks as a subject has been done extensively. So do a lot of thinking and a lot of experimenting to find a new way to approach the subject. I always advise to move beyond the clichΓ©s, and with fireworks, you have your work cut out for you.

That said, I have found that the most interesting photos include the spectators, illuminated by the glow of the fireworks. Also, be judicious with long exposuresβ€”it is easy to overdo it and include too many bursts in one shot, which can be overkill.

Β 

Gabriel Biderman:

Arrive early to stake out a good vantage point. This is especially important for fireworks shows in major cities, where photographers show up early in the morning to plant their tripods in the perfect spot. It’s like being first in line to a popular concert.

Scout the location and look for landmarks, bridges or other interesting foreground elements to give the image scale and drama. Often fireworks are shot over waterβ€”include the water and get fantastic reflections.

Β© Gabriel Biderman

Β© Gabriel Biderman

You will be surrounded by people, which I do like to include in the image, but watch out and make sure they don’t bump into you and knock your tripod over. Also, use a lens shade to prevent flare from street lights.

Lastly, be aware of any downward smoke, because it can obscure fireworks orβ€”if you are too close to the showβ€”can just smoke you out! So strategically, try to avoid it physically and in your shots. As the show goes on, the smoke tends to linger and gather lower to ground (launch location). To compensate, I might shoot very wide and include the crowd or subject matter at the beginning of the show, but then shoot higher and tighter in the sky the more the smoke accumulates.
Β 

Tim Cooper:

Use a lens that will allow a composition wide enough to encompass enough of the sky to capture different bursts at different heights. Either focus it to infinity (unless you have a foreground reason not to) or, better yet, use hyperfocal distance to maximize depth of field.

Use a slow ISO (such as 100) and a medium aperture (such as f/8, or even smaller). Experiment. Set your camera to bulb and use a cable release to control the shutter.

Β© Tim Cooper

Β© Tim Cooper

When ready to shoot, open the shutter and cover your lens with a black card to keep out any extraneous light. When you hear the sound of a firework exploding, remove the card from the lens and let the fireworks fly through your frame. When the bursts subside, cover the lens again and wait for the next explosion. Repeat several times, covering your lens in between bursts, so that you can β€œstack” multiple patterns onto one frame.

Β 

Matt Hill:

If you want to shoot and enjoy the show, then your intervalometer is your best friend. Or maybe your wing-man. (Pick whichever analogy works better for you.)

First, test for the right exposure. You can choose a fast shutter speed to capture many frames with a few explosions in each, or you can choose a long shutter speed to capture fewer frames with more explosions in each. Then find the right aperture and ISO (using Tim's advice above), and you have your exposure. You can do this pretty quickly, within the first minute or two of the fireworks display.

Β© Chris Nicholson

Β© Chris Nicholson

Once that's done, get the intervalometer configured. Set your interval to 1 second, and the number of photos to infinite or a couple hundred. (You can do the math to figure out exactly how many frames to shoot, but why bother? Just set it to keep firing.) Finally, simply start the sequence, walk away and enjoy the show! When the fireworks are over, stop the sequence.

Voila! You've shot a whole fireworks display while sitting down and feeling like a kid.

Β 

Chris Nicholson:

If the fireworks start before the sky is dark and the sky is too light for a long exposure, it's a perfect time to get a neutral density filter out of the bag. A 3-stop filter (or even less) should do the trick. It will allow you to shoot longer, catching more bursts (and complete bursts), which is kind of key in the sparser, early moments of a pyrotechnics show.

Also, if you know the display is beginning in twilight, try to get an east-facing position, which will give you a darker-sky background than if you were facing west.

Framing can be tricky, because it's nearly impossible to precisely predict where the blasts will occur and how large they'll be. So frame loosely to get everything, then crop to taste in post-production.

Β© Chris Nicholson

Β© Chris Nicholson

Finally... please, please, please keep safety in mind. I’ve been to all sorts of fireworks shows, and one of the most impressive I’ve ever seen and photographed (a few times) was a local β€œpassionate amateurs” display put on in a beachfront neighborhood of my old hometown. Everything is exploding right over you or the nearby water, making it at once spectacular and terrifying. In the few years I attended, I saw a few firework-human near collisions.

Should you shoot this type of event, be sure not to keep your eye stuck to your viewfinderβ€”frame your photograph, then stick your eyes to what’s happening around you. Also, consider wearing eye and ear protection if you’re close to the launch area.
Β 

From All of Us:

All the best for doing some great work, and have a very Happy 4th of July!

Chris Nicholson is the author of Photographing National Parks (Sidelight Books, 2015). Learn more about national parks as photography destinations, subscribe to Chris' free e-newsletter, and more at www.PhotographingNationalParks.com.

Upcoming workshops from National Parks at Night

Use Hyperfocal Distance to Maximize Depth of Field at Night

Hyperfocal focusing is a time-tested technique for maximizing depth of field, which is especially useful with the wide apertures used in astro-landscape photography. Pre-focusing using the hyperfocal distance (HFD) also has the added advantages of ensuring accurate focus in extreme low-light situations, and of negating the need to refocus between every shot.

The hyperfocal distance is the nearest pointβ€”for any given focal length, aperture and camera formatβ€”that will keep infinity in acceptably sharp focus.

For every lens there is an exact point of focus, and an area in front of and behind the focal point, that is reasonably or acceptably in focus. Sharpness falls off gradually as you move farther away from the focal point, until the image is noticeably out of focus. This zone of focus is what we know of as depth of field.

When a lens is focused at the hyperfocal point, the depth of field extends from half of that distance to infinity. For example, if the hyperfocal distance for your lens/aperture/camera combination is 30 feet, then your depth of field extends from half of that distanceβ€”or 15 feetβ€”to infinity.

Most prime lenses have a depth of field (DOF) scale that allows you to pre-focus to the hyperfocal distance. The scale combines the use of distance markings with pairs of numbers representing the f-numbers of the lens, one on either side of the mark representing the focal point. By lining up the infinity symbol on the distance scale with the outer number representing your working aperture, you are focusing the lens to the hyperfocal distance!

This manual focus Olympus Zuiko Shift 35mm lens shows the depth of field scale, and is set to the hyperfocal distance for f/22. By placing the infinity mark just inside the right-hand 22 on the DOF scale, the HFD is set. The actual focal point is a …

This manual focus Olympus Zuiko Shift 35mm lens shows the depth of field scale, and is set to the hyperfocal distance for f/22. By placing the infinity mark just inside the right-hand 22 on the DOF scale, the HFD is set. The actual focal point is a little more than 7 feet, and the depth of field extends from about 4 feet to infinity. The HFD increases as the aperture diameter is increased, and depth of field increases as the aperture gets smaller.

The near distance in the depth of field will be indicated by the inside number or colored line on the DOF scale. The scale provides only an approximation of the true DOF, and for this reason, it’s a good idea to use the HFD for the aperture one stop larger than your working aperture. In other words, if you are shooting at f/4, focus to the HFD for f/2.8, which ensures that infinity will be perfectly sharp, thereby giving you a comfortable margin of error.

Zoom lenses do not have DOF scales, because the DOF changes with the focal length as the lens is zoomed in and out. But if your lens does not have a depth of field or distance scale, you can still use hyperfocal focusing by employing one of the many smartphone apps designed for this purpose. The one shown here is called Tack Sharp, and is easy-to-use, highly customizable, and accurate.

Tack Sharp

Tack Sharp

Once you determine the appropriate HFD, walk off the distance from the camera by counting your steps and place a flashlight on the ground pointed back toward the camera. Focus on the light, and now you’re focused at the HFD. The average adult stride is about three feet, so if your HFD is 30 feet, start at the camera, and walk ten steps into the shot, and that’s where you place the light to focus on.

Don’t worry if your measurement isn’t completely accurate; this is one of the reasons for calculating the hyperfocal distance conservatively by closing down the lens an extra stop. A laser measuring device can also be used to more accurately measure the hyperfocal distance. After HFD is achieved, the focus ring on the lens can then be secured with tape, ensuring the lens will remain properly focused all night. Of course, if you change apertures, your HFD will change, and you will need to refocus.

If this all sounds confusing, rest assured that once you have your lens focused at the HFD, you can leave it there as long as you use the same aperture. Those with low vision or who have difficulty focusing at night should consider pre-focusing their lenses before dark.

Lance Keimig has been photographing at night for 30 years, and is the author of Night Photography and Light Painting: Finding Your Way in the Dark (Focal Press, 2015). Learn more about his images and workshops at www.thenightskye.com.

Upcoming workshops from National Parks at Night