Prepping an Image in Lightroom for the Printer or the Lab

Last week Gabriel Biderman wrote a post about making printing part of your photographic process. I loved it. Reading it brought me back to my earliest days of photography. As it is for Gabriel, printing was always a huge part of my creative process. An image wasnโ€™t complete until I mounted and framed the finished print and shared it with others.

Now, in this post, Iโ€™ll go over the modern tools and techniques so that you, too, can feel the satisfaction of a finished print.

Lower Manhattan skyline from Brooklyn. Fuji X-T2, 16-55mm f/2.8 at 21mm. 25 seconds, f/6.4, ISO 200.

Tools of the Trade

Although you donโ€™t need an overly robust computer to print your images, you do need a good computer monitor. Why? One word: WYSIWYG (What You See Is What You Get).

A quality monitor, like the BenQ SW240, is the first step to a quality print.

Todayโ€™s monitors can easily exceed the brightness and contrast that a print can display, so itโ€™s important for us to be working with a high-quality and calibrated monitor. If you are not working with a high-quality, calibrated monitor, you can never expect your prints to look like what you see on screen.

Every choice we make when editing our images depends on what we see on our display. If the monitor is too dark, weโ€™ll adjust our images so they end up being too bright. If the monitor is too contrasty, weโ€™ll force our images to end up being overly flat. It just canโ€™t be overstated how important using a good, calibrated monitor is to the editing process.

Here at National Parks at Night, we love our BenQ monitors. They cover 99 percent of the Adobe RGB color space and have the manual controls necessary to perform an accurate calibration. Both of these qualities are necessary for them to be considered high-end photography monitors, but they also go a step further by being calibrated straight out of the box.

For less than $400 you can get the BenQ SW240 24" Photovue. For just a little more you can upgrade your screen real estate to 27 inches with the SW2700PT.

Even the best screens in the world, however, will drift out of calibration. Despite starting off accurate, they drift into being too bright, too dark, off color, or displaying too much or too little contrast. So it is essential that we continue to calibrate our monitors as we use them.

Our favorite colorimeter, the X-Rite i1Display Pro. We use this on our monitors at home, and on our workshops too, for calibrating TV displays and projector/screen combos in the meeting rooms.

I have my monitors on most of the day and calibrate them about once per month. If you have your screen on constantly, then you might consider calibrating more often. Regardless of how often you keep your monitors lit, you should certainly calibrate them just before you begin a new printing project.

There are many excellent calibration solutions out there, but we have settled on the X-Rite i1Display Pro to keep our monitors in line. Whichever system you choose, youโ€™ll get some sort of colorimeter and the software to run it.

Once you install the software, youโ€™ll be guided through the process of calibrating your own monitor. At the end of the process, which usually takes only a few minutes, youโ€™ll be asked to save the profile. Craft the name so that it includes the monitor model and the current date so that you can keep track of when you last calibrated. For example: โ€œBenQ SW240-12-15-2018.โ€

Printing With a Lab vs. at Home

Once you have a high-quality and calibrated monitor, you can rest assured that you are getting WYSISYG. This means you are ready to make some prints! Now you just have to choose between using a print lab or making prints yourself at home. Both avenues have pros and cons.

The Bay Photo Xposer is one of our favorite print formats at the moment, and is a good example of the variety of formats available only from labs.

Using a Lab

For many good reasons, most photographers choose labs for their prints rather than making them at home. Why? Because there are several advantages that are widely attractive.

To begin with, there is no upfront expense. No need to run out and buy a printer, stock up on inks or purchase a small raft of paper. Using a lab is also less frustrating and less time-consuming. This allows the photographer to focus on their work behind the camera rather than spending more time in front of the computer.

While there are advantages to printing at home, saving time (and perhaps even money) is not one of them. For those who want a no-hassle printing solutionโ€”use a lab. And be sure to choose a good one. If you donโ€™t, youโ€™ll end up spending more time and money than you expected.

taking time to choose a pro lab to make your prints is a decision youโ€™ll never regret. Your prints will be on the highest-quality papers, they will always be accurate, you will have a wide variety of formats to choose from, and the process of ordering and receiving will be streamlined. Just be aware that not all labs produce the same quality prints and deliver as high a level of service.

While there are many excellent pro labs out there, we use and love Bay Photo for all of the reasons outlined above.

The Epson P600 is a good example of a good home printer for great photos.

Printing at Home

Printing at home can be very rewarding, but it can also be extremely frustrating. Inkjet printers (both high-end professional as well as prosumer models) are notoriously fussy. Their nozzles can clog, the paper can jam and sometimes they are just simply bewildering.

But when things are going smoothly, printing at home is pure joy.

The biggest advantage is seeing your images immediately. No waiting! If your print comes out a little dark, itโ€™s a snap to reprint it. Too warm? No problemโ€”adjust the white balance and print again.

Owning your own printer also allows you to easily and quickly experiment with different types of papers. From high-gloss to satin to watercolor paper, there are a host of surfaces and brand options to choose from. Each type has a slightly different look; you may find that you prefer gloss for some types of photography and watercolor for others. Being able to experiment at home makes finding those preferences much easier.

Interpreting Your Capture

This is the fun part! Ansel Adams famously quipped, โ€œthe negative is like the composer's score โ€ฆ [and] the print is the performance.โ€ This means we get to take the original score (our capture) and (re)interpret its performance (through editing).

Whether sending your image to the lab or to the inkjet printer in your digital darkroom, this is the step where you can unleash your creativity. From Photoshop to Lightroom to innumerable plug-ins and stand-alone programs, there is no shortage of technology to help you create the best version of your photograph.

Once you have created your masterpiece, itโ€™s time to get it ready for printing. Weโ€™ll use Lightroom as our example, but most programs will behave in much the same way.

Prepping Your Print for the Lab

If your final destination is the lab, the process of prepping your image is fairly simple. Itโ€™s really just a matter of making or exporting a copy of your file and uploading it to your favorite printing service.

Hereโ€™s how to make the copy:

1. In the Library module, select your image.

2. Choose File > Export, or click on the Export button at the lower left of the screen.

3. From the Export dialog, set your options as follows:

  • Export Location: Under Export To, choose Desktop. This will send the copy to your desktop so that you can upload it to the lab.

  • File Naming: Here you can choose to rename your photograph. Or not. Totally up to you.

  • File Settings: Choose JPEG for image format, Quality 100 and leave Color Space at its default of sRGB.

  • Image Sizing: Ensure that you uncheck the Resize to Fit box.

  • Output Sharpening: Here you can choose the type of paper youโ€™ll be printing on (Glossy or Matte) and level of sharpening you would like to apply. Begin with Standard until practical experience suggests using Low or High.

Thatโ€™s it! Hit the export button and a copy of your masterpiece will land on your desktop ready for uploading to your favorite lab.

Lightroom Export settings for sending an image to a photo lab.

Printing at Home Using Lightroom

Using Lightroomโ€™s Print module is pretty straightforward when you forego the many superfluous options and just get down to making prints.

1. Select your image and then move to the Print module.

2. From the Template Browser on the left, choose Maximum Size.

The Lightroom Print module.

3. Click the Page Setup button at the lower left of the screen. Choose your printer, paper size, and whether you want a vertical or horizontal orientation.

4. Click the Print Settings button, also at the lower left of the screen. (If you use a PC and donโ€™t see this button, then go back to Page Setup, click Properties, then click Advanced.) Here youโ€™ll choose your printer and the settings that are specific to that printer. In general, you should address the following:

  • Color Controls: If the print dialog offers the option of Color Matching, choose the printerโ€™s color controls.

  • Paper Type: Choose Glossy or Matte or any other variation that your printer offers. (For beginners, I highly recommend using paper from the same manufacturer that made your printer. Epson papers for Espon printers, Canon paper for Canon printers, etc.)

  • Print Quality: Manufacturers will have different names describing print quality. Donโ€™t choose Fast, Draft or Economy. Use a setting that produces a high-quality photograph.

  • Borderless: Avoid using this setting. It generally causes more problems than itโ€™s worth. If you want a borderless print, manually trim the paper after printing.

  • Color Options: Some printers will allow you to tweak the look of the image with certain options such as vivid or realistic. Best to play it safe here and stick with the defaults. Experiment as desired.

5. Itโ€™s time to move over to right side of the Print module. The good news here is that because you have chosen Maximum Size in the Template Browser and specified the paper size in Page Setup, most of your work is done. You can move right past the Layout Style, Image Settings, Layout, Guides and Page panels to get to the Print Job panel. In that panel:

  • Uncheck Draft Mode Printing.

  • Set Print Resolution to 360 for an Epson printer or to 300 for any other manufacturer.

  • Set Print Sharpening to Standard for the first print. If the result is overly sharp or too soft, choose Low or High on the next printing.

  • Under Color Management, set the Profile to Managed by Printer.

  • Uncheck Print Adjustment for the first print. If you find your print comes back too dark or too light, then you can return to this setting on your next printing.

Just Do it

Whether you are crafting your own prints at home or sending out your files to off-site experts, making prints of your photographs is a great way to honor the work youโ€™ve put into your craft.

They also make excellent holiday gifts โ€ฆ just sayinโ€™.

Tim Cooper is a partner and workshop leader with National Parks at Night. Learn more techniques from his book The Magic of Light Painting, available from Peachpit.

UPCOMING WORKSHOPS FROM NATIONAL PARKS AT NIGHT

Make Printing Part of Your Process

Do you make prints?

Is it part of your workflow?

When I was getting into photography in the early 1990s, the print always was the final part of the process. We shot on film, edited our contact sheets or slides, and then the best photos were blown up to share with the world.

Let me wax nostalgic about the process in the darkroom so I can lay the groundwork for why I still love the print today.

Darkroom Days

The darkroom was a sacred space to immerse yourself in the process of creating a photograph. It was an incredibly tactile experienceโ€”you turned off all the lights, felt around for the paper, and once you found it, checked to make sure you laid it emulsion side up.

The enlarger was like a huge camera on a crane. You dialed in f-stops on the lens and shutter speeds for the time, and you used filters to bring more or less contrast to the ISO of your paper. And then the magic happened. Nothing will ever beat the feeling of seeing the latent image start to appear after agitating the print in the developer. It was a very hands-on experience. It generally took 30 to 60 minutes to perfect the print. A minimal commitment to the darkroom was at least a three-hour session.

Me feeding the troughs with mural prints (above). Each trough was filled with developer, water rinse, stop, water rinse, fix, water final rinse. The 8x10 enlarger (right) with the final 30x40 print underneath.

The ultimate challenge was making a mural printโ€”something bigger than 20x24 inches. I had the good fortune to study this technique. It was saved for a large negative and the absolute best images in your portfolio. The 8x10 mural enlarger could project against the wall or onto a table underneath. Youโ€™d use roll paper and tape it down flat. And hereโ€™s the fun part: Troughs held all the chemicals, and in order to spread them evenly over the 6x3-foot paper you would roll and reverse-roll the paper back and forth.

The end result of your time in the darkroom was hopefully a portfolio image or a print ready to be matted and framed.

My final prints are stored in archival boxes, organized by theme/subject matter.

Digital Days

Letโ€™s flash back (forward) to the modern process. I flipped to Lightroom for good about eight years ago, and the process can be just as immersive, but without taking up as much space and of course no chemicals!

While it is still a deliberate process, I do miss the hands-on aspect that made you really โ€œwork your negativeโ€ to figure out what you could pull from it. Everything was a physical and tactile task. Through that experience I feel there was a deeper understanding of what we were trying to create.

While there is so much more we can do with software, are we experiencing and understanding the image as much as we used to? I have to wonder: Is our goal the same? Are we processing to print or just going straight to publishing on the World Wide Web?

Sharing has taken on a whole new meaning in this digital world. You can be everywhere instantaneously but then gone in a moment.

Where is your work? Where does it live for someone to pore over?

Is it just going on your Instagram profile page? Or is your gallery of work on 500px, or Flickr, or Squarespace?

As much faith as I have in Facebook for forever storing my memories, I want a better archive than that. Remember all the family albums that weโ€™d flip through or that were passed down to us? These memories are even more precious than the portfolio!

The digital solution to this conundrum is easy, and I hope you are at least doing this: Make books.

Archiving โ€œsnapshotโ€ memories is a must, and is easier to do than ever before.

Every year I put together a family year-in-review. I like the small, 6x8 keepsake books. My wife makes calendars full of last yearโ€™s escapes and escapades. Both are excellent solutions to ensure you have a physical archive that will live on.

Perfecting the Print

If your goal is to create high-quality art, then go beyond publishing your images online. If you want to up your printing game, learn from a master printer. Here is how I did it:

I had been printing in the darkroom for 14 years, and pretty confidently for the last 10 of those. Then I took a darkroom course with one of the master printers of our era, George Tice. If you have never seen his image โ€œPetitโ€™s Mobil Station,โ€ then spend some time soaking in the perfect balance and rich tonality in this masterpiece. And by the way, your screen is not doing justice to the tonal range of highlights and shadows that are showcased in his print.

George taught our whole class to print with a purpose, and he taught us to try to pull out a full tonal range. I was a high-contrast printer at the time and my shadows were level-1 black. By using lower contrast gels I could massage multiple levels of blacks and whites and extend that tonal range. That experience with George Tice elevated my approach to printmaking.

I was lucky enough that year to also snap a shot of George with another master printer and icon of photography: Paul Caponigro. Get one of their books and lose yourself in it.

My favorite picture I have of George Ticeโ€”the master at work.

Two masters of the darkroom: Paul Caponigro (left) and George Tice.

Want to level up your digital printing? Well, the Caponigro family strikes again. John Paul Caponigro took what he learned from his father and applied it to Photoshop pretty much since the softwareโ€™s inception. He is a true master printer of our digital age.

I took JPโ€™s โ€œB&W Masteryโ€ class last year and he โ€œGeorge Ticedโ€ me! He spent a whole day on the different ways that we can โ€œoutput sharpenโ€ to create the finest print. We also spent time talking about the process and immersing ourselves in photo books and our own prints

Poring over prints during John Paul Caponigroโ€™s โ€œB&W Masteryโ€ class.

The highlight of the week, however, was visiting his dadโ€™s studio and having him sharing his work. We spent at least two hours asking Paul about the experience of seeing as well as his process of pulling out ever iota of detail.

I returned home from that workshop reinvigorated and with a deeper focus on working those digital files for inkjet prints.

Showing Your Work

Ask yourself: What is your goal with your images? How do you celebrate your work?

For two of our workshops this year, we were thrilled to host gallery shows that could be shared with thousands of visitors to those parks. And just a few weeks ago we finished our workshop at Sloss Furnaces and they were so impressed with our studentsโ€™ work that they offered to have a gallery show at their visitor center!

Why not finish your project, or showcase your body of work, with an exhibit? It doesnโ€™t have to be in a galleryโ€”plenty of cafรฉs, restaurants and businesses are always looking for artists. Of course, there are your own walls as well. Curate your home, invite people over to really take in your work. Hanging a print on the wall is the ultimate respect you can give to your photography.

To close this out, I want to share my favorite image that I created in 2018.

โ€œReality is outside the skull,โ€ Joshua Tree 2018. Nikon D750, 14-24mm f/2.8 lens. 80 seconds, f/2.8, ISO 1600.

Iโ€™m taking my own advice and making a print with Bay Photo Lab. Their new Xpozer system has this slick spring assembly in the back that lets the print float off the wall. And because itโ€™s so easy to mount and dismount them, I can order more Xpozer Xchange prints and just swap out the assembly. If youโ€™ve been to my house in New York City, youโ€™ve seen the limited wall space I have, so this will inspire me to keep fresh work rotating in.

Seize the Print!

My Favorite Printing Resources

Next week we will continue the printing theme by taking a deep dive into the Print module in Lightroom. Stay tuned!

Gabriel Biderman is a partner and workshop leader with National Parks at Night. He is a Brooklyn-based fine art and travel photographer, and author of Night Photography: From Snapshots to Great Shots (Peachpit, 2014). During the daytime hours you'll often find Gabe at one of many photo events around the world working for B&H Photoโ€™s road marketing team. See his portfolio and workshop lineup at www.ruinism.com.

UPCOMING WORKSHOPS FROM NATIONAL PARKS AT NIGHT

The Iceball Cometh: Getting Ready for Comet Wirtanen with Astronomer Tyler Nordgren

This month, Earth is receiving a very special visitor: Comet 46P/Wirtanen will adorn our night skies for all of December, ready for people to gaze at (likely with naked eyes) and to photograph.

Interested? Then you should get readyโ€”as in, now. The comet will make its closest approach to Earth on December 16, but the best time to view and photograph it may be as early as this coming week.

To get the scoop on what we can expect, I chatted with our favorite astronomer, Tyler Nordgren, author of Stars Above, Earth Below: A Guide to Astronomy in the National Parks. Heโ€™s also the artist behind the popular โ€œHalf the Park is After Darkโ€ national park posters. (Check out his website, tylernordgren.com, for more info on everything he does.)

If youโ€™ve been reading this blog for a while, you may remember Tyler from one of our very first posts. Weโ€™re also thrilled that heโ€™ll be joining us and Atlas Obscura to co-lead our trip โ€œDeath Valley After Dark: Astronomy and Photography in the Backcountry,โ€ which begins in just a few days. (While there, we should get great views of the comet. Stay tuned to our Instagram feed!)

Below, Tyler talks about Comet Wirtanenโ€”everything from where and how to find it, to where and how to photograph it, and more.


Chris: Why does this comet have astronomers excited?

Tyler: Comets are one of those amazing phenomena where every single time one of them shows up in the sky, itโ€™s always different.

Throughout human history, the sky has always been something that was thought to be eternal and unchanging. The stars always had the same constellations and those constellations came back each year at the exact same time. But comets would show up out of the blueโ€”or out of the blacknessโ€”and when they did, you could see these great big tails sweeping across the sky, sometimes from horizon to horizon.

So every time one of these comes along, you never know exactly what youโ€™re going to see. You get one with naked-eye visibility maybe once every decade. I definitely know itโ€™s been about a decade since the last one I saw with my naked eye, so Iโ€™m really excited about this. And if it gets more people curious and going outside, looking at the stars, and getting out to dark locations, then all the better.

You can see photos that have been made of 46P/Wirtanen so farโ€”mostly in the Southern Hemisphereโ€”by clicking on these gallery screen shots of Flickr (above) and Spaceweather.com (right).

You can see photos that have been made of 46P/Wirtanen so farโ€”mostly in the Southern Hemisphereโ€”by clicking on these gallery screen shots of Flickr (above) and Spaceweather.com (right).

Chris: A lot of times in the past weโ€™ve heard thereโ€™s going to be a comet and then something happens to itโ€”like it breaks up on the other side of the sunโ€”and we never see anything. Is Wirtanen pretty much a guarantee?

Tyler: Thereโ€™s this quote: โ€œComets are like cats; they both have tails and they do exactly whatever they want.โ€ So yeah, there have been loads of comets that have been announced to the public that in the end werenโ€™t visible at all.

But this one weโ€™ll see. In fact, people are already photographing it. Itโ€™s been visible in the skies of the Southern Hemisphere already, and thatโ€™s only the beginning of the show. As it moves closer to both the sun and Earth, and as it gets brighter and bigger, it will be moving into the skies of the Northern Hemisphere.

This is something that will be coming into view for those of us in the continental United States over the next two weeks, and if you are lucky enough to be within driving distance of some really dark skies, you should be able to set up a camera and capture this thing. Itโ€™s going to be bright enough and big enough.

Chris: This should be pretty exciting for photographers. This is not a common thing that we get to shoot.

Tyler: Right! In fact, my first attempt at astrophotography was in 1997 when Comet Hale-Bopp came along. That was the perfect comet because it was naked-eye visible for almost a year. You could see it from New York City. Especially back in the day when everyone was shooting on film and you needed time to develop it, look at the prints and then go out and try it again, you had a lot of opportunity to really hone the shot. Thatโ€™s actually when I first got my interest in night sky photography.

NASA offers a fun breakdown of what happens to a comet as it approaches the sun, enabling us to see it from Earth.

Chris: What will Wirtanen look like?

Tyler: Comets are balls of dirt and ice. They have very elliptical orbits, so they come close to the sun and then go far away. When they come close, their ice turns into gas, and the dust and the dirt thatโ€™s mixed in with it gets ejected, and you wind up with these great big glowing tails that point away from the sun.

Well, hereโ€™s the problem with this comet. Its elliptical orbit at its furthest goes almost out to Jupiter, and at its closest it comes barely outside the orbit of Earth. We are going to be closest to Wirtanen when itโ€™s at its closest to the sun. So what youโ€™re going to have is the sun, Earth and this comet all lined up. The comet is going to be at oppositionโ€”itโ€™s on the opposite side of the sky from the sun.

What this all means is that its tail will be pointed almost directly away from Earth, so the comet probably will look like a great big fuzzy ball. Thatโ€™s pretty neat, but itโ€™s not what we think of as these giant swooping tails that arch across the sky over 40, 50, 60 degrees. It will be a big fuzz ball, but one thatโ€™s two to three times the size of the moon, so thatโ€™s pretty darn neat in my opinion.

Chris: Where exactly on earth will the comet be visible from?

Tyler: Itโ€™s really moving and brightening at just the right rate, in just the right direction, so that pretty much everybody on earth will have a great shot at this thing.

Chris: Where should a photographer look in the sky to find it?

Tyler: Itโ€™s going to start off early next week in the constellation of Eridanus. As you see Orion rising in the east, lying on its side, the comet will be rising before it. At around midnight, looking south, it will be just off to the right of Orion toward the west of the constellation, and it will be moving northward and passing by Taurus. It will be going to The Pleiades, and eventually around Christmas it will be visible through the constellation of Auriga.

Courtesy of a NASA widget, a view of Wirtanenโ€™s route on its 2019 visit near Earth.

Chris: How dark does the sky need to be to see and shoot Wirtanen? Will we be able to view this from the suburbs, or do we need to get out into the hinterlands?        

Tyler: Youโ€™re going to want to get out into the hinterlands. Currently Iโ€™m seeing the comet as maybe around 4th magnitude or 5th magnitude, and itโ€™s predicted to get to 3rd magnitude.

For those who may not be familiar with the magnitude scale, the smaller the number, the brighter the object is to the human eye. In a dark sky location, a pristine location, we can see stars as faint as 6th magnitude. So for this comet getting to 3rd magnitude, thatโ€™s like Polaris. That should be easily really bright.

The problem is, it wonโ€™t be a point of light. All that light, all that brightness, will be spread out over an area a little larger than a full moon, and up to three times larger. So itโ€™s like taking a 3rd magnitude star and smearing it out over this large space.

For that reason, if youโ€™re someplace with light pollution, the comet will probably appear too faint. So you really want to get out to as dark of a location as you can, so that that background sky is as dark as possible.

If you want to determine the best dark-sky areas near you, check out DarkSkyFinder.com, which maps dark sky areas around the globe.

If you want to determine the best dark-sky areas near you, check out DarkSkyFinder.com, which maps dark sky areas around the globe.

Chris: How will the moon cycle affect the best time to see the comet?

Tyler: Next week is going to be new moon, and thatโ€™s when you have your darkest skies, your darkest background. But after that, the moon starts to come into the sky. By the time the comet is at its closest to us, about December 16, the moon will be brightening up the sky and probably making the comet harder to see with your naked eye. But at that point you should probably still be able to pick it out with the camera.

Chris: In terms of exposure, will this be like photographing a dim section of the Milky Way?

Tyler: Exactly. Your camera will pick up more light than your eyes will. As an astronomerโ€”especially when it comes to comets, I donโ€™t want to say anything definitivelyโ€”but I feel like I can honestly say that there should be no doubt your camera will be able to capture this.

Comet 46P/Wirtanen, courtesy of Knight Observatory, Tomar, Portugal.

Chris: Should photographers just use whatever exposure they would for a general star photo?

Tyler: Yes. The cometโ€”unlike stars or galaxiesโ€”is moving against those background stars. So from night to night itโ€™s actually moving from the south toward the north, which means as itโ€™s rising from the east, it will be moving from southeast to eventually northeast. By the time we get to the end of the month, the comet will have moved so far north that it will have become whatโ€™s called circumpolar, which means it will never actually set behind the horizon over the course of the night.

So it will be moving around quite a bit, but for the next week or so it will be slow enough that in a typical exposure that you would use to capture stars or the Milky Way, the comet probably would not appear to move relative to the stars.

Now, I have seen predictions that say by the time it gets to be the closest to usโ€”so, around December 16โ€”it will be moving fast enough so that while looking at it maybe through a pair of binoculars or a telescope, you might actually be able to pick out its motion against the stars with your own eye. So at that point you should be aware of the fact that during a long exposure the comet might show some movement in a long exposure, and you may have to compensate for that.

Chris: Because itโ€™s moving around so much, it sounds like that will allow for different creative possibilities, and different composition possibilities, every night.

Tyler: Right. In fact, one of the things that Iโ€™d recommend is starting early next week, go out at a certain time every evening and photograph this thing as it moves from night to night. Then you can composite all those photos together to create a multiframe exposure, or a time-lapse. Heck, if you do a really good job of this you could probably even create a movie of the comet moving against those background starsโ€”and itโ€™s going to be moving through some really neat stars.

Also, think about the focal length of your lens and what kind of field of view youโ€™re going to have. If youโ€™ve photographed the moon, how big does the moon look in your field of view, depending on what lens you use? Imagine the comet in a similar wayโ€”itโ€™s currently about the size of a full moon, but eventually will be possibly two or three times larger.

Comet 46P/Wirtanen, courtesy of Victor Ruiz, Siding Springs Observatory, Australia.

Chris: How about shoot locations? What national parks might be best for photographing Wirtanen?

Tyler: Youโ€™re looking for a combination of dark skies and clear skies. There are some wonderful dark skies all around the Great Lakes, places in Michigan like Sleeping Bear Dunes National Lakeshore, but you can get some terrible weather up there right about now. So my suggestion would be to head to the clear, dry parks of the American Southwest. The best park will be Death Valley. And Great Sand Dunes could be really niftyโ€”to be there amongst the sand dunes, with the Sangre de Cristo Mountains off toward your east just as your comet is coming up.

The last comet I photographed was in December 2007, and I photographed that in Chaco Culture National Historical Park, amongst some of the ruins at night. Iโ€™d really recommend places in the Colorado Plateauโ€”pretty much any of those places with a good view toward the east and the Rocky Mountains when the comet is rising. That will give you a good opportunity to capture the comet against some interesting landscapes.

Chris: Itโ€™s been a great couple of years for astronomical events. Last year we had the solar eclipse, this year we have the comet. What might be coming up next year that photographers will be interested in?

Tyler: Thereโ€™s going to be a total lunar eclipse that comes along January 21. Everybody in North and South America should have a wonderful view. If you havenโ€™t seen the moon turn that wonderful dark blood-red as it goes into Earthโ€™s shadow, this is going to be a perfect opportunity to see and photograph it.

We also have a couple of solar eclipses for those folks who caught the eclipse bug from last year. There will be a total solar eclipse in southern South America on July 2. Youโ€™ve got to be in Chile or Argentinaโ€”the path of totality will be visible only across the Pacific Ocean and then over those two countries. Iโ€™ll be co-leading a trip in Chile for this eclipse, with a group called Betchart Expeditions, which partners with The Planetary Society.

Then there will be an annular solar eclipse happening right about Christmas 2019. An annular eclipse is when the moon is a little too far away from Earth, so it doesnโ€™t completely block out the sunโ€™s light. That alignment is perfect for getting a ring of fire visible in the sky. That will be visible in Singapore and across parts of the Indian Ocean.

Note: Weโ€™d love to see your photographs of 46P/Wirtanen. Feel free to share them in the comments section below, post them on our Facebook page, or upload them to Instagram and tag us @nationalparksatnight.

Chris Nicholson is a partner and workshop leader with National Parks at Night, and author of Photographing National Parks (Sidelight Books, 2015). Learn more about national parks as photography destinations, subscribe to Chris' free e-newsletter, and more at www.PhotographingNationalParks.com.

UPCOMING WORKSHOPS FROM NATIONAL PARKS AT NIGHT

How to Be Merry and Bright at Night: Our 2018 Holiday Gift Guide

The holidays are upon us, and once again itโ€™s time for us to help you find the best gift ideas for those special photographers in your life. So, welcome to National Parks at Nightโ€™s third annual Holiday Gift Guide!

Weโ€™ve scanned our camera bags, suitcases, computer files and storage cubbies, and compiled a new list of things that help us enjoy our photography and all the conditions we find ourselves in because of it. From shoe dryers to phone apps, hand warmers to training videos, weโ€™ve created a must-have/seriously-want list that will help you with those tough decisions of what to buy for yourself this holiday season. And, looking through it twice, you may even find the perfect gift for the loved ones in your life!

Weโ€™re providing all of our discoveries as a free downloadable PDF ebook, so you can read it and reference it on any device, anytime, anywhere. Inside youโ€™ll find products from major brands such as B&H Photo, BenQ, Bay Photo and Nikon, along with great little finds from smaller companies and startups.

In addition to the product information, the ebook version includes:

  • a lot more photos

  • a few extra discount codes and offers

  • night photography tips from all five National Parks at Night instructors

Help us spread the cheer by posting our guide on your favorite social media channels and share it with other like-minded photographers, friends and nature enthusiasts!

If you prefer to read the guide in our blog, thatโ€™s okay too; weโ€™re also publishing it right here, below. (Though, we will say the ebook version looks cooler.)

Carpe Longa Nocte (seize the long night)!

โ€”Gabe, Lance, Matt, Chris and Tim

Note: If you decide to purchase any of the items in this gift guide, please consider using the links included, as many generate a small commission that helps us improve the National Parks at Night workshop program.


Acratech

GPS

Our absolute favorite ball head that keeps our long exposures locked in! Made in America and weighs in at .75 pounds, but supports up to 25 pounds! It accepts all Arca-Swiss L brackets and quick release plates. We prefer the GPS model with the lever lock, so it wonโ€™t be confused for the other knobs when we are adjusting our ball heads in the dark. If you own a travel tripod with the 180-degree rotating legs, get the smaller GPSS, which holds the same amount but has a smaller base plate so you can collapse the tripod legs around it for travel.

Special offer: Use promo code โ€œNPAN18โ€ at bhphoto.com for 5 percent off the GPS, until December 20.

Anderson Design Group

National Park Adventure Guide Book

Weโ€™ve seen the Anderson Design Groupโ€™s WPA-inspired postcards in all the parks and absolutely love them. Now they have been compiled into a travel-friendly National Park Adventure Guide! It has become our new โ€œpassportโ€ to the parks. Stickers are included in the book for you to place in the appropriate park, once youโ€™ve visited. Each place includes some basic info on the park as well as โ€œ10 Things to Do and See.โ€ There is also a spot for you to take notes, to sketch or to stamp the official cancellation from the parkโ€™s visitor center.

Apollo

Moon Light

Send your night photographer over the moon with this photorealistic LED moon globe! Now you too can hold the moon in your hands, or bring it wherever you go. The Moon Light comes in a variety of sizes from 3.5 to 7.9 inches, giving you plenty of options to illuminate your home. Brightness and color are adjustable by simply tapping the moon. We can imagine using a few of these in an upcoming photoshoot as well!

AstroReality

Lunar Pro

The Lunar Pro is a hand-crafted, hand-painted 120mm 3D model of the moon that is so realistic, you may believe you have grown to cosmic proportions. If you want to study Earthโ€™s nearest satellite in detail, load up their companion Augmented Reality (AR) app to view in real-time interesting facts and details about the geography on the moon. And when you arenโ€™t dreaming of gray space cheese, this is sure to be a conversation starter on display in your office or living room.

Atlas Obscura

Explorerโ€™s Guide for the Worldโ€™s Most Adventurous Kid

We have always been huge fans of Atlas Obscura. With their book An Explorerโ€™s Guide to the Worldโ€™s Hidden Wonders, they initiated us into the mysterious, introduced us to strange places and showed us undiscovered treasures. Now they have upped their game with their latest book, Explorerโ€™s Guide for the Worldโ€™s Most Adventurous Kid. Why keep all the fun for ourselves? Share a copy with your favorite curious youngster. Or for anyone, reallyโ€”plenty there for adults as well. This book is interesting for the kid in all of us.

B&H Photo

Gift Certificate

The most universal gift for any image-maker, audiophile or anyone looking for the latest computers, hardware, software, telescopes or home theater. Available in increments from $25 to $500, a B&H gift certificate is guaranteed to make that certain someone extremely happy! Pro tip: Add a trip to NYC with the gift card and visit B&Hโ€™s 70,000-square-foot superstore where everything is out on display.

Bay Photo Lab

Xpozer Print

Get your images off the computer and onto your walls! Weโ€™re big fans of all of Bay Photo Labโ€™s print surfaces, but traditional print media can be space-consuming to store and costly to ship. Enter the Xpozer, an ingenious new way to display your art. Printed on beautiful Vivid Satin paper that floats off the wall with Bayโ€™s unique aluminum tension hanging system. This provides a cost-effective way to beautifully showcase your work, and is incredibly portable if you need to cart it around or send it off-site. Available in sizes from 16x16 to 40x80 inches.

BenQ

SW240

For the digital photographer, few things are more important than viewing our images on a high-quality, accurate screen. For years, BenQ has been making some of the best monitors available. And for years, we at National Parks at Night have benefited from using their incredibly accurate products. BenQ offers a particularly intriguing model that is within reach of any photographer: The SW240 has all of the qualities of its larger siblings, such as 99 percent coverage of the Adobe RGB color space and out-of-the-box calibration, while sporting the slightly smaller screen size of 24.1 inches. This high-resolution (1920x1200) monitor is perfect for demanding photographers with a smaller workspace. Its lower price tag doesnโ€™t hurt either!

Benro

TrueNight Filter

Benroโ€™s TrueNight filter is ideal for urban and suburban night photographers who desire a more natural look than artificial lighting in the sky. The TrueNight filter will give you a more pleasing color temperature, which is also easier to edit than trying to combat the yellow, orange and green tones from sodium and mercury vapor lighting. Available in 77mm and 82mm screw-in sizes (step-down rings also available for smaller lens filter threads), as well as a100x100mm drop-in.

Best Maps Ever

417 National Park System Units Map

There are over 400 official units of the National Park System! Start planning your next park adventures and checking off the NPS locations with this comprehensive map. Each spot has an icon for a pin to be placed, and trails, rivers, seashores and parkways managed by the National Park System are also outlined. The 2-by-3-foot wall map is heavyweight to last for a lifetime of exploration.

Chimani

Chimani App

If youโ€™re venturing into national parks with a phone or tablet in hand or in pocket, youโ€™ll want to install Chimani before you go. Chimani relaunched this year as one standalone app that features information about 417 units of the National Park Service, including all 60 national parks. Data includes times for sunrise and sunset, moonrise and moonset, and golden hour and blue hour, as well as information on photo locations, with hundreds of example images. Available for iOS and Android. Also look into the Chimani Perks program, a paid membership that avails discounts at and near parks all across the U.S.โ€”hiking and rafting tours, bed and breakfast, hotels, local breweries, restaurants, cafรฉs, gear rentals, gift stores, outdoor retailers and more.

Coast Portland

G9 Inspection Beam Pocket Light

Night photographers and flashlights go together like beans and cornbread, like hotcakes and molasses. Chances are, the night photographer on your holiday list has more than a few flashlights in their kit, and most of them are bright enough to burn a hole in a piece of paper from 3 feet away. For the last 3 years, our workshop attendees have all received a flashlight compliments of Coast Portland. This year, many got a G9, Coastโ€™s diminutive fixed-beam inspection light. This little guy is almost perfect for navigating at close quarters in extreme low light environments or for adjusting your camera when you canโ€™t find the button in the dark. And with a quick DIY hack, it is the perfect light: Just unscrew the cap and place a small piece of tissue in front of the bulb, and you have a diffused, dim light that wonโ€™t spoil your night vision, or your buddyโ€™s shot.

Cosmic Watch

Cosmic Watch App

Want something to do with your time during a long rip or star stack? Download Cosmic Watch for your touch device and dive into learning more about exactly where you are in the cosmos. Itโ€™s both a timepiece that would look great on your desktop at the office, and an amazingly rich and detailed planetarium through which you can learn more about astronomy. Our favorite feature is that the app teaches you about time, and what time means. Itโ€™s heavy, dude. But what do you think about while practicing the art of dilating minutes and hours with your camera during long exposures?

CreativeLive

Night Photography Week

Video learning is huge. The problem is that not all online content is reliable or accurate. You might find what you need on YouTube, but why not invest a little for a vetted and trusted source? CreativeLive continues to produce some of the best online photography classes with world-renowned instructors. National Parks at Night is proud to have partnered with CreativeLive to present five complete courses on night photography subspecialties, one taught by each of our instructors. The courses are available bundled as โ€œNight Photography Week,โ€ or a la carte for the night photographer who wants to learn a specific skill.

DryGuy

Travel Dry

How many times have you been out shooting in the rain, or even shooting on a clear night, when you stepped into a stream or a bogโ€”or experienc anything else that results in wet feet? Few things dampen the outdoor experience more than walking around in soggy shoes and socks. But, ya know, it happens. It often takes a couple of days to dry those shoes out, but you can accelerate the process with DryGuy Travel Dry shoe driers, often completing the task overnight. A workshop attendee gave us a set, and our feet have never been so happy.

eParks

Park Patches

If youโ€™ve ever seen Mattโ€™s National Parks at Night โ€œboy scoutโ€ shirt, or hung out with the National Park Patch Lady (see below), itโ€™s possible youโ€™ve been infected by an enthusiasm to document your adventures with colorful patches. Alas, being night photographers, we sometimes miss the visitor center and donโ€™t get to buy a patch. :-( Fear not, nocturnal adventurers! You can catch up on those missed patches at eParks, as well as pick up a bevy of other cools gifts you may have missed, such as shirts, posters and even the Passport to Your National Parks book for your cancellation stamps.

Hot Hands

Hand Warmers

Having your long exposure night photos ruined by condensation on the front of your lens is frustratingโ€”but avoidable! Condensation on your lens can occur in humid conditions when the lens is colder than the air surrounding it. To avoid or alleviate the condensation, simply warm up your lens by activating two hand warmers, laying them on opposite sides of your lens and securing them with a couple of rubber bands or a koozie sliced down the side. Voila! Warm lens, no condensation. Outside Magazine tests gave the brand Hot Hands the highest marks for chemical hand warmers.

Huckberry

Hand-Blown Whiskey Glasses

Ever wanted to admire some of your favorite national parks through your favorite whiskey or bourbon? Well, youโ€™re in luck. These precious, hand-blown whiskey glasses feature raised topographic impressions of Half Dome, Mt. Rainier and the Grand Canyon, among some other gorgeous global destinations. So crack a bottle of choice libations, and toast your adventurous spirit with friends.

Irix

150mm f/2.8 Dragonfly

Most of the time night photographers gravitate toward wide-angle lenses to capture the grandeur of nature or the city skyline. If you are feeling stuck in your ways or want to create images that stand out from the crowd, consider shooting with a longer lens to change your perspective. And if youโ€™re into star trails but are too impatient to wait for those long exposures, telephoto lenses get the job done much faster than wide angle lenses! The folks at Irix have just announced a new lens, their 150mm f/2.8 Dragonfly. Like Irixโ€™ 15mm and 11mm lenses, the Dragonfly is a weather-sealed, manual focus lens with their unique focus lock mechanism. It can produce 1-to-1 magnification scenes, but also makes a great night-portrait or medium telephoto lens. Available now for pre-order.

Ken Burns

The National Parks: Americaโ€™s Best Idea

The magnum opus of national parks documentaries. This six-episode series details how the idea of saving and preserving wild spaces was born and popularized, and how the idea and its execution evolved through the 20th century. Learn about the people and places that literally changed the world.

Light Painting Brushes

Universal Connector

At the heart of the Light Painting Brushes (LPB) system is the deceivingly humble Universal Connector. Simply add this to any flashlight from 0.975 to 1.5 inches in diameter and you have a snoot to control the spill of light exiting your flashlight. Itโ€™s tiny, so it wonโ€™t take up much space in your bag, and can help you perfect those light painting masterpieces youโ€™re dreaming about. When youโ€™re ready to engage in light writing, pop on any of the dozens of cool accessories from LPB to start crafting light art from thin air.

LuminAID

Solar Inflatable Lantern

We first met the Solar Inflatable Lantern at the Atlas Obscura eclipse event in Durkee, Oregon, in 2017. By day, it charges via the embedded solar panel in 10 to 14 hours. At night, you inflate it to create a diffused cube of light with many, many color options you can cycle through by using the buttons on the top handle. The handle also allows you to hang it in a tree, inside your tent or anywhere you dream up. When deflated, the lantern can store in the bottom of your camera bag and you wonโ€™t even know itโ€™s there.

Luxli

Cello

The Lucie award-winning Luxli Cello takes all the things you love about the Viola and doublesโ€”no, triplesโ€”your capabilities. Itโ€™s twice as wide and as bright. The TLCI is 97 percent from 3000 K to 10,000 K. The Hue mode has saturation control (to dial back juicy colors to within your cameraโ€™s gamut). And they added 150 digital gel filters that apply to any color temperature you choose, making color matching your gelled flashlights or LED panels a breeze. Finally, the built-in Fx mode allows for all sorts of playful options, such as CCT change over time, police lights and fire effects.

Mandorra

Smoke Grenades

Now, we must say these are a no-no within the boundaries of national parks. But in places where smoke effects are permitted, well, now weโ€™re going to make some cool stuff happen. Despite the aggressive names, we prefer smoke grenades over smoke bombs. Many smoke grenades come with a pull tab to activate (like a grenade) instead of lighting a fuse. But the effect, oh, the effect! Backlight or sidelight the smoke with a Luxli Viola for a smooth long exposure effect or arrest it with a speedlite for crispy smoke.

Manfrotto

Befree Advanced Carbon Fiber Travel Tripod with 494 Ball Head

Tired of cheap lightweight tripods? So are we. So thank you to Manfrotto for the Befreeโ€”a high-quality, lightweight travel tripod! Last year we listed the aluminum version, this year weโ€™re happy to list the carbon fiber option. Weighing in at less than 3 pounds, this tripod and head system can handle nearly 18 pounds of camera while extended to its maximum height of 59.1 inches. You may find that this โ€œtravelโ€ tripod becomes part of your everyday gear.

Misty Morning Artwork

National Park Mugs

Enjoy your favorite coffee with (in?) your favorite park, all while supporting an independent artist. A workshop attendee turned us on to these beautiful handmade mugs from potter, painter and illustrator Abbey Stieglitz. Mugs include depictions of Yosemite, Joshua Tree, Grand Canyon, Yellowstone and more. Custom orders available.

Montem

Ultra Strong Anti-Shock Trekking Poles

If youโ€™re going to be trekking to remote (or even semi-remote) places for unique photos, youโ€™ll want to complement your inborn stability with some hiking poles. Particularly when bearing the weight of gear on your back, comfort and safety both dictate having poles for maintaining balance, reducing fatigue, and anchoring yourself on ascents and descents. Look into Montem Ultra Strong Anti-Shock Trekking Poles for a good rundown of desirable features, including low weight, shock absorption and adjustable height.

National Park Service

America the Beautiful Pass

With a deal this good, how could we ever exclude it from our gift guide? For less than a C-note the annual pass grants access to 60 amazing national parks, plus over 2,000 federal recreation sites including national monuments, wildlife refuges, national forests and grasslands, and sites managed by the Bureau of Land Management, Bureau of Reclamation and U.S. Army Corps of Engineers. The pass covers entrance fees for a driver and all passengers in a personal vehicle. The cost of the annual pass is $80, or $20 for seniors over the age of 62. Seniors can also buy a lifetime pass for $80. Passes are free for American veterans, Americans with permanent disabilities and fourth-graders. Now thatโ€™s a deal!

National Parks at Night

2019 Calendar

With National Parks at Nightโ€™s โ€œLong Nights, Beautiful Spacesโ€ calendar, follow 2019 in the night photographerโ€™s way, with all the info you need for scheduling shoots during new and full moons, meteor showers, festivals and more. Each month is adorned with a night photograph from some our favorite places: Olympic, Grand Canyon, Big Bend, Great Smoky Mountains, Lassen Volcanic and Bryce Canyon national parks, as well as Cuba, Devils Tower, Valley of Fire and more.

Biscayne and Redwood Prints

Biscayne and Redwood National Parks celebrated their 50th anniversaries this year. We were honored to be part of their ceremonies that culminated with a group print show of our workshop attendeesโ€™ photographs at both parks, sponsored by Bay Photo Lab. You can help continue to support those parks as well as get some great artwork on your wall when you purchase a print from our online gallery. You can choose from multiple formatsโ€”metal, canvas and paper, all at a plethora of sizes and price points. All profits go to Biscayne and Redwood. Support our parks!

Photography Books

Looking for some national park and night photography inspiration and education that you can always have at your fingertips? Choose from one of the four books written by members of the NPAN team!

  • Photographing National Parks by Chris Nicholson is a portable and concise look at each of our national parks and how to best capture them. Includes best locations, times and great info on each park to help you plan your next adventure.

  • Have someone new to the night? Gabriel Biderman and Tim Cooperโ€™s book Night Photography: From Snapshots to Great Shots (now in its third printing) is a great introduction to night photography, and it inspires you to get out there and seize the night!

  • Want an even deeper dive into the night? Lanceโ€™s book on night photography, Night Photography and Light Painting: Finding Your Way in the Dark, has long been the ultimate tome for those interested in a deep dive into the genre! The latest edition has an amazing chapter on the history of light painting and does an excellent job of balancing theory, history and enthusiasm for taking your night visions to the next level.

  • Light Painting is the most creative expression in night photography, and Tim Cooperโ€™s ebook The Magic of Light Painting is a detailed exploration of all the illuminating possibilities that can happen when we practice the craft.

Night Photography Adventure Workshops

We simply love the outdoors, teaching and helping people get awesome pictures. So weโ€™re super excited that many of our 2019 Passport Series workshops are already full. But we want you to share some of the magic as well! Our Passport workshops in Great Smoky Mountains, Grand Canyon and Lassen Volcanic national parks still have a few openings.

We also have some seats in our Adventure Series workshops. These workshops were developed so that we could visit the varied and limitless beauty that lies outside of our national parks and the more typical workshop schedule. Experience the stark beauty of Devils Tower National Monument, camp and hike the hither regions of Olympic National Park on our Shi Shi Beach Backcountry adventure, or immerse yourself in the culture and night vibe of Cuba. Wherever and whenever it may be, weโ€™d love to have you join us in 2019. Come and help us Seize the Night!

National Park Patch Lady

I Brake For Brown Signs Bumper Sticker

Who doesnโ€™t get excited by those brown road signs? They always point us to something fun, interesting or awe-inspiring. Show your love for our national treasures by sporting this โ€œI Brake For Brown Signsโ€ bumper sticker from our fellow parks enthusiast Sandra Ramos, aka National Park Patch Lady.

Nikon

Z6

We are very excited to see Nikon join the full-frame mirrorless world, and we have put the Z7 through the night paces. Itโ€™s frickinโ€™ amazing, but those 100 MB file sizes make stacking stars a longer process than we prefer. Weโ€™ve been able to get our hands on the Z6 for a only hot minute, but it looks like the perfect companion to bring on our nocturnal adventures. The 24.5 megapixels will still give us tons of image quality to work with, without having to buy a new computer! The ISO image quality is an absolute game-changer. 6400 ISO is the new 1600, and we would not hesitate to use 12800 or even dabble with 25,600. If you are already a Nikon user, get the kit that comes with the FTZ adapter so you can use your current glass!

Palette

Starter Kit

The digital darkroom is far superior to the image-making technology of yesteryear, but letโ€™s admit itโ€”a mouse, touchpad or tablet doesnโ€™t really provide intuitive controls for the sliders, buttons and checkboxes found in image-editing software. Enter Palette! Their system of interchangeable modules of physical sliders, buttons and dials allows you to take easy control of apps such as Lightroom, Photoshop, Illustrator, InDesign and more. Magnetic connections allow you to rearrange the modules however they make sense to you, and the control app allows you to set whatever commands and functions you want quick access to. New to the Palette game? Try starting with the Starter Kit, which features a slide, a dial and two buttons. When youโ€™re ready to grow, simply add more modules individually.

Peak Design

Travel Backpack 45L

The Travel Backpack 45L is the ultimate travel backpack that adapts to all of your journeys. Beautifully, comfortably and simply designed with the single idea that no two trips are the same. The exterior is incredibly durable with easy-to-access pockets and the interior is totally customizable for both photo and general travel. The large camera cube is perfect for a pure photo trip, but the packing cube, tech pouch and larger wash pouch convert the photo backpack into the perfect weekender. Shipping in December!

Photographers Breakthrough

Adobe Lightroom: Inside Library and Develop

Understanding how to organize, find and enhance your images in Lightroom is an essential skill for any photographer. Produced by our colleague and noted author Tim Cooper, the โ€œAdobe Lightroom: Inside Library and Developโ€ video is as beneficial to the first-time user as it is to those who have been using the program for years. This 33-part, 6-hour training video starts at the very beginning with catalog creation and image organization, and ends by demonstrating high-end image enhancement. Concentrating on only the Library and Develop modules allows Tim to fully explain and demonstrate the most relevant aspects of this powerful program.

Special offer: Use coupon code โ€œnightโ€ during checkout for 20 percent off.

PhotoPills

PhotoPills App

Take Your Medicine. National Parks at Night just spent a weekend teaching with and learning more from Rafael Pons, the bard of PhotoPills. Heโ€™s the public face of the worldโ€™s best photography utility app, and heโ€™s here to help. Weโ€™ve used and loved PhotoPills for years, but Rafa took us all, as well as our New York Night Photography Summit attendees, to the next level. The โ€œpillsโ€ are individual utilities to help with different photography tasks. Convert exposures, calculate depth of field, determine where the Milky Way will be, or plan a photo idea from 3,000 miles away so you know in advance when the best time to get the shot will be. Itโ€™s really the only photo app you, and every photographer on your list, needs. Available for iOS and Android.

Shimoda

Explore 60

Creating a photo backpack that wears comfortably, and has smart organizational features inspired by serious backpackers, is a challenge. Fortunately, Shimoda nailed it. Their Explore 60 (it holds 60 cubic liters of gear) has an innovative harness system that adjusts for XL, L, M and S body types. The interior system has many module options, and each comes with a lightweight zipper bag for when you want to just go hiking without your camera gear. Matt lovingly calls his Shimoda 60L โ€œthe Kitchen Sink,โ€ as it allows him to come prepared for almost anything on a workshop. Available in โ€œblue nightsโ€ or โ€œsea pineโ€ colors.

Tether Tools

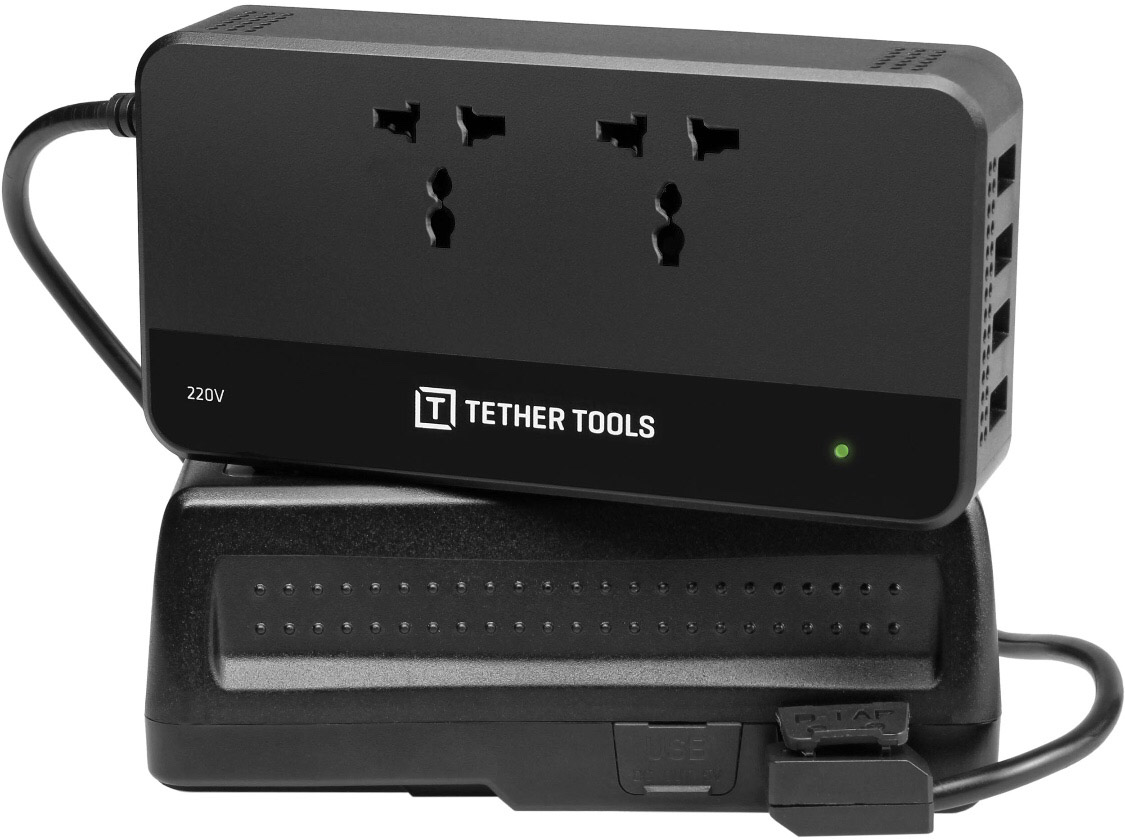
ONsite D-Tap Battery

Tether Tools is known for their studio solutions, and their new ONsite Power system is keenly geared to plugging in your computer wherever your shoot. However, itโ€™s also a great solution if you need to recharge in remote locations. The ONsite D-Tap to AC Power Supply comes with two AC outlets and four USB connections, and when you connect the D-Tap Battery with V-Mount (sold separately) you get a ton of juice! Itโ€™s the perfect solution for day-to-night time-lapses, for long nighttime exposures, or for 2- to 3-day wilderness trips. Charge devices such as laptops, camera and flashlight batteries, tablets, phones and moreโ€”wherever power is needed. TSA approved for carry-on luggage.

Vallerret

Skadi Zipper Mitt Photography Glove

The Folks at Vallerret just donโ€™t slow down. Their tireless pursuit of warm hands brings a crop of new releases this year including a revised version of the Markhof Pro model for mid-winter use, the Alta Over Mitt for Arctic conditions, and the new Skadi Zipper Mitt which provides the warmth and comfort of a mitten with the versatility of a glove. A warm, windproof merino wool and thinsulate lined mitten with an easy-to-grasp zipper covers a form-fitting glove that has touch sensitivity and allows for unimpeded camera adjustments in cold weather. The mitten is fully removable, and has an integrated leash so you donโ€™t have to put them down if you need to momentarily take one off. The mitten has plenty of room for a hand warmer if you need it.

Van Cleef & Arpels

Midnight Planรฉtarium Watch

Not just a watch. Itโ€™s a timepiece. One geared toward aficionados of the night. One that brings the story of the solar system to life on your wrist. Encased in pink gold, the Midnight Planรฉtarium Watch depicts the real-life orbits of five planetsโ€”a serpentine Mercury, a chloromelanite Venus, a turquoise Earth, a red jasper Mars, a blue agate Jupiter and a sugilite Saturnโ€”while a shooting star indicates earthly time. Priced a little over $200,000, which is far less than NASA spends to track the same information remotely.

Western Digital

My Passport Wireless Pro

Want to travel light on your next adventure but still have security for backing up your files? Western Digitalโ€™s My Passport Wireless Pro will make you think twice about hauling your laptop. This hard drive-plus offers direct download via SD slot, or you can plug your card reader into the USB 2.0 slot. From there you can wirelessly transmit and view the files on your tablet or phone. Itโ€™s compatible with both Mac and PC and can charge your USB connected devices as well. Available in capacities of 1TB to 4TB.

X-Rite

X-Rite i1 Photographer Kit

Are you trying to master your color management workflow? If you arenโ€™t, then think again. Starting from a profiled and calibrated neutral setting for your camera and your computer monitor helps you to make better edit decisions. Youโ€™ll have the confidence of knowing that the colors you choose are the ones you will share with the world when you export your masterpieces. The X-Rite i1 Photographer Kit will help make that happen.

Yaktrax

Chains

Named after the sure-footed Himalayan yak, Yaktrax help you get a grip! Night photography presents all sorts of challenges from basics like finding your way in the dark to the technical limitations of pushing your camera to the limit. Slipping and sliding on snow or ice shouldnโ€™t get in the way of getting the shot, and Yaktrax are a simple and affordable solution to the slippery situations you might encounter this winter. They create a solid, secure grip with a patented system of coils or chains that bite into the ice below your feet. We used them last year in Iceland and found that the basic Walk model provided a measure of confidence in packed snow, but the Chains model gave us extra traction on both snow and ice, allowing us to safely get wherever we needed to go in order to get the shot.

YES Watch

Equillibrium

Weโ€™ve always been a fan of the YES Watch, as a tool for keeping track of the times of sunrises and sunsets, moonrises and moonsets, and other similar information while globetrotting for photography. This year YES released a brand new model, the Equilibrium, that brings time tracking to a whole new level. Available with a wide choice of bevels, straps and finishes so you can customize your look.


Happy Holidays!

Remember, just like holidays, and just like gifts, gift guides are meant to be shared! Please feel free to forward this to anyone and everyone you think might be interested. Particularly if itโ€™s someone who buys a gift for you!

And remember, this gift guide is also available as a PDF e-book that includes lots more photos, some exclusive discount codes, and photo tips from all five National Parks at Night instructors. You can download that for free right here:

NPAN 2018 Holiday Guide cover.jpg

Get your 2018 Gift Guide ebook

โ€ฆ for free!

From all of us at National Parks at Night, we wish you and your loved ones a wonderful holiday season.

Tim Cooper is a partner and workshop leader with National Parks at Night. Learn more techniques from his book The Magic of Light Painting, available from Peachpit.

How I Got the Shot: Milky Way and Planets in Lassen Volcanic

Looking across Cinder Cone to the Milky Way, Mars, Saturn and Jupiter. ยฉ 2018 Lance Keimig.

Last summer Chris and I had a chance to spend a few days in Lassen Volcanic National Park in Northern California. Lassen is one of the least known and least visited parks in the West, but it had been on both our radars for a long time. As the more popular parks like Joshua Tree and Yosemite become increasingly crowded, hidden jewels like Lassen Volcanic provide tremendous opportunities for photographersโ€“โ€“or for anyone who wants to explore the wonder of our public lands without being overwhelmed by other tourists.

Lassen peak from Cinder Cone at Sunset. iPhone 6S+.

The Location

Roughly an hour east of Redding, California, Lassen is remote and far from the stateโ€™s major cities, which probably explains its relative obscurity. It certainly isnโ€™t because the park doesnโ€™t have much to offerโ€”quite the contrary. In some ways, the park typifies the High Sierra landscape: rocky, mountainous terrain, rivers, lakes, wildlife, fragrant Jeffrey pines, hot days, cool nights, and clear, crisp air. Add some recently erupting volcanoes to the mix, and perhaps you can start to appreciate what makes this park special.

All four of the major types of volcano are present in the park. Lassen Peak, which the park is named after, is the southernmost active volcano in the Cascade Range. It is a lava dome, and is the largest of this type anywhere in the world. Lassen Peak last erupted between 1915 and 1918. The park also contains composite and shield volcanoes, as well as cinder cone. In todayโ€™s post, Iโ€™m going to write about the appropriately (if unimaginatively) named Cinder Cone volcano.

Cinder Cone from the Butte Lake Campground trailhead. iPhone 6S+.

Nestled in the northeast corner of the park, far from the main visitor center, accommodations and other infrastructure, many visitors to Lassen Volcanic never get to see Cinder Cone. Itโ€™s the youngest volcano in the park, formed only 350 years ago!

Getting to the top of the cone is one of the more challenging hikes in the park, but the solitude and the views of Lassen Peak, nearby Butte Lake and the Painted Dunes below are well worth the effort. Cinder Cone has a relatively rare feature in that it contains two concentric craters, making it twice as photogenic as your ordinary volcano!

Nikon D750, Irix 15mm f/2.4 lens. A 10-frame panorama. All exposures 8 seconds, f/3.2, ISO 100.

The Experience

We arrived late in the afternoon and made the 1.5-mile hike to the base of Cinder Cone from the trailhead at Butte Lake Campground. It was slow going, having to trudge through the forest over the loose, sandy volcanic soil, but when we rounded a bend and first saw the cone appear before us we quickened our pace at the excitement.

The sun was sinking quickly as we began our ascent. Chris was determined to get to the top before the sun set, and we were literally racing the shadow up the side of the mountain. Itโ€™s a testament to how challenging the climb was that the shadow was at many times moving faster than we were. During one of our frequent stops to catch our breath, Chris said that we were experiencing โ€œType 2 fun.โ€ Apparently, misery that is remembered nostalgically is what makes for Type 2 fun. Itโ€™s only in hindsight that you realize you were having a good time. It was worth every minute of the effort, and I was happy to be sharing the experience with Chris as his determination to beat the sun to the top kept me going.

Type 2 Fun. Chris racing the sun to the top of Cinder Cone. Nikon D750, 24-120mm f/4 lens at 110mm. 1/60, f/7.1, ISO 100.

When we finally reached the summit, the scene before us was extraordinary. We were surrounded by an awesome panoramic view on all sides, staring across a 1,000-foot-wide double crater with Lassen Peak to the southwest, Butte Lake to the northeast, and the Painted Dunes to the south.

Our excitement led to newfound energies that had us circling the rim of both the outer and inner craters, but not quite enough energy or madness to descend into the inner crater, knowing weโ€™d have to come back up at some point. The local terrain was spartan, with only a few trees and colorful low flowers dotting the landscape. We spent about an hour and a half alone on the summit, exploring, photographing and waiting for darkness.

The Painted Dunes at sunset from Cinder Cone. Nikon D750, 24-120mm f/4 lens at 34mm. 1/25 second, f/8, ISO 400.

The Night

We knew that once darkness set, we would have a spectacular view of the Milky Way, and that a rare planetary alignment we had witnessed earlier in the trip would present us with a unique opportunity to make a great image.

We were there in early July. Mars was approaching opposition, the point where Earth is exactly between our red neighbor and the Sun. Mars was approximately 40 million miles away from us, compared to its normal average distance of 140 million miles. It was five times brighter than usual and was the brightest object in the sky after the sun and moon. Jupiter and Saturn were not to be left out, as they had just passed their own oppositions.

All of this meant that if Earth was almost directly between the sun and planets, the planets would appear relatively close to each other in the sky. Of course, early July around the new moon is a great time to view the Milky Way too. The best time of year to view the galactic core is when it is at opposition. Can you guess where this is all headed?

As astronomical twilight faded the scene before us made our hearts race with excitement. It was incredible.

We positioned ourselves on the northwest side of the crater so that we could look across it to see the Milky Way and planets rise as the sky darkened. We had a pretty good idea of where the core and planets would appear based on experience and our previous nights photographing in the park. Despite having a good idea of what was coming, as astronomical twilight faded the scene before us made our hearts race with excitement. It was incredible.

As the objects in the night sky brightened, the landscape before us darkened dramatically, and we wondered if we would be able to capture both the crater in front of us and the celestial glory above. We were constrained by the requirement to keep our exposures short enough to maintain the stars as points rather than trails, aperture-limited by comatic aberration, and ISO-limited by high ISO noise.

Of course there are several ways to deal with the differing exposures for ground and sky in astro-landscape photography. One could compromise and have an underexposed foreground and an overexposed sky and make the best of it, or make separate exposures for each at different settings and combine them during post-processing. Because we are masochists, we decided to light paint the 1,000 feet of crater during our 20-second exposure.

The Shoot

Chris and I both follow a similar procedure when we make night photographs. Every image is made by following the same basic steps. They are:

  1. compose

  2. focus

  3. calculate exposure

  4. determine lighting

  5. tweak and repeat

In this case, the composition was fairly straightforward. We knew we wanted the crater in the foreground and Milky Way above it. We aligned ourselves, and set up our cameras about 40 or 50 feet apart. Because the scene was so large, the distance between us made for only a slight variation in the foreground of our compositions.

A few test shots to get the lines right, and it was time to focus. I was using the Irix 15mm f/2.4 lens, which has a convenient and accurate detent at infinity. There was nothing closer than about 50 feet in my foreground, so I knew that I could safely focus at infinity without worrying about anything being soft. I rotated the lens until I felt the detent, and that was it for step 2.

On to exposure. There was no moon yet (it wouldnโ€™t rise for another couple of hours), and only a little light pollution on the horizon from the resort towns surrounding Lake Almanor to the southeast. The standard astro-landscape (ALP) exposure of 20 seconds, f/2.8, ISO 6400 would be about right. I chose to close down one-third of a stop to f/3.2 because I wanted to minimize coma in the bright planets, which were close to the left and right edges of my frame. To compensate, I increased the shutter speed by one-third of a stop to 25 seconds, and made a test.

Test image looking across Cinder Cone to the Milky Way, Mars, Saturn and Jupiter. Nikon D750, Irix 15mm f/2.4 lens. 25 seconds, f/3.2, ISO 6400.

Every ALP exposure is a compromise. The Earthโ€™s rotation limits shutter speed because of the need to maintain star points. The limit is based on sensor size, focal length and the cardinal direction your camera is facing. Increase your shutter speed, and risk star trails instead of points. Open up your aperture to maximum, and risk coma and softness at the edges of the frame, as well as potential depth of field issues with foreground objects. Raise your ISO and the noise increases, especially in the underexposed shadow area common in the foregrounds of ALP images. Itโ€™s up to the photographer to decide which variable to compromise based on experience, equipment, taste and how the final image will be displayed. But I digressโ€”on to the lighting.

The final image. Looking across Cinder Cone to the Milky Way, Mars, Saturn and Jupiter. Nikon D750, Irix 15mm f/2.4 lens. 25 seconds, f.3.2, ISO 6400. Lighting with two Luxli Violas at 3200 K and 100 percent brightness for the entire exposure. Mars on the left, Jupiter on the right. Saturn is hard to make out because it is right in front of the galactic core.

We really didnโ€™t know if it was going to work or not, but there was nothing else to do but try it. We both had Luxli Violas, and the same idea. Usually we set these lights at 1 percent brightness for ALP images, and sometimes even that is too much. We are not usually trying to light the better part of a square mile in 20 seconds.

We set the color temperature to 3200 K and the brightness to 100 percent, opened the shutters, and walked quickly away from the cameras holding the lights toward the crater but tilted upward so that the foregrounds would not be overly bright. The technique worked remarkably well, and after a few adjustments we felt like we had it in the bag.

Wrapping Up

As we approach Thanksgiving and I look back at the images I made this year, this may well be my favorite from 2018. Itโ€™s a unique photograph made in an amazing location, collaborating with a great friend. It took some determination to make it happen, along with the good fortune of being in the right place at the right time. #ISO6400andBeThere

Note: Lance will be back at Lassen Volcanic National Park, this time with Gabe, for our 2019 night photography workshop. Click here for more information.

Lance Keimig is a partner and workshop leader with National Parks at Night. He has been photographing at night for 30 years, and is the author of Night Photography and Light Painting: Finding Your Way in the Dark (Focal Press, 2015). Learn more about his images and workshops at www.thenightskye.com.

UPCOMING WORKSHOPS FROM NATIONAL PARKS AT NIGHT