How I Got the Shot

How I Got the Shot: Car and Star Trails in Great Smoky Mountains National Park

Car and Star Trails in Great Smoky Mountains National Park. ยฉ 2018 Matt Hill.

Car and Star Trails in Great Smoky Mountains National Park. ยฉ 2018 Matt Hill.

Choosing what you want to include in the frame is often an iterative process. Doubly so when shooting at night.

When I was spending some time shooting in Great Smoky Mountains National Park (hint: We are offering an amazing workshop here in 2019!), I was getting to know the placeโ€”finding its essence in the darkest hours.

I drove up to Newfound Gap, anticipating an even more spectacular view under the stars than I had seen in broad daylight.

Using PhotoPills (above), I knew when and where the Milky Way would be. With that info in hand, I planned to be at Clingmanโ€™s Dome earlier for dusk and first darkness, leaving enough time to make my way back to Newfound Gap to shoot the galactic core of the Milky Way.

Alas, the clouds came early.

Nikon D750, Zeiss 15mm Distagon f/2.8. 22 seconds, f/2.8, ISO 6400.

And my first shot was great! Loved those car trails. But the photograph was not a complete story, nor the story I thought should be told. So I decided to light paint the trees in front of me.

Nikon D750, Zeiss 15mm Distagon f/2.8. 22 seconds, f/2.8, ISO 6400.

This was OK, but not good. There was no way to sidelight the trees, outside of rigging myself and descending the steep mountainside.

So I decided to rip a long exposure to capture some movementโ€”to get kinesis in the photo.

Nikon D750, Zeiss 15mm Distagon f/2.8. 8 minutes, f/2.8 ISO 400.

I really liked it. Great tonal range, great movement. But darn, were those car trails calling to me! But they were so โ€ฆ tiny.

So I swapped the 15mm lens out for my trusty Nikon 70-200mm f/2.8 and punched in on that detail. I was aiming to get a good balance between sky and earth, while making the car trails more important.

Nikon D750, Nikon 70-200mm f/2.8 at 70mm. 60 seconds, f/2.8, ISO 6400.

Better. But โ€ฆ Still. Not. Right.

I reframed to reduce the dark foreground and play the composition game. You know, the one where you check your edges, look for balance and ask, โ€œWhat could be better?โ€

Nikon D750, Nikon 70-200mm f/2.8 at 70mm. 60 seconds, f/2.8, ISO 6400.

Ah, now I felt like I had the balance I wanted. Next, all I needed was some motion. And car trails! So I applied the Six-Stop Rule and aimed at 16 minutes. The weather was cool, but not cold. I know my D750 can handle an exposure that long without long exposure noise.

Nikon D750, Nikon 70-200mm f/2.8 at 70mm. 16 minutes, f/2.8, ISO 400.

Nailed it. You know when you get it right.

The clouds passing over the mountaintops; the long, bright car trails lighting up the forest edge; the mild definition in the foreground trees. I loved it. I put on the lens cap and moved on, despite not getting the Milky Way shot Iโ€™d wanted.

But โ€ฆ Patience paid off when I waited out the clouds. :-) Got the other shot anyway!

Nikon D750, Sigma 35mm f/1.4 Art lens. 11 seconds, f/4, ISO 6400.

Matt Hill is a partner and workshop leader with National Parks at Night. See more about his photography, art, workshops and writing at MattHillArt.com. Follow Matt on Twitter Instagram Facebook.

UPCOMING WORKSHOPS FROM NATIONAL PARKS AT NIGHT

How I Got the Shot: Lake McDonald in Glacier National Park

Star Circles Over Lake McDonald. ยฉ 2015 Gabriel Biderman.

Iโ€™m fortunate to visit the Treasure State, Montana, at least once per year. But unfortunately it took me too many years to finally visit the Crown Jewel of Montana, Glacier National Park. There might not be as many glaciers as when the Great Northern Railway cut its path west over 100 years ago, but the three ranges of the Rocky Mountains still carve out some incredibly impressive views.

In 2015, before I saddled up on my motorcycle to ride out to Going to the Sun Road, I synced up with my good friend and fellow NPAN instructor Tim Cooper, who has been leading workshops in Glacier for more than 10 years. In fact, we are very excited to have him lead our first night ventures in Glacier in August and September.

I had only a couple of days to spend in the park, and Tim shared some of his favorite locations, which made the scouting so much easier.  Tim suggested we spend the night at Lake McDonald (below), as it has one of the iconic views in the park.

Scouting photo of Lake McDonald in Glacier National Park.

Scouting photo of Lake McDonald in Glacier National Park.

The Location

Lake McDonald is definitely a popular spot, and it sits about 11 miles into the park on Going to the Sun Road. There are many cabins and campsites that let you take in all of this majestic beauty.

As I walked along the southern shore where most of the boat and kayak rentals are based, it became more and more obvious what kind of picture I needed to make. An epic location requires some epically long star trails! When we aim our camera to the northern skies we can create those jaw droppingly long circular star trails. In order to do this effectively, you need to dedicate at least 1.5 to 2 hours to shooting. So charge up your batteries and Iโ€™ll share with you how I got the shot!

Lake McDonald, my shoot location, is nestled along Going to the Sun Road on the west side of the park.

Lake McDonald, my shoot location, is nestled along Going to the Sun Road on the west side of the park.

The Conditions

The night I took this shot was June 6, 2015. The sun set at 8:35 p.m., but because we were at a higher latitude at the beginning of summer, the twilights lasted almost three hours. I guess I was lucky to actually get a night sky at all! The moon was a waning gibbous of 76 percent, but wouldnโ€™t rise over the horizon until 11:44 p.m., meaning it wouldnโ€™t rise above the mountains until at least an hour later.

Soon after the sky grew dark, I walked out onto the long dock to start shooting. As we entered astronomical twilight, which was to last over an hour, I was amazed to see the clarity of the northern tail of the Milky Way. I was joined by an astro-enthusiast who had his iPad out and was using a star map guide to identify all the celestial bodies that were shining brightly and surrounding us from all sides. It was so dark that the stars were easily reflecting in the calm waters of Lake MacDonald.

The Gear

The equipment I had with me presented a challenge for star-point photography. My lens was a superwide 10-24mm f/4 on the Fujifilm X-T1. The wide was good, as it let me get to a shutter speed of 30 seconds without stars starting to trail. However, we typically like โ€œfasterโ€ lenses of f/2.8 or wider to let in more light and keep our ISOs somewhat manageable.

I had to work with what I had and shoot at ISO 6400 for 30 seconds at f/4. That resulted in definitely a noisy image, but I embraced the grain by converting this โ€œbonusโ€ shot (below) into black and white, and Iโ€™m very happy with it.

My first photo of the night, of the Milky Way floating over Lake McDonald and the distant mountain ranges. Fujifilm X-T1, 10-24mm f/4 lens. 30 seconds, f/4, ISO 6400.

The Shoot

I like nights that give you both complete darkness and moonlight to work with. This enables you to come away with a variety of night images as you explore the many different lights of night.

One thing I love about moonlight is how much color it brings into the night. Dark black skies can be difficult to work with, but a lick of moonlight brings a little blue to the sky.

I felt it was wise to move off the dock and onto more stable ground, to shoot from the terra firma along the beach. The moon was rising, and after taking a few test shots to finesse the composition, it was important for me to confirm that the North Star was still in the shot. It can be difficult to make out the exact placement of the North Star in an image, so before committing to a long exposure, I take a 2-minute shot so I can see how the stars are rotating (Figure 1). That confirms the placement of Polaris in the frame.

Figure 1. Test shot to confirm that Polaris is in the desired spot in the composition.

Figure 1. Test shot to confirm that Polaris is in the desired spot in the composition.

After I confirmed focus and composition, I settled on an exposure of 2 minutes, f/4, ISO 3200. I chose this setting because I was looking for the optimal image quality for star stacking and had noticed that the Fujifilm cameras quickly get color noise after 2 minutes of exposure at temperatures of 60 degrees or more. Also, Fujifilm caps their longest exposure in Bulb mode at 60 minutes, and I definitely wanted to blow past that!

I couldnโ€™t have done such a long cumulative exposure without the help of the Tether Tools Case Relay. Typically mirrorless cameras can last about 1 to 1.5 hours of straight shooting on a fully charged battery. Tether Tools lets you plug one of their dummy batteries into your cameraโ€™s battery compartment and then link it to the Case Relay and a 10,000mAh USB battery to give you a much longer charge. (Check out the video we made that shows this in action.)

With the Case Relay hooked up, I set my Vello intervelometer to 2 minutes with a 1-second break between shots. I then lay back on the sand and enjoyed the show! I think I might have taken a little catnap during this shot, as the camera kept clicking for 1 hour and 24 minutes!

The Post-Production

I was very excited to see this shot. At that time it was my longest star trail to date. (My current mark is 6 hours โ˜บ.)

The star stack was fairly easy to put together using Lightroom and Photoshop. In the Lightroom Library module I flagged all the โ€œimages to get stackedโ€ (Figure 2) with a red color label (number 6 on your keyboard).

Figure 2.

This makes it easy to differentiate between my test shots and the images that have only a 1-second break in between. Once I had them marked, I selected them all and then clicked Photo > Edit In > Open as Layers in Photoshop (Figure 3).

Figure 3.

Depending on how many images you have and how powerful your computer is, this can take just a few minutes or enough time to brew and drink some coffee. Once the images loaded in Photoshop as layers, I selected them all. Then from the Blend Mode drop-down menu I chose Lighten (Figure 4).

Figure 4.

This blend mode lets the brightest part of each layer reveal itself in the final image. This connected all the bright star trails, as well as the car trails in the background (Figure 5).

Figure 5.

I saved the file, and Photoshop sent it back to Lightroom, where I did some basic touch-up to finalize the image (Figure 6).

Figure 6. Final image. 41 stacked frames, each shot at 2 minutes, f/4, ISO 3200.

Typically when you expose a night sky for this long, you are bound to get airplane or satellite light trails as well, but Glacier must be a very special place to have such a limited amount of โ€œsky traffic.โ€ I didnโ€™t see any in my photo.

Final Thoughts

This is one of my favorite shots, still to this day. It heightens the majesty of Glacier National Park. I love how the moonlight reveals the Livingston and Lewis mountains ranges in the distance but also creates a mirror reflection. When I saw the cars come down Going to the Sun Road during my exposure I thought Iโ€™d have to remove them in post, but they slice through the shadow and its reflection perfectly. Oh, and who doesnโ€™t like reflections of star trails? Yes, please!

This shot reconfirms the pristine beauty of our national parks at night. And aside from the gentleman with the iPad, I had Lake McDonald to myself that night!

Note: When we announced our 2018 night workshop at Glacier National Park, it was one of the first to sell out. We recently added a second week and we still have a few spots left. If you want to create images like this, come join us at the Crown Jewel of the Continent!

Gabriel Biderman is a partner and workshop leader with National Parks at Night. He is a Brooklyn-based fine art and travel photographer, and author of Night Photography: From Snapshots to Great Shots (Peachpit, 2014). During the daytime hours you'll often find Gabe at one of many photo events around the world working for B&H Photoโ€™s road marketing team. See his portfolio and workshop lineup at www.ruinism.com.

UPCOMING WORKSHOPS FROM NATIONAL PARKS AT NIGHT

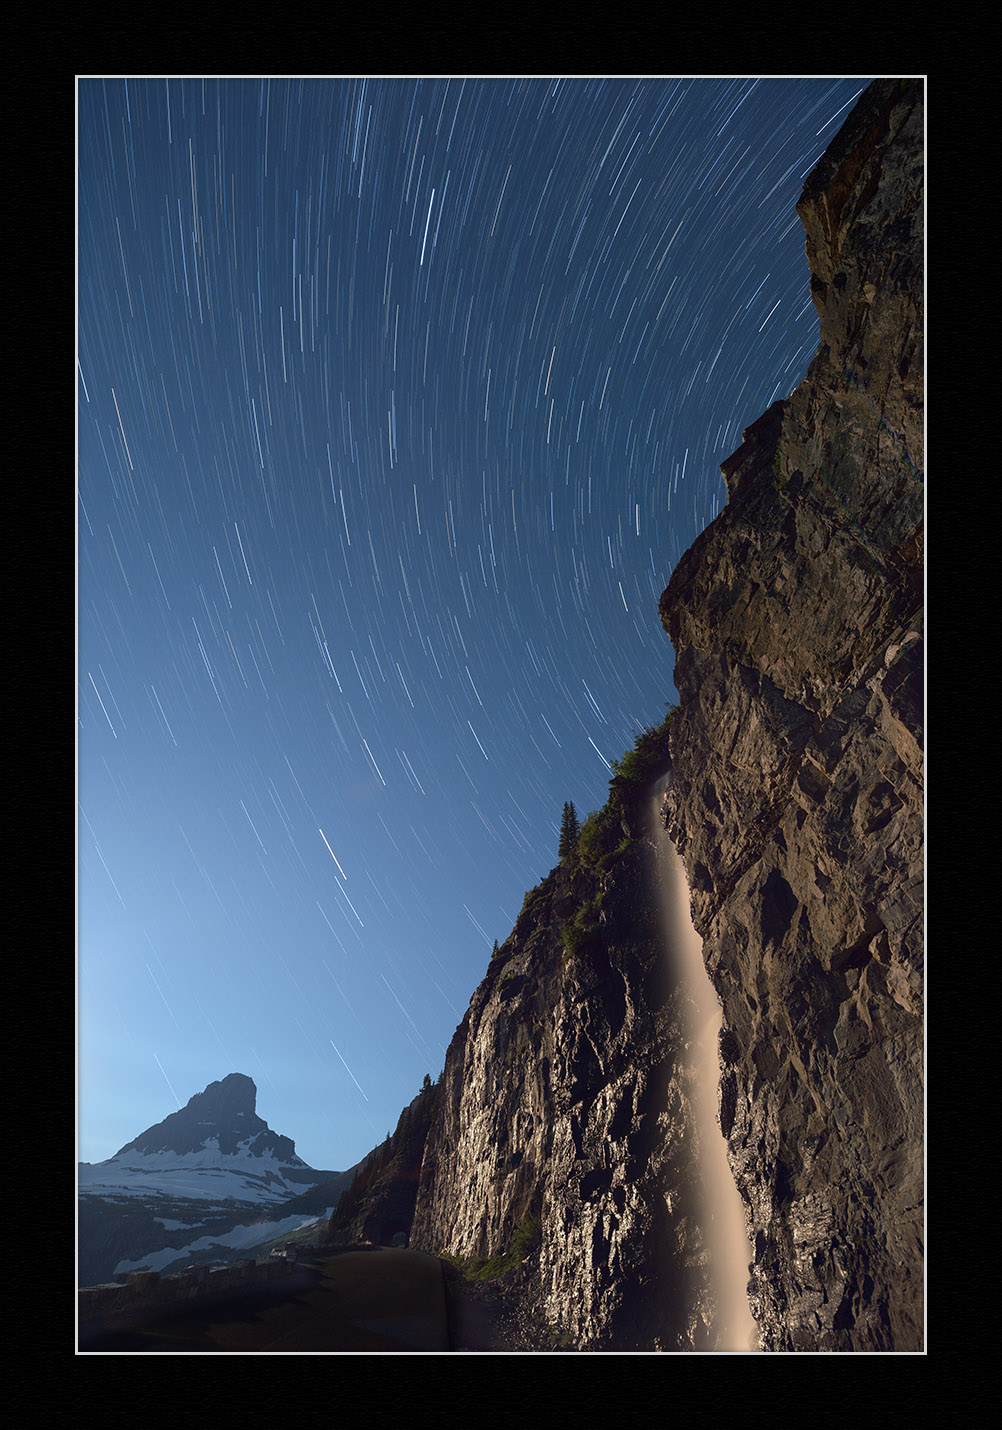
How I Got the Shot: Waterfall and Clements Mountain in Glacier National Park

โ€œClements Mountain, Star Trails, Waterfall.โ€ ยฉ Tim Cooper.

โ€œClements Mountain, Star Trails, Waterfall.โ€ ยฉ Tim Cooper.

The Location

I am fortunate to live in Montana. Itโ€™s a beautiful state filled with wonderful people and fantastic landscapes. My โ€œbackyardโ€ is Glacier National Park. Glacier is truly one of Americaโ€™s great alpine experiencesโ€”from gorgeous glaciated peaks to alpine meadows carpeted with wildflowers to the host of wildlife visible on a near daily basis. I take every chance I can to get up to the park.

Early last summer I made this image while scouting for our upcoming National Parks at Night workshops in August and September. (While the first week of this workshop is already filled, the second week still has some spots available. Check out our workshop page for more information.)

Luck vs. Planning

When it comes to photography, I always give luck a little credit. Did the clouds cover the sky? Or did they add a nice accent? Did it rain on the night I had planned to shoot? There are so many small blessings that are easy to overlook.

Luck, however, is no substitute for planning. If you read this blog often then you have seen us discuss many times the importance of planning a night shoot. My familiarity with Glacier helped enormously with planning this shot. I already knew the location of the waterfall and exactly where I wanted the moon to be so that it would backlight the water. It was just a simple matter of using the indispensable phone app, PhotoPills, to determine when the moon would reach the necessary spot in the sky (see Figure 1).

Figure 1. The zoomed-out and zoomed-in views of the shoot location, as seen in PhotoPillsโ€™' Planner mode. The blue lines told me where the moon would be at different times of the night, which told me when to shoot for the effect I wanted.

The Exposure

I wanted to use the moon to illuminate the falls, but I also envisioned star trails rather than star points in my image. To create the effect of star trails, you have to make a very long exposureโ€”15 minutes, 30 minutes, an hour or even longer. This makes the stars appear as if they are trailing through the sky. Another method to create these trails is to break up the exposure time into shorter chunks, and then stack the resulting set of images in post-production. This is especially helpful under bright moon situations or when you want to light paint.

Using multiple short exposures was my plan for this setup. The first step was to calculate an exposure using a high ISO test (i.e., the 6 Stop Rule). Setting my Nikon D4s to ISO 3200 and f/4, my final test shot (Figure 2) was exposed for 30 seconds.

Figure 2. Test shot at 30 seconds, f/4, ISO 3200.

The Shoot

Typically night photographers use an ISO of 6400 for test shots because, according to that 6 Stop Rule, we know that an exposure time of X seconds at ISO 6400 equals X minutes at ISO 100. This is a very handy little trick for calculating long exposures easily.

Because my successful test exposure was 30 seconds at ISO 3200, which equals 15 seconds at ISO 6400, then my long low-ISO exposure would be 15 minutes at ISO 100. Orโ€”to shorten things up a bitโ€”8 minutes at ISO 200. Using this exposure, I could shoot multiple frames at 8 minutes and blend them later in post using the star-stacking technique.

This evening, however, I either miscalculated or mistakenly set my camera wrong. My final exposures (Figure 3) ended up being shot at 5 minutes, f/4, ISO 100. Thatโ€™s about two stops underexposed!

Figure 3.

I didnโ€™t notice that at the time. I finished shooting and had to leave immediately, so there was no time to reshoot the frames. I was destined to have to fix it later in post.

Post-Processing

After downloading my images, the first post-processing edit was adjusting the Exposure slider to account for the underexposure out in the field. After increasing the exposure, the final set of images looked like this:

Figure 4.

The next step was to blend all the frames together to create the star trail effect. I began by selecting all of the images in Lightroom. Next, from the menu I selected Photo > Edit In > Open as Layers in Photoshop. This opens all of the images into Photoshop as layers within one file.

Once the file opened, I clicked on the top layer, held down the Shift key, then clicked on the bottom layer. This selects all of the layers in the file.

Next, in the Blending Mode drop-down list (circled in red in Figure 5), I selected Lighten (Figure 6).

Figure 5.

Figure 6.

This blending mode allows the brightest part of each layer to show through on the final image, which in this case creates the effect of the stars trailing across the sky. Figure 7 shows the result of blending the images with this technique.

Figure 7.

Did you notice the multiple car headlights that showed up after blending the layers? They were in the first, second and last photo frames (Figure 8). Because using the Lighten mode reveals the brightest parts of each layer, all the headlights showed up after blending.

Figure 8.

So, the next step was to remove the unwanted car lights. One of the benefits of stacking frames rather than taking one long exposure is that you can use layer masks to remove unwanted artifacts that show up in just a few frames rather than overwhelming an entire final photo. To do this, I clicked on the first layer that contained headlights to select it. Then at the bottom of the Layers palette I clicked on the Add a Mask icon (Figure 9).

Figure 9.

Figure 10.

Next I selected the paintbrush tool and chose black as my foreground color. Then I just painted on the mask over the area I wanted to remove. Notice in Figure 10 how I painted over the tunnel where the car headlights appeared. Also notice the corresponding black area on the white mask thumbnail, indicating the shape and location of the mask.

I followed the same steps for the other two layers with the artifact, painting out the headlights further up the road. Figure 11 shows the three masks with black painted on them covering up all of the headlights that exist on the different layers.

Figure 11.

Figure 12.

Finally, I wanted to separate the cool tones of the sky from the foreground waterfall. I clicked on the bottom layer, chose the Quick Select tool and then selected the foreground waterfall and cliff face (Figure 12).

Then I created a Color Balance layer by choosing Layer > New Adjustment Layer > Color Balance. Adding some warmth via the Red and Yellow sliders started to really separate the warm colors in the foreground from the cool colors of the background.

Figure 13 shows the final image.

Figure 13. Five stacked frames, each shot at 5 minutes, f/4, ISO 100 with a Nikon D4s and Nikkor 14-24mm f/2.8 lens zoomed out to 14mm.

While this may sound like a lot of work, after a little practice in Photoshop, youโ€™ll find that completing these types of images takes no time at all!

Tim Cooper is a partner and workshop leader with National Parks at Night. Learn more techniques from his book The Magic of Light Painting, available from Peachpit.

UPCOMING WORKSHOPS FROM NATIONAL PARKS AT NIGHT

How I Got the Shot: Heather Whatever at Rockaway Beach

Heather Whatever at Rockaway Beach. ยฉ Matt Hill.

The early fall evening at Rockaway Beach seemed to echo the buzz of relaxing sun revelers and carousers. We approached the shore with Heather Whatever, a local burlesque performer in NYC, and chatted about how โ€œat least this time itโ€™ll be warmer. โ€ฆโ€ (Last time Heather had collaborated with us, sheโ€™d been knee-deep in the fresh-fallen snow of a private backyard in Brooklyn. This time was downright balmy.)

The Goal: Bake more art for my series Night Paper (note: link NSFW).

The Method: Combine long exposure, flash and a flashlight to make a kinetic night portrait.

The Aesthetic: brilliant white hand-cut paper fashions, including a mask and body piece, along with Heatherโ€™s natural beauty (and crazy cool enthusiasm).

Night Portraiting

There are a dozens and dozens of ways to make portraits at night. During the course of developing my artistic voice for Night Paper, I zeroed in on tactics and methods that helped me solve the question I had.

What question, you may ask? How can I make a portrait that dilates time, adds overt and subtle surreal elements, yet retains identifiable elements of classic portraiture?

Itโ€™s crucial to have a mission. Once you have that, you can begin to make decisions about what youโ€™re going to do to reach the goal.

The Shoot

Our first location was the stone jetty.

I established a baseline exposure using the high ISO test. I wanted to retain the highlights in the shoreline buildings at the bottom right, plus nab some of those stars peeking out.

Once I got that, I pulled out a pair of speedlights that mount in a portable beauty dish, and added the diffusion sock over the end. I mounted the setup on a light stand and placed it about 4 feet away to the left and about 4 feet above Heather.

I grabbed my trusty Sekonic L-308 flash meter and adjusted the output to match my ambient exposure. Essentially, that means turning the power of both speedlights up or down until the aperture/ISO combination matched the f/stop set on my camera.

I then moved my attention away from technical matters and focused on Heatherโ€™s costume and pose, and on connecting with her to start a portrait session.

In beauty lighting, I prefer the face to turn toward the light source. I find the shadows to be complimentary. The shadows create structure and depth, especially on rounded contours such as the thigh, cheekbone and jaw. Itโ€™s not a rule, but itโ€™s where I start, and I experiment from there.

We achieved the shot I loved most from this scene. It satisfies my mission:

  • It looks like a human.

  • Itโ€™s well exposed.

  • There are elements that show the passing of time (stars, soft surf, edge blur from behind).

  • The outfit adds the surreal what-is-going-on-here? component.

17 seconds, f/4, ISO 200. Nikon D750, Zeiss 15mm Distagon f/2.8 lens.

I usually shoot two to three scenes during every night portrait session. Our second location that night resulted in another series that I adore. Because the haze was coming in and there was a lack of distant lights, I ramped up my exposure to 49 seconds. I added a 65-degree long-throw reflector to the flashes and a grid to eliminate light spill.

Every instance you see where Heather is โ€œfrozenโ€ was created with flash. The rest of the effect is a result of the following: During the open shutter, I walked into the edge of the surf at left and cupped my hand around the end of my Coast HP7R flashlight to create a snoot that I could open and close by squeezing and un-squeezing my hand. I pulsed that beam of light on Heather as she frolicked in the breaking waves.

It was completely unknown what would happen. Except the magic that did.

Success! Very surreal, with recognizable human elements.

Wrapping Up

I hope you try your hand at telling stories with people at night via portraiture. Admittedly, it requires mastery of separate practices in night photography, and a willingness to work with people. But if you choose to climb that mountain, itโ€™s worth the effort. Your art will amaze you.

For further perusal โ€ฆ

And finally: Want some hands-on instruction and immediate feedback for doing this kind of creative work? Join me on the 2018 Night Portraiture Workshops with National Parks at Night.

Matt Hill is a partner and workshop leader with National Parks at Night. See more about his photography, art, workshops and writing at MattHillArt.com. Follow Matt on Twitter Instagram Facebook.

UPCOMING WORKSHOPS FROM NATIONAL PARKS AT NIGHT

How We Got the Shot: Wildrose Charcoal Kilns of Death Valley National Park

Wildrose Charcoal Kilns, Death Valley National Park. ยฉ 2017 Lance Keimig.

The Location

Last month I led a small private workshop to do night photography and light painting in Death Valley National Park. With only five participants in the workshopโ€”all of them advancedโ€”we spent our time differently and chose locations that could not be accessed with larger groups. One place everyone wanted to go was to the Wildrose Charcoal Kilns, which are among the most interesting architectural and historical features in the park.

The ten charcoal kilns were built by the Modock Consolidated Mining Company and completed in 1877. They were built to provide fuel for two lead/silver smeltersโ€“โ€“about 25 miles away. They were used for only a couple of years, which accounts for their remarkably good condition. They are aligned in a row at about 8,000 feet of elevation, which makes for a challenging night photography location in late November!

I had been to the kilns only once before, in 2012, and had been looking forward to another chance to photograph them. Despite my return visit being five years later, the conditions were remarkably similar: cold and windy with an almost full moon. On my first visit, I was there with Scott Martin, Aaron Grimes, and Russell Brown from Adobe. Russell had brought a brand new Wescott Ice Light, the likes of which we had never seen. Thatโ€™s another story, but it reminds me of just how fast technology is moving, as today there are many similar tools for a wide range of purposes and budgets. Back then, we were mightily impressed, and used it to great effect.

The Setup

Back to the presentโ€ฆ After spending a few minutes exploring and talking about how we would tackle this project, we decided to work as a group on the first shot, and then split up and work with individual kilns. From my previous visit, I knew that the only way for a group to photograph the entire set of kilns at once was to do so from a similar location. We chose to work from the downhill end of the row, which meant we were facing almost due east.

We set up in a row, with my camera being furthest out from the kilns, which meant that I had the least oblique angle, and could see more of the most distant kilns in my image. This also meant that I couldnโ€™t include the first kiln without also including the first couple of photographers in the shot. I simply rotated my camera to the right, and completely excluded the first kiln rather than have it partially in the frame.

Figure 1. The basic setup for the shot. I would be doing the final shot at the cameraโ€™s native ISO of 64, so the test shot was done at ISO 4000, six stops more than the final. Nikon D850, Nikon 14-24 mm f/2.8 lens at 24 mm. 8 seconds, f/8, ISO 4000.

I had the good fortune to be working with the outstanding new Nikon D850, which Nikon Professional Services had sent me for testing and review. (My next blog postโ€”to run in early Januaryโ€”will be an in-depth review of the camera as a night photography tool.) I set the focal length of the 14-24mm lens to 24mm, which was still just a bit wider than I needed from this camera position. That was fine, as I was tilting the camera upward, and I knew that I would be using the Transform tab in Lightroomโ€™s Develop module to correct the perspective, and would lose a bit from the sides of the composition in the process.

The Exposure

After the composition and focus was set, the next step was to figure out the ambient exposure. Since we were working with an almost full moon, we decided that star trails would be a better option than star points, as the dimmer stars would be obscured by the moonlight anyway. This also gave us the added advantage of being able to do all of the lighting in one long exposure, something that never could have been accomplished in a single 20-second shot.

Due to the wide-angle lens and the camera distance from the subject, I could have shot wide open, but that would have left me with a 1-minute exposure at ISO 64โ€“โ€“ not enough time to light the scene. I closed down the aperture three stops to f/8, and came up with a final exposure of 8 minutes, f/8, ISO 64.

Figure 2. The first attempt to light the kilns. Klaus (under)lit the interiors of each kiln, and I (under)lit the back sides of each. We stopped the exposure as soon as the lighting was finished, which was after 7 minutes and 4 seconds. We were both using a Coast HP7R flashlight with a full CTO and 1/4 Minus Green gels.

The Shoot

That first attempt at lighting was underwhelming. The moon washed out most of the light painting, and workshop participant Klausโ€”who was lighting the doorways from inside the kilnsโ€”realized that he needed to take a couple of steps to his right, and aim the light slightly uphill to light the camera-facing part of the opening.

I initially lit the back of each kiln from a position near the back and up against the downhill neighbor of the structure I was lighting. This worked well for the first couple of kilns, but by the time I got to the third one, my lighting was barely visible. For the next attempt, I moved progressively further around toward the front of each kiln, but made sure that I was still out of sight of the cameras, and I also increased the time I was lighting each structure. This resulted in a longer exposure time, so we stopped down one-third of a stop to f/9 to compensate for the additional exposure.

We pretty much nailed it on the second attempt, but went ahead and made a third exposure just to have a little extra piece of mindโ€“โ€“ an insurance policy, if you will. The third exposure was almost identical to the second one, so we wrapped the shot and went off to work on our own images.

Figure 3. The second and third attempts to light the kilns yielded almost identical images, and the third is the final version. Each kiln was lit from the left rear for about 15 seconds, and from the interior, with the light facing outward, for about 10 seconds. I made minimal adjustments in Lightroom to the single RAW file, including vertical perspective correction. 8 minutes and 38 seconds, f/9, ISO 64.

Figure 4. I made another image using similar lighting, but featuring a smaller grouping of the kilns. This image has less ambient exposure for a more dramatic look. 30 seconds, f/7.1, ISO 400.

Figure 5. Klaus and I worked together to make this one, from the inside looking out. This shot would be better at a high ISO with star points, or if the clouds did not take up most of the sky. 30 seconds, f/7.1, ISO 1250.

Final Thoughts

The D850 is a joy to use, and Nikon users will find the menus, button layout and features familiar yet improved from previous models. I am duly impressed with the image quality of the pictures I made at the charcoal kilns, and think you will be too. Cold weather under moonlit skies are conditions that most modern DSLRs will handle with aplomb, so the real test will be when I present images made in high-contrast scenes or at high ISOs under dark starry skies.

I had the opportunity to use a D850 at our recent Eastern Sierra workshop as well as at this Death Valley workshop, both times around the full moon. I did manage to do a few shots under dark skies in my front yard before returning the camera to Nikon, and will share those with you in an extensive review soon. Youโ€™ll see images shot with the D850, D810, D750 and D5 all side by side so you can decide which is the right camera for you.

Note: See our January 2018 post โ€œNikon Night Photography Showdownโ€ for our full rundown on the Nikon D850 and its efficacy in night photography.

Lance Keimig is a partner and workshop leader with National Parks at Night. He has been photographing at night for 30 years, and is the author of Night Photography and Light Painting: Finding Your Way in the Dark (Focal Press, 2015). Learn more about his images and workshops at www.thenightskye.com.