Save Time by Using High ISO Testing to Set Up Your Night Shots

When photographing in very dark environments, the camera’s light meter is usually unable to suggest a starting exposure. It can be a tedious exercise of trial and error to determine the best exposure to use.

Waiting 15 or 20 minutes for an exposure to finish, and then an additional 15 or 20 minutes for Long Exposure Noise Reduction, can be very frustrating if the end result is an image that is considerably under- or over-exposed. Waiting that long for an image only to find out that the shot was not properly focused, or that the camera was not level, isn’t any better.

To take some of the guesswork out of calculating long exposures, and to save time in doing so, I developed a simple method for testing exposures at high ISOs.


High ISO testing

The aim of High ISO test exposures is two-fold. The first is to quickly determine the correct exposure in moonlight or other very dark situations. High ISO testing is not very useful in situations where the final exposure will be less than about 2 minutes.

The second purpose is to confirm focus, composition and camera alignment, and to make sure there are no unintended distractions in the frame. Using this procedure will save you a lot of time and will eliminate a lot of frustration in the field.

Testing is performed by raising the ISO 6 stops above your camera’s native ISO. This is because there are six stops of exposure between 1 second and 1 minute, and using this formula allows for a direct translation from testing exposure in seconds to final exposure in minutes. This greatly simplifies exposure calculation, and as a result:

The number of seconds in a High ISO test exposure equals the number of minutes at the native ISO at the same aperture.

For native 100 ISO cameras, the testing ISO is 6400
For native 200 ISO cameras, the testing ISO is 12,800

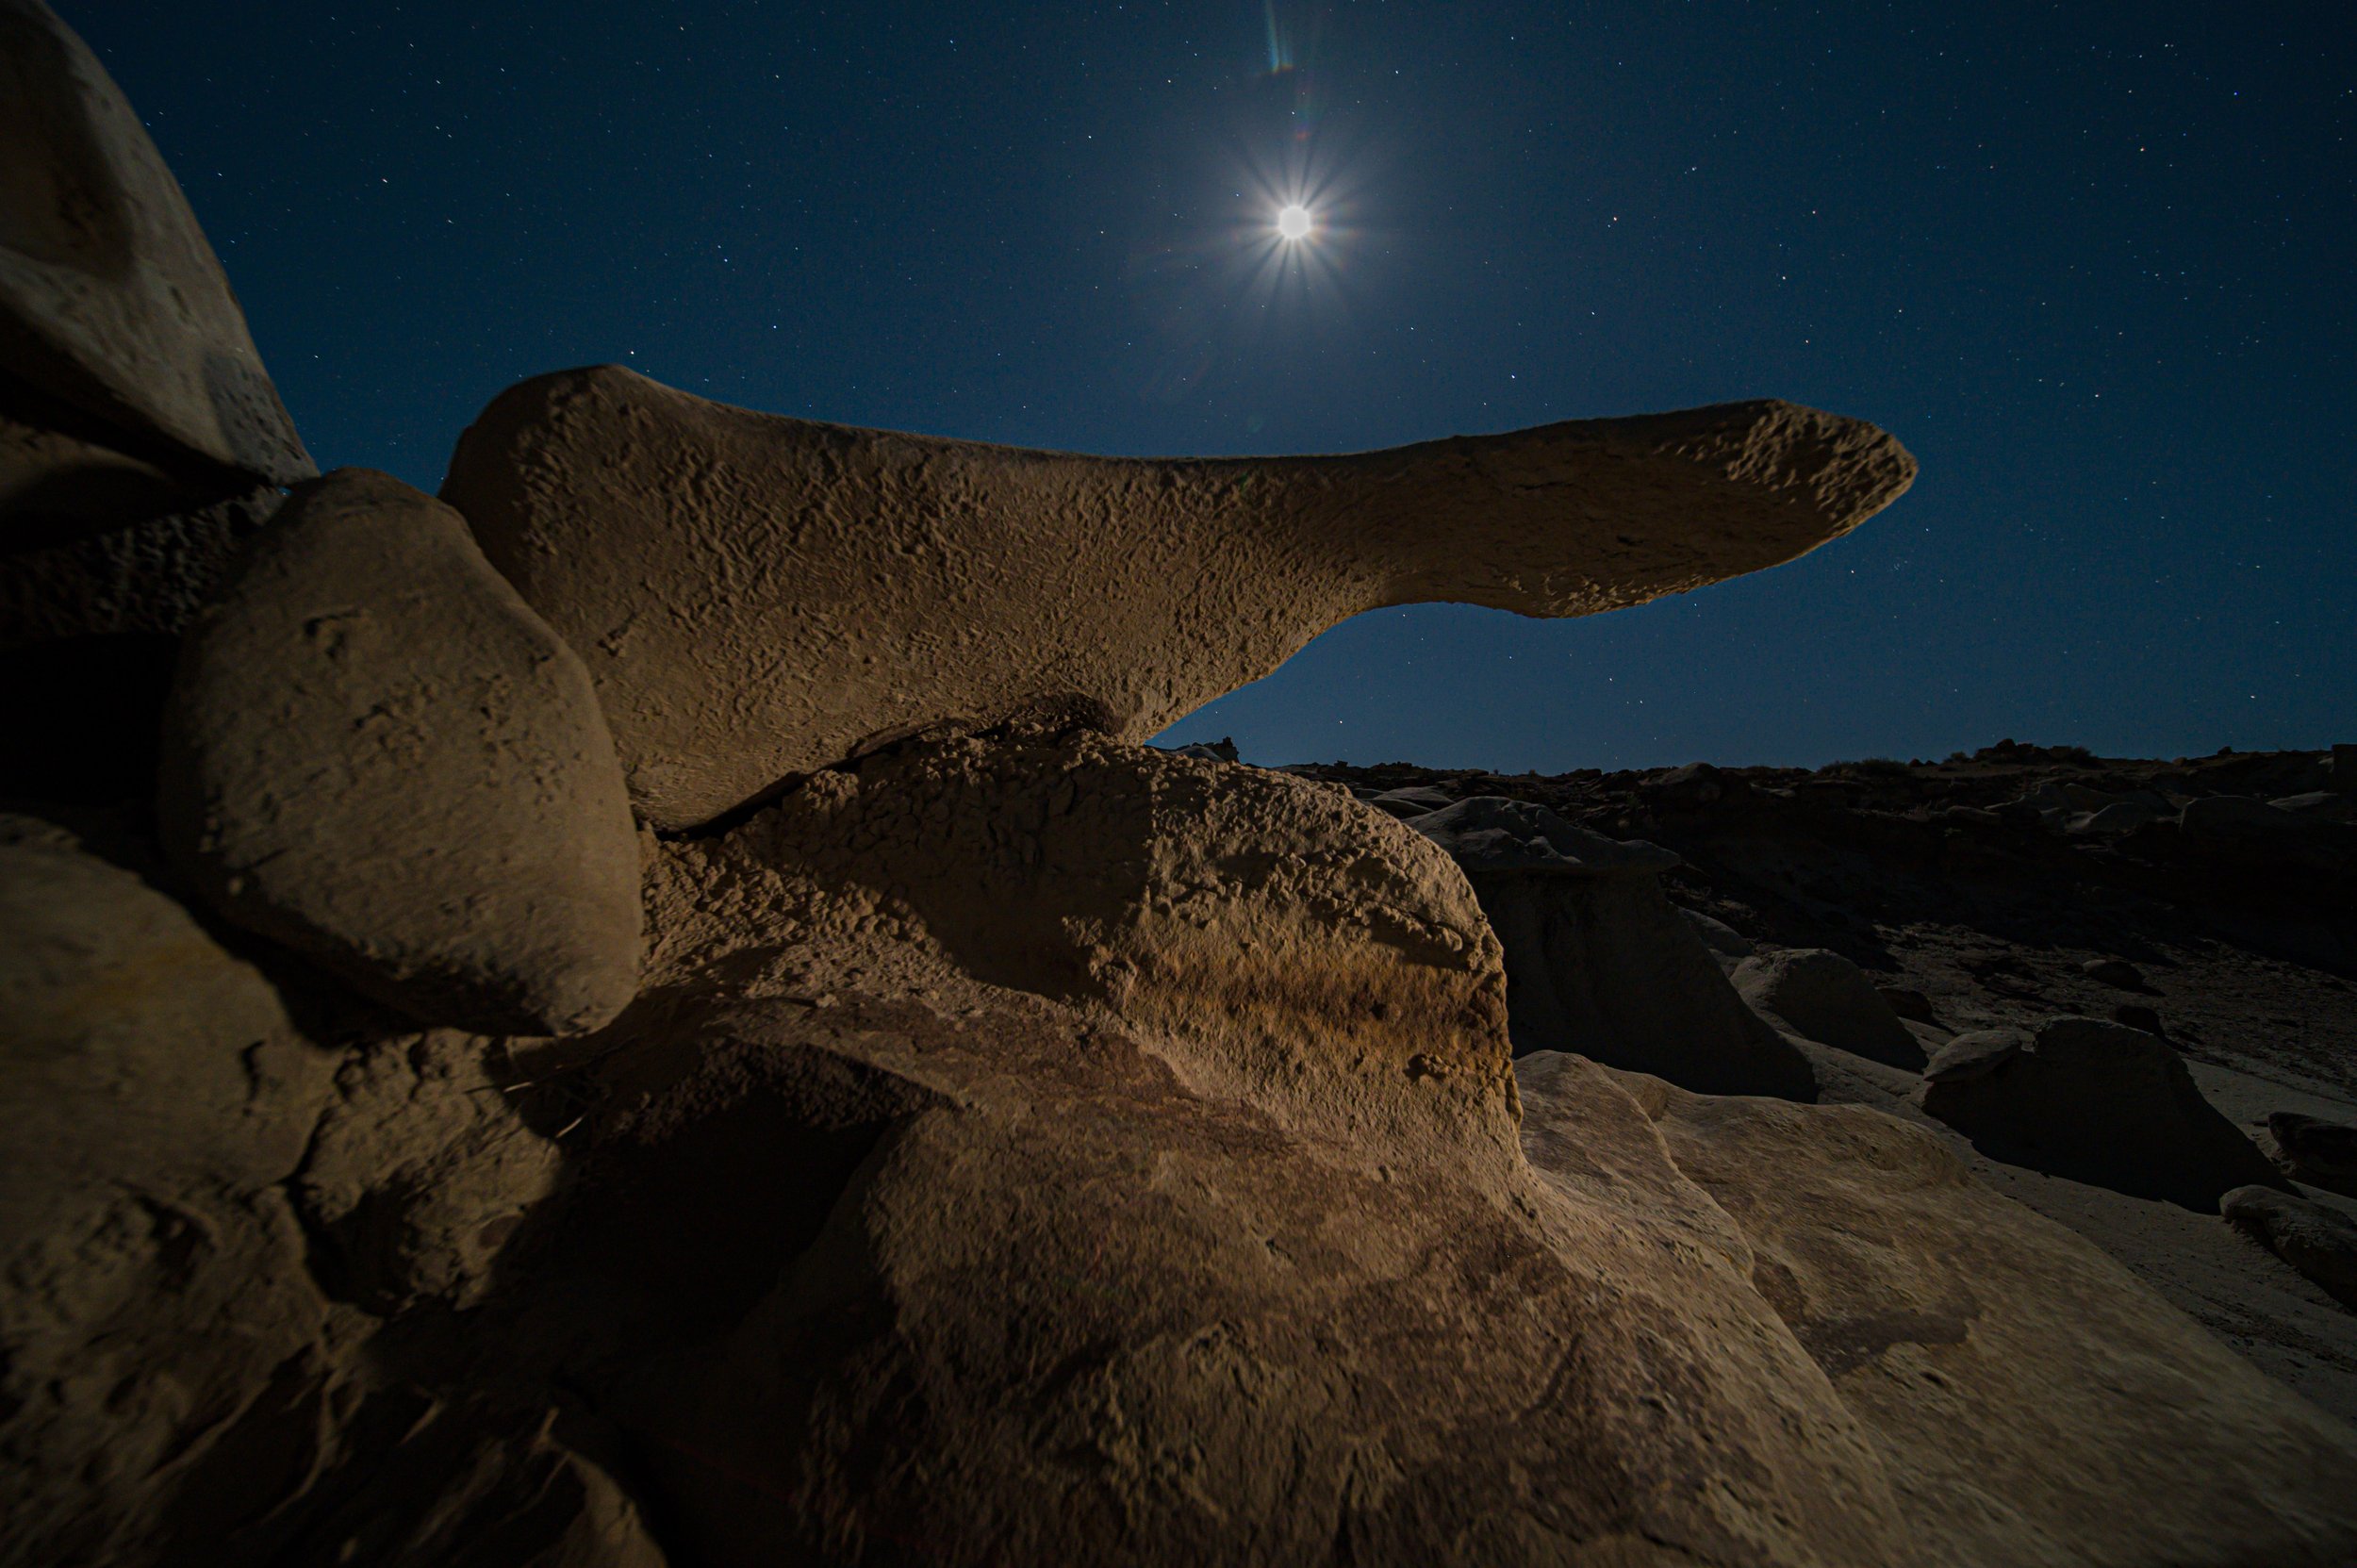
In moonlight or similar relatively low-contrast situations, using the histogram is the best way to determine exposure. A good starting point in full-moon conditions is 5 seconds, ISO 6400, f/8, or 3 seconds, ISO 12800, f/8. (Choose one depending on your ISOβ€”see above.) This results in a quick exposure for testing composition, focus, etc. When you’re ready for the real shot, that exposure becomes 5 minutes, ISO 100, f/8, or 3 minutes, ISO 200, f/8.

Just outside Big Bend National Park, I used a High ISO test (above) to get the image right with fast exposures, then reduced the ISO and lowered my shutter speed to get the final images (below).

Just outside Big Bend National Park, I used a High ISO test (above) to get the image right with fast exposures, then reduced the ISO and lowered my shutter speed to get the final images (below).

Keep in mind that there is no one correct exposure, but many possibilities that will all yield different results. Use the exposure that best meets your needs based on your intended appearance of the final shot. In a moonlight-only image, a full, right-biased histogram may be best for optimal image quality. If you will be adding light to the shot, a better ambient exposure might be one that is just enough to avoid shadow clipping. In that case, the highlights will be provided by the added light, which will also push the histogram to the right. Simply increase or decrease the exposure until the desired histogram is achieved.

Photographing by the light of the moon and light painting is a lot of fun, and can be a tremendously rewarding endeavor with almost limitless possibilities. Getting the technical aspects of exposure and lighting out of the way quickly and efficiently leaves you with more time and energy to use your creativity to make truly outstanding images.

With practice, these techniques will become second-nature. If you incorporate them into your working methods, you’ll be rewarded with increased productivity, and with a higher success rate with your night photography.

Lance Keimig has been photographing at night for 30 years, and is the author of Night Photography and Light Painting: Finding Your Way in the Dark (Focal Press, 2015). Learn more about his images and workshops at www.thenightskye.com.

Upcoming workshops from National Parks at Night

NPAN + Nikon + B&H + Brooklyn Bridge = Epic Day of Night Photography!

Last Wednesday, National Parks at Night ran our first-ever major event, an epic day in New York City that included five lectures, a panel discussion and a two-hour night-photography walk in one of NYC’s hottest and most intriguing spots for photography.

B&H Photo was an awesome host, providing their great Event Space and handling all the logistics. Nikon sponsored the whole day and night and provided some of their best new gear for participants to use. And Manfrotto was there at night too, providing additional support (figuratively and literally!).

The B&H Event Space full of people interested in seizing the night!

The B&H Event Space full of people interested in seizing the night!

The B&H Event Space hosted the afternoon session, which comprised all of the talking. The house was packed with over 80 people filling the seats and a few dedicated stragglers standing in the back for four hours. We couldn’t have been more happy with the turnoutβ€”we greatly appreciate how many people came to B&H to hear us talk about this topic we love so much, and we were thrilled that so many photographers are interested in this dynamic niche of our industry and artform.

We presented five back-to-back lectures that covered:

  • Essential gear for night photography (Gabriel Biderman)
  • Scouting national park locations for photo shoots (Chris Nicholson)
  • Creating visual distinction in your work (Lance Keimig)
  • Best practices and creative effects of light-painting (Tim Cooper)
  • How to get the most out of a workshop experience (Matt Hill)

Afterward, Deborah Gilbert of the Event Space moderated a half-hour panel discussion about night photography. Both she and the audience had some great questions. We particularly liked getting into the philosophy of why the night-photography niche is so intriguing and so creatively inspiring.

Also, the front of the Event Space was decorated with 20x30 prints of our night images provided by Digital Silver Imaging. We couldn’t have been more happy with how it all lookedβ€”they do fantastic work!

Tim talks light painting with the Event Space crowd.

Tim talks light painting with the Event Space crowd.

Videos of the lectures will be posted on the B&H YouTube channel in the coming weeks. Keep an eye on our website and social media, as well as the Event Space Twitter feedβ€”we’ll be sure to announce as soon as they’re published.

From there, everyone headed to the photo walk in Brooklyn, where we emerged from the subway in a rainfall. Despite the precipitation, more than 60 photographers attended. And their patience paid off. The weather cleared only ten minutes into the program, leaving behind a wet sheen to all the foreground elements of Brooklyn Bridge Park and the Dumbo neighborhood’s waterfront.

We set up five shooting and education stations:

  • Gabe and Chris were positioned at spots looking over the East River at the Brooklyn Bridge and the Manhattan Bridge, respectively, advising on composition and focusing
  • Lance worked with participants on exposure at a calm, rocky shore at the edge of the park
  • Tim helped people with composition and camera settings on a point of land right under the Manhattan Bridge
  • Matt led participants through working with a Pixelstick, a great and fun light tool for night photography
One of the fabulous images we saw created during the evening, showing the shores of the East River with the Manhattan Bridge stretching toward the bright lights of the big city. Β© 2016 Marco Catini, www.catini.net.

One of the fabulous images we saw created during the evening, showing the shores of the East River with the Manhattan Bridge stretching toward the bright lights of the big city. Β© 2016 Marco Catini, www.catini.net.

Nikon’s JC Carey also attended the walk, bringing a caseload of Nikon lenses and bodies for people to borrow and use during the evening, including the amazing Nikon D750. JC was great working with everyone. He's always high-energy, charismatic and knows anything you want to ask him about Nikon gear.

Manfrotto came to the walk too, bringing tripods for participants to use. We’re very grateful to both companies, as they made the experience for everyone even better by providing access to some of the best new gear by two of the industry’s elite brands. So a huge thank you to Nikon and Manfrotto, and of course to B&H. We couldn't have pulled this off without the topnotch support and collaboration from all of you.

Flagged from behind by Matt's Pixelstick is the portion of the photo walk crowd who stayed until the end of the night. Photo Β© 2016 JC Carey.

Flagged from behind by Matt's Pixelstick is the portion of the photo walk crowd who stayed until the end of the night. Photo Β© 2016 JC Carey.

All in all, it was a great day. So many people came up to us to say how much they learned, or how much fun they had. Both of those sentiments are exactly what we were hoping to provide: We want people to learn more about night photography so they have the same great experience we do when we head into the dark with our cameras.

Thank you to everyone who attended and made our event so special. If you couldn’t make it to this one, stayed tunedβ€”we will definitely do this again!

Chris Nicholson is the author of Photographing National Parks (Sidelight Books, 2015). Learn more about national parks as photography destinations, subscribe to Chris' free e-newsletter, and more at www.PhotographingNationalParks.com.

Upcoming workshops from National Parks at Night

Photographic Foreknowledge: Planning Your Shots in National Parks

Visiting our National Parks with a little foreknowledge is the best way to ensure your chances of coming home with great photographs. Being in the right place at the right time is rarely an accident. Foreknowledge is also the recipe for making your images stand out from the millions of other photos taken in these dramatic locations.

Photographers should take the time to do some β€œvirtual” scouting. Begin with a Google search of the name of the park you are planning to visit. At the top of the resulting screen you’ll find filters to adjust what content is displayed on the page. Click on β€œImages” to be rewarded with a page full of photos in and around the park.

While not all of the photos will be masterpieces, they will give you a great idea of the locations of the more popular viewpoints and places of interest. Clicking on an image opens it to a larger view and supplies the link to the image. You’ll often find the name of the location or feature right here. If not, click on the link to discover more information about the image.

Take some time with this process and create a list of all possible locations you’d like to visit. Some of the places you may want to shoot might be inconvenient, closed for the season or farther than you would like hike.

Next, find a map! Google Maps is a great resource, as are the official National Park maps that can be found at www.nps.gov. Once you locate the desired sights on the map, you can better assess the best time of day or night to be there. Knowing the exact direction you want to face makes it easier to find south-facing mountains for star trails around the North Star, east-facing objects for sunrise, and west-facing scenes for sunset.

Making a list of possible scenes and locating them on the map is the least anyone should do before visiting a national park for photography. For those who leave nothing to chance, there are plenty of websites, computer applications and smartphone apps that can assist in exact sun angles and rise and set times, direction of moon rises and even when it will rise above a land formation. A couple of my favorites are PhotoPills and Google Earth.

PhotoPills is a great iPhone app that can do just about everything β€” planning your Milky Way shots, calculating depth of field, discovering the start time of astronomical twilight, or even discovering exactly when and where the moon will rise over the nearby peaks. It’s a must-have for any photographer who uses an iPhone. By phone app standards it’s a bit pricey ($9.99), but well worth every penny.

Google Earth is another indispensable, content-rich application for your computer and iOS or Android phone. Using Google Earth you can get an excellent lay of the land you plan to visit. By using the controls in the upper right, you can not only zoom in and around but also tilt to get a reasonable idea of the land formations.

For those looking for a less technical experience, Sun Seeker, Night Sky and Moon Seeker are three apps that are quite useful … and free!

Learn more techniques from Tim Cooper’s book The Magic of Light Painting, available from Peachpit.

Upcoming workshops from National Parks at Night

National Parks at Night’s First Official Event is Going to be EPIC!

We are very excited to be hosting our first gathering of all five NPAN instructors on March 16 at the B&H Event Space from 1-5 p.m. and 7-9 p.m.: "Night Photography Panel and Night Walk With National Parks at Night Sponsored by Nikon."

Chris, Lance, Matt, Tim and I have been building the foundation of NPAN for nearly a year, and this is one of the events that we wanted to share with you from the beginning!

This will not be your typical seminar. Each one of us will spend about 30 minutes discussing a specific topic about night photography, and then we will open the floor for an hour to answer your questions in a no-holds-barred panel discussion.

It would be crazy to get us all together and not do any hands-on instruction, so after we’ve filled you full of words and visions we will take it to the streets … or at least to Brooklyn Bridge Park!

That’s right, starting at 7 p.m. we will set up five shooting stations for you to try out different night photography techniques at one of the most scenic spots to photograph in New York City.

We’d like to give a big shout out to Nikon for sponsoring this event. We are all big fans of their cameras and glass, and Nikon will join us at Brooklyn Bridge Park where you’ll be able to try out a selection of their gear.

Need a better tripod to steady those long exposures? Manfrotto will be there too, and they’ll have loaner tripods for you to use during our night walk.

This lectures and discussion panel booked to capacity in just a few days, but that doesn't mean you can't be part of it! You can still get on the wait list by arriving at the Event Space 15-30 minutes beforehand. And if you can’t attend, you can still watch laterβ€”B&H will be recording the β€œclassroom” aspect of the day and publishing it to their YouTube channel later.

As for the night portion, as of last night the Event Space is taking registrations for that separately, and as of right now there are still slots available. Check out "Night Photography Photo Walk With National Parks at Night" for more information and to register. I recommend signing up immediately, because this will book up fast too!

Seize the Night!

Gabriel Biderman is a Brooklyn-based fine art and travel photographer, and author of Night Photography: From Snapshots to Great Shots (Peachpit, 2014). During the daytime hours you'll often find Gabe at one of many photo events around the world working for B&H Photo’s road marketing team. See his portfolio and workshop lineup at www.ruinism.com.

UPCOMING WORKSHOPS FROM NATIONAL PARKS AT NIGHT

Experimenting with Uncommon Light Sources in Night Photography

One of the joys we have as night photographers is having extra time to make more deliberate choices about lighting for our imagery. Our common tools include flashlights, speedlites and larger flashes. But it certainly isn't limited to the usual, right?

Let's explore some alternate lighting experiments I've conducted:

Adjacent to Sand Arch in Arches National Park, Utah Β© Matt Hill

The above image combines me choosing to record another photographer's light painting while adding my own twist: toy LED "Rocket Copters." I had thrown them in my bag, knowing that I would be able to make some UFO-like descending lights.

Central Park in January Β© Matt Hill

Point light sources, such as battery-operated Christmas lights, are often used to make glowing orbs, but they are also fun to drag along the ground to illuminate and write with light simultaneously. This aided this photo in becoming an obvious long exposure. Without it, the only clue was the rising fog in the rear left.

Toy sword inside crashed plane in northern Arizona. 

At a trade show in Las Vegas, someone left a toy sword in our booth that lit up green. The kid in me was like, "YEAH!" The photographer in me was like, "I'm gonna use that for tonight's shoot." And I did.

Toys with cheap, colored LEDs in them can sit well in small places and provide that perfect color glow to make a scene.

Arches National Park Β© Matt Hill

A tablet is also a gorgeous source of light, with both very consistent and controllable output. On my iPad mini I have an app called Rave Magnet. It cycles through all chroma as you wave it around, making beautiful color gradients. The effect is excellent for light writing and painting.

Downtown Denver

Sometimes the tools you have can be repurposed. The above was my two flashlights in plastic bags, dragged along underwater.

This was the most exercise I'd gotten in weeks. My friend and I threw this light back and forth for eight minutes while the camera popped off sequential exposures. Stacked in post.

Have fun. Look at the world of light-emitting objects in a new way: How can I make cool new photos with that?

See more about Matt's photography, art, workshops and writing at MattHillArt.com. Follow Matt on Twitter Instagram Facebook.

Upcoming workshops from National Parks at Night