How I Got the Shot

How I Got the Shot: Lighthouse Beams at Fire Island

Fire Island Lighthouse. Nikon D750, Irix 15mm f/2.4 lens. Nine exposures at 1/2 second, f/2.4, ISO 6400.

The Location

Lighthouses are the great sentinels of the sea and their true souls shine at night.

The northeast U.S. has some of the most famous lighthouses in the country. Theyโ€™re mostly in New England, but here in New York we have a couple of noteworthy examples too, including the amazing Fire Island Lighthouse at the western end of Fire Island National Seashore.

We shot here a few times last fall, including twice with attendees of our New York Night Photography Summit. I created the above image on one of those nights.

Well, perhaps I should say I created this image partly on one of those nights, and partly at my desk at homeโ€”because this technique involves a fair amount of post-processing, which is what this installment of How I Got (er โ€ฆ processed) the Shot is all about.

The Shoot

The Fire Island Lighthouse has a rotating beam. When a lighthouse has a rotating light it gives us more opportunities to depict the beams at different widths, depending upon the length of our exposureโ€”i.e., a longer exposure will capture more of the beam as it moves, thereby making the beam appear wider in the image.

So the first thing to consider is shutter speeds. For the Fire Island Lighthouse I experimented with everything from 1/4 to 4 seconds. The 1/4 exposures resulted in very narrow beams of light; the 1/2 exposures were obviously wider, and also (naturally) resulted in fewer beams to stack in post, and both those trends continued as the shutter speeds got longer. Each exposure generates a different interpretation of the lighthouse, so I always suggest exploring your shutter speeds first so you can figure out what works best for you.

You can see in my test shots how the width of the rotating lighthouse beam changes with longer shutter speeds. In these examples, 1/8 resulted in the narrowest beam, 1 second in the widest.

Once I settled on 1/2 as my favorite shutter speed, that determined my aperture and ISO. Of course, shorter shutter speeds at night generally mean you need to push the envelope on the other aspects of the exposure triangleโ€”shooting with a wide-open aperture (f/2.8 or wider) and a higher ISO (3200 to 6400). These combinations will generally allow you to capture bright beams of light as well as adequate detail in the lighthouse structure and the foreground.

Another image of the Fire Island Lighthouse from the same night. This one is composed of 1/4-second exposures, which resulted in the narrower beams of light. Nikon D750, Irix 15mm f/2.4 lens. 20 stacked frames shot at 1/4, f/2.4, ISO 6400.

Once I was happy with my exposureโ€”i.e., beams that are bright but not blown outโ€”I set my camera to burst mode. To prevent camera shake, I used a cable release (the Vello Shutterboss II) to fire the shutter. I kept my finger on the remoteโ€™s trigger until the beams did a full rotation around the lighthouse. (If you need to take another longer shot for more detail in the foreground, you can do that as well.)

Once I captured the assets, I was able to blend them in Lightroom and Photoshop to get that multiple-beam effect.

The Processing

Processing all of those raw images together into the final version is not terribly complicated, but involves a few steps and some finessing. So weโ€™ve put together this video to show how I brought the photograph to completion.

In the video I talk about everything from the planning to the execution to how to put it all together in post.

Wrapping Up

If you live near or are planning to visit a rotating-beam lighthouse for night photography, we highly recommend giving this a go. Itโ€™s a fun technique that can generate some very dynamic images.

When you do, please share your work! Weโ€™d love to see your photos in the comments section below or on our Facebook page.

Note: Did you like that video, and think youโ€™ll like more? Consider subscribing to the National Parks at Night YouTube channel to get notified about all our new videos when they come out.

Gabriel Biderman is a partner and workshop leader with National Parks at Night. He is a Brooklyn-based fine art and travel photographer, and author of Night Photography: From Snapshots to Great Shots (Peachpit, 2014). During the daytime hours you'll often find Gabe at one of many photo events around the world working for B&H Photoโ€™s road marketing team. See his portfolio and workshop lineup at www.ruinism.com.

UPCOMING WORKSHOPS FROM NATIONAL PARKS AT NIGHT

How I Got the Shot: Milky Way and Planets in Lassen Volcanic

Looking across Cinder Cone to the Milky Way, Mars, Saturn and Jupiter. ยฉ 2018 Lance Keimig.

Last summer Chris and I had a chance to spend a few days in Lassen Volcanic National Park in Northern California. Lassen is one of the least known and least visited parks in the West, but it had been on both our radars for a long time. As the more popular parks like Joshua Tree and Yosemite become increasingly crowded, hidden jewels like Lassen Volcanic provide tremendous opportunities for photographersโ€“โ€“or for anyone who wants to explore the wonder of our public lands without being overwhelmed by other tourists.

Lassen peak from Cinder Cone at Sunset. iPhone 6S+.

The Location

Roughly an hour east of Redding, California, Lassen is remote and far from the stateโ€™s major cities, which probably explains its relative obscurity. It certainly isnโ€™t because the park doesnโ€™t have much to offerโ€”quite the contrary. In some ways, the park typifies the High Sierra landscape: rocky, mountainous terrain, rivers, lakes, wildlife, fragrant Jeffrey pines, hot days, cool nights, and clear, crisp air. Add some recently erupting volcanoes to the mix, and perhaps you can start to appreciate what makes this park special.

All four of the major types of volcano are present in the park. Lassen Peak, which the park is named after, is the southernmost active volcano in the Cascade Range. It is a lava dome, and is the largest of this type anywhere in the world. Lassen Peak last erupted between 1915 and 1918. The park also contains composite and shield volcanoes, as well as cinder cone. In todayโ€™s post, Iโ€™m going to write about the appropriately (if unimaginatively) named Cinder Cone volcano.

Cinder Cone from the Butte Lake Campground trailhead. iPhone 6S+.

Nestled in the northeast corner of the park, far from the main visitor center, accommodations and other infrastructure, many visitors to Lassen Volcanic never get to see Cinder Cone. Itโ€™s the youngest volcano in the park, formed only 350 years ago!

Getting to the top of the cone is one of the more challenging hikes in the park, but the solitude and the views of Lassen Peak, nearby Butte Lake and the Painted Dunes below are well worth the effort. Cinder Cone has a relatively rare feature in that it contains two concentric craters, making it twice as photogenic as your ordinary volcano!

Nikon D750, Irix 15mm f/2.4 lens. A 10-frame panorama. All exposures 8 seconds, f/3.2, ISO 100.

The Experience

We arrived late in the afternoon and made the 1.5-mile hike to the base of Cinder Cone from the trailhead at Butte Lake Campground. It was slow going, having to trudge through the forest over the loose, sandy volcanic soil, but when we rounded a bend and first saw the cone appear before us we quickened our pace at the excitement.

The sun was sinking quickly as we began our ascent. Chris was determined to get to the top before the sun set, and we were literally racing the shadow up the side of the mountain. Itโ€™s a testament to how challenging the climb was that the shadow was at many times moving faster than we were. During one of our frequent stops to catch our breath, Chris said that we were experiencing โ€œType 2 fun.โ€ Apparently, misery that is remembered nostalgically is what makes for Type 2 fun. Itโ€™s only in hindsight that you realize you were having a good time. It was worth every minute of the effort, and I was happy to be sharing the experience with Chris as his determination to beat the sun to the top kept me going.

Type 2 Fun. Chris racing the sun to the top of Cinder Cone. Nikon D750, 24-120mm f/4 lens at 110mm. 1/60, f/7.1, ISO 100.

When we finally reached the summit, the scene before us was extraordinary. We were surrounded by an awesome panoramic view on all sides, staring across a 1,000-foot-wide double crater with Lassen Peak to the southwest, Butte Lake to the northeast, and the Painted Dunes to the south.

Our excitement led to newfound energies that had us circling the rim of both the outer and inner craters, but not quite enough energy or madness to descend into the inner crater, knowing weโ€™d have to come back up at some point. The local terrain was spartan, with only a few trees and colorful low flowers dotting the landscape. We spent about an hour and a half alone on the summit, exploring, photographing and waiting for darkness.

The Painted Dunes at sunset from Cinder Cone. Nikon D750, 24-120mm f/4 lens at 34mm. 1/25 second, f/8, ISO 400.

The Night

We knew that once darkness set, we would have a spectacular view of the Milky Way, and that a rare planetary alignment we had witnessed earlier in the trip would present us with a unique opportunity to make a great image.

We were there in early July. Mars was approaching opposition, the point where Earth is exactly between our red neighbor and the Sun. Mars was approximately 40 million miles away from us, compared to its normal average distance of 140 million miles. It was five times brighter than usual and was the brightest object in the sky after the sun and moon. Jupiter and Saturn were not to be left out, as they had just passed their own oppositions.

All of this meant that if Earth was almost directly between the sun and planets, the planets would appear relatively close to each other in the sky. Of course, early July around the new moon is a great time to view the Milky Way too. The best time of year to view the galactic core is when it is at opposition. Can you guess where this is all headed?

As astronomical twilight faded the scene before us made our hearts race with excitement. It was incredible.

We positioned ourselves on the northwest side of the crater so that we could look across it to see the Milky Way and planets rise as the sky darkened. We had a pretty good idea of where the core and planets would appear based on experience and our previous nights photographing in the park. Despite having a good idea of what was coming, as astronomical twilight faded the scene before us made our hearts race with excitement. It was incredible.

As the objects in the night sky brightened, the landscape before us darkened dramatically, and we wondered if we would be able to capture both the crater in front of us and the celestial glory above. We were constrained by the requirement to keep our exposures short enough to maintain the stars as points rather than trails, aperture-limited by comatic aberration, and ISO-limited by high ISO noise.

Of course there are several ways to deal with the differing exposures for ground and sky in astro-landscape photography. One could compromise and have an underexposed foreground and an overexposed sky and make the best of it, or make separate exposures for each at different settings and combine them during post-processing. Because we are masochists, we decided to light paint the 1,000 feet of crater during our 20-second exposure.

The Shoot

Chris and I both follow a similar procedure when we make night photographs. Every image is made by following the same basic steps. They are:

  1. compose

  2. focus

  3. calculate exposure

  4. determine lighting

  5. tweak and repeat

In this case, the composition was fairly straightforward. We knew we wanted the crater in the foreground and Milky Way above it. We aligned ourselves, and set up our cameras about 40 or 50 feet apart. Because the scene was so large, the distance between us made for only a slight variation in the foreground of our compositions.

A few test shots to get the lines right, and it was time to focus. I was using the Irix 15mm f/2.4 lens, which has a convenient and accurate detent at infinity. There was nothing closer than about 50 feet in my foreground, so I knew that I could safely focus at infinity without worrying about anything being soft. I rotated the lens until I felt the detent, and that was it for step 2.

On to exposure. There was no moon yet (it wouldnโ€™t rise for another couple of hours), and only a little light pollution on the horizon from the resort towns surrounding Lake Almanor to the southeast. The standard astro-landscape (ALP) exposure of 20 seconds, f/2.8, ISO 6400 would be about right. I chose to close down one-third of a stop to f/3.2 because I wanted to minimize coma in the bright planets, which were close to the left and right edges of my frame. To compensate, I increased the shutter speed by one-third of a stop to 25 seconds, and made a test.

Test image looking across Cinder Cone to the Milky Way, Mars, Saturn and Jupiter. Nikon D750, Irix 15mm f/2.4 lens. 25 seconds, f/3.2, ISO 6400.

Every ALP exposure is a compromise. The Earthโ€™s rotation limits shutter speed because of the need to maintain star points. The limit is based on sensor size, focal length and the cardinal direction your camera is facing. Increase your shutter speed, and risk star trails instead of points. Open up your aperture to maximum, and risk coma and softness at the edges of the frame, as well as potential depth of field issues with foreground objects. Raise your ISO and the noise increases, especially in the underexposed shadow area common in the foregrounds of ALP images. Itโ€™s up to the photographer to decide which variable to compromise based on experience, equipment, taste and how the final image will be displayed. But I digressโ€”on to the lighting.

The final image. Looking across Cinder Cone to the Milky Way, Mars, Saturn and Jupiter. Nikon D750, Irix 15mm f/2.4 lens. 25 seconds, f.3.2, ISO 6400. Lighting with two Luxli Violas at 3200 K and 100 percent brightness for the entire exposure. Mars on the left, Jupiter on the right. Saturn is hard to make out because it is right in front of the galactic core.

We really didnโ€™t know if it was going to work or not, but there was nothing else to do but try it. We both had Luxli Violas, and the same idea. Usually we set these lights at 1 percent brightness for ALP images, and sometimes even that is too much. We are not usually trying to light the better part of a square mile in 20 seconds.

We set the color temperature to 3200 K and the brightness to 100 percent, opened the shutters, and walked quickly away from the cameras holding the lights toward the crater but tilted upward so that the foregrounds would not be overly bright. The technique worked remarkably well, and after a few adjustments we felt like we had it in the bag.

Wrapping Up

As we approach Thanksgiving and I look back at the images I made this year, this may well be my favorite from 2018. Itโ€™s a unique photograph made in an amazing location, collaborating with a great friend. It took some determination to make it happen, along with the good fortune of being in the right place at the right time. #ISO6400andBeThere

Note: Lance will be back at Lassen Volcanic National Park, this time with Gabe, for our 2019 night photography workshop. Click here for more information.

Lance Keimig is a partner and workshop leader with National Parks at Night. He has been photographing at night for 30 years, and is the author of Night Photography and Light Painting: Finding Your Way in the Dark (Focal Press, 2015). Learn more about his images and workshops at www.thenightskye.com.

UPCOMING WORKSHOPS FROM NATIONAL PARKS AT NIGHT

How I Got the Shot: Car and Star Trails in Great Smoky Mountains National Park

Car and Star Trails in Great Smoky Mountains National Park. ยฉ 2018 Matt Hill.

Car and Star Trails in Great Smoky Mountains National Park. ยฉ 2018 Matt Hill.

Choosing what you want to include in the frame is often an iterative process. Doubly so when shooting at night.

When I was spending some time shooting in Great Smoky Mountains National Park (hint: We are offering an amazing workshop here in 2019!), I was getting to know the placeโ€”finding its essence in the darkest hours.

I drove up to Newfound Gap, anticipating an even more spectacular view under the stars than I had seen in broad daylight.

Using PhotoPills (above), I knew when and where the Milky Way would be. With that info in hand, I planned to be at Clingmanโ€™s Dome earlier for dusk and first darkness, leaving enough time to make my way back to Newfound Gap to shoot the galactic core of the Milky Way.

Alas, the clouds came early.

Nikon D750, Zeiss 15mm Distagon f/2.8. 22 seconds, f/2.8, ISO 6400.

And my first shot was great! Loved those car trails. But the photograph was not a complete story, nor the story I thought should be told. So I decided to light paint the trees in front of me.

Nikon D750, Zeiss 15mm Distagon f/2.8. 22 seconds, f/2.8, ISO 6400.

This was OK, but not good. There was no way to sidelight the trees, outside of rigging myself and descending the steep mountainside.

So I decided to rip a long exposure to capture some movementโ€”to get kinesis in the photo.

Nikon D750, Zeiss 15mm Distagon f/2.8. 8 minutes, f/2.8 ISO 400.

I really liked it. Great tonal range, great movement. But darn, were those car trails calling to me! But they were so โ€ฆ tiny.

So I swapped the 15mm lens out for my trusty Nikon 70-200mm f/2.8 and punched in on that detail. I was aiming to get a good balance between sky and earth, while making the car trails more important.

Nikon D750, Nikon 70-200mm f/2.8 at 70mm. 60 seconds, f/2.8, ISO 6400.

Better. But โ€ฆ Still. Not. Right.

I reframed to reduce the dark foreground and play the composition game. You know, the one where you check your edges, look for balance and ask, โ€œWhat could be better?โ€

Nikon D750, Nikon 70-200mm f/2.8 at 70mm. 60 seconds, f/2.8, ISO 6400.

Ah, now I felt like I had the balance I wanted. Next, all I needed was some motion. And car trails! So I applied the Six-Stop Rule and aimed at 16 minutes. The weather was cool, but not cold. I know my D750 can handle an exposure that long without long exposure noise.

Nikon D750, Nikon 70-200mm f/2.8 at 70mm. 16 minutes, f/2.8, ISO 400.

Nailed it. You know when you get it right.

The clouds passing over the mountaintops; the long, bright car trails lighting up the forest edge; the mild definition in the foreground trees. I loved it. I put on the lens cap and moved on, despite not getting the Milky Way shot Iโ€™d wanted.

But โ€ฆ Patience paid off when I waited out the clouds. :-) Got the other shot anyway!

Nikon D750, Sigma 35mm f/1.4 Art lens. 11 seconds, f/4, ISO 6400.

Matt Hill is a partner and workshop leader with National Parks at Night. See more about his photography, art, workshops and writing at MattHillArt.com. Follow Matt on Twitter Instagram Facebook.

UPCOMING WORKSHOPS FROM NATIONAL PARKS AT NIGHT

How I Got the Shot: Lake McDonald in Glacier National Park

Star Circles Over Lake McDonald. ยฉ 2015 Gabriel Biderman.

Iโ€™m fortunate to visit the Treasure State, Montana, at least once per year. But unfortunately it took me too many years to finally visit the Crown Jewel of Montana, Glacier National Park. There might not be as many glaciers as when the Great Northern Railway cut its path west over 100 years ago, but the three ranges of the Rocky Mountains still carve out some incredibly impressive views.

In 2015, before I saddled up on my motorcycle to ride out to Going to the Sun Road, I synced up with my good friend and fellow NPAN instructor Tim Cooper, who has been leading workshops in Glacier for more than 10 years. In fact, we are very excited to have him lead our first night ventures in Glacier in August and September.

I had only a couple of days to spend in the park, and Tim shared some of his favorite locations, which made the scouting so much easier.  Tim suggested we spend the night at Lake McDonald (below), as it has one of the iconic views in the park.

Scouting photo of Lake McDonald in Glacier National Park.

Scouting photo of Lake McDonald in Glacier National Park.

The Location

Lake McDonald is definitely a popular spot, and it sits about 11 miles into the park on Going to the Sun Road. There are many cabins and campsites that let you take in all of this majestic beauty.

As I walked along the southern shore where most of the boat and kayak rentals are based, it became more and more obvious what kind of picture I needed to make. An epic location requires some epically long star trails! When we aim our camera to the northern skies we can create those jaw droppingly long circular star trails. In order to do this effectively, you need to dedicate at least 1.5 to 2 hours to shooting. So charge up your batteries and Iโ€™ll share with you how I got the shot!

Lake McDonald, my shoot location, is nestled along Going to the Sun Road on the west side of the park.

Lake McDonald, my shoot location, is nestled along Going to the Sun Road on the west side of the park.

The Conditions

The night I took this shot was June 6, 2015. The sun set at 8:35 p.m., but because we were at a higher latitude at the beginning of summer, the twilights lasted almost three hours. I guess I was lucky to actually get a night sky at all! The moon was a waning gibbous of 76 percent, but wouldnโ€™t rise over the horizon until 11:44 p.m., meaning it wouldnโ€™t rise above the mountains until at least an hour later.

Soon after the sky grew dark, I walked out onto the long dock to start shooting. As we entered astronomical twilight, which was to last over an hour, I was amazed to see the clarity of the northern tail of the Milky Way. I was joined by an astro-enthusiast who had his iPad out and was using a star map guide to identify all the celestial bodies that were shining brightly and surrounding us from all sides. It was so dark that the stars were easily reflecting in the calm waters of Lake MacDonald.

The Gear

The equipment I had with me presented a challenge for star-point photography. My lens was a superwide 10-24mm f/4 on the Fujifilm X-T1. The wide was good, as it let me get to a shutter speed of 30 seconds without stars starting to trail. However, we typically like โ€œfasterโ€ lenses of f/2.8 or wider to let in more light and keep our ISOs somewhat manageable.

I had to work with what I had and shoot at ISO 6400 for 30 seconds at f/4. That resulted in definitely a noisy image, but I embraced the grain by converting this โ€œbonusโ€ shot (below) into black and white, and Iโ€™m very happy with it.

My first photo of the night, of the Milky Way floating over Lake McDonald and the distant mountain ranges. Fujifilm X-T1, 10-24mm f/4 lens. 30 seconds, f/4, ISO 6400.

The Shoot

I like nights that give you both complete darkness and moonlight to work with. This enables you to come away with a variety of night images as you explore the many different lights of night.

One thing I love about moonlight is how much color it brings into the night. Dark black skies can be difficult to work with, but a lick of moonlight brings a little blue to the sky.

I felt it was wise to move off the dock and onto more stable ground, to shoot from the terra firma along the beach. The moon was rising, and after taking a few test shots to finesse the composition, it was important for me to confirm that the North Star was still in the shot. It can be difficult to make out the exact placement of the North Star in an image, so before committing to a long exposure, I take a 2-minute shot so I can see how the stars are rotating (Figure 1). That confirms the placement of Polaris in the frame.

Figure 1. Test shot to confirm that Polaris is in the desired spot in the composition.

Figure 1. Test shot to confirm that Polaris is in the desired spot in the composition.

After I confirmed focus and composition, I settled on an exposure of 2 minutes, f/4, ISO 3200. I chose this setting because I was looking for the optimal image quality for star stacking and had noticed that the Fujifilm cameras quickly get color noise after 2 minutes of exposure at temperatures of 60 degrees or more. Also, Fujifilm caps their longest exposure in Bulb mode at 60 minutes, and I definitely wanted to blow past that!

I couldnโ€™t have done such a long cumulative exposure without the help of the Tether Tools Case Relay. Typically mirrorless cameras can last about 1 to 1.5 hours of straight shooting on a fully charged battery. Tether Tools lets you plug one of their dummy batteries into your cameraโ€™s battery compartment and then link it to the Case Relay and a 10,000mAh USB battery to give you a much longer charge. (Check out the video we made that shows this in action.)

With the Case Relay hooked up, I set my Vello intervelometer to 2 minutes with a 1-second break between shots. I then lay back on the sand and enjoyed the show! I think I might have taken a little catnap during this shot, as the camera kept clicking for 1 hour and 24 minutes!

The Post-Production

I was very excited to see this shot. At that time it was my longest star trail to date. (My current mark is 6 hours โ˜บ.)

The star stack was fairly easy to put together using Lightroom and Photoshop. In the Lightroom Library module I flagged all the โ€œimages to get stackedโ€ (Figure 2) with a red color label (number 6 on your keyboard).

Figure 2.

This makes it easy to differentiate between my test shots and the images that have only a 1-second break in between. Once I had them marked, I selected them all and then clicked Photo > Edit In > Open as Layers in Photoshop (Figure 3).

Figure 3.

Depending on how many images you have and how powerful your computer is, this can take just a few minutes or enough time to brew and drink some coffee. Once the images loaded in Photoshop as layers, I selected them all. Then from the Blend Mode drop-down menu I chose Lighten (Figure 4).

Figure 4.

This blend mode lets the brightest part of each layer reveal itself in the final image. This connected all the bright star trails, as well as the car trails in the background (Figure 5).

Figure 5.

I saved the file, and Photoshop sent it back to Lightroom, where I did some basic touch-up to finalize the image (Figure 6).

Figure 6. Final image. 41 stacked frames, each shot at 2 minutes, f/4, ISO 3200.

Typically when you expose a night sky for this long, you are bound to get airplane or satellite light trails as well, but Glacier must be a very special place to have such a limited amount of โ€œsky traffic.โ€ I didnโ€™t see any in my photo.

Final Thoughts

This is one of my favorite shots, still to this day. It heightens the majesty of Glacier National Park. I love how the moonlight reveals the Livingston and Lewis mountains ranges in the distance but also creates a mirror reflection. When I saw the cars come down Going to the Sun Road during my exposure I thought Iโ€™d have to remove them in post, but they slice through the shadow and its reflection perfectly. Oh, and who doesnโ€™t like reflections of star trails? Yes, please!

This shot reconfirms the pristine beauty of our national parks at night. And aside from the gentleman with the iPad, I had Lake McDonald to myself that night!

Note: When we announced our 2018 night workshop at Glacier National Park, it was one of the first to sell out. We recently added a second week and we still have a few spots left. If you want to create images like this, come join us at the Crown Jewel of the Continent!

Gabriel Biderman is a partner and workshop leader with National Parks at Night. He is a Brooklyn-based fine art and travel photographer, and author of Night Photography: From Snapshots to Great Shots (Peachpit, 2014). During the daytime hours you'll often find Gabe at one of many photo events around the world working for B&H Photoโ€™s road marketing team. See his portfolio and workshop lineup at www.ruinism.com.

UPCOMING WORKSHOPS FROM NATIONAL PARKS AT NIGHT

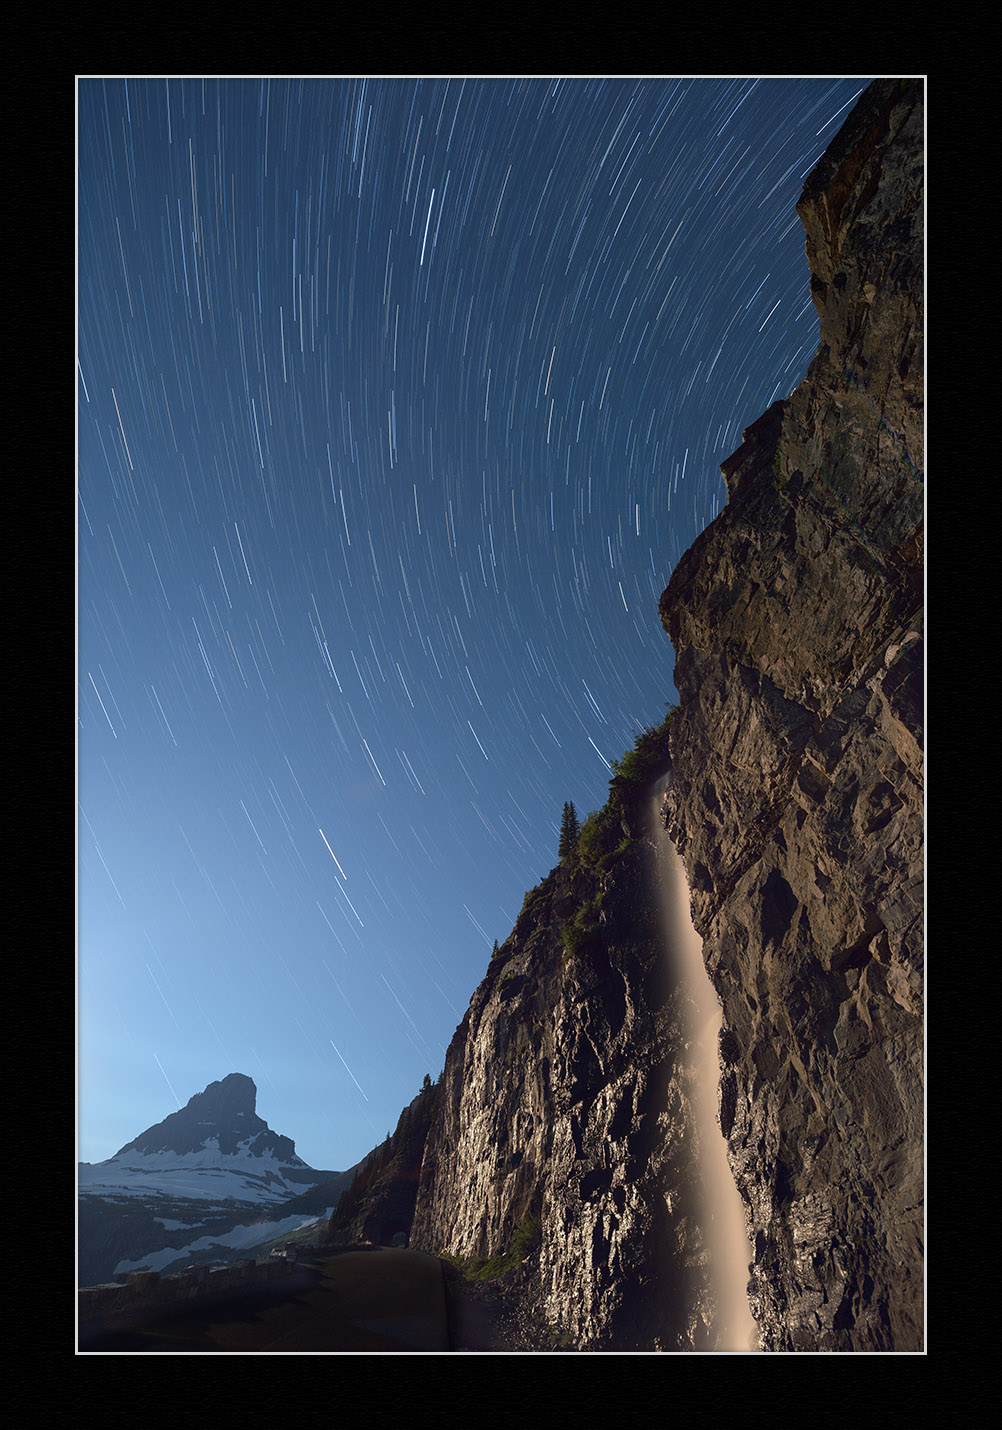
How I Got the Shot: Waterfall and Clements Mountain in Glacier National Park

โ€œClements Mountain, Star Trails, Waterfall.โ€ ยฉ Tim Cooper.

โ€œClements Mountain, Star Trails, Waterfall.โ€ ยฉ Tim Cooper.

The Location

I am fortunate to live in Montana. Itโ€™s a beautiful state filled with wonderful people and fantastic landscapes. My โ€œbackyardโ€ is Glacier National Park. Glacier is truly one of Americaโ€™s great alpine experiencesโ€”from gorgeous glaciated peaks to alpine meadows carpeted with wildflowers to the host of wildlife visible on a near daily basis. I take every chance I can to get up to the park.

Early last summer I made this image while scouting for our upcoming National Parks at Night workshops in August and September. (While the first week of this workshop is already filled, the second week still has some spots available. Check out our workshop page for more information.)

Luck vs. Planning

When it comes to photography, I always give luck a little credit. Did the clouds cover the sky? Or did they add a nice accent? Did it rain on the night I had planned to shoot? There are so many small blessings that are easy to overlook.

Luck, however, is no substitute for planning. If you read this blog often then you have seen us discuss many times the importance of planning a night shoot. My familiarity with Glacier helped enormously with planning this shot. I already knew the location of the waterfall and exactly where I wanted the moon to be so that it would backlight the water. It was just a simple matter of using the indispensable phone app, PhotoPills, to determine when the moon would reach the necessary spot in the sky (see Figure 1).

Figure 1. The zoomed-out and zoomed-in views of the shoot location, as seen in PhotoPillsโ€™' Planner mode. The blue lines told me where the moon would be at different times of the night, which told me when to shoot for the effect I wanted.

The Exposure

I wanted to use the moon to illuminate the falls, but I also envisioned star trails rather than star points in my image. To create the effect of star trails, you have to make a very long exposureโ€”15 minutes, 30 minutes, an hour or even longer. This makes the stars appear as if they are trailing through the sky. Another method to create these trails is to break up the exposure time into shorter chunks, and then stack the resulting set of images in post-production. This is especially helpful under bright moon situations or when you want to light paint.

Using multiple short exposures was my plan for this setup. The first step was to calculate an exposure using a high ISO test (i.e., the 6 Stop Rule). Setting my Nikon D4s to ISO 3200 and f/4, my final test shot (Figure 2) was exposed for 30 seconds.

Figure 2. Test shot at 30 seconds, f/4, ISO 3200.

The Shoot

Typically night photographers use an ISO of 6400 for test shots because, according to that 6 Stop Rule, we know that an exposure time of X seconds at ISO 6400 equals X minutes at ISO 100. This is a very handy little trick for calculating long exposures easily.

Because my successful test exposure was 30 seconds at ISO 3200, which equals 15 seconds at ISO 6400, then my long low-ISO exposure would be 15 minutes at ISO 100. Orโ€”to shorten things up a bitโ€”8 minutes at ISO 200. Using this exposure, I could shoot multiple frames at 8 minutes and blend them later in post using the star-stacking technique.

This evening, however, I either miscalculated or mistakenly set my camera wrong. My final exposures (Figure 3) ended up being shot at 5 minutes, f/4, ISO 100. Thatโ€™s about two stops underexposed!

Figure 3.

I didnโ€™t notice that at the time. I finished shooting and had to leave immediately, so there was no time to reshoot the frames. I was destined to have to fix it later in post.

Post-Processing

After downloading my images, the first post-processing edit was adjusting the Exposure slider to account for the underexposure out in the field. After increasing the exposure, the final set of images looked like this:

Figure 4.

The next step was to blend all the frames together to create the star trail effect. I began by selecting all of the images in Lightroom. Next, from the menu I selected Photo > Edit In > Open as Layers in Photoshop. This opens all of the images into Photoshop as layers within one file.

Once the file opened, I clicked on the top layer, held down the Shift key, then clicked on the bottom layer. This selects all of the layers in the file.

Next, in the Blending Mode drop-down list (circled in red in Figure 5), I selected Lighten (Figure 6).

Figure 5.

Figure 6.

This blending mode allows the brightest part of each layer to show through on the final image, which in this case creates the effect of the stars trailing across the sky. Figure 7 shows the result of blending the images with this technique.

Figure 7.

Did you notice the multiple car headlights that showed up after blending the layers? They were in the first, second and last photo frames (Figure 8). Because using the Lighten mode reveals the brightest parts of each layer, all the headlights showed up after blending.

Figure 8.

So, the next step was to remove the unwanted car lights. One of the benefits of stacking frames rather than taking one long exposure is that you can use layer masks to remove unwanted artifacts that show up in just a few frames rather than overwhelming an entire final photo. To do this, I clicked on the first layer that contained headlights to select it. Then at the bottom of the Layers palette I clicked on the Add a Mask icon (Figure 9).

Figure 9.

Figure 10.

Next I selected the paintbrush tool and chose black as my foreground color. Then I just painted on the mask over the area I wanted to remove. Notice in Figure 10 how I painted over the tunnel where the car headlights appeared. Also notice the corresponding black area on the white mask thumbnail, indicating the shape and location of the mask.

I followed the same steps for the other two layers with the artifact, painting out the headlights further up the road. Figure 11 shows the three masks with black painted on them covering up all of the headlights that exist on the different layers.

Figure 11.

Figure 12.

Finally, I wanted to separate the cool tones of the sky from the foreground waterfall. I clicked on the bottom layer, chose the Quick Select tool and then selected the foreground waterfall and cliff face (Figure 12).

Then I created a Color Balance layer by choosing Layer > New Adjustment Layer > Color Balance. Adding some warmth via the Red and Yellow sliders started to really separate the warm colors in the foreground from the cool colors of the background.

Figure 13 shows the final image.

Figure 13. Five stacked frames, each shot at 5 minutes, f/4, ISO 100 with a Nikon D4s and Nikkor 14-24mm f/2.8 lens zoomed out to 14mm.

While this may sound like a lot of work, after a little practice in Photoshop, youโ€™ll find that completing these types of images takes no time at all!

Tim Cooper is a partner and workshop leader with National Parks at Night. Learn more techniques from his book The Magic of Light Painting, available from Peachpit.

UPCOMING WORKSHOPS FROM NATIONAL PARKS AT NIGHT