lenses

Five Questions: Super Resolution, Ghosts, Intervalometers and More

If you have questions, we have either answers or opinions, and we’re not shy to share either.

This installment of our “Five Questions” series features inquiries about Adobe’s new Super Resolution, the work of Alexey Titarenko, Milky Way lenses for the Nikon Z 7, intervalometer recommendations, and the efficacy of carrying two Coast flashlights.

If you have any questions you would like to throw our way, please contact us anytime. Questions could be about gear, national parks and other photo locations, post-processing techniques, field etiquette, or anything else related to night photography. #SeizeTheNight!


1. Seeing Quadruple

Question:

Regarding your post about Adobe’s new Super Resolution feature, I was surprised to see the headline mention “quadruple” enlargements. I thought the new feature was “2X.” Did I read it wrong or misunderstand the feature announcement? — Robyn

Answer:

It’s just a math thing. You are correct that Super Resolution doubles the pixel count of an image in both the horizontal and vertical linear directions. For example, a 200 x 300 image would become 400 x 600.

That results in the total area of the image being quadrupled. In that same example, the resolution would go from 60,000 square pixels to 240,000 square pixels—i.e., quadruple, or four times the number of pixels. See the image above for a graphical representation. — Chris

2. Ghosts in the Composition

Question:

I am trying to mimic Alexey Titarenko’s work, especially the movement he puts in. I used native ISO, an appropriate aperture and a long shutter. Would you mind giving me help in this type of work? — David C.
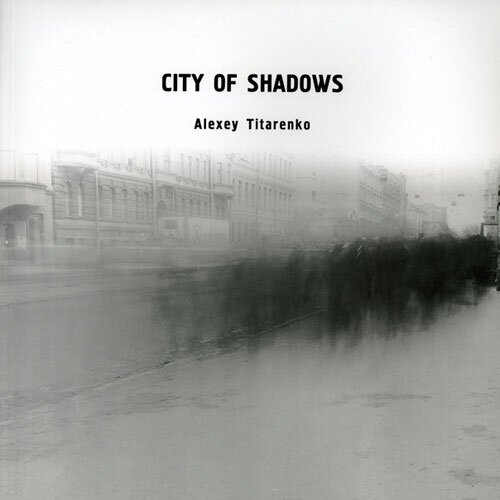
Answer:

I assume you are talking about Alexey’s “City of Shadows” series. Interesting human movement happens in exposures from 1/15 to 15 seconds, because most people can’t hold truly still for more than 1 to 2 seconds.

In order to create the “ghosts and shadows” effect that Alexey is getting during daytime, you need to use a 3-, 6- or 10-stop neutral density filter to allow for a long enough exposure. Operating under overcast skies will help, as will lots of experimentation.

A lot depends on how much stillness you want to show in the chaos of movement. That is important. For example, for Alexey’s shot of the handrail, it was critical that the rail remain sharp amid the mass of bodies moving past. It works beautifully. However, many of his other photographs feature just a little movement, which allows him to capture a “soul” that is still.

On the other hand, reaching longish shutter speeds like that at night is easy, because you’re already working with minimal light. In fact, the challenge in dark conditions is actually adding light so you can see the human subjects in all that darkness. For more info on how to do that, see my blog post “Photographing Phantoms.” — Gabe

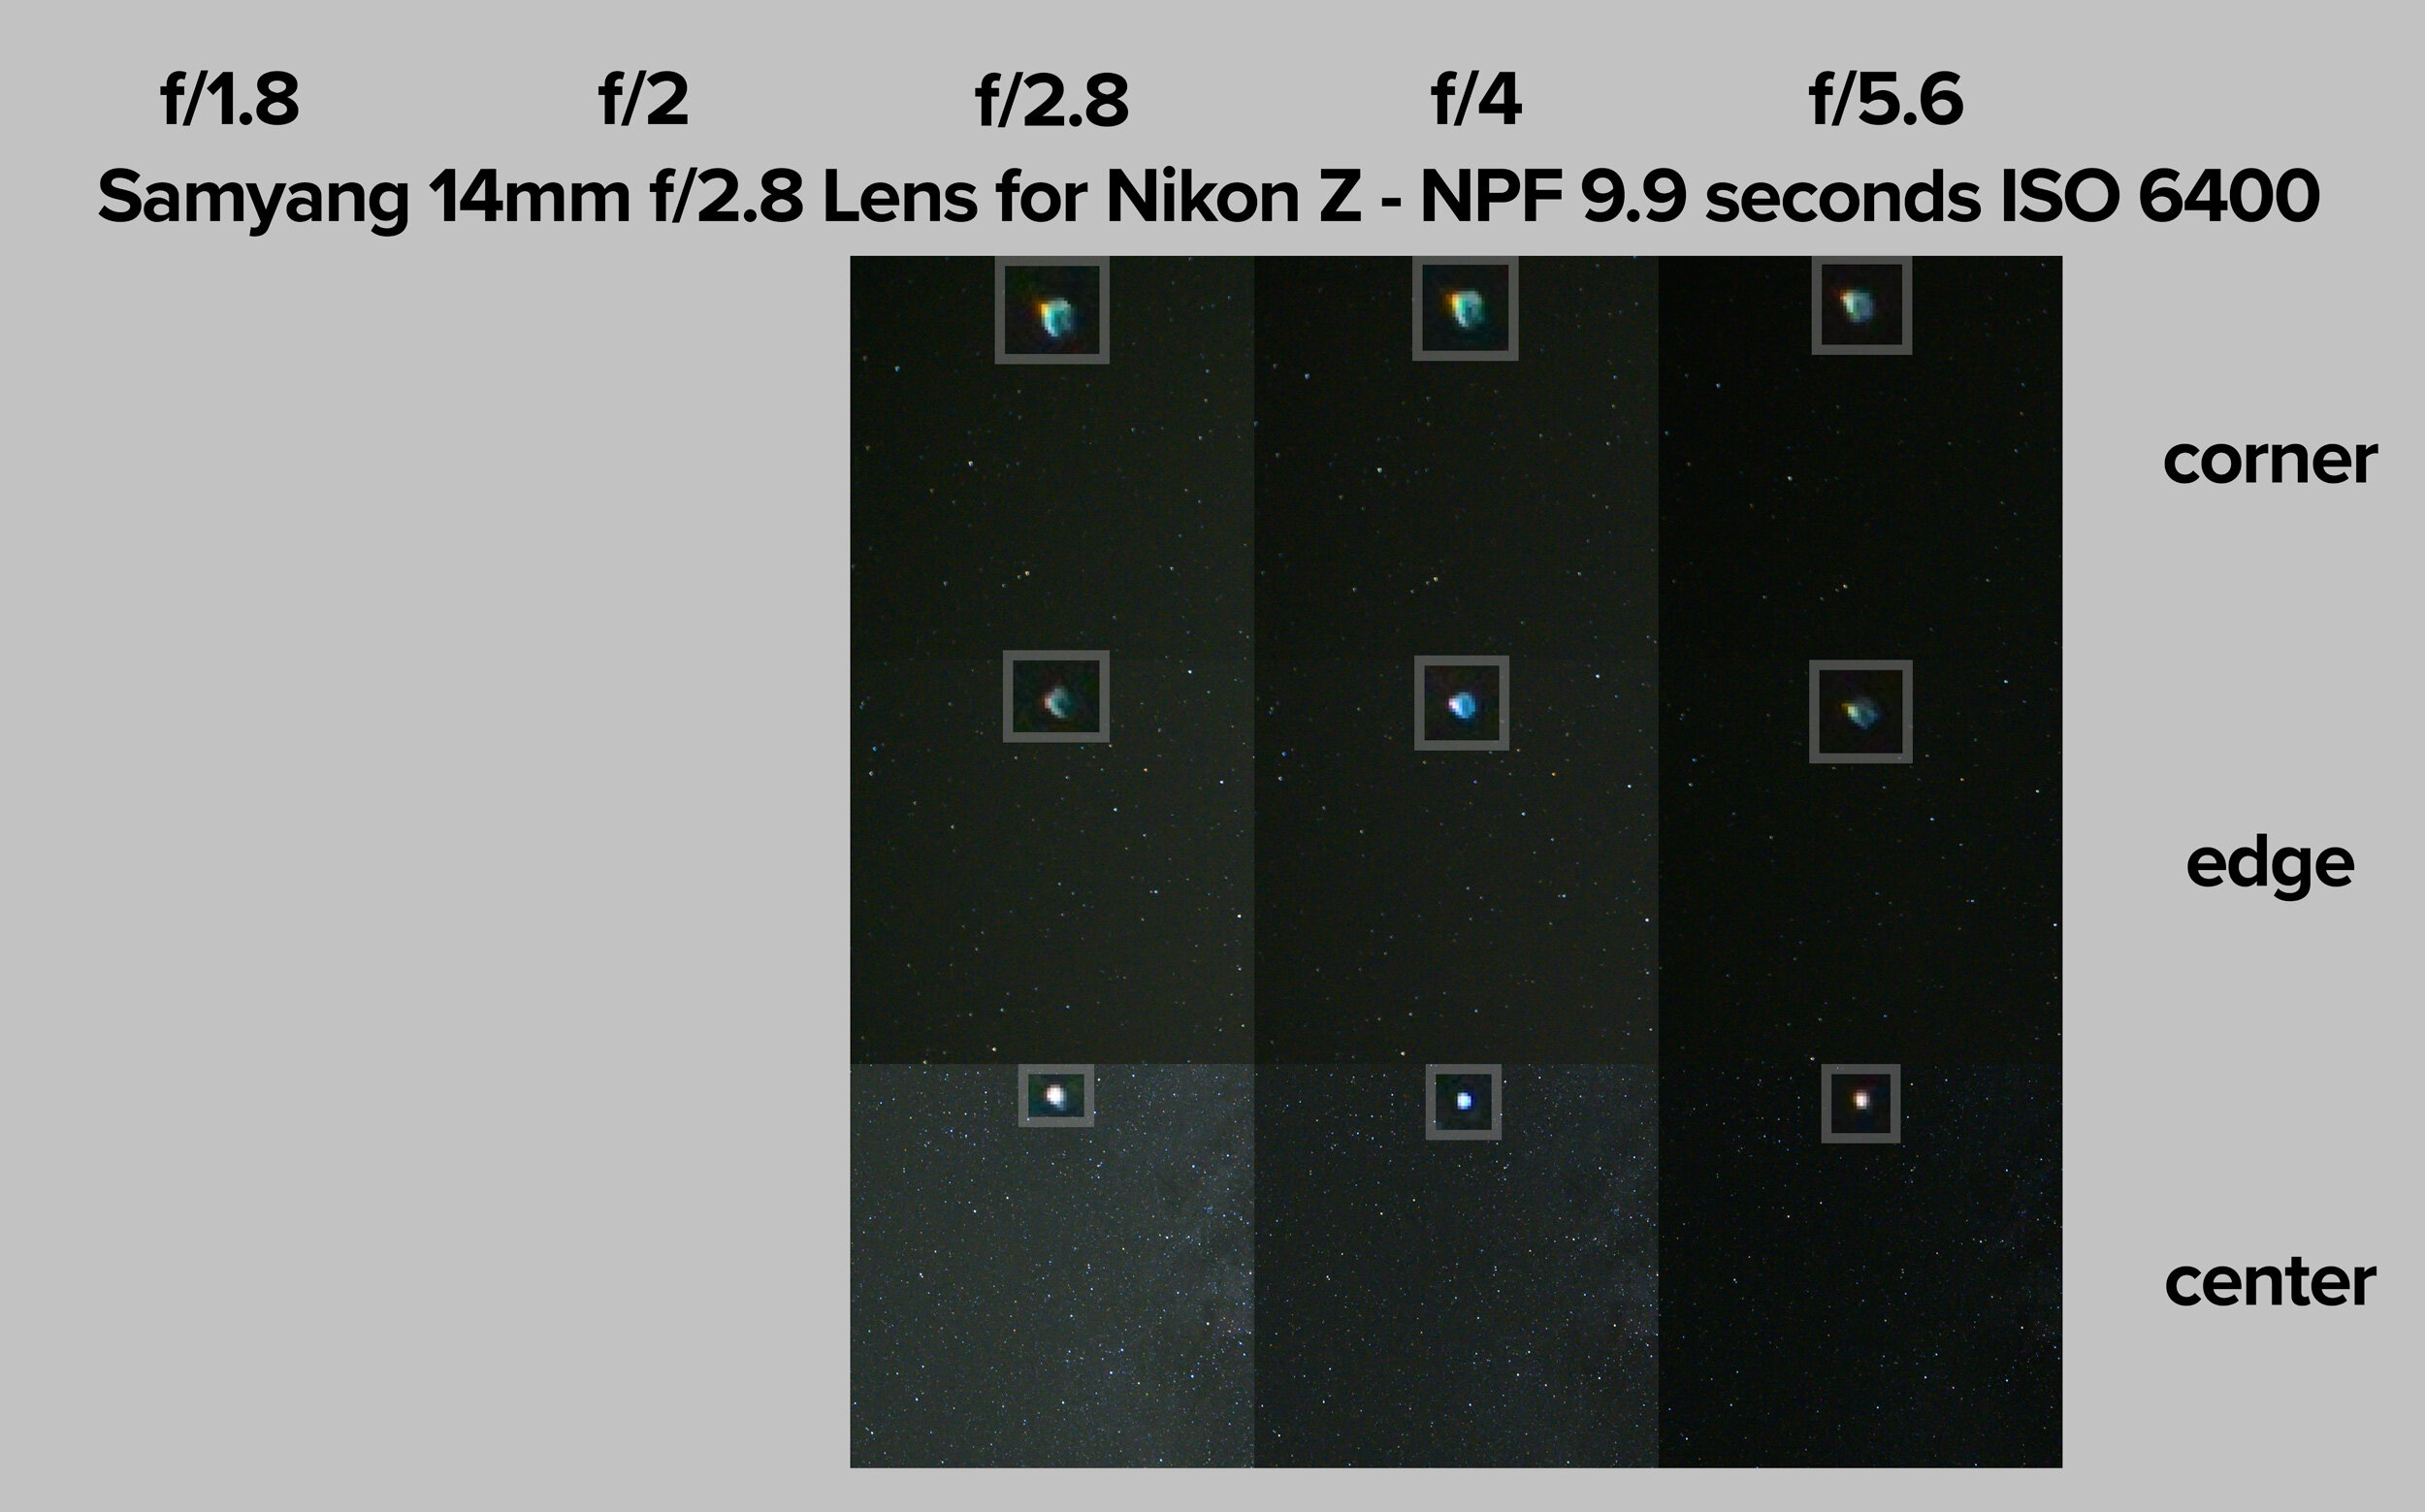
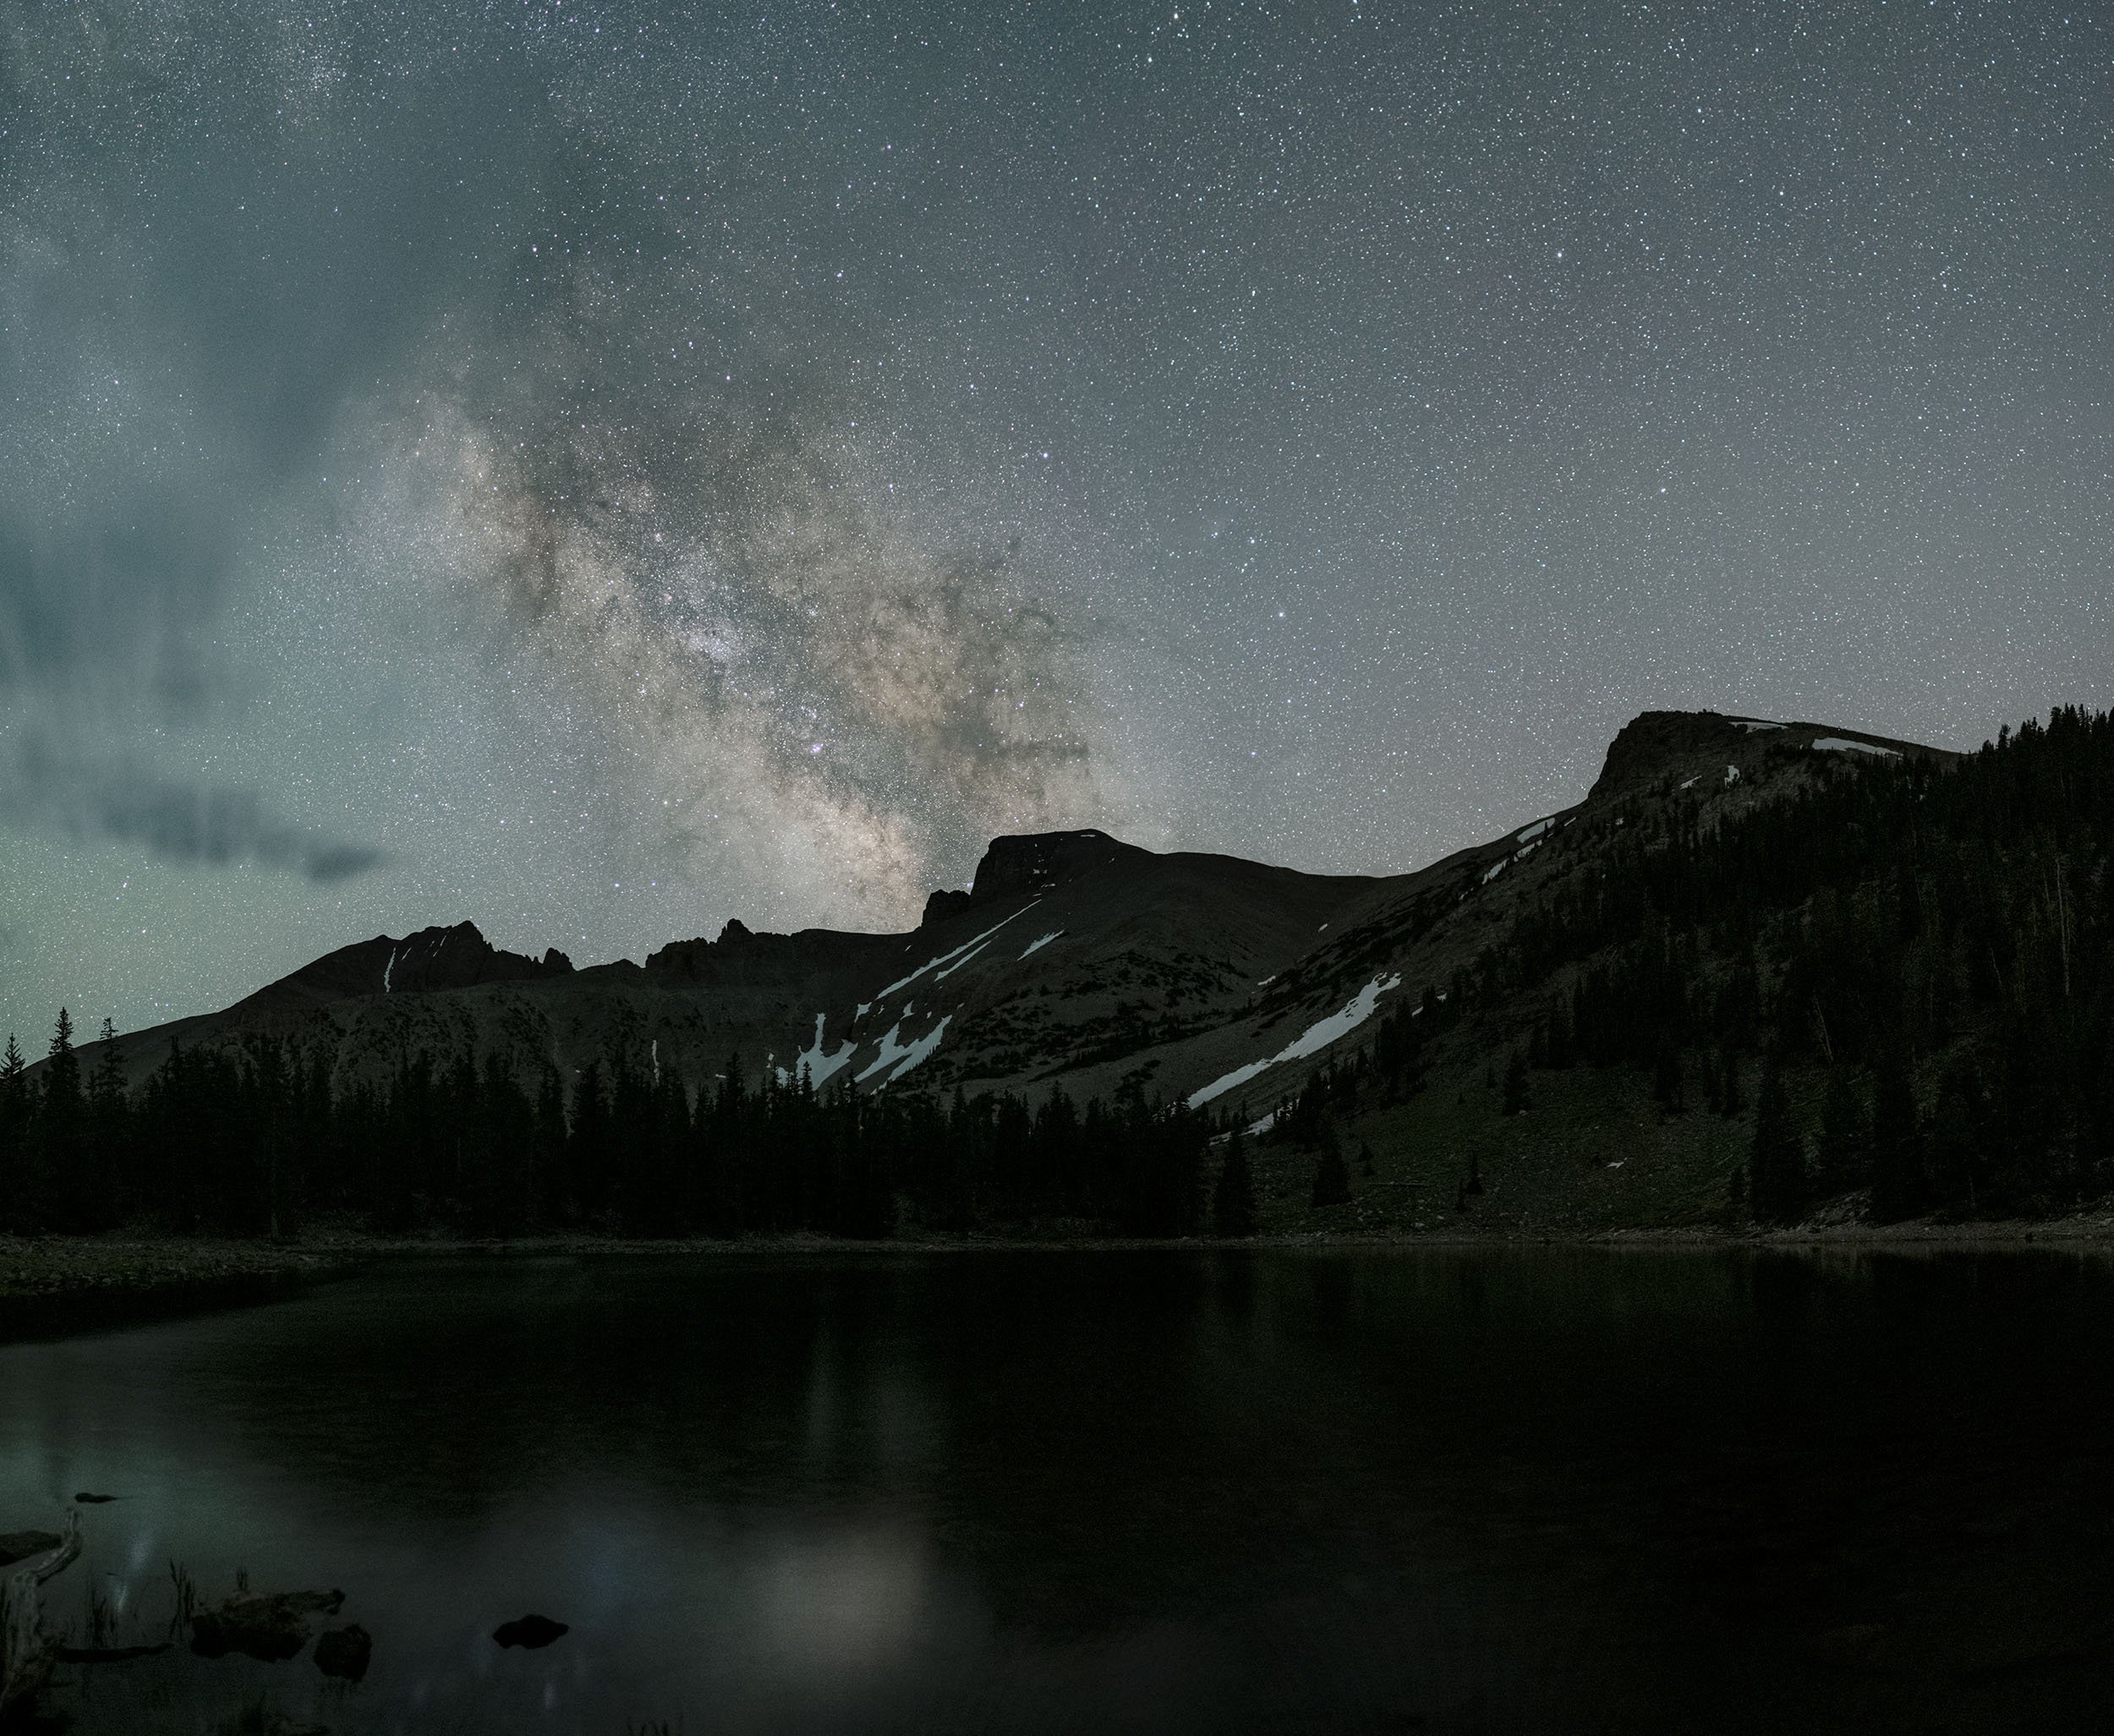
3. Z 7 Milky Way Glass

Question:

I have a Nikon Z 7 and would like to try Milky Way photography this summer. I have the Nikon Z 14-30mm f/4 S lens and believe the f/4 aperture will not be fast enough to prevent star streaking. Would the Nikon Z 20mm f/1.8 S or the Irix 15mm f/2.4 be an acceptable alternative? — Jerry

Answer:

You’re right that the f/4 lens will be very limiting for star-point images in general. They would require you to shoot at an ISO of 12,800, which I would not recommend with the Z 7 unless you’re planning to stack multiple frames in software such as Sequator or Starry Landscape Stacker. Since you have a Z 7, I suggest going with a native Z lens. Though I haven’t shot with most of them, word is that they’re all truly outstanding.

I have not shot with the Z 20mm f/1.8,  but I love that focal length for Milky Way. So I think that either that lens or the more-expensive Nikon Z 14-24mm f/2.8 would be your best bets.

The Irix lenses are excellent, though they require an adapter to use on a Z-mount camera. (Irix will no doubt release Z-mount lenses in the future, but we don’t know how near that future is.)

If you’re still stuck about which lens to buy, you could always rent to try before committing. We can recommend Borrow Lenses or Lens Rentals. — Lance

4. Intervalometer Recommendation

Question:

I just reviewed your 2017 article on wired versus wireless intervalometers. Are you still recommending the wired Vello Shutterboss II? — Hadley

Answer:

Yes, it’s still on the recommended list for wired intervalometers. Though it does share the one weak spot of all wired intervalometers, which is the connection point to the unit, which often wears down over time.

If you’re open to a wireless solution instead, my favorite intervalometer overall is the Phottix Aion. Not only does it not suffer from that weak spot, but it also allows for exposures of fractions of seconds, which is useful when shooting with NPF Rule shutter speeds.

To learn more about the Aion, see my post “A Better Intervalometer.”

Though I do champion my favorite, either of the above options will suffice. You really can decide based on your personal priorities and be happy and successful either way. — Matt

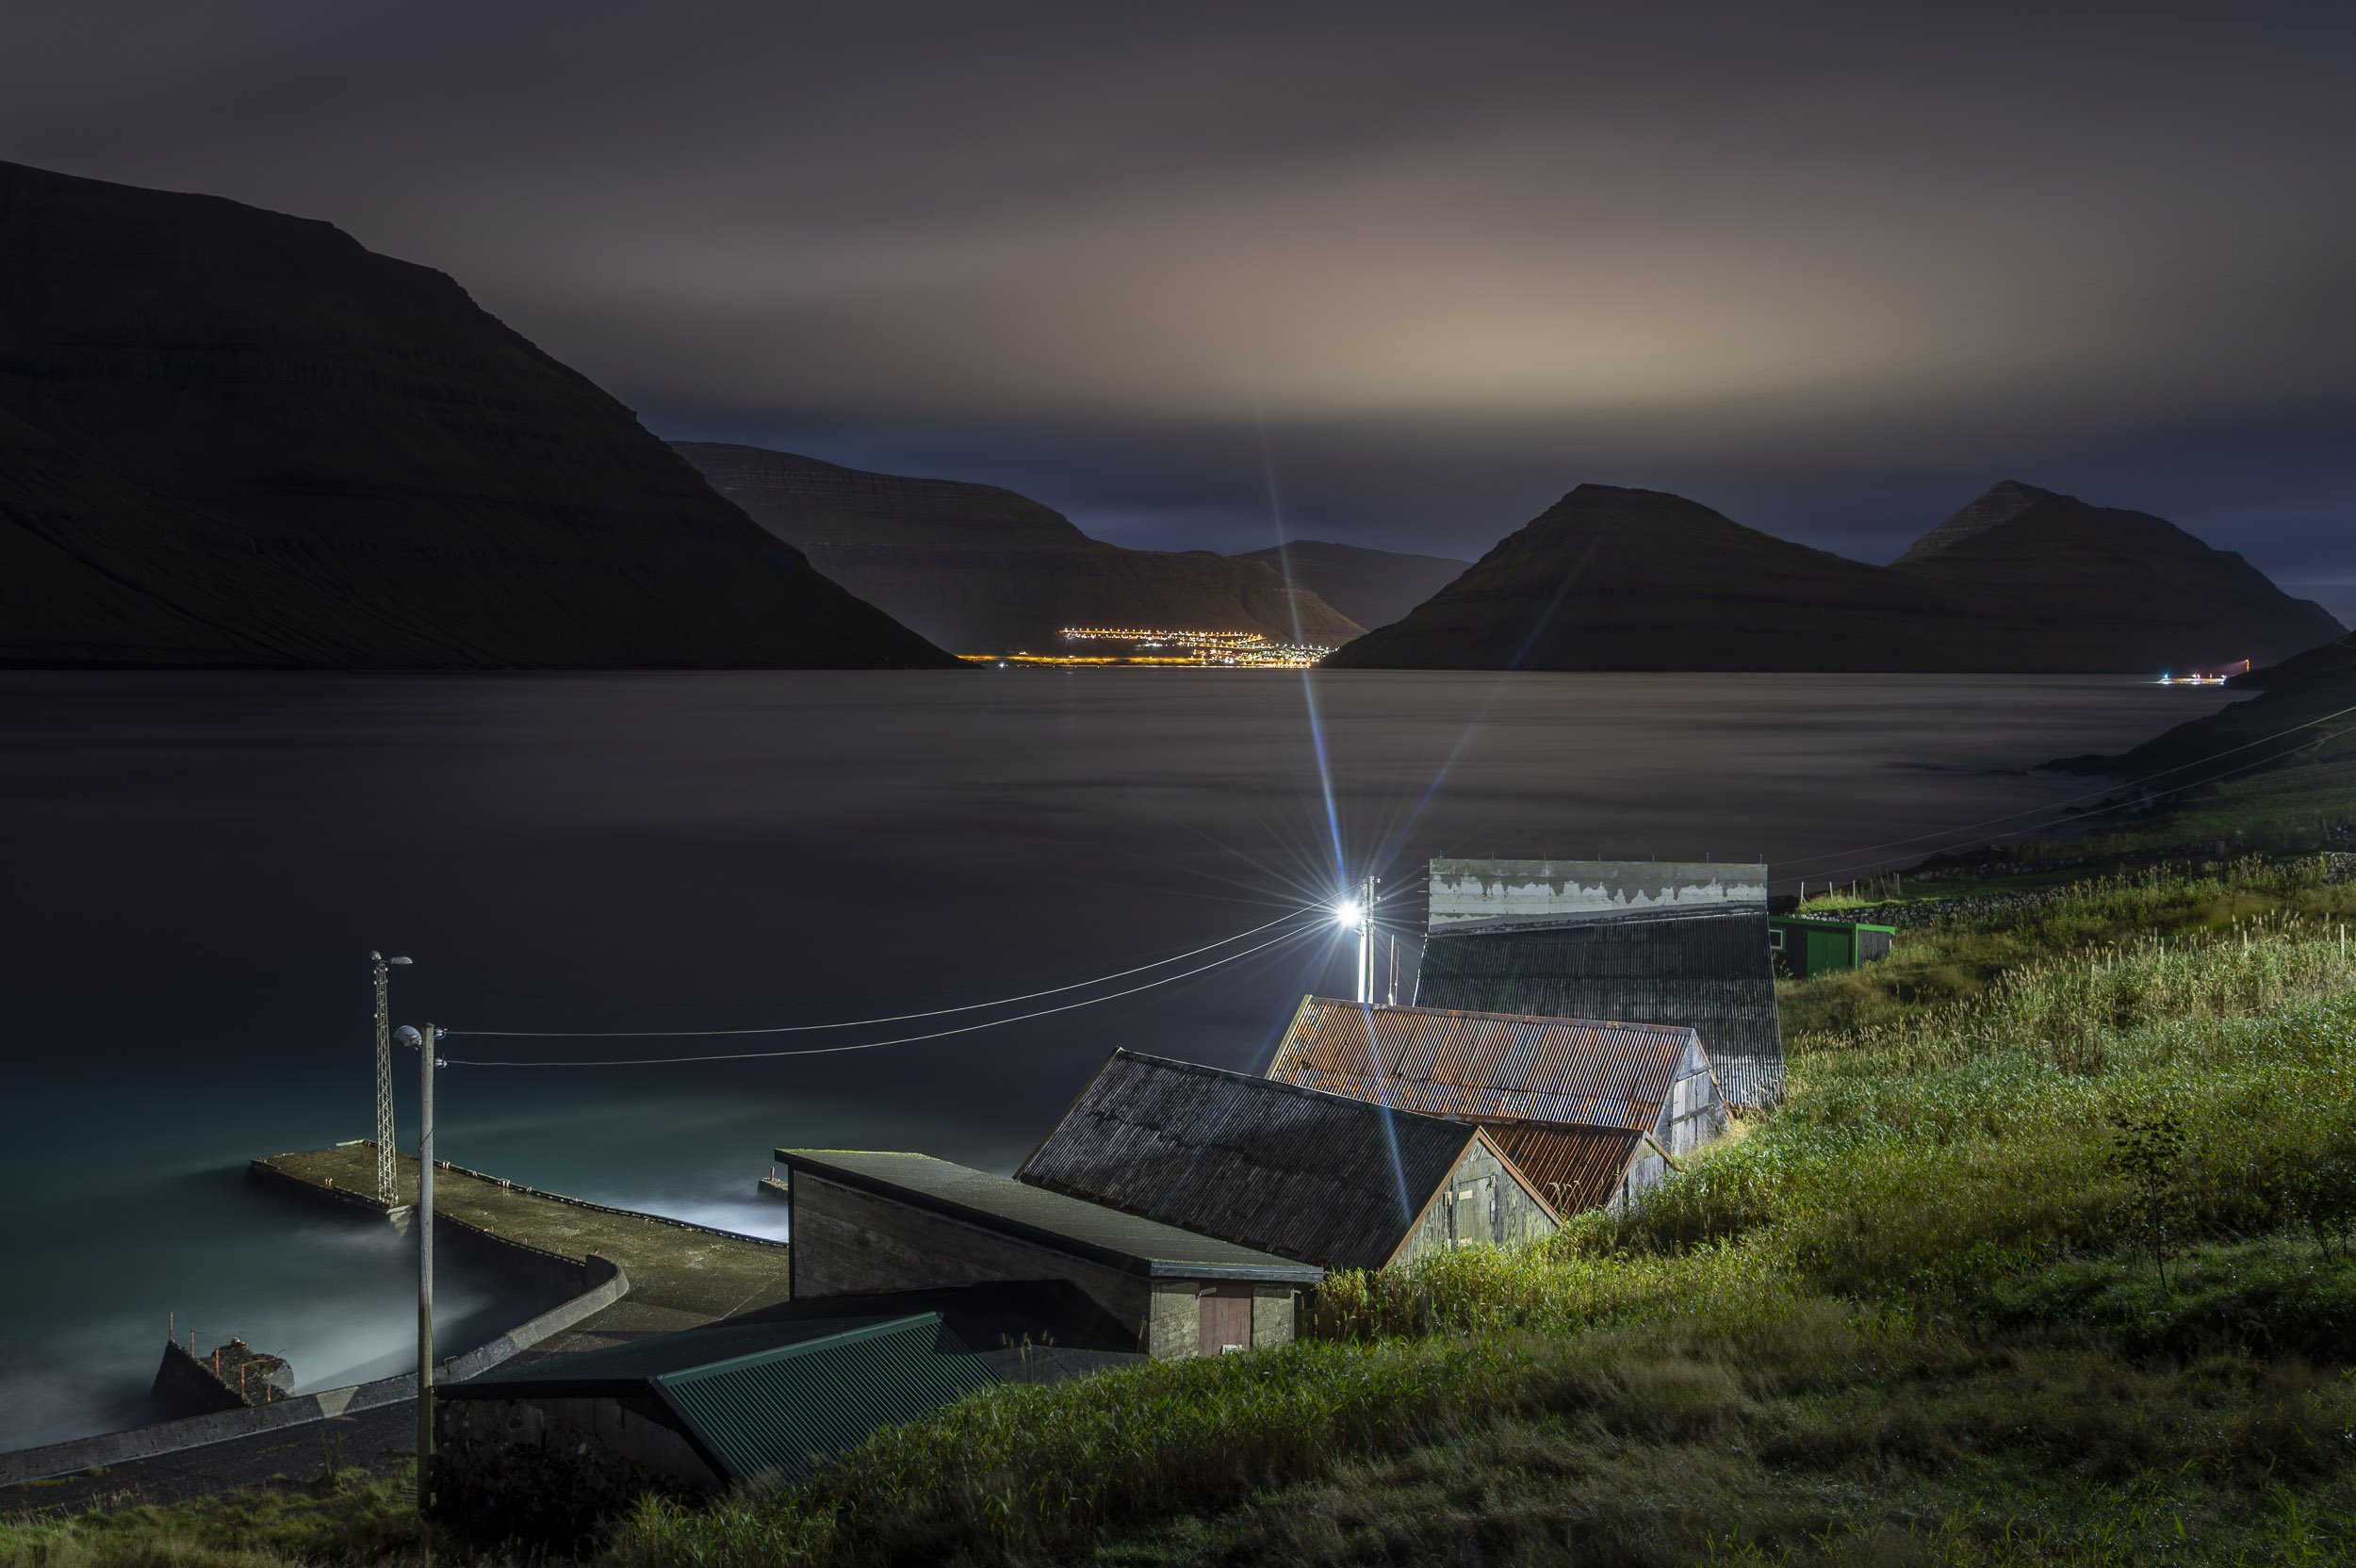
5. Are Two Coasts Better Than One?

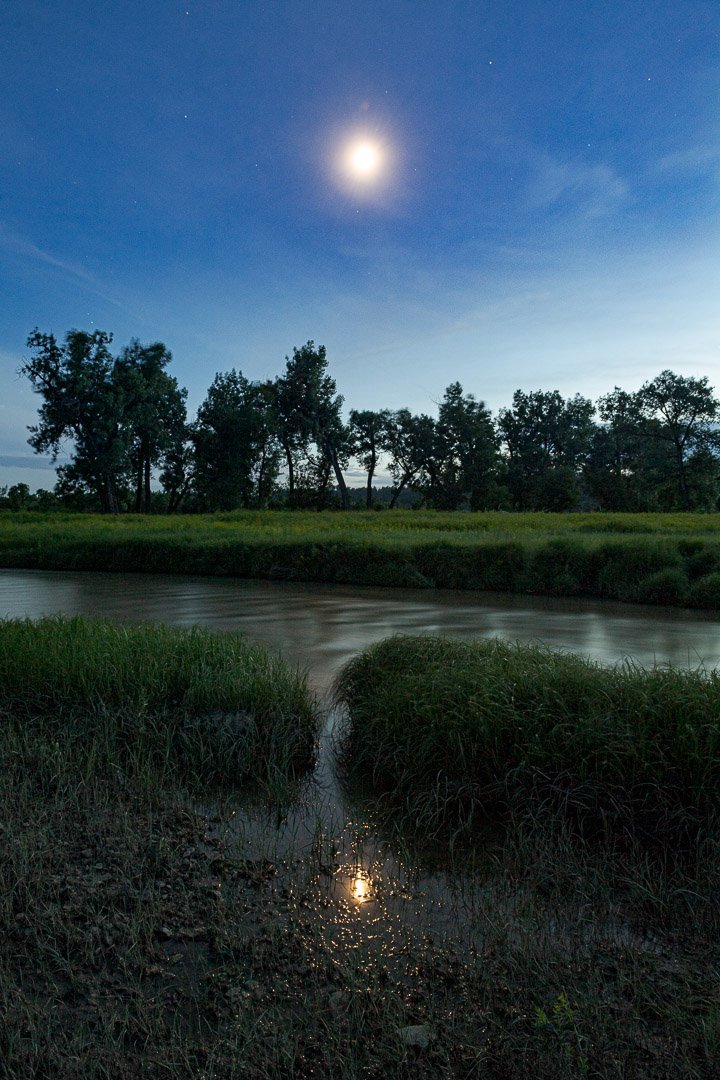
Serpent—Borrego Springs. Nikon D4s with a Nikon 14-24mm f/2.8 lens set at 24mm, light painted at close range with a Coast HP7R flashlight. Three exposures at 15 seconds, f/4, ISO 6400.

Question:

I notice that you guys seem to all have both Coast HP7R and HP5R flashlights. I want to buy a more powerful small flashlight than I have now. Do you own both because the HP7R is too powerful for some applications? If you were to buy just one, which would it be? — Mark

Answer:

Yes, we all own both the HP7R and the HP5R because the difference in power is useful for different applications. The HP7R is a very bright flashlight (300 lumens), while the HP5R is less bright (185 lumens). Both have a second power setting that drops the output by 90 percent, so the combination essentially gives us four different lumen options.

How do we use this versatility? One example: If we’re shooting the Milky Way under a new moon (pitch black, no moonlight at all), then our apertures are very wide (f/2 or f/2.8) and we are using very sensitive ISOs such as 3200 or 6400. That makes 300 lumens overkill and more difficult to control, whereas 185 lumens can be very effective. You just don’t need a powerful flashlight for that kind of sensitive exposure.

An opposite example is when we’re shooting under the much brighter conditions of a full moon, when our apertures may be set to f/5.6 or f/8 and the ISOs to 100 or 200. These less-sensitive exposures require a stronger flashlight to paint the scene.

The different flashlights can also be more or less useful when considering the distance of the subject from where you’re light painting. A rock formation 100 yards away obviously requires a more powerful light than a flower 2 feet in front of you.

So yes, it’s nice to have both models to cover all the possible situations. But if you are looking to purchase just one, I would recommend one of these strategies:

  1. Purchase the more powerful HP7R and use some neutral density gels to knock down the power when needed. You can get a sample pack that contains all you might need for less than $10.  Remember, you can always make a bright flashlight dimmer, but you can’t make a dim flashlight brighter.

  2. Decide which conditions you favor for night photography. If you mostly shoot under a new moon, get the HP5R. If you find yourself doing a lot of work under brighter conditions (full moon, city scenes), purchase the HP7R.

Either way, both of these Coast flashlights are excellent night photography tools that are worth every dollar you spend on them. — Tim

Chris Nicholson is a partner and workshop leader with National Parks at Night, and author of Photographing National Parks (Sidelight Books, 2015). Learn more about national parks as photography destinations, subscribe to Chris' free e-newsletter, and more at www.PhotographingNationalParks.com.

UPCOMING WORKSHOPS FROM NATIONAL PARKS AT NIGHT

Five Questions: Flashlight Filters, Night Photography with Film, Adobe Bridge and More

We like getting questions. Sometimes they challenge us, sometimes they fascinate us, and sometimes they allow us to fill in the gaps of the things we teach on workshops and in our blog.

This installment of our “Five Questions” series features inquiries about making custom filters for color-correcting flashlights, Pentax’s built-in equatorial tracking, film photography at night, Viltrox lenses and using Adobe Bridge with Lightroom.

If you have any questions you would like to throw our way, please contact us anytime. Questions could be about gear, national parks or other photo locations, post-processing techniques, field etiquette, or anything else related to night photography. #SeizeTheNight!


1. Making Custom Color-Correction Filters

Coast Portland LF100 flashlight filters.

Q: Thanks for your recent post on color temperature. Can you describe how you physically make a filter for the flashlight? Tons of gaffer tape? — Will

A: You could use gaffer tape, or you could just wrap the gel around the end of the flashlight and hold it there with your hand or a rubber band. But there’s a more elegant way. In Part I of that series, Tim told how he attaches the gel to the flashlight. Personally, I like to use double-sided tape to adhere the gel to the clear filter, which gives me a nice, clean piece of gear to work with.

However, the first time I did this, I used standard-size clear tape. It didn’t fit across the whole filter, so I needed to use three pieces side-by-side, which created shadow lines in my flashlight beam. Not a huge problem, but it wasn’t polished enough for me. Moreover, one of the reasons I love using a Coast HP7R to light paint is because the illumination is even across the whole beam. So, shadows from my filter wouldn’t do.

Because of that, I instead started using clear mounting sheets. They come in 8.5x11 sheets, from which I can cut a piece that covers the whole filter. I cut a square piece large enough to cover the clear plastic disc, then use sharp scissors to trim the edges to align with the circle. Then I peel off the backing, adhere a square of filter gel, and finish by trimming that as well. If I need two gels, I repeat the process on the other side of the disc.

Then I can pop my custom filter in the holder, and light paint with precise color with no fuss. — Chris

2. Equatorial Tracking with Pentax

Q: I rarely see anything about the use of equatorial mounts in general, or more specifically what Pentax claims to have with their K1 being able to simulate an equatorial mount for up to 3 minutes. I purchased the K1 thinking that this was the way to go, but as I am just starting in astro-landscape photography, I would be interested in your thoughts on these approaches to letting the shutter stay open a little while longer. — Ray B.

A: None of us have shot with a Pentax K1, but I have a couple of friends who have, and the AstroTracer feature does indeed perform as advertised. Since you already have the camera, I definitely recommend that you give it a go. Just bear in mind that you will still have to do a separate shot for the landscape or foreground, as it will be blurred in the tracer image. (The AstroTracer tracks the sky, so the camera will not be synchronous with the earth!)

For general astro-landscape photography, typical exposures are 20 seconds, f/2.8, ISO 6400. With the AstroTracer, you should be able to get 2 or 3 minutes at f/2.8 to f/3.5 and ISO 1600, depending on your lens.

We would love to see your results. Please send us a couple of images, or better yet, share on our Facebook page. — Lance

3. Film Photography at Night

Q: Greetings from Portugal! I make landscape photos with long exposures, including night photography. I shoot in black and white with digital, but also with film (Tri-X), and recently I got some Acros. What are your views about these two options? — Verissimo

Figure 1. Click to englarge.

A: Thank you for reaching out, all the way from Portugal! I’ve used film for night photography for over 20 years—less and less over the last 2 or 3, but lately I’ve been resurging. (Keep your eye out for a post about that soon!)

Figure 1 is an excerpt from my book Night Photography: From Snapshots to Great Shots, with a chart that compares the film reciprocity of Tri-X and Acros.

As you can see, Tri-X is not a good film for night photography, unless you want to be pushed to very long exposures very quickly. A 15-minute exposure for digital would need to be doubled for Acros (30 minutes), but quadrupled for Tri-X. That’s 1 hour, and anything over 15 minutes is not recommended for Tri-X. This means that with Tri-X at night, you can shoot only under full moon or in brightly lit urban conditions.

Last summer there was some very good news for film night photographers, as Fujifilm brought back Acros after a yearlong hiatus. One of our most beloved black-and-white films, Acros has very low reciprocity failure and can be used successfully under a variety of low-light conditions.

Another thing to consider is that when shooting film at night you are technically overexposing the lights to get a better burn into the silver. To compensate, I advise that you reduce your development times by 10 percent or so to get the best results. Use my chart and -10 percent as a starting point to cook up solutions that best fit your style and the chemicals you use. — Gabe

4. Viltrox 20mm

Q: In your recent blog post “How to Plan, Shoot and Edit a Milky Way Arch Panorama,” I have to say I am a bit confused by this statement: “Lately I’ve fallen in love with the Viltrox 20mm f/1.8, because it comes in a Nikon Z-mount and is crazy-easy to focus manually.” I am unable to find this lens in a non-Z-mount. Maybe you can point me in the right direction? Also, do you know how the Viltrox compares to the Nikon F-mount 20mm f/1.8G combined with the FTZ Adapter? — Eunice

The Viltrox 20mm f/1.8 Z-mount lens.

A: Viltrox is a relative newcomer to the lens market. They presently make the 20mm f/1.8 lens only in a Sony E-mount and a Nikon Z-mount. The latter is not yet available through U.S. retailers, but you can order one directly through Viltrox on Amazon. The Viltrox website is not so up-to-date, but here is some information about the two focal lengths they make (20mm and 85mm). For most of what they manufacture that is available in the U.S., check out B&H Photo.

As for your other question, I have not compared those two lenses directly, so I cannot comment about the optics. But I can comment on the physical attributes.

The Nikon 20mm f/1.8G is substantially lighter, but then you do need to factor in the FTZ Adapter, which adds a little weight. The 20mm is very sharp, though it does suffer from more coma than the Nikon 14-24mm f/2.8, which is why the latter is legendary among night photographers.

Here’s the breakdown:

  • Viltrox: heavier, manual focus only, has coma until stopped down to at least f/2.8, all metal lens barrel, comes with adapter to use screw-on filters 

  • Nikon: lighter, requires adapter, auto and manual focus, also has coma until stopped down to at least f/2.8, plastic lens housing, can use screw-on filters natively

Matt

5. Bridge to Lightroom?

Adobe Bridge—meant for using with Photoshop, not generally with Lightroom.

Q: At a recent workshop you said not to use Adobe Bridge to edit photos before importing them into Lightroom, but rather use just Lightroom. If you import from Bridge, that changes the equation somewhat? Most folks in my camera club swear by Bridge. — Brien R.

A: If someone is not using Lightroom, then by all means they should be using Bridge. But there just isn’t any good reason I can think of to use Bridge before Lightroom. Everything that Bridge does is something that’s built into Lightroom, so using Bridge beforehand is just adding extra steps to accomplish the same tasks.

I’m not claiming that there’s not some truly efficacious reason out there to use Bridge first, but it would be a major exception to the rule, something that would fit a very specific, out-of-the-ordinary need. As an indication of how unusual that need would be, know that between Lance, Tim and I, we don’t know any professional photographer who uses Bridge before Lightroom. — Chris

Chris Nicholson is a partner and workshop leader with National Parks at Night, and author of Photographing National Parks (Sidelight Books, 2015). Learn more about national parks as photography destinations, subscribe to Chris' free e-newsletter, and more at www.PhotographingNationalParks.com.

UPCOMING WORKSHOPS FROM NATIONAL PARKS AT NIGHT

Getting the Best Star Points for Astro Landscapes: How to Test Lenses for Coma

It’s time to talk about something scary that hides in dark corners. It’s an unwanted guest, and has ruined many star parties. The regret comes in the morning, and in the form of a lens aberration called “coma.”

The technical term is comatic aberration. This is not to be confused with chromatic aberration. They sound very similar. Chromatic aberration is color fringing at high-contrast edges in an image, and it’s quite easy to correct in post-processing.

Comatic aberration, on the other hand, has to do with a different type of lens artifact. In night photography terms, coma is when stars start elongating or distorting to look like spaceships or seagulls (Figure 1)—not because of problems with an exposure, but because of quirks in how a lens works. Coma ruins star points, but it’s also a problem with star trails. Imagine: That odd shape drags across the sky, making large, fat trails that can be distracting in a composition (Figure 2).

Figure 1. See the odd shapes of the stars? That’s coma. The shapes can also present as “wings” or diamonds. Fuji X-T1 with 7Artisans 7.5mm f/2.8 fisheye lens. 58 seconds, f/2.8, ISO 6400.

Figure 2. Coma also presents a problem with trails, which will be fatter than normal. Fuji X-T1 with 7.5mm 7Artisans Fisyeve f/2.8 lens. 90-minute stack, f/2.8, ISO 6400.

While not impossible to work with in post, coma is tedious to repair (or to clone out, or to paint out with special brushes). To be frank, I’d rather re-shoot with a better aperture or lens than correct a photo full of coma.

Why Does Coma Matter?

When I got serious about astro-landscape photography, I paid attention to certain things that I believed directly affect the quality of the final image. Coma is one of those things that matters to me. And I know my colleagues at National Parks at Night also care about it at the same level. In fact, Lance Keimig was who first taught me about it.

Now I am at a crossroads. As I move fully to mirrorless on my Nikon Z 6, I want to replace all my F-mount lenses with native Z-mount equivalents. So I am testing a bunch of lenses to see exactly what I want to be carrying in my backpack. As I test, my primary criterion is—you guessed it—coma.

Coma most often occurs on fast, wide lenses. The most common culprits are lenses with apertures of f/2.8 or wider, which are exactly the lenses that are best for astro-landscape photography.

Milky Way over Bryce Canyon National Park, with very little coma. Nikon D750 with a Viltrox 20mm f/1.8 MF lens. Foreground exposure created by blending 25 frames in Starry Landscape Stacker, each shot at 13 seconds, f/2.8, ISO 6400. Foreground exposure 323 seconds, f/2.8, ISO 1600. Blended in Photoshop.

When coma occurs, it is strongest at the corners of the image. It appears less so at the top and side edges, and is unlikely to (but could) appear at the center.

The easiest way to reduce or eliminate coma is to stop down the lens. The aberration is likely to sufficiently diminish by f/5.6. But that’s an aperture that’s not usually wide enough to create shutter speeds that can capture sharp stars in an astro-landscape image.

So the better alternative is to have a lens that doesn’t need to be stopped down to begin with. All lenses have coma to some degree, but some lenses are certainly better than others. In night photography, we want fast ultrawide lenses in which coma disappears or is nearly nonexistent at f/2.8. Why? Because that’s what’s best for star-point and Milky Way photos.

This is the reason we love the Nikon 14-24mm f/2.8. It exhibits almost no coma when shot wide open. This is also why we love the Irix 15mm f/2.4. It too exhibits almost no discernible coma when shot at f/2.8. Both of these lenses are extraordinary.

Unfortunately, my goals for my new kit take me away from these dear optics. While both of those brands are working on Z-mount versions of those lenses, neither has a release date. Also, I do not want to carry an FTZ adapter. While it does allow any F-mount lens to be mounted to a Z-series camera, those lenses tend to be heavier than Z-mounts. Lighter, more compact lenses are part of why I wanted to go mirrorless to begin with. So onward I must journey.

I strive to make the highest-quality photographs I can. I do some printing now, and I plan on doing even more this winter. So when I make 20-inch, 30-inch or 40-inch prints, I want them to evoke the feelings I had when visiting the gorgeous destinations where I made the images.

Night photography is a process of acknowledging which variables are hard boundaries and which are acceptable areas for compromise. Coma is one place I will not compromise. Therefore, I test all the lenses I consider for purchase. I suggest you do the same. To that end, below I will reveal how I recently tested four lenses, and will discuss how to interpret the results.

Preparing a Lens Test

This part is really simple. Grab a notebook and a pen. Draw a grid/table. At the left, write the full apertures of your lenses as rows going downward. Across the top, make a column header for each lens you are testing.

Note: Yes, for sure it’s good to run these tests on lenses you’re thinking of buying. Rent one, borrow one from a friend, whatever. But it’s also good to test lenses you already own, so you know where and when they begin to fail you. Then you can compensate in the field when needed.

My notes from this test. Why am I making notes during the test rather than just checking metadata in Lightroom? Because none of the ultrawide lenses I was testing have electronic contacts, which means the metadata does not contain either the make/model of the lens nor the aperture used in the exposure.

These are the four lenses I recently tested:

  1. Samyang MF 14mm f/2.8 for Nikon Z

  2. Venus Optics Laowa 15mm f/2 FE Zero-D for Nikon Z

  3. Viltrox 20mm f/1.8 MF for Nikon Z

  4. ZEISS Distagon T* 15mm f/2.8 ZF.2 for Nikon F

B&H Photo kindly sent me the Samyang and Laowa for evaluation. I tested these against my tried-and-true Zeiss Distagon. I own the Viltrox, having chosen it already to replace my 35mm Sigma Art as my standard wide lens and for shooting panos.

Performing the Coma Lens Test in the Field

I chose a new moon, and I drove west for 15 minutes out of Catskill, New York, where farmland leaves broad, open, dark rural skies. This combination of choices gave me the maximum number of stars to work with. (If you run your test during a different moon phase, do so a couple of hours before the moon rises or a couple of hours after it sets. You want to be able to see even the faintest of stars.)

Step 1: Nail the focus.

I set up a quarter-mile away from a traffic light so that I could use it to zoom in and really hit the perfect focus. For reference, I took a shot of each perfect focus. See below.

To ensure I ended up with stars that didn’t blur due to movement, I used the following settings: ISO 6400 and the proper NPF calculation for sharp star points (using the Accurate setting in the PhotoPills calculator, as opposed to Default).

Step 2: Make a test shot at each aperture up to about f/5.6.

As noted earlier, this is where coma disappears on most lenses anyway. Moreover, you’re highly unlikely to be shooting star photos at smaller apertures than this.

Step 3: Take Good Notes.

As you make your test images, look at them on the back of your LCD and note the filename in your notebook grid.

OK! That’s all you really need to do in the field. But I suggest that you really take the lenses for a drive. Shoot some star stacks, some star trails, car trails, etc. Get cozy with the lens in general.

Examining the Coma Lens Tests Results

At 800 percent zoom, look at the shape of the stars.

  • acceptable/ideal = round and crisp

  • unacceptable/comatic = irregular shapes that look like birds, flying saucers, donuts, cigars, etc.

It’s that simple.

Wanna pixel-peep? Download the full-resolution JPGs from my test:

The results of my lens test?

  1. I am purchasing the Laowa 15mm f/2 Z-mount and selling my Zeiss Distagon F-mount. Surprisingly, the Laowa has a little less coma than the Zeiss at f/2.8. And the former feels like half the size. That’s a double win.

  2. The Samyang has coma even at f/5.6, so it’s not a good lens for astro-landscape photography.

  3. The Viltrox 20mm f/1.8 is a keeper! No coma at f/2.8. Perfect for star points. It’s heavy, but the focus is smooth and it’s sharp as heck.

Now I can rest easy knowing that my first two native Z-mount lenses are friendly to night photography.

I hope this helps you both understand what coma is, and how to perform your own reliable tests. Now go and test your lenses. Share the results in the comments below or on our Facebook page

Matt Hill is a partner and workshop leader with National Parks at Night. See more about his photography, art, workshops and writing at MattHillArt.com. Follow Matt on Twitter Instagram Facebook.

UPCOMING WORKSHOPS FROM NATIONAL PARKS AT NIGHT

Five Questions: Meteor Showers, Pano Stitching, and Lots and Lots of Gear

Welcome again to the National Parks at Night Q&A, where we share some of the great questions we’ve received via email. This time around we're featuring Q’s and A’s about post-producing meteor shower photos, advice about five different camera systems, pano vignetting and wide-angle lens choice from the Nikon world.

If you have any questions you would would like to throw our way, contact us anytime! Questions could be about gear, national parks or other photo locations, post-processing techniques, field etiquette, or anything else related to night photography. #SeizeTheNight!

1. Meteor Showers Post-Production

Great Sand Dunes National Park, Colorado. Nikon D750, 15mm Zeiss Distagon f/2.8 lens. 234 images at 22 seconds, f/2.8, ISO 6400, plus a single exposure at 382 seconds, ISO 2000 for the landscape after moonrise. Photo © 2017 Matt Hill.

Q: Regarding your recent blog post “Meteors and Eclipses and Comets, Oh My!—The Celestial Events of 2018,” one of the spectacular photos that has me asking “How did he do that?” the loudest is Matt’s photo of the meteor shower in Great Sand Dunes National Park.

As a novice to post-processing, I can only assume that the 234 photos were somehow aligned so that the stars did not turn into trails, while ignoring the meteor shower streaks that were not in the all of the other frames, and then overlaying or merging in the foreground. Is that an oversimplification? — Rex

A: We are planning an in-depth post about this exact technique that will run this summer. But I’m happy to give you a light preview that should answer your question. The heart of the technique is this:

I used PhotoPills to scout the shot. It was also my fourth visit to Great Sand Dunes, and my second during the Pereid Meteor Shower (the first time I totally botched it!). This time I approached it with better planning (and with better physical conditioning—those dunes are difficult to climb!). From PhotoPills, I knew that astronomical twilight ended at a certain time and the moon rose at a certain time. The latter was important because I knew that the dunes just don’t look right without a little sidelight.

I set up my shot, started the sequence of exposures and waited patiently for moonrise. Others in our group who didn’t wait for the moon to side-light the landscape have radically different foregrounds in their final images, with less detail and muddy shadows. But I understand their hesitance to stay out so late; honestly, I would have light painted the dunes instead if the descent and subsequent ascent wasn’t so difficult. Besides, I was enjoying the show—lots of meteors all over the sky that evening.

When it came to post-processing, I was deeply inspired by David Kingham’s generous video from a few years ago. An even better explanation that you can hold in your hand is available courtesy of my National Parks at Night colleague Lance Keimig, who has a full description of the technique in his book Night Photography and Light Painting—Finding Your Way in the Dark (on pages 114 to 119).

I used a very similar technique to isolate the meteors with layer masking in Photoshop, and rotated those layers to align with the stars in the base image layer. (Another option is to use Starry Landscape Stacker.) I then layered in that moonlit foreground, performed some minor tweaking, and voila!

(You can also see my sequence of images rendered as a time-lapse on our Instagram account.)

So, in short, your guess about the technique is in part not oversimplified, but in part is. Watching the video, reading Lance’s book and waiting for our summer blog post will all help to clarify this in-some-ways simple yet in-some-ways complex technique that is, either way, tremendously rewarding.

Also, we are planning a one-night event during the Perseids this year—to be announced. Stay tuned for details! — Matt

2. Full-frame Camera for Milky Way Photography

Q: In one of your blog posts (by Lance Keimig, I believe), a comment was made about full-frame cameras being best for star and/or Milky Way photos. In the same post it was mentioned that most of the newer full-frame cameras should be able to handle ISOs in the 3200 to 6400 range. My question is: How new?

I am looking to upgrade from a crop-sensor to a full-frame DSLR in the Nikon series. The D810 is way out of my price range, but I am thinking about the D610, or possibly the D750 if I can get a great deal on a used model. Would the D610, which entered the market in 2013, handle the 3200 to 6400 ISO range well, or should I really focus on trying to find a D750 in my price range? — Larry G.

A: I would strongly recommend going for the D750. It is without a doubt the best value in DSLRs for night and astro-landscape photography. If you want a minimal kit, consider adding a Tamron 15-30mm f/2.8 lens, and that will be pretty much all you need, provided that you already have a decent tripod. The D610 is OK, but the D750 is stellar! — Lance

3. Pano Vignetting

Milky Way pano over Montana. Seven stitched images shot at 30 seconds, f/4, ISO 6400. Nikon D750 with Nikkor 14-24mm f/2.8 lens at 14mm. Photo © Gabriel Biderman.

Q: In shooting panos of the Milky Way and sunrises, etc., I’m having vignetting issues in Lightroom. When stitching, it creates vertical darker areas at the overlap portions of pano. Do you guys use third-party software to make night panos, or do you use Lightroom and Photoshop? — Steve W.

A: We are big fans of panorama night photography, but it definitely has its challenges.

While I have not noticed a heavy vignette in any of my panos, you might want to make sure you are applying your lens corrections prior to stitching. We generally work on all the individual images and correct them before stitching in Lightroom. Wider lenses definitely vignette more, especially when shooting wide open.

Lightroom and Photoshop do a pretty good job at single-row panos, but they can struggle with double-row and low-contrast scenes. I’ve just started playing with Autoan, which lets you take more manual control over your stitching. We will definitely be bringing this topic to our blog in the next few months as we do more testing and stitching! — Gabe

4. Canon, Phase One, Sony Options for Night Photography

Q: In building a kit for astro-landscape photography, do you know about the results from the Canon 5D as well as the 50-megapixel Canon camera? How about the Phase One IQ3 100-megapixel system? I have also heard the Sony system is great for astro-landscape images. — Jeannine H.

A: For astro-landscape photography, the best Canon cameras would be, in order of preference:

The 5DS and 5DS R are not built for high ISO or high dynamic range imaging, and as such are not well-suited for astro-landscape photography.

In terms of value, the 6D will by far get you the most for your money, but it is also an older camera that should be replaced soon. The next best value would be the 5D Mark IV. The minimal quality gain from the 1D X is not worth the extra money or weight in your bag. If you were stuck on Canon, I’d go for the 5D Mark IV.

As for the Phase One, in general, I have not been impressed by the high ISO performance of any of the medium format cameras, and the return on investment is definitely not there for night photography.

Regarding Sony, the a7S II and a7R II perform very well in low light and at high ISOs, and the live view in low light is great. However, I find the menu navigation is so awkward that it makes the cameras burdensome to use. (But it should be noted that learning menu structures from brand to brand tends to be like learning a language—the first you learn is the easiest, and everything after seems foreign.)

At National Parks at Night, most of us use the Nikon D750 at least part-time, if not full-time. It’s a great all-around camera, and a great value. The D750 and D850 outperform all of the Canons.

Another viable option you didn’t ask about is Pentax. The Pentax K1 combined with the 15-30mm f/2.8 lens is an outstanding value and is excellent for night photography. — Lance

5. Nikon Wides vs. Wide Zoom

Q: What is the advantage of the Nikon 14-24mm f/2.8 at $1,900 versus, say, their 24mm f/1.4 at about the same price? There’s more flexibility with the zoom, of course, but the f/1.4 is two full f-stops better. In night shooting, I guess that is really significant. But can’t you just increase the exposure time (leaving ISO alone) to compensate for the slower lens and obtain the same result? It seems the 14-24mm would be more useful presuming that f/2.8 will get the shot. Also, is there much difference in f/1.4 (24mm) versus f/1.8 (20mm) besides $1,200? — B.R.

A: Lots to consider here! But first, allow me to point out a misconception in your premise: You can’t just increase the exposure time and get the same results. Why? Because stars move. A 15-second exposure at f/1.4 would become (while leaving ISO alone, as you indicated) a 1-minute exposure at f/2.8; the former would likely produce sharp star points, while the latter would produce short star trails.

Now, on to the crux of your question: Why would we choose the slower 14-24mm over the faster 24mm f/1.4 or 20mm f/1.8?

Rocky Mountain National Park, Colorado. Nikon D810 and 14-24mm f/2.8. 15 seconds, f/2.8, ISO 6400. Photo © 2017 Chris Nicholson.

Yes, a wider aperture will allow you to expose with a faster shutter speed, which is important if you want to shoot a sharp Milky Way or star points, rather than longer exposures that create star trails. For example, say we’re shooting at a focal length of 20mm on a standard-size full-frame camera. Using the relatively accurate 400 Rule, we’d know that our maximum shutter speed for keeping the stars as points is 20 seconds. With that shutter speed on a new-moon night, at f/2.8 we’d need to shoot at about ISO 6400 to get a correct exposure. Whereas if you could shoot at f/1.8—an aperture 1 1/3 two stops wider—you could use ISO 2500, resulting in less high ISO noise in the image. Shooting at f/1.4 would be even better, because you could get the same exposure at ISO 1600.

That makes it sound like we should always use the widest aperture (and thus the fastest lens) possible. The caveat, though, is that not all lenses are created equal. For our purposes, there are two main points to consider:

  • Many lenses are sharpest (in terms of focus) with the aperture closed down a couple of stops.

  • All lenses suffer from some degree of comatic aberration, otherwise known as "coma." This aberration can cause stars—particularly those in the corners of the frame—to appear distorted, looking like tiny comets or flying saucers when viewed at 100 percent.

That brings us back to your question about why we might recommend the Nikon 14-24mm over the 24mm f/1.4 or the 20mm f/1.8. The reason is because from our experience with those latter two lenses, they show very apparent coma when shot wide open; with both, you need to stop down to about f/2.8 to get the coma to a level we believe is acceptable by our image quality standards. However, the 14-24mm produces so little coma that you can shoot it wide open and get the same results.

So, if you’d need to shoot those faster primes at f/2.8 anyway in order to get the same results as shooting the 14-24mm at f/2.8, then to us it makes sense to just use this fantastic wide-angle zoom instead and get the additional benefits of the variable focal lengths. — Chris

Do you have a question the NPAN team might able to answer? Email us today!

Chris Nicholson is a partner and workshop leader with National Parks at Night, and author of Photographing National Parks (Sidelight Books, 2015). Learn more about national parks as photography destinations, subscribe to Chris' free e-newsletter, and more at www.PhotographingNationalParks.com.

UPCOMING WORKSHOPS FROM NATIONAL PARKS AT NIGHT